

As the holiday season draws near, the urge to bake something warm and inviting becomes irresistible. My kitchen turns into a cozy haven filled with the comforting aromas of freshly baked bread. From a zesty Cranberry Orange Bread to a rich Chocolate Babka, these Christmas bread recipes bring festive cheer to our homes. Discover these delightful loaves that make every moment special. Let’s bake some magic together!
Classic Stollen With Marzipan
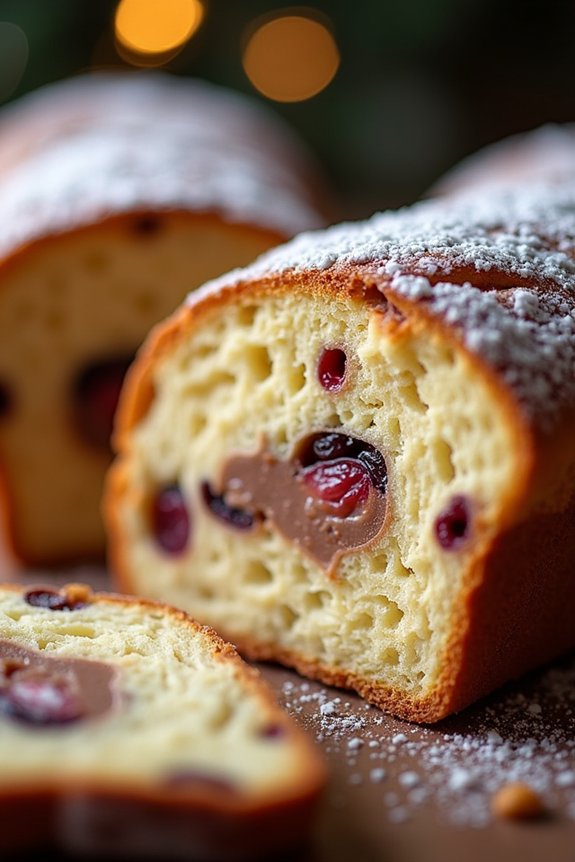
Classic Stollen With Marzipan is a traditional German Christmas bread that embodies the festive spirit with its rich flavors and delightful texture. This bread is filled with dried fruits, nuts, and a sweet marzipan center, making it a favorite holiday treat. Its fragrant blend of spices and zesty citrus notes bring warmth and joy to holiday gatherings. This recipe yields a delicious loaf that serves 4-6 people, perfect for sharing with family and friends during the holiday season.
Originating from Dresden, Germany, this classic Christmas bread has been enjoyed for centuries. The addition of marzipan adds a nutty, almond sweetness that beautifully complements the tangy dried fruits and crunchy nuts. The bread is traditionally dusted with powdered sugar, giving it the appearance of a snow-covered winter scene. Baking your own stollen at home allows you to adjust the flavors to your liking, guaranteeing a personalized and authentic holiday experience.
Ingredients for 4-6 servings:
- 2 1/2 cups all-purpose flour
- 1/3 cup granulated sugar
- 1/2 teaspoon salt
- 1 teaspoon ground cinnamon
- 1/2 teaspoon ground nutmeg
- 1 packet (2 1/4 teaspoons) active dry yeast
- 1/2 cup warm milk (110°F/45°C)
- 1/3 cup unsalted butter, softened
- 1 large egg
- 1 teaspoon vanilla extract
- 1 teaspoon almond extract
- 3/4 cup mixed dried fruits (such as raisins, currants, and candied orange peel)
- 1/3 cup sliced almonds
- 7 ounces marzipan
- 2 tablespoons powdered sugar, for dusting
Instructions:
- Prepare the Yeast Mixture: In a small bowl, combine the warm milk and active dry yeast. Stir gently and let it sit for about 5-10 minutes until the mixture becomes frothy. This indicates that the yeast is active.
- Mix the Dry Ingredients: In a large mixing bowl, whisk together the flour, granulated sugar, salt, ground cinnamon, and ground nutmeg until evenly combined.
- Combine Wet Ingredients: In another bowl, blend the softened butter, egg, vanilla extract, and almond extract. Once mixed, add the frothy yeast mixture and stir until smooth.
- Form the Dough: Gradually add the wet mixture to the dry ingredients, stirring with a wooden spoon or hands until a soft dough forms. Knead the dough on a floured surface for about 5-7 minutes, or until it becomes smooth and elastic.
- Incorporate Fruits and Nuts: Gently fold in the mixed dried fruits and sliced almonds into the dough, making sure they’re evenly distributed throughout the dough.
- First Rise: Place the dough in a greased bowl, cover with a damp cloth, and let it rise in a warm place for about 1-2 hours, or until it doubles in size.
- Prepare the Marzipan: While the dough is rising, roll the marzipan into a log about 10 inches long.
- Shape the Stollen: Once the dough has risen, punch it down to release the air. Roll the dough into a rectangle approximately 12×8 inches. Place the marzipan log along the center of the dough and fold the dough over, encasing the marzipan. Seal the edges by pinching them together.
- Second Rise: Place the shaped stollen on a baking sheet lined with parchment paper, cover with a cloth, and let it rise for another 45 minutes.
- Bake the Stollen: Preheat your oven to 350°F (175°C). Bake the stollen for 30-35 minutes, or until it’s golden brown and sounds hollow when tapped on the bottom.
- Cool and Dust: Allow the stollen to cool on a wire rack. Once cooled, dust generously with powdered sugar before serving.
Extra Tips:
For a richer flavor, you can soak the dried fruits in rum or orange juice overnight before adding them to the dough. This will enhance the overall taste of the stollen.
It’s also vital to confirm the marzipan is sealed well within the dough to prevent it from leaking during baking.
Remember that freshly baked stollen improves in flavor after a day or two, so consider making it ahead of time for the best taste experience. Wrap it tightly in foil or plastic wrap to keep it fresh.
Gingerbread Loaf With Cream Cheese Frosting
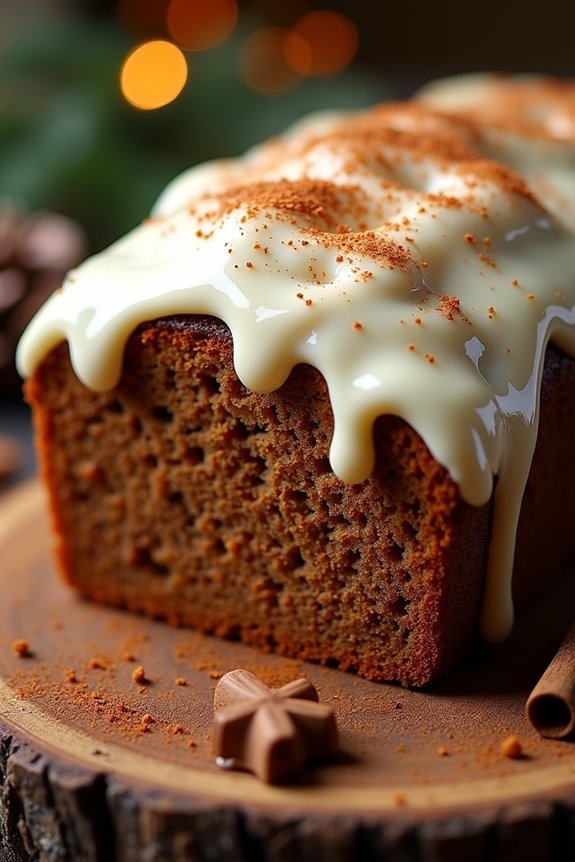
Gingerbread Loaf With Cream Cheese Frosting is a delightful Christmas treat that combines the warm spices of gingerbread with the rich and creamy texture of cream cheese frosting. This loaf is perfect for holiday gatherings, offering a cozy and festive flavor that will impress your family and friends.
The combination of molasses, cinnamon, ginger, and nutmeg creates an aromatic and flavorful loaf, while the cream cheese frosting adds a sweet and tangy finish that complements the spiced bread beautifully.
This recipe yields a loaf that serves 4-6 people, making it an ideal choice for a small festive brunch or as part of a larger holiday spread. The loaf itself is moist and fragrant, with a soft crumb that pairs perfectly with a cup of coffee or tea. The cream cheese frosting is smooth and slightly tangy, balancing the sweetness of the gingerbread.
Whether you’re a seasoned baker or a beginner, this recipe is straightforward and rewarding, promising a delicious result that captures the essence of the holiday season.
Ingredients:
- 1 1/2 cups all-purpose flour
- 1 teaspoon baking soda
- 1 teaspoon ground cinnamon
- 1 teaspoon ground ginger
- 1/4 teaspoon ground nutmeg
- 1/4 teaspoon salt
- 1/2 cup unsalted butter, softened
- 1/2 cup brown sugar
- 1/2 cup molasses
- 2 large eggs
- 1/2 cup buttermilk
For the Cream Cheese Frosting:
- 4 oz cream cheese, softened
- 1/4 cup unsalted butter, softened
- 1 cup powdered sugar
- 1 teaspoon vanilla extract
Instructions:
- Preheat and Prepare: Preheat your oven to 350°F (175°C). Grease and flour a 9×5-inch loaf pan to prevent the bread from sticking.
- Mix Dry Ingredients: In a medium bowl, whisk together the flour, baking soda, cinnamon, ginger, nutmeg, and salt. Set aside.
- Cream Butter and Sugar: In a large bowl, beat the softened butter and brown sugar together until light and fluffy using an electric mixer.
- Add Wet Ingredients: Add the molasses to the butter mixture and mix until well combined. Then, add the eggs one at a time, beating well after each addition. Gradually mix in the buttermilk.
- Combine Mixtures: Slowly add the dry ingredients to the wet ingredients, mixing just until combined. Be careful not to overmix.
- Bake the Loaf: Pour the batter into the prepared loaf pan and smooth the top. Bake in the preheated oven for 45-50 minutes, or until a toothpick inserted into the center comes out clean.
- Cool the Loaf: Allow the loaf to cool in the pan for 10 minutes before transferring it to a wire rack to cool completely.
- Prepare Frosting: In a medium bowl, beat the cream cheese and butter together until smooth. Gradually add the powdered sugar and vanilla extract, beating until the frosting is smooth and creamy.
- Frost the Loaf: Once the loaf is completely cooled, spread the cream cheese frosting over the top. Slice and serve.
Extra Tips:
For the best results, verify all your ingredients, especially the butter and cream cheese, are at room temperature before starting. This will help the batter and frosting come together smoothly.
If you prefer a spicier loaf, you can increase the amount of ginger or add a pinch of cloves for extra warmth. When spreading the frosting, use an offset spatula for an even layer, and consider garnishing with a sprinkle of cinnamon or a few candied ginger pieces for added flair.
Cranberry Orange Bread
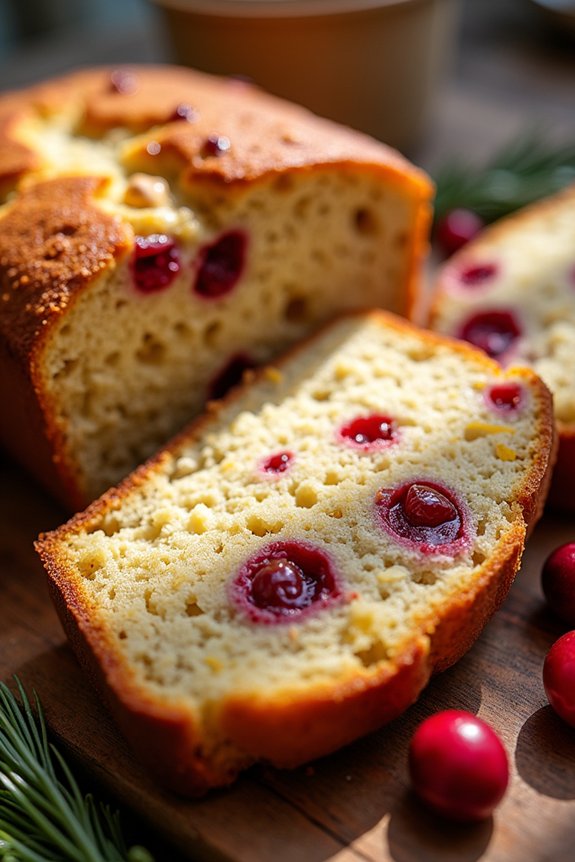
Cranberry Orange Bread is a delightful holiday treat that combines the tartness of cranberries with the bright, citrusy flavor of orange. This fragrant and moist bread is perfect for breakfast, brunch, or as a sweet snack during the festive season. Its vibrant colors and tantalizing aroma make it an eye-catching addition to any holiday table.
Whether served warm with a pat of butter or simply on its own, Cranberry Orange Bread is sure to be a hit with family and friends. This recipe yields a loaf that comfortably serves 4-6 people and is perfect for making ahead of time. The combination of fresh cranberries and orange zest gives the bread a revitalizing and zesty taste that complements the sweetness of the bread.
The preparation is simple, and the results are simply scrumptious, making it an ideal choice for both novice and experienced bakers. Let’s plunge into the ingredients and instructions to create this delectable treat.
Ingredients (Serving Size: 4-6 people)
- 2 cups all-purpose flour
- 1 cup granulated sugar
- 1 1/2 teaspoons baking powder
- 1/2 teaspoon baking soda
- 1/2 teaspoon salt
- 1 tablespoon grated orange zest
- 3/4 cup fresh orange juice
- 1/4 cup unsalted butter, melted
- 1 large egg
- 1 teaspoon vanilla extract
- 1 1/2 cups fresh cranberries, coarsely chopped
- 1/2 cup chopped walnuts (optional)
Cooking Instructions
- Preheat the Oven: Begin by preheating your oven to 350°F (175°C). Grease a 9×5-inch loaf pan or line it with parchment paper to guarantee easy removal of the bread.
- Mix Dry Ingredients: In a large mixing bowl, combine the flour, sugar, baking powder, baking soda, and salt. Stir in the grated orange zest, making sure it’s evenly distributed throughout the dry mixture.
- Combine Wet Ingredients: In a separate bowl, whisk together the fresh orange juice, melted butter, egg, and vanilla extract until well combined.
- Blend Ingredients: Pour the wet ingredients into the bowl of dry ingredients. Stir gently until just combined. Be careful not to overmix, as this can lead to a dense bread.
- Add Cranberries and Walnuts: Fold in the chopped cranberries and walnuts (if using) with a spatula until evenly distributed throughout the batter.
- Transfer to Loaf Pan: Pour the batter into the prepared loaf pan, spreading it evenly with the back of a spoon or a spatula.
- Bake the Bread: Place the loaf pan in the preheated oven and bake for 50-60 minutes, or until a toothpick inserted into the center comes out clean or with just a few moist crumbs.
- Cool and Serve: Once baked, remove the bread from the oven and allow it to cool in the pan for about 10 minutes. Then transfer it to a wire rack to cool completely before slicing and serving.
Extra Tips
To enhance the flavor of your Cranberry Orange Bread, consider using freshly squeezed orange juice and fresh cranberries for the best results. If fresh cranberries are unavailable, you can use frozen ones; just make sure to thaw and drain them before adding to the batter.
For an extra touch of sweetness, drizzle a simple glaze made of powdered sugar and orange juice over the cooled bread. Additionally, this bread freezes well, so you can make it ahead of time and enjoy it during the busy holiday season. Simply wrap it tightly in plastic wrap and aluminum foil before freezing.
Chocolate Babka
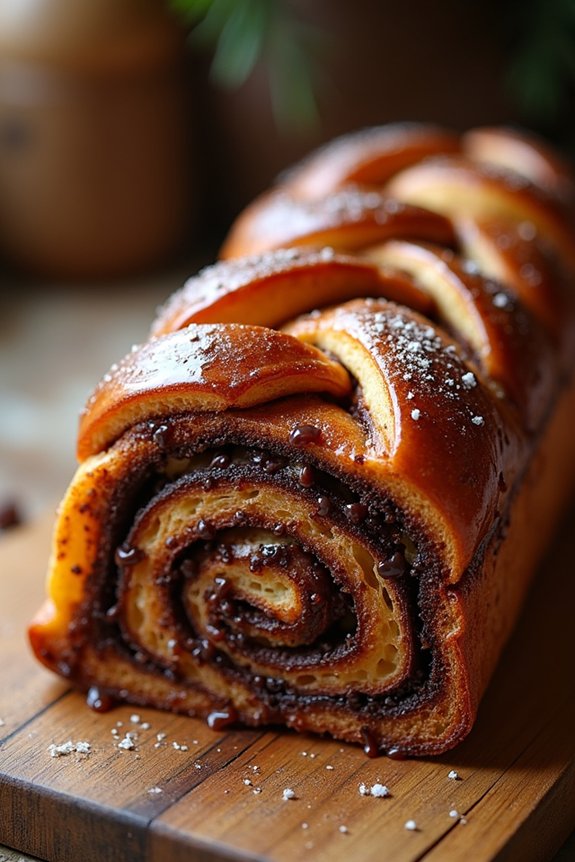
Chocolate Babka is a rich, sweet, and indulgent bread that’s perfect for the holiday season. Originating from Eastern Europe, this twisted bread is filled with layers of decadent chocolate and cinnamon, creating a beautiful marbled effect when sliced. It’s ideal as a festive dessert or a luxurious breakfast treat.
The process of making Chocolate Babka can be quite therapeutic, involving a series of steps such as kneading, rolling, and twisting the dough to create its signature shape. The key to a perfect Chocolate Babka is in the dough and filling. The dough should be soft and slightly sweet, providing a perfect contrast to the rich chocolate filling.
The filling itself can be customized with additional ingredients like nuts or dried fruits, but the classic combination of chocolate and cinnamon is always a crowd-pleaser. Making this bread may require a bit of time and patience, but the result is worth every effort. Serve your Chocolate Babka warm with a cup of coffee or tea, and it’s sure to be a hit with family and friends.
Ingredients (Serves 4-6)
- 3 1/2 cups all-purpose flour
- 1/2 cup granulated sugar
- 1 packet (2 1/4 teaspoons) active dry yeast
- 1/2 cup whole milk, warmed
- 3 large eggs
- 1 teaspoon vanilla extract
- 1/2 teaspoon salt
- 10 tablespoons unsalted butter, softened
For the Chocolate Filling:
- 1 cup semisweet chocolate chips
- 1/2 cup unsalted butter
- 1/4 cup cocoa powder
- 1/2 cup powdered sugar
- 1 tablespoon ground cinnamon
For the Syrup:
- 1/3 cup water
- 1/3 cup granulated sugar
Instructions
- Prepare the Dough: In a large mixing bowl, combine the flour, sugar, and yeast. Add the warm milk, eggs, vanilla extract, and salt. Mix until a dough forms. Gradually add the softened butter, one tablespoon at a time, kneading until the dough is smooth and elastic, about 10 minutes.
- First Rise: Place the dough in a lightly oiled bowl, cover with a clean cloth, and let it rise in a warm place until it doubles in size, approximately 1 to 1.5 hours.
- Prepare the Filling: While the dough is rising, make the filling. In a saucepan over low heat, melt the butter and chocolate chips together until smooth. Stir in the cocoa powder, powdered sugar, and cinnamon. Mix well and let it cool to room temperature.
- Shape the Babka: Once the dough has risen, punch it down to release the air and roll it out on a floured surface into a large rectangle (about 12×16 inches). Spread the chocolate filling evenly over the dough, leaving a 1/2-inch border around the edges.
- Roll and Twist: Starting from the long side, roll the dough into a tight log. Using a sharp knife, cut the log in half lengthwise to expose the layers. Twist the two halves together, keeping the cut sides facing up, to form a braid.
- Second Rise: Transfer the twisted dough into a greased loaf pan, cover, and let it rise again for about 30-45 minutes, until it has puffed up.
- Bake the Babka: Preheat your oven to 350°F (175°C). Bake the babka for 35-40 minutes, or until it’s golden brown and cooked through.
- Make the Syrup: While the babka is baking, make the syrup by combining the water and sugar in a small saucepan. Bring to a boil and let it simmer until the sugar dissolves. Pour the syrup over the hot babka as soon as it comes out of the oven.
- Cool and Serve: Let the babka cool in the pan for about 10 minutes, then transfer it to a wire rack to cool completely before slicing and serving.
Extra Tips
When making Chocolate Babka, it’s important to give the dough enough time to rise properly; patience during this part will yield a lighter and fluffier bread.
Make sure the chocolate filling isn’t too hot when spreading it on the dough to prevent it from becoming too runny. If you prefer a more pronounced chocolate flavor, consider adding a bit more cocoa powder to the filling.
For additional texture, you can add chopped nuts such as walnuts or pecans to the filling. Finally, the syrup not only adds sweetness but also keeps the babka moist, so don’t skip this step for the best results.
Cardamom Bread Wreath
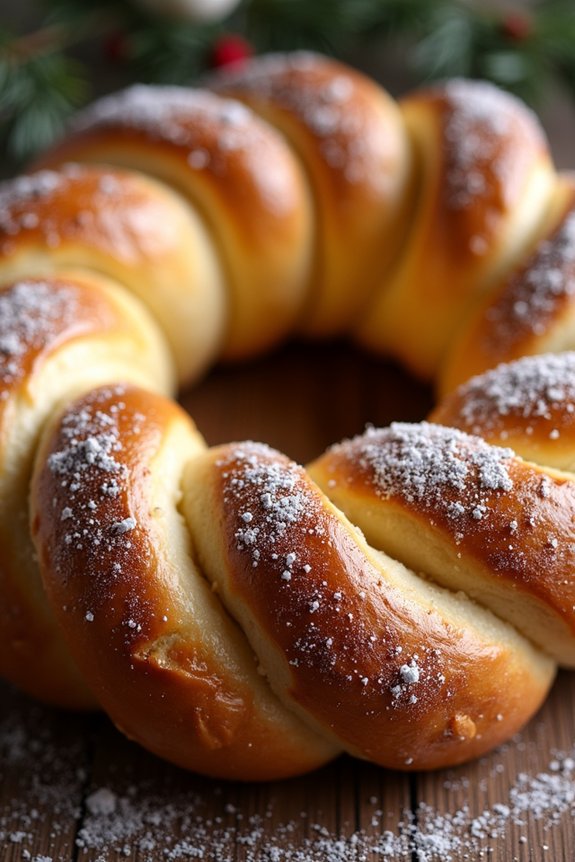
Cardamom Bread Wreath is a delightful and aromatic festive bread that brings warmth and joy to any holiday table. With its beautiful braided design and the rich scent of cardamom, this bread is a stunning centerpiece that tastes as good as it looks. Perfect for Christmas gatherings, this bread pairs wonderfully with a cup of hot cocoa or coffee, making it a favorite treat for both adults and children alike.
This Cardamom Bread Wreath recipe combines the traditional flavors of sweet bread with the exotic and spicy notes of cardamom, creating a unique and memorable experience. The soft and fluffy texture of the bread, combined with the inviting aroma, makes it a must-try recipe for anyone looking to add a touch of elegance and warmth to their holiday celebrations. Follow this recipe to make a Cardamom Bread Wreath that serves 4-6 people.
Ingredients:
- 3 1/2 cups all-purpose flour
- 1/4 cup granulated sugar
- 2 teaspoons ground cardamom
- 1 teaspoon salt
- 1 package (2 1/4 teaspoons) active dry yeast
- 1 cup whole milk
- 1/4 cup unsalted butter
- 1 large egg
- 1 teaspoon vanilla extract
- 1 egg yolk (for egg wash)
- 1 tablespoon milk (for egg wash)
- Optional: powdered sugar for dusting
Instructions:
- Prepare the Dough: In a large mixing bowl, combine the flour, sugar, ground cardamom, salt, and yeast. Mix well to evenly distribute the ingredients.
- Heat the Milk and Butter: In a small saucepan, heat the milk and butter over low heat until the butter is melted and the mixture is warm, but not hot (around 110°F or 43°C).
- Mix Wet and Dry Ingredients: Pour the warm milk and butter mixture into the dry ingredients. Add the egg and vanilla extract. Stir the mixture until a dough forms.
- Knead the Dough: Transfer the dough onto a lightly floured surface. Knead for about 8-10 minutes until the dough is smooth and elastic. If the dough is too sticky, add a little more flour as needed.
- First Rise: Place the dough in a lightly greased bowl, cover with a clean kitchen towel, and let it rise in a warm place for about 1-2 hours, or until doubled in size.
- Shape the Wreath: Punch down the risen dough and divide it into three equal parts. Roll each part into a long rope, about 18 inches long. Braid the ropes together, then shape the braid into a circle to form a wreath. Pinch the ends to seal.
- Second Rise: Place the wreath on a parchment-lined baking sheet. Cover it lightly with a towel and let it rise for another 30-45 minutes until puffy.
- Preheat the Oven: While the wreath is rising, preheat your oven to 350°F (175°C).
- Egg Wash: In a small bowl, whisk together the egg yolk and tablespoon of milk. Brush the mixture over the risen wreath for a glossy finish.
- Bake the Bread: Bake the wreath in the preheated oven for 25-30 minutes, or until golden brown and cooked through. If the top browns too quickly, cover it loosely with aluminum foil.
- Cool and Serve: Remove the wreath from the oven and let it cool on a wire rack. Dust with powdered sugar if desired before serving.
Extra Tips:
To enhance the flavor, consider adding a pinch of nutmeg or cinnamon to the dough along with the cardamom.
If you prefer a sweeter bread, you can incorporate a swirl of cinnamon sugar inside the braid before shaping it into a wreath.
For a festive touch, decorate the wreath with candied fruits or nuts.
Irish Soda Bread With Raisins
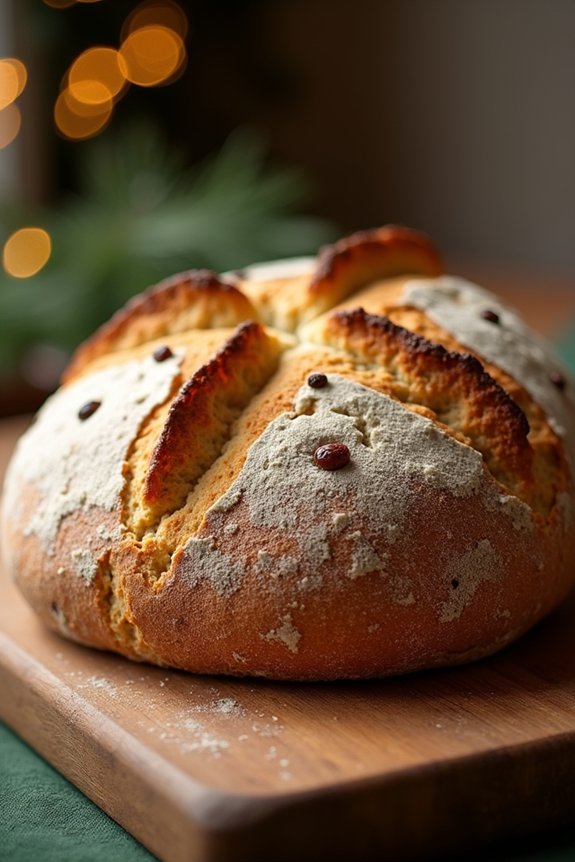
Irish Soda Bread With Raisins is a traditional, easy-to-make bread that’s perfect for the holiday season. Known for its hearty texture and slightly sweet flavor, this bread is a staple in many Irish homes, especially during Christmas. The addition of raisins adds a delightful sweetness and enhances the overall taste, making it a favorite among both children and adults.
Unlike yeast breads, Irish Soda Bread relies on baking soda as a leavening agent, which means it comes together quickly without the need for lengthy rising times. The origin of Irish Soda Bread dates back to the 19th century when baking soda became a popular alternative to yeast in Ireland. It provided a faster, simpler way to make bread, especially in regions where yeast was hard to come by.
The classic combination of flour, baking soda, buttermilk, and salt forms the base, while raisins or currants are often included for an added touch of sweetness. This bread is perfect for serving alongside a hearty stew or enjoying with a generous spread of butter during your Christmas celebrations.
Ingredients (Serves 4-6):
- 4 cups all-purpose flour
- 1 teaspoon baking soda
- 1 teaspoon salt
- 1 ¾ cups buttermilk
- 1 cup raisins
Cooking Instructions:
- Preheat the Oven: Start by preheating your oven to 425°F (220°C). This guarantees that your bread will bake evenly with a nice golden crust.
- Mix Dry Ingredients: In a large mixing bowl, combine the all-purpose flour, baking soda, and salt. Stir well to guarantee the baking soda and salt are evenly distributed throughout the flour.
- Add Raisins: Stir in the raisins, making sure they’re coated with the flour mixture. This helps prevent them from sinking to the bottom of the dough while baking.
- Incorporate Buttermilk: Make a well in the center of the dry ingredients and pour in the buttermilk. Using a wooden spoon or your hands, gently mix until a soft dough forms. Be careful not to overmix, as this can result in a tough bread.
- Knead the Dough: Turn the dough out onto a lightly floured surface. Knead it gently just until it comes together into a smooth ball. This should take about 1-2 minutes.
- Shape and Score: Shape the dough into a round loaf and place it on a greased or parchment-lined baking sheet. Using a sharp knife, score a deep cross on the top of the loaf. This allows the heat to penetrate the dough for even baking.
- Bake: Place the loaf in the preheated oven and bake for 35-45 minutes, or until the bread has risen and is golden brown. A hollow sound when tapped on the bottom indicates it’s done.
- Cool: Remove the bread from the oven and let it cool on a wire rack for at least 10 minutes before slicing. This helps to set the texture and makes slicing easier.
Extra Tips: For a richer flavor, consider adding a tablespoon of sugar to the dry ingredients. If you don’t have buttermilk on hand, you can make a substitute by adding 1 tablespoon of lemon juice or vinegar to 1 ¾ cups of milk and letting it sit for 5 minutes.
Additionally, experiment with other dried fruits or nuts to create variations of this classic bread. Remember, the key to a perfect Irish Soda Bread isn’t to overwork the dough, as this can make it dense. Happy baking!
Panettone With Dried Fruits
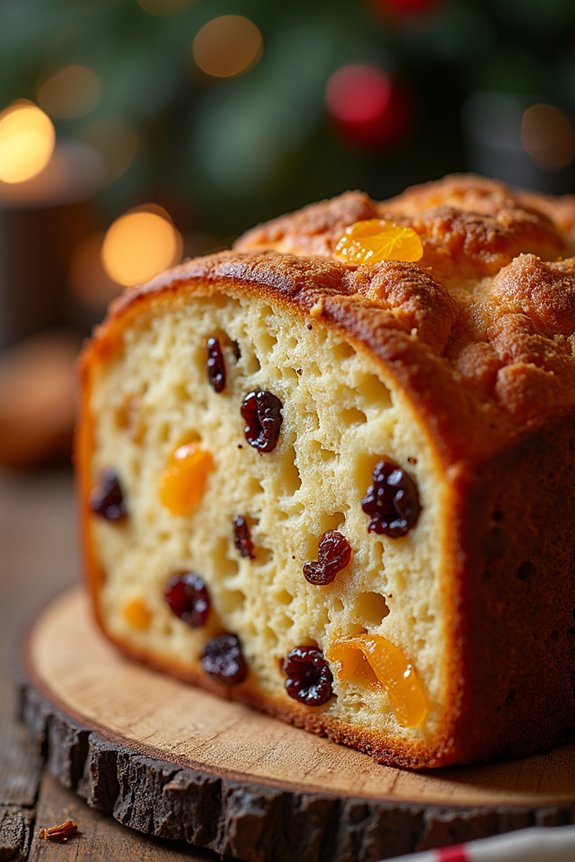
Panettone is a classic Italian Christmas bread that has won hearts around the world with its light, fluffy texture and rich, fruity flavor. Originating in Milan, this festive treat is traditionally enjoyed during the holiday season and often given as a gift.
Making Panettone at home can be a delightful experience, filling your kitchen with the comforting aroma of sweet bread and dried fruits. The combination of citrus zest and various dried fruits creates a flavorful and aromatic bread, which pairs beautifully with a hot cup of coffee or tea.
This Panettone With Dried Fruits recipe is designed to serve 4-6 people, making it perfect for a small family gathering or a cozy holiday breakfast. The process involves time for the dough to rise, which is essential for achieving the perfect airy texture. While it requires a bit of patience, the end result is a wonderful homemade bread that’s sure to impress your family and friends.
Let’s explore the ingredients and steps needed to create this delightful Christmas bread.
Ingredients:
- 3 1/2 cups all-purpose flour
- 1/2 cup granulated sugar
- 1/2 teaspoon salt
- 2 teaspoons active dry yeast
- 2/3 cup warm milk
- 3 large eggs
- 1 teaspoon vanilla extract
- 1 teaspoon grated lemon zest
- 1 teaspoon grated orange zest
- 1/2 cup unsalted butter, softened
- 1/2 cup mixed dried fruits (such as raisins, currants, and dried apricots)
- 1/4 cup chopped candied orange peel
- 2 tablespoons rum (optional)
Instructions:
- Prepare the Dough: In a small bowl, dissolve the yeast in the warm milk and let it sit until foamy, about 5 minutes. In a large mixing bowl, combine the flour, sugar, and salt. Make a well in the center and add the foamy yeast mixture, eggs, vanilla extract, lemon zest, and orange zest. Mix until the dough begins to come together.
- Knead the Dough: Add the softened butter to the dough and knead either by hand or using a stand mixer with a dough hook attachment, until the dough is smooth and elastic. This should take about 10 minutes. If the dough is sticky, add a little more flour, one tablespoon at a time.
- First Rise: Place the dough in a lightly oiled bowl, cover with a clean kitchen towel, and let it rise in a warm place until doubled in size, about 1 to 2 hours.
- Prepare the Fruits: While the dough is rising, soak the mixed dried fruits and candied orange peel in rum (if using) for about 30 minutes. Drain any excess liquid before adding to the dough.
- Incorporate the Fruits: Once the dough has risen, punch it down gently and turn it out onto a lightly floured surface. Flatten it slightly and sprinkle the soaked dried fruits and candied peel over the top. Knead the dough gently to evenly distribute the fruits.
- Second Rise: Shape the dough into a ball and place it in a panettone mold or a high-sided, round baking pan lined with parchment paper. Cover and let it rise again in a warm place until it reaches the top of the mold, about 1 hour.
- Bake the Panettone: Preheat your oven to 350°F (175°C). Once the dough has risen, bake the panettone for 35-40 minutes, or until the top is golden brown and a skewer inserted into the center comes out clean. If the top browns too quickly, cover with foil and continue baking.
- Cool and Serve: Remove the panettone from the oven and let it cool completely on a wire rack before slicing. Enjoy it fresh, or store it in an airtight container to maintain its freshness.
Extra Tips:
For an extra luxurious touch, you can add a handful of chopped nuts, such as almonds or walnuts, to your panettone. If you don’t have a panettone mold, you can use a deep cake tin; just be sure to line it with parchment paper to help with the rise.
When kneading the dough, resist the temptation to add too much flour, as it can make the bread dense. Finally, if you prefer a non-alcoholic version, you can soak the dried fruits in orange juice instead of rum. Enjoy your homemade Panettone with a dusting of powdered sugar on top for a festive finish!
Cinnamon Star Bread
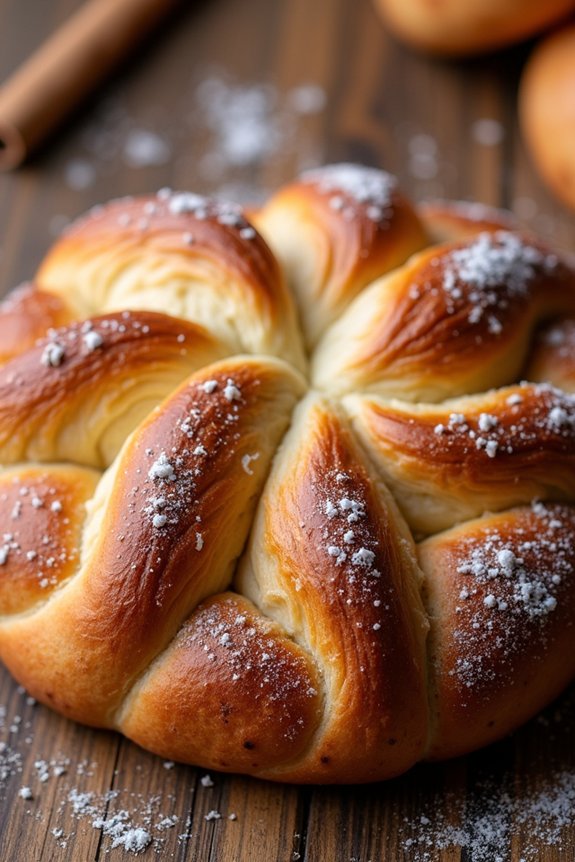
Cinnamon Star Bread is a delightful and visually stunning bread that’s perfect for the holiday season. This festive bread not only looks impressive but also fills your home with the warm, inviting aroma of cinnamon. It’s a great addition to any Christmas breakfast or brunch, and it’s sure to be a hit with family and friends.
The intricate star shape may seem complicated, but with a few simple steps, you can create this beautiful centerpiece for your holiday table. Making Cinnamon Star Bread involves creating layers of sweet dough filled with a cinnamon-sugar mixture, then twisting and shaping it into a star. The result is a soft, fluffy bread that pulls apart easily, making it perfect for sharing.
This recipe serves 4-6 people, guaranteeing there’s plenty to go around at your festive gathering. Let’s plunge into the ingredients and steps needed to bring this delectable treat to life.
Ingredients for Cinnamon Star Bread (serving size: 4-6 people):
- 3 1/4 cups all-purpose flour
- 1/4 cup granulated sugar
- 2 1/4 teaspoons instant yeast
- 1 teaspoon salt
- 3/4 cup whole milk
- 1/4 cup unsalted butter
- 2 large eggs
- 1 teaspoon vanilla extract
- 1/2 cup brown sugar
- 2 tablespoons ground cinnamon
- 1/4 cup unsalted butter, melted (for filling)
- Powdered sugar for dusting (optional)
Cooking Instructions:
1. Prepare the Dough: In a large mixing bowl, combine the flour, granulated sugar, instant yeast, and salt. In a small saucepan, warm the milk and butter over low heat until the butter melts. Remove from heat and let it cool to lukewarm.
Add the milk mixture, eggs, and vanilla extract to the dry ingredients. Mix until a dough forms.
2. Knead the Dough: Transfer the dough to a floured surface and knead for about 5-7 minutes until smooth and elastic. Place the dough in a lightly oiled bowl, cover with a clean kitchen towel, and let it rise in a warm place until doubled in size, about 1-2 hours.
3. Prepare the Filling: In a small bowl, mix the brown sugar and ground cinnamon. Set aside.
4. Shape the Dough: Once the dough has risen, punch it down and divide it into four equal pieces. Roll each piece into a circle about 10 inches in diameter. Place the first circle on a parchment-lined baking sheet and brush with melted butter.
Sprinkle a third of the cinnamon-sugar mixture over the butter.
5. Layer and Cut: Repeat the layering process with the remaining dough circles, ending with the fourth dough circle on top without any filling. Place a small cup or glass in the center of the dough stack to mark the center.
Using a sharp knife, cut the dough into 16 equal strips, leaving the center intact.
6. Twist and Form the Star: Take two adjacent strips and twist them away from each other twice, then pinch the ends together to form a point. Repeat this process with the remaining strips to form an eight-pointed star.
7. Final Rise and Bake: Cover the shaped bread with a kitchen towel and let it rise for another 20-30 minutes. Preheat the oven to 375°F (190°C). Bake the bread for 20-25 minutes, or until golden brown.
Remove from the oven and let it cool slightly before dusting with powdered sugar, if desired.
Extra Tips:
When making Cinnamon Star Bread, confirm your dough isn’t too sticky or too dry; adjust with small amounts of flour or milk as needed.
Allow the dough to rise in a warm, draft-free environment to confirm it doubles in size properly. When twisting the bread, be gentle to maintain the shape and prevent tearing.
If you want a richer flavor, consider adding a pinch of nutmeg or cardamom to the cinnamon-sugar mixture. Finally, enjoy the process of creating this beautiful bread, and don’t worry if it’s not perfect; each star is unique and adds charm to your festive table.
Eggnog Quick Bread
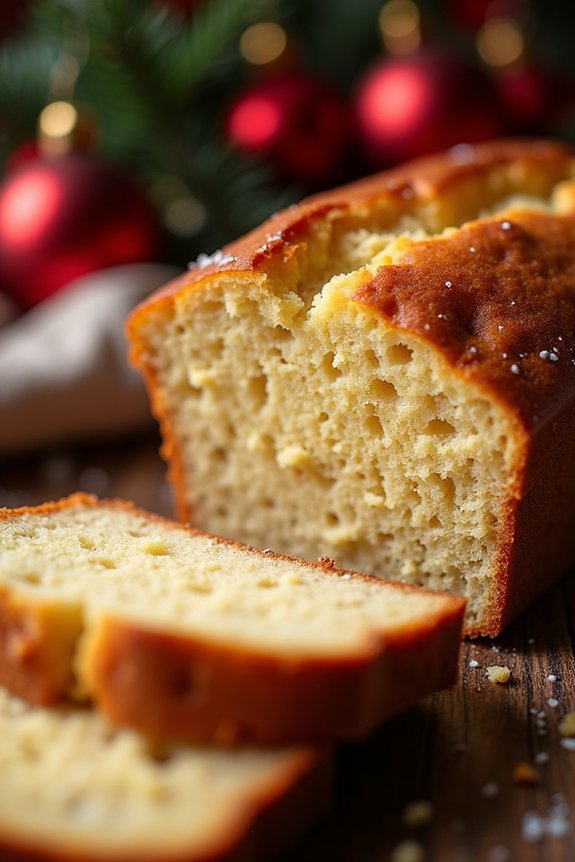
Eggnog Quick Bread is a delightful seasonal treat that combines the rich, creamy flavors of eggnog with the comforting texture of bread. Perfect for holiday gatherings, this quick bread is simple to make and guaranteed to impress your family and friends. The subtle nutmeg and cinnamon spices enhance the eggnog’s flavor, creating a warm and inviting aroma that fills your kitchen as it bakes.
Whether served as a festive breakfast, an afternoon snack, or a sweet conclusion to a holiday meal, this bread is a versatile addition to your Christmas menu. This recipe yields one loaf, serving 4-6 people, and is ideal for anyone looking to add a touch of holiday spirit to their baking. The preparation is straightforward, requiring minimal effort and time, making it an excellent choice for busy holiday schedules.
The combination of eggnog, spices, and a hint of vanilla creates a moist and flavorful bread that pairs beautifully with a hot cup of coffee or tea. Follow the simple steps below to create your own Eggnog Quick Bread and bring a taste of the holidays to your table.
Ingredients (serves 4-6):
- 2 cups all-purpose flour
- 1 cup granulated sugar
- 1 teaspoon baking powder
- ½ teaspoon baking soda
- ½ teaspoon salt
- ½ teaspoon ground nutmeg
- ½ teaspoon ground cinnamon
- 1 cup eggnog
- ½ cup unsalted butter, melted
- 2 large eggs
- 1 teaspoon vanilla extract
Instructions:
- Preheat the Oven: Start by preheating your oven to 350°F (175°C). Grease a 9×5-inch loaf pan with butter or non-stick cooking spray, making certain all sides are well-coated to prevent sticking.
- Mix Dry Ingredients: In a large bowl, combine the all-purpose flour, granulated sugar, baking powder, baking soda, salt, ground nutmeg, and ground cinnamon. Whisk these ingredients together until they’re thoroughly mixed to guarantee even distribution of the spices and leavening agents.
- Prepare Wet Ingredients: In a separate medium bowl, whisk together the eggnog, melted butter, eggs, and vanilla extract. Make sure the butter isn’t too hot when mixing to prevent curdling the eggs.
- Combine Ingredients: Pour the wet mixture into the bowl with the dry ingredients. Gently fold the ingredients together using a spatula or wooden spoon until just combined. Be careful not to overmix, as this can result in a dense bread.
- Transfer to Pan: Pour the batter into the prepared loaf pan, spreading it evenly with the spatula. Tap the pan lightly on the counter to remove any air bubbles.
- Bake the Bread: Place the loaf pan in the preheated oven and bake for 50-60 minutes, or until a toothpick inserted into the center of the bread comes out clean. Baking times may vary slightly, so start checking at the 50-minute mark.
- Cool and Serve: Once baked, remove the bread from the oven and let it cool in the pan for 10 minutes. Afterward, transfer it to a wire rack to cool completely before slicing and serving.
Extra Tips:
For an extra festive touch, consider adding a glaze made from powdered sugar and eggnog, drizzled over the top of the cooled bread. You can also incorporate chopped nuts or dried fruits like cranberries into the batter for additional texture and flavor.
If you prefer a stronger spice flavor, you can increase the amount of nutmeg and cinnamon slightly. This bread also freezes well, so you can prepare it in advance and enjoy it throughout the holiday season.
Pecan and Date Holiday Bread
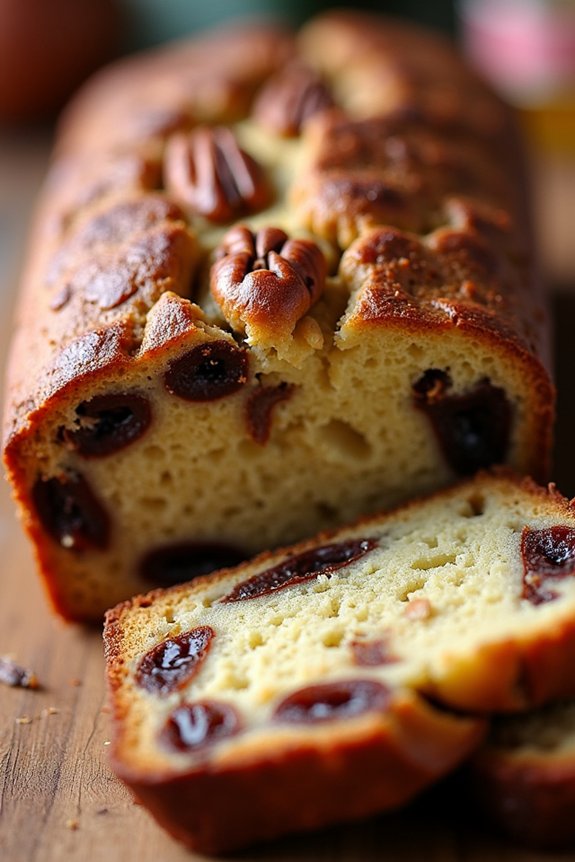
Pecan and Date Holiday Bread is a delightful treat that combines the rich, nutty flavor of pecans with the natural sweetness of dates. This holiday bread is perfect for breakfast, as a snack, or even as a dessert. The soft, moist texture of the bread pairs beautifully with the crunchy pecans and chewy dates, creating a harmonious blend of flavors and textures.
It’s a fantastic addition to any holiday spread and is sure to impress your family and friends. This recipe is designed to serve 4-6 people and is an excellent way to bring a festive touch to your holiday meals. The preparation process is straightforward, making it ideal for both beginners and experienced bakers.
Whether you’re planning a holiday brunch or just want to enjoy a cozy moment with a warm slice of homemade bread, this Pecan and Date Holiday Bread is a wonderful choice.
Ingredients (for 4-6 servings):
- 2 cups all-purpose flour
- 1 teaspoon baking soda
- 1/2 teaspoon salt
- 1/2 teaspoon ground cinnamon
- 1 cup pitted dates, chopped
- 1 cup pecans, chopped
- 1/2 cup unsalted butter, melted
- 1 cup brown sugar
- 2 large eggs
- 1 teaspoon vanilla extract
- 1 cup buttermilk
Cooking Instructions:
- Preheat the Oven: Start by preheating your oven to 350°F (175°C). Grease and flour a 9×5 inch loaf pan to prevent the bread from sticking.
- Mix Dry Ingredients: In a medium-sized bowl, combine the flour, baking soda, salt, and ground cinnamon. Stir well to guarantee the ingredients are evenly distributed.
- Prepare Dates and Pecans: In a separate bowl, toss the chopped dates and pecans with a tablespoon of the flour mixture. This helps to keep them from sinking to the bottom of the bread during baking.
- Combine Wet Ingredients: In a large mixing bowl, whisk together the melted butter and brown sugar until smooth. Add the eggs one at a time, beating well after each addition. Stir in the vanilla extract.
- Add Buttermilk: Gradually add the buttermilk to the wet mixture, stirring until well combined.
- Incorporate Dry Ingredients: Slowly add the dry ingredient mixture to the wet ingredients, stirring gently until just combined. Be careful not to overmix, as this can make the bread tough.
- Fold in Dates and Pecans: Gently fold the flour-coated dates and pecans into the batter until they’re evenly distributed.
- Pour and Bake: Pour the batter into the prepared loaf pan, smoothing the top with a spatula. Bake in the preheated oven for 50-60 minutes, or until a toothpick inserted into the center of the bread comes out clean.
- Cool and Serve: Allow the bread to cool in the pan for about 10 minutes before transferring it to a wire rack to cool completely. Slice and serve the bread warm or at room temperature.
Extra Tips: To enhance the flavor of your Pecan and Date Holiday Bread, consider toasting the pecans in a dry skillet over medium heat for a few minutes before chopping them. This will bring out their natural oils and add a deeper, richer flavor to the bread.
Additionally, if you don’t have buttermilk on hand, you can make a substitute by adding one tablespoon of lemon juice or vinegar to a cup of milk and letting it sit for a few minutes until it curdles. This will mimic the acidity of buttermilk and provide the same tenderizing effects in your bread.