

The holiday season is just around the corner, and I’m always thrilled to find baking recipes that will impress my guests. There’s something so special about the scent of gingerbread or the sight of a beautifully frosted cupcake on a holiday table. With these 15 Christmas party baking recipes, I’m all set to make my holiday gatherings even more memorable. Each recipe puts a fun twist on classic favorites, perfect for adding a little extra cheer. Let’s discover these delightful treats together.
Classic Gingerbread Cookies

Gingerbread cookies are a timeless holiday treat that brings warmth and cheer to any Christmas party. These cookies are characterized by their delightful blend of spices, creating an aroma that fills your home with the essence of the festive season. Perfect for decorating with icing and candies, these cookies aren’t only delicious but also fun to make with family and friends.
Whether you enjoy them plain or adorned with colorful decorations, classic gingerbread cookies are a must-have addition to your holiday baking repertoire.
This recipe is designed to make a batch of classic gingerbread cookies that will serve 4-6 people. The cookies come out crisp on the edges and soft in the center, with a rich molasses flavor and a perfect hint of spice from ginger, cinnamon, and cloves. Gather your ingredients, roll up your sleeves, and get ready to bake these delightful holiday favorites that are certain to be a hit at your Christmas party.
Ingredients:
- 3 cups all-purpose flour
- 3/4 teaspoon baking soda
- 1 tablespoon ground ginger
- 1 tablespoon ground cinnamon
- 1/2 teaspoon ground cloves
- 1/2 teaspoon salt
- 1/4 teaspoon freshly grated nutmeg
- 1/2 cup unsalted butter, softened
- 1/2 cup packed dark-brown sugar
- 1 large egg
- 1/2 cup unsulfured molasses
- 2 teaspoons vanilla extract
Cooking Instructions:
- Prepare the Dry Ingredients: In a large bowl, whisk together the flour, baking soda, ginger, cinnamon, cloves, salt, and nutmeg. This will guarantee that all the spices are evenly distributed throughout the gingerbread cookie dough.
- Cream Butter and Sugar: In a separate large bowl, using an electric mixer, beat the softened butter and brown sugar together on medium speed until light and fluffy, about 2-3 minutes. This process incorporates air into the mixture, resulting in a tender cookie.
- Add Wet Ingredients: Beat in the egg, molasses, and vanilla extract into the butter and sugar mixture until well combined. The molasses adds a deep flavor and color to the cookies.
- Combine Wet and Dry Ingredients: Gradually add the dry ingredients to the wet ingredients, mixing on low speed until just combined. Be careful not to overmix, as this can make the cookies tough.
- Chill the Dough: Divide the dough in half, place each half onto a piece of plastic wrap, and flatten into a disk. Wrap tightly and refrigerate for at least 1 hour or until firm. This step prevents the dough from spreading too much during baking.
- Preheat and Prepare Baking Sheets: Preheat your oven to 350°F (175°C). Line two baking sheets with parchment paper.
- Roll Out the Dough: On a lightly floured surface, roll out one disk of dough to about 1/4 inch thick. Use gingerbread cookie cutters to cut out shapes and place them on the prepared baking sheets, about 1 inch apart.
- Bake the Cookies: Bake in the preheated oven for 8-10 minutes, or until the edges are firm and the centers are slightly soft. Rotate the pans halfway through baking for even cooking.
- Cool and Decorate: Allow the cookies to cool on the baking sheets for 5 minutes before transferring them to a wire rack to cool completely. Once cooled, decorate with icing and candies as desired.
Extra Tips:
For the best results, make sure your butter is at room temperature before starting to guarantee it creams well with the sugar. If you prefer a softer gingerbread cookie, reduce the baking time slightly.
For added flavor, try incorporating a pinch of ground black pepper into the dough for a subtle spicy kick. When decorating, royal icing works wonderfully due to its ability to harden, making it ideal for detailed designs and stacking.
Enjoy your baking and happy holidays!
Peppermint Chocolate Crinkle Cookies
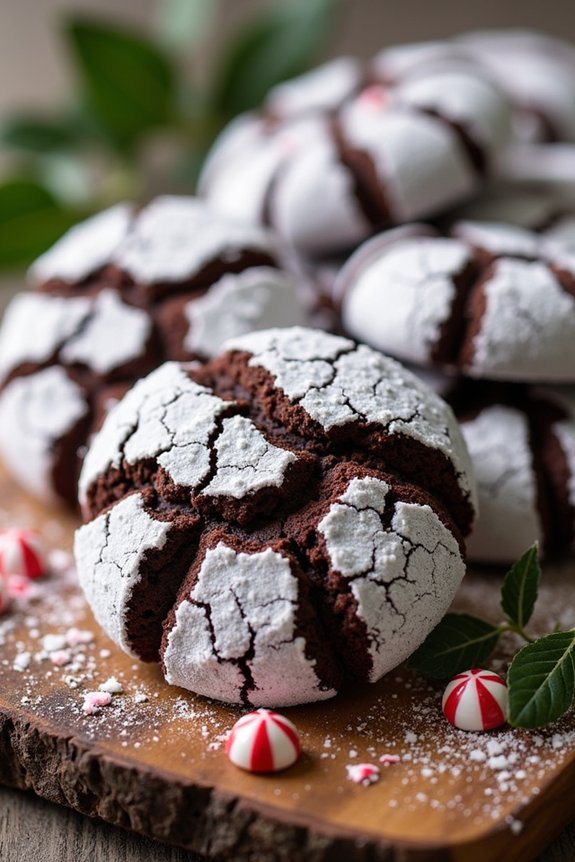
Peppermint Chocolate Crinkle Cookies are a festive and delightful treat perfect for any Christmas party. These cookies combine rich chocolatey goodness with a revitalizing hint of peppermint, making them a crowd-pleaser during the holiday season.
The crinkled exterior gives them a charming homemade appearance, while the powdered sugar coating adds an extra touch of sweetness. Whether you’re hosting a holiday gathering or looking for a thoughtful gift for friends and family, these cookies are sure to bring joy and warmth to any occasion.
The recipe yields approximately 24 cookies, making it an ideal choice for serving 4-6 people. The preparation involves creating a dough flavored with cocoa and peppermint, which is then rolled in powdered sugar before baking. This process results in the characteristic crinkled look as the cookies expand in the oven.
The recipe is both simple to follow and rewarding, guaranteeing that even novice bakers can achieve delicious results. Gather the following ingredients and get ready to bake these delectable holiday treats!
Ingredients:
- 1 cup all-purpose flour
- 1/2 cup unsweetened cocoa powder
- 1 teaspoon baking powder
- 1/4 teaspoon salt
- 2/3 cup granulated sugar
- 1/3 cup vegetable oil
- 2 large eggs
- 1 teaspoon vanilla extract
- 1 teaspoon peppermint extract
- 1 cup powdered sugar (for rolling)
Instructions:
- Prepare the Dough: In a medium bowl, whisk together the flour, cocoa powder, baking powder, and salt. Set aside. In a large mixing bowl, combine the granulated sugar and vegetable oil until smooth. Beat in the eggs one at a time, then add the vanilla and peppermint extracts. Gradually add the dry ingredients to the wet ingredients, mixing until just combined. The dough will be sticky.
- Chill the Dough: Cover the dough with plastic wrap and refrigerate for at least 2 hours or until firm. Chilling the dough is essential as it makes it easier to handle and helps achieve the crinkle effect during baking.
- Preheat the Oven: Preheat your oven to 350°F (175°C) and line two baking sheets with parchment paper.
- Shape the Cookies: Place the powdered sugar in a shallow bowl. Using a tablespoon or small cookie scoop, scoop out the dough and roll it into 1-inch balls. Roll each ball generously in the powdered sugar, making sure it’s fully coated.
- Bake the Cookies: Arrange the coated dough balls on the prepared baking sheets, spacing them about 2 inches apart. Bake in the preheated oven for 10-12 minutes, or until the edges are set and the tops have cracked.
- Cool and Serve: Allow the cookies to cool on the baking sheet for 5 minutes before transferring them to a wire rack to cool completely. Serve the cookies once cool, or store them in an airtight container for up to a week.
Extra Tips:
For a more intense peppermint flavor, you can add a few crushed peppermint candies to the dough before baking. If you prefer a softer, chewier cookie, slightly underbake them by a minute or two.
Always verify the dough is well-chilled before rolling to make handling easier and to achieve the best crinkle effect. Adjust the amount of powdered sugar based on your preference; a thicker coating will result in a more pronounced crinkle. Enjoy these cookies with a glass of milk or hot cocoa for the ultimate holiday treat!
Eggnog Cheesecake Bars
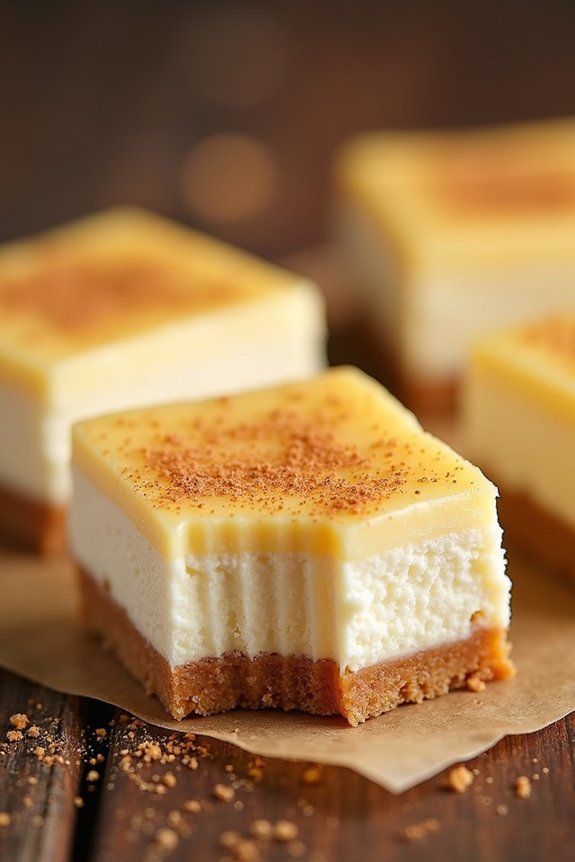
Eggnog Cheesecake Bars are a delightful holiday treat that combines the rich, creamy flavors of traditional cheesecake with the spicy, aromatic essence of eggnog. This dessert is perfect for Christmas parties and family gatherings, offering a festive twist that will surely impress your guests.
The smooth, velvety texture of the cheesecake pairs beautifully with the buttery crust, creating a harmonious blend of flavors that capture the spirit of the season.
These bars aren’t only delicious but also relatively simple to prepare, making them an ideal choice for both novice and experienced bakers. The recipe yields a serving size of 4-6 people, making it a great option for smaller gatherings or as part of a larger holiday dessert spread.
With a little preparation and these straightforward instructions, you can create a sweet and satisfying dessert that will become a favorite holiday tradition.
Ingredients (serving size: 4-6 people):
- 1 1/2 cups graham cracker crumbs
- 1/4 cup granulated sugar
- 1/2 cup unsalted butter, melted
- 16 oz cream cheese, softened
- 1 cup granulated sugar
- 3 large eggs
- 1 cup eggnog
- 1 tablespoon all-purpose flour
- 1 teaspoon vanilla extract
- 1/2 teaspoon ground nutmeg
- 1/4 teaspoon salt
Cooking Instructions:
1. Prepare the Crust: Preheat your oven to 325°F (163°C). In a medium bowl, combine the graham cracker crumbs and 1/4 cup granulated sugar. Stir in the melted butter until the mixture resembles wet sand.
Press the mixture firmly into the bottom of a greased 9×9-inch baking pan, creating an even layer. Bake the crust for 10 minutes, then set aside to cool.
2. Make the Cheesecake Filling: In a large mixing bowl, beat the softened cream cheese with 1 cup of granulated sugar until smooth and creamy. Add the eggs one at a time, beating well after each addition.
Mix in the eggnog, flour, vanilla extract, ground nutmeg, and salt until everything is well combined and the filling is smooth.
3. Assemble the Bars: Pour the cheesecake filling over the cooled crust, spreading it evenly with a spatula. Tap the pan gently on the counter to remove any air bubbles and guarantee an even layer.
4. Bake the Cheesecake Bars: Place the pan in the preheated oven and bake for 40-45 minutes, or until the edges are set and the center is slightly jiggly.
Remove from the oven and allow the bars to cool to room temperature in the pan.
5. Chill and Serve: Once cooled, refrigerate the cheesecake bars for at least 2 hours, or until fully chilled and set. Cut into squares and serve chilled.
Optionally, sprinkle with additional ground nutmeg before serving for an extra festive touch.
Extra Tips:
For the best results, verify that all your ingredients are at room temperature before you begin mixing. This will help create a smooth, lump-free cheesecake filling.
Additionally, when cutting the bars, use a sharp knife and wipe it clean between each cut to achieve neat, professional-looking squares. If you’re preparing this dish in advance, the cheesecake bars can be stored in the refrigerator for up to three days, making it a convenient option for holiday planning.
Spiced Apple Cider Cupcakes

Spiced Apple Cider Cupcakes are the perfect festive treat to bring warmth and cheer to your Christmas party. These delightful cupcakes capture the essence of the holiday season with a blend of aromatic spices and the rich, fruity flavor of apple cider. Topped with a luscious cinnamon cream cheese frosting, they promise to be a crowd-pleaser, leaving your guests longing for more.
Whether you’re hosting a cozy get-together or a grand celebration, these cupcakes will add a touch of seasonal magic to your dessert table. The recipe is straightforward, making it an excellent choice for both novice and experienced bakers. The combination of apple cider, cinnamon, nutmeg, and cloves infuses each bite with a burst of flavor that evokes memories of holiday gatherings and winter warmth.
Best of all, the recipe yields enough cupcakes to serve 4-6 people, making it ideal for intimate parties or as part of a larger dessert spread.
Ingredients:
For the Cupcakes:
- 1 1/2 cups all-purpose flour
- 1 teaspoon baking powder
- 1/2 teaspoon baking soda
- 1/2 teaspoon ground cinnamon
- 1/4 teaspoon ground nutmeg
- 1/4 teaspoon ground cloves
- 1/4 teaspoon salt
- 1/2 cup unsalted butter, softened
- 1/2 cup granulated sugar
- 1/2 cup light brown sugar, packed
- 2 large eggs
- 1 teaspoon vanilla extract
- 3/4 cup apple cider
For the Frosting:
- 8 ounces cream cheese, softened
- 1/4 cup unsalted butter, softened
- 2 cups powdered sugar
- 1 teaspoon ground cinnamon
- 1 teaspoon vanilla extract
Instructions:
- Preheat the Oven: Begin by preheating your oven to 350°F (175°C). Line a 12-cup muffin tin with cupcake liners to prepare for baking.
- Mix Dry Ingredients: In a medium bowl, whisk together the flour, baking powder, baking soda, cinnamon, nutmeg, cloves, and salt. This guarantees that the spices are evenly distributed throughout the batter.
- Cream Butter and Sugars: In a large mixing bowl, cream together the softened butter, granulated sugar, and brown sugar until light and fluffy using an electric mixer. This should take about 2-3 minutes.
- Add Eggs and Vanilla: Beat in the eggs one at a time, making sure each is fully incorporated before adding the next. Mix in the vanilla extract until smooth.
- Combine with Apple Cider: Gradually add the dry ingredients to the wet mixture, alternating with the apple cider. Begin and end with the dry ingredients, mixing just until combined. Be careful not to overmix.
- Fill Cupcake Liners: Divide the batter evenly among the prepared cupcake liners, filling each about two-thirds full.
- Bake: Place the muffin tin in the preheated oven and bake for 18-20 minutes, or until a toothpick inserted into the center of a cupcake comes out clean. Allow the cupcakes to cool in the pan for 5 minutes, then transfer them to a wire rack to cool completely.
- Prepare the Frosting: While the cupcakes cool, make the frosting. In a medium bowl, beat the softened cream cheese and butter together until smooth. Gradually add the powdered sugar, cinnamon, and vanilla extract, mixing until fully combined and creamy.
- Frost Cupcakes: Once the cupcakes are completely cool, use a piping bag or a spatula to frost them generously with the cinnamon cream cheese frosting.
Extra Tips: For an extra festive touch, consider garnishing your Spiced Apple Cider Cupcakes with a sprinkle of ground cinnamon or a small apple slice on top. If you prefer a stronger apple flavor, you can reduce the apple cider in a saucepan by half before adding it to the batter, intensifying the flavor.
Cranberry Orange Bread

Cranberry Orange Bread is a delightful treat that combines the tartness of fresh cranberries with the sweet, citrusy flavor of oranges. This quick bread is perfect for a Christmas party, offering a vibrant and festive touch to your dessert table. The bread is moist and flavorful, and the combination of cranberries and orange zest not only tastes incredible but also fills your kitchen with a warm, inviting aroma.
This recipe is designed to serve 4-6 people, making it ideal for a small gathering or family celebration. The use of fresh cranberries and orange juice guarantees a burst of freshness in every bite. Whether you serve it as a breakfast treat, an afternoon snack, or a dessert, Cranberry Orange Bread is sure to impress your guests and become a holiday favorite.
Ingredients for a serving size of 4-6 people:
- 2 cups all-purpose flour
- 1 cup granulated sugar
- 1 1/2 teaspoons baking powder
- 1/2 teaspoon baking soda
- 1/2 teaspoon salt
- 1 tablespoon grated orange zest
- 3/4 cup orange juice (freshly squeezed is best)
- 1/4 cup unsalted butter, melted
- 1 large egg
- 1 cup fresh cranberries, roughly chopped
- 1/2 cup chopped nuts (optional, such as walnuts or pecans)
Cooking Instructions:
- Preheat the Oven: Begin by preheating your oven to 350°F (175°C). Grease a 9×5-inch loaf pan and line it with parchment paper to make sure the bread doesn’t stick.
- Mix Dry Ingredients: In a large mixing bowl, combine the all-purpose flour, granulated sugar, baking powder, baking soda, and salt. Whisk these ingredients together until they’re evenly distributed.
- Prepare Wet Mixture: In another bowl, mix the grated orange zest, freshly squeezed orange juice, melted butter, and the egg. Whisk until the mixture is smooth and the egg is fully incorporated.
- Combine Mixtures: Gradually add the wet ingredients to the dry ingredients, stirring gently until just combined. Be careful not to overmix as this can make the bread dense.
- Fold in Additions: Gently fold in the chopped cranberries and nuts (if using) into the batter. Make sure that the cranberries are evenly distributed throughout the batter.
- Pour and Bake: Pour the batter into the prepared loaf pan, spreading it evenly. Bake in the preheated oven for 50-60 minutes, or until a toothpick inserted into the center comes out clean.
- Cool the Bread: Once baked, remove the bread from the oven and allow it to cool in the pan for about 10 minutes. Then, transfer it to a wire rack to cool completely before slicing.
Extra Tips:
For the best results, use fresh cranberries and freshly squeezed orange juice to enhance the flavor of your Cranberry Orange Bread. If you find fresh cranberries unavailable, frozen cranberries can be used; just remember not to thaw them before adding to the batter.
Additionally, be sure not to overmix the batter once you combine the wet and dry ingredients, as this can result in a tough texture. For a finishing touch, consider glazing the bread with a simple orange glaze made from powdered sugar and orange juice for an added layer of sweetness and shine.
Stained Glass Cookie Ornaments
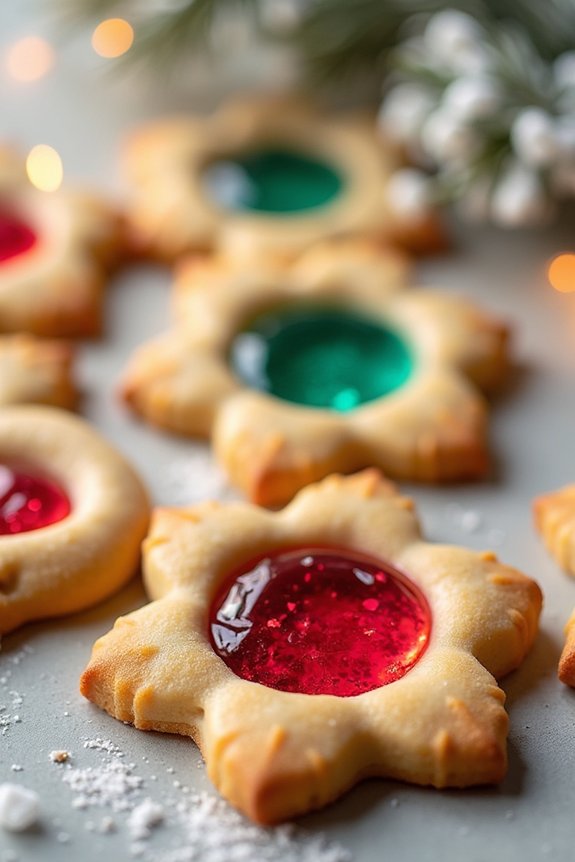
Stained Glass Cookie Ornaments are a delightful and festive treat, perfect for adding a touch of charm to your Christmas party. These cookies not only taste delicious but also double as beautiful ornaments for your holiday tree. Their vibrant appearance comes from the candy centers that melt into a stunning stained glass effect during baking.
Whether you’re hosting a party or looking for a fun family activity, these cookies are sure to impress everyone with their unique look and taste.
The process of making Stained Glass Cookie Ornaments is both enjoyable and straightforward, making it an ideal activity for bakers of all ages. You’ll start by preparing a classic sugar cookie dough, cutting out fun shapes, and filling the centers with crushed hard candies.
As the cookies bake, the candies melt to create a colorful, translucent center, reminiscent of stained glass. The end result is a batch of cookies that are as pretty as they’re tasty, perfect for enjoying during the holiday season.
Ingredients (Serves 4-6):
- 2 1/2 cups all-purpose flour
- 1/2 teaspoon baking powder
- 1/4 teaspoon salt
- 3/4 cup unsalted butter, softened
- 1 cup granulated sugar
- 1 large egg
- 1 teaspoon vanilla extract
- Assorted colors of hard candies (e.g., Jolly Ranchers or Life Savers)
- Optional: Edible glitter or decorative sugars
Cooking Instructions:
1. Preheat the Oven:
Preheat your oven to 350°F (175°C) and line two baking sheets with parchment paper.
2. Prepare the Dough:
In a medium bowl, whisk together the flour, baking powder, and salt. In a separate large bowl, cream the softened butter and sugar together until light and fluffy. Beat in the egg and vanilla extract until well combined. Gradually add the flour mixture, mixing until a smooth dough forms.
3. Chill the Dough:
Divide the dough in half, flatten into discs, wrap in plastic wrap, and refrigerate for at least 1 hour. This helps the dough firm up and makes it easier to roll out.
4. Crush the Candies:
While the dough chills, separate the hard candies by color and place them in separate zip-top bags. Use a rolling pin to crush the candies into small pieces and set aside.
5. Roll Out the Dough:
On a lightly floured surface, roll out one disc of dough to about 1/4-inch thickness. Use cookie cutters to cut out desired shapes and transfer them to the prepared baking sheets.
Then, use a smaller cutter to remove the centers of the cookies.
6. Fill the Centers:
Fill the center of each cookie with the crushed candies, ensuring the candy pieces fill the entire cutout without overflowing onto the cookie dough.
7. Bake:
Bake the cookies in the preheated oven for 8-10 minutes, or until the edges are lightly golden and the candy centers have melted and spread evenly. Remove from the oven and allow the cookies to cool completely on the baking sheet before transferring.
8. Decorate:
If desired, dust the cooled cookies with edible glitter or decorative sugars for additional sparkle.
Extra Tips:
When making Stained Glass Cookie Ornaments, it’s important to keep an eye on the cookies as they bake, as the candy can quickly overheat and bubble over.
Make sure to use a variety of candy colors for a vibrant effect, and if you plan to hang these cookies as ornaments, use a straw to create a small hole at the top of each cookie before baking.
This way, you can easily thread a ribbon through once they’re cooled. Finally, store the cookies in an airtight container to maintain their freshness and prevent the candy centers from becoming sticky.
Chocolate Hazelnut Yule Log
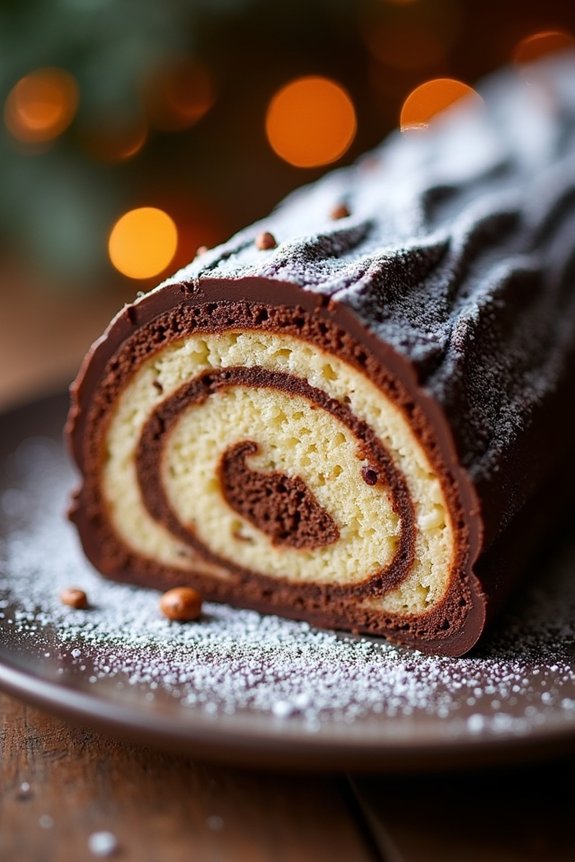
The Chocolate Hazelnut Yule Log is a classic holiday dessert that combines rich chocolate flavors with the nutty taste of hazelnuts, making it a perfect centerpiece for any Christmas party. The Yule log, or Bûche de Noël, is a traditional French dessert that resembles a log, symbolizing the yule log burned in the hearth as a Christmas tradition.
This dessert not only looks spectacular but also delights the taste buds with its creamy filling and soft, moist sponge. This recipe is designed for 4-6 people, ensuring everyone at your gathering can indulge in a generous slice. The chocolate sponge cake is rolled with a luscious chocolate hazelnut cream, then coated in a rich ganache, offering layers of texture and flavor.
While it may seem intricate, with careful attention to detail and patience, you can create a show-stopping dessert that will impress your guests and add a festive touch to your celebrations.
Ingredients:
- 4 large eggs, separated
- 100g granulated sugar
- 1 teaspoon vanilla extract
- 40g unsweetened cocoa powder
- 1 tablespoon all-purpose flour
- 1/4 teaspoon salt
- 100g chocolate hazelnut spread
- 200ml heavy cream
- 50g chopped hazelnuts
- 150g dark chocolate, chopped
- 100ml heavy cream (for ganache)
- Icing sugar, for dusting
Instructions:
- Preheat the Oven: Preheat your oven to 180°C (350°F). Line a large baking sheet (approximately 13×9 inches) with parchment paper, ensuring it covers the sides.
- Prepare the Sponge Cake: In a large mixing bowl, whisk the egg yolks and sugar until the mixture is pale and creamy. Add the vanilla extract and mix well.
- Beat the Egg Whites: In a separate clean bowl, beat the egg whites and salt until stiff peaks form. Gently fold the egg whites into the yolk mixture, maintaining as much air as possible.
- Combine Dry Ingredients: Sift the cocoa powder and flour together and gently fold into the egg mixture until just combined.
- Bake the Sponge: Pour the batter onto the prepared baking sheet, spreading evenly. Bake for 10-12 minutes or until the sponge is springy to the touch.
- Roll the Sponge: While the cake is still warm, gently roll it up with the parchment paper from the short end. Allow it to cool completely on a wire rack.
- Prepare the Filling: Whip the heavy cream until soft peaks form, then fold in the chocolate hazelnut spread. Carefully unroll the cooled sponge and spread the filling evenly over it. Sprinkle with chopped hazelnuts.
- Roll and Chill: Re-roll the sponge without the parchment paper and wrap it tightly in cling film. Chill in the refrigerator for at least 1 hour.
- Make the Ganache: Heat the cream in a saucepan until it begins to simmer. Remove from heat and pour over the chopped dark chocolate, stirring until smooth.
- Decorate the Yule Log: Remove the log from the refrigerator and place it on a serving platter. Pour the ganache over the log, smoothing with a spatula. Use a fork to create bark-like texture, if desired.
- Final Touches: Dust with icing sugar before serving to resemble a snowy log.
Extra Tips: When folding the egg whites into the yolk mixture, be gentle to avoid deflating the air incorporated, which is vital for a light sponge. If the sponge cracks while rolling, don’t worry; the ganache will cover any imperfections.
For an extra festive decoration, consider adding meringue mushrooms or holly leaves made from marzipan to the log. Allow the Yule Log to sit at room temperature for about 10 minutes before serving for the best texture.
Snowball Pecan Cookies

Snowball Pecan Cookies are a delightful holiday treat that brings a touch of sweetness and a crunch of pecans to your Christmas party. These cookies are known for their delicate, buttery texture and their charming dusting of powdered sugar that resembles freshly fallen snow. They aren’t only easy to make but also a hit with both children and adults alike, making them a perfect addition to your festive baking repertoire.
These cookies are often enjoyed with a cup of tea or coffee and are ideal for sharing with friends and family. The recipe yields approximately 24 cookies, which is suitable for a serving size of 4-6 people. Whether you’re baking them for a holiday party or simply to enjoy at home, these Snowball Pecan Cookies are bound to spread holiday cheer with every bite.
Ingredients (serving size: 4-6 people):
- 1 cup unsalted butter, softened
- 1/2 cup powdered sugar, plus more for coating
- 1 teaspoon vanilla extract
- 2 cups all-purpose flour
- 1 cup finely chopped pecans
- 1/4 teaspoon salt
Cooking Instructions:
- Preheat the Oven: Start by preheating your oven to 350°F (175°C). This guarantees that the cookies bake evenly once they’re placed inside.
- Cream the Butter and Sugar: In a large mixing bowl, cream together the softened butter and 1/2 cup of powdered sugar until the mixture is light and fluffy. This usually takes about 2-3 minutes with an electric mixer.
- Add Vanilla Extract: Mix in the vanilla extract into the creamed butter and sugar, making sure it’s thoroughly combined.
- Combine Dry Ingredients: In a separate bowl, whisk together the all-purpose flour and salt. Gradually add this to the butter mixture, mixing until a dough forms.
- Incorporate Pecans: Fold in the finely chopped pecans, making sure they’re evenly distributed throughout the dough.
- Shape the Cookies: Using your hands, roll the dough into small balls, approximately 1 inch in diameter. Place them on a baking sheet lined with parchment paper, leaving some space between each ball.
- Bake the Cookies: Place the baking sheet in the preheated oven and bake for 15-18 minutes, or until the bottoms are lightly golden. The tops of the cookies should remain pale.
- Cool and Coat with Sugar: Allow the cookies to cool for about 5 minutes on the baking sheet. While they’re still warm, roll them in powdered sugar to coat them thoroughly.
- Final Coating: Once the cookies are completely cool, roll them in powdered sugar once more to guarantee they’ve a generous coating.
Extra Tips: For the best texture, make sure your butter is at room temperature before starting the recipe. You can also experiment with different nuts if pecans aren’t your preference; walnuts or almonds can be great alternatives. If you like a bit of spice, a pinch of cinnamon added to the dough can enhance the holiday flavor.
Store the cookies in an airtight container to keep them fresh, and if they lose their powdered sugar coating over time, simply roll them in more sugar before serving.
Red Velvet Mini Bundt Cakes
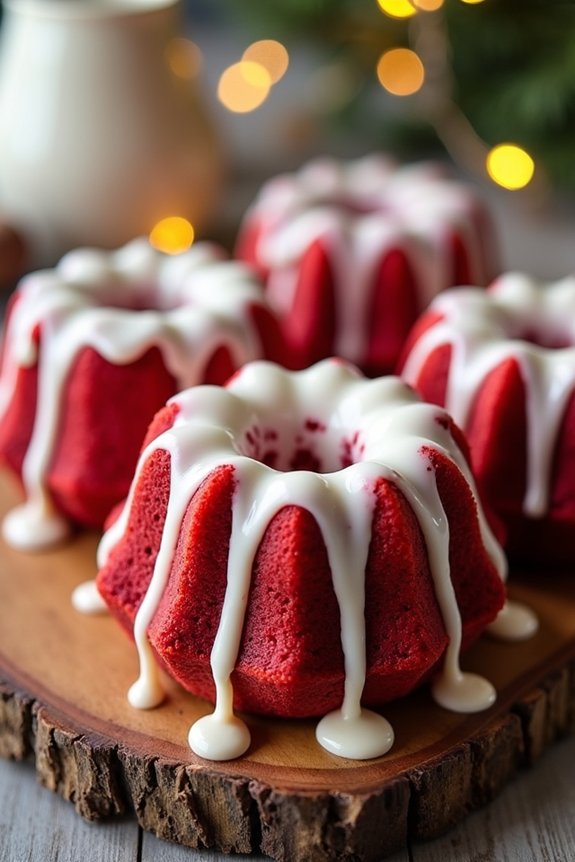
Red Velvet Mini Bundt Cakes are a delightful addition to any Christmas party, offering a luxurious and festive treat that’s sure to impress your guests. These mini cakes combine the rich flavors of cocoa and vanilla with a striking red hue, creating a visually stunning and delicious dessert.
The mini bundt shape adds an elegant touch, making them perfect for individual servings at your holiday gathering. Topped with a smooth cream cheese glaze, these cakes are both beautiful and delectable.
Perfect for a serving size of 4-6 people, this recipe will yield approximately 8-10 mini bundt cakes, depending on the size of your molds. These little cakes aren’t only easy to make but also bring a touch of sophistication to your dessert table.
Whether you’re an experienced baker or a beginner, this recipe is simple to follow and guarantees a delightful outcome every time. Serve them to your family and friends, and watch as they disappear in no time.
Ingredients:
- 1 1/2 cups all-purpose flour
- 1 cup granulated sugar
- 1 tablespoon unsweetened cocoa powder
- 1/2 teaspoon baking soda
- 1/2 teaspoon salt
- 1 large egg
- 1/2 cup vegetable oil
- 1/2 cup buttermilk
- 1 tablespoon red food coloring
- 1 teaspoon vanilla extract
- 1 teaspoon white vinegar
- 1/4 cup unsalted butter, softened
- 4 ounces cream cheese, softened
- 1 1/2 cups powdered sugar
- 1/2 teaspoon vanilla extract
Cooking Instructions:
- Preheat and Prepare: Preheat your oven to 350°F (175°C). Grease your mini bundt pans with butter or non-stick spray to guarantee the cakes release easily after baking.
- Mix Dry Ingredients: In a medium bowl, sift together the flour, cocoa powder, baking soda, and salt. Set aside.
- Combine Wet Ingredients: In a large bowl, beat the egg and sugar together until light and fluffy. Gradually add the oil, buttermilk, red food coloring, and vanilla extract, mixing until well combined.
- Incorporate Dry and Wet Mixtures: Slowly add the dry ingredients to the wet mixture, stirring gently until just combined. Be careful not to overmix, as this can result in dense cakes.
- Add Vinegar: Stir in the white vinegar, which will help to enhance the cake’s texture and color.
- Fill and Bake: Pour the batter into the prepared mini bundt pans, filling each cavity about two-thirds full to allow room for rising. Bake in the preheated oven for 18-20 minutes, or until a toothpick inserted into the center comes out clean.
- Cool: Let the cakes cool in the pans for about 10 minutes before transferring them to a wire rack to cool completely.
- Make the Glaze: In a medium bowl, beat together the softened butter and cream cheese until smooth. Gradually add the powdered sugar and vanilla extract, mixing until the glaze is smooth and creamy.
- Glaze the Cakes: Once the cakes are completely cool, drizzle the cream cheese glaze over the top of each bundt cake. Allow the glaze to set slightly before serving.
Extra Tips:
For the best results, confirm all your ingredients are at room temperature before you start baking, as this helps them blend together more smoothly.
If you don’t have mini bundt pans, you can use a muffin tin instead; just adjust the baking time accordingly. Additionally, if you prefer a more intense red color, feel free to add a few extra drops of food coloring.
These cakes can be made a day in advance and stored in an airtight container, making them a convenient option for busy holiday preparations. Enjoy your Red Velvet Mini Bundt Cakes as a perfect festive treat!
Raspberry Linzer Cookies

Raspberry Linzer Cookies are a delightful and festive treat, perfect for any Christmas party. These classic Austrian cookies are known for their delicate buttery texture and a sweet, tangy raspberry jam filling that peeks through a cut-out on the top cookie layer.
As they’re both beautiful and delicious, Linzer cookies make an elegant addition to any holiday dessert table. The cookies are typically dusted with powdered sugar, adding a snowy finish that’s sure to charm your guests.
This recipe for Raspberry Linzer Cookies serves 4-6 people, making it ideal for small gatherings or as part of a larger holiday spread. The dough is enriched with almond flour, giving the cookies a nutty flavor that complements the raspberry filling perfectly.
With a little patience and care, these cookies are surprisingly easy to make and are sure to impress friends and family alike with their festive appearance and exquisite taste.
Ingredients:
- 1 cup all-purpose flour
- 1/2 cup almond flour
- 1/2 teaspoon ground cinnamon
- 1/4 teaspoon salt
- 1/2 cup unsalted butter, softened
- 1/3 cup granulated sugar
- 1 large egg yolk
- 1 teaspoon vanilla extract
- 1/2 cup raspberry jam
- Powdered sugar for dusting
Instructions:
1. Prepare the Dough: In a medium bowl, whisk together the all-purpose flour, almond flour, ground cinnamon, and salt. In a separate large bowl, beat the softened butter and granulated sugar with an electric mixer on medium speed until light and fluffy, about 3 minutes.
Add the egg yolk and vanilla extract, and beat until well combined.
2. Combine Ingredients: Gradually add the dry ingredients to the butter mixture, mixing until just combined. Form the dough into a ball, wrap it tightly in plastic wrap, and refrigerate for at least 1 hour, or until firm.
3. Roll and Cut the Dough: Preheat your oven to 350°F (175°C). Line two baking sheets with parchment paper. On a lightly floured surface, roll out the chilled dough to about 1/8-inch thickness. Use a round cookie cutter (about 2 1/2 inches in diameter) to cut out cookies.
With a smaller cutter (about 1 inch in diameter), cut out the centers of half of the cookies to create the top layer.
4. Bake the Cookies: Place the cookies on the prepared baking sheets, spacing them about 1 inch apart. Bake for 10-12 minutes, or until the edges are lightly golden.
Remove from the oven and let the cookies cool on the baking sheets for a few minutes before transferring them to a wire rack to cool completely.
5. Assemble the Cookies: Once the cookies are cooled, spread about 1 teaspoon of raspberry jam on the flat side of each whole cookie (without the cut-out). Top with a cookie that has a cut-out center, pressing gently to sandwich them together.
6. Finish and Serve: Dust the assembled cookies with powdered sugar before serving. These cookies can be stored in an airtight container for up to a week.
Extra Tips:
When rolling out the dough, it’s helpful to work in batches and keep the unused dough refrigerated to maintain its firmness. If the dough becomes too sticky, sprinkle a bit of flour on your work surface and rolling pin to prevent sticking.
Additionally, feel free to experiment with other jams or preserves, such as apricot or strawberry, to suit your taste preferences. Enjoy your homemade Raspberry Linzer Cookies as a sweet highlight of your holiday festivities!
Sticky Toffee Pudding
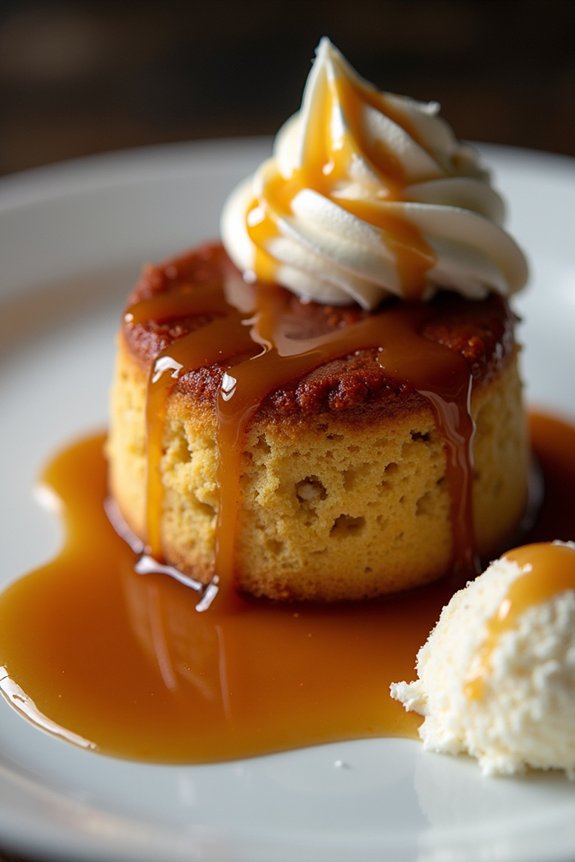
Sticky Toffee Pudding is a classic dessert that’s perfect for your Christmas party. This rich and indulgent dish features a moist, sponge-like cake made with dates, which gives it a unique sweetness and depth of flavor. The cake is then drenched in a luscious toffee sauce, making it an irresistible treat that’s sure to impress your guests.
Whether served warm with a scoop of vanilla ice cream or a dollop of whipped cream, Sticky Toffee Pudding is a comforting end to any festive meal. Originating from the United Kingdom, this dessert has become a beloved favorite around the world. The combination of the warm, spongy cake and the gooey, caramel-like sauce creates a harmonious blend of textures and flavors.
It’s the perfect way to add a touch of traditional charm to your Christmas celebrations. The following recipe serves 4-6 people, ensuring everyone at your gathering can enjoy a slice of this delightful pudding.
Ingredients:
- 200g pitted dates
- 250ml water
- 1 teaspoon baking soda
- 60g unsalted butter, softened
- 150g light brown sugar
- 2 large eggs
- 1 teaspoon vanilla extract
- 175g self-raising flour
- 1/4 teaspoon salt
Toffee Sauce:
- 100g unsalted butter
- 150g dark brown sugar
- 200ml heavy cream
- 1 teaspoon vanilla extract
Cooking Instructions:
- Prepare the Dates: Preheat your oven to 180°C (350°F). Chop the pitted dates and place them in a saucepan with the water. Bring to a boil, then reduce the heat and simmer for about 5 minutes until the dates are soft. Remove from heat and stir in the baking soda. Set aside to cool slightly.
- Make the Batter: In a large mixing bowl, cream together the softened butter and light brown sugar until light and fluffy. Beat in the eggs, one at a time, followed by the vanilla extract. Gradually fold in the self-raising flour and salt. Stir in the cooled date mixture until well combined.
- Bake the Pudding: Pour the batter into a greased baking dish or individual ramekins. Bake in the preheated oven for 25-30 minutes or until a skewer inserted into the center comes out clean.
- Prepare the Toffee Sauce: While the pudding is baking, make the toffee sauce by melting the butter in a saucepan over medium heat. Stir in the dark brown sugar and heavy cream. Bring to a gentle boil, then reduce the heat and simmer for about 5 minutes, stirring occasionally, until the sauce thickens. Stir in the vanilla extract.
- Assemble the Dessert: Once the pudding is baked, remove it from the oven and let it cool slightly. Pour the warm toffee sauce over the pudding, allowing it to soak in. Serve the pudding warm, topped with extra sauce and a scoop of vanilla ice cream or whipped cream if desired.
Extra Tips:
- For a more intense flavor, you can soak the dates in a bit of warm water an hour before cooking to enhance their sweetness.
- Make sure the toffee sauce is richly thick but still pourable. If it becomes too thick, add a little more cream to adjust the consistency.
- This pudding can be made a day in advance; just reheat it gently in the oven before serving. Keep the sauce separate and warm it just before drizzling over the pudding.
Almond Biscotti With White Chocolate Drizzle
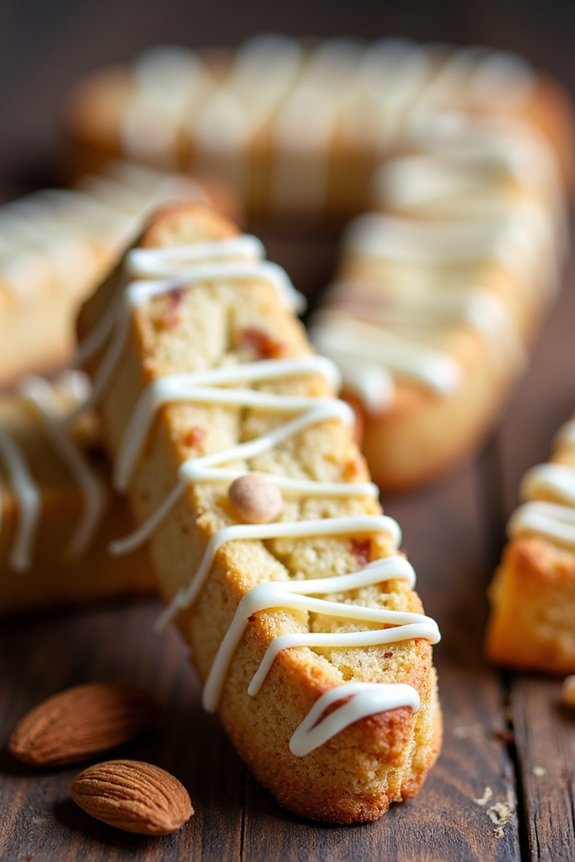
Almond Biscotti With White Chocolate Drizzle is a delightful treat perfect for holiday gatherings. These twice-baked Italian cookies are known for their crunchy texture and rich almond flavor, which pairs beautifully with a sweet white chocolate drizzle. Ideal for serving alongside coffee or tea, these biscotti are sure to impress your guests at your Christmas party.
The process of making Almond Biscotti With White Chocolate Drizzle involves creating a simple dough, which is then shaped into logs and baked until firm. After the first bake, the logs are sliced into individual cookies and baked again to achieve their signature crunch. The final touch is a generous drizzle of melted white chocolate, which adds a touch of elegance and sweetness to each biscotti. This recipe yields approximately 24 biscotti, serving 4-6 people.
Ingredients:
- 2 cups all-purpose flour
- 1 cup granulated sugar
- 1 teaspoon baking powder
- 1/2 teaspoon salt
- 3 large eggs
- 1 teaspoon vanilla extract
- 1 teaspoon almond extract
- 1 cup whole almonds, toasted and coarsely chopped
- 1 cup white chocolate chips (for drizzle)
- 1 tablespoon unsalted butter
Instructions:
- Preheat and Prepare: Preheat your oven to 350°F (175°C). Line a baking sheet with parchment paper or a silicone baking mat.
- Mix Dry Ingredients: In a large bowl, whisk together the flour, sugar, baking powder, and salt until well combined.
- Combine Wet Ingredients: In a separate bowl, beat the eggs, vanilla extract, and almond extract until well mixed.
- Form Dough: Gradually add the wet ingredients to the dry ingredients, stirring until a dough forms. Fold in the chopped almonds until evenly distributed.
- Shape and First Bake: Divide the dough in half and shape each half into a log approximately 12 inches long and 2 inches wide. Place the logs onto the prepared baking sheet and bake for 25-30 minutes, or until firm to the touch and lightly golden.
- Cool and Slice: Allow the logs to cool slightly (about 10 minutes). Using a serrated knife, slice the logs diagonally into 1/2-inch-thick slices.
- Second Bake: Arrange the slices cut-side down on the baking sheet and return to the oven. Bake for an additional 10-15 minutes, flipping halfway through, until the biscotti are golden and crisp.
- Melt Chocolate: In a microwave-safe bowl, combine the white chocolate chips and butter. Microwave in 20-second intervals, stirring between each, until the chocolate is melted and smooth.
- Drizzle and Cool: Drizzle the melted white chocolate over the cooled biscotti using a fork or piping bag. Allow the chocolate to set before serving.
Extra tips: Confirm that the almonds are well toasted before adding them to the dough for an enhanced flavor. When slicing the biscotti, use a sharp serrated knife to maintain clean edges and prevent crumbling. If you’re gifting these biscotti, consider wrapping them in cellophane bags tied with festive ribbons for a charming presentation.
Festive Fruitcake Bites
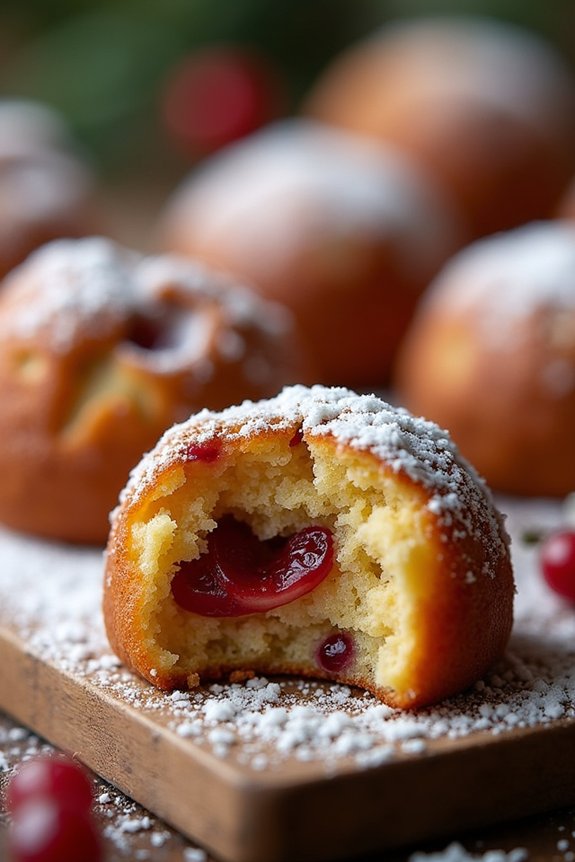
Celebrate the holiday season with these delightful Festive Fruitcake Bites, a modern twist on the traditional fruitcake. Bite-sized and packed with rich flavors, these treats are perfect for sharing at Christmas parties or gifting to loved ones.
Combining dried fruits, nuts, and a hint of spice, these bites aren’t only delicious but also beautifully festive. The recipe is easy to follow and results in a delightful combination of textures and tastes that will surely be a hit at any gathering.
These Festive Fruitcake Bites are designed to serve 4-6 people, making them ideal for intimate gatherings or as a part of a larger dessert spread. They can be made ahead of time, allowing you to focus on other party preparations.
Whether enjoyed with a warm cup of tea or a glass of mulled wine, these bites are sure to bring a touch of holiday cheer to your festivities.
Ingredients:
- 1 cup mixed dried fruits (such as cranberries, raisins, and chopped dried apricots)
- 1/4 cup brandy or orange juice
- 1/2 cup chopped mixed nuts (such as walnuts, pecans, and almonds)
- 1/2 cup all-purpose flour
- 1/4 teaspoon baking powder
- 1/4 teaspoon ground cinnamon
- 1/8 teaspoon ground nutmeg
- 1/8 teaspoon salt
- 1/4 cup unsalted butter, softened
- 1/4 cup brown sugar
- 1 large egg
- 1/2 teaspoon vanilla extract
- Powdered sugar for dusting (optional)
Instructions:
- Prepare the Fruit Mixture: In a small bowl, combine the mixed dried fruits with the brandy or orange juice. Let them soak for at least 30 minutes, allowing the fruits to absorb the liquid and become plump and flavorful.
- Preheat and Prep: Preheat your oven to 350°F (175°C). Line a baking sheet with parchment paper or lightly grease it to prevent sticking.
- Mix Dry Ingredients: In a separate bowl, whisk together the all-purpose flour, baking powder, ground cinnamon, ground nutmeg, and salt. Set aside.
- Cream Butter and Sugar: In a large mixing bowl, cream the softened butter and brown sugar together until light and fluffy. This should take about 3-4 minutes using an electric mixer.
- Add Egg and Vanilla: Beat in the egg and vanilla extract until well incorporated.
- Combine Ingredients: Gradually add the dry ingredients to the butter mixture, stirring until just combined. Be careful not to overmix.
- Fold in Fruits and Nuts: Drain any excess liquid from the soaked fruits and fold them into the batter along with the chopped nuts. Confirm they’re evenly distributed throughout the mixture.
- Shape the Bites: Using a small cookie scoop or a spoon, drop tablespoons of the mixture onto the prepared baking sheet, spacing them about 2 inches apart.
- Bake: Bake in the preheated oven for 12-15 minutes, or until the edges are golden brown and the centers are set.
- Cool and Serve: Allow the fruitcake bites to cool on the baking sheet for a few minutes before transferring them to a wire rack to cool completely. Dust with powdered sugar before serving, if desired.
Extra Tips:
To enhance the flavor, consider letting the dried fruits soak overnight in the brandy or orange juice. This step is optional but adds an extra depth of flavor to your fruitcake bites.
Additionally, you can customize the nuts and dried fruits to your preference or what you have on hand, making this recipe versatile and adaptable.
If storing, keep the bites in an airtight container at room temperature for up to a week, or freeze for longer storage. Enjoy these festive bites as a sweet treat during the holiday season!
Cinnamon Sugar Palmiers
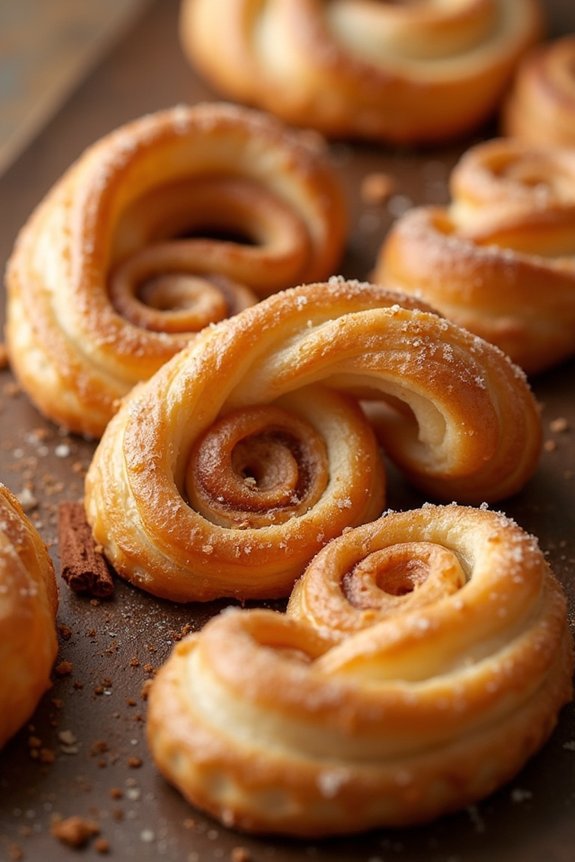
Cinnamon Sugar Palmiers are a delightful and elegant pastry that are perfect for a Christmas party. Originating from France, these pastries are made by rolling up puff pastry with a sweet and spicy cinnamon sugar mixture, then slicing and baking them into delicate, crispy palm leaf shapes. The cinnamon sugar caramelizes during baking, creating a beautiful, golden-brown exterior that’s irresistibly sweet and crunchy.
They aren’t only delicious but also visually appealing, making them a great addition to any festive spread.
The best part about making Cinnamon Sugar Palmiers is their simplicity, as they require only a handful of ingredients and minimal preparation time. Whether you’re an experienced baker or a novice in the kitchen, this recipe is sure to captivate your family and friends. The palmiers are wonderful on their own, or they can be served alongside coffee, tea, or even a scoop of ice cream as a delightful dessert.
Ingredients (serving size: 4-6 people):
- 1 sheet of puff pastry (thawed according to package instructions)
- 1/2 cup granulated sugar
- 1 tablespoon ground cinnamon
- 1/4 cup unsalted butter, melted
- Flour, for dusting
Instructions:
- Preheat the Oven: Preheat your oven to 400°F (200°C). Line a baking sheet with parchment paper to prevent the palmiers from sticking.
- Prepare the Cinnamon Sugar: In a small bowl, mix together the granulated sugar and ground cinnamon until well combined. Set aside.
- Roll Out the Puff Pastry: Lightly dust your work surface with flour. Unfold the thawed puff pastry sheet and use a rolling pin to gently roll it out into a rectangle, approximately 12×12 inches.
- Brush with Butter: Using a pastry brush, evenly spread the melted butter over the entire surface of the puff pastry.
- Sprinkle the Cinnamon Sugar: Generously sprinkle the cinnamon sugar mixture over the buttered pastry, ensuring an even layer across the entire surface.
- Fold and Roll: Starting from one edge of the pastry, gently roll the edge towards the center. Repeat with the opposite edge until both rolls meet in the middle. Press lightly to seal.
- Slice the Palmiers: Using a sharp knife, slice the rolled pastry into 1/2-inch thick pieces. Place each piece cut-side up on the prepared baking sheet, leaving some space between each palmier.
- Bake: Bake in the preheated oven for 12-15 minutes, or until the palmiers are golden brown and the sugar has caramelized. Remove from the oven and allow to cool on the baking sheet for 5 minutes before transferring to a wire rack to cool completely.
Extra Tips:
To guarantee your Cinnamon Sugar Palmiers are perfectly crisp, make sure not to over-bake them, as they can quickly go from golden to burnt.
If you want a more pronounced caramel flavor, you can use brown sugar instead of granulated sugar. Additionally, for a festive twist, consider adding a pinch of nutmeg or cardamom to the cinnamon sugar mixture.
Storing the palmiers in an airtight container will help maintain their crunch for several days, making them a great make-ahead treat for holiday gatherings.
Gingerbread House Cake
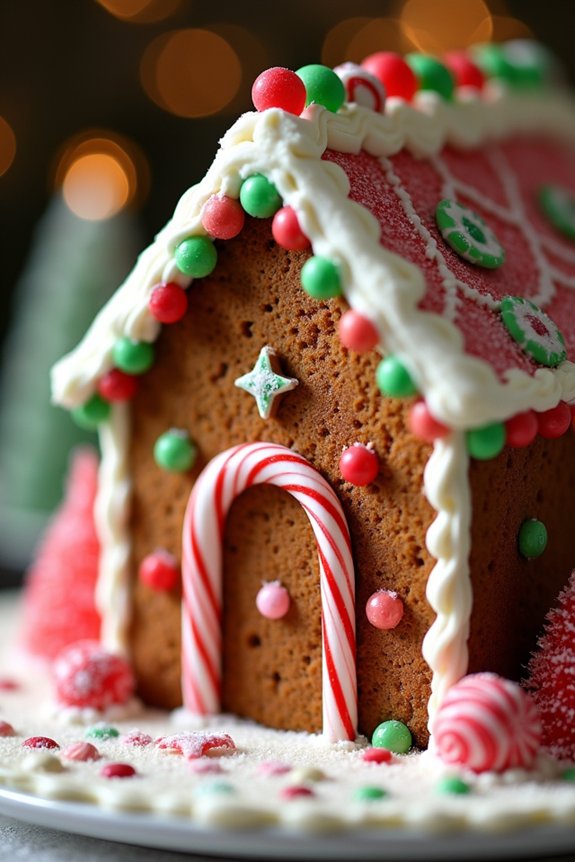
Creating a gingerbread house cake is a delightful way to combine the architectural fun of a gingerbread house with the deliciousness of cake. This whimsical dessert is perfect for a Christmas party, capturing the festive spirit in both appearance and taste.
The cake is built with layers of spiced gingerbread cake and decorated with royal icing and candy to resemble a charming little house. Not only is it a visual treat, but the warm spices and sweet icing will have your guests coming back for more.
This recipe is designed to serve 4-6 people, making it a perfect centerpiece for a small holiday gathering. The gingerbread cake layers are moist and flavorful, with a rich mix of ginger, cinnamon, and cloves.
Once baked and cooled, the cakes are stacked and sculpted into a house shape before being adorned with a snowy coat of icing and an assortment of candies. Follow the instructions closely to construct your own edible masterpiece and enjoy the process of bringing this festive creation to life.
Ingredients:
- 2 cups all-purpose flour
- 1 teaspoon baking soda
- 2 teaspoons ground ginger
- 1 teaspoon ground cinnamon
- 1/2 teaspoon ground cloves
- 1/4 teaspoon salt
- 1/2 cup unsalted butter, softened
- 1/2 cup brown sugar, packed
- 1/2 cup molasses
- 1 large egg
- 1/2 cup buttermilk
- 2 cups powdered sugar
- 1 large egg white
- 1/2 teaspoon cream of tartar
- Assorted candies for decorating (gumdrops, peppermint candies, etc.)
Instructions:
- Preheat and Prepare Pans: Preheat your oven to 350°F (175°C). Grease and flour two 9×9 inch cake pans. This will prevent the cake from sticking and make it easier to remove later.
- Mix Dry Ingredients: In a medium bowl, whisk together the flour, baking soda, ginger, cinnamon, cloves, and salt. This guarantees the spices are evenly distributed throughout the cake.
- Cream Butter and Sugar: In a large bowl, beat the butter and brown sugar together until light and fluffy. This should take about 3 minutes. Add the molasses and egg, beating until fully combined.
- Combine Wet and Dry Ingredients: Gradually add the dry ingredients to the butter mixture, alternating with the buttermilk. Begin and end with the dry ingredients, mixing until just combined after each addition.
- Bake the Cakes: Divide the batter evenly between the prepared pans. Bake for 25-30 minutes, or until a toothpick inserted into the center comes out clean. Allow the cakes to cool in the pans for 10 minutes, then turn them out onto a wire rack to cool completely.
- Prepare Royal Icing: In a clean bowl, beat the powdered sugar, egg white, and cream of tartar together until stiff peaks form. This icing will act as the “glue” for your gingerbread house.
- Assemble the House: Once the cakes are completely cool, cut them into desired shapes to form the walls and roof of the house. Use the royal icing to assemble the pieces, holding them in place until the icing sets.
- Decorate: Use the remaining royal icing to decorate the house, adding candies to create doors, windows, and other festive details. Let your creativity shine!
Extra Tips:
To confirm your gingerbread house cake stands securely, make sure the icing is thick and sets well before adding heavy candies.
It’s helpful to let the structure sit for a couple of hours to firm up before serving. If you’re short on time, you can prepare the cake layers a day in advance and assemble the house the following day.
Additionally, use a serrated knife to carefully trim and shape the cake pieces for a cleaner finish. Enjoy the process and don’t worry about imperfections—your gingerbread house cake will be charmingly unique!