

There’s something so special about Christmas tree cookies. They bring back memories of festive gatherings filled with laughter and joy. Picture a table adorned with these charming treats, each one a little masterpiece. From classic sugar cookies with vibrant icing to the fragrant warmth of spiced gingerbread, there’s a flavor for every holiday craving. Let’s explore these delightful creations together!
Classic Sugar Christmas Tree Cookies

Classic Sugar Christmas Tree Cookies are a delightful treat that embodies the spirit of the holiday season. These cookies not only taste delicious but also add a festive touch to any holiday gathering. With their buttery flavor and crisp texture, they’re a perfect addition to your Christmas cookie platter. Decorate them simply with colored sugar or go all out with intricate icing designs to make them the centerpiece of your holiday dessert table.
Making Classic Sugar Christmas Tree Cookies is a fun activity that can be enjoyed with family and friends. The recipe is straightforward and involves basic ingredients that are likely already in your pantry. Once baked, these cookies can be stored for several days, making them a convenient option for holiday gifting or for keeping on hand for unexpected guests. Follow this recipe to create a batch of 24 cookies that will delight everyone who tastes them.
Ingredients (for a serving size of 4-6 people):
- 1 cup unsalted butter, softened
- 1 cup granulated sugar
- 1 large egg
- 1 teaspoon vanilla extract
- 2 ½ cups all-purpose flour
- 1 teaspoon baking powder
- ½ teaspoon salt
- Colored sugar or icing for decorating
Instructions:
- Prepare the Dough: In a large mixing bowl, cream together the softened butter and granulated sugar until light and fluffy. This should take about 2-3 minutes using an electric mixer at medium speed.
- Add Egg and Vanilla: Beat in the egg and vanilla extract until well combined. Confirm the mixture is smooth and homogenous.
- Mix Dry Ingredients: In a separate bowl, whisk together the all-purpose flour, baking powder, and salt. Gradually add these dry ingredients to the wet mixture, mixing on low speed until a dough forms.
- Chill the Dough: Divide the dough in half, shape into disks, and wrap in plastic wrap. Refrigerate for at least 1 hour or until firm enough to roll.
- Preheat Oven and Prepare Baking Sheets: Preheat your oven to 350°F (175°C). Line baking sheets with parchment paper.
- Roll and Cut the Dough: On a floured surface, roll out one disk of dough to about 1/4 inch thickness. Use a Christmas tree-shaped cookie cutter to cut out cookies and place them on the prepared baking sheets, spacing them about 1 inch apart.
- Bake the Cookies: Bake in the preheated oven for 8-10 minutes, or until the edges are lightly golden. Remove from the oven and let the cookies cool on the baking sheets for 5 minutes before transferring them to wire racks to cool completely.
- Decorate: Once cooled, decorate the cookies with colored sugar or icing as desired. Allow any icing to set before serving or storing.
Extra Tips:
For a more pronounced vanilla flavor, you can add an extra half teaspoon of vanilla extract. If you prefer a softer cookie, reduce the baking time slightly and keep an eye on the cookies to prevent over-browning. When decorating with icing, confirm the cookies are completely cool to prevent the icing from melting. Store decorated cookies in an airtight container at room temperature to maintain their crispness and flavor.
Chocolate-Dipped Christmas Tree Cookies
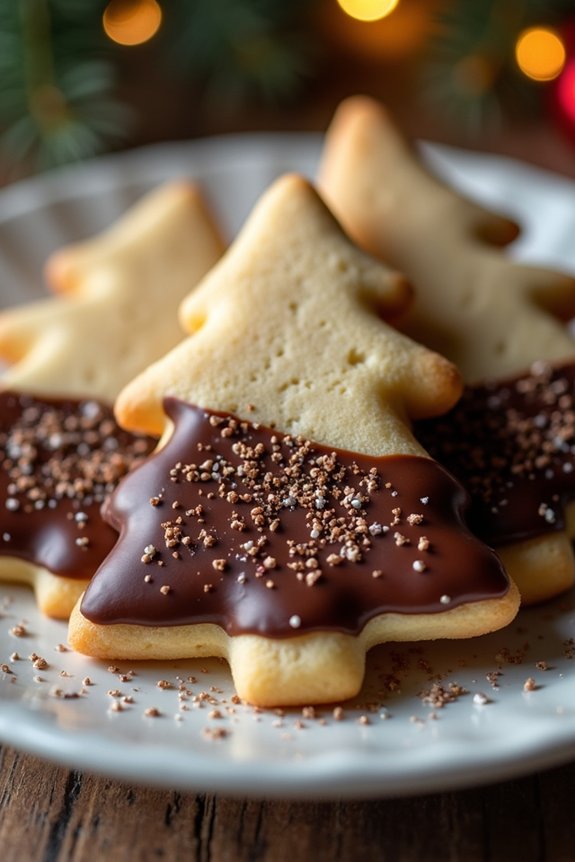
Chocolate-Dipped Christmas Tree Cookies are a delightful holiday treat that combines the classic flavors of sugar cookies with the rich taste of chocolate. These cookies aren’t only delicious but also visually appealing, making them a perfect addition to your holiday dessert table. The charming tree shapes are fun to decorate, allowing you to get creative with your festive designs.
Whether you’re making them with family or for a holiday party, these cookies are sure to spread joy and cheer with every bite. The recipe is designed to serve 4-6 people, making it ideal for a small gathering or as a cozy family treat. The ingredients are simple and readily available, guaranteeing that you can whip up a batch with minimal fuss.
The process involves making a classic sugar cookie dough, cutting it into tree shapes, and then dipping the cooled cookies into melted chocolate. You can personalize them with sprinkles or edible glitter for an extra festive touch. Here’s everything you need to make these delightful cookies:
Ingredients:
- 1 cup unsalted butter, softened
- 1 cup granulated sugar
- 1 large egg
- 1 teaspoon vanilla extract
- 1/4 teaspoon almond extract
- 2 1/2 cups all-purpose flour
- 1 teaspoon baking powder
- 1/2 teaspoon salt
- 8 ounces semi-sweet chocolate, chopped
- 1 tablespoon shortening
- Sprinkles or edible glitter (optional)
Instructions:
- Prepare the Dough: In a large bowl, cream together the softened butter and granulated sugar until light and fluffy. Add the egg, vanilla extract, and almond extract, mixing until combined. In another bowl, whisk together the flour, baking powder, and salt. Gradually add the dry ingredients to the wet ingredients, mixing until a dough forms.
- Chill the Dough: Divide the dough into two equal portions, flatten into disks, and wrap each in plastic wrap. Refrigerate for at least 1 hour or until firm.
- Preheat and Roll Out: Preheat your oven to 350°F (175°C). On a lightly floured surface, roll out one disk of dough to about 1/4 inch thickness. Keep the other disk in the fridge until ready to use.
- Cut and Bake: Using a tree-shaped cookie cutter, cut out cookies and place them on a baking sheet lined with parchment paper. Bake for 8-10 minutes or until the edges are lightly golden. Cool on a wire rack.
- Melt the Chocolate: In a microwave-safe bowl, combine the chopped chocolate and shortening. Microwave in 30-second intervals, stirring in between, until smooth and melted.
- Dip and Decorate: Once the cookies are completely cooled, dip the top half of each cookie into the melted chocolate, allowing any excess to drip off. Place on a parchment-lined tray and sprinkle with your choice of decorative sprinkles or edible glitter before the chocolate sets.
- Set and Serve: Allow the chocolate to set completely at room temperature or in the refrigerator for quicker results. Serve these delightful cookies on a festive platter.
Extra Tips:
When rolling out the dough, make sure it’s cold but pliable to prevent sticking and maintain the shape of the cookies. If the dough becomes too soft while cutting shapes, return it to the fridge to re-chill.
Using shortening in the chocolate helps create a smooth, glossy finish that sets beautifully. Feel free to experiment with different types of chocolate or festive decorations to suit your taste and holiday theme. Enjoy the baking process and let your creativity shine!
Vegan Christmas Tree Cookies

Vegan Christmas Tree Cookies are a delightful and festive treat that will add a touch of holiday spirit to your celebrations. These cookies aren’t only visually appealing but also delicious, filled with the flavors of the season. With a perfect balance of sweetness and spice, these cookies are ideal for sharing with friends and family during holiday gatherings.
As they’re vegan, they cater to a wide range of dietary preferences without compromising on taste or texture. Creating these Vegan Christmas Tree Cookies is a fun holiday activity that involves simple ingredients and straightforward steps. The cookie dough is easy to work with, making it perfect for cutting out festive tree shapes.
Once baked, the cookies are decorated with vibrant, plant-based icing that captures the essence of Christmas. Whether you’re an experienced baker or a novice, this recipe will guide you through the process of making beautiful and delicious vegan cookies that everyone will love.
Ingredients (Serves 4-6):
- 2 cups all-purpose flour
- 1/2 cup granulated sugar
- 1/2 cup vegan butter, softened
- 1/4 cup almond milk
- 1 teaspoon vanilla extract
- 1 teaspoon baking powder
- 1/2 teaspoon ground cinnamon
- 1/4 teaspoon salt
- Green food coloring (vegan)
- Vegan icing or royal icing for decoration
- Optional: Sprinkles or edible glitter for decoration
Instructions:
- Prepare the Dough: In a large mixing bowl, cream together the softened vegan butter and granulated sugar until light and fluffy. This should take about 2-3 minutes with an electric mixer. Then, add the almond milk and vanilla extract, mixing until well combined.
- Combine Dry Ingredients: In a separate bowl, whisk together the all-purpose flour, baking powder, ground cinnamon, and salt. Gradually add the dry ingredients to the wet mixture, stirring until a dough begins to form.
- Add Food Coloring: Once the dough has formed, knead in a few drops of green food coloring until you achieve the desired shade of green. Be careful not to over-knead, as this may affect the texture.
- Chill the Dough: Wrap the dough in plastic wrap and refrigerate for at least 30 minutes. This will make it easier to roll out and cut into shapes.
- Preheat the Oven: Preheat your oven to 350°F (175°C) and line a baking sheet with parchment paper.
- Roll and Cut: On a lightly floured surface, roll out the chilled dough to about 1/4 inch thickness. Use a tree-shaped cookie cutter to cut out shapes and place them on the prepared baking sheet.
- Bake the Cookies: Bake the cookies in the preheated oven for 10-12 minutes, or until the edges are lightly golden. Remove from the oven and let them cool completely on a wire rack.
- Decorate: Once the cookies are cooled, use vegan icing or royal icing to decorate your Christmas tree cookies. Add sprinkles or edible glitter for extra sparkle if desired.
Extra Tips: For the best results, make sure that the vegan butter is softened to room temperature before beginning the recipe. This will help in achieving the right consistency for the dough.
If you’re using homemade or store-bought icing, make sure it’s plant-based to keep the recipe fully vegan. Additionally, feel free to adjust the amount of food coloring to your preference, and remember that the cookies will slightly darken as they bake. Happy holiday baking!
Gluten-Free Christmas Tree Cookies

Indulge in the holiday spirit with these delightful Gluten-Free Christmas Tree Cookies. Perfect for those who are gluten-sensitive or simply opting for a gluten-free diet, these cookies capture the essence of Christmas with their festive shapes and irresistible taste.
Made with a blend of gluten-free flour and other wholesome ingredients, these cookies aren’t only safe to eat for those with gluten allergies but also a treat for everyone at your holiday gathering.
These charming cookies are easy to make and can be decorated in a myriad of ways to suit your holiday festivities. Whether you like them simply dusted with sugar or intricately iced, these cookies are sure to add joy to your holiday celebrations. The recipe serves 4 to 6 people, making it perfect for family gatherings or small holiday parties.
Ingredients (for 4-6 servings):
- 2 cups gluten-free all-purpose flour
- 1 teaspoon baking powder
- 1/4 teaspoon salt
- 1/2 cup unsalted butter, softened
- 3/4 cup granulated sugar
- 1 large egg
- 1 teaspoon vanilla extract
- 1/2 teaspoon almond extract (optional)
- Green food coloring (optional)
- Assorted sprinkles, icing, or colored sugar for decoration
Cooking Instructions:
- Preheat the Oven: Start by preheating your oven to 350°F (175°C). Line two baking sheets with parchment paper to prevent the cookies from sticking.
- Prepare the Dry Ingredients: In a medium bowl, whisk together the gluten-free all-purpose flour, baking powder, and salt. Set aside.
- Cream the Butter and Sugar: In a large mixing bowl, cream the softened butter and granulated sugar together until light and fluffy. This should take about 2-3 minutes with an electric mixer on medium speed.
- Add the Egg and Extracts: Beat in the egg, vanilla extract, and almond extract (if using) until well combined. If you want your cookies to have a green hue, add a few drops of green food coloring and mix until the color is evenly distributed.
- Combine the Mixtures: Gradually add the dry ingredients to the wet ingredients, mixing on low speed until a smooth dough forms.
- Roll Out the Dough: Place the dough between two sheets of parchment paper and roll it out to about 1/4 inch thickness. This will prevent the dough from sticking to the rolling pin.
- Cut Out the Cookies: Use Christmas tree-shaped cookie cutters to cut out shapes from the rolled dough. Transfer the cookies to the prepared baking sheets, leaving a little space between each one.
- Bake the Cookies: Bake in the preheated oven for 8-10 minutes, or until the edges are lightly golden. Be careful not to overbake as gluten-free cookies can become dry quickly.
- Cool and Decorate: Allow the cookies to cool on the baking sheets for a few minutes before transferring them to wire racks to cool completely. Once cool, decorate with icing, sprinkles, or colored sugar as desired.
Extra Tips:
For best results, make sure all your ingredients are at room temperature before beginning the recipe. This helps the dough come together more smoothly.
If the dough feels too sticky, chill it in the refrigerator for about 30 minutes before rolling it out. When decorating, let your creativity shine—use a variety of icing colors and sprinkles to make each cookie unique.
Store the decorated cookies in an airtight container to keep them fresh throughout the holiday season.
Spiced Gingerbread Christmas Tree Cookies

Spiced Gingerbread Christmas Tree Cookies are a delightful treat that encapsulates the warmth and joy of the holiday season. These cookies aren’t only delicious but also fun to make and decorate with family and friends. The aroma of ginger, cinnamon, and cloves will fill your kitchen, creating the perfect festive atmosphere.
The recipe yields beautifully shaped cookies that can be decorated with icing to resemble charming little Christmas trees. This recipe serves 4-6 people, making it ideal for a small gathering or family celebration. The cookies have a rich, spiced flavor that pairs wonderfully with hot cocoa or a glass of milk.
The dough is easy to work with, and the decorating process allows for creativity, making these cookies a perfect activity for all ages during the holiday season.
Ingredients:
- 3 cups all-purpose flour
- 3/4 cup packed dark brown sugar
- 3/4 cup unsalted butter, softened
- 1/2 cup molasses
- 1 large egg
- 1 teaspoon baking soda
- 1 tablespoon ground ginger
- 1 tablespoon ground cinnamon
- 1/2 teaspoon ground cloves
- 1/2 teaspoon salt
- Royal icing, for decorating
- Assorted sprinkles and edible decorations
Cooking Instructions:
- Prepare the Dough: In a large mixing bowl, combine the flour, ginger, cinnamon, cloves, and salt. In another bowl, beat the butter and brown sugar until fluffy. Add the egg and molasses, mixing until well combined. Gradually add the dry ingredients to the wet mixture, mixing until a dough forms.
- Chill the Dough: Divide the dough into two portions, wrap them in plastic wrap, and refrigerate for at least 1 hour. This will make the dough easier to roll out.
- Preheat and Prepare the Baking Sheet: Preheat your oven to 350°F (175°C). Line a baking sheet with parchment paper.
- Roll and Cut the Dough: On a lightly floured surface, roll out the dough to about 1/4 inch thickness. Use a Christmas tree cookie cutter to cut out the shapes and place them on the prepared baking sheet.
- Bake the Cookies: Bake the cookies in the preheated oven for 8-10 minutes or until the edges are firm. Allow them to cool on the baking sheet for a few minutes before transferring them to a wire rack to cool completely.
- Decorate the Cookies: Once the cookies are completely cool, use royal icing to decorate the cookies. Add sprinkles and other edible decorations as desired.
Extra Tips:
When making Spiced Gingerbread Christmas Tree Cookies, it’s important to ascertain the dough is well-chilled before rolling it out. This prevents the cookies from spreading too much during baking.
Additionally, if you plan to hang the cookies as ornaments, remember to poke a small hole near the top of each tree before baking. Then, once decorated and dry, thread a ribbon through the hole for hanging. Enjoy the process of decorating, and don’t hesitate to involve kids; it makes for a joyful holiday activity.
Lemon-Drizzle Christmas Tree Cookies

Lemon-Drizzle Christmas Tree Cookies are a delightful treat that pairs the festive spirit of the holiday season with the invigorating taste of lemon. These cookies aren’t only fun to make but also add a vibrant flavor to your holiday cookie platter. Perfect for family gatherings or as a homemade gift, they’re sure to impress with their unique shape and delicious drizzle.
Crafting these cookies involves a simple sugar cookie base with a hint of lemon zest, which is then shaped into charming Christmas tree silhouettes. Once baked to a golden perfection, they’re topped with a sweet and tangy lemon drizzle, adding a burst of flavor that complements the buttery cookie perfectly. This recipe yields approximately 24 cookies, making it ideal for serving 4-6 people.
Ingredients:
- 2 1/2 cups all-purpose flour
- 1/2 teaspoon baking powder
- 1/4 teaspoon salt
- 1 cup unsalted butter, softened
- 3/4 cup granulated sugar
- 1 large egg
- 1 teaspoon vanilla extract
- Zest of 1 lemon
- 1 cup powdered sugar
- 2 tablespoons fresh lemon juice
- Green food coloring (optional)
- Sprinkles or edible decorations (optional)
Instructions:
- Prepare the Dough: In a medium bowl, whisk together the all-purpose flour, baking powder, and salt. In a separate large bowl, beat the softened butter and granulated sugar together until light and fluffy. Mix in the egg, vanilla extract, and lemon zest until well combined.
- Combine Ingredients: Gradually add the dry ingredients to the wet ingredients, mixing until a dough forms. If the dough is too sticky, add a little more flour, one tablespoon at a time.
- Chill the Dough: Divide the dough into two disks, wrap each in plastic wrap, and refrigerate for at least 1 hour. This will make the dough easier to roll out and cut.
- Preheat and Prepare: Preheat your oven to 350°F (175°C). Line two baking sheets with parchment paper.
- Roll and Cut: On a lightly floured surface, roll out the dough to about 1/4-inch thickness. Use a Christmas tree-shaped cookie cutter to cut out the cookies, placing them on the prepared baking sheets about 1 inch apart.
- Bake the Cookies: Bake for 10-12 minutes, or until the edges are lightly golden. Remove from the oven and allow the cookies to cool on the baking sheet for 5 minutes before transferring to a wire rack to cool completely.
- Make the Lemon Drizzle: In a small bowl, whisk together the powdered sugar and fresh lemon juice until smooth. If desired, add a few drops of green food coloring to the drizzle for a festive touch.
- Decorate the Cookies: Once the cookies are completely cool, drizzle the lemon icing over the tops using a spoon or piping bag. Decorate with sprinkles or edible decorations as desired. Allow the icing to set before serving.
Extra Tips:
For best results, make sure all your ingredients are at room temperature before starting. This helps the ingredients mix together more smoothly, resulting in a more uniform dough.
If you want to add a bit more zest to the cookies, consider using a lemon-flavored extract in place of some or all of the vanilla extract.
When rolling out the dough, work quickly to prevent it from becoming too soft. If it does get too warm, simply return it to the fridge for a few minutes.
Finally, store any leftover cookies in an airtight container to keep them fresh and delicious.
Peanut Butter Christmas Tree Cookies

Peanut Butter Christmas Tree Cookies are a delightful holiday treat that combines the rich, creamy taste of peanut butter with the festive spirit of Christmas. These cookies are perfect for holiday gatherings, cookie exchanges, or simply as a sweet treat for you and your family. The shape of a Christmas tree adds a fun and festive touch, making them a hit among both kids and adults.
With just the right amount of sweetness and the classic peanut butter flavor we all love, these cookies are bound to become a family favorite during the holiday season.
These cookies are easy to make and require only a few simple ingredients that you may already have in your pantry. The dough is easy to work with and can be prepared in advance, which is always a plus during the busy holiday season. Once baked, these cookies can be decorated with festive sprinkles or icing to make them even more special.
This recipe serves 4-6 people, making it perfect for a small family gathering or a cozy holiday evening.
Ingredients (serves 4-6):
- 1 cup creamy peanut butter
- 1 cup granulated sugar
- 1 large egg
- 1 teaspoon vanilla extract
- 1/2 teaspoon baking soda
- 1/4 teaspoon salt
- 1/2 cup all-purpose flour
- Green food coloring (optional)
- Assorted holiday sprinkles or colored sugar for decoration
Instructions:
- Preheat the Oven: Begin by preheating your oven to 350°F (175°C). This guarantees that the cookies bake evenly.
- Mix Ingredients: In a large mixing bowl, combine the peanut butter, sugar, egg, and vanilla extract. Use a hand mixer or a sturdy spoon to mix until the ingredients are well combined.
- Incorporate Dry Ingredients: Add the baking soda, salt, and flour to the wet mixture. Stir until the dough forms. If you want green cookies, add a few drops of green food coloring until you reach your desired shade.
- Shape the Cookies: Roll the dough into small balls, about 1 inch in diameter. Place them on a baking sheet lined with parchment paper, spacing them about 2 inches apart.
- Create the Tree Shape: Using your fingers or a fork, gently press each ball into a triangular shape resembling a Christmas tree. If desired, use a knife to create small indents to mimic tree branches.
- Decorate: Sprinkle the shaped cookies with assorted holiday sprinkles or colored sugar to give them a festive look.
- Bake: Place the baking sheet in the preheated oven and bake for 10-12 minutes, or until the edges are lightly golden. Be careful not to overbake, as they’ll continue to firm up as they cool.
- Cool and Serve: Allow the cookies to cool on the baking sheet for about 5 minutes before transferring them to a wire rack to cool completely. Once cooled, they’re ready to be served or stored for later enjoyment.
Extra Tips:
For best results, use creamy peanut butter to achieve a smooth dough consistency. If you prefer chunkier cookies, you can substitute half of the peanut butter with chunky peanut butter for added texture.
Additionally, if you plan to store these cookies, keep them in an airtight container to maintain their freshness. Decorating these cookies can be a fun family activity, so feel free to get creative with different colors and types of sprinkles!
No-Bake Christmas Tree Cookies

The holiday season is a time for festive treats and delightful desserts, and nothing says Christmas quite like No-Bake Christmas Tree Cookies. Perfect for those who want to enjoy the holiday spirit without spending hours in the kitchen, these cookies aren’t only easy to make but also a fun activity for the whole family.
With their vibrant green color and festive decorations, these cookies will surely be a hit at your holiday gatherings, and the best part is, there’s no need for an oven!
This recipe is ideal for serving a group of 4-6 people, making it perfect for family get-togethers or small holiday parties. The base of the cookies is made with rice cereal, giving them a delightful crunch, while marshmallows and butter bind everything together. A touch of green food coloring transforms the mixture into a festive canvas, ready to be decorated with candies and sprinkles to resemble adorable Christmas trees.
Ingredients:
- 3 tablespoons unsalted butter
- 4 cups mini marshmallows
- 6 cups crispy rice cereal
- 1 teaspoon vanilla extract
- Green food coloring
- Assorted small candies and sprinkles for decoration
- Pretzel sticks (optional, for tree trunks)
Instructions:
- Melt the Butter and Marshmallows: In a large saucepan over medium heat, melt the butter. Once the butter is melted, add the mini marshmallows and stir continuously until they’re completely melted and the mixture is smooth.
- Add Vanilla and Food Coloring: Remove the saucepan from heat and stir in the vanilla extract. Next, add green food coloring a few drops at a time, stirring until the desired shade of green is achieved.
- Combine with Rice Cereal: Pour the melted marshmallow mixture over the crispy rice cereal in a large bowl. Stir until the cereal is evenly coated with the green marshmallow mixture.
- Shape the Trees: Using your hands, shape the mixture into small tree shapes. It’s helpful to lightly coat your hands with butter or cooking spray to prevent sticking. Press a pretzel stick into the bottom of each tree to serve as the trunk, if desired.
- Decorate the Trees: Once the trees are shaped, decorate them with assorted candies and sprinkles. Press the decorations lightly into the surface so they stick.
- Set and Serve: Allow the cookies to set for about 15-20 minutes before serving. They can be stored in an airtight container at room temperature for up to a week.
Extra Tips: When shaping the trees, work quickly as the mixture can become sticky and harder to shape as it cools. If you find the mixture is sticking to your hands, reapply butter or cooking spray as needed.
Feel free to get creative with the decorations—use whatever candies and sprinkles you have on hand to personalize your Christmas trees. These cookies aren’t only a treat to eat but also a fun craft to make with kids, so let your imaginations run wild!
Decorated Royal Icing Christmas Tree Cookies

Decorated Royal Icing Christmas Tree Cookies are a delightful holiday treat that combines the classic sugar cookie with beautifully piped royal icing decorations, forming a festive and sweet addition to your holiday dessert spread.
Whether you’re baking these cookies as a family activity, for a holiday party, or as a gift, their vibrant and cheerful appearance is sure to bring joy to everyone who sees and tastes them. The crisp texture of the cookies pairs perfectly with the smooth and sweet royal icing, making them an irresistible treat for both kids and adults alike.
These cookies aren’t only visually appealing but also fun to make! The process of decorating each cookie with royal icing allows for creativity and personalization, making it a wonderful activity to share with loved ones.
Plus, the cookies can be made in advance and stored, making them a convenient option for the busy holiday season. Follow this recipe to create approximately 4 to 6 servings of these delightful Decorated Royal Icing Christmas Tree Cookies.
Ingredients:
For the Cookies:
- 2 ¾ cups all-purpose flour
- 1 teaspoon baking powder
- ½ teaspoon salt
- 1 cup unsalted butter, softened
- 1 cup granulated sugar
- 1 large egg
- 1 teaspoon vanilla extract
- ½ teaspoon almond extract
For the Royal Icing:
- 3 cups powdered sugar
- 2 large egg whites or 5 tablespoons meringue powder
- 1 teaspoon vanilla extract
- Gel food coloring (green, red, and other desired colors)
- Assorted sprinkles and edible decorations
Instructions:
- Prepare the Cookie Dough: In a large bowl, whisk together the all-purpose flour, baking powder, and salt. In another bowl, use an electric mixer to cream the softened butter and granulated sugar until light and fluffy. Beat in the egg, vanilla extract, and almond extract until well combined. Gradually add the dry ingredients to the wet ingredients, mixing until a dough forms.
- Chill the Dough: Divide the dough in half, flatten each portion into a disk, and wrap in plastic wrap. Refrigerate for at least 1 hour or until firm.
- Preheat the Oven: Preheat your oven to 350°F (175°C) and line baking sheets with parchment paper.
- Roll Out and Cut the Cookies: Roll out the chilled dough on a lightly floured surface to about ¼ inch thickness. Use Christmas tree-shaped cookie cutters to cut out shapes. Place the cookies on the prepared baking sheets, about 1 inch apart.
- Bake the Cookies: Bake in the preheated oven for 8-10 minutes or until the edges are lightly golden. Remove from oven and allow the cookies to cool on the baking sheets for 5 minutes before transferring to a wire rack to cool completely.
- Make the Royal Icing: In a large bowl, combine the powdered sugar, egg whites (or meringue powder and water), and vanilla extract. Beat until the icing is thick and glossy. Divide the icing into separate bowls and add desired gel food coloring to each portion.
- Decorate the Cookies: Transfer the colored icing into piping bags fitted with small round tips. Decorate each cookie with patterns to resemble Christmas trees, using assorted sprinkles and edible decorations as desired. Allow the icing to set completely before serving or storing.
Extra Tips:
When working with royal icing, maintaining the right consistency is key. If the icing is too thick, add a few drops of water to thin it out; if too thin, add more powdered sugar.
To make the process of decorating easier, practice piping on a piece of parchment paper before moving on to the cookies. Store decorated cookies in an airtight container at room temperature for up to a week, ensuring they remain fresh and crisp.
If you’re preparing these cookies as a gift, consider packaging them in festive boxes or tins lined with wax paper to keep them intact.
Matcha Green Tea Christmas Tree Cookies
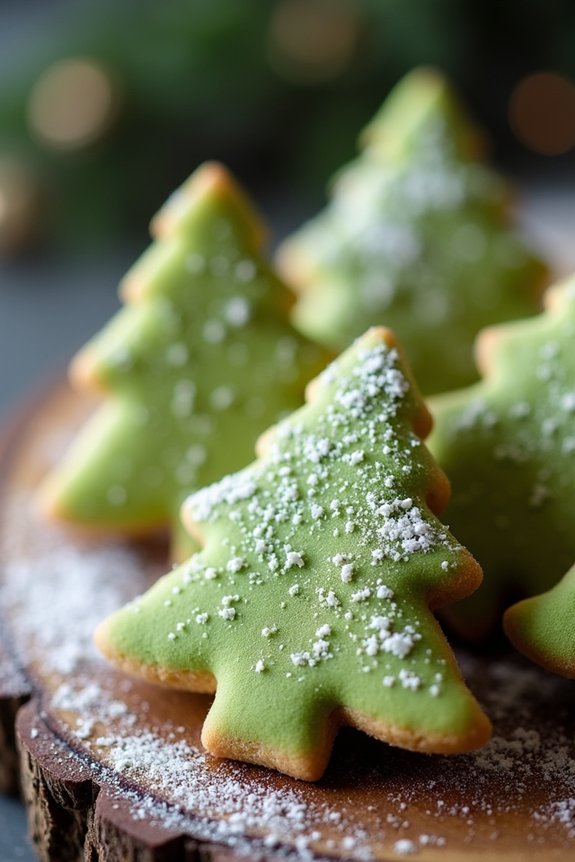
Matcha Green Tea Christmas Tree Cookies are a delightful twist on the traditional holiday cookie, bringing a hint of exotic flavor with the earthy notes of matcha green tea powder. These cookies aren’t only delectable but also visually appealing, with their vibrant green color shaped into festive Christmas trees. Perfect for holiday gatherings, they offer a unique taste experience that will impress your guests and add an elegant touch to your cookie platter.
The combination of matcha and sweet cookie dough creates a harmonious balance, making these cookies a must-try for any matcha lover. They’re also simple to make, allowing you to involve the whole family in the baking process. This recipe yields enough cookies to serve 4-6 people, making it ideal for small holiday gatherings or as a part of a larger dessert spread.
Ingredients (for 4-6 people):
- 2 cups all-purpose flour
- 1 tablespoon matcha green tea powder
- 1/2 teaspoon baking powder
- 1/4 teaspoon salt
- 3/4 cup unsalted butter, softened
- 1 cup granulated sugar
- 1 large egg
- 1 teaspoon vanilla extract
- Green gel food coloring (optional)
- Powdered sugar for dusting
Cooking Instructions:
- Preheat the Oven: Start by preheating your oven to 350°F (175°C). Line two baking sheets with parchment paper to prevent the cookies from sticking.
- Mix Dry Ingredients: In a medium-sized bowl, whisk together the flour, matcha green tea powder, baking powder, and salt. This guarantees that the matcha and leavening are evenly distributed throughout the dough.
- Cream Butter and Sugar: In a large mixing bowl, beat the softened butter and granulated sugar together using a hand mixer or stand mixer on medium speed until the mixture is light and fluffy. This should take about 3-5 minutes.
- Add Egg and Vanilla: Add the egg and vanilla extract to the butter and sugar mixture and beat until well combined. If you prefer a more vibrant green color, you can add a few drops of green gel food coloring at this stage.
- Combine Wet and Dry Ingredients: Gradually add the dry ingredients to the wet mixture, mixing on low speed until a dough forms. Be careful not to overmix, as this can make the cookies tough.
- Shape the Cookies: Roll out the dough on a lightly floured surface to about 1/4-inch thickness. Use a Christmas tree-shaped cookie cutter to cut out the cookies, and place them on the prepared baking sheets.
- Bake the Cookies: Bake in the preheated oven for 10-12 minutes, or until the edges are slightly golden. The cookies will continue to firm up as they cool, so avoid overbaking.
- Cool and Decorate: Let the cookies cool on the baking sheets for a few minutes before transferring them to a wire rack to cool completely. Once cooled, dust them lightly with powdered sugar for a snowy effect.
Extra Tips:
For the best flavor, use high-quality matcha green tea powder. Culinary-grade matcha is usually sufficient for baking, but if you want a brighter color and more pronounced flavor, go for a higher grade.
If the dough feels too sticky, refrigerate it for 15-30 minutes before rolling it out. This will make it easier to handle. Additionally, if you don’t have a Christmas tree cutter, you can freehand cut triangles and add a trunk for a similar effect.
Enjoy your festive and flavorful Matcha Green Tea Christmas Tree Cookies!