

Christmas is the perfect time to indulge in baking, as the kitchen transforms into a cozy retreat filled with warmth and sweet nostalgia. The delightful scent of gingerbread and peppermint wafts through the house, setting a festive mood. Each recipe, from classic sugar cookies to rich chocolate yule logs, offers its own unique charm and cherished memories. There’s something truly special about these comforting treats that I’m excited to share with you. Curious to discover which festive favorites made the list?
Classic Sugar Cookies

The holiday season is the perfect time to indulge in delicious baked goods, and nothing says Christmas quite like a batch of classic sugar cookies. These buttery, sweet treats aren’t only delightful to eat but also a joy to make with family and friends. Their simplicity allows for endless customization with festive shapes and colorful decorations, making them a staple in any cozy Christmas baking repertoire.
The beauty of classic sugar cookies lies in their versatility. Whether you’re an experienced baker or a novice in the kitchen, this recipe is straightforward and yields consistently delicious results. With a crisp exterior and a soft, chewy center, these cookies are sure to become a family favorite. This recipe serves 4-6 people, making it perfect for a small gathering or to have on hand for holiday visitors.
Ingredients:
- 2 ¾ cups all-purpose flour
- 1 teaspoon baking soda
- ½ teaspoon baking powder
- 1 cup unsalted butter, softened
- 1 ½ cups white sugar
- 1 egg
- 1 teaspoon vanilla extract
- ½ teaspoon almond extract
- 3-4 tablespoons of milk (as needed)
- Colored sugar or sprinkles for decorating
Instructions:
- Preheat the Oven: Start by preheating your oven to 375°F (190°C). This guarantees the oven is at the perfect temperature by the time you’re ready to bake your cookies.
- Mix Dry Ingredients: In a medium-sized bowl, whisk together the flour, baking soda, and baking powder. This will evenly distribute the leavening agents throughout the flour.
- Cream Butter and Sugar: In a large mixing bowl, cream together the softened butter and white sugar until the mixture is light and fluffy. This should take about 2-3 minutes using an electric mixer.
- Add Eggs and Extracts: Beat in the egg, vanilla extract, and almond extract until well combined. These add moisture and flavor to your cookies.
- Combine Wet and Dry Ingredients: Gradually add the dry ingredients to the wet ingredients, mixing until just combined. If the dough is too dry, add milk one tablespoon at a time until the dough comes together.
- Roll Out and Shape: On a floured surface, roll out the dough to about ¼ inch thickness. Use your favorite cookie cutters to cut out shapes, and place them on ungreased baking sheets.
- Decorate: Sprinkle colored sugar or sprinkles on top of the cookies before baking to add a festive touch.
- Bake: Bake in the preheated oven for 8-10 minutes, or until the edges are just beginning to turn golden. Be careful not to overbake, as the cookies will continue to firm up as they cool.
- Cool: Allow the cookies to cool on the baking sheet for a few minutes before transferring them to a wire rack to cool completely.
Extra Tips:
When making sugar cookies, it’s important to keep your dough chilled. If your dough starts to warm up while rolling and cutting, place it in the refrigerator for a few minutes before continuing. This helps maintain the shape of your cookies during baking.
Additionally, feel free to experiment with different extracts or add a dash of cinnamon or nutmeg for a unique twist. Finally, if you prefer a softer cookie, slightly underbake them and let them cool on the baking sheet. Enjoy your holiday baking!
Spiced Gingerbread Men

Spiced Gingerbread Men are a classic holiday treat that bring warmth and cheer to any festive gathering. Their delightful aroma and unmistakable spice blend capture the essence of Christmas, making them a favorite among both children and adults.
These charming cookies aren’t only delicious but also fun to decorate, offering a perfect opportunity to get creative with icing and candies. Whether you’re an experienced baker or a novice, these gingerbread men are sure to become a holiday staple in your home.
The magic of Spiced Gingerbread Men lies in their perfect balance of spices, which includes ginger, cinnamon, and cloves. These spices give the cookies their signature warmth and depth of flavor, while the molasses adds a rich sweetness that complements the spices beautifully.
The dough is easy to work with, allowing you to roll it out and cut out shapes with ease. Once baked, the gingerbread men are ready to be adorned with icing details, turning them into delightful little characters that bring joy to the holiday season.
Ingredients (Serves 4-6):
- 3 cups all-purpose flour
- 3/4 teaspoon baking soda
- 1 tablespoon ground ginger
- 1 tablespoon ground cinnamon
- 1/2 teaspoon ground cloves
- 1/2 teaspoon salt
- 1/2 cup unsalted butter, softened
- 1/2 cup packed dark-brown sugar
- 1 large egg
- 1/2 cup unsulfured molasses
- 2 teaspoons vanilla extract
- Assorted candies and colored icing for decorating
Instructions:
- Prepare the Dry Ingredients: In a large mixing bowl, whisk together the flour, baking soda, ginger, cinnamon, cloves, and salt. This will guarantee that the spices and leavening agent are evenly distributed throughout the flour.
- Cream Butter and Sugar: In another large bowl, using an electric mixer, beat the softened butter and brown sugar together on medium speed until the mixture is light and fluffy, about 3 minutes. This step is essential for creating a tender cookie texture.
- Add Wet Ingredients: Add the egg, molasses, and vanilla extract to the butter-sugar mixture, and beat until well combined. The molasses will give the dough its characteristic dark color and rich flavor.
- Combine Ingredients: Gradually add the dry ingredients to the wet mixture, beating on low speed just until combined. Be careful not to overmix, as this can make the dough tough.
- Chill the Dough: Divide the dough into two portions, flatten into disks, wrap each in plastic wrap, and refrigerate for at least 1 hour. Chilling the dough helps to firm it up and makes it easier to roll out.
- Roll Out the Dough: Preheat your oven to 350°F (175°C). On a lightly floured surface, roll out one disk of dough to about 1/4-inch thickness. Use gingerbread men cookie cutters to cut out shapes, and transfer them to a baking sheet lined with parchment paper.
- Bake the Cookies: Bake in the preheated oven for 8-10 minutes or until the edges are firm and the centers are set. Allow the cookies to cool on the baking sheet for a few minutes before transferring them to a wire rack to cool completely.
- Decorate: Once completely cooled, use colored icing and assorted candies to decorate your gingerbread men as desired. Let the icing set before serving or storing.
Extra Tips:
When making Spiced Gingerbread Men, it’s important to pay attention to the thickness of your dough as it can affect the baking time and texture of the cookies. Thinner cookies will bake faster and be crisper, while thicker cookies will be softer.
Also, be sure to keep your dough chilled between batches to prevent it from becoming too sticky to work with. For more even baking, rotate your baking sheet halfway through the bake time.
And most importantly, have fun with the decorating process—let your creativity run wild to create festive and whimsical gingerbread characters!
Indulgent Chocolate Yule Log
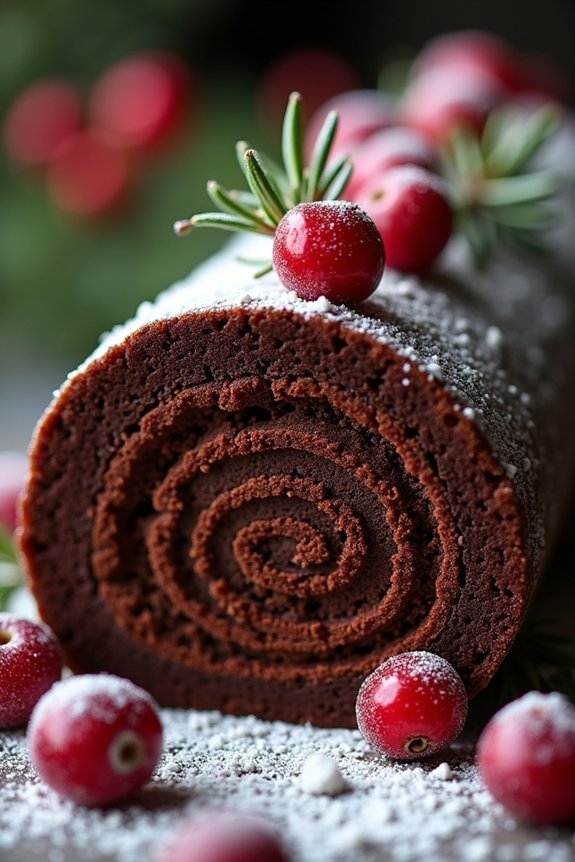
The Indulgent Chocolate Yule Log is a decadent dessert that brings festive warmth to your holiday table. Its moist chocolate sponge cake, filled with rich chocolate buttercream and adorned with a luscious ganache, is a true showstopper. This traditional holiday treat, often referred to as a “Bûche de Noël,” is designed to resemble a log, paying homage to the ancient custom of burning a Yule log during Christmas as a symbol of good fortune.
The combination of creamy textures and deep chocolate flavor makes it irresistible for chocolate lovers and a centerpiece worthy of your holiday celebrations. Perfect for serving 4-6 people, this recipe balances elegance with simplicity, allowing you to create an impressive dessert without too much fuss.
The key to a successful Yule log is in its careful rolling technique and the quality of ingredients used. By following each step precisely, you’ll achieve a beautifully rolled cake that maintains its structure, filled with sumptuous buttercream that melts in the mouth. Whether you’re a seasoned baker or trying your hand at this classic for the first time, the Indulgent Chocolate Yule Log promises to impress your family and friends with its festive charm and rich flavors.
Ingredients
- 4 large eggs
- 1/2 cup granulated sugar
- 1/3 cup all-purpose flour
- 1/4 cup unsweetened cocoa powder
- 1/4 teaspoon salt
- 1 teaspoon vanilla extract
- 2 cups heavy cream
- 8 ounces semisweet chocolate, chopped
- 1 cup unsalted butter, softened
- 2 cups powdered sugar
- 2 teaspoons instant coffee granules
- Powdered sugar, for dusting
Cooking Instructions
- Preheat and Prepare: Preheat your oven to 350°F (175°C). Line a 15×10-inch jelly roll pan with parchment paper, ensuring it covers the sides as well. Lightly grease the parchment paper.
- Make the Sponge Cake: In a large mixing bowl, beat the eggs and granulated sugar using an electric mixer on high speed until thick and pale, about 5 minutes. Gently fold in the vanilla extract.
- Combine Dry Ingredients: Sift together the flour, cocoa powder, and salt in a separate bowl. Gradually fold the dry ingredients into the egg mixture, taking care not to deflate the eggs.
- Bake the Cake: Spread the batter evenly in the prepared pan. Bake for 10-12 minutes, or until the cake springs back when lightly touched. While it’s baking, lay a clean kitchen towel on a flat surface and dust it generously with powdered sugar.
- Roll the Cake: As soon as the cake comes out of the oven, carefully invert it onto the prepared towel. Gently peel off the parchment paper. Starting at a short end, roll up the cake and towel together. Let it cool completely on a wire rack.
- Prepare the Ganache: Heat the heavy cream in a small saucepan until it begins to simmer. Pour it over the chopped chocolate in a heatproof bowl. Let it sit for a minute, then stir until smooth. Allow the ganache to cool to room temperature.
- Make the Buttercream: Beat the softened butter and powdered sugar together until smooth and creamy. Dissolve the instant coffee granules in a tablespoon of hot water, then add to the buttercream. Beat until well combined and fluffy.
- Fill and Assemble: Unroll the cooled cake and spread an even layer of buttercream over the surface. Re-roll the cake without the towel. Trim the ends for a neat appearance.
- Cover with Ganache: Spread the cooled ganache over the rolled cake, ensuring even coverage. Use a fork to create bark-like textures in the ganache.
- Chill and Serve: Transfer the Yule log to a serving platter and refrigerate for at least 1 hour to set. Dust with powdered sugar before serving to mimic snow.
Extra Tips
For the smoothest texture, make sure the butter is at room temperature before starting the buttercream. When rolling the cake, do it while it’s still warm to prevent cracking. If any cracks do occur, they can be easily hidden with the ganache.
To enhance the presentation, consider decorating your Yule log with sugared cranberries and sprigs of rosemary for a festive touch. Finally, prepare the cake a day in advance to enhance the flavors, as the resting time allows for the chocolate elements to meld beautifully.
Peppermint Bark Brownies
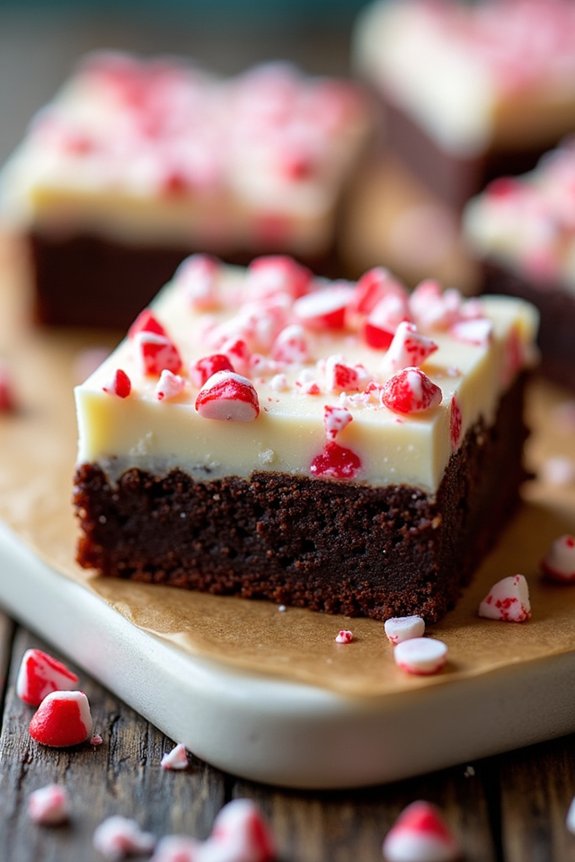
Indulge in the ultimate holiday treat with Peppermint Bark Brownies, a delightful fusion of rich chocolate brownie and the invigorating taste of peppermint. Perfect for cozy winter nights or festive gatherings, these brownies are layered with a smooth, creamy peppermint bark topping, offering a harmonious blend of flavors and textures.
The fudgy chocolate base, combined with the crispy, cool peppermint layer, makes this dessert an irresistible choice for anyone with a sweet tooth. This recipe serves 4-6 people, making it ideal for small gatherings or family dessert time. The process involves creating a decadent brownie base, which is then topped with a luxurious layer of white chocolate and peppermint candy.
Follow this simple recipe to bring a taste of the holidays to your table.
Ingredients
- 1/2 cup unsalted butter
- 1 cup granulated sugar
- 2 large eggs
- 1 teaspoon vanilla extract
- 1/3 cup unsweetened cocoa powder
- 1/2 cup all-purpose flour
- 1/4 teaspoon baking powder
- 1/4 teaspoon salt
- 1 cup white chocolate chips
- 1/2 teaspoon peppermint extract
- 1/2 cup crushed peppermint candies or candy canes
Instructions
- Preheat and Prepare: Preheat your oven to 350°F (175°C). Grease and line an 8×8-inch (20×20 cm) baking pan with parchment paper, leaving some overhang on the sides for easy removal later.
- Make the Brownie Base: In a medium saucepan, melt the butter over low heat. Once melted, remove the pan from the heat and stir in the granulated sugar, eggs, and vanilla extract until well combined.
- Mix Dry Ingredients: In a separate bowl, sift together the cocoa powder, flour, baking powder, and salt. Gradually add this dry mixture to the wet ingredients, stirring until just combined.
- Bake the Brownies: Pour the brownie batter into the prepared pan, spreading it evenly. Bake in the preheated oven for 20-25 minutes, or until a toothpick inserted into the center comes out mostly clean. Remove from the oven and let cool completely in the pan.
- Prepare the Peppermint Topping: In a microwave-safe bowl, melt the white chocolate chips in 30-second intervals, stirring in between, until completely smooth. Stir in the peppermint extract.
- Layer the Peppermint Bark: Spread the melted white chocolate evenly over the cooled brownie base. Sprinkle the crushed peppermint candies or candy canes on top, pressing them gently into the white chocolate to adhere.
- Set and Serve: Allow the white chocolate to set completely at room temperature or refrigerate for quicker results. Once set, lift the brownies out of the pan using the parchment paper overhang, slice into squares, and serve.
Extra Tips
For an extra touch of decadence, consider adding a drizzle of dark chocolate over the peppermint layer once it has set. This will enhance the visual appeal and add a bit more chocolate flavor to balance the sweetness of the peppermint.
When crushing peppermint candies, place them in a sealed plastic bag and gently crush them with a rolling pin to avoid a mess. If you prefer a more intense peppermint flavor, feel free to adjust the amount of peppermint extract to your taste.
Enjoy these brownies with a warm cup of cocoa for the ultimate winter treat.
Eggnog Cheesecake Bars
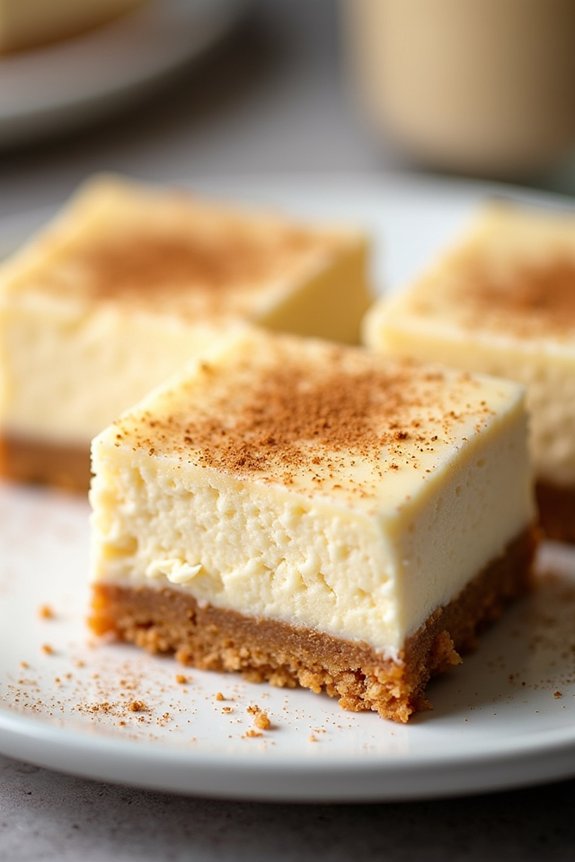
Eggnog Cheesecake Bars are a delightful treat that perfectly combines the creamy richness of cheesecake with the festive flavors of eggnog. These bars are an ideal dessert for holiday gatherings, as they’re easy to serve and can be prepared in advance. The buttery graham cracker crust complements the smooth, spiced cheesecake filling, creating a harmonious blend of flavors that capture the essence of Christmas.
Whether you’re hosting a party or simply enjoying a cozy night in, these bars are sure to be a hit. The recipe yields a serving size of 4-6 people, making it a great choice for small get-togethers or family celebrations. The subtle notes of nutmeg and cinnamon in the eggnog enhance the classic cheesecake flavor, while the hint of rum extract adds an extra festive touch.
With their creamy texture and spiced aroma, these Eggnog Cheesecake Bars are a must-try for any holiday dessert table.
Ingredients:
- 1 1/2 cups graham cracker crumbs
- 1/4 cup granulated sugar
- 1/2 cup unsalted butter, melted
- 16 oz cream cheese, softened
- 3/4 cup granulated sugar
- 2 large eggs
- 1/2 cup eggnog
- 1 teaspoon vanilla extract
- 1/2 teaspoon rum extract
- 1/2 teaspoon ground nutmeg
- 1/4 teaspoon ground cinnamon
Cooking Instructions:
- Preheat the Oven: Begin by preheating your oven to 325°F (163°C). This will guarantee that your cheesecake bars bake evenly.
- Prepare the Crust: In a medium mixing bowl, combine the graham cracker crumbs and 1/4 cup of granulated sugar. Pour in the melted butter and mix until the crumbs are well coated and can hold together when pressed.
- Form the Crust: Press the graham cracker mixture firmly into the bottom of a greased 9×9-inch baking pan to form an even crust layer. Use the back of a spoon or the bottom of a measuring cup to press down firmly.
- Bake the Crust: Place the crust in the preheated oven and bake for 10 minutes. Remove from the oven and allow it to cool slightly while you prepare the filling.
- Make the Cheesecake Filling: In a large mixing bowl, beat the softened cream cheese and 3/4 cup of granulated sugar together until smooth and creamy. Add the eggs one at a time, mixing well after each addition.
- Incorporate the Eggnog and Spices: Gradually add the eggnog, vanilla extract, rum extract, ground nutmeg, and ground cinnamon to the cream cheese mixture. Beat until all ingredients are fully combined and the mixture is smooth.
- Pour and Bake: Pour the cheesecake filling over the cooled crust, spreading it evenly with a spatula. Bake in the preheated oven for 30-35 minutes, or until the edges are set and the center is slightly jiggly.
- Cool and Chill: Remove the bars from the oven and let them cool to room temperature. Once cooled, refrigerate for at least 3 hours, or until fully chilled and set.
- Cut and Serve: Once the cheesecake bars are set, cut them into squares and serve. They can be garnished with a sprinkle of nutmeg or a dollop of whipped cream for an extra festive touch.
Extra Tips:
When making Eggnog Cheesecake Bars, it’s important to verify that all ingredients are at room temperature before mixing. This will help the ingredients blend more easily and create a smoother filling.
When mixing the filling, be careful not to overbeat, as this can incorporate too much air and lead to cracks during baking. Finally, for clean edges when cutting the bars, use a sharp knife and wipe it clean between each cut. These tips will help you achieve a perfect batch of festive cheesecake bars every time.
Cranberry Orange Muffins

Cranberry Orange Muffins are a delightful addition to your Christmas baking repertoire. These muffins combine the tartness of fresh cranberries with the bright citrusy flavor of orange, creating a wonderful balance of sweet and tangy. Perfect for a festive breakfast or a holiday dessert, these muffins aren’t only delicious but also fill your kitchen with the warm and inviting scents of the season.
With their fluffy texture and jeweled cranberry pieces, they’re sure to be a hit with family and friends. The recipe is simple enough for even a novice baker, making it an ideal choice for holiday preparations. Whether you’re serving them warm from the oven with a dollop of butter or packing them for a holiday brunch, these muffins will surely bring a smile to anyone’s face.
Let’s plunge into making these scrumptious Cranberry Orange Muffins for a serving size of 4-6 people.
Ingredients:
- 2 cups all-purpose flour
- 1 cup granulated sugar
- 1 tablespoon baking powder
- 1/2 teaspoon salt
- 1/2 cup unsalted butter, melted
- 2 large eggs
- 1/2 cup milk
- 1 teaspoon vanilla extract
- Zest of 1 large orange
- 1/4 cup fresh orange juice
- 1 1/2 cups fresh cranberries, roughly chopped
- 1/4 cup coarse sugar for topping (optional)
Instructions:
- Preheat the Oven: Start by preheating your oven to 375°F (190°C). Line a muffin tin with paper liners or grease it lightly with butter or non-stick spray to prevent the muffins from sticking.
- Mix Dry Ingredients: In a large mixing bowl, whisk together the all-purpose flour, granulated sugar, baking powder, and salt. This guarantees that the baking powder is evenly distributed throughout the flour, helping the muffins to rise properly.
- Combine Wet Ingredients: In a separate bowl, whisk together the melted butter, eggs, milk, vanilla extract, orange zest, and orange juice until well combined. The orange zest and juice will infuse the batter with a fresh citrus flavor.
- Combine Mixtures: Pour the wet ingredients into the bowl with the dry ingredients. Gently stir until just combined. Be careful not to over-mix as this can make the muffins dense and tough.
- Add Cranberries: Fold the chopped cranberries into the batter using a spatula. Confirm that the cranberries are evenly distributed throughout the batter for consistent flavor in every bite.
- Fill the Muffin Tin: Spoon the batter into the prepared muffin tins, filling each about 2/3 full. If desired, sprinkle the tops with coarse sugar for a sweet, crunchy topping.
- Bake: Place the muffin tin in the preheated oven and bake for 18-20 minutes, or until a toothpick inserted into the center of a muffin comes out clean. The tops should be golden brown.
- Cool: Once baked, remove the muffins from the oven and allow them to cool in the tin for about 5 minutes. Then, transfer the muffins to a wire rack to cool completely.
Extra Tips:
For an extra burst of flavor, you can soak the cranberries in the orange juice for 15 minutes before adding them to the batter; this will make them juicier and enhance the orange taste in the muffins.
If you prefer a sweeter muffin, you can increase the sugar by an additional 1/4 cup. For a more pronounced orange flavor, consider adding a teaspoon of orange extract along with the vanilla extract.
These muffins can be stored in an airtight container at room temperature for up to three days, or you can freeze them for up to a month. Enjoy these delightful muffins with your favorite holiday beverage, such as hot cocoa or spiced tea.
Cinnamon Star Bread

- 2 3/4 cups all-purpose flour
- 1/4 cup granulated sugar
- 1 teaspoon salt
- 2 1/4 teaspoons instant yeast
- 1/2 cup whole milk
- 1/4 cup unsalted butter
- 2 large eggs
- 1 teaspoon vanilla extract
- 1/2 cup light brown sugar
- 1 tablespoon ground cinnamon
- 2 tablespoons unsalted butter, melted
- Powdered sugar for dusting (optional)
Instructions:
1. Prepare the Dough: In a large mixing bowl, combine the flour, granulated sugar, salt, and instant yeast. In a small saucepan, warm the milk and butter over low heat until the butter is melted and the mixture is lukewarm.
Pour the milk mixture into the dry ingredients, then add the eggs and vanilla extract. Mix until a soft dough forms.
2. Knead the Dough: Transfer the dough to a lightly floured surface and knead for about 6-8 minutes until smooth and elastic. Alternatively, you can use a stand mixer fitted with a dough hook for this step.
Place the kneaded dough in a greased bowl, cover with a cloth, and let it rise in a warm place for about 1 hour or until doubled in size.
3. Prepare the Filling: In a small bowl, mix the light brown sugar and ground cinnamon. Set aside.
4. Shape the Bread: Once the dough has risen, punch it down to release the air. Divide it into four equal pieces. Roll each piece into a circle about 10 inches in diameter.
Place one dough circle on a parchment-lined baking sheet and brush with melted butter. Sprinkle a third of the cinnamon-sugar mixture evenly over the buttered dough.
5. Layer and Twist: Place a second dough circle on top of the first, brush with butter, and sprinkle with another third of the cinnamon sugar. Repeat with the third dough circle.
Place the final circle on top, without adding butter or cinnamon sugar.
6. Create the Star: Place a small glass in the center of the dough stack as a guide. With a sharp knife, make 16 evenly spaced cuts from the edge of the glass to the edge of the dough, creating 16 “spokes.”
Take two adjacent sections and twist them away from each other twice, then pinch the ends together to seal. Repeat with the remaining sections to form a star shape.
7. Final Rise and Bake: Cover the bread with a cloth and let it rise for another 30 minutes. Preheat your oven to 375°F (190°C).
Once risen, bake the bread for 25-30 minutes until golden brown. Cool slightly on a wire rack.
8. Serve: Dust with powdered sugar before serving, if desired.
Extra Tips:
When making the dough, verify the milk is lukewarm, not hot, to avoid killing the yeast.
If you’re short on time, you can prepare the dough the night before and let it rise slowly in the refrigerator overnight.
Before baking, make certain the bread is well sealed at the points after twisting to maintain the star shape during baking.
To keep the bread soft, store it in an airtight container at room temperature for a couple of days or freeze for longer storage.
Enjoy your beautifully crafted Cinnamon Star Bread with a hot cup of cocoa or coffee for the ultimate holiday treat.
Almond Snowball Cookies
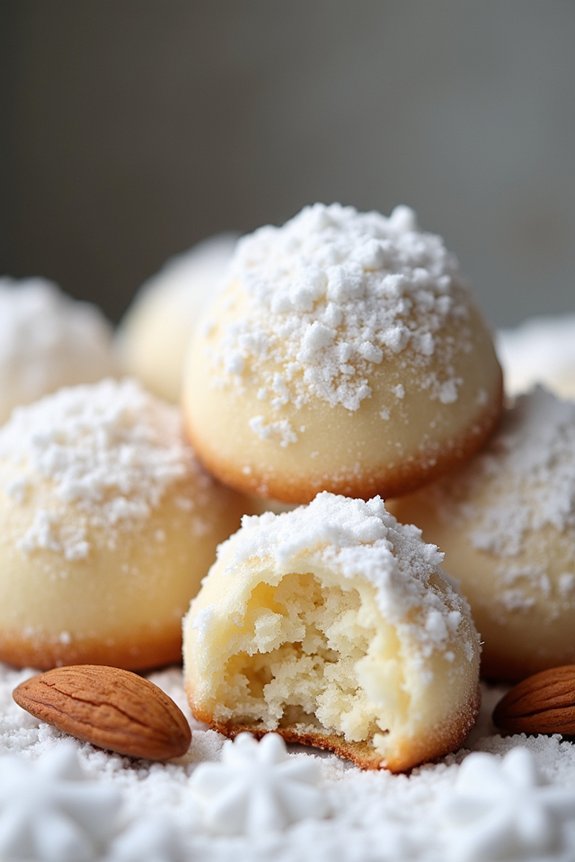
Almond Snowball Cookies are a delightful addition to any festive holiday spread. These bite-sized treats are tender and buttery, with a melt-in-your-mouth texture that makes them irresistible. Their snowy appearance is created by rolling the warm cookies in powdered sugar, giving them a beautiful, wintry look. Perfect for sharing with family and friends, these cookies aren’t only a joy to eat but also a pleasure to make.
The subtle nutty flavor of almonds in these cookies is complemented by a hint of vanilla, making them a comforting and satisfying treat. They’re a classic choice for Christmas baking, evoking nostalgic memories of holiday gatherings and cozy winter evenings. Whether you’re hosting a holiday party or looking for a sweet gift idea, Almond Snowball Cookies are sure to be a hit with their simple yet delicious appeal.
Ingredients (serving size: 4-6 people)
- 1 cup unsalted butter, softened
- 1/2 cup powdered sugar
- 1 teaspoon vanilla extract
- 2 cups all-purpose flour
- 1 cup finely chopped almonds
- 1/4 teaspoon salt
- Additional powdered sugar for rolling
Cooking Instructions
- Preheat the Oven: Begin by preheating your oven to 350°F (175°C). This guarantees that the cookies bake evenly once they’re placed inside.
- Cream Butter and Sugar: In a large mixing bowl, cream together the softened butter and 1/2 cup of powdered sugar until the mixture is light and fluffy. This should take about 2-3 minutes with an electric mixer.
- Add Vanilla: Mix in the vanilla extract to the creamed butter and sugar, making sure it’s fully incorporated.
- Combine Dry Ingredients: In a separate bowl, whisk together the all-purpose flour and salt. Gradually add this dry mixture to the wet ingredients, stirring until just combined.
- Incorporate Almonds: Gently fold in the finely chopped almonds until they’re evenly distributed throughout the dough.
- Shape the Cookies: Using your hands, shape the dough into 1-inch balls and place them on ungreased baking sheets, spacing them about 1 inch apart.
- Bake: Bake the cookies in the preheated oven for 15-18 minutes, or until the edges are lightly golden. Be careful not to overbake as they can dry out quickly.
- Coat in Sugar: Remove the cookies from the oven and allow them to cool for just a couple of minutes on the baking sheets. While still warm, roll each cookie in additional powdered sugar until fully coated. Let them cool completely on a wire rack.
- Final Dusting: Once the cookies are completely cooled, give them a second roll in powdered sugar for an extra snowy appearance.
Extra Tips
For best results, make sure your butter is at room temperature before you begin baking, as this will help achieve the desired creamy texture when creaming with the sugar.
If you prefer a more pronounced almond flavor, consider adding a few drops of almond extract in addition to the vanilla.
For a festive touch, you can also mix in a small amount of finely grated orange zest to the dough, which pairs beautifully with the almonds.
Finally, store the cookies in an airtight container to maintain their softness and fresh flavor. These cookies also freeze well, so you can make them ahead of time and enjoy them throughout the holiday season.
Red Velvet Cake With Cream Cheese Frosting

Red Velvet Cake With Cream Cheese Frosting is a classic holiday treat that brings warmth and joy to any festive gathering. The striking red hue coupled with the rich, tangy cream cheese frosting creates a visually stunning and deliciously moist cake that’s guaranteed to impress your guests.
This cake combines elements of both cocoa and vanilla, creating a delicate balance of flavors that’s enhanced by the creamy, slightly tangy frosting. Whether for a family gathering, a holiday party, or simply to indulge your sweet tooth, this cake is the perfect centerpiece for any Christmas celebration.
Making a Red Velvet Cake from scratch is surprisingly simple, and it’s a wonderful way to add a personal touch to your holiday baking. The key to a perfect Red Velvet Cake lies in achieving the right texture and color, which requires just the right amount of cocoa powder and red food coloring. The cream cheese frosting adds a luscious layer that complements the cake’s subtle chocolate flavor.
Serve this cake to a group of 4-6 people and watch as it disappears slice by slice, with everyone clamoring for seconds.
Ingredients (Serves 4-6):
- 2 ½ cups all-purpose flour
- 1 ½ cups granulated sugar
- 1 tsp baking soda
- 1 tsp salt
- 1 tsp cocoa powder
- 1 ½ cups vegetable oil
- 1 cup buttermilk, room temperature
- 2 large eggs, room temperature
- 2 tbsp red food coloring
- 1 tsp vanilla extract
- 1 tsp white distilled vinegar
For the Cream Cheese Frosting:
- 1 pound cream cheese, softened
- 2 sticks unsalted butter, softened
- 1 tsp vanilla extract
- 4 cups powdered sugar
Instructions:
- Preheat the Oven: Start by preheating your oven to 350°F (175°C). Prepare two 9-inch round cake pans by greasing them with butter and dusting with flour. This guarantees the cake doesn’t stick and comes out easily once baked.
- Mix Dry Ingredients: In a large mixing bowl, sift together the flour, sugar, baking soda, salt, and cocoa powder. This helps to remove any lumps and evenly distributes the cocoa throughout the dry mixture.
- Combine Wet Ingredients: In another bowl, whisk together the oil, buttermilk, eggs, food coloring, vanilla, and vinegar. Make sure the eggs and buttermilk are at room temperature to create a smooth mixture.
- Combine Wet and Dry Mixtures: Gradually add the dry mixture to the wet mixture, stirring gently until just combined. Be careful not to overmix, as this can make the cake dense.
- Bake the Cake: Divide the batter evenly between the prepared cake pans. Bake in the preheated oven for 25-30 minutes, or until a toothpick inserted into the center comes out clean. Allow the cakes to cool in the pans for 10 minutes before transferring them to a wire rack to cool completely.
- Prepare the Frosting: In a large bowl, beat the cream cheese and butter together until smooth and creamy. Add the vanilla extract, then gradually add the powdered sugar, beating until the frosting is light and fluffy.
- Assemble the Cake: Once the cakes are completely cooled, spread a layer of cream cheese frosting on top of one cake layer. Place the second layer on top and apply a crumb coat of frosting. Chill the cake for about 30 minutes, then apply the final layer of frosting evenly over the top and sides.
- Serve: Slice the cake and serve it to your enthusiastic guests, or store it in the refrigerator if preparing in advance.
Extra Tips:
For an even deeper red color, you can adjust the amount of food coloring based on your preference. If you don’t have buttermilk on hand, you can make a substitute by mixing 1 tablespoon of lemon juice or vinegar with a cup of milk and letting it sit for 5 minutes.
Confirm the frosting ingredients are at room temperature to avoid lumps and achieve a smooth consistency. Finally, for a more festive touch, consider decorating the cake with white chocolate shavings or edible glitter.
Pistachio Cranberry Biscotti
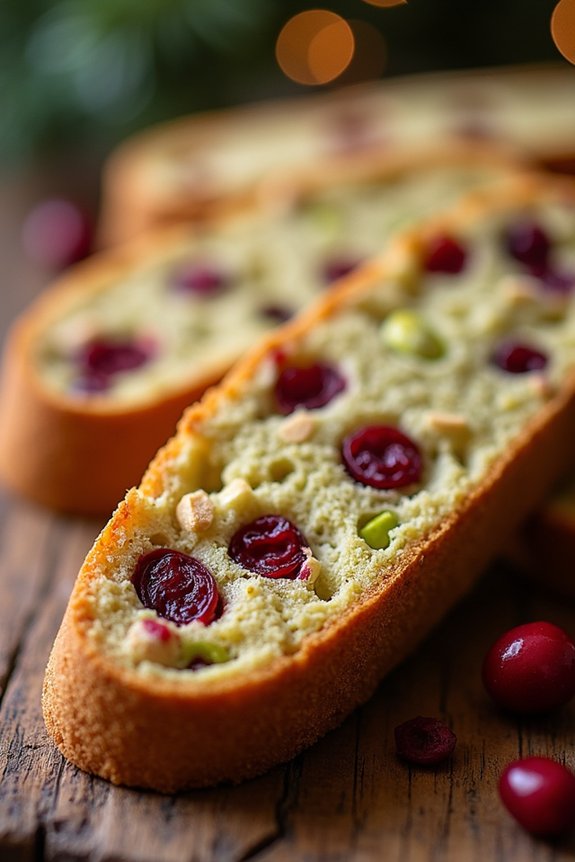
Indulge in the festive flavors of Pistachio Cranberry Biscotti, a delightful treat perfect for the holiday season. This twice-baked Italian classic combines the rich nuttiness of pistachios with the tartness of dried cranberries, creating a crunchy yet flavorful cookie that pairs beautifully with a warm cup of coffee or tea.
Ideal for sharing with family and friends, these biscotti are both delicious and easy to make, adding a touch of elegance to your holiday dessert table. Biscotti are known for their long shelf life, making them a wonderful gift option during Christmas time.
The vibrant green of the pistachios and the deep red of the cranberries not only taste heavenly but also add a festive color palette to the cookies. This recipe is simple enough for novice bakers yet impressive enough to delight the most discerning palate.
Here’s how you can make a batch of Pistachio Cranberry Biscotti to serve 4-6 people.
Ingredients:
- 2 cups all-purpose flour
- 1 cup granulated sugar
- 1 teaspoon baking powder
- 1/2 teaspoon salt
- 3 large eggs
- 1 teaspoon vanilla extract
- 1/2 teaspoon almond extract
- 1 cup unsalted pistachios, roughly chopped
- 3/4 cup dried cranberries
Instructions:
- Preheat and Prepare: Preheat your oven to 350°F (175°C). Line a baking sheet with parchment paper or a silicone baking mat.
- Mix Dry Ingredients: In a medium bowl, whisk together the flour, sugar, baking powder, and salt until well combined.
- Combine Wet Ingredients: In a separate large bowl, lightly beat the eggs. Add the vanilla and almond extracts, whisking thoroughly.
- Form the Dough: Gradually add the dry ingredients to the wet ingredients, mixing until a dough begins to form. It may be slightly sticky, which is normal.
- Add Nuts and Berries: Fold in the chopped pistachios and dried cranberries until they’re evenly distributed throughout the dough.
- Shape the Logs: Divide the dough in half. On a lightly floured surface, shape each half into a log approximately 10 inches long and 2 inches wide. Place the logs onto the prepared baking sheet.
- First Bake: Bake in the preheated oven for 25-30 minutes, or until the logs are firm to the touch and lightly golden. Remove from the oven and allow them to cool for about 10 minutes.
- Slice the Biscotti: Using a serrated knife, slice the logs diagonally into 1/2-inch thick slices.
- Second Bake: Arrange the slices cut-side down on the baking sheet. Bake for an additional 10-15 minutes, flipping halfway through, until the biscotti are golden brown and crisp.
- Cool and Store: Transfer the baked biscotti to a wire rack to cool completely. Store in an airtight container for up to two weeks.
Extra Tips:
For best results, use fresh, high-quality pistachios and plump cranberries, as their flavors will shine through in the final product. When slicing the biscotti, use a gentle sawing motion with your serrated knife to prevent crumbling.
If you prefer a softer biscotti, reduce the time of the second bake slightly. These biscotti make excellent gifts; simply wrap them in cellophane bags tied with a festive ribbon for a thoughtful homemade present.
Stollen With Marzipan

Stollen with Marzipan is a traditional German Christmas bread that perfectly encapsulates the festive season with its rich flavors and delightful texture. This bread is a wonderful combination of dried fruits, nuts, and spices, all wrapped around a marzipan filling, making it a cherished treat during the holidays.
Its origins date back to the 15th century, and over time, it has become a staple in many households during Christmas, cherished for its sweet, buttery taste and the warmth it brings to any holiday gathering.
Perfect for serving alongside a cup of tea or coffee, this version of Stollen with Marzipan is ideal for a family of 4-6 people. The recipe involves a bit of preparation time, but the resulting aroma and flavor are well worth the effort.
Whether you’re an experienced baker or trying your hand at baking Stollen for the first time, this recipe will guide you through creating a delicious, festive loaf that captures the essence of Christmas.
Ingredients (Serving Size: 4-6 people):
- 500g all-purpose flour
- 100g granulated sugar
- 250g unsalted butter, softened
- 200ml warm milk
- 25g fresh yeast or 7g dry yeast
- 1 teaspoon salt
- 1 teaspoon ground cinnamon
- 1/2 teaspoon ground nutmeg
- Zest of 1 lemon
- 200g mixed dried fruits (raisins, currants, candied orange peel)
- 100g chopped almonds
- 200g marzipan
- 1 teaspoon vanilla extract
- 50g powdered sugar (for dusting)
Cooking Instructions:
- Prepare the Yeast Mixture: In a small bowl, dissolve the yeast in the warm milk. Add a pinch of the sugar and leave it for about 10 minutes until it becomes frothy.
- Combine Dry Ingredients: In a large mixing bowl, combine the flour, sugar, salt, ground cinnamon, nutmeg, and lemon zest. Mix well to guarantee the spices are evenly distributed.
- Mix Wet Ingredients: Make a well in the center of the dry ingredients. Add the yeast mixture, softened butter, and vanilla extract. Mix everything together until a dough begins to form.
- Add the Fruits and Nuts: Incorporate the mixed dried fruits and chopped almonds into the dough. Knead the dough on a floured surface for about 10 minutes until it’s smooth and elastic.
- First Rise: Place the dough in a lightly greased bowl, cover it with a clean towel, and let it rise in a warm place for 1-2 hours, or until it has doubled in size.
- Prepare the Marzipan: While the dough is rising, shape the marzipan into a log about 20 cm (8 inches) long.
- Shape the Stollen: After the dough has risen, punch it down and roll it out into an oval shape. Place the marzipan log in the center and fold the dough over it, sealing the edges.
- Second Rise: Place the shaped stollen on a baking sheet lined with parchment paper. Cover it and let it rise for another 30-45 minutes.
- Bake the Stollen: Preheat the oven to 180°C (350°F). Bake the stollen for 35-40 minutes or until it’s golden brown.
- Cool and Dust: Allow the stollen to cool on a wire rack. Once cooled, dust generously with powdered sugar before serving.
Extra Tips: When preparing Stollen with Marzipan, verify that all your ingredients are at room temperature for the best results.
If your dough is sticky, don’t hesitate to add a little more flour until it becomes manageable. For a more robust flavor, soak the dried fruits in rum or brandy for a few hours before incorporating them into the dough.
Finally, Stollen can be made in advance and stored in a cool place; its flavors continue to develop, making it even tastier over time.
Hot Cocoa Cupcakes
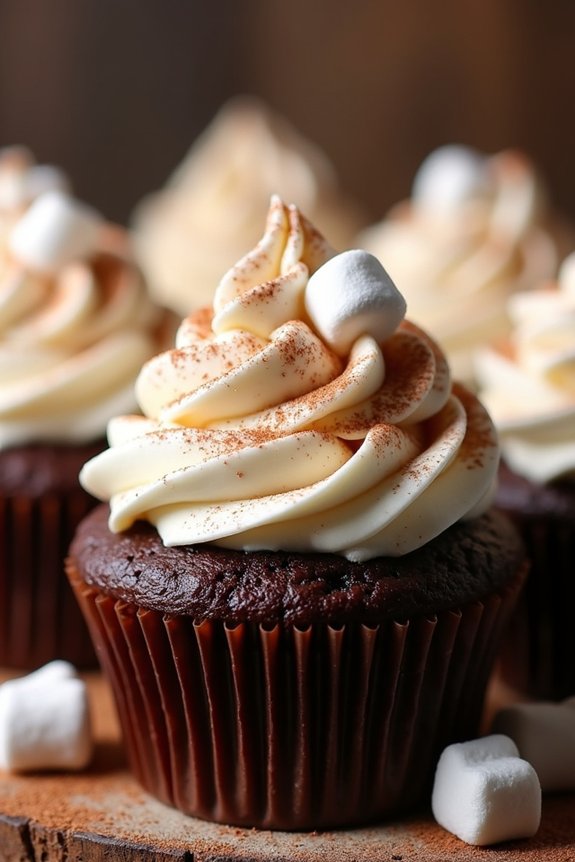
Indulge in the delightful warmth of the holiday season with Hot Cocoa Cupcakes, a festive treat that perfectly captures the essence of Christmas. These cupcakes marry the rich flavors of hot cocoa with the fluffy, moist texture of a classic cupcake, creating a dessert that’s both nostalgic and comforting.
Topped with a generous swirl of marshmallow frosting and a sprinkle of cocoa powder, they’re the perfect sweet treat to enjoy while curled up with a blanket and a good book by the fire. Ideal for serving 4-6 people, these Hot Cocoa Cupcakes aren’t just a treat for the taste buds but a feast for the eyes.
The cupcakes are adorned with tiny marshmallows and a dusting of cinnamon, evoking the cozy feel of a steaming mug of hot cocoa. Whether you’re planning a holiday gathering or simply looking to treat yourself, these cupcakes are sure to be a hit. You’ll find that they’re as fun to make as they’re to eat, bringing a touch of festive cheer to your kitchen.
Ingredients (Serves 4-6)
- 1 cup all-purpose flour
- 1/2 cup unsweetened cocoa powder
- 1 teaspoon baking powder
- 1/2 teaspoon baking soda
- 1/4 teaspoon salt
- 1/2 cup granulated sugar
- 1/2 cup brown sugar
- 1/2 cup unsalted butter, melted
- 2 large eggs
- 1 teaspoon vanilla extract
- 1/2 cup buttermilk
- 1/2 cup hot water
- 1 cup mini marshmallows
- For the frosting:
- 1 cup unsalted butter, softened
- 2 cups powdered sugar
- 1 jar (7 oz) marshmallow creme
- 1 teaspoon vanilla extract
- Cocoa powder and cinnamon for dusting
Cooking Instructions
- Preheat and Prep: Begin by preheating your oven to 350°F (175°C). Line a 12-cup muffin tin with cupcake liners.
- Mix Dry Ingredients: In a large mixing bowl, whisk together the flour, cocoa powder, baking powder, baking soda, and salt. This guarantees even distribution of the baking agents and cocoa powder.
- Combine Sugars and Butter: In another bowl, mix the granulated sugar, brown sugar, and melted butter until well combined. This forms the base of your cupcake batter.
- Add Wet Ingredients: Add the eggs one at a time to the sugar mixture, beating well after each addition. Stir in the vanilla extract. Gradually add the buttermilk and mix until smooth.
- Combine Mixtures: Gradually add the dry ingredients to the wet ingredients, mixing just until combined. Stir in the hot water until the batter is smooth and slightly thin.
- Fill and Bake: Divide the batter evenly among the cupcake liners, filling each about two-thirds full. Bake for 18-20 minutes or until a toothpick inserted into the center comes out clean.
- Cool and Frost: Allow the cupcakes to cool in the pan for 5 minutes, then transfer them to a wire rack to cool completely. For the frosting, beat the softened butter until creamy, then gradually add the powdered sugar. Mix in the marshmallow creme and vanilla extract until fluffy.
- Decorate: Frost each cooled cupcake generously with the marshmallow frosting. Top with a few mini marshmallows and dust with cocoa powder and cinnamon for an authentic hot cocoa feel.
Extra Tips
When making the batter, verify that all ingredients are at room temperature; this helps them blend more seamlessly and results in a smoother batter.
If you don’t have buttermilk on hand, you can make a substitute by mixing 1/2 cup milk with 1/2 tablespoon of lemon juice or vinegar and letting it sit for 5 minutes.
For a unique twist, consider adding a pinch of cayenne pepper to the batter for a bit of heat, reminiscent of Mexican hot chocolate.
These cupcakes store well in an airtight container at room temperature for up to three days, making them perfect for preparing ahead of time for holiday festivities.
Buttery Shortbread Twists
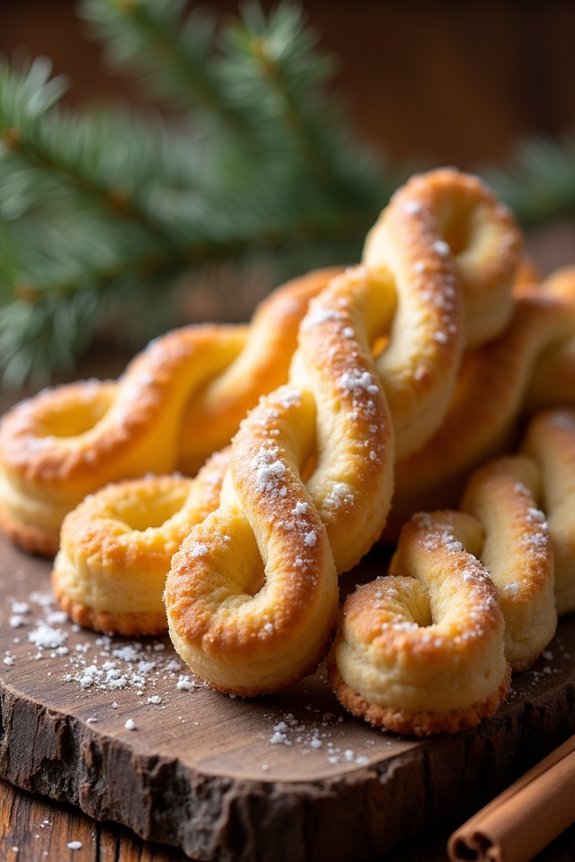
There’s nothing quite like the aroma of freshly baked shortbread filling your home during the holiday season. These Buttery Shortbread Twists are a delightful twist on the classic shortbread cookie, offering a perfect balance of buttery richness and delicate sweetness.
The twists aren’t only delicious but also visually appealing, making them an ideal treat for your Christmas gatherings or as a homemade gift to share with loved ones.
This recipe yields 24-30 buttery twists, perfect for serving 4-6 people. With simple ingredients and an easy-to-follow process, you’ll find yourself coming back to this recipe time and again. These twists can be enjoyed on their own or paired with a hot cup of cocoa or tea for a cozy afternoon treat.
Ingredients:
- 2 cups all-purpose flour
- 1/4 cup cornstarch
- 1/2 teaspoon salt
- 1 cup unsalted butter, softened
- 2/3 cup powdered sugar
- 2 teaspoons vanilla extract
- 1 tablespoon milk
- Extra flour for dusting
- Granulated sugar for sprinkling
Instructions:
1. Prepare the Dough: In a medium bowl, whisk together the all-purpose flour, cornstarch, and salt until well combined. Set aside.
In a large mixing bowl, cream the softened butter and powdered sugar together using an electric mixer on medium speed until light and fluffy, about 2-3 minutes. Mix in the vanilla extract and milk until fully incorporated.
2. Combine Ingredients: Gradually add the dry ingredients to the butter mixture, mixing on low speed until the dough starts to come together. The dough should be soft but not sticky. If necessary, add an additional tablespoon of flour.
3. Chill the Dough: Divide the dough into two equal portions and shape each into a disc. Wrap the discs in plastic wrap and refrigerate for at least 30 minutes. This chilling time helps the dough firm up, making it easier to handle.
4. Preheat and Prepare: Preheat your oven to 350°F (175°C). Line two baking sheets with parchment paper. Lightly flour a clean surface and rolling pin to prevent sticking.
5. Shape the Twists: Remove one dough disc from the refrigerator and roll it out into a rectangle about 1/4 inch thick. Using a sharp knife or a pizza cutter, cut the dough into strips about 1/2 inch wide and 4-5 inches long.
Twist each strip gently and place it on the prepared baking sheet, leaving some space between each twist.
6. Bake the Twists: Sprinkle a light coating of granulated sugar over the twists for added sweetness and sparkle. Bake in the preheated oven for 12-15 minutes or until the edges are lightly golden.
Be careful not to overbake, as this can cause the shortbread to become too hard.
7. Cool and Serve: Once baked, remove the twists from the oven and allow them to cool on the baking sheet for about 5 minutes before transferring them to a wire rack to cool completely.
The twists will firm up as they cool.
Extra Tips:
For an extra festive touch, consider adding a hint of lemon or orange zest to the dough for a subtle citrus flavor.
You can also dip one end of each cooled twist in melted chocolate and sprinkle with crushed nuts or festive sprinkles for added flair.
Remember that the key to perfect shortbread isn’t overworking the dough; handle it just enough to combine the ingredients. Enjoy your Buttery Shortbread Twists with friends and family, or savor them as a delightful solo indulgence!