

There’s something so comforting about cream cheese desserts during the holiday season. Whether it’s the rich, velvety texture of a New York-style cheesecake or the festive flair of a peppermint cream cheese brownie, these treats bring warmth and joy. They’re more than just sweets; they’re like a cozy hug in dessert form. Ready to explore more delicious creations that could make your holiday gatherings even cozier? Let’s dive into these mouthwatering cream cheese Christmas desserts.
Classic New York-Style Cheesecake
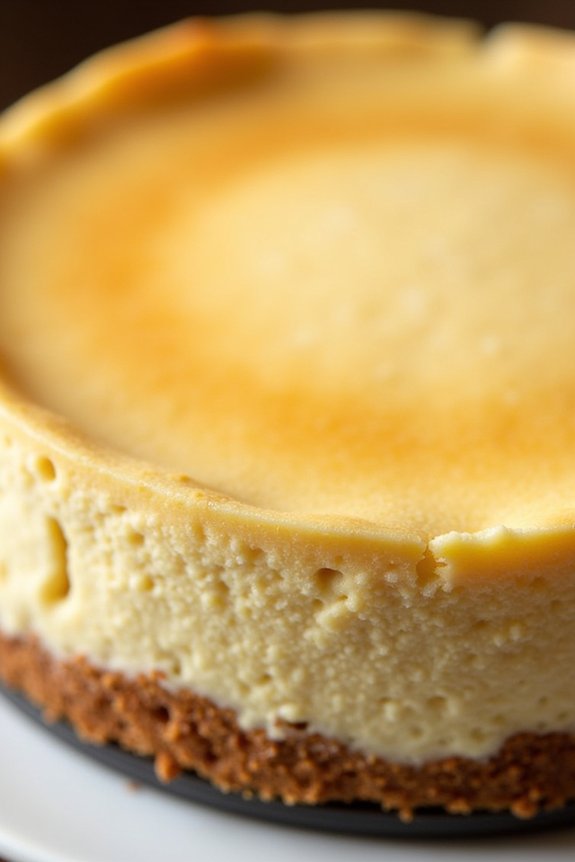
Indulge in the rich and creamy flavors of a Classic New York-Style Cheesecake, perfect for your holiday dessert table. This luxurious treat combines a smooth, dense filling made from cream cheese with a buttery graham cracker crust, offering a delightful balance of textures and flavors.
Perfect for Christmas celebrations, this cheesecake is sure to impress your family and friends with its elegant simplicity and decadent taste.
The following recipe yields a cheesecake that serves 4-6 people. The key to achieving the perfect New York-style cheesecake is in the preparation and baking technique. You’ll start with a classic graham cracker crust that provides the perfect foundation for the rich, creamy filling. The filling is made with cream cheese, sugar, and a hint of vanilla, all baked to perfection in a water bath to guarantee a smooth, crack-free surface.
Ingredients:
- 1 1/2 cups graham cracker crumbs
- 1/4 cup unsalted butter, melted
- 4 (8 oz) packages cream cheese, softened
- 1 1/4 cups granulated sugar
- 1 teaspoon vanilla extract
- 4 large eggs
- 2/3 cup sour cream
- 2/3 cup heavy cream
Instructions:
- Prepare the Crust:
- Preheat your oven to 325°F (163°C). In a medium bowl, mix the graham cracker crumbs and melted butter until well combined.
- Press the crumb mixture firmly into the bottom of a 9-inch springform pan to form an even layer. Bake for 10 minutes, then remove from the oven and set aside to cool.
- Make the Filling:
- In a large mixing bowl, beat the softened cream cheese with an electric mixer on medium speed until smooth and creamy.
- Gradually add the sugar and vanilla extract, continuing to beat until well combined.
- Add the eggs one at a time, beating just until blended after each addition to avoid overmixing.
- Stir in the sour cream and heavy cream until the mixture is smooth.
- Assemble the Cheesecake:
- Pour the cream cheese filling over the cooled crust in the springform pan, smoothing the top with a spatula.
- Place the springform pan in a larger baking dish and fill the dish with hot water until it reaches halfway up the sides of the springform pan (creating a water bath).
- Bake the Cheesecake:
- Carefully transfer the baking dish to the preheated oven. Bake for 55-60 minutes, or until the edges are set but the center still jiggles slightly when shaken.
- Turn off the oven and let the cheesecake cool in the oven with the door slightly ajar for about 1 hour.
- Chill and Serve:
- Remove the cheesecake from the oven and water bath, then run a knife around the edge of the cake to release it from the sides of the pan.
- Cover and refrigerate the cheesecake for at least 4 hours, or overnight, to allow it to set completely.
- Before serving, remove the sides of the springform pan and slice the cheesecake with a sharp, clean knife.
Extra Tips:
To guarantee the best results, make sure that all ingredients, especially the cream cheese, are at room temperature before you begin mixing. This helps to achieve a smooth, lump-free filling.
Additionally, when baking in a water bath, be sure to wrap the outside of the springform pan with aluminum foil to prevent water from seeping in. This technique helps to maintain an even baking temperature, resulting in a creamy, crack-free cheesecake.
Finally, for clean slices, dip your knife in hot water and wipe it clean between each cut. Enjoy your creamy, classic New York-Style Cheesecake this holiday season!
Peppermint Cream Cheese Brownies

Peppermint Cream Cheese Brownies are a delightful twist on a classic dessert, perfect for the holiday season. The combination of rich, fudgy chocolate brownies with a creamy peppermint-infused cream cheese layer makes for a decadent treat that’s bound to impress your family and friends. With the invigorating hint of peppermint, these brownies capture the festive spirit and are ideal for serving at Christmas gatherings.
The balance of flavors and textures in these brownies make them irresistible. The chocolate provides depth and richness, while the peppermint cream cheese layer adds a touch of coolness and creaminess. Topped with crushed candy canes or peppermint bark, these brownies not only taste amazing but also look visually stunning. Perfect for a serving size of 4-6 people, this recipe will have everyone reaching for seconds.
Ingredients:
- 1 cup unsalted butter
- 1 1/4 cups granulated sugar
- 1 cup brown sugar
- 4 large eggs
- 1 teaspoon vanilla extract
- 1 cup all-purpose flour
- 1 cup unsweetened cocoa powder
- 1/2 teaspoon salt
- 8 oz cream cheese, softened
- 1/4 cup confectioners’ sugar
- 1/2 teaspoon peppermint extract
- 1/2 cup crushed peppermint candies or candy canes
Cooking Instructions:
- Preheat and Prepare Pan: Preheat your oven to 350°F (175°C). Line a 9×13 inch baking pan with parchment paper, leaving some overhang for easy removal, and set aside.
- Melt Butter and Mix with Sugars: In a medium saucepan over low heat, melt the butter. Once melted, remove from heat and stir in the granulated sugar and brown sugar until well incorporated.
- Add Eggs and Vanilla: Whisk in the eggs, one at a time, until the mixture is smooth. Stir in the vanilla extract.
- Combine Dry Ingredients: In a separate bowl, sift together the flour, cocoa powder, and salt. Gradually add this dry mixture to the wet ingredients, stirring until just combined. Be careful not to overmix.
- Spread Brownie Batter: Pour about two-thirds of the brownie batter into the prepared baking pan, spreading it evenly.
- Prepare Cream Cheese Layer: In a separate bowl, beat the softened cream cheese, confectioners’ sugar, and peppermint extract until smooth and creamy.
- Layer Brownie and Cream Cheese: Gently spread the cream cheese mixture over the brownie batter in the pan. Then, dollop the remaining brownie batter over the top and use a knife to swirl the layers together, creating a marbled effect.
- Add Peppermint Topping: Sprinkle the crushed peppermint candies evenly over the top of the batter.
- Bake: Place the pan in the preheated oven and bake for 30-35 minutes, or until a toothpick inserted into the center comes out mostly clean with a few moist crumbs attached.
- Cool and Serve: Allow the brownies to cool completely in the pan on a wire rack. Once cooled, lift them out using the parchment overhang, cut into squares, and serve.
Extra Tips:
For the best results, make sure to use room temperature ingredients, especially the eggs and cream cheese, as this guarantees a smoother batter and filling. If you prefer a stronger peppermint flavor, you can adjust the peppermint extract to taste, but be cautious as peppermint extract is quite potent.
Additionally, when swirling the brownie and cream cheese layers, be gentle to prevent over-mixing, which could muddy the distinct layers. Enjoy these brownies with a scoop of vanilla ice cream for an extra indulgent treat!
Gingerbread Cheesecake Bars
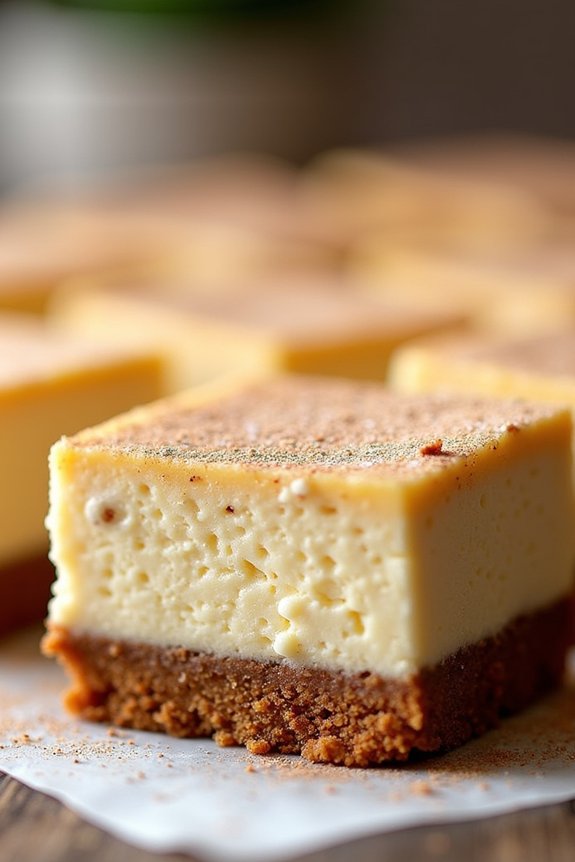
Gingerbread Cheesecake Bars are the perfect holiday treat that combines the rich, creamy texture of cheesecake with the warm, spicy flavors of gingerbread. Ideal for festive gatherings or a cozy night in, these bars are sure to impress.
The gingerbread crust provides a delightful contrast to the smooth cheesecake layer, while a hint of spice from ground ginger and cinnamon elevates this dessert to holiday perfection. Make certain to serve these bars chilled for the best texture and flavor experience.
This recipe is designed to serve 4-6 people, making it an excellent choice for a small gathering or family dessert. The preparation involves creating a ginger-spiced crust, followed by a velvety cream cheese filling. The result is a harmonious blend of flavors that capture the essence of Christmas in every bite.
Whether you’re a seasoned baker or a novice in the kitchen, these Gingerbread Cheesecake Bars are simple to make and sure to become a holiday favorite.
Ingredients:
- 1 1/2 cups gingersnap cookie crumbs
- 1/4 cup unsalted butter, melted
- 16 oz cream cheese, softened
- 1/2 cup granulated sugar
- 2 large eggs
- 1/4 cup molasses
- 1 tsp vanilla extract
- 1 tsp ground ginger
- 1/2 tsp ground cinnamon
- 1/4 tsp ground nutmeg
- 1/4 tsp salt
Instructions:
1. Preheat the Oven: Preheat your oven to 350°F (175°C). Grease or line an 8×8 inch baking pan with parchment paper, allowing some overhang for easy removal.
2. Prepare the Crust: In a medium bowl, mix the gingersnap cookie crumbs with the melted butter until well combined. Press the mixture firmly into the bottom of the prepared baking pan to form an even crust. Bake for 10 minutes, then remove from the oven and set aside to cool slightly.
3. Make the Cheesecake Filling: In a large mixing bowl, beat the softened cream cheese with a hand or stand mixer on medium speed until smooth. Gradually add in the granulated sugar, and continue to beat until well incorporated.
Add the eggs one at a time, mixing well after each addition. Stir in the molasses, vanilla extract, ground ginger, cinnamon, nutmeg, and salt. Mix until everything is fully combined and the filling is smooth.
4. Assemble the Bars: Pour the cheesecake filling over the pre-baked crust, smoothing the top with a spatula to ensure an even layer.
5. Bake the Bars: Place the baking pan in the preheated oven and bake for 30-35 minutes, or until the edges are set and the center is slightly jiggly. Avoid overbaking as the cheesecake will continue to firm up as it cools.
6. Cool and Chill: Remove the pan from the oven and let it cool to room temperature. Once cooled, refrigerate the bars for at least 3 hours or until fully chilled and set.
7. Serve: Once chilled, use the parchment paper overhang to lift the bars out of the pan. Cut into squares and serve. Enjoy the rich and spicy flavors of these festive treats!
Extra Tips: To guarantee a smooth cheesecake filling, make certain the cream cheese is fully softened before mixing. This will prevent lumps in the batter.
Also, when pressing the crust into the pan, use the bottom of a measuring cup to get an even and compact layer. If you prefer a more pronounced ginger flavor, consider adding a bit more ground ginger to the filling.
Finally, for an added touch, you can dust the top of the bars with powdered sugar or a sprinkle of cinnamon just before serving.
Cranberry Cream Cheese Tart
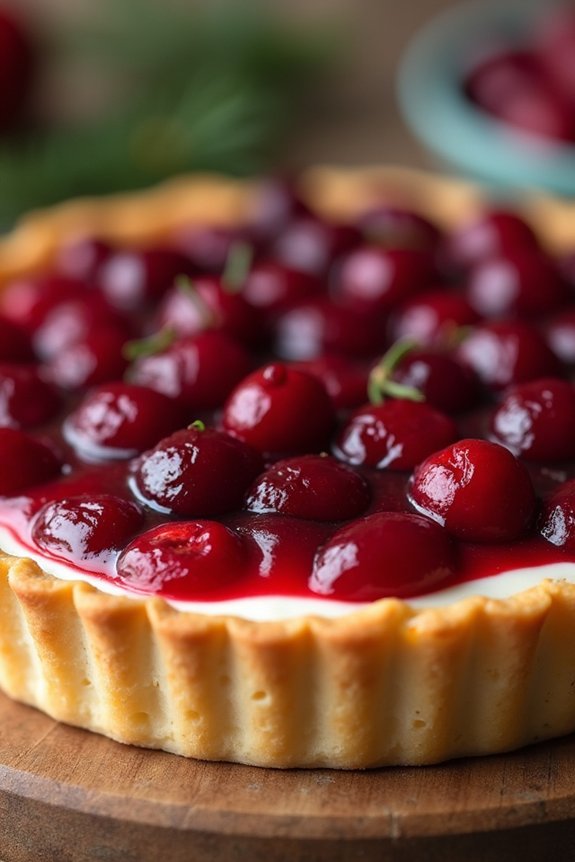
Cranberry Cream Cheese Tart is a delightful holiday dessert that perfectly combines the tangy sweetness of cranberries with the rich creaminess of cheese. This dessert, with its vibrant color and irresistible flavor, makes for a stunning centerpiece at any festive gathering.
The tart features a buttery crust that cradles a smooth cream cheese filling, topped with a glossy cranberry sauce that adds a rejuvenating zing. Whether you’re hosting a family dinner or a holiday party, this dessert is sure to impress your guests and satisfy their sweet cravings.
Ideal for serving 4-6 people, this tart isn’t only delicious but also relatively simple to prepare. The key components include a homemade crust, a beautifully balanced cream cheese filling, and a tart yet sweet cranberry topping. By following the instructions carefully, even a novice baker can achieve a professional-looking dessert.
The combination of flavors and textures in this tart will make it a favorite in your holiday dessert repertoire.
Ingredients:
- 1 1/2 cups all-purpose flour
- 1/2 cup powdered sugar
- 1/4 teaspoon salt
- 1/2 cup unsalted butter, cubed and chilled
- 8 oz cream cheese, softened
- 1/2 cup granulated sugar
- 1 teaspoon vanilla extract
- 1 egg
- 2 cups fresh cranberries
- 1/2 cup water
- 1/2 cup granulated sugar (for cranberry sauce)
- 1 tablespoon cornstarch
- 1 teaspoon lemon juice
Cooking Instructions:
1. Prepare the Crust: Preheat your oven to 350°F (175°C). In a mixing bowl, combine the all-purpose flour, powdered sugar, and salt. Add the cubed, chilled butter and mix with a pastry cutter or your fingertips until the mixture resembles coarse crumbs.
Press the mixture evenly into the bottom and sides of a 9-inch tart pan. Prick the crust with a fork and bake for 15 minutes or until lightly golden. Remove from oven and let it cool.
2. Make the Cream Cheese Filling: In a separate bowl, beat the softened cream cheese until smooth. Gradually add 1/2 cup granulated sugar and continue beating until creamy. Mix in the vanilla extract and then the egg, blending well until combined.
Pour the cream cheese mixture into the cooled tart crust, smoothing the top with a spatula.
3. Prepare the Cranberry Sauce: In a saucepan, combine fresh cranberries, 1/2 cup water, and 1/2 cup granulated sugar. Cook over medium heat until the cranberries begin to burst, about 10 minutes.
In a small bowl, mix cornstarch with a tablespoon of water to form a slurry, and add it to the cranberry mixture. Stir in the lemon juice and cook until the sauce thickens, about 3-5 minutes.
4. Assemble the Tart: Once the cranberry sauce has cooled slightly, gently spread it over the cream cheese layer in the tart. Use a spoon or spatula to create an even layer, ensuring the cream cheese layer is completely covered.
5. Chill and Serve: Refrigerate the assembled tart for at least 2 hours or until the filling is firm. This chilling time allows the flavors to meld together beautifully.
Before serving, remove the tart from the pan and slice into wedges.
Extra Tips: When making the crust, make sure your butter is well-chilled to achieve a flaky texture. If you find your cranberry sauce too tart, add a bit more sugar to taste.
For a decorative touch, you can reserve a few whole cranberries and arrange them on top of the tart before serving. Additionally, garnish with a few sprigs of fresh mint to add a festive pop of color.
Eggnog Cheesecake With Gingersnap Crust
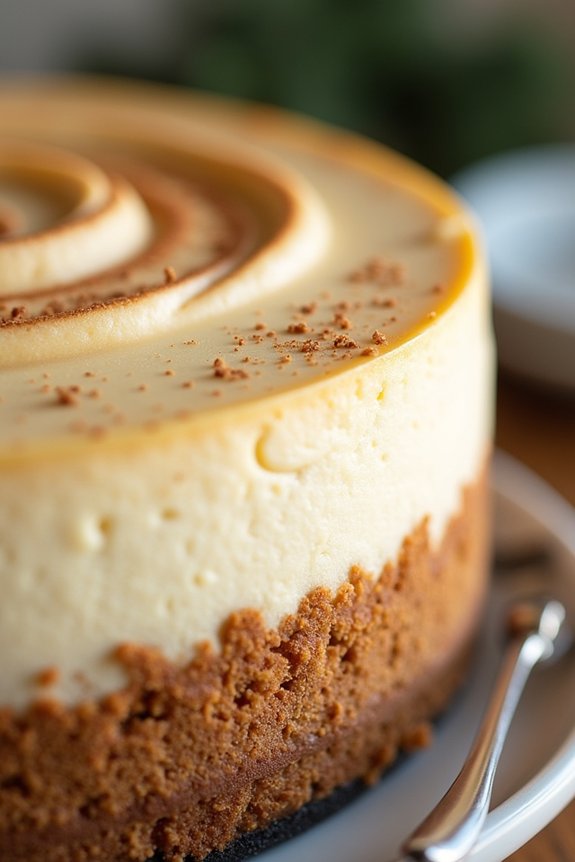
Eggnog Cheesecake With Gingersnap Crust is a delightful holiday dessert that combines the rich and creamy flavors of cheesecake with the festive taste of eggnog. The gingersnap crust adds a spicy and crunchy base, perfectly complementing the smooth and spiced filling. This dessert is perfect for gatherings and will surely impress your family and friends during the Christmas season.
This cheesecake isn’t only delicious but also visually appealing, with its golden crust and creamy filling. The aromatic spices in the gingersnap crust enhance the eggnog’s nutmeg and cinnamon notes, creating a harmonious blend of flavors. It’s an ideal dessert for those who love traditional holiday flavors presented in a modern and elegant way.
Ingredients (Serves 4-6):
- 1 1/2 cups gingersnap cookies, crushed
- 1/4 cup unsalted butter, melted
- 16 oz cream cheese, softened
- 1 cup granulated sugar
- 3 large eggs
- 1 cup eggnog
- 1 tablespoon all-purpose flour
- 1 teaspoon vanilla extract
- 1/2 teaspoon ground nutmeg
- 1/2 teaspoon ground cinnamon
Cooking Instructions:
- Prepare the Crust: Preheat your oven to 325°F (163°C). In a medium bowl, combine the crushed gingersnap cookies with melted butter. Mix until the crumbs are evenly coated. Press the mixture firmly into the bottom of a 9-inch springform pan to create an even crust.
- Bake the Crust: Place the springform pan with the crust into the preheated oven. Bake for about 10 minutes until the crust is set and slightly golden. Remove from the oven and let it cool while you prepare the filling.
- Make the Cheesecake Filling: In a large mixing bowl, beat the softened cream cheese with a hand mixer until smooth and creamy. Gradually add in the granulated sugar and continue to beat until well combined.
- Add the Eggs and Eggnog: Beat in the eggs one at a time, making certain each egg is fully incorporated before adding the next. Pour in the eggnog, flour, vanilla extract, nutmeg, and cinnamon. Mix on low speed until the ingredients are fully blended and smooth.
- Assemble and Bake: Pour the cheesecake filling over the cooled gingersnap crust, spreading evenly. Place the springform pan in a larger baking dish and fill the dish with hot water halfway up the sides of the pan to create a water bath. This helps the cheesecake bake evenly without cracking.
- Bake the Cheesecake: Carefully transfer the baking dish to the oven and bake for 50-60 minutes, or until the center is set but still slightly jiggly. Turn off the oven and crack the door open, allowing the cheesecake to cool in the oven for about an hour.
- Chill the Cheesecake: Remove the cheesecake from the oven and the water bath. Let it cool to room temperature, then refrigerate for at least 4 hours or overnight to set completely.
Extra Tips:
For the best results, make sure all your ingredients are at room temperature before starting, as this helps create a smooth and creamy filling.
Be careful not to overmix the batter once the eggs are added, as this can incorporate too much air and cause the cheesecake to crack.
If you don’t have a springform pan, you can use a regular 9-inch cake pan lined with parchment paper for easier removal.
Finally, if you prefer a stronger spice flavor, you can add a pinch more nutmeg or cinnamon to the filling according to your taste preference.
Red Velvet Cream Cheese Trifle
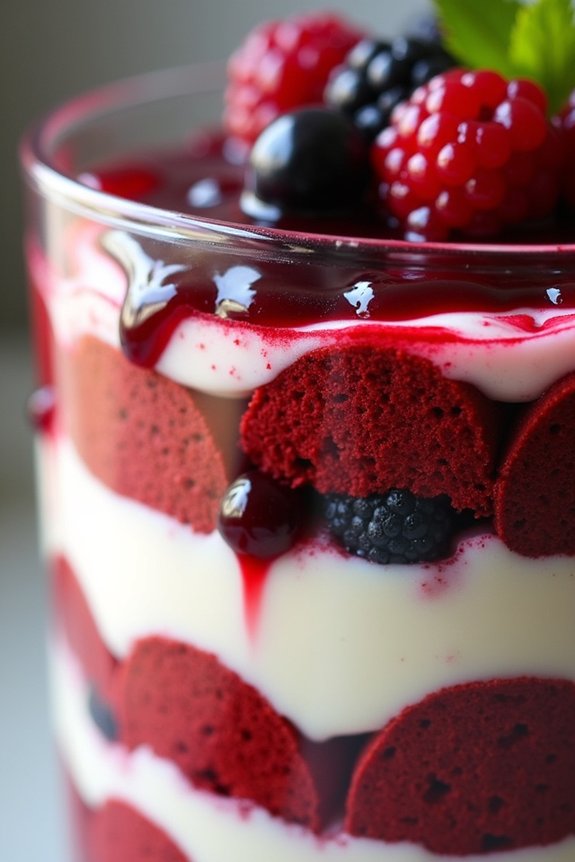
Red Velvet Cream Cheese Trifle is a stunning and delicious dessert that’s perfect for the holiday season. This layered dessert combines the rich flavors of red velvet cake with the creamy goodness of a tangy cream cheese filling. The bright red color of the cake layers is festive and inviting, making it an ideal centerpiece for your Christmas dessert table.
The trifle isn’t only a feast for the eyes but also a delightful treat for the taste buds, with each spoonful offering a harmonious blend of textures and flavors.
This dessert is surprisingly simple to put together, requiring just a few components that can be prepared in advance. The red velvet cake provides the base, while the cream cheese filling adds a luscious, creamy layer. Fresh berries or a berry compote can be added for a touch of tartness and color contrast.
Served in a trifle dish or individual glasses, this dessert is versatile enough to be scaled for larger gatherings or intimate family dinners. With the following recipe, you can easily create a Red Velvet Cream Cheese Trifle to serve 4-6 people.
Ingredients:
- 1 box of red velvet cake mix (plus ingredients required for the cake)
- 8 oz cream cheese, softened
- 1 cup powdered sugar
- 1 teaspoon vanilla extract
- 2 cups heavy whipping cream
- 1 cup fresh berries (such as raspberries or strawberries)
- Optional: 1/4 cup berry compote or sauce
Cooking Instructions:
1. Prepare the Red Velvet Cake: Follow the instructions on the box to bake the red velvet cake. Once baked, allow it to cool completely. When cooled, cut the cake into small cubes. This will make it easier to layer in the trifle dish.
2. Make the Cream Cheese Filling: In a large bowl, beat the softened cream cheese until smooth. Gradually add the powdered sugar and vanilla extract, and continue to beat until fully combined and creamy.
3. Whip the Cream: In a separate bowl, whip the heavy cream until soft peaks form. Gently fold the whipped cream into the cream cheese mixture until well combined. This will create a light and airy filling for the trifle.
4. Assemble the Trifle: Begin by placing a layer of red velvet cake cubes at the bottom of your trifle dish or individual serving glasses. Add a layer of the cream cheese filling over the cake, followed by a sprinkle of fresh berries or a spoonful of berry compote.
Repeat these layers until all ingredients are used, finishing with a layer of cream cheese filling and berries on top.
5. Chill and Serve: Refrigerate the trifle for at least 2 hours before serving. This allows the flavors to meld together and the dessert to set properly.
Extra Tips:
When making the Red Velvet Cream Cheese Trifle, consider preparing the cake a day in advance to save time on the day of assembling the trifle. You can also experiment with different berries or add a layer of crushed cookies for extra texture.
If you wish to make the dessert more adult-friendly, a splash of liqueur such as Grand Marnier or Chambord can be drizzled over the cake layers for a boozy twist. Remember to serve the trifle in clear glass dishes to showcase the beautiful layers, adding to its festive appeal.
Chocolate Cream Cheese Yule Log
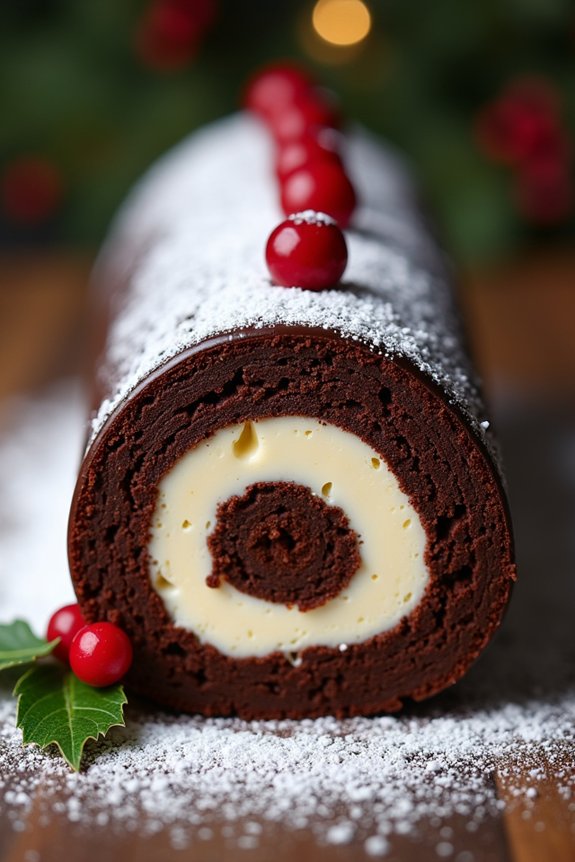
A Chocolate Cream Cheese Yule Log is a festive dessert that combines the rich flavors of chocolate with the creamy texture of cream cheese, making it an ideal centerpiece for your holiday celebrations. This delightful dessert not only looks stunning but also offers a delectable taste that will impress your friends and family.
The rolled sponge cake is filled with a smooth cream cheese filling and covered in a luscious chocolate ganache, providing a perfect balance of sweetness and texture. The preparation of this dessert requires some time and patience, but the result is certainly worth the effort.
The key is to work gently with the sponge cake to avoid cracking when rolling it with the filling. Once assembled and chilled, the yule log can be decorated to your liking, with powdered sugar resembling snow, chocolate shavings, or even edible holly leaves. This recipe serves 4-6 people, making it a perfect dessert for a small festive gathering.
Ingredients:
- 4 large eggs
- 2/3 cup granulated sugar
- 1 teaspoon vanilla extract
- 1/4 cup cocoa powder, unsweetened
- 1/2 cup all-purpose flour
- 1 teaspoon baking powder
- 1/4 teaspoon salt
- 8 ounces cream cheese, softened
- 1/2 cup powdered sugar
- 1 teaspoon vanilla extract (for filling)
- 1 cup heavy cream
- 8 ounces dark chocolate, chopped
- 2 tablespoons butter
Instructions:
- Prepare the Sponge Cake: Preheat your oven to 350°F (175°C). Line a 10×15 inch jelly roll pan with parchment paper. In a large bowl, beat the eggs and granulated sugar with an electric mixer until thick and pale. Add in vanilla extract, then sift in cocoa powder, flour, baking powder, and salt. Gently fold the dry ingredients into the egg mixture until just combined.
- Bake the Cake: Pour the batter evenly into the prepared pan, smoothing the top with a spatula. Bake in the preheated oven for 10-12 minutes, or until the cake springs back when lightly touched. Remove from the oven and let it cool for a few minutes.
- Roll the Cake: While the cake is still warm, gently lift it with the parchment paper and roll it from the short end into a log. Allow it to cool completely in the rolled shape. This helps prevent cracking later.
- Prepare the Cream Cheese Filling: In a medium bowl, beat the softened cream cheese until smooth. Add in powdered sugar and vanilla extract, then mix until well combined and creamy.
- Unroll and Fill the Cake: Carefully unroll the cooled cake and spread the cream cheese mixture evenly over the surface. Re-roll the cake without the parchment, enclosing the filling.
- Make the Chocolate Ganache: Heat the heavy cream in a saucepan over medium heat until it just begins to simmer. Remove from heat, then add the chopped dark chocolate and butter. Let it sit for a minute, then stir until smooth and glossy.
- Assemble the Yule Log: Place the rolled cake seam-side down on a serving platter. Pour the ganache over the cake, spreading it evenly with a spatula to cover the entire log. Chill in the refrigerator for at least 1 hour to allow the ganache to set.
- Decorate and Serve: Once set, you can dust the yule log with powdered sugar to resemble snow, or decorate with chocolate shavings or edible holly for a festive touch. Slice and serve.
Extra Tips:
When preparing the sponge cake, be gentle when folding the dry ingredients into the egg mixture to maintain the cake’s airy texture. If possible, use a serrated knife to cut the yule log, as it will help prevent the cake from tearing.
For added flavor, you can incorporate a dash of coffee into the ganache for a mocha twist. Remember, practice makes perfect with rolling the cake, so don’t be discouraged if it doesn’t come out flawlessly on the first try. Enjoy the process and have fun with the decorations!
Lemon Cream Cheese Pound Cake
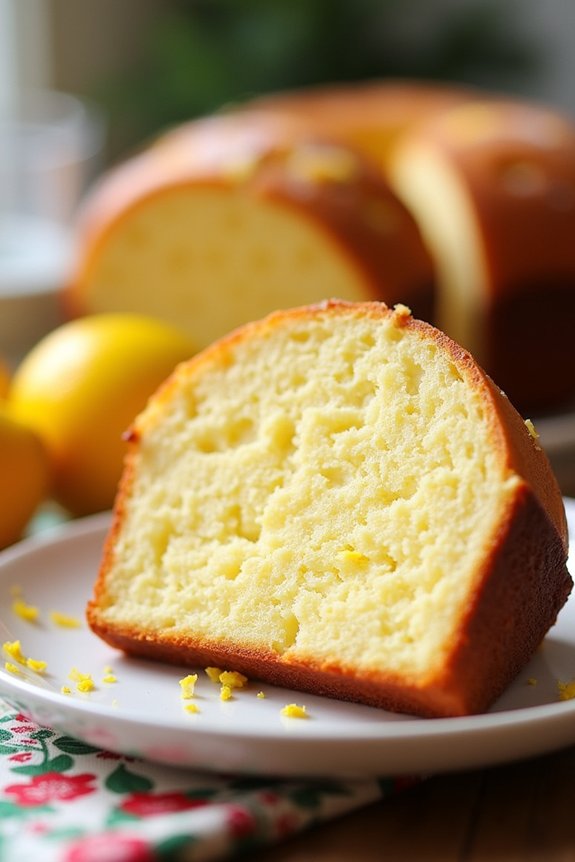
Lemon Cream Cheese Pound Cake is a delightful dessert that combines the tangy freshness of lemon with the rich, creamy texture of cream cheese. This cake is perfect for the holiday season, offering a burst of citrus flavor that complements the sweet, buttery pound cake base. Ideal for gatherings, this dessert is sure to impress your friends and family with its moist texture and vibrant flavor.
This recipe yields a cake that serves 4-6 people, making it a great choice for smaller holiday get-togethers. The preparation process is straightforward, though it requires some attention to detail to guarantee the cake bakes evenly and maintains its rich, creamy texture. By following this recipe, you’ll create a luscious Lemon Cream Cheese Pound Cake that will quickly become a festive favorite.
Ingredients:
- 1 1/2 cups all-purpose flour
- 1/2 teaspoon baking powder
- 1/4 teaspoon salt
- 1/2 cup unsalted butter, softened
- 4 ounces cream cheese, softened
- 1 cup granulated sugar
- 2 large eggs
- 2 tablespoons lemon juice
- 1 tablespoon lemon zest
- 1 teaspoon vanilla extract
- 1/4 cup milk
Cooking Instructions:
- Preheat the Oven: Begin by preheating your oven to 325°F (165°C). This lower temperature helps guarantee the cake bakes evenly without browning too quickly.
- Prepare the Pan: Grease and flour a 9×5 inch loaf pan. This will help prevent the cake from sticking to the pan and make it easier to remove once baked.
- Mix Dry Ingredients: In a medium bowl, whisk together the all-purpose flour, baking powder, and salt. Set this mixture aside as you’ll incorporate it later into the wet ingredients.
- Cream Butter and Cream Cheese: In a large bowl, beat the softened butter and cream cheese together using an electric mixer on medium speed until the mixture is smooth and creamy, about 2-3 minutes.
- Add Sugar and Eggs: Gradually add the granulated sugar to the butter mixture, beating until light and fluffy. Then, add the eggs one at a time, beating well after each addition to guarantee they’re fully incorporated.
- Incorporate Lemon and Vanilla: Stir in the lemon juice, lemon zest, and vanilla extract. These ingredients will add a revitalizing citrus flavor to the cake.
- Combine Wet and Dry Ingredients: Gradually add the dry flour mixture to the wet ingredients, alternating with the milk. Begin and end with the flour mixture, mixing just until combined. Avoid over-mixing to prevent the cake from becoming too dense.
- Bake the Cake: Pour the batter into the prepared loaf pan, smoothing the top with a spatula. Bake in the preheated oven for 60-70 minutes, or until a toothpick inserted into the center comes out clean.
- Cool and Serve: Allow the cake to cool in the pan for about 10 minutes before transferring it to a wire rack to cool completely. Once cooled, slice and serve your Lemon Cream Cheese Pound Cake.
Extra Tips:
For an added touch, consider making a simple lemon glaze by mixing powdered sugar with a little lemon juice and drizzling it over the cooled cake. This will enhance the lemon flavor and add a lovely decorative finish.
If you prefer a more intense lemon flavor, you can increase the amount of lemon zest in the recipe. Remember, the key to achieving the perfect texture isn’t to over-mix the batter once the flour is added, as this can lead to a tough cake.
Enjoy your Lemon Cream Cheese Pound Cake with a cup of tea or coffee for a truly delightful holiday treat!
Pistachio Cream Cheese Cookies

Pistachio Cream Cheese Cookies are a delightful addition to any Christmas dessert spread, offering a unique and flavorful twist on traditional cookies. These soft and tender cookies combine the rich creaminess of cream cheese with the nutty flavor of pistachios, creating an irresistible treat that’s perfect for holiday gatherings.
The vibrant green color of pistachios adds a festive touch, making them visually appealing as well as delicious. This recipe is perfect for serving 4-6 people, providing just the right amount of cookies to share with family and friends.
The use of cream cheese in the dough not only adds a subtle tang but also guarantees that the cookies remain soft and chewy, even after baking. Follow the instructions below to create these scrumptious cookies that are sure to be a hit at any Christmas celebration.
Ingredients:
- 1 cup unsalted butter, softened
- 4 oz cream cheese, softened
- 1 cup granulated sugar
- 1 large egg
- 1 teaspoon vanilla extract
- 2 ½ cups all-purpose flour
- 1 teaspoon baking powder
- ½ teaspoon salt
- 1 cup shelled pistachios, chopped
- ½ cup powdered sugar (for dusting, optional)
Instructions:
- Preheat and Prepare: Preheat your oven to 350°F (175°C). Line two baking sheets with parchment paper or silicone baking mats to prevent the cookies from sticking.
- Cream Butter and Cheese: In a large mixing bowl, beat the softened butter and cream cheese together using an electric mixer on medium speed until the mixture is smooth and creamy.
- Add Sugar and Flavorings: Gradually add the granulated sugar to the butter and cream cheese mixture, continuing to beat until light and fluffy. Beat in the egg and vanilla extract until well combined.
- Mix Dry Ingredients: In a separate bowl, whisk together the all-purpose flour, baking powder, and salt. Gradually add this dry mixture to the wet ingredients, beating on low speed just until the dough comes together.
- Incorporate Pistachios: Gently fold in the chopped pistachios, making sure they’re evenly distributed throughout the dough.
- Shape and Bake: Using a tablespoon or cookie scoop, portion out the dough and roll into balls. Place the dough balls onto the prepared baking sheets, spacing them about 2 inches apart. Flatten each ball slightly with the palm of your hand.
- Bake the Cookies: Bake in the preheated oven for 12-15 minutes, or until the edges of the cookies are lightly golden. Remove from the oven and allow them to cool on the baking sheet for 5 minutes before transferring to a wire rack to cool completely.
- Dust with Sugar: Once cooled, dust the cookies with powdered sugar if desired, for an extra touch of sweetness and a festive appearance.
Extra Tips: When making Pistachio Cream Cheese Cookies, make sure that both the butter and cream cheese are softened at room temperature to achieve the best consistency for your dough.
If you prefer a crunchier texture, toast the pistachios lightly before chopping them. Additionally, you can add a touch of almond extract for a more complex flavor profile.
These cookies can be stored in an airtight container for up to a week, making them a convenient option for advance holiday baking. Enjoy these cookies with a warm cup of tea or cocoa for a cozy treat!
Spiced Apple Cream Cheese Danish
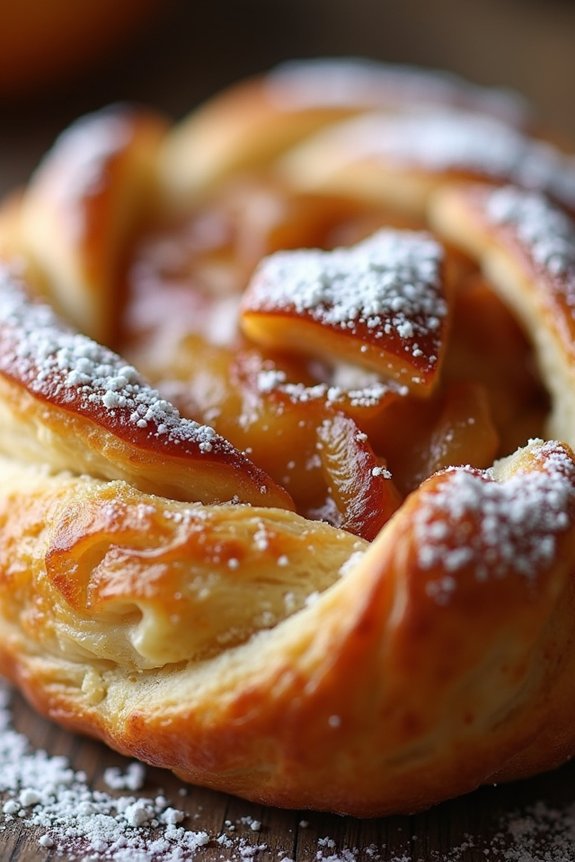
Indulge in the warmth and comfort of a Spiced Apple Cream Cheese Danish, a perfect treat for the holiday season. This delightful dessert combines the tartness of spiced apples with the creamy richness of cream cheese, all encased in a flaky, buttery pastry. Ideal for serving at festive gatherings or as a cozy treat with a cup of tea, this recipe is certain to impress your friends and family.
The aromas of cinnamon, nutmeg, and cloves wafting from your oven will evoke the spirit of Christmas, making these danishes a must-try for your holiday baking repertoire. Creating this dish isn’t only rewarding but also fun and relatively easy. You’ll be using store-bought puff pastry to save on time, allowing you to focus on perfecting the delectable spiced apple and cream cheese filling.
With this recipe, you can prepare 4-6 servings, guaranteeing there’s enough to share with loved ones. So, gather your ingredients and prepare to create a holiday dessert that’s as beautiful as it’s delicious.
Ingredients for 4-6 servings:
- 2 sheets of puff pastry, thawed
- 2 large apples, peeled, cored, and diced
- 1 tablespoon lemon juice
- 1/4 cup brown sugar
- 1 teaspoon ground cinnamon
- 1/4 teaspoon ground nutmeg
- 1/4 teaspoon ground cloves
- 1 tablespoon cornstarch
- 8 ounces cream cheese, softened
- 1/4 cup granulated sugar
- 1 teaspoon vanilla extract
- 1 egg, beaten (for egg wash)
- Powdered sugar (optional, for dusting)
Cooking Instructions:
- Prepare the Apple Filling: In a medium saucepan, combine the diced apples, lemon juice, brown sugar, cinnamon, nutmeg, and cloves. Cook over medium heat, stirring occasionally until the apples are tender, about 5-7 minutes. Stir in the cornstarch and cook for an additional 2 minutes until the mixture thickens. Remove from heat and let it cool.
- Make the Cream Cheese Filling: In a bowl, beat the softened cream cheese with the granulated sugar and vanilla extract until smooth and creamy. Set aside.
- Preheat the Oven: Preheat your oven to 400°F (200°C). Line a baking sheet with parchment paper.
- Roll Out the Pastry: On a lightly floured surface, roll out each sheet of puff pastry. Cut each sheet into 4 equal squares, giving you a total of 8 squares.
- Assemble the Danish: Place a tablespoon of cream cheese filling in the center of each pastry square, followed by a spoonful of the spiced apple mixture. Fold the corners of the pastry over the filling to meet in the center, pressing gently to seal.
- Apply Egg Wash: Brush the top of each Danish with the beaten egg to guarantee a golden, shiny finish after baking.
- Bake the Danish: Transfer the assembled Danishes to the prepared baking sheet. Bake in the preheated oven for 15-20 minutes or until the pastry is puffed and golden brown.
- Cool and Serve: Once baked, remove from the oven and let them cool slightly on a wire rack. Dust with powdered sugar before serving if desired.
Extra Tips:
To guarantee the best flavor and texture, use firm apples like Granny Smith or Honeycrisp that hold their shape well during cooking. If you prefer a more pronounced spice flavor, feel free to adjust the amounts of cinnamon, nutmeg, and cloves to your liking.
Additionally, make sure to seal the pastry edges securely to prevent the filling from leaking out during baking. These Danishes are best enjoyed fresh, but they can be stored in an airtight container for up to two days. Reheat them in a warm oven to refresh their crispness before serving.
Raspberry Swirl Cheesecake Bites
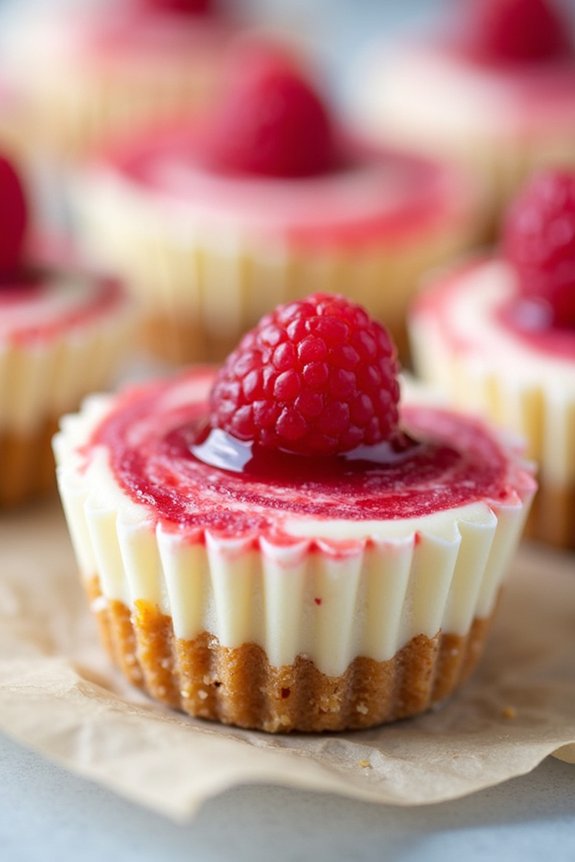
These cheesecake bites aren’t only delicious but also convenient. They can be made ahead of time, freeing you up to enjoy the festivities. The recipe involves creating a simple graham cracker crust, followed by a rich cream cheese filling, and finished with a homemade raspberry swirl.
By baking them in a muffin tin, you get perfect individual portions that are easy to serve. Whether you’re hosting a large Christmas party or an intimate family gathering, these Raspberry Swirl Cheesecake Bites are guaranteed to be a hit.
Ingredients (serves 4-6 people):
- 1 cup graham cracker crumbs
- 3 tablespoons unsalted butter, melted
- 1 tablespoon granulated sugar
- 8 oz cream cheese, softened
- 1/4 cup granulated sugar
- 1 teaspoon vanilla extract
- 1 large egg
- 1/4 cup sour cream
- 1/4 cup raspberry preserves
- 1 teaspoon lemon juice
Cooking Instructions:
- Prepare the Crust: Preheat your oven to 325°F (163°C). In a medium-sized bowl, combine the graham cracker crumbs, melted butter, and 1 tablespoon of sugar. Mix until the crumbs are evenly coated. Line a muffin tin with paper liners and press about a tablespoon of the graham cracker mixture into the bottom of each liner to form the crust.
- Bake the Crust: Place the muffin tin in the preheated oven and bake for 5 minutes. Remove from the oven and let them cool while you prepare the filling.
- Make the Cheesecake Filling: In a large mixing bowl, beat the softened cream cheese with 1/4 cup of sugar until smooth and creamy. Add the vanilla extract and egg, mixing until well combined. Then, fold in the sour cream until the mixture is smooth.
- Prepare the Raspberry Swirl: In a small bowl, stir together the raspberry preserves and lemon juice until smooth. Set aside.
- Assemble the Cheesecake Bites: Divide the cream cheese mixture evenly among the prepared crusts in the muffin tin. Drop small spoonfuls of the raspberry mixture onto each cheesecake and use a toothpick to swirl it into the cream cheese.
- Bake the Cheesecake Bites: Return the muffin tin to the oven and bake for 15-18 minutes, or until the edges are set but the center still jiggles slightly. Allow the cheesecake bites to cool in the pan for about 30 minutes before transferring them to the refrigerator to chill for at least 2 hours.
Extra Tips:
For an even richer flavor, consider using full-fat cream cheese and sour cream. Verify all your ingredients are at room temperature before you start mixing to achieve a smooth and creamy filling.
If you want a more pronounced raspberry flavor, feel free to add more preserves or even fresh raspberries to the swirl. When swirling the raspberry mixture, be gentle to avoid over-mixing, which can cause the colors to blend completely.
Finally, for best results, chill the cheesecake bites overnight to allow the flavors to fully develop and the texture to set properly.