

Flipping through my holiday recipe book always brings a warm and cozy feeling. Picture gingerbread houses straight from a storybook and snowflake cookies too pretty to eat. These recipes remind me of joyful times baking with loved ones, with laughter filling the kitchen and the scent of cinnamon in the air. Ready to discover some festive treats that will make your holidays extra special? Let’s get baking!
Whimsical Gingerbread Houses
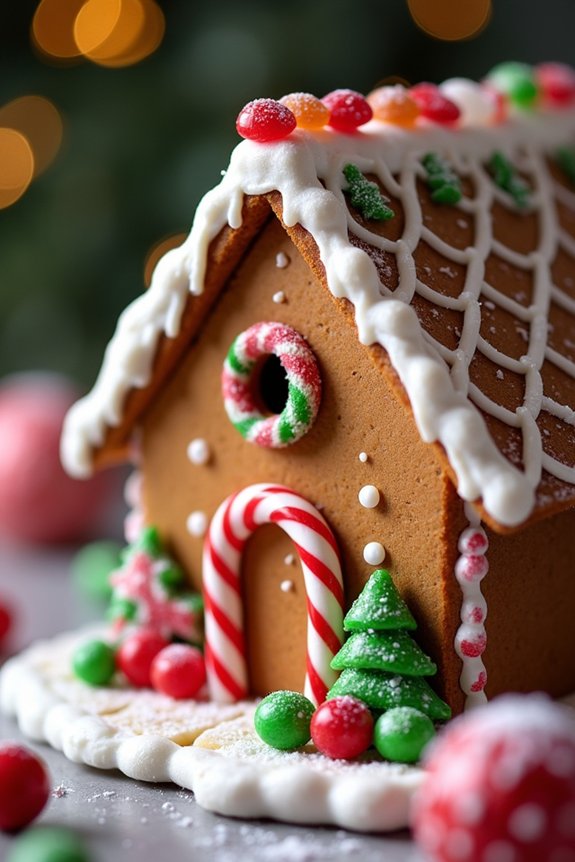
Whimsical Gingerbread Houses aren’t only a delightful treat to make during the Christmas season, but they also offer a fun and creative activity that families can enjoy together. These charming houses, made from fragrant gingerbread and adorned with colorful candies, can be as simple or elaborate as you like.
With a little imagination, you can create a magical winter village right in your kitchen. The aroma of ginger, cinnamon, and cloves filling your home is sure to evoke a warm holiday spirit and make the process even more enjoyable.
Building a Whimsical Gingerbread House demands patience and precision, but the end result is a stunning centerpiece that’s as delicious as it’s beautiful. Whether you’re a seasoned baker or a novice, this recipe will guide you through the process of creating your very own gingerbread masterpiece.
Gather your family and friends, roll up your sleeves, and let’s get started on crafting a sweet and memorable Christmas tradition.
Ingredients for a Serving Size of 4-6 People:
- 3 cups all-purpose flour
- 1 teaspoon baking soda
- 1 tablespoon ground ginger
- 1 tablespoon ground cinnamon
- 1/2 teaspoon ground cloves
- 1/2 teaspoon salt
- 3/4 cup unsalted butter, softened
- 3/4 cup packed brown sugar
- 1 large egg
- 1/2 cup molasses
- 1 teaspoon vanilla extract
- Assorted candies for decoration (gumdrops, candy canes, etc.)
- Royal icing for assembly and decoration
Cooking Instructions:
- Prepare the Dough: In a large mixing bowl, whisk together the flour, baking soda, ginger, cinnamon, cloves, and salt. In another bowl, cream the softened butter and brown sugar until light and fluffy. Beat in the egg, molasses, and vanilla extract. Gradually add the dry ingredients to the wet ingredients, mixing until a dough forms.
- Chill the Dough: Divide the dough into two portions, flatten each into a disk, wrap in plastic wrap, and refrigerate for at least 2 hours or until firm.
- Roll and Cut the Dough: Preheat your oven to 350°F (175°C). On a lightly floured surface, roll out one disk of dough to about 1/4 inch thickness. Use a gingerbread house template to cut out walls, a roof, and any additional pieces like doors and windows.
- Bake the Gingerbread: Place the cut pieces on a baking sheet lined with parchment paper. Bake for 10-12 minutes or until the edges are firm. Allow the pieces to cool completely on the baking sheet.
- Prepare the Royal Icing: In a mixing bowl, beat together 3 egg whites, 4 cups powdered sugar, and 1/2 teaspoon cream of tartar until smooth and thick. Transfer the icing to a piping bag.
- Assemble the House: Use the royal icing as glue to assemble the gingerbread house. Start by attaching the walls to a sturdy base, then add the roof. Hold each piece in place for a few minutes until the icing sets.
- Decorate: Once the house is assembled, use the remaining icing and assorted candies to decorate your gingerbread house to your liking. Let the house sit for a few hours to allow the icing to harden.
Extra Tips:
When making your Whimsical Gingerbread House, confirm that all the gingerbread pieces are completely cool before assembling to prevent them from breaking. If you encounter any breaks, don’t worry – royal icing can be used to mend minor cracks.
Consider creating a few extra pieces in case of breakage. Also, for a more stable structure, use a thick layer of icing, and let each piece set before moving on to the next.
The decorating process can be messy, so place a large sheet of parchment paper or a baking mat under your work area to catch any stray icing or candy. Remember, the most important part is to have fun and let your creativity shine!
Enchanting Snowflake Cookies

Enchanting Snowflake Cookies are a delightful addition to any Christmas celebration, capturing the essence of the season in both appearance and taste. These cookies, with their intricate designs and delicate sweetness, are perfect for sharing with family and friends or as a thoughtful homemade gift. The combination of buttery dough and a hint of vanilla provides a melt-in-your-mouth experience that’s complemented by a dusting of powdered sugar or a delicate icing glaze.
Whether you’re an experienced baker or a novice in the kitchen, crafting these cookies can be a joyous and rewarding activity that brings loved ones together.
Creating these Enchanting Snowflake Cookies requires attention to detail and a touch of creativity. The process begins with preparing a simple yet rich dough, which is then rolled out and cut into beautiful snowflake shapes using cookie cutters. Once baked to a golden perfection, the cookies are cooled and decorated to resemble the delicate patterns of snowflakes, often with a sprinkle of edible glitter or a drizzle of royal icing.
This recipe yields approximately 24 cookies, making it perfect for a gathering of 4-6 people.
Ingredients:
- 2 1/2 cups all-purpose flour
- 1 cup unsalted butter, softened
- 3/4 cup granulated sugar
- 1 large egg
- 1 teaspoon vanilla extract
- 1/2 teaspoon almond extract
- 1/2 teaspoon salt
- Powdered sugar or royal icing for decoration
- Edible glitter or sprinkles (optional)
Cooking Instructions:
- Prepare the Dough: In a large mixing bowl, cream together the softened butter and granulated sugar until light and fluffy. This should take about 2-3 minutes. Add the egg, vanilla extract, and almond extract, mixing until fully incorporated.
- Combine Dry Ingredients: In a separate bowl, whisk together the all-purpose flour and salt. Gradually add the dry ingredients to the wet ingredients, mixing until the dough comes together and is smooth.
- Chill the Dough: Divide the dough into two equal portions. Flatten each portion into a disc, wrap in plastic wrap, and refrigerate for at least 1 hour. This makes the dough easier to handle and helps maintain the shape of the cookies while baking.
- Roll and Cut the Dough: Preheat your oven to 350°F (175°C) and line baking sheets with parchment paper. On a lightly floured surface, roll out one disc of dough to about 1/4-inch thickness. Using snowflake-shaped cookie cutters, cut out cookies and place them on the prepared baking sheets.
- Bake the Cookies: Bake in the preheated oven for 8-10 minutes, or until the edges are just beginning to turn golden. Keep a close eye on them to avoid overbaking. Remove from the oven and allow them to cool on the baking sheets for a few minutes before transferring to wire racks to cool completely.
- Decorate the Cookies: Once the cookies are completely cooled, dust them with powdered sugar or decorate with royal icing. If desired, add a touch of edible glitter or sprinkles to enhance the snowflake effect.
Extra Tips:
When making Enchanting Snowflake Cookies, it’s essential to guarantee that the dough is well-chilled before rolling it out; this prevents the cookies from spreading too much while baking.
If the dough becomes too soft while working, simply return it to the refrigerator for a few minutes. When decorating, make sure the cookies are completely cool to prevent the icing from melting.
For an extra festive touch, consider adding a small amount of food coloring to the icing or using a fine-tipped piping bag to create intricate designs. Enjoy the process and let your creativity shine!
Festive Reindeer Cupcakes
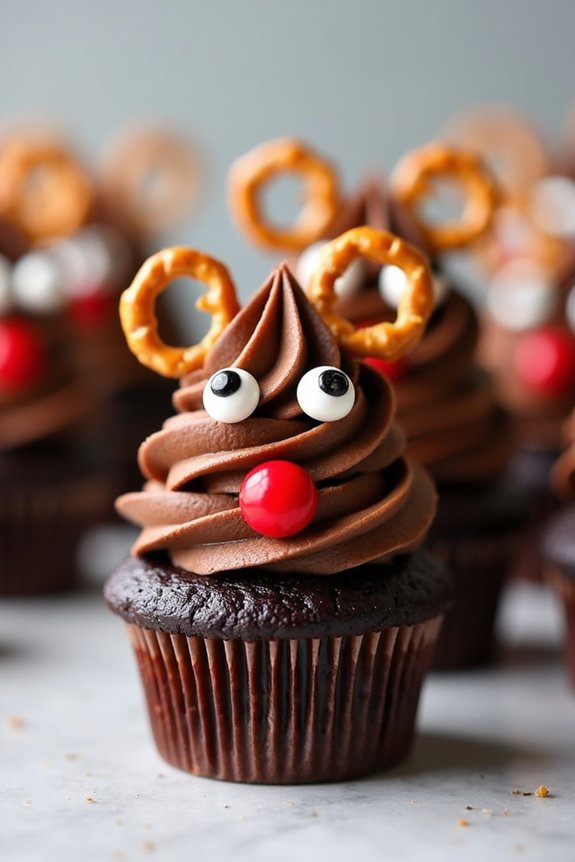
Festive Reindeer Cupcakes are a delightful holiday treat that combines the joy of baking with the whimsical spirit of Christmas. These charming cupcakes are adorned with playful reindeer faces made from simple ingredients, making them a fun project for bakers of all ages.
Whether you’re planning a family gathering, a holiday party, or simply looking to add some cheer to your dessert table, these cupcakes are certain to spread holiday warmth and smiles.
The process of making Festive Reindeer Cupcakes involves creating a moist and fluffy chocolate cupcake base, topped with a rich and creamy frosting, and decorated with pretzel antlers and candy features. This recipe is designed to serve 4-6 people, making it perfect for small gatherings or an intimate Christmas celebration at home.
Let’s gather our ingredients and get started on this merry baking adventure.
Ingredients (Serving Size: 4-6 people)
- 1 cup all-purpose flour
- 1/2 cup unsweetened cocoa powder
- 1 teaspoon baking powder
- 1/2 teaspoon baking soda
- 1/4 teaspoon salt
- 1/2 cup unsalted butter, softened
- 1 cup granulated sugar
- 2 large eggs
- 1 teaspoon vanilla extract
- 1/2 cup buttermilk
- 1 cup chocolate frosting
- 12 small pretzels
- 12 round candies (for noses)
- 24 candy eyes
- 6 red or brown M&M’s (for noses)
Instructions
- Preheat the Oven: Start by preheating your oven to 350°F (175°C) and line a muffin tin with cupcake liners. This guarantees the cupcakes have a proper shape and are easy to remove after baking.
- Mix Dry Ingredients: In a medium bowl, whisk together the flour, cocoa powder, baking powder, baking soda, and salt. This aids in evenly distributing the leavening agents and cocoa powder throughout the flour.
- Cream Butter and Sugar: In a large mixing bowl, beat the softened butter and granulated sugar together using an electric mixer on medium-high speed until the mixture becomes light and fluffy, about 3-4 minutes.
- Add Eggs and Vanilla: Add the eggs one at a time, beating well after each addition. Stir in the vanilla extract, making sure everything is well combined.
- Combine Mixtures: Gradually add the dry ingredients to the wet ingredients, alternating with the buttermilk. Start and end with the dry ingredients. Mix until just combined, being careful not to overmix.
- Fill and Bake: Divide the batter evenly among the cupcake liners, filling each about two-thirds full. Bake in the preheated oven for 18-20 minutes or until a toothpick inserted into the center of a cupcake comes out clean.
- Cool and Frost: Allow the cupcakes to cool in the pan for 5 minutes, then transfer them to a wire rack to cool completely. Once cooled, spread a generous amount of chocolate frosting on each cupcake.
- Decorate: Insert two pretzels at the top of each cupcake to create antlers. Place two candy eyes just below the pretzels. Add a round candy or M&M to form the nose, positioning it beneath the eyes.
Extra Tips
When making Festive Reindeer Cupcakes, verify that all ingredients are at room temperature before starting, especially the butter, as it creams better and results in a smoother batter.
For a more uniform and professional look, consider using a piping bag for the frosting instead of spreading it with a knife. If you’re baking with kids, let them get creative with the decorations—they might come up with unique reindeer expressions!
Additionally, if you want to make the cupcakes ahead of time, they can be stored in an airtight container at room temperature for up to two days. Enjoy your festive baking!
Adorable Penguin Macarons
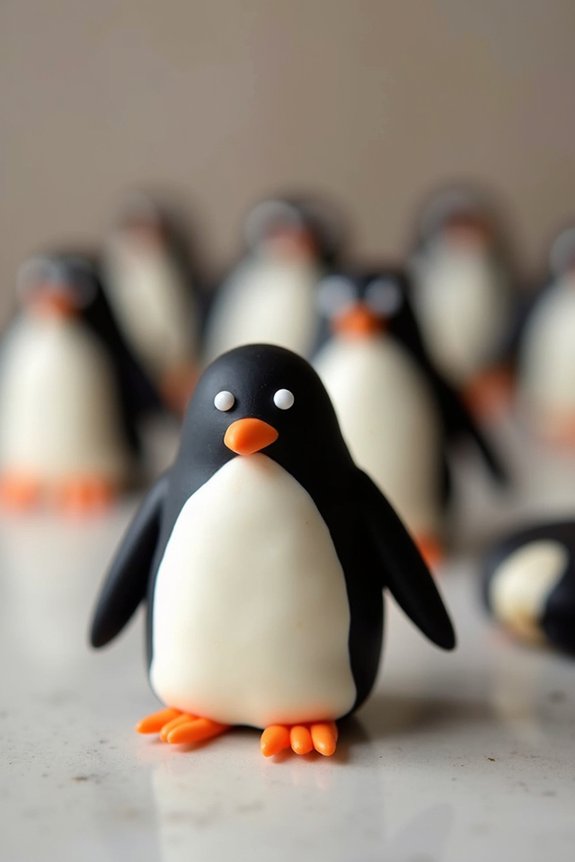
Creating adorable penguin macarons is a delightful way to add a whimsical touch to your Christmas baking repertoire. These charming treats aren’t only visually appealing but also deliciously sweet, making them a perfect holiday dessert. The process involves crafting delicate macaron shells and filling them with a luscious buttercream, all while decorating them to resemble cute little penguins.
With a bit of patience and creativity, you can create a batch of macarons that will be a hit at any festive gathering. Macarons can be a bit tricky, but with the right technique and attention to detail, anyone can master them. The key to successful macarons lies in the preparation of the meringue and the careful folding of ingredients to achieve the perfect consistency.
Once baked, the macarons are filled and decorated to bring the penguins to life. This recipe is designed to serve 4-6 people, making it ideal for a small holiday party or family gathering.
Ingredients:
- 100g almond flour
- 100g powdered sugar
- 75g egg whites (approximately 2 large eggs)
- 75g granulated sugar
- Black food coloring gel
- White food coloring gel
- Orange food coloring gel
- 1/2 tsp vanilla extract
- 100g unsalted butter, softened
- 150g powdered sugar (for buttercream)
- 2 tbsp heavy cream
Instructions:
- Prepare the Baking Sheets and Piping Bags:
- Line two baking sheets with parchment paper or silicone mats. Prepare three piping bags fitted with small round tips, one for the black batter, one for the white batter, and one for the orange icing.
- Mix the Dry Ingredients:
- In a food processor, pulse the almond flour and 100g powdered sugar until well combined. Sift the mixture into a large bowl to remove any lumps.
- Make the Meringue:
- In a clean, dry mixing bowl, whisk the egg whites until frothy. Gradually add the granulated sugar while continuing to whisk until stiff peaks form.
- Color the Meringue:
- Divide the meringue into two bowls. Add black food coloring to one bowl and white food coloring to the other, mixing each until the desired colors are achieved.
- Combine and Fold:
- Gently fold half of the almond flour mixture into the black meringue until combined. Add the remaining flour mixture and fold until the batter flows like lava. Repeat for the white meringue.
- Pipe the Macarons:
- Pipe small rounds of black batter on the prepared baking sheets for the penguin bodies. Add a small dab of white batter on each to form the belly. Gently tap the baking sheets to release any air bubbles.
- Rest the Macarons:
- Allow the macarons to rest at room temperature for 30-60 minutes, or until they form a skin and are no longer sticky to the touch.
- Bake:
- Preheat the oven to 300°F (150°C). Bake the macarons for 15-18 minutes, rotating the sheets halfway through. Allow them to cool completely on the sheets.
- Prepare the Buttercream:
- In a bowl, beat the softened butter until creamy. Gradually add 150g powdered sugar, heavy cream, and vanilla extract. Beat until smooth and fluffy.
- Decorate the Macarons:
- Pair similar-sized macaron shells. Pipe a small amount of buttercream onto the flat side of one shell and sandwich with another. Use the orange icing to pipe feet and beaks on the macarons.
- Add Details:
- With a small brush or toothpick, add tiny black dots for eyes on each penguin face using black food coloring.
Extra Tips:
Achieving the perfect macaron requires practice, so don’t be discouraged by initial attempts. Confirm your mixing bowl and tools are grease-free to help the egg whites whip properly.
Resting the macarons before baking is essential for forming the skin that gives them their signature “feet.” If your macarons crack or don’t develop feet, adjust your oven temperature or baking time. Remember, even imperfect macarons are delicious, and with practice, you’ll soon master the art of making these cute penguin treats.
Jolly Santa Claus Brownies
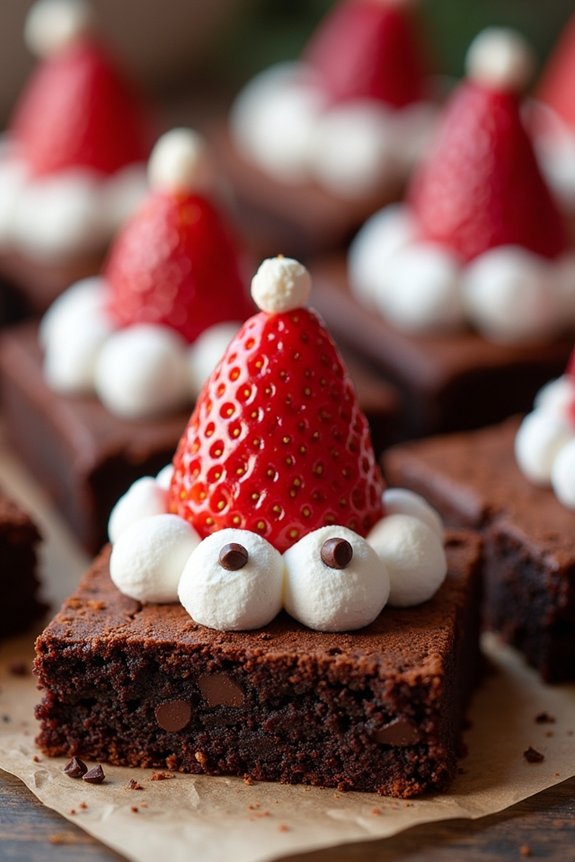
This recipe is straightforward, making it an ideal project for involving little helpers in the kitchen. The key to these brownies is achieving the perfect balance of a dense, moist brownie base that can support the decorative elements on top.
Once baked, the brownies are cut into triangles and decorated with strawberries and whipped cream to mimic Santa’s hat, while mini marshmallows and chocolate chips complete the jolly look. Follow the instructions carefully for a fun and delicious holiday treat that will bring smiles to your table.
Ingredients for 4-6 servings:
- 1/2 cup unsalted butter
- 1 cup granulated sugar
- 2 large eggs
- 1 teaspoon vanilla extract
- 1/3 cup unsweetened cocoa powder
- 1/2 cup all-purpose flour
- 1/4 teaspoon salt
- 1/4 teaspoon baking powder
- 6-8 fresh strawberries
- 1 cup whipped cream or frosting
- Mini marshmallows
- Chocolate chips
Cooking Instructions:
- Preheat and Prepare the Baking Dish: Preheat your oven to 350°F (175°C). Line an 8×8-inch baking dish with parchment paper or lightly grease it to prevent the brownies from sticking.
- Melt Butter and Mix Wet Ingredients: In a medium saucepan over low heat, melt the butter. Once melted, remove from heat and stir in the sugar, eggs, and vanilla extract until well combined.
- Combine Dry Ingredients: In a separate bowl, sift together the cocoa powder, flour, salt, and baking powder. Gradually add the dry ingredients to the wet mixture, stirring until you have a smooth batter.
- Bake the Brownies: Pour the batter into the prepared baking dish, spreading it evenly. Bake in the preheated oven for 20-25 minutes, or until a toothpick inserted into the center comes out clean. Allow the brownies to cool completely in the pan.
- Cut and Decorate: Once cooled, lift the brownies from the pan and cut them into triangle shapes. Place a dollop of whipped cream or frosting at the wide base of each triangle. Place a strawberry, pointed side up, on top of the cream to form Santa’s hat.
- Add the Finishing Touches: Use mini marshmallows to create the brim of Santa’s hat and a small dot of whipped cream or frosting at the tip of the strawberry for the pom-pom. Use chocolate chips to form eyes and a smile on each brownie.
Extra Tips:
For the best results, make sure that the brownies are completely cool before you begin decorating, as warm brownies can cause the whipped cream or frosting to melt.
If fresh strawberries aren’t available, you can substitute them with strawberry slices or use a red candy to mimic the hat. Be creative with the decorations, and feel free to add additional embellishments like edible glitter or colored sprinkles for extra festive flair.
Store the decorated brownies in an airtight container in the refrigerator if not serving immediately to keep them fresh.
Frosted Christmas Tree Cupcakes
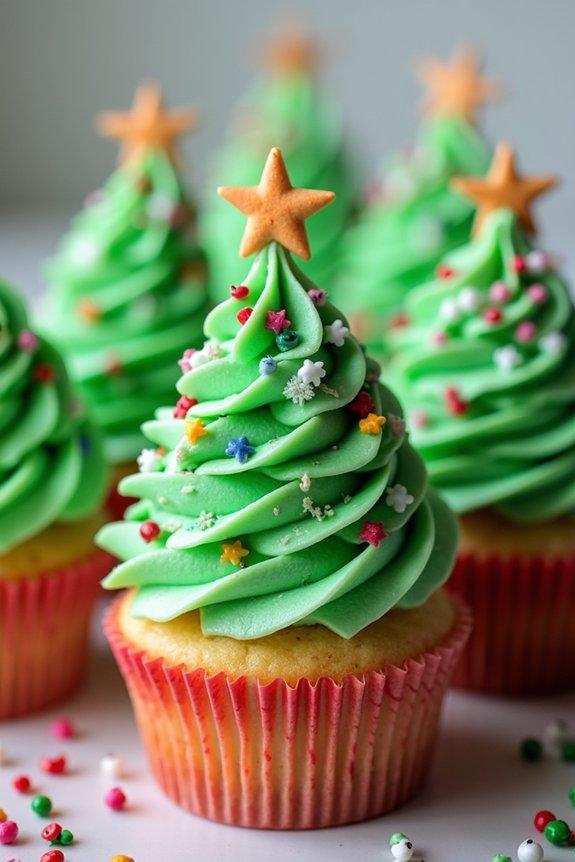
Frosted Christmas Tree Cupcakes are a delightful addition to any holiday gathering, bringing festive cheer with their vibrant colors and whimsical design. Perfect for both children and adults, these cupcakes capture the essence of Christmas with their tree-like appearance, adorned with frosting and sprinkles that mimic ornaments.
Creating these cupcakes isn’t only an enjoyable baking activity but also a wonderful opportunity to share in the spirit of the season with family and friends.
These cupcakes are made using a classic vanilla or chocolate base, topped with green-tinted frosting to resemble evergreen branches. The frosting is skillfully piped to achieve the look of a Christmas tree, and the cupcakes are decorated with colorful sprinkles and edible stars to complete the festive look.
Ideal for a serving size of 4-6 people, these cupcakes are as delicious as they’re visually appealing, making them a hit at any holiday dessert table.
Ingredients:
- 1 1/2 cups all-purpose flour
- 1 cup granulated sugar
- 1/2 cup unsalted butter, softened
- 2 large eggs
- 1/2 cup whole milk
- 1 teaspoon vanilla extract
- 1 1/2 teaspoons baking powder
- 1/4 teaspoon salt
- Green food coloring
- 1 cup unsalted butter (for frosting), softened
- 3 cups powdered sugar
- 2 tablespoons heavy cream
- 1 teaspoon vanilla extract (for frosting)
- Assorted sprinkles and edible stars for decoration
Cooking Instructions:
- Preheat the Oven: Begin by preheating your oven to 350°F (175°C). Line a cupcake pan with cupcake liners to prepare for baking.
- Prepare the Cupcake Batter: In a large mixing bowl, cream together the softened butter and granulated sugar until light and fluffy. Add eggs one at a time, beating well after each addition. Stir in the vanilla extract.
- Combine Dry Ingredients: In a separate bowl, whisk together the all-purpose flour, baking powder, and salt. Gradually add these dry ingredients to the creamed mixture, alternating with the milk, beginning and ending with the flour mixture. Mix until just combined.
- Bake the Cupcakes: Divide the batter evenly among the prepared cupcake liners, filling each about two-thirds full. Bake in the preheated oven for 18-20 minutes, or until a toothpick inserted into the center of a cupcake comes out clean. Allow cupcakes to cool completely on a wire rack.
- Make the Frosting: In a mixing bowl, beat the softened butter until creamy. Gradually add powdered sugar, one cup at a time, beating well after each addition. Add heavy cream and vanilla extract, and continue to beat until the frosting is smooth and spreadable.
- Tint the Frosting: Add green food coloring to the frosting, a few drops at a time, until you achieve the desired shade of green. Mix thoroughly to guarantee an even color.
- Decorate the Cupcakes: Fit a piping bag with a star tip and fill it with the green frosting. Pipe the frosting onto each cupcake in a swirling motion to resemble a Christmas tree. Decorate with assorted sprinkles and edible stars to mimic ornaments.
Extra Tips:
For the best results, make sure that your butter is at room temperature before beginning the recipe to achieve a smooth and creamy texture for both the batter and the frosting.
If you don’t have a piping bag, you can use a resealable plastic bag with a corner snipped off. When decorating, be creative with the sprinkles and edible stars to personalize each cupcake to your liking.
Additionally, these cupcakes can be made a day in advance, allowing the flavors to meld, and stored in an airtight container to maintain their freshness.
Charming Nutcracker Cake Pops

Celebrate the festive season with these delightful Charming Nutcracker Cake Pops. Perfect for holiday gatherings, these cake pops bring a whimsical touch to your dessert spread. Inspired by the classic Nutcracker ballet, they’re a fun and creative way to get into the Christmas spirit.
These cake pops combine the rich flavor of cake with the creamy texture of frosting, all coated in a crisp candy shell. Decorated to resemble little nutcrackers, they’re as fun to make as they’re to eat.
Making these charming treats is a wonderful activity to share with family and friends. Not only do they look impressive, but they also taste delicious, making them a hit among both children and adults.
With a few simple ingredients and a bit of artistic flair, you can create these festive pops that are certain to brighten your holiday table. Ideal for serving 4-6 people, these Nutcracker Cake Pops are a delightful addition to any Christmas celebration.
Ingredients (Serves 4-6):
- 1 box of vanilla cake mix
- 3 large eggs
- 1 cup water
- 1/2 cup vegetable oil
- 1 cup vanilla frosting
- 48 oz white candy melts
- Red, blue, black, and gold food coloring
- 24 lollipop sticks
- Edible glitter
- Edible black gel pen
- Assorted sprinkles
Instructions:
- Bake the Cake: Preheat your oven to 350°F (175°C). Prepare the vanilla cake mix according to the package instructions by combining it with eggs, water, and vegetable oil. Pour the batter into a greased cake pan and bake for 25-30 minutes, or until a toothpick inserted into the center comes out clean. Allow the cake to cool completely.
- Prepare the Cake Balls: Once the cake is cooled, crumble it into a large bowl. Add the vanilla frosting to the crumbled cake and mix thoroughly until the mixture is smooth and moldable.
- Form the Cake Balls: Scoop a small amount of the cake mixture and roll it into a ball about the size of a walnut. Place the balls onto a baking sheet lined with parchment paper. Refrigerate for at least 2 hours or until firm.
- Melt the Candy Coating: In a microwave-safe bowl, melt the white candy melts according to the package instructions. Divide the melted candy into separate bowls and add red, blue, black, and gold food coloring to each to achieve your desired Nutcracker colors.
- Assemble the Cake Pops: Dip the tip of each lollipop stick into the melted candy, then insert it halfway into each cake ball. Dip the cake balls into the colored candy melts, making sure they’re completely covered. Place them upright in a styrofoam block to dry.
- Decorate the Nutcracker Faces: Use the edible black gel pen to draw eyes, a mustache, and other Nutcracker features. Add edible glitter and assorted sprinkles for extra decoration. Allow the decorations to set before serving.
Extra Tips:
When making these Nutcracker Cake Pops, verify that the cake balls are well-chilled before dipping them into the candy melts, as this helps them hold their shape.
If the candy melt coating begins to harden while you’re working, simply reheat it in the microwave for a few seconds to regain the right consistency.
Feel free to get creative with your colors and decorations to make each Nutcracker unique. Keeping the design simple yet colorful will make these treats both charming and festive.
Delightful Snowman Sugar Cookies
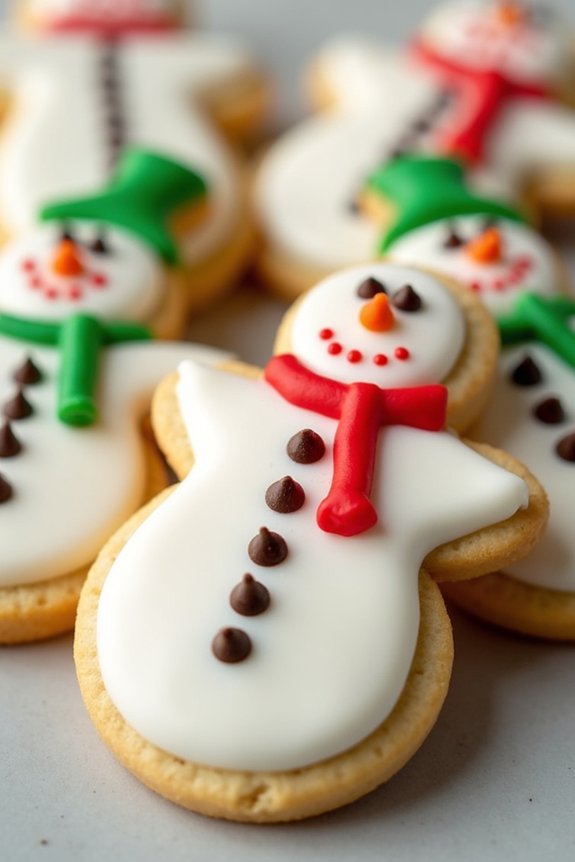
Delightful Snowman Sugar Cookies are a whimsical treat that capture the magic of the winter season. These cookies aren’t only delicious but also fun to make, allowing you to express your creativity as you decorate each snowman to your liking. Perfect for holiday gatherings or as a festive gift, these cookies are sure to bring a smile to anyone’s face.
The sugar cookie base is light and buttery, providing the perfect canvas for your artistic flair. Plus, with a hint of vanilla, these cookies are as tasty as they’re cute.
The process of creating these delightful snowmen involves a few steps, but the end result is well worth the effort. You’ll start by preparing a simple sugar cookie dough, which you’ll shape into the iconic snowman figure before baking.
Once baked and cooled, you’ll bring your snowmen to life with icing and decorations. This recipe makes enough cookies to serve 4-6 people, making it perfect for a small gathering or family treat time. Gather your ingredients and let’s commence on this fun, festive baking adventure.
Ingredients for 4-6 servings:
- 3 cups all-purpose flour
- 1 teaspoon baking powder
- 1/2 teaspoon salt
- 1 cup unsalted butter, softened
- 1 cup granulated sugar
- 1 large egg
- 1 teaspoon vanilla extract
- White royal icing
- Assorted decorations (mini chocolate chips, colored icing, sprinkles)
Cooking Instructions:
- Preheat and Prepare: Preheat your oven to 350°F (175°C). Line two baking sheets with parchment paper to prevent the cookies from sticking and to make cleanup easier.
- Mix Dry Ingredients: In a medium bowl, whisk together the flour, baking powder, and salt. This helps to evenly distribute the leavening agents and salt throughout the flour.
- Cream Butter and Sugar: In a large mixing bowl, beat the softened butter and granulated sugar together with an electric mixer at medium speed until the mixture is light and fluffy, about 2-3 minutes.
- Add Wet Ingredients: Beat in the egg and vanilla extract until fully incorporated. This helps to bind the dough and infuses it with a lovely vanilla aroma.
- Combine Dry and Wet Mixtures: Gradually add the dry ingredients to the wet mixture, mixing on low speed until just combined. Be careful not to overmix as this can make the cookies tough.
- Shape the Cookies: Roll the dough on a floured surface to about 1/4 inch thickness. Use a snowman cookie cutter to cut out shapes and place them on the prepared baking sheets.
- Bake the Cookies: Bake in the preheated oven for 10-12 minutes, or until the edges are just starting to turn golden. Remove from the oven and allow the cookies to cool on the baking sheet for a few minutes before transferring them to a wire rack to cool completely.
- Decorate Your Snowmen: Once the cookies are completely cool, use white royal icing to cover the snowmen. Use mini chocolate chips for eyes and buttons, and colored icing to create scarves, hats, and other details as desired.
Extra Tips: For the best results, make sure your butter is properly softened before you start. This will make it easier to cream with the sugar and will result in a smoother dough.
If you find the dough too sticky when rolling, chill it for 15-20 minutes in the refrigerator. This helps firm up the butter and makes it easier to handle.
When decorating, let your creativity shine! You can use any assortment of candies and edible decorations to personalize each snowman. Remember to let the icing set completely before stacking or storing the cookies to prevent smudging.
Magical Hot Cocoa Bombs
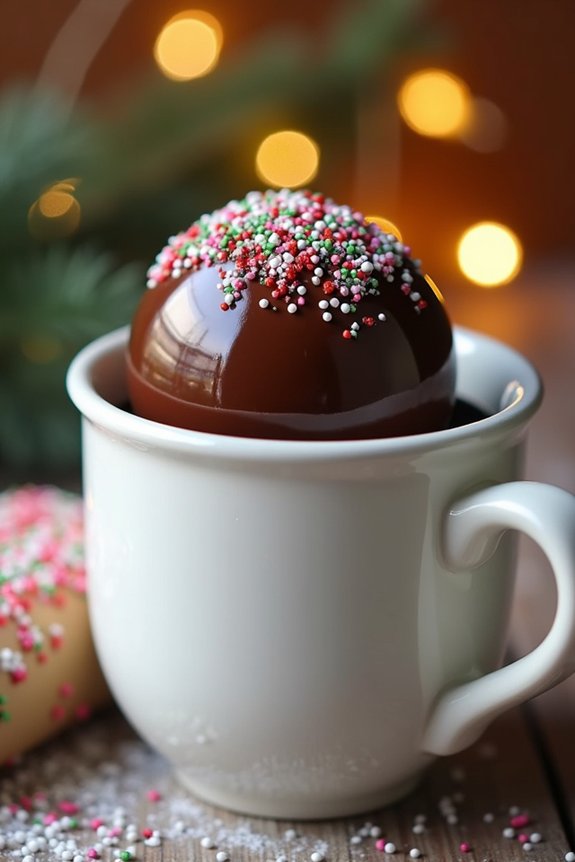
Magical Hot Cocoa Bombs are a delightful treat that transforms an ordinary mug of hot milk into a whimsical, chocolatey experience. These spheres of joy are made by encasing a rich cocoa mix and an assortment of marshmallows within a thin chocolate shell. As the shell melts away in hot milk, it releases the hidden contents, creating a luscious and velvety hot cocoa. Perfect for the holiday season, these cocoa bombs aren’t only a treat for the taste buds but also a fun and magical surprise for anyone lucky enough to receive one.
To create these enchanting hot cocoa bombs, you’ll need to start with quality chocolate that can be tempered to achieve a glossy finish and a satisfying snap. The process involves melting the chocolate, coating silicone molds, and filling them with a combination of cocoa mix and mini marshmallows. Once assembled, these cocoa bombs can be packaged in festive wrappers or served immediately by dropping them into steaming mugs of milk, where they’ll reveal their delicious contents in a mesmerizing display.
Ingredients (serving size: 4-6 people):
- 2 cups of high-quality semi-sweet chocolate chips
- 1 cup of hot cocoa mix
- 1 cup of mini marshmallows
- 6 tablespoons of powdered milk
- 1 teaspoon of vanilla extract (optional)
- Assorted sprinkles or edible glitter for decoration (optional)
Cooking Instructions:
- Prepare the Chocolate: Begin by melting the semi-sweet chocolate chips in a microwave-safe bowl. Heat in 30-second intervals, stirring in between, until the chocolate is smooth and fully melted. Alternatively, use a double boiler for a more controlled melting process.
- Coat the Molds: Use a brush or spoon to coat silicone half-sphere molds with a generous layer of melted chocolate. Make sure to cover all surfaces evenly, avoiding thin spots. Place the molds in the refrigerator for about 10-15 minutes to let the chocolate harden.
- Apply a Second Coat: Once the first coat is set, apply a second layer of chocolate to guarantee the shells are sturdy. Harden again in the refrigerator for another 10 minutes.
- Prepare the Filling: In a bowl, mix the hot cocoa mix, powdered milk, and vanilla extract (if using). Set aside.
- Assemble the Cocoa Bombs: Carefully remove the chocolate shells from the molds. Fill half of the shells with 1-2 tablespoons of the cocoa mix and a handful of mini marshmallows.
- Seal the Bombs: Warm a small plate in the microwave. Take an empty chocolate shell, quickly and gently press its edge against the warm plate to slightly melt it, then place it on top of a filled shell to seal. Repeat for all cocoa bombs.
- Decorate: If desired, brush a little melted chocolate on the outside of the bombs and add sprinkles or edible glitter for a festive touch. Allow the decorated bombs to set for a few minutes.
- Serve: To enjoy, place a cocoa bomb in a mug and pour hot milk over it. Stir until the bomb is melted and the cocoa is fully mixed.
Extra Tips:
When making Magical Hot Cocoa Bombs, it’s essential to temper the chocolate properly if you’re using chocolate bars instead of chips to guarantee the shells are glossy and have a good snap.
Confirm the molds are completely dry to prevent the chocolate from seizing. If you don’t have a silicone mold, you can use a muffin tin lined with cupcake liners as an alternative.
Additionally, feel free to customize the filling with other add-ins such as crushed peppermint candies or a pinch of cinnamon for added flavor. Store any unused bombs in an airtight container to keep them fresh.
Sparkling Candy Cane Bark
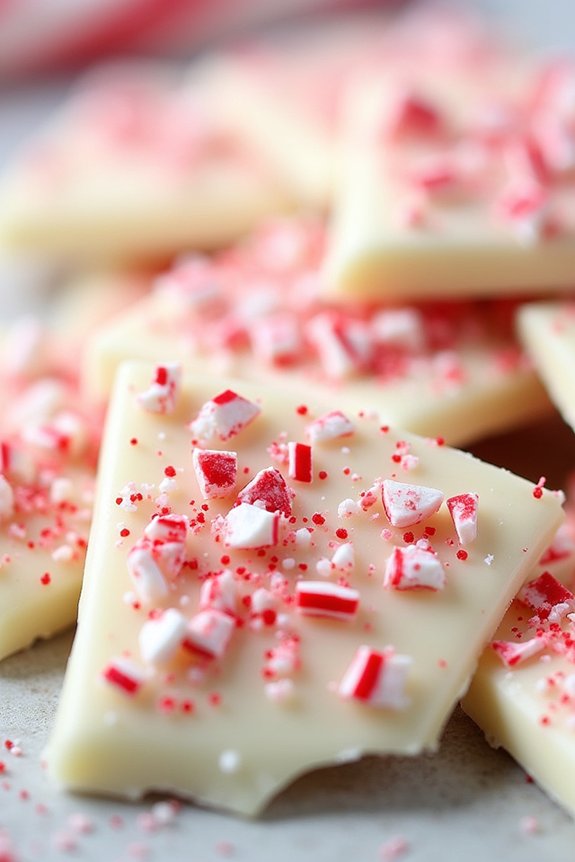
The festive season calls for delightful treats that not only please the palate but also add a touch of sparkle to your holiday celebrations. Sparkling Candy Cane Bark is a perfect confectionary delight that embodies the spirit of Christmas with its vibrant colors and invigorating peppermint flavor. This easy-to-make recipe brings together smooth white chocolate, crushed candy canes, and a sprinkle of edible glitter to create a visually stunning and delicious treat.
Ideal for gifting or serving at holiday gatherings, this bark is sure to become a seasonal favorite. Creating Sparkling Candy Cane Bark involves a straightforward process that yields a satisfying result with minimal effort. The combination of textures—from the creamy chocolate to the crunchy candy canes—guarantees a delightful eating experience.
The recipe serves 4-6 people, making it perfect for small gatherings or cozy family celebrations. With just a few simple ingredients and a bit of creativity, you can craft a treat that not only tastes amazing but also captures the magical essence of the holiday season.
Ingredients (Serves 4-6 people):
- 16 ounces of white chocolate
- 1 cup of crushed candy canes
- Edible glitter (optional but recommended for sparkle)
- 1/4 teaspoon of peppermint extract
- Parchment paper
Instructions:
- Prepare the Baking Sheet: Line a baking sheet with parchment paper to prevent the bark from sticking. Make sure the sheet is large enough to spread the chocolate to your desired thickness.
- Melt the White Chocolate: Break the white chocolate into small pieces and place them in a microwave-safe bowl. Microwave the chocolate in 30-second intervals, stirring between each interval, until the chocolate is fully melted and smooth. Alternatively, you can melt the chocolate using a double boiler on the stove.
- Add Peppermint Extract: Once the chocolate is melted, stir in the peppermint extract. This will infuse the chocolate with a invigorating minty flavor.
- Spread the Chocolate: Pour the melted chocolate onto the prepared baking sheet. Use a spatula to spread it into an even layer, about 1/4-inch thick.
- Add Candy Canes: Sprinkle the crushed candy canes evenly over the top of the melted chocolate. Press them gently into the surface to guarantee they stick as the chocolate cools.
- Add Edible Glitter: If using, sprinkle a light dusting of edible glitter over the bark to give it a festive sparkle.
- Cool and Set: Allow the bark to set at room temperature or place it in the refrigerator for about 30 minutes until the chocolate is firm.
- Break into Pieces: Once set, break the bark into pieces of your desired size. Serve immediately or store in an airtight container.
Extra Tips:
For the best results, use high-quality white chocolate, as it will melt more smoothly and provide a creamier texture. If you prefer a less minty flavor, reduce the amount of peppermint extract slightly.
If you don’t have edible glitter, you can use other decorative toppings like colored sugar or sprinkles to add a festive touch. Additionally, be sure to crush the candy canes into small, even pieces to guarantee they adhere well to the chocolate and create a uniform appearance.
Enjoy your Sparkling Candy Cane Bark as a delightful holiday treat or a charming homemade gift!
Cozy Yule Log Cakes
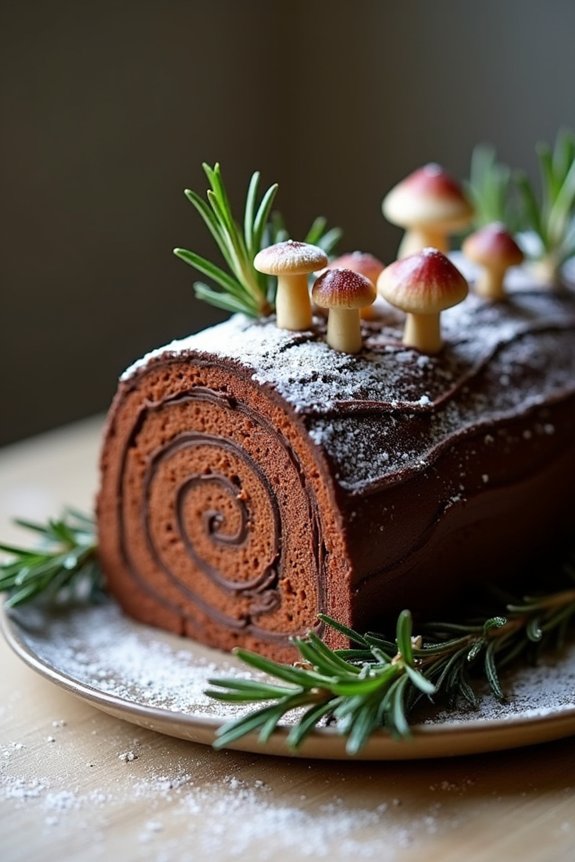
The Yule Log Cake, or Bûche de Noël, is a traditional Christmas dessert that embodies the warmth and charm of the festive season. This delightful cake isn’t only a feast for the taste buds but also a visual treat, resembling a log decorated with festive elements such as powdered sugar snow, marzipan mushrooms, and sprigs of rosemary as pine branches.
Perfectly suited for holiday gatherings, this dessert serves as both a centerpiece and a sweet finale to your Christmas feast.
Crafting a Yule Log Cake requires a blend of baking skills and creativity. The cake consists of a light and airy sponge rolled around a rich and creamy filling, typically chocolate buttercream, and then covered with more chocolate buttercream to mimic the bark of a tree. The final touches with decorations make it a truly festive creation.
Here’s how you can make a Cozy Yule Log Cake that serves 4-6 people.
Ingredients:
- 6 large eggs, separated
- 1 cup granulated sugar
- 1 teaspoon vanilla extract
- 1/2 cup all-purpose flour
- 1/4 cup unsweetened cocoa powder
- 1/4 teaspoon salt
- 1/2 teaspoon baking powder
- 1 cup heavy cream
- 2 tablespoons confectioners’ sugar
- 1 teaspoon vanilla extract
- 1 cup unsalted butter, softened
- 2 cups confectioners’ sugar
- 1/3 cup unsweetened cocoa powder
- 1/4 cup milk
- Powdered sugar for dusting
- Marzipan mushrooms and rosemary sprigs for decoration
Instructions:
- Preheat and Prepare: Preheat your oven to 350°F (175°C). Line a 10×15 inch jelly roll pan with parchment paper and lightly grease it. This will help the cake release easily after baking.
- Make the Sponge Cake: In a large bowl, beat egg yolks and 1/2 cup sugar together until thick and pale. Stir in the vanilla extract. In another bowl, sift together flour, cocoa powder, salt, and baking powder. Gradually fold the dry ingredients into the yolk mixture.
- Whip Egg Whites: In a separate clean bowl, beat the egg whites until soft peaks form. Gradually add the remaining 1/2 cup of granulated sugar, beating until stiff peaks form. Gently fold the whites into the chocolate mixture in three additions, being careful not to deflate the batter.
- Bake the Cake: Spread the batter evenly into the prepared pan. Bake for 12-15 minutes, or until the cake springs back when lightly touched. Once baked, immediately turn the cake onto a clean towel dusted with powdered sugar. Remove the parchment paper and roll the cake up in the towel, starting at the short end. Let it cool completely.
- Prepare the Filling: In a chilled bowl, whip the heavy cream, confectioners’ sugar, and vanilla extract until stiff peaks form. Carefully unroll the cooled cake and spread the whipped cream filling over the surface. Roll the cake back up, without the towel, and place it seam-side down on a platter.
- Make the Buttercream: Beat the softened butter until creamy. Gradually add confectioners’ sugar and cocoa powder, alternating with the milk, beating until smooth and spreadable.
- Decorate the Cake: Spread the chocolate buttercream over the rolled cake. Use a fork to create a bark-like texture. Dust with powdered sugar and decorate with marzipan mushrooms and rosemary sprigs to complete the festive look.
Extra Tips:
To guarantee the cake rolls easily without cracking, make sure not to overbake it and roll it while it’s still warm.
If you’re short on time, you can prepare the cake a day in advance and store it in the fridge, covering it with plastic wrap to keep it moist.
When serving, a gentle dusting of powdered sugar can add a snowy effect, enhancing the visual appeal of your Yule Log Cake.
Finally, if marzipan mushrooms aren’t readily available, they can be crafted at home using marzipan and cocoa powder for a simple DIY approach.
Merry Christmas Ornament Cookies

Celebrate the festive season with Merry Christmas Ornament Cookies, a delightful treat that not only satisfies your sweet tooth but also brings a touch of artistry to your holiday baking. These charming cookies are perfect for adding color and joy to your Christmas dessert table, and they make a wonderful homemade gift for friends and family.
With their vibrant icing and playful decorations, Merry Christmas Ornament Cookies are sure to become a beloved tradition in your holiday baking repertoire. These cookies are designed to resemble the pretty ornaments that adorn Christmas trees, making them a fun activity to bake and decorate with loved ones.
The soft and buttery sugar cookie base provides the perfect canvas for colorful icing and festive sprinkles. With a serving size of 4-6 people, this recipe guarantees there’s plenty to share, whether you’re hosting a holiday party or simply enjoying a cozy night in with family.
Ingredients (Serves 4-6):
- 2 ¾ cups all-purpose flour
- 1 teaspoon baking soda
- ½ teaspoon baking powder
- 1 cup unsalted butter, softened
- 1 ½ cups granulated sugar
- 1 egg
- 1 teaspoon vanilla extract
- ½ teaspoon almond extract
- ¼ teaspoon salt
- Assorted food coloring
- Royal icing or store-bought icing
- Edible glitter, sprinkles, and other decorations
Instructions:
- Prepare the Dough: Begin by preheating your oven to 350°F (175°C). In a medium bowl, whisk together the flour, baking soda, baking powder, and salt. Set aside. In a large bowl, cream the softened butter and sugar together until light and fluffy. This should take about 3-4 minutes.
- Mix in Eggs and Flavorings: Add the egg, vanilla extract, and almond extract to the butter-sugar mixture. Beat until well combined. Gradually add the dry ingredients to the wet ingredients, mixing until a dough forms. Don’t overmix.
- Chill the Dough: Divide the dough into two portions, flatten into discs, and wrap each in plastic wrap. Chill in the refrigerator for at least 1 hour. This helps the dough firm up, making it easier to roll and cut out.
- Roll and Cut: On a lightly floured surface, roll out one disc of dough to about ¼ inch thickness. Use ornament-shaped cookie cutters to cut out shapes. Place the cookies on a parchment-lined baking sheet, about 2 inches apart.
- Bake: Bake in the preheated oven for 8-10 minutes, or until the edges are lightly golden. Let the cookies cool on the baking sheet for 5 minutes before transferring them to a wire rack to cool completely.
- Decorate: Prepare your royal icing according to package instructions or your recipe. Divide the icing into small bowls and tint each with your desired food coloring. Use piping bags or ziplock bags with a small corner snipped off to pipe the icing onto the cookies. Decorate with edible glitter, sprinkles, and other festive decorations as desired.
- Let Set: Allow the icing to set completely before serving or packaging the cookies.
Extra Tips:
For the best results, make sure your butter is softened to room temperature before starting the recipe, as this will create a smoother, more uniform dough.
When decorating, consider using toothpicks or small brushes to perfect intricate designs. If you plan to hang these cookies as ornaments, use a straw to create a small hole at the top of each cookie before baking.
Finally, store the decorated cookies in an airtight container to maintain freshness. Enjoy the process, and have fun making these beautiful and delicious Merry Christmas Ornament Cookies!