

The holiday season is the perfect time to indulge in baking Christmas cookies that are almost too pretty to eat. I can still recall the delight of crafting my first batch of snowflake sugar cookies, their delicate designs shimmering with festive joy. I’ve curated a collection of recipes that promise not only delicious flavors but also a feast for the eyes. Each one is a vibrant masterpiece begging to be shared. Ready to find out which cookie creation will be your next holiday baking inspiration?
Snowflake Sugar Cookies
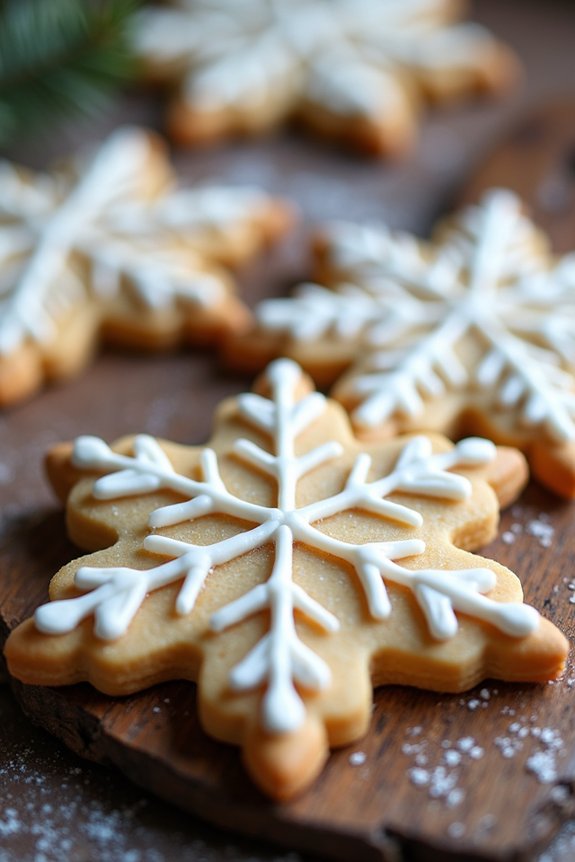
Snowflake Sugar Cookies are a delightful and festive treat, perfect for celebrating the holiday season. These cookies not only taste delicious but also add a touch of winter magic to your dessert table. With their intricate snowflake design and sweet sugar coating, they’re sure to be a hit with both children and adults alike. The recipe is simple enough for a novice baker to tackle, yet impressive enough to wow your holiday guests.
These charming cookies are made with a classic sugar cookie dough that’s easy to roll out and cut into beautiful snowflake shapes. Once baked, the cookies are decorated with a layer of royal icing, giving them a pristine, snowy appearance. You can choose to keep them simple with a white icing or add some sparkle with edible glitter or colored sugar. This recipe yields about 24-30 cookies, making it perfect for sharing or gifting.
Ingredients for Snowflake Sugar Cookies (Serves 4-6):
- 3 cups all-purpose flour
- 1 teaspoon baking powder
- 1/2 teaspoon salt
- 1 cup unsalted butter, softened
- 1 cup granulated sugar
- 1 large egg
- 1 teaspoon vanilla extract
- 1/2 teaspoon almond extract (optional)
- Royal icing (for decoration)
- Edible glitter or colored sugar (optional)
Instructions:
- Prepare the Dough: In a medium bowl, whisk together the flour, baking powder, and salt. In a large bowl, using an electric mixer, beat the softened butter and sugar on medium speed until light and fluffy. Add the egg, vanilla extract, and almond extract (if using), and continue to mix until well combined.
- Combine Ingredients: Gradually add the dry ingredients to the wet ingredients, mixing on low speed until the dough forms. Make sure to scrape down the sides of the bowl to verify everything is well incorporated.
- Chill the Dough: Divide the dough into two equal portions, flatten each into a disk, wrap in plastic wrap, and refrigerate for at least 1 hour. Chilling the dough makes it easier to roll out and helps the cookies maintain their shape when baked.
- Preheat and Roll: Preheat your oven to 350°F (175°C). On a lightly floured surface, roll out one disk of dough to about 1/4 inch thickness. Use snowflake-shaped cookie cutters to cut out shapes and place them on a baking sheet lined with parchment paper, leaving some space between each cookie.
- Bake the Cookies: Bake the cookies in the preheated oven for 8-10 minutes, or until the edges are just beginning to turn golden. Remove from the oven and let them cool on the baking sheet for a few minutes before transferring to a wire rack to cool completely.
- Decorate: Once the cookies are completely cool, decorate them with royal icing. You can pipe intricate designs or simply flood the cookies with icing for a smooth finish. Add edible glitter or colored sugar for extra sparkle, if desired.
Extra Tips:
To verify your snowflake sugar cookies come out perfect, make sure your butter is softened to room temperature before starting. This will help achieve a smooth and creamy dough.
When rolling out the dough, use a light hand with the flour to avoid altering the texture of the cookies. If you find the dough becoming too soft while cutting shapes, return it to the refrigerator for a few minutes to firm up.
For a professional-looking finish, use a piping bag with a small tip for detailed icing work. Finally, store any leftover cookies in an airtight container to keep them fresh and delicious throughout the holiday season.
Reindeer Thumbprint Cookies
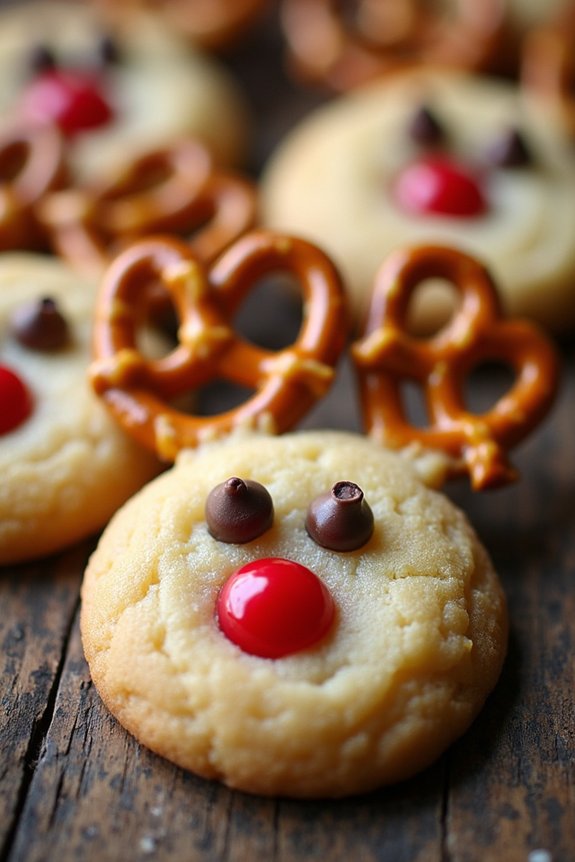
Reindeer Thumbprint Cookies are a delightful and festive treat that will add a touch of whimsy to your holiday cookie platter. These cookies aren’t just fun to make, but they also combine the classic taste of a thumbprint cookie with the creative flair of reindeer decorations. Perfect for a family baking session, these cookies are sure to be a hit with both kids and adults alike. Their buttery, crumbly texture combined with a sweet filling and charming design makes them irresistible.
With the holiday season in full swing, Reindeer Thumbprint Cookies are an excellent choice for holiday gatherings, gift exchanges, or simply as a fun baking activity. The process involves creating a simple cookie dough, forming it into balls, and then pressing your thumb into each one to create the signature “thumbprint.” What sets these cookies apart is the addition of chocolate chips, pretzels, and red candies to transform them into adorable reindeer faces. This recipe makes enough for 4-6 people, guaranteeing everyone can indulge in the festive spirit.
Ingredients for Reindeer Thumbprint Cookies:
- 1 cup unsalted butter, softened
- 1/2 cup granulated sugar
- 1 teaspoon vanilla extract
- 2 cups all-purpose flour
- 1/4 teaspoon salt
- 1/2 cup chocolate chips
- 12 small pretzel twists
- 12 red candy-coated chocolates (such as M&M’s)
Cooking Instructions:
- Preheat and Prep: Preheat your oven to 350°F (175°C). Line a baking sheet with parchment paper to prevent sticking.
- Make the Dough: In a large mixing bowl, cream together the softened butter and granulated sugar until light and fluffy. Add the vanilla extract and mix until combined.
- Combine Ingredients: Gradually add the all-purpose flour and salt to the butter mixture, mixing until a smooth dough forms.
- Shape the Cookies: Roll the dough into 1-inch balls and place them on the prepared baking sheet, spacing them about 2 inches apart.
- Create Thumbprints: Using your thumb, gently press down in the center of each dough ball to create a small indentation.
- Bake the Cookies: Place the baking sheet in the preheated oven and bake for 12-15 minutes, or until the edges are lightly golden. Remove from the oven and allow to cool slightly on the baking sheet.
- Decorate the Reindeer: Once the cookies are cool enough to handle, press two chocolate chips into the top edge of each cookie to form the eyes. Break the pretzel twists in half and insert them into the top of the cookie to create antlers. Finally, place a red candy in the indentation for the nose.
- Let Them Set: Allow the cookies to cool completely on a wire rack so the decorations can set properly.
Extra Tips:
When making Reindeer Thumbprint Cookies, it’s important to ascertain your butter is properly softened to easily cream with the sugar. If the dough is too crumbly, you can add a tablespoon of milk to help it come together.
Confirm that the cookies are completely cool before adding the decorations to prevent the chocolate and candy from melting. If you’re baking with kids, let them get creative with different colors of candies for the noses to make each reindeer unique.
Enjoy your festive creations with a glass of milk or hot cocoa!
Festive Holly Leaf Cookies
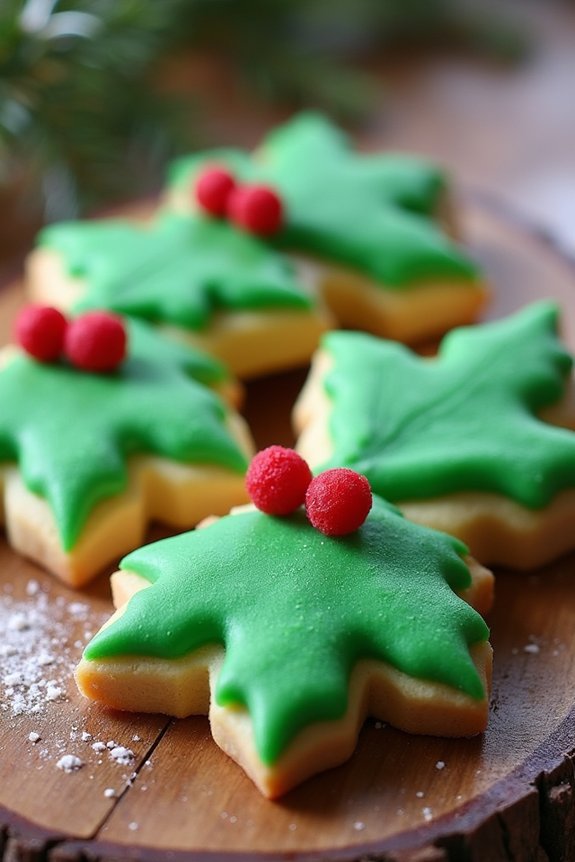
Festive Holly Leaf Cookies are a delightful addition to any holiday dessert spread. These cookies not only taste delicious but also add a touch of seasonal charm to your table. With their vibrant green color and decorative red sugar berries, they truly capture the essence of festive decorations, making them perfect for holiday gatherings or as a thoughtful homemade gift.
The buttery and crisp texture of these cookies, paired with a hint of vanilla and almond, will definitely make them a favorite among family and friends.
The preparation of Festive Holly Leaf Cookies is both enjoyable and straightforward, making it an ideal baking project for the entire family. Whether you’re an experienced baker or just starting out, this recipe is sure to bring joy and satisfaction.
The cookies are designed to resemble holly leaves, complete with red sugar “berries” for that authentic festive look. Not only do they look impressive, but they also taste wonderfully rich and buttery, with a subtle sweetness that complements the holiday season. Perfect for serving 4 to 6 people, these cookies will be a hit at any holiday gathering.
Ingredients for 4-6 people:
- 2 1/2 cups all-purpose flour
- 1/2 teaspoon baking powder
- 1/4 teaspoon salt
- 1 cup unsalted butter, softened
- 3/4 cup granulated sugar
- 1 large egg
- 1 teaspoon vanilla extract
- 1/2 teaspoon almond extract
- Green food coloring
- Red sugar pearls or candy
- Powdered sugar (for rolling)
Cooking Instructions:
- Prepare the Dough: In a medium bowl, whisk together the flour, baking powder, and salt. In a separate large bowl, using an electric mixer, beat the softened butter and granulated sugar until light and fluffy. Add the egg, vanilla extract, and almond extract, mixing until well combined.
- Color the Dough: Gradually add the dry ingredients to the wet mixture, mixing until a smooth dough forms. Add a few drops of green food coloring and mix until the dough is evenly colored. You can add more food coloring if needed to achieve your desired shade of green.
- Chill the Dough: Shape the dough into a disk, wrap it in plastic wrap, and refrigerate for at least 1 hour. This helps the dough firm up, making it easier to roll out and cut into shapes.
- Preheat and Prepare: Preheat your oven to 350°F (175°C). Line two baking sheets with parchment paper or silicone baking mats.
- Roll and Cut: Lightly dust your work surface with powdered sugar. Roll out the chilled dough to about 1/4-inch thickness. Using a holly leaf-shaped cookie cutter, cut out shapes and place them on the prepared baking sheets.
- Decorate: Place red sugar pearls or candy on the cookies to resemble holly berries. Gently press down so they adhere to the dough.
- Bake: Bake the cookies for 8-10 minutes or until the edges are lightly golden. Be careful not to overbake as they can lose their green color.
- Cool and Serve: Remove from the oven and allow the cookies to cool on the baking sheets for a few minutes before transferring them to a wire rack to cool completely.
Extra Tips:
When preparing Festive Holly Leaf Cookies, it’s crucial to keep the dough chilled as much as possible to help maintain the shape of the cookies during baking. If at any point the dough becomes too soft to work with, simply return it to the refrigerator for a few minutes.
Additionally, feel free to adjust the intensity of the green food coloring to your preference, and for an added touch of flavor, consider incorporating a pinch of cinnamon or nutmeg into the dough for a warm, festive aroma.
Santa Hat Meringue Cookies
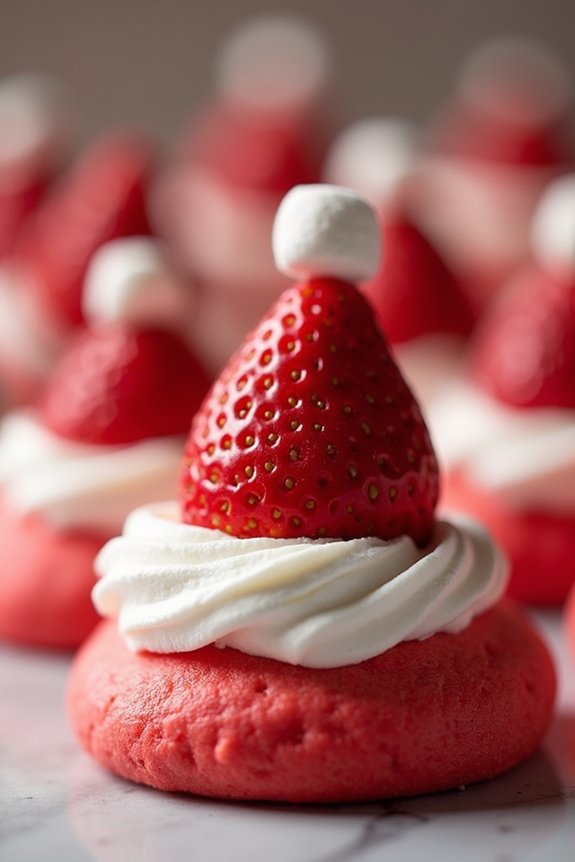
Santa Hat Meringue Cookies are a delightful and festive treat that will add a touch of holiday magic to your dessert table. These cookies are as fun to make as they’re to eat, featuring light and airy meringues topped with a sweet and creamy strawberry frosting, all crowned with a cute mini marshmallow to resemble Santa’s iconic hat.
With their vibrant colors and adorable design, these cookies are bound to be a hit with both kids and adults alike. Perfect for a holiday party or as a special treat for Santa himself, Santa Hat Meringue Cookies are an excellent way to spread some Christmas cheer.
The process of making these cookies is simple, allowing you to focus on the fun part—decorating! Whether you’re a seasoned baker or a beginner, this recipe is easy to follow and promises delicious results. Gather your loved ones and enjoy the festive fun of creating these charming cookies together.
Ingredients (serves 4-6):
- 4 large egg whites
- 1 cup granulated sugar
- 1 teaspoon vanilla extract
- Red gel food coloring
- 1 cup heavy whipping cream
- 2 tablespoons powdered sugar
- 1 teaspoon vanilla extract (for cream)
- Fresh strawberries, hulled
- Mini marshmallows
Instructions:
- Preheat and Prepare: Preheat your oven to 225°F (110°C) and line two baking sheets with parchment paper.
- Make the Meringue: In a clean, dry bowl, beat the egg whites on medium speed until foamy. Gradually add the granulated sugar, beating continuously until stiff, glossy peaks form. Add the vanilla extract and a few drops of red gel food coloring, then gently fold until the color is evenly distributed.
- Pipe the Meringue: Transfer the meringue mixture to a piping bag fitted with a large round tip. Pipe small mounds onto the prepared baking sheets, leaving a bit of space between each one.
- Bake the Meringues: Bake in the preheated oven for 1.5-2 hours, or until the meringues are dry and easily lift off the parchment paper. Turn off the oven and let the meringues cool completely inside the oven with the door slightly ajar.
- Prepare the Cream: In a separate bowl, whip the heavy cream with the powdered sugar and vanilla extract until stiff peaks form.
- Assemble the Cookies: Once the meringues are completely cool, use a small dollop of whipped cream to attach a hulled strawberry (pointed side up) to the top of each meringue. Add a tiny dollop of whipped cream on top of each strawberry and place a mini marshmallow on top to complete the Santa hat look.
Extra Tips:
To guarantee your meringues turn out perfectly, make sure your mixing bowl and beaters are completely free of any grease or moisture, as even the tiniest amount can prevent the egg whites from whipping up properly.
When adding the food coloring, start with a few drops and add more if needed to achieve the desired shade of red. Be patient while baking the meringues; low and slow is key to achieving the perfect texture.
If your whipped cream begins to soften while assembling the cookies, return it to the fridge for a few minutes to firm up again. Enjoy these delightful treats and spread the holiday joy!
Christmas Tree Shortbread Cookies

Christmas Tree Shortbread Cookies are a delightful and festive treat that will add a touch of holiday magic to your dessert table. These buttery, melt-in-your-mouth cookies are shaped like charming Christmas trees, perfect for both gifting and entertaining during the holiday season. The simplicity of the shortbread dough is complemented by the creative decoration, making them a fun baking project for families and friends to enjoy together.
The beauty of Christmas Tree Shortbread Cookies lies in their versatility. You can keep them classic with a simple dusting of powdered sugar or get creative with colored icing and sprinkles to mimic the twinkling lights and ornaments of a real Christmas tree. These cookies not only taste divine, but they also bring a sense of nostalgia, as the rich aroma of baked shortbread fills your kitchen with the warmth and spirit of Christmas.
Here’s how to make a batch of these delightful cookies, perfect for serving 4-6 people.
Ingredients:
- 2 cups all-purpose flour
- 1 cup unsalted butter, softened
- 1/2 cup powdered sugar
- 1 teaspoon vanilla extract
- 1/4 teaspoon salt
- Green food coloring (optional)
- Assorted sprinkles and decorations
- Icing (optional, for decoration)
Instructions:
- Prepare the Dough: In a large mixing bowl, cream together the softened butter and powdered sugar until the mixture is light and fluffy. This should take about 3-4 minutes with an electric mixer.
- Add Vanilla and Salt: Mix in the vanilla extract and salt to the butter mixture, ensuring they’re fully incorporated.
- Mix in Flour: Gradually add the flour to the butter mixture, mixing on low speed until the dough begins to come together. If you’re using food coloring, add a few drops of green food coloring to achieve the desired shade and mix until the color is evenly distributed.
- Chill the Dough: Shape the dough into a disc, wrap it in plastic wrap, and refrigerate for at least 1 hour. This will make the dough easier to handle and help the cookies maintain their shape during baking.
- Preheat the Oven: Preheat your oven to 350°F (175°C) and line a baking sheet with parchment paper.
- Roll and Shape the Cookies: On a lightly floured surface, roll out the chilled dough to about 1/4-inch thickness. Use a Christmas tree-shaped cookie cutter to cut out the cookies and place them on the prepared baking sheet.
- Bake the Cookies: Bake the cookies in the preheated oven for 10-12 minutes, or until the edges begin to turn a light golden brown. Be careful not to overbake, as shortbread should remain pale in color.
- Cool and Decorate: Allow the cookies to cool on the baking sheet for a few minutes before transferring them to a wire rack to cool completely. Once cooled, decorate with icing and sprinkles as desired.
Extra Tips:
For an extra burst of flavor, consider adding a teaspoon of almond extract in addition to the vanilla. If you find the dough too sticky to handle when rolling out, dust your rolling pin and surface with a bit more flour.
When decorating, use a small piping bag for precise icing application, and let your creativity shine with a variety of sprinkles and edible glitter for a truly festive look. These cookies can be stored in an airtight container for up to a week, making them a convenient option for preparing in advance of the holidays.
Iced Gingerbread Men

Nothing says Christmas like the sweet and spicy aroma of gingerbread men baking in the oven. These delightful cookies aren’t only a festive treat to enjoy but also a fun and creative activity for the whole family.
With their charming gingerbread shape and colorful icing, they make for a perfect homemade gift or a decorative addition to your holiday table. Whether you like them thick and chewy or thin and crispy, these iced gingerbread men are sure to bring joy to your holiday season.
This recipe yields around 18-24 gingerbread men, making it ideal for serving 4-6 people. The combination of ginger, cinnamon, and cloves creates that traditional gingerbread flavor, while the icing adds a touch of sweetness and an opportunity to let your creativity shine. From simple designs to elaborate patterns, these cookies can be customized to suit your style and taste.
Ingredients:
- 3 cups all-purpose flour
- 3/4 cup packed dark brown sugar
- 3/4 teaspoon baking soda
- 1 tablespoon ground ginger
- 1 tablespoon ground cinnamon
- 1/2 teaspoon ground cloves
- 1/2 teaspoon salt
- 12 tablespoons (1 1/2 sticks) unsalted butter, softened
- 3/4 cup molasses
- 2 tablespoons milk
- 1 teaspoon vanilla extract
- Royal icing (for decorating)
- Assorted food coloring (optional)
Instructions:
- Prepare the Dough: In a large mixing bowl, combine the flour, dark brown sugar, baking soda, ginger, cinnamon, cloves, and salt. Mix until well combined. Add the softened butter and mix on medium speed until the mixture resembles fine crumbs.
- Add Wet Ingredients: In a small bowl, whisk together the molasses, milk, and vanilla extract. Gradually add this to the flour mixture, mixing on low speed until the dough forms. The dough might seem sticky, but it will firm up once chilled.
- Chill the Dough: Divide the dough in half, flatten into disks, and wrap each in plastic wrap. Refrigerate for at least 1 hour or until firm. This step is essential for ensuring the dough is easy to roll out.
- Preheat the Oven: Preheat your oven to 350°F (175°C) and line two baking sheets with parchment paper.
- Roll Out the Dough: On a lightly floured surface, roll out one disk of dough to about 1/4 inch thick. Use a gingerbread man cookie cutter to cut out shapes and place them on the prepared baking sheets, about 1 inch apart.
- Bake the Cookies: Bake in the preheated oven for 8-10 minutes, or until the edges are firm and the centers are set. Allow the cookies to cool on the baking sheets for 5 minutes before transferring them to a wire rack to cool completely.
- Decorate the Cookies: Once the cookies are completely cool, use the royal icing to decorate. You can divide the icing into separate bowls and add food coloring as desired. Use a piping bag or a small spatula to create your designs.
Extra Tips:
For added convenience, make the dough a day in advance and store it in the refrigerator until you’re ready to bake.
If the dough becomes too firm to roll out, let it sit at room temperature for a few minutes to soften slightly. When decorating, use a toothpick to help with intricate designs or to fix small mistakes.
If you want to add a little sparkle, sprinkle the icing lightly with edible glitter before it sets. Enjoy your creative baking session, and have a merry and delicious Christmas!
Ornament Sugar Cookies

Ornament Sugar Cookies are a delightful treat that combines the traditional look of Christmas ornaments with the delicious taste of sugar cookies. These cookies are perfect for adding a festive touch to your holiday gatherings, or for giving as thoughtful homemade gifts.
With their intricate designs and vibrant colors, they’re sure to be a hit with both kids and adults alike. This recipe will guide you through the process of making these charming cookies, from mixing the dough to decorating them with a variety of vibrant icings and sprinkles.
The recipe yields a serving size suitable for 4-6 people, guaranteeing that everyone can enjoy a taste of these sweet holiday treats. The dough is easy to roll and cut into festive shapes, and the sweet icing adds both flavor and a lovely sheen to each cookie.
You’ll find that these cookies aren’t only fun to make, but also an excellent activity to share with family or friends. Gather your ingredients, preheat your oven, and let’s get started on creating these delightful Ornament Sugar Cookies.
Ingredients:
- 2 ¾ cups all-purpose flour
- 1 teaspoon baking soda
- ½ teaspoon baking powder
- 1 cup unsalted butter, softened
- 1 ½ cups white sugar
- 1 egg
- 1 teaspoon vanilla extract
- ½ teaspoon almond extract
- Assorted colored icing
- Sprinkles and edible decorations
Instructions:
- Preheat and Prepare: Preheat your oven to 375°F (190°C). Line a baking sheet with parchment paper to prevent the cookies from sticking.
- Mix Dry Ingredients: In a medium-sized bowl, whisk together the flour, baking soda, and baking powder. This will guarantee that all the dry ingredients are evenly distributed.
- Cream Butter and Sugar: In a large bowl, cream together the softened butter and sugar until light and fluffy. This should take about 2-3 minutes with an electric mixer.
- Add Egg and Extracts: Beat in the egg, vanilla extract, and almond extract until well combined. This mixture should be smooth and creamy.
- Combine Dry and Wet Ingredients: Gradually add the dry ingredients to the wet ingredients, mixing until just combined. Be careful not to overmix, as this can make the cookies tough.
- Roll and Cut Dough: Roll the dough out onto a lightly floured surface to about ¼ inch thickness. Use ornament-shaped cookie cutters to cut out shapes, and place them on the prepared baking sheet.
- Bake: Bake in the preheated oven for 8-10 minutes, or until the edges are just beginning to turn golden. Remove from the oven and let cool on a wire rack.
- Decorate: Once cooled, use assorted colored icings to decorate the cookies. Add sprinkles and edible decorations as desired to create the appearance of colorful ornaments.
Extra Tips:
For the best results, verify your butter is properly softened before beginning to mix. This will help achieve the ideal cookie texture.
When rolling out the dough, if it becomes too sticky, simply chill it for a few minutes in the fridge to firm it up.
When decorating, use a piping bag for more precise icing application, and let the icing set completely before storing the cookies. These cookies can be stored in an airtight container for up to a week, making them a perfect make-ahead option for holiday festivities.
Peppermint Candy Cane Cookies
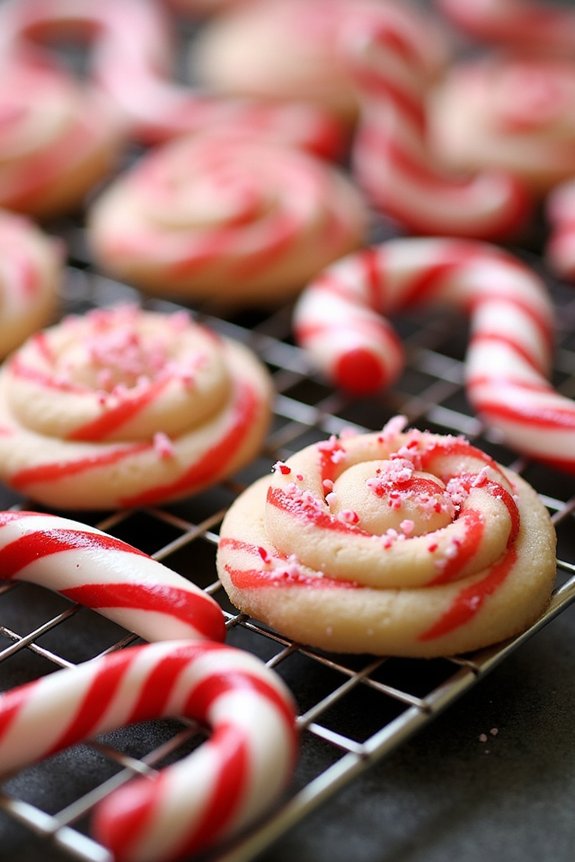
Peppermint Candy Cane Cookies are the perfect festive treat to add a touch of Christmas magic to your holiday gatherings. These delightful cookies not only look charming with their red and white swirls but also offer a revitalizing peppermint flavor that embodies the spirit of the season.
Whether you’re sharing them with family, gifting them to friends, or simply enjoying them with a warm cup of cocoa by the fire, these cookies are sure to become a holiday favorite.
Creating these cookies is both a fun and rewarding experience. Their playful design makes them a hit with kids and adults alike, and their sweet, minty taste is a rejuvenating twist on traditional holiday cookies. With a soft and chewy texture, these cookies are perfect for enjoying fresh out of the oven or packaged for later enjoyment.
Here’s how to make a batch to serve 4-6 people.
Ingredients:
- 2 1/2 cups all-purpose flour
- 1/2 teaspoon salt
- 1/2 teaspoon baking powder
- 1 cup unsalted butter, softened
- 1 cup granulated sugar
- 1 large egg
- 1 teaspoon vanilla extract
- 1 teaspoon peppermint extract
- Red food coloring
- 1/2 cup crushed peppermint candies or candy canes
Instructions:
- Preheat the Oven: Begin by preheating your oven to 350°F (175°C). Line two baking sheets with parchment paper to prevent the cookies from sticking.
- Mix Dry Ingredients: In a medium bowl, whisk together the flour, salt, and baking powder. This guarantees the baking powder is evenly distributed and helps prevent clumping.
- Cream Butter and Sugar: In a large mixing bowl, cream together the softened butter and granulated sugar using an electric mixer on medium speed until the mixture is light and fluffy. This should take about 3 minutes.
- Add Egg and Extracts: Beat in the egg, vanilla extract, and peppermint extract until fully incorporated. The extracts will give the cookies their delicious flavor.
- Combine Wet and Dry Ingredients: Gradually add the dry ingredients to the wet mixture, mixing until just combined. Be careful not to overmix, as this can make the cookies tough.
- Divide and Color Dough: Divide the dough in half. Add red food coloring to one half, kneading until the color is evenly distributed. Leave the other half plain.
- Form Candy Canes: Take a small portion of each dough color, rolling them into 4-inch long ropes. Twist one red and one plain rope together, then curve the top to form a candy cane shape. Place on the prepared baking sheets.
- Bake: Bake the cookies in the preheated oven for 10-12 minutes, or until the edges are lightly golden. Allow them to cool on the baking sheet for a few minutes before transferring them to a wire rack.
- Add Peppermint Crunch: While the cookies are still warm, sprinkle crushed peppermint candies on top for added flavor and texture.
Extra Tips:
When making Peppermint Candy Cane Cookies, it’s important to keep the dough chilled if you find it becoming too soft to work with. This will make it easier to handle and shape without the colors blending together too much.
Always confirm your butter is softened but not melted for the best consistency. If you prefer a stronger peppermint flavor, you can adjust the amount of peppermint extract according to your taste.
Additionally, these cookies make beautiful gifts when wrapped in clear cellophane bags tied with festive ribbons.
Snowman Marshmallow Cookies
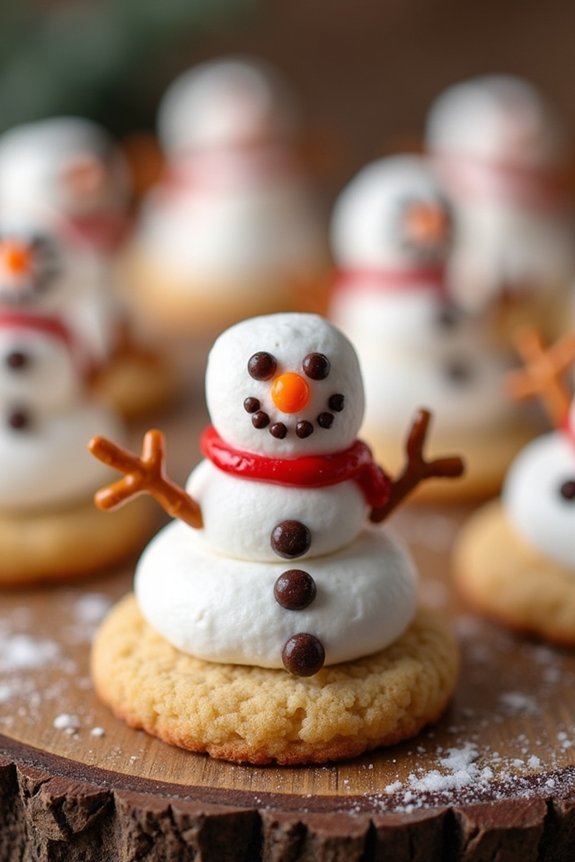
Snowman Marshmallow Cookies are the perfect festive treat to add a sweet touch to your holiday celebrations. These adorable cookies feature a delightful blend of flavors and textures, combining the classic taste of sugar cookies with the gooey softness of marshmallows. The whimsical snowman design is sure to bring a smile to both children and adults alike, making them a fantastic choice for holiday parties, family gatherings, or even as a delightful homemade gift.
To create these charming Snowman Marshmallow Cookies, you’ll start with a batch of your favorite sugar cookie dough. Once baked to a golden perfection, marshmallows act as the snowman’s body, while icing, candies, and pretzels are used to adorn and detail each snowman, giving them personality and flair. Whether you’re a seasoned baker or a novice in the kitchen, these cookies aren’t only delightful to eat but also fun to make, providing a wonderful opportunity for holiday creativity.
Ingredients (serving size: 4-6 people):
- 1 batch of sugar cookie dough
- 12 large marshmallows
- 1 cup powdered sugar
- 2 tablespoons milk
- Black icing gel or edible black marker
- Orange candies (for noses)
- Mini chocolate chips or black candies (for buttons and eyes)
- Pretzel sticks (for arms)
- Red or green icing (optional, for scarfs or hats)
Cooking Instructions:
- Prepare the Cookie Dough: Preheat your oven to 350°F (175°C). Roll out the sugar cookie dough on a lightly floured surface to about 1/4-inch thickness. Use a round cookie cutter to cut out circles and transfer them onto a baking sheet lined with parchment paper.
- Bake the Cookies: Place the baking sheet in the preheated oven and bake the cookies for 8-10 minutes, or until the edges are lightly golden. Remove the cookies from the oven and let them cool completely on a wire rack.
- Make the Icing: In a small bowl, mix the powdered sugar with milk until smooth to create a thick icing. This will be used to attach the marshmallows and decorations to the cookies.
- Assemble the Snowmen: Once the cookies are cool, place a small dollop of icing in the center of each cookie. Position a large marshmallow vertically on the icing, pressing gently to secure it as the snowman’s body.
- Decorate the Snowmen: Use the black icing gel or edible marker to draw eyes and a mouth on the marshmallow. Add an orange candy for the nose. Attach mini chocolate chips or black candies to the marshmallow using a small amount of icing for buttons. Insert two pretzel sticks on each side of the marshmallow for arms.
- Add Final Touches: If desired, use red or green icing to draw a scarf or hat on the snowman. Allow the icing to set completely before serving or packaging the cookies.
Extra Tips:
When making Snowman Marshmallow Cookies, verify that your work surface and hands are clean and dry, as moisture can affect the consistency of your icing. If you’re short on time, store-bought sugar cookie dough can be a convenient alternative to homemade dough.
For a more colorful appearance, consider adding sprinkles or edible glitter to the icing before it sets. Finally, involving children in the decoration process can add an extra layer of fun and creativity to your holiday baking experience.
Nutcracker Ballet Cookies

Celebrate the magic of the holiday season with these delightful Nutcracker Ballet Cookies. Inspired by the whimsical characters of the beloved ballet, these cookies aren’t only delicious but also a feast for the eyes. Made with a classic sugar cookie base, these treats are perfect for both children and adults who appreciate a touch of festive artistry.
Whether you’re hosting a Nutcracker-themed party or simply want to add a bit of ballet charm to your dessert table, these cookies are sure to be a showstopper.
The recipe uses simple ingredients and basic decorating techniques, making it accessible for bakers of all skill levels. With a serving size that generously caters to 4-6 people, you can share the joy of these cookies with family and friends. The dough is easy to work with and the fun begins when you bring out your creativity to decorate each cookie to resemble your favorite Nutcracker characters like Clara, the Mouse King, or the Nutcracker himself.
Ingredients for Nutcracker Ballet Cookies:
- 2 1/2 cups all-purpose flour
- 1 cup unsalted butter, softened
- 1 cup granulated sugar
- 1 large egg
- 1 teaspoon vanilla extract
- 1/2 teaspoon almond extract
- 1 teaspoon baking powder
- 1/2 teaspoon salt
- Assorted food colorings
- Royal icing
- Edible glitter and sprinkles
- Assorted decorating tools and piping bags
Cooking Instructions:
- Prepare the Dough: In a large bowl, cream together the softened butter and granulated sugar until light and fluffy. This should take about 2-3 minutes. Add in the egg, vanilla extract, and almond extract. Beat until well combined.
- Combine Dry Ingredients: In a separate bowl, whisk together the flour, baking powder, and salt. Gradually add the dry ingredients to the wet mixture, mixing until a dough forms. Don’t overmix.
- Chill the Dough: Divide the dough into two portions, wrap each in plastic wrap, and refrigerate for at least 1 hour. This step is essential for easier rolling and cutting.
- Preheat and Roll: Preheat your oven to 350°F (175°C). On a lightly floured surface, roll out the dough to about 1/4 inch thickness. Use Nutcracker-themed cookie cutters to cut out shapes.
- Bake the Cookies: Place the cut-out cookies on a parchment-lined baking sheet, leaving space between them. Bake for 8-10 minutes or until the edges are lightly golden. Allow cookies to cool completely on a wire rack.
- Decorate the Cookies: Prepare royal icing according to package instructions. Divide the icing into several bowls and add different food colorings to each. Using piping bags, decorate the cookies to resemble Nutcracker characters. Add details with edible glitter and sprinkles. Allow icing to set completely before serving.
Extra Tips:
When working with royal icing, make sure it’s the right consistency for decorating; if it’s too thick, add a few drops of water, and if it’s too thin, add more powdered sugar.
Consider using a toothpick to help with finer details when decorating. To make the process smoother, prepare all your decorations and colors in advance. Additionally, if you’re short on time, the dough can be made a day ahead and kept in the refrigerator.
Enjoy the process of creating these festive cookies, and remember that every cookie is a unique piece of edible art!
Sparkling Star Cookies
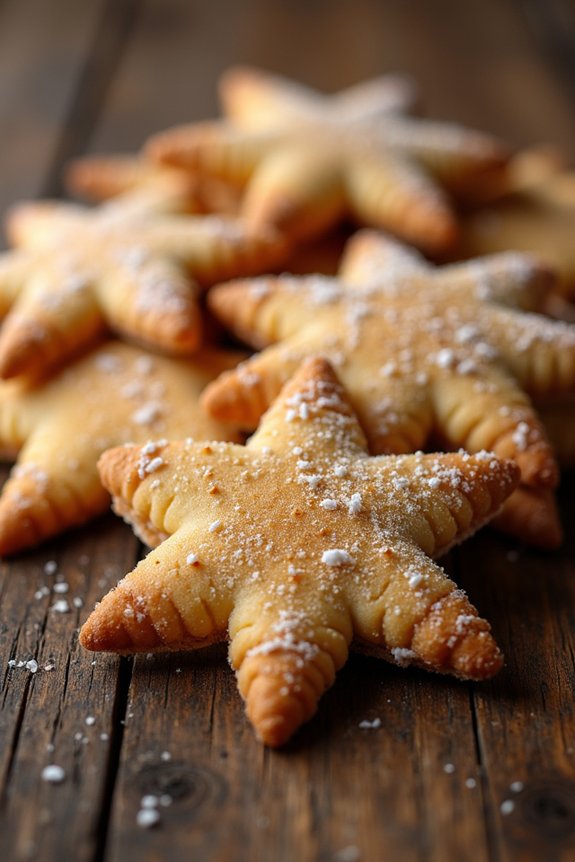
Sparkling Star Cookies are a delightful addition to your holiday baking repertoire. These charming cookies not only taste delicious with their buttery and sweet flavor, but they also add a touch of sparkle to your dessert table. Perfect for enjoying with family and friends, these cookies are shaped like stars and dusted with a glistening sugar mixture that catches the light beautifully.
Whether you’re hosting a festive gathering or looking for a sweet treat to enjoy while curled up with a holiday movie, these cookies are sure to bring joy to your celebrations.
Making Sparkling Star Cookies is a fun and rewarding baking project. The dough is simple to prepare and easy to work with, making it a great activity for involving little helpers in the kitchen. The secret to their enchanting appearance lies in the final sprinkle of sparkling sugar, which gives these cookies their signature look.
Once baked, they offer a delightful crunch and a buttery melt-in-your-mouth experience that’s sure to impress. Let’s plunge into the ingredients and steps needed to create these beautiful cookies for a serving size of 4-6 people.
Ingredients (Serving Size: 4-6 people)
- 2 ½ cups all-purpose flour
- 1 cup unsalted butter, softened
- 1 cup granulated sugar
- 1 teaspoon vanilla extract
- ½ teaspoon almond extract
- 1 large egg
- ½ teaspoon baking powder
- ¼ teaspoon salt
- ½ cup sparkling sugar (for decorating)
Cooking Instructions
- Prepare the Dough: In a large bowl, cream together the softened butter and granulated sugar until light and fluffy. This should take about 3-4 minutes using an electric mixer on medium speed. Add in the egg, vanilla extract, and almond extract, and continue to beat until well combined.
- Combine Dry Ingredients: In another bowl, sift together the all-purpose flour, baking powder, and salt. Gradually add the dry ingredients to the wet ingredients, mixing on low speed until a dough begins to form and all the flour is incorporated.
- Chill the Dough: Divide the dough into two portions, flatten into discs, wrap in plastic wrap, and refrigerate for at least 1 hour. Chilling will make the dough easier to roll out and cut.
- Preheat and Prepare: Preheat your oven to 350°F (175°C). Line two baking sheets with parchment paper.
- Roll and Cut: On a lightly floured surface, roll out one disc of dough to about ¼ inch thickness. Use a star-shaped cookie cutter to cut out cookies and transfer them to the prepared baking sheets. Repeat with the second disc of dough.
- Decorate with Sparkling Sugar: Sprinkle the tops of the star-shaped cookies generously with sparkling sugar, pressing lightly to confirm it adheres.
- Bake: Bake the cookies in the preheated oven for 10-12 minutes or until the edges are lightly golden. Remove from oven and let cool on the baking sheets for a few minutes before transferring to wire racks to cool completely.
- Enjoy: Once cooled, serve your Sparkling Star Cookies on a festive platter and enjoy with a warm beverage of choice.
Extra Tips
For the best results, verify your butter is at room temperature before creaming with sugar; this will help achieve the perfect texture for your cookies.
If you don’t have sparkling sugar, you can substitute with regular granulated sugar mixed with a bit of edible glitter for a similar effect.
To keep the cookies from spreading too much during baking, make sure the dough is well-chilled before cutting out your star shapes.
Additionally, storing the cookies in an airtight container will keep them fresh and crunchy for up to a week. Happy baking!
Winter Wonderland Macarons

Transform your holiday baking with Winter Wonderland Macarons, a delightful treat that will add a touch of elegance to your festive celebrations. These delicate French confections, with their crisp shells and creamy centers, are perfect for sharing with loved ones or as a stunning addition to your Christmas dessert table.
With a hint of winter spice and a touch of frosty decoration, these macarons capture the essence of a snowy holiday landscape. Creating macarons can be a rewarding experience, especially during the festive season. The key to successful macarons is patience and precision, as these delightful cookies require attention to detail in both preparation and presentation.
Whether you’re a seasoned baker or a first-time macaron maker, this recipe will guide you through the process, guaranteeing that your Winter Wonderland Macarons are as beautiful as they’re delicious.
Ingredients (serving size: 4-6 people):
- 100g almond flour
- 100g powdered sugar
- 70g egg whites (room temperature)
- 70g granulated sugar
- 1/4 teaspoon cream of tartar
- 1/2 teaspoon vanilla extract
- Blue and white gel food coloring
- Silver edible glitter or snowflake sprinkles
For the filling:
- 100g unsalted butter (softened)
- 150g powdered sugar
- 1 teaspoon vanilla extract
- 1/2 teaspoon ground cinnamon
- A pinch of ground nutmeg
Instructions:
- Prepare the dry mix: Sift the almond flour and powdered sugar together into a bowl, confirming there are no lumps. This will create a smooth texture for the macaron shells.
- Make the meringue: In a separate bowl, whisk the egg whites until they begin to foam. Add the cream of tartar and continue whisking. Gradually add the granulated sugar while whisking until you achieve stiff, glossy peaks. Mix in the vanilla extract and a few drops of blue food coloring until you reach the desired wintery shade.
- Combine ingredients: Gently fold the dry almond mixture into the meringue in batches, using a spatula. The batter should be smooth and lava-like, flowing off the spatula in thick ribbons.
- Pipe the macarons: Transfer the batter into a piping bag fitted with a round tip. Pipe small circles (about 1.5 inches in diameter) onto a baking sheet lined with parchment paper. Once piped, tap the baking sheet on the counter to release air bubbles.
- Rest the macarons: Allow the macarons to rest at room temperature for 30-60 minutes, or until they form a skin and don’t stick to your finger when gently touched.
- Bake the macarons: Preheat your oven to 300°F (150°C). Bake the macarons on the middle rack for 15-18 minutes, checking for doneness by gently touching the tops. They should be firm and not wobbly.
- Prepare the filling: While the macarons cool, beat the softened butter until creamy. Gradually add the powdered sugar, vanilla extract, cinnamon, and nutmeg. Mix until smooth and fluffy.
- Assemble the macarons: Pair the macaron shells by size and gently pipe the spiced buttercream filling onto the flat side of one shell. Top with another shell to create a sandwich.
- Decorate: Lightly brush the tops of the macarons with a bit of water and sprinkle with silver edible glitter or snowflake sprinkles for a winter wonderland effect.
Extra Tips:
When making macarons, humidity can affect the resting time needed for the shells to form a skin, so be patient and adjust as necessary. Additionally, using gel food coloring helps maintain the consistency of the batter better than liquid dyes.
If you’re new to macaron-making, practice piping skills on parchment paper before starting to guarantee uniform sizes. Finally, macarons taste even better after a day or two as the flavors meld, so consider making them in advance and storing them in an airtight container in the fridge.
Cozy Sweater Sugar Cookies
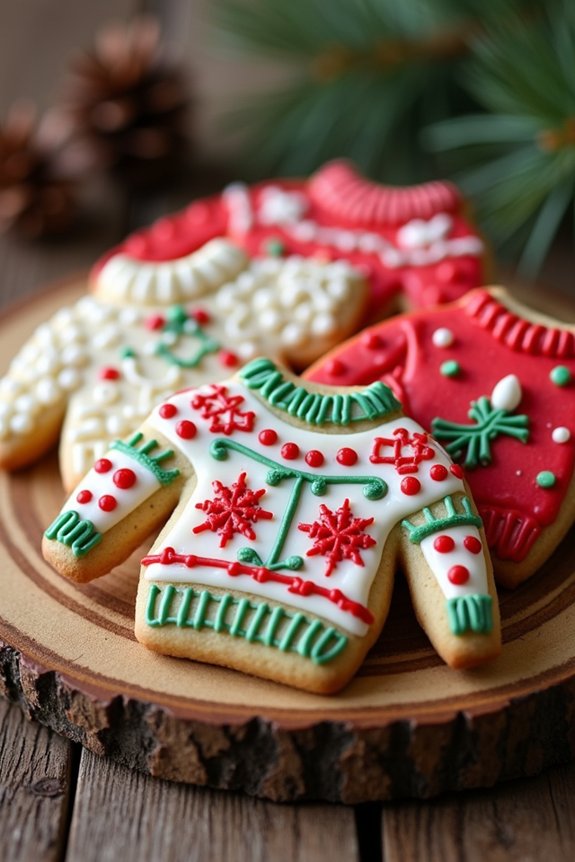
Cozy Sweater Sugar Cookies are the perfect way to bring a touch of warmth and whimsy to your holiday baking routine. These delightful cookies not only taste amazing but also serve as a fun, edible canvas for your creative holiday designs. Each cookie is shaped to resemble a cozy sweater, making them ideal for Christmas parties, gift exchanges, or simply enjoying with a cup of hot cocoa by the fireplace.
Whether you’re an experienced baker or a novice in the kitchen, this recipe is straightforward and offers plenty of room for personalization regarding decoration. The key to these cookies is a simple yet delicious sugar cookie base that holds its shape well during baking, guaranteeing that your sweater designs remain crisp and clear.
To decorate, you can use royal icing in various colors to create intricate patterns, or keep it simple with a single color and some festive sprinkles. This recipe yields enough cookies to serve 4-6 people, making it perfect for a small gathering or for enjoying over a few days. Gather your ingredients and let’s get started on these adorable and tasty Cozy Sweater Sugar Cookies!
Ingredients (Serves 4-6):
- 2 1/2 cups all-purpose flour
- 1/2 teaspoon baking powder
- 1/4 teaspoon salt
- 3/4 cup unsalted butter, softened
- 1 cup granulated sugar
- 1 large egg
- 1 teaspoon vanilla extract
- 1/2 teaspoon almond extract (optional)
- Assorted food coloring
- Royal icing mix or homemade royal icing
- Piping bags and tips
- Assorted sprinkles and edible decorations
Cooking Instructions:
- Prepare the Dough: In a medium bowl, whisk together the flour, baking powder, and salt. In a separate large bowl, cream the softened butter and sugar together until light and fluffy. Beat in the egg, vanilla extract, and almond extract (if using) until well combined.
- Combine Ingredients: Gradually add the dry ingredients to the wet mixture, mixing until a smooth dough forms. Divide the dough into two portions, flatten each into a disc, wrap in plastic wrap, and refrigerate for at least 1 hour or until firm.
- Preheat and Roll: Preheat your oven to 350°F (175°C). Roll out one disc of dough on a lightly floured surface to about 1/4-inch thickness. Use a sweater-shaped cookie cutter to cut out cookies and place them on a baking sheet lined with parchment paper.
- Bake the Cookies: Bake the cookies in the preheated oven for 10-12 minutes, or until the edges are lightly golden. Remove from the oven and allow them to cool completely on a wire rack.
- Decorate the Cookies: Prepare your royal icing according to package instructions or your preferred recipe. Divide the icing into separate bowls and color each with different food coloring as desired. Use piping bags and tips to pipe designs onto each cookie, creating sweater patterns such as stripes, polka dots, or snowflakes. Add sprinkles and edible decorations as desired.
Extra Tips:
For the best results, make sure your cookie dough is adequately chilled before rolling it out, as this helps the cookies maintain their shape while baking. When decorating, start with a base layer of icing and let it dry before adding additional layers or details to prevent colors from bleeding into each other.
If you don’t have a sweater-shaped cookie cutter, you can draw a template on parchment paper and use it to cut out the shapes with a knife. Finally, remember to have fun and get creative with your designs – it’s the perfect opportunity to let your holiday spirit shine!