

As the holiday season approaches, I’m thrilled to explore the world of Christmas desserts that are as delightful to look at as they are to enjoy. Reindeer cupcakes with pretzel antlers and snowman macarons add a special touch to any festive gathering. These charming treats are perfect for spreading joy and warmth. There’s so much more to discover in the realm of holiday sweets. Ready to add some sweetness to your celebrations?
Reindeer Cupcakes
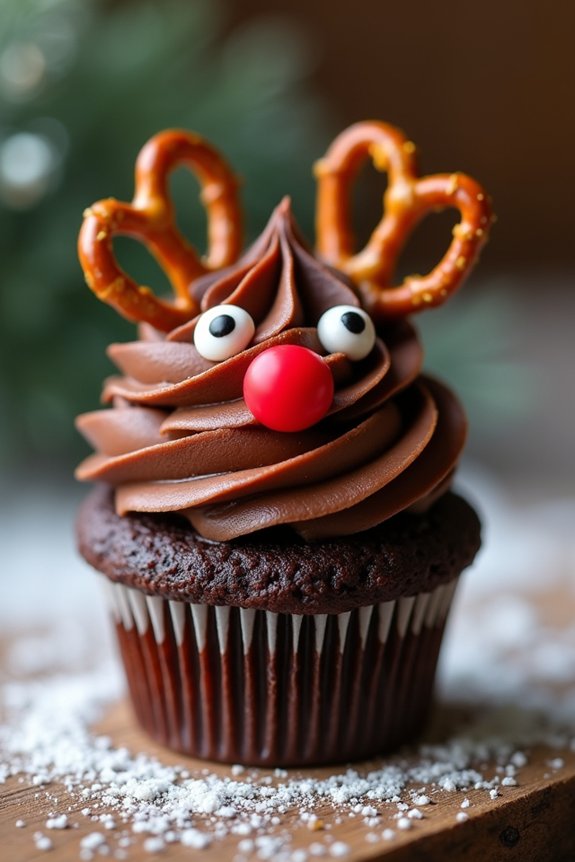
Reindeer Cupcakes are a festive and fun treat that’s perfect for holiday gatherings. These whimsical cupcakes delight both kids and adults with their charming appearance and delicious taste. With a chocolate cupcake base, creamy frosting, and clever decorations, they’re certain to bring a smile to everyone’s face.
Perfect for a Christmas dessert table, these cupcakes aren’t only delightful to look at, but they’re also a sweet indulgence that captures the spirit of the season.
To make Reindeer Cupcakes, you’ll begin by baking chocolate cupcakes and then decorating them with chocolate frosting, pretzels for antlers, and candies for eyes and noses. The process is straightforward but allows for creativity, making it an enjoyable activity to do with family or friends.
This recipe yields 12 cupcakes, which is a suitable serving size for 4-6 people, depending on how hungry your guests are!
Ingredients (Serves 4-6):
- 1 cup all-purpose flour
- 1 cup granulated sugar
- 1/3 cup unsweetened cocoa powder
- 1 teaspoon baking powder
- 1/2 teaspoon baking soda
- 1/4 teaspoon salt
- 1/2 cup milk
- 1/4 cup vegetable oil
- 1 teaspoon vanilla extract
- 1 large egg
- 1/2 cup boiling water
- 1 cup chocolate frosting
- 24 mini pretzels
- 12 red candies (such as M&M’s or red gumdrops)
- 24 candy eyes
Instructions:
- Prepare the Cupcake Batter: Preheat your oven to 350°F (175°C) and line a cupcake tin with 12 cupcake liners. In a mixing bowl, combine the flour, sugar, cocoa powder, baking powder, baking soda, and salt. Mix well to ascertain all dry ingredients are thoroughly combined.
- Mix Wet Ingredients: In a separate bowl, whisk together the milk, vegetable oil, vanilla extract, and egg until smooth. Gradually add the wet ingredients to the dry ingredients, stirring continuously until the mixture is well-combined.
- Add Boiling Water: Carefully pour in the boiling water, mixing as you go. The batter will be thin, but this is normal and will result in moist cupcakes.
- Bake the Cupcakes: Pour the batter evenly into the prepared cupcake liners, filling each about 2/3 full. Bake in the preheated oven for 18-20 minutes or until a toothpick inserted into the center of a cupcake comes out clean. Allow the cupcakes to cool completely on a wire rack.
- Decorate the Cupcakes: Once the cupcakes are cool, spread a generous amount of chocolate frosting on top of each one. Insert two mini pretzels at the top of each cupcake to create reindeer antlers.
- Add the Reindeer Face: Place two candy eyes beneath the antlers. Finish by adding a red candy in the center to represent the reindeer’s nose.
Extra Tips:
For an extra festive touch, try using different colored candies to create a variety of reindeer characters. You can also use white chocolate chips for the eyes and draw pupils with a dab of melted chocolate.
If you’re making these cupcakes with young children, pre-assemble the antlers and eyes so they can focus on placing them on the cupcakes. Finally, consider preparing the cupcakes a day in advance to save time on the day of your event, but wait to decorate until just before serving to keep the pretzels crisp.
Snowman Macarons
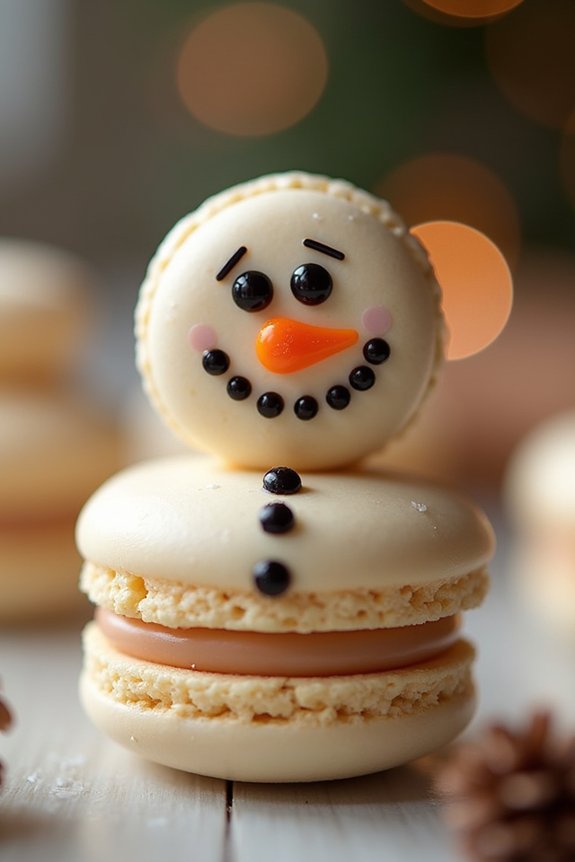
Creating a festive treat like Snowman Macarons can be a delightful way to celebrate the holiday season. These adorable macarons capture the essence of winter with their snowman design and are sure to be a hit at any Christmas gathering. With a crunchy shell and a creamy filling, these macarons are both visually appealing and delicious, making them the perfect dessert to add to your holiday menu.
To guarantee your Snowman Macarons turn out perfectly, it’s essential to follow the recipe closely. This recipe makes approximately 24-30 macarons, which is perfect for serving 4-6 people. The process involves creating the macaron shells, preparing the filling, and assembling the snowmen with decorative touches. With a little patience and attention to detail, you’ll have a batch of delightful macarons that are sure to impress your family and friends.
Ingredients (for 4-6 people):
- 200g powdered sugar
- 110g almond flour
- 3 large egg whites (room temperature)
- 50g granulated sugar
- 1/4 teaspoon cream of tartar
- Gel food coloring (black and orange)
- 100g white chocolate chips
- 50g heavy cream
- Black edible marker or gel pen
Instructions:
- Prepare the Macaron Batter:
- Sift the powdered sugar and almond flour together into a large mixing bowl to guarantee there are no lumps.
- In a separate bowl, beat the egg whites with an electric mixer until they become frothy. Add the cream of tartar and continue beating until soft peaks form.
- Gradually add the granulated sugar to the egg whites and beat until stiff peaks form. The mixture should be thick and glossy.
- Gently fold the sifted almond mixture into the beaten egg whites, being careful not to deflate the batter. Mix until well combined and the batter flows in a thick ribbon when lifted with a spatula.
- Pipe and Bake the Macarons:
- Line two baking sheets with parchment paper or silicone baking mats.
- Transfer the batter to a piping bag fitted with a round tip. Pipe small circles (about 1 inch in diameter) onto the prepared baking sheets, leaving space between each one.
- Tap the baking sheets on the counter a few times to release any air bubbles. Let the macarons sit at room temperature for 30-60 minutes, or until a skin forms on the surface.
- Preheat the oven to 300°F (150°C) and bake the macarons for 15-18 minutes, or until they easily lift off the parchment paper. Allow them to cool completely on the baking sheets.
- Prepare the Filling:
- Heat the heavy cream in a small saucepan over medium heat until it begins to simmer.
- Pour the hot cream over the white chocolate chips in a heatproof bowl. Let it sit for a minute, then stir until smooth and well combined.
- Allow the ganache to cool to room temperature, then transfer it to a piping bag.
- Assemble the Snowman Macarons:
- Pair the macaron shells by size and pipe a small amount of ganache onto the flat side of one shell. Sandwich it with another shell.
- Use the black edible marker or gel pen to draw eyes, a mouth, and buttons on the macarons. Use a small brush or toothpick to apply orange food coloring for the nose.
Extra Tips:
To achieve the perfect macaron, guarantee your mixing bowl and utensils are clean and free of any grease, as this can affect how the egg whites whip.
Be patient while letting the macarons rest before baking; this step is vital for forming the characteristic “feet” of the macaron.
If your oven has hot spots, consider baking one tray at a time or rotating the trays halfway through baking to guarantee even cooking.
Finally, if possible, let the assembled macarons sit in the refrigerator for a day to enhance their flavor and texture.
Christmas Tree Brownies
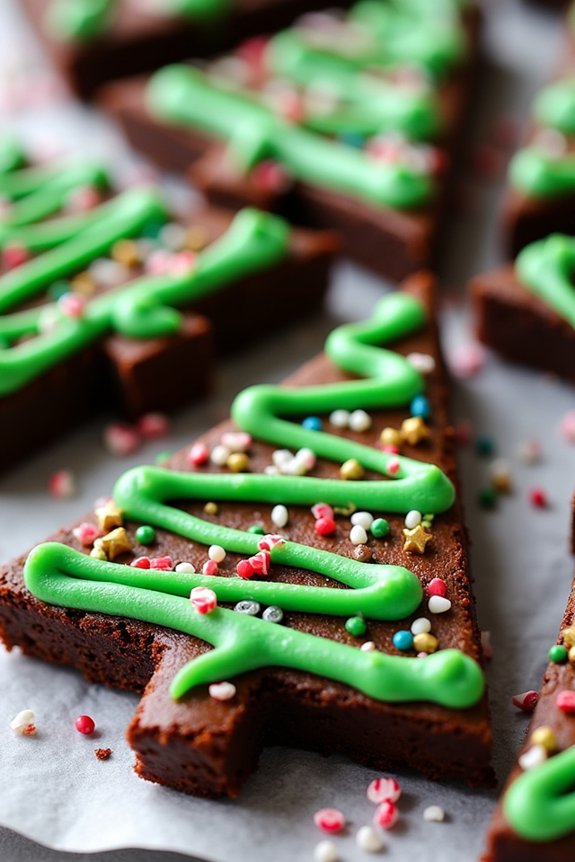
Christmas Tree Brownies are a festive and delightful treat that can add a touch of whimsy to your holiday dessert table. These brownies aren’t only deliciously rich and fudgy, but they’re also creatively decorated to resemble adorable Christmas trees, making them a perfect addition to your holiday celebrations.
Whether you’re hosting a party or enjoying a cozy family gathering, these brownies are sure to impress both kids and adults alike.
The preparation of Christmas Tree Brownies is a fun activity that the whole family can enjoy. With just a few ingredients and a bit of creativity, you can transform simple brownies into a holiday masterpiece. The recipe is straightforward, and the decoration process allows for personal touches, making each “tree” unique.
These brownies are perfect for serving 4-6 people, guaranteeing everyone gets a taste of this delightful holiday dessert.
Ingredients (Serves 4-6):
- 1/2 cup unsalted butter
- 1 cup granulated sugar
- 2 large eggs
- 1 teaspoon vanilla extract
- 1/3 cup unsweetened cocoa powder
- 1/2 cup all-purpose flour
- 1/4 teaspoon salt
- 1/4 teaspoon baking powder
- Green frosting
- Assorted holiday sprinkles
- Candy canes, cut into small pieces
Cooking Instructions:
- Preheat and Prep: Preheat your oven to 350°F (175°C). Line an 8×8 inch baking pan with parchment paper, leaving some overhang for easy removal of the brownies after baking.
- Mix Wet Ingredients: In a medium saucepan, melt the butter over low heat. Once melted, remove from the heat and stir in the sugar, eggs, and vanilla extract until well combined.
- Combine Dry Ingredients: In a separate bowl, sift together the cocoa powder, flour, salt, and baking powder. Gradually stir this dry mixture into the wet ingredients until the batter is smooth and well combined.
- Bake the Brownies: Pour the brownie batter into the prepared baking pan, spreading it evenly. Bake in the preheated oven for about 20-25 minutes, or until a toothpick inserted in the center comes out with a few moist crumbs. Don’t overbake.
- Cool and Cut: Allow the brownies to cool in the pan for about 10 minutes, then lift them out using the parchment paper overhang. Once completely cool, cut the brownies into triangles to resemble tree shapes.
- Decorate the Brownies: Use green frosting to pipe zigzag lines across each brownie triangle to mimic a garland. Decorate with holiday sprinkles for ornaments and place a small piece of candy cane at the base of each triangle to serve as the tree trunk.
Extra Tips:
When preparing the Christmas Tree Brownies, make certain that the brownies are completely cool before cutting and decorating them. This will prevent the frosting from melting and help the decorations adhere better.
You can also use a variety of toppings, such as mini chocolate chips or edible glitter, to add more texture and sparkle to your Christmas trees. If you’re short on time, store-bought brownies can also be used as a base, allowing you to focus on the fun part—decorating!
Santa Hat Cheesecake Bites
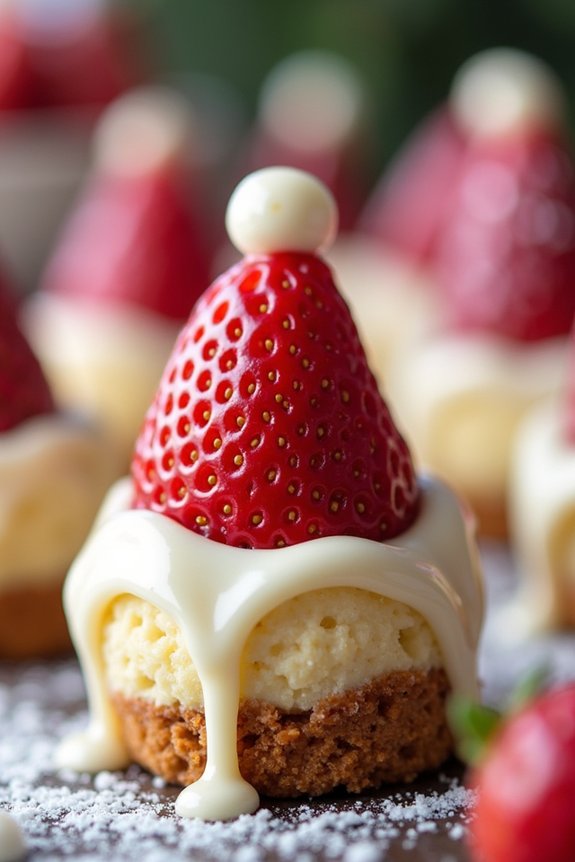
Santa Hat Cheesecake Bites are the perfect festive treat to serve at your Christmas gatherings. These delightful mini desserts aren’t only visually appealing but also deliciously creamy, with the classic flavor of cheesecake topped with a fresh strawberry “hat” and a hint of white chocolate for a snowy finish.
They’re easy to make and a fun way to add a touch of holiday cheer to your dessert table. This recipe is designed to serve 4-6 people, making around 16 bite-sized pieces perfect for sharing. The creamy cheesecake base pairs beautifully with the juicy strawberries, and the white chocolate adds a sweet and decorative touch that completes the holiday look.
Best of all, these treats are simple enough to prepare that even novice bakers can achieve impressive results.
Ingredients:
- 1 cup graham cracker crumbs
- 3 tablespoons unsalted butter, melted
- 2 tablespoons granulated sugar
- 8 oz cream cheese, softened
- 1/3 cup powdered sugar
- 1 teaspoon vanilla extract
- 1/2 cup heavy whipping cream
- 16 small strawberries, hulled
- 1/4 cup white chocolate chips, melted
Instructions:
- Prepare the Crust: In a medium bowl, combine the graham cracker crumbs, melted butter, and granulated sugar. Mix until well combined and the texture resembles wet sand.
- Form the Base: Line a mini muffin tin with paper liners. Spoon about a tablespoon of the crumb mixture into each liner and press down firmly with your fingers or the back of a spoon to create a compact crust. Chill in the refrigerator while preparing the cheesecake filling.
- Make the Cheesecake Filling: In a large mixing bowl, beat the softened cream cheese with an electric mixer until smooth and creamy. Add the powdered sugar and vanilla extract, and continue to beat until fully incorporated.
- Add Whipping Cream: In a separate bowl, whip the heavy cream until stiff peaks form. Gently fold the whipped cream into the cream cheese mixture until no streaks remain.
- Assemble the Bites: Remove the crusts from the refrigerator. Spoon or pipe the cheesecake filling onto each crust, filling nearly to the top. Smooth the tops with a spatula.
- Top with Strawberries: Place one strawberry, pointed side up, onto each cheesecake bite, pressing down gently so it adheres to the filling.
- Decorate with White Chocolate: Using a small spoon or piping bag, drizzle melted white chocolate over the strawberries and cheesecake. You can also add a small dot of white chocolate to the top of each strawberry to complete the “Santa hat” look.
- Chill and Serve: Refrigerate the cheesecake bites for at least 2 hours or until set. Carefully remove the paper liners before serving.
Extra Tips: For the best results, make sure that your cream cheese is at room temperature before you begin mixing to avoid lumps in the filling.
If you don’t have a piping bag, a plastic sandwich bag with the corner snipped off works well for piping the cheesecake mixture. To make the bites more festive, consider adding some green sprinkles or a touch of edible glitter.
These Santa Hat Cheesecake Bites are also great for making ahead of time, as they can be stored in the refrigerator for up to 2 days.
Gingerbread Men Cookies
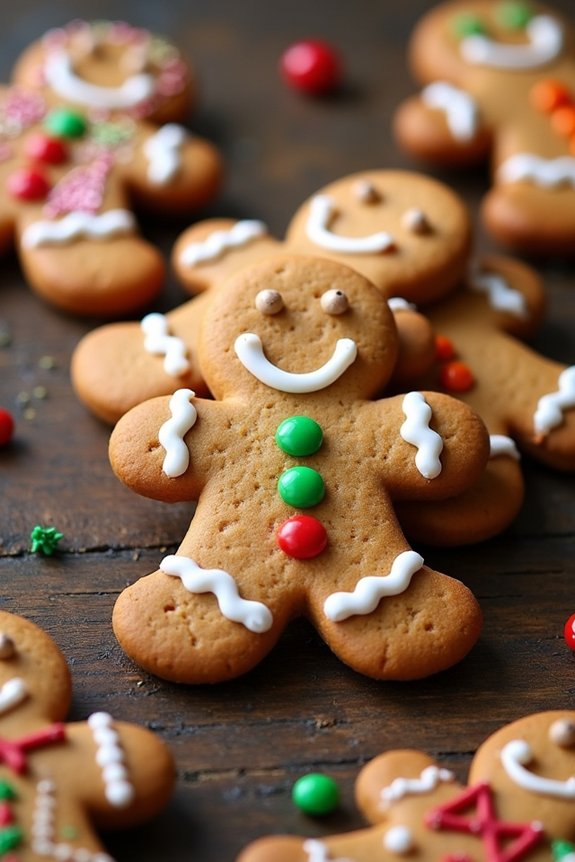
Gingerbread Men Cookies are a festive and delightful treat that embodies the warmth and cheer of the holiday season. These classic cookies are a staple during Christmas celebrations, bringing joy to both children and adults with their sweet, spiced flavor and charming appearance.
Whether you’re making them for a holiday party, as a gift, or simply to enjoy with a cup of hot cocoa, Gingerbread Men Cookies are sure to become a favorite in your home.
Creating these whimsical cookies is a fun and creative activity that can be enjoyed by the whole family. The process involves mixing a flavorful dough infused with spices like ginger, cinnamon, and cloves, which fills your kitchen with an irresistible aroma.
Once baked and cooled, these cookies can be decorated to your heart’s content, using icing, candies, and other edible decorations to bring your gingerbread characters to life. With this recipe, you’ll have enough cookies to serve 4-6 people, perfect for a cozy gathering or a festive dessert spread.
Ingredients (Serves 4-6):
- 3 cups all-purpose flour
- 1 teaspoon baking soda
- 1/4 teaspoon baking powder
- 1 tablespoon ground ginger
- 1 tablespoon ground cinnamon
- 1/2 teaspoon ground cloves
- 1/2 teaspoon salt
- 3/4 cup (1 1/2 sticks) unsalted butter, softened
- 3/4 cup packed dark-brown sugar
- 1 large egg
- 1/2 cup molasses
- 2 teaspoons vanilla extract
- Icing and candies for decorating
Cooking Instructions:
- Prepare the Dry Ingredients: In a large bowl, whisk together the flour, baking soda, baking powder, ginger, cinnamon, cloves, and salt. Set this mixture aside for later use.
- Cream the Butter and Sugar: In a separate large mixing bowl, beat the softened butter and brown sugar with an electric mixer on medium speed until the mixture is light and fluffy. This should take about 2-3 minutes.
- Add the Wet Ingredients: Add the egg to the butter-sugar mixture and beat until incorporated. Then, mix in the molasses and vanilla extract, ensuring that all wet ingredients are well combined.
- Combine Wet and Dry Ingredients: Gradually add the dry ingredient mixture to the wet ingredients, stirring until a dough forms. The dough should be soft but not sticky.
- Chill the Dough: Divide the dough into two equal halves, flatten each into a disk, and wrap them in plastic wrap. Refrigerate for at least 1 hour or until firm.
- Preheat Oven and Prepare Baking Sheets: Preheat your oven to 350°F (175°C) and line baking sheets with parchment paper.
- Roll Out and Cut Dough: On a lightly floured surface, roll out one disk of dough to about 1/4-inch thickness. Use gingerbread man cookie cutters to cut out shapes and transfer them to the prepared baking sheets, leaving space between each cookie.
- Bake the Cookies: Bake in the preheated oven for 8-10 minutes, or until the edges are firm and the cookies are slightly puffed. Let them cool on the baking sheets for a few minutes before transferring to wire racks to cool completely.
- Decorate the Cookies: Once the cookies are completely cooled, use icing and candies to decorate them as desired. Allow the icing to set before serving or storing.
Extra Tips: For the best flavor, try making the dough a day ahead and letting it chill overnight. This helps the spices meld together, intensifying the gingerbread flavor.
When rolling out the dough, work quickly to prevent it from getting too warm, which can make it sticky and difficult to handle. If you’re not using icing immediately, keep it covered to prevent it from drying out.
These cookies can be stored in an airtight container at room temperature for up to a week, making them a great make-ahead option for busy holiday schedules.
Holiday Ornament Cake Pops
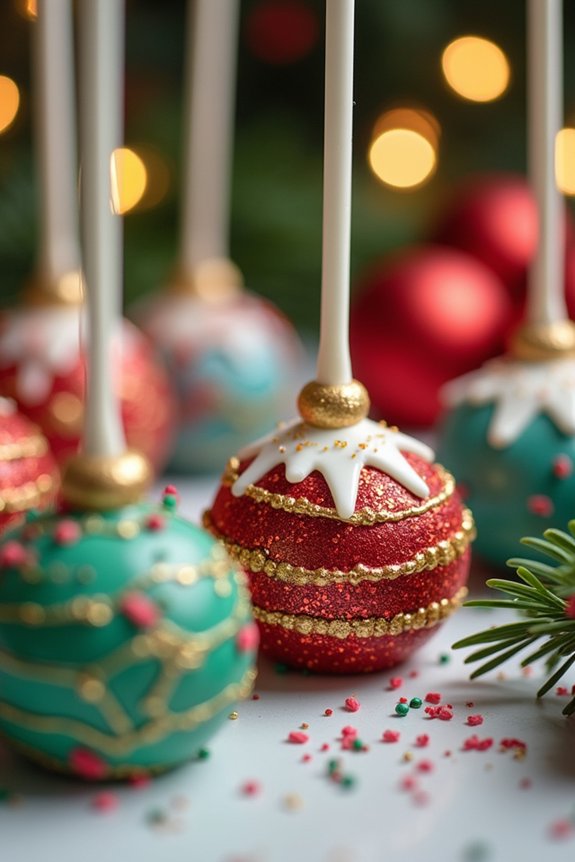
Holiday Ornament Cake Pops are a delightful and festive treat that are perfect for Christmas celebrations. These charming cake pops are designed to resemble colorful ornaments, making them a whimsical addition to any holiday dessert table. With a combination of moist cake and creamy frosting, they’re dipped in vibrant candy coatings and decorated with edible glitter, sprinkles, and other festive adornments. Not only do they taste delicious, but they also add an element of fun and creativity to your holiday festivities.
Making Holiday Ornament Cake Pops is a fun activity that you can enjoy with family or friends. The process involves baking a cake, crumbling it, and then mixing it with frosting to form a dough-like consistency. This mixture is then shaped into balls, inserted with sticks, and chilled before being coated in melted candy. The decorating stage is where you can let your creativity shine, adding different colors and patterns to create your own unique set of edible ornaments. Whether you’re an experienced baker or a beginner, these cake pops are a fun and rewarding project that everyone will enjoy.
Ingredients (Serves 4-6):
- 1 box of cake mix (any flavor)
- Ingredients required for cake mix (as per box instructions)
- 1/2 cup of frosting (any flavor)
- 12 oz of candy melts (various colors)
- 1 tablespoon of vegetable oil
- Assorted sprinkles and edible glitter
- Cake pop sticks
- Styrofoam block or cake pop stand
Cooking Instructions:
- Bake the Cake: Start by preparing the cake according to the instructions on the box. Once baked, allow it to completely cool on a wire rack.
- Make the Cake Pop Mixture: Once the cake is cooled, crumble it into a large bowl until it resembles fine crumbs. Add the frosting to the crumbled cake and mix until you achieve a dough-like consistency.
- Shape the Cake Pops: Using your hands, take portions of the mixture and roll them into small balls, approximately 1 inch in diameter. Place them on a baking sheet lined with parchment paper.
- Chill the Cake Balls: Insert a cake pop stick into each ball and place them in the refrigerator for at least 1 hour, or until they’re firm.
- Melt the Candy Coating: In a microwave-safe bowl, melt the candy melts according to the package instructions, adding a tablespoon of vegetable oil to guarantee a smooth consistency.
- Coat the Cake Pops: Dip each cake pop into the melted candy, ensuring it’s fully coated. Allow any excess coating to drip off before standing the cake pop upright in a styrofoam block or cake pop stand.
- Decorate the Cake Pops: While the coating is still wet, quickly decorate the cake pops with sprinkles, edible glitter, or other desired decorations. Allow them to set completely.
Extra Tips:
For best results, confirm that the cake balls are firm before dipping them in the melted candy. This will help prevent them from falling off the sticks. If the candy coating is too thick, add a little more vegetable oil to thin it out. Be sure to work quickly when decorating, as the candy coating can harden fast. Store the cake pops in an airtight container at room temperature, or refrigerate them if the environment is warm. These cake pops also make great gifts when wrapped individually in clear cellophane bags with a festive ribbon.
Peppermint Bark Reindeer
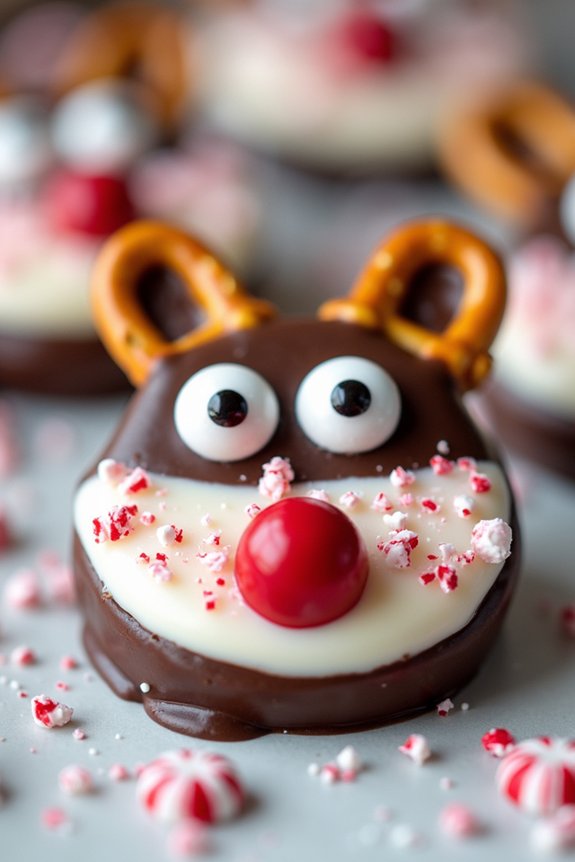
Peppermint Bark Reindeer is a delightful and festive treat that brings a whimsical touch to your holiday dessert table. This recipe combines the classic flavors of peppermint bark with a fun and playful presentation that’s sure to impress both kids and adults alike. The rich, creamy layers of dark and white chocolate are infused with invigorating peppermint, and are then creatively shaped into adorable reindeer faces using pretzels for antlers and candies for eyes and noses. This dish isn’t only delicious, but also a fun activity to engage in with family and friends during the holiday season.
Creating Peppermint Bark Reindeer is a straightforward process that requires minimal ingredients and effort, making it a perfect choice for those looking to whip up a festive dessert without spending too much time in the kitchen. The combination of smooth chocolate and crunchy peppermint bits creates a delightful texture contrast that will satisfy any sweet craving. Whether you’re serving this treat at a holiday party or simply enjoying it with a cup of hot cocoa, Peppermint Bark Reindeer is sure to become a seasonal favorite.
Ingredients for 4-6 servings:
- 12 oz dark chocolate, chopped
- 12 oz white chocolate, chopped
- 1 teaspoon peppermint extract
- 1/2 cup crushed peppermint candies
- Mini pretzels
- Red and brown candy-coated chocolates (for noses)
- Candy eyes
Instructions:
- Prepare the Baking Sheet: Line a baking sheet with parchment paper, making sure that it’s smooth and flat. This will prevent the chocolate from sticking and make it easier to remove once set.
- Melt the Dark Chocolate: In a heatproof bowl, melt the dark chocolate over a saucepan of simmering water (double boiler method), stirring occasionally until completely smooth. Alternatively, you can melt the chocolate in a microwave in 30-second intervals, stirring between each, until fully melted.
- Spread the Dark Chocolate Layer: Pour the melted dark chocolate onto the prepared baking sheet and spread it evenly using a spatula to form a rectangle. Allow it to cool and set slightly, but not completely.
- Melt the White Chocolate: Using the same melting method, melt the white chocolate until smooth. Stir in the peppermint extract once melted.
- Spread the White Chocolate Layer: Pour the melted white chocolate over the dark chocolate layer, spreading it evenly with a spatula. Work quickly to make sure the two layers bind together.
- Add Peppermint Candies: Immediately sprinkle the crushed peppermint candies over the white chocolate layer, pressing gently to make sure they adhere.
- Create the Reindeer Faces: Before the chocolate sets completely, place two mini pretzels at the top of each section to form antlers. Add two candy eyes and a red or brown candy-coated chocolate for the nose.
- Cool and Set: Allow the chocolate to set completely at room temperature, or place it in the refrigerator for faster setting.
- Break into Pieces: Once fully set, use a sharp knife to cut or break the chocolate into pieces, ensuring each piece has a reindeer face.
Extra Tips:
When making Peppermint Bark Reindeer, make sure that the chocolate isn’t overheated as this can cause it to seize and become grainy.
Also, work quickly when adding the peppermint candies and decorating the reindeer faces to make sure they stick well before the chocolate hardens.
If you prefer a more vibrant peppermint flavor, you can increase the amount of peppermint extract slightly, but be cautious as too much can become overpowering.
These delightful treats can be stored in an airtight container at room temperature for up to a week, making them a perfect make-ahead dessert for holiday gatherings.
Melted Snowman Cookies
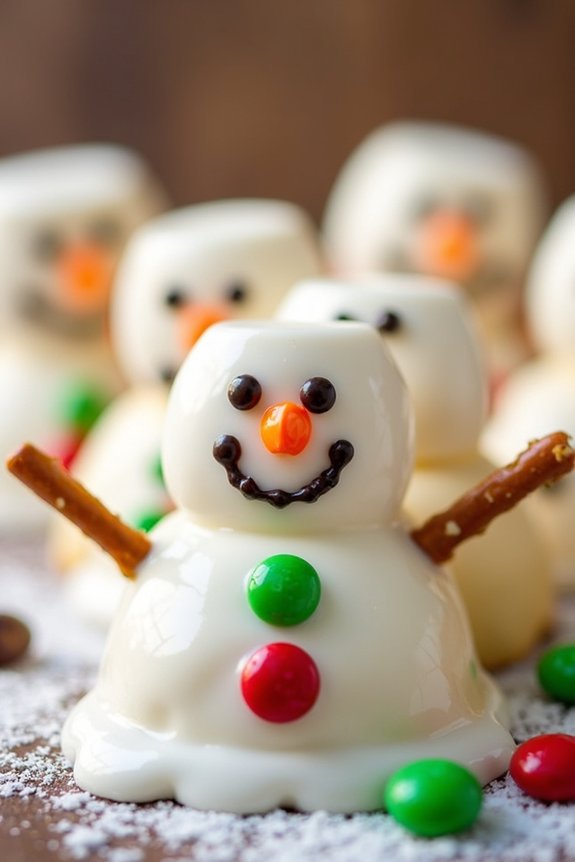
Melted Snowman Cookies are a delightful and whimsical treat that will surely bring a smile to anyone’s face during the holiday season. These cookies capture the fun and festive spirit of Christmas with their playful design, reminiscent of snowmen that have started to melt away. Perfect for holiday parties or as a fun activity with kids, these cookies are as enjoyable to make as they’re to eat.
With a combination of sugar cookies, marshmallows, and colorful decorations, Melted Snowman Cookies are both a visual feast and a tasty treat. Making Melted Snowman Cookies is a creative process that allows you to experiment with different expressions and accessories for your snowmen. The base of the cookie is a simple sugar cookie, which provides a sweet and buttery foundation.
Topped with a marshmallow to represent the snowman’s head and decorated with icing and candies, each cookie becomes a unique character. This recipe serves 4-6 people, making it ideal for small gatherings or as a special treat for the family.
Ingredients (Serving size: 4-6 people):
- 1 batch of sugar cookie dough
- All-purpose flour (for dusting)
- 12 large marshmallows
- 1 cup white icing
- Black decorating gel
- Orange mini M&M’s or candy-coated chocolate bits
- Red and green candy-coated chocolate bits
- Pretzel sticks, broken into smaller pieces
Instructions:
- Prepare the Cookie Dough: Preheat your oven to 350°F (175°C). Roll out the sugar cookie dough on a lightly floured surface to about 1/4-inch thickness. Use a round cookie cutter or the rim of a glass to cut out 12 round cookies.
- Bake the Cookies: Place the cut-out dough on a baking sheet lined with parchment paper. Bake in the preheated oven for 8-10 minutes or until the edges are lightly golden. Let the cookies cool completely on a wire rack.
- Create the Snowman Heads: While the cookies are cooling, prepare the marshmallows. Flatten each marshmallow slightly by pressing down gently with your fingers. Use the black decorating gel to draw eyes and a mouth on each marshmallow.
- Assemble the Snowmen: Once the cookies are cool, spread a spoonful of white icing on each cookie to resemble melting snow. Place a decorated marshmallow slightly off-center on each cookie for the snowman’s head.
- Add Details: Use the orange mini M&M’s for the noses by pressing them into the marshmallow faces. Use the red and green candy-coated chocolate bits to create buttons on the icing. Break pretzel sticks into small pieces and gently press them into the icing on each side of the marshmallow to create arms.
- Set the Cookies: Allow the cookies to sit at room temperature for at least 30 minutes to let the icing set. Alternatively, you can place them in the refrigerator for a quicker set.
Extra Tips:
For best results, make sure the cookies are completely cool before adding the icing and decorations; otherwise, the icing may melt and slide off. If you don’t have orange mini M&M’s for the noses, you can use orange icing or small pieces of dried apricot.
Feel free to get creative with the accessories; you can add scarves made from fruit roll-ups or hats made from chocolate candies. Remember, the imperfections add charm to these whimsical treats, so have fun with the process!
Candy Cane Meringue Kisses

Candy Cane Meringue Kisses are a delightful and festive treat perfect for the holiday season. These light and airy meringue cookies are infused with the invigorating flavor of peppermint and the charming appearance of candy canes. They aren’t only a joy to eat but also add a beautiful touch to any holiday dessert spread.
Whether you’re hosting a Christmas party or simply want to enjoy a sweet treat by the fireplace, these meringue kisses are sure to impress friends and family alike.
Making Candy Cane Meringue Kisses is a fun and rewarding process that involves whipping up a glossy meringue, piping it into delicate kisses, and baking them to perfection. The key to achieving the ideal texture lies in the careful incorporation of sugar and guaranteeing the meringue is stable enough to hold its shape.
The addition of crushed candy canes gives these cookies their signature look, adding a splash of color and a hint of crunch that perfectly complements the smooth texture of the meringue.
Ingredients (Serving Size: 4-6 people):
- 4 large egg whites
- 1 cup granulated sugar
- 1/2 teaspoon cream of tartar
- 1/4 teaspoon peppermint extract
- 2-3 candy canes, crushed
- Red gel food coloring (optional)
Cooking Instructions:
- Prepare the Equipment: Preheat your oven to 200°F (93°C). Line two baking sheets with parchment paper and set aside.
- Whip the Egg Whites: In a clean, dry bowl, beat the egg whites on medium speed with an electric mixer until they become frothy. Add the cream of tartar and continue to beat until soft peaks form.
- Add Sugar Gradually: Increase the mixer speed to high and add the sugar one tablespoon at a time. Continue to beat until the mixture is glossy and stiff peaks form. This should take about 5-7 minutes.
- Incorporate Flavor and Color: Gently fold in the peppermint extract. If using, add a few drops of red gel food coloring to create a swirled effect. Be careful not to overmix as you want to maintain the meringue’s structure.
- Pipe the Meringue: Transfer the meringue into a piping bag fitted with a large star tip. Pipe small dollops onto the prepared baking sheets, leaving about an inch of space between each one.
- Add Candy Cane Topping: Sprinkle the crushed candy canes over the tops of the meringue kisses.
- Bake: Place the baking sheets in the preheated oven and bake for 1.5-2 hours, or until the meringues are dry and can easily be lifted off the parchment paper. Turn off the oven and let the meringues cool inside to prevent cracking.
- Store or Serve: Once completely cooled, store the meringue kisses in an airtight container at room temperature until ready to serve.
Extra Tips:
For ideal results, verify that there’s no yolk mixed with the egg whites, as even a small amount of fat can prevent the meringue from reaching the desired peaks. Use room temperature egg whites for better volume.
If you don’t have a piping bag, you can use a spoon to drop the meringue onto the baking sheets, though they won’t have the same uniform shape. Finally, make sure to crush the candy canes finely so they don’t weigh down the meringue and cause it to collapse.
Enjoy these delightful treats with a cup of hot cocoa for a perfect holiday experience!
Elf Hat Cupcakes
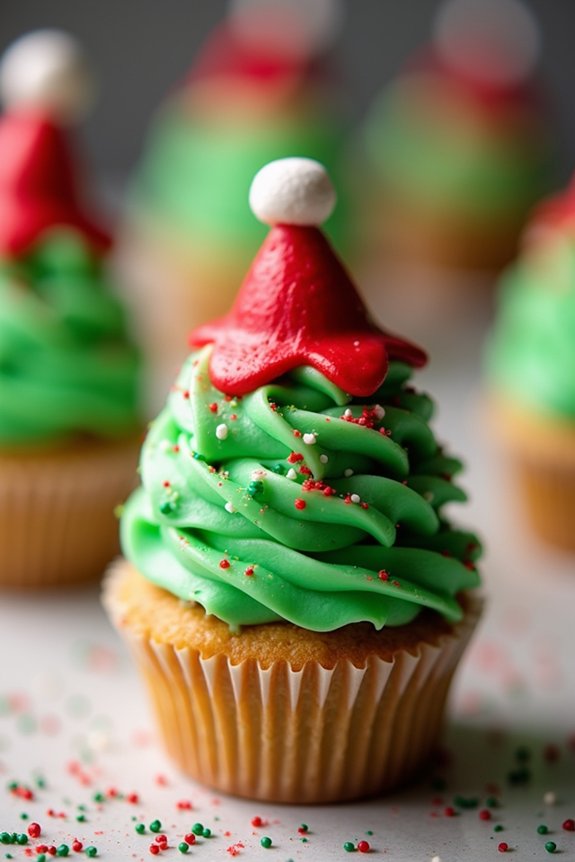
Elf Hat Cupcakes are a delightful and festive dessert perfect for adding a touch of whimsy to your Christmas celebrations. These charming cupcakes are designed to resemble the iconic hats worn by Santa’s little helpers, with a vibrant green frosting base and a sweet red topper to complete the look.
Whether you’re hosting a holiday party or simply enjoying a cozy family gathering, these cupcakes are certain to bring smiles to both kids and adults alike.
Creating Elf Hat Cupcakes involves a combination of baking fluffy cupcakes and decorating them to capture the festive spirit. The cupcakes themselves can be any flavor you desire, but a classic vanilla or chocolate base tends to complement the colorful toppings perfectly.
The key to success with these cupcakes lies in the decoration, where you’ll transform a simple cupcake into a magical Christmas treat. With just a few easy steps and some creativity, you’ll have a batch of adorable Elf Hat Cupcakes ready to delight your guests.
Ingredients for Elf Hat Cupcakes (Serves 4-6):
- 1 cup all-purpose flour
- 1/2 cup granulated sugar
- 1/4 cup unsalted butter, softened
- 1/2 cup milk
- 1 large egg
- 1 teaspoon vanilla extract
- 1 teaspoon baking powder
- 1/4 teaspoon salt
- Green food coloring
- Red candy melts or red frosting
- Mini marshmallows
- Edible glitter or sprinkles (optional)
Cooking Instructions:
1. Preheat the Oven: Start by preheating your oven to 350°F (175°C) and line a muffin tin with cupcake liners.
2. Mix the Batter: In a mixing bowl, combine the flour, sugar, baking powder, and salt. Add the softened butter, milk, egg, and vanilla extract. Beat the mixture with an electric mixer on medium speed until the batter is smooth and well combined.
3. Bake the Cupcakes: Spoon the batter into the prepared cupcake liners, filling each about two-thirds full. Place the muffin tin in the preheated oven and bake for 18-20 minutes, or until a toothpick inserted into the center of a cupcake comes out clean.
Once baked, remove the cupcakes from the oven and let them cool completely on a wire rack.
4. Prepare the Frosting: While the cupcakes cool, prepare your frosting. If using store-bought white frosting, add green food coloring gradually until you achieve the desired shade of green. Mix thoroughly to guarantee even color distribution.
5. Decorate the Cupcakes: Once the cupcakes are cool, spread a generous layer of green frosting on top of each cupcake to create the base of the elf hat.
6. Create the Elf Hats: Melt the red candy melts according to package instructions, or use red frosting to create a small cone shape on top of each cupcake, resembling the tip of an elf hat.
7. Add the Finishing Touches**: Place a mini marshmallow** at the tip of each red hat to resemble a pom-pom. For extra sparkle, sprinkle edible glitter or sprinkles over the cupcakes.
Extra Tips:
When making Elf Hat Cupcakes, take your time with the decoration to guarantee each cupcake looks festive and inviting. If you don’t have red candy melts, red frosting piped into a cone shape works just as well.
To speed up the cooling process, place the cupcakes in the refrigerator for a few minutes before decorating. For a more personalized touch, consider using different colored frostings or adding edible decorations like stars or holly leaves.
Christmas Lights Sugar Cookies
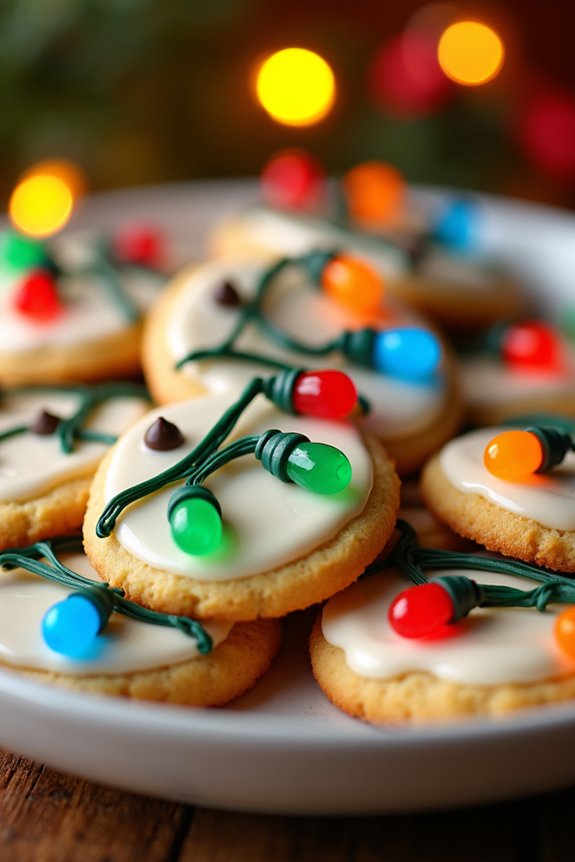
Christmas Lights Sugar Cookies are a delightful and festive treat perfect for the holiday season. These cookies aren’t just delicious, but they also add a colorful and cheerful touch to your Christmas dessert table. The soft, buttery sugar cookie base is adorned with a vibrant array of icing “lights,” mimicking the twinkling Christmas lights that decorate homes during this joyous time of year.
Easy to make and decorate, these cookies are a wonderful activity to enjoy with family and friends, bringing a little extra holiday spirit into your kitchen. These cookies are a great choice for a holiday party or as a homemade gift to share with loved ones. With a simple sugar cookie recipe and a bit of creativity, you can create a beautiful and tasty addition to your Christmas celebrations.
The recipe is designed to serve 4-6 people, making it perfect for a small gathering or to complement a larger dessert spread. Gather your ingredients, preheat your oven, and let’s get started on making these charming Christmas Lights Sugar Cookies.
Ingredients (serves 4-6):
- 2 3/4 cups all-purpose flour
- 1 teaspoon baking powder
- 1/2 teaspoon baking soda
- 1 cup unsalted butter, softened
- 1 1/2 cups granulated sugar
- 1 egg
- 2 teaspoons vanilla extract
- 1/4 teaspoon almond extract
- 3 tablespoons milk
- Assorted food coloring
- 1 cup powdered sugar
- 2-3 tablespoons milk (for icing)
- 1/2 teaspoon vanilla extract (for icing)
- Mini chocolate chips or small candies (for lights)
Instructions:
1. Preheat and Prepare:
Preheat your oven to 350°F (175°C). Line a baking sheet with parchment paper.
2. Mix Dry Ingredients:
In a medium bowl, whisk together the flour, baking powder, and baking soda. Set aside.
3. Cream Butter and Sugar:
In a large mixing bowl, use an electric mixer to cream together the softened butter and granulated sugar until light and fluffy.
4. Add Egg and Extracts:
Beat in the egg, vanilla extract, and almond extract until well combined.
5. Combine Ingredients:
Gradually add the dry ingredients to the creamed mixture, alternating with the milk, mixing until a soft dough forms.
6. Roll and Cut:
Roll out the dough on a floured surface to about 1/4-inch thickness. Use a round cookie cutter to cut out shapes and place them on the prepared baking sheet.
7. Bake:
Bake in the preheated oven for 8-10 minutes, or until the edges are lightly golden. Remove from the oven and allow to cool completely on a wire rack.
8. Prepare Icing:
In a small bowl, mix together powdered sugar, 2-3 tablespoons of milk, and 1/2 teaspoon vanilla extract to create a smooth icing. Divide into several bowls and color each with different food coloring.
9. Decorate:
Use the colored icing to draw a string of lights across each cookie. Use mini chocolate chips or small candies to represent the bulbs. Allow the icing to set before serving.
Extra Tips:
When decorating your Christmas Lights Sugar Cookies, use a piping bag or a small plastic bag with the tip snipped off to have better control over the icing. If you find the dough is too sticky to roll out, chill it in the refrigerator for 30 minutes to make it easier to handle.
For a glossy finish, you can add a few drops of corn syrup to the icing mix. To guarantee even baking, rotate the baking sheet halfway through the cooking time. Enjoy the process and get creative with your designs!