

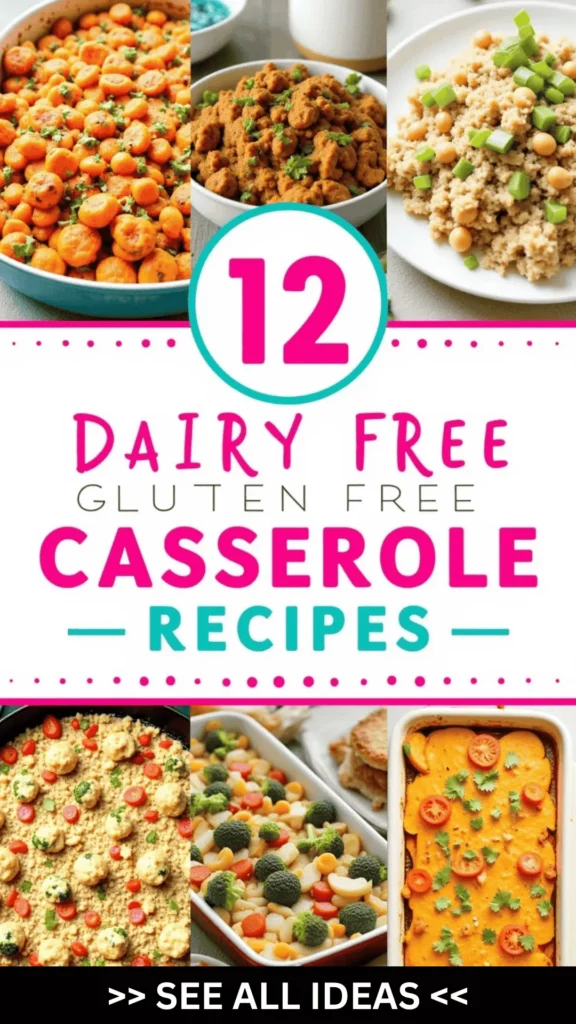
Are you on the lookout for comforting meals that fit your dietary needs?
I’ve discovered a scrumptious collection of 12 dairy-free and gluten-free casseroles that will warm your heart and satisfy your cravings.
From a creamy Chicken and Broccoli Casserole to a hearty Lentil and Vegetable Shepherd’s Pie, each recipe is crafted using clever alternatives like almond milk and gluten-free flour.
These dishes are perfect for busy nights or cozy gatherings with loved ones.
Let’s explore these delicious options that will make mealtime a breeze!
Creamy Chicken and Broccoli Casserole

Creamy Chicken and Broccoli Casserole is a delicious and satisfying dish that caters to those on a dairy-free and gluten-free diet. This recipe combines tender chicken pieces, fresh broccoli florets, and a rich, creamy sauce that’s sure to please everyone at the dinner table. The dish isn’t only comforting but also packed with nutrients, making it a wholesome meal option for families looking to maintain a balanced diet without compromising on taste.
Designed to serve 4-6 people, this casserole is perfect for a cozy family dinner or a gathering with friends. The preparation is straightforward, and the ingredients are easy to find, making it an ideal choice for both novice and seasoned cooks. By using simple substitutions and thoughtful preparation, you can enjoy this classic comfort food while fulfilling your dietary needs.
Ingredients:
- 2 lbs chicken breast, diced
- 4 cups broccoli florets
- 1 large onion, diced
- 3 cloves garlic, minced
- 1 cup chicken broth
- 1 cup full-fat coconut milk
- 2 tablespoons olive oil
- 2 tablespoons gluten-free all-purpose flour
- 1 teaspoon dried thyme
- 1 teaspoon salt
- 1/2 teaspoon black pepper
- 1/2 cup gluten-free bread crumbs (optional for topping)
Instructions:
- Preheat the Oven: Start by preheating your oven to 350°F (175°C) to guarantee it’s ready for the casserole.
- Cook the Chicken: In a large skillet, heat 1 tablespoon of olive oil over medium heat. Add the diced chicken breast and cook until golden brown and fully cooked, about 7-10 minutes. Remove the chicken from the skillet and set aside.
- Sauté the Vegetables: In the same skillet, add the remaining tablespoon of olive oil. Sauté the diced onion and minced garlic until they’re soft and fragrant, about 3-4 minutes.
- Prepare the Sauce: Sprinkle the gluten-free flour over the sautéed onions and garlic, stirring continuously for about 1 minute. Slowly pour in the chicken broth and coconut milk, whisking to combine. Add the dried thyme, salt, and black pepper. Continue to cook the sauce until it thickens, approximately 5 minutes.
- Combine Ingredients: In a large mixing bowl, combine the cooked chicken, broccoli florets, and creamy sauce. Mix well to guarantee the sauce coats all the ingredients evenly.
- Assemble the Casserole: Transfer the mixture into a greased 9×13 inch baking dish. If using, sprinkle the gluten-free bread crumbs evenly over the top for an added crispy texture.
- Bake the Casserole: Place the casserole in the preheated oven and bake for 25-30 minutes, or until the top is golden brown and the broccoli is tender.
- Serve: Allow the casserole to cool for a few minutes before serving. Enjoy!
Extra Tips:
When cooking the chicken, make sure not to overcrowd the skillet to guarantee an even browning. For the sauce, you can adjust the consistency by adding more chicken broth or coconut milk, depending on your preference.
If you prefer a more cheesy flavor without dairy, consider adding nutritional yeast to the sauce for a savory, cheese-like taste. Additionally, feel free to experiment with other vegetables such as bell peppers or mushrooms to add variety to your casserole.
This dish can also be prepared ahead of time and stored in the refrigerator for up to two days, making it a convenient option for meal prep.
Sweet Potato and Black Bean Enchilada Bake
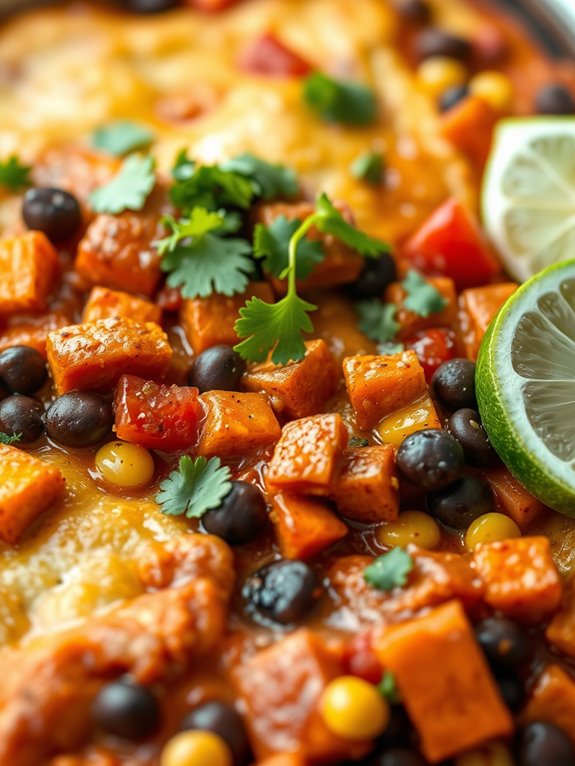
Sweet Potato and Black Bean Enchilada Bake is a delicious and satisfying casserole that’s both dairy-free and gluten-free, making it a perfect choice for those with dietary restrictions. This hearty dish combines the sweetness of roasted sweet potatoes with the rich, savory flavors of black beans and enchilada sauce, creating a meal that’s both comforting and nutritious. Packed with protein and fiber, this casserole is sure to be a hit with everyone at the dinner table, whether they’ve dietary restrictions or not.
The Sweet Potato and Black Bean Enchilada Bake is easy to prepare and makes a great option for meal prep, as it holds up well in the refrigerator and can be reheated throughout the week. It can also be customized with your favorite vegetables and toppings, allowing you to tailor it to your taste preferences. Whether you’re serving it as a main dish or a side, this casserole is a versatile and flavorful addition to any meal plan.
Ingredients for 4-6 servings:
- 2 large sweet potatoes, peeled and diced
- 1 tablespoon olive oil
- 1 teaspoon cumin
- 1 teaspoon smoked paprika
- Salt and pepper to taste
- 1 (15-ounce) can black beans, drained and rinsed
- 1 cup corn kernels (fresh, frozen, or canned)
- 1 cup diced tomatoes
- 2 cups enchilada sauce
- 8-10 gluten-free corn tortillas
- 1/4 cup chopped cilantro
- 1 lime, cut into wedges
Cooking Instructions:
1. Preheat the Oven:
Preheat your oven to 400°F (200°C) to get it ready for roasting the sweet potatoes.
2. Prepare the Sweet Potatoes:
In a large bowl, toss the diced sweet potatoes with olive oil, cumin, smoked paprika, salt, and pepper. Verify the sweet potatoes are evenly coated with the spices.
3. Roast the Sweet Potatoes:
Spread the seasoned sweet potatoes on a baking sheet in a single layer. Roast them in the preheated oven for 20-25 minutes, or until they’re tender and slightly caramelized. Remove from the oven and set aside.
4. Prepare the Filling:
In a large mixing bowl, combine the roasted sweet potatoes, black beans, corn, and diced tomatoes. Mix well to confirm all the ingredients are evenly distributed.
5. Assemble the Casserole:
Spread a thin layer of enchilada sauce at the bottom of a 9×13-inch baking dish. Place a layer of corn tortillas over the sauce, followed by half of the sweet potato mixture. Pour a cup of enchilada sauce over the top. Repeat the layers, ending with a final layer of tortillas and enchilada sauce on top.
6. Bake the Casserole:
Cover the baking dish with foil and bake in the oven for 25-30 minutes, until heated through and bubbly. Remove the foil for the last 5 minutes of baking to allow the top to slightly crisp.
7. Serve:
Remove from the oven and let it cool for a few minutes before serving. Garnish with chopped cilantro and serve with lime wedges on the side for a fresh burst of flavor.
Extra Tips:
For added flavor, consider adding some chopped bell peppers or jalapeños to the filling for a spicy kick. If you prefer a creamier texture, you can add a dollop of dairy-free sour cream or avocado crema on top when serving.
This dish can also be made ahead of time and stored in the refrigerator for up to three days, making it a convenient option for busy weeknights. When reheating, cover the casserole with foil to prevent it from drying out, and heat in the oven at 350°F (175°C) until warmed through.
Lentil and Vegetable Shepherd’s Pie
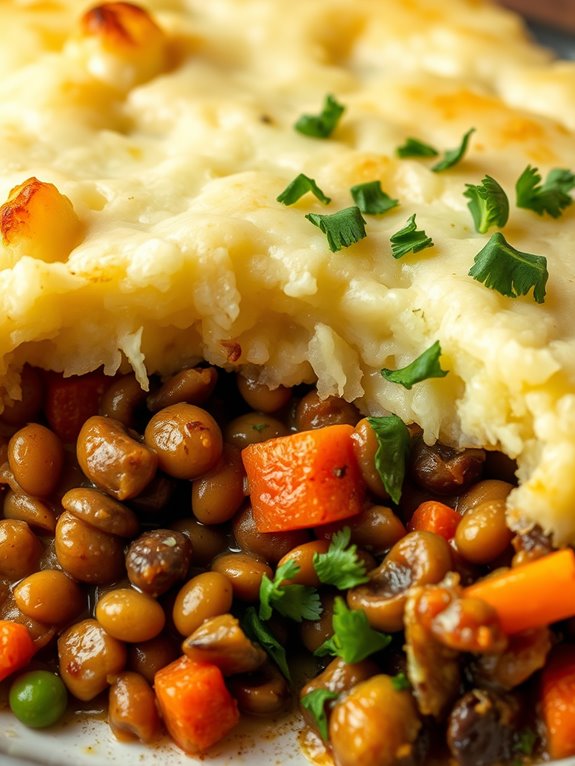
Lentil and Vegetable Shepherd’s Pie is a hearty and satisfying dish that’s perfect for those following a dairy-free and gluten-free diet. This casserole combines the earthy flavors of lentils and fresh vegetables, creating a nutritious meal that’s rich in protein and fiber. The comforting layers of creamy mashed potatoes and savory lentil filling make it an excellent choice for family dinners or gatherings with friends. This recipe is designed to serve 4-6 people, making it ideal for a small group or for leftovers the next day.
The base of this shepherd’s pie is made with lentils cooked in a savory broth with a mix of vegetables such as carrots, peas, and mushrooms, providing a burst of flavors in every bite. The top layer is a smooth and creamy mashed potato made with plant-based milk and butter alternatives, guaranteeing that the dish remains completely dairy-free. The combination of these elements results in a casserole that’s both comforting and flavorful, making it a favorite for anyone, regardless of dietary restrictions.
Ingredients (Serves 4-6)
- 1 cup dry green or brown lentils
- 2 cups vegetable broth
- 1 onion, chopped
- 2 carrots, diced
- 1 cup mushrooms, sliced
- 1 cup frozen peas
- 2 cloves garlic, minced
- 1 tablespoon olive oil
- 1 teaspoon dried thyme
- 1 teaspoon dried rosemary
- Salt and pepper to taste
- 4 large potatoes, peeled and chopped
- 1/2 cup unsweetened almond milk (or other dairy-free milk)
- 2 tablespoons dairy-free butter
- Fresh parsley, chopped (for garnish)
Instructions
- Prepare the Lentil Filling: Rinse the lentils under cold water. In a large pot, combine lentils and vegetable broth. Bring to a boil, then reduce heat and let simmer for 20-25 minutes until lentils are tender. Drain any excess liquid.
- Cook the Vegetables: In a large skillet, heat olive oil over medium heat. Add chopped onion, diced carrots, and sliced mushrooms. Sauté for about 5 minutes until the vegetables soften. Add minced garlic, thyme, and rosemary, stirring for an additional 1-2 minutes.
- Combine the Filling: Add the cooked lentils and frozen peas to the skillet with the vegetables. Stir well to combine and season with salt and pepper to taste. Cook for another 5 minutes, then remove from heat.
- Prepare the Mashed Potatoes: While the filling is cooking, boil the chopped potatoes in a large pot of salted water until tender, about 15-20 minutes. Drain and return the potatoes to the pot.
- Mash the Potatoes: Add almond milk and dairy-free butter to the drained potatoes. Mash until smooth and creamy. Season with salt and pepper to taste.
- Assemble the Casserole: Preheat your oven to 400°F (200°C). Spread the lentil and vegetable mixture evenly at the bottom of a baking dish. Top with the mashed potatoes, spreading them evenly over the filling.
- Bake the Shepherd’s Pie: Place the baking dish in the preheated oven and bake for 20-25 minutes until the top is lightly golden and the filling is bubbling.
- Serve: Remove from the oven and let cool for a few minutes. Garnish with fresh parsley before serving.
Extra Tips
For extra flavor, consider adding a splash of balsamic vinegar or a tablespoon of tomato paste to the lentil filling before baking. This will enhance the depth of the flavors.
If you prefer a creamier mashed potato topping, you can add an additional splash of almond milk. Make sure to taste and adjust the seasoning before assembling the casserole to guarantee balanced flavors.
This dish can be prepared in advance and stored in the refrigerator, making it a convenient option for meal prep or busy weeknights.
Quinoa and Spinach Stuffed Bell Peppers
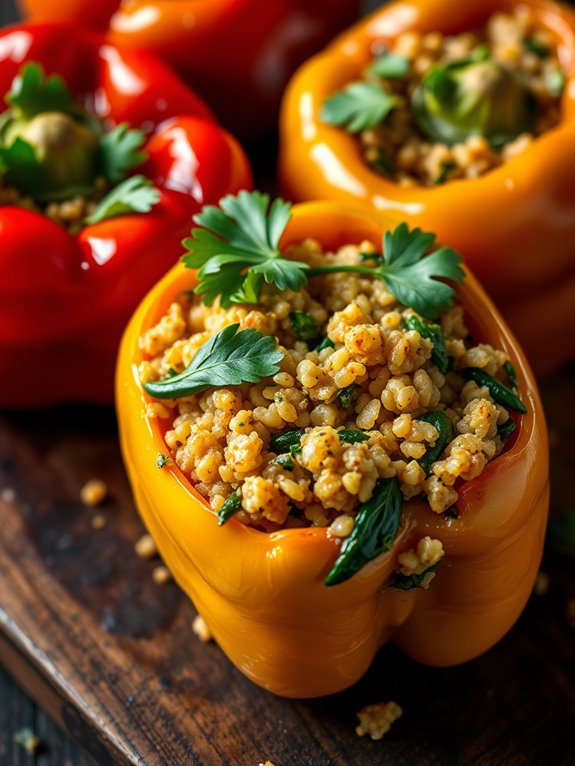
Quinoa and Spinach Stuffed Bell Peppers is a delightful and nourishing dish that’s perfect for those following a dairy-free and gluten-free diet. This recipe combines the nutty flavor of quinoa with the freshness of spinach, all encased within a sweet, roasted bell pepper.
Whether you’re preparing a weeknight meal or hosting guests, these stuffed peppers are sure to impress with their vibrant colors and rich flavors. Not only is this dish healthy and satisfying, but it also offers a beautiful presentation that can brighten up any dinner table.
The filling is a nutrient-rich blend of quinoa, spinach, and a medley of aromatic spices, ensuring every bite is packed with flavor. The natural sweetness of the bell peppers pairs perfectly with the savory filling, creating a harmonious balance.
Additionally, this dish is incredibly versatile; you can prepare it ahead of time and simply bake it when ready to serve. It’s an excellent option for meal prepping or when you need a quick yet wholesome dinner solution. With minimal ingredients and simple preparation, Quinoa and Spinach Stuffed Bell Peppers are a must-try for anyone seeking a satisfying plant-based meal.
Ingredients for 4-6 Servings:
- 4 large bell peppers (any color)
- 1 cup quinoa, rinsed
- 2 cups vegetable broth
- 2 tablespoons olive oil
- 1 medium onion, finely chopped
- 3 cloves garlic, minced
- 4 cups fresh spinach, roughly chopped
- 1 teaspoon ground cumin
- 1 teaspoon smoked paprika
- Salt and pepper, to taste
- 1/4 cup fresh parsley, chopped
Cooking Instructions:
- Prepare the Bell Peppers: Preheat your oven to 375°F (190°C). Slice the tops off the bell peppers and remove the seeds and membranes. Lightly brush the outside of the peppers with olive oil and place them in a baking dish, cut side up. Set aside.
- Cook the Quinoa: In a medium saucepan, bring the vegetable broth to a boil. Add the rinsed quinoa, reduce the heat to low, cover, and let it simmer for about 15 minutes, or until all the liquid is absorbed and the quinoa is fluffy. Remove from heat and set aside.
- Saute the Vegetables: In a large skillet, heat the olive oil over medium heat. Add the chopped onion and sauté until translucent, about 5 minutes. Stir in the minced garlic and cook for another minute until fragrant.
- Add Spinach and Spices: Add the chopped spinach to the skillet and cook until wilted, about 3 minutes. Stir in the ground cumin, smoked paprika, salt, and pepper. Mix well to combine all the flavors.
- Combine Filling: Add the cooked quinoa to the skillet with the spinach mixture. Stir well to combine all ingredients thoroughly. Taste and adjust seasoning if necessary.
- Stuff the Peppers: Spoon the quinoa and spinach mixture into each bell pepper, pressing down gently to pack the filling. Place the stuffed peppers back into the baking dish.
- Bake the Peppers: Cover the dish with aluminum foil and bake in the preheated oven for 25-30 minutes. Remove the foil and bake for an additional 10 minutes, or until the peppers are tender and slightly roasted.
- Garnish and Serve: Remove from oven, garnish with fresh parsley, and serve warm.
Extra Tips:
When selecting bell peppers, choose ones that are firm and have a flat bottom so they stand upright during baking. If you prefer a bit of heat, consider adding a pinch of red pepper flakes to the quinoa mixture.
For added texture, you can mix in some chopped nuts such as almonds or walnuts. If you want a more substantial meal, serve these stuffed peppers alongside a fresh green salad or roasted vegetables.
Additionally, these stuffed peppers can be stored in the refrigerator for up to 3 days, making them a convenient option for meal prepping.
Baked Ratatouille With Crispy Topping
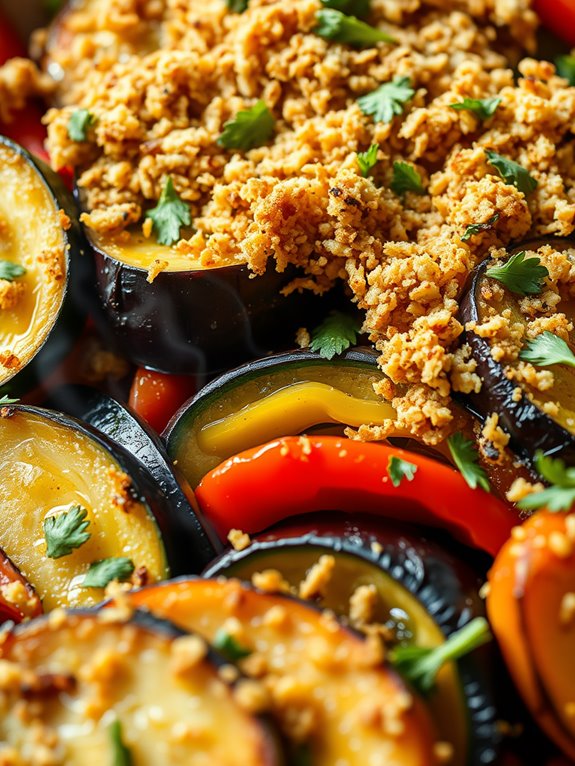
Baked Ratatouille with a crispy topping is a delightful casserole dish that combines the rich flavors of traditional ratatouille with a satisfying, crunchy finish. This dairy-free and gluten-free recipe is perfect for those who are looking for a wholesome, comforting meal without compromising on their dietary needs.
The vegetables in the dish are cooked until tender, absorbing a medley of herbs and spices, while the crispy topping adds a contrasting texture that elevates the overall experience. Whether enjoyed as a main course or a hearty side dish, this baked ratatouille is sure to become a family favorite.
This dish is perfect for serving 4-6 people and is an excellent way to utilize fresh seasonal produce. The preparation involves layering a variety of colorful vegetables such as zucchini, eggplant, and bell peppers, and baking them to perfection.
The crispy topping, made from gluten-free breadcrumbs and nutritional yeast, not only adds a burst of flavor but also keeps the dish completely dairy-free. This recipe is ideal for those who appreciate the earthy taste of roasted vegetables combined with the savory crunch of a well-seasoned topping.
Ingredients:
- 2 medium zucchini, sliced into rounds
- 1 medium eggplant, sliced into rounds
- 2 red bell peppers, sliced into strips
- 1 yellow bell pepper, sliced into strips
- 1 large onion, thinly sliced
- 4 cloves garlic, minced
- 4 large tomatoes, sliced
- 1/4 cup olive oil
- 1 tsp dried thyme
- 1 tsp dried oregano
- Salt and pepper, to taste
- 1 cup gluten-free breadcrumbs
- 1/4 cup nutritional yeast
- 2 tbsp fresh parsley, chopped
Instructions:
- Preheat the Oven: Preheat your oven to 375°F (190°C) to guarantee it’s ready once the ratatouille is assembled.
- Prepare the Vegetables: Wash and slice the zucchini, eggplant, bell peppers, onion, and tomatoes. Aim for even slices to guarantee they cook uniformly.
- Sauté the Aromatics: In a large skillet, heat 2 tablespoons of olive oil over medium heat. Add the onion and garlic, sautéing until the onion is translucent and the garlic is fragrant, about 5 minutes.
- Season the Vegetables: In a large bowl, combine the sliced vegetables with the sautéed onion and garlic. Drizzle with the remaining olive oil and season with dried thyme, oregano, salt, and pepper. Toss well to coat the vegetables evenly with the seasoning.
- Assemble the Casserole: In a large baking dish, arrange the seasoned vegetables in layers. Start by spreading a layer of eggplant, followed by tomatoes, zucchini, and bell peppers. Repeat the layers until all vegetables are used.
- Prepare the Crispy Topping: In a separate bowl, mix the gluten-free breadcrumbs, nutritional yeast, and chopped parsley. Sprinkle the mixture evenly over the top of the layered vegetables.
- Bake the Ratatouille: Cover the baking dish with foil and bake in the preheated oven for 30 minutes. Remove the foil and bake for an additional 15-20 minutes, or until the vegetables are tender, and the topping is golden brown and crispy.
- Serve: Remove from the oven and allow it to cool slightly before serving. Garnish with additional parsley if desired.
Extra Tips:
When preparing this dish, make sure to slice the vegetables as evenly as possible to guarantee they cook uniformly. If you have a mandoline slicer, it can be a helpful tool for achieving consistent slices.
Additionally, feel free to experiment with different herbs and spices to suit your personal taste. For an extra layer of flavor, consider adding a splash of balsamic vinegar to the vegetable mix before baking. This dish can be prepared ahead of time and reheated, making it a convenient option for meal prep or gatherings.
Zucchini and Tomato Gratin
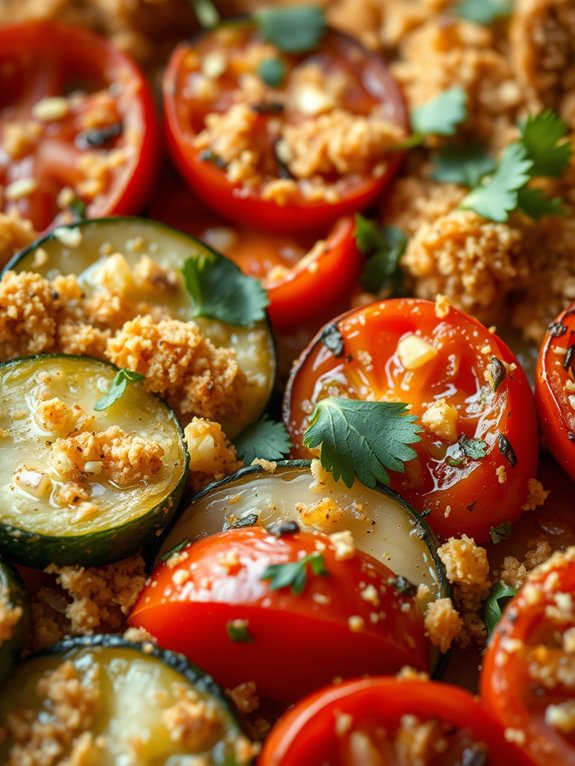
This gratin is characterized by its layers of thinly sliced zucchini and juicy tomatoes, seasoned with garlic, olive oil, and herbs. The vegetables are then baked to perfection, allowing the flavors to meld together beautifully.
The use of gluten-free breadcrumbs adds a delightful crunch on top, while nutritional yeast provides a cheesy, umami flavor without any dairy. Serve this dish for a serving size of 4-6 people, and you’ll surely have everyone asking for seconds.
Ingredients (serving size: 4-6 people):
- 3 medium zucchinis, thinly sliced
- 4 large tomatoes, thinly sliced
- 2 cloves of garlic, minced
- 2 tablespoons olive oil
- 1 teaspoon dried oregano
- 1 teaspoon dried basil
- Salt and pepper to taste
- 1 cup gluten-free breadcrumbs
- 3 tablespoons nutritional yeast
- 2 tablespoons fresh parsley, chopped (optional, for garnish)
Cooking Instructions:
1. Preheat the Oven: Set your oven to 375°F (190°C) to guarantee it’s hot enough to bake the vegetables evenly.
2. Prepare the Baking Dish: Lightly grease a 9×13-inch baking dish with olive oil to prevent sticking.
3. Layer the Vegetables: Arrange a layer of zucchini slices at the bottom of the baking dish. Follow with a layer of tomato slices. Sprinkle some minced garlic, oregano, basil, salt, and pepper over the first layer.
Repeat the layering process until all the zucchini and tomato slices are used, making sure each layer is seasoned.
4. Drizzle with Olive Oil: Evenly drizzle the olive oil over the top layer to help with roasting and flavor infusion.
5. Prepare the Topping: In a small mixing bowl, combine the gluten-free breadcrumbs with the nutritional yeast. Mix well.
6. Add the Topping: Sprinkle the breadcrumb mixture evenly over the top layer of vegetables. This will create a crispy crust once baked.
7. Bake the Gratin: Place the baking dish in the preheated oven and bake for 35-40 minutes, or until the vegetables are tender and the top is golden brown.
8. Garnish and Serve: Once baked, remove the dish from the oven and let it cool slightly. Garnish with fresh parsley before serving for an added burst of color and flavor.
Extra Tips:
For best results, use ripe tomatoes and firm zucchini to guarantee the gratin holds its shape and doesn’t become watery.
If you prefer a spicier flavor, consider adding a pinch of red pepper flakes to the seasoning. Additionally, you can prepare this dish ahead of time and store it in the refrigerator before baking, making it a convenient option for meal prepping.
Cauliflower Rice and Turkey Casserole
Cauliflower Rice and Turkey Casserole is a delicious and nutritious dish that perfectly fits into a dairy-free and gluten-free diet. This casserole isn’t only satisfying but also packed with flavors, making it an excellent choice for a family dinner or a get-together with friends. The combination of ground turkey and cauliflower rice is a healthy alternative to traditional casseroles, providing a lower carb option without compromising on taste.
The beauty of this dish lies in its simplicity and the way it incorporates wholesome ingredients. The cauliflower rice serves as a fantastic base, absorbing the flavors of the turkey and spices, while the vegetables add a nice crunch and freshness to the casserole. Whether you’re looking for a hearty meal on a busy weeknight or something to impress your guests, this Cauliflower Rice and Turkey Casserole is sure to be a hit.
Ingredients for 4-6 servings:
- 1 pound ground turkey
- 1 medium head of cauliflower or 4 cups pre-packaged cauliflower rice
- 1 large onion, chopped
- 2 cloves garlic, minced
- 1 red bell pepper, diced
- 1 cup mushrooms, sliced
- 1 cup spinach, chopped
- 1 tablespoon olive oil
- 1 teaspoon dried oregano
- 1 teaspoon paprika
- 1 teaspoon cumin
- Salt and pepper, to taste
- 1/2 cup chicken broth
- 1/4 cup nutritional yeast
- 2 tablespoons fresh parsley, chopped (for garnish)
Cooking Instructions:
- Prepare the Cauliflower Rice: If using a fresh cauliflower, chop it into florets and pulse in a food processor until it resembles rice. Set aside. If you have pre-packaged cauliflower rice, skip this step.
- Cook the Turkey: In a large skillet, heat olive oil over medium heat. Add the chopped onion and garlic, sautéing until the onion becomes translucent. Add ground turkey and cook until browned, breaking it up with a spoon.
- Add Vegetables: Stir in the red bell pepper and mushrooms, cooking for about 5 minutes until they start to soften. Add the chopped spinach and cook until wilted.
- Season the Mixture: Sprinkle in the oregano, paprika, cumin, salt, and pepper. Mix well to guarantee the spices evenly coat the turkey and vegetables.
- Incorporate Cauliflower Rice: Add the cauliflower rice to the skillet, stirring well to combine with the turkey mixture. Pour in the chicken broth and bring to a simmer.
- Bake the Casserole: Preheat your oven to 375°F (190°C). Transfer the mixture to a greased baking dish. Sprinkle nutritional yeast on top for a cheesy flavor without dairy. Bake for 20-25 minutes, until the top is slightly golden and the casserole is heated through.
- Garnish and Serve: Remove from the oven and let it cool slightly. Garnish with fresh parsley before serving.
Extra Tips:
For a more robust flavor, consider adding a splash of coconut aminos or tamari sauce while cooking the turkey. If you prefer a spicier kick, a pinch of red pepper flakes can also be added.
Confirm the cauliflower rice isn’t too watery by patting it dry with a paper towel before cooking. This will prevent the casserole from becoming soggy. Adjust the seasoning to your taste, and enjoy the rich, savory flavors of this healthy casserole.
Butternut Squash and Chickpea Bake
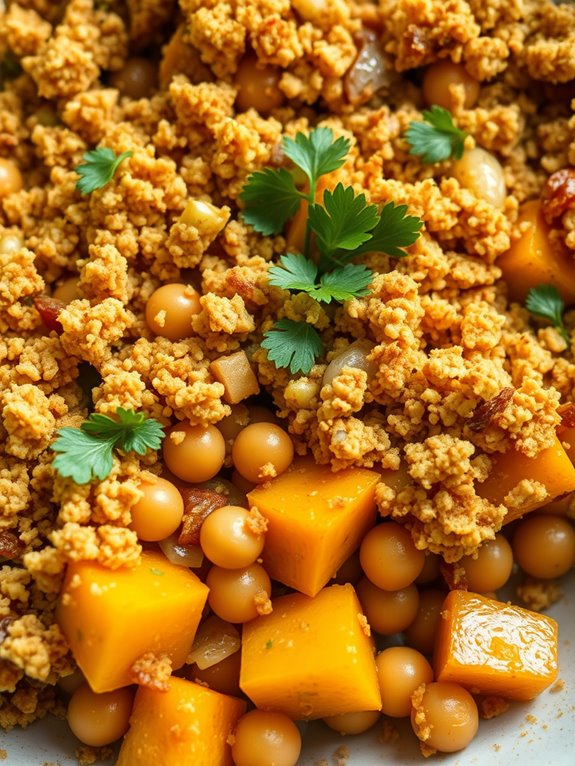
Butternut Squash and Chickpea Bake is a delicious and hearty dish perfect for those following a dairy-free and gluten-free diet. The creamy texture of butternut squash combined with the protein-rich chickpeas creates a satisfying meal that’s both nourishing and flavorful.
This casserole dish isn’t only easy to prepare but also versatile, making it an excellent choice for a family dinner or a potluck gathering. The blend of spices and herbs used in this recipe enhances the natural sweetness of the squash while adding a savory depth of flavor.
This recipe serves 4-6 people and showcases the delightful combination of tender roasted butternut squash and chickpeas, enveloped in aromatic herbs and spices. By using gluten-free breadcrumbs and nutritional yeast, this bake achieves a cheesy, crispy topping without any dairy.
The dish can be prepared ahead of time and popped into the oven when you’re ready to enjoy a warm, comforting meal. Whether you’re accommodating dietary restrictions or simply looking for a delicious plant-based option, this Butternut Squash and Chickpea Bake is sure to satisfy everyone at the table.
Ingredients:
- 1 large butternut squash, peeled and cubed
- 2 cans (15 oz each) chickpeas, drained and rinsed
- 1 large onion, chopped
- 3 cloves garlic, minced
- 2 tablespoons olive oil
- 1 teaspoon ground cumin
- 1 teaspoon smoked paprika
- 1/2 teaspoon turmeric
- Salt and pepper to taste
- 1/2 cup vegetable broth
- 1/2 cup gluten-free breadcrumbs
- 1/4 cup nutritional yeast
- 2 tablespoons fresh parsley, chopped
Cooking Instructions:
- Preheat the Oven: Preheat your oven to 400°F (200°C) to guarantee it’s hot and ready for baking.
- Prepare the Butternut Squash: Peel and cube the butternut squash into bite-sized pieces. Place them in a large mixing bowl.
- Mix Chickpeas and Vegetables: Add the drained chickpeas, chopped onion, and minced garlic to the bowl with the squash.
- Season the Mixture: Drizzle the olive oil over the vegetables and chickpeas, and sprinkle with ground cumin, smoked paprika, turmeric, salt, and pepper. Toss everything together until well coated with the oil and spices.
- Transfer to Baking Dish: Pour the seasoned squash and chickpea mixture into a greased 9×13-inch baking dish. Spread it out evenly.
- Add Broth: Pour the vegetable broth over the mixture in the baking dish. This will help to keep the dish moist while baking.
- Prepare Topping: In a small bowl, combine the gluten-free breadcrumbs and nutritional yeast. Mix well and sprinkle evenly over the top of the squash and chickpea mixture.
- Bake the Casserole: Place the baking dish in the preheated oven and bake for 30-35 minutes, or until the top is golden brown and the squash is tender when pierced with a fork.
- Garnish and Serve: Remove the casserole from the oven and let it cool slightly. Garnish with chopped fresh parsley before serving.
Extra Tips:
To guarantee the butternut squash cooks evenly, try to cut the pieces into uniform sizes. If you prefer a more robust flavor, consider adding a pinch of chili flakes for some heat or a splash of lemon juice for brightness.
If you want to prepare the dish in advance, you can assemble it up to the point of baking, cover it tightly, and store it in the refrigerator for up to a day. Just remember to bake it when you’re ready to serve. Enjoy your Butternut Squash and Chickpea Bake with a side salad or some gluten-free bread for a complete meal.
Mushroom and Wild Rice Casserole
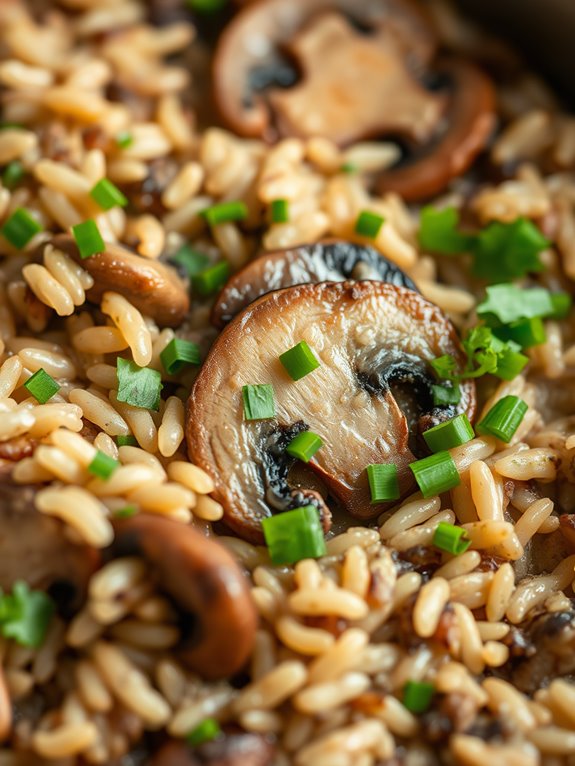
Indulge in the earthy flavors of a Mushroom and Wild Rice Casserole, a hearty and satisfying dish that’s both dairy-free and gluten-free. This casserole combines the nutty taste of wild rice with the rich, savory flavors of mushrooms, creating a comforting meal perfect for any occasion.
Ideal for those with dietary restrictions or anyone looking to enjoy a wholesome, plant-based dish, this recipe is bound to become a favorite at your dinner table.
The Mushroom and Wild Rice Casserole isn’t only delicious but also incredibly nutritious, offering a variety of vitamins and minerals. The wild rice provides a chewy texture and a host of nutrients like fiber and protein, while the mushrooms add an umami depth and a boost of antioxidants.
This dish is a true celebration of wholesome ingredients coming together to create a comforting and flavorful meal that can be enjoyed by everyone.
Ingredients for 4-6 servings:
- 1 cup wild rice
- 2 cups vegetable broth
- 2 tablespoons olive oil
- 1 onion, finely chopped
- 3 garlic cloves, minced
- 2 cups sliced mushrooms (such as cremini or button)
- 1 teaspoon dried thyme
- 1 teaspoon dried rosemary
- 1 cup unsweetened almond milk
- 1 tablespoon cornstarch
- Salt and pepper to taste
- 1/4 cup chopped fresh parsley (optional, for garnish)
Cooking Instructions:
- Preheat Oven: Begin by preheating your oven to 350°F (175°C). This will guarantee that your casserole cooks evenly.
- Cook Wild Rice: Rinse the wild rice under cold water, then combine it with the vegetable broth in a medium saucepan. Bring to a boil, then reduce the heat to low, cover, and simmer for about 45 minutes, or until the rice is tender and the liquid is absorbed.
- Sauté Vegetables: In a large skillet, heat the olive oil over medium heat. Add the chopped onion and minced garlic, sautéing until the onion becomes translucent, about 3-4 minutes.
- Add Mushrooms: Add the sliced mushrooms to the skillet with the onions and garlic. Cook until the mushrooms are browned and have released their juices, approximately 5-7 minutes.
- Season: Stir in the dried thyme and rosemary, and season with salt and pepper to taste. Mix well to combine the flavors.
- Prepare Sauce: In a small bowl, whisk together the almond milk and cornstarch until smooth. Pour this mixture into the skillet with the mushrooms, stirring constantly until the sauce thickens, about 2-3 minutes.
- Combine Ingredients: Once the wild rice is cooked, add it to the skillet with the mushroom mixture. Stir well to guarantee the rice is evenly coated with the sauce.
- Bake Casserole: Transfer the rice and mushroom mixture into a lightly greased casserole dish. Spread it evenly and cover with foil. Bake in the preheated oven for 20-25 minutes.
- Garnish and Serve: Remove the casserole from the oven and let it cool slightly. Garnish with chopped fresh parsley before serving, if desired.
Extra Tips:
For an added depth of flavor, consider using a mix of different mushroom varieties, such as shiitake or portobello, to complement the wild rice.
If you prefer a bit of heat, a pinch of red pepper flakes can be added along with the herbs. Additionally, for a creamier texture, you might experiment with other dairy-free milk alternatives like cashew or oat milk.
Remember to taste and adjust seasoning as needed before baking to guarantee a perfectly balanced dish.
Eggplant and Tomato Lasagna
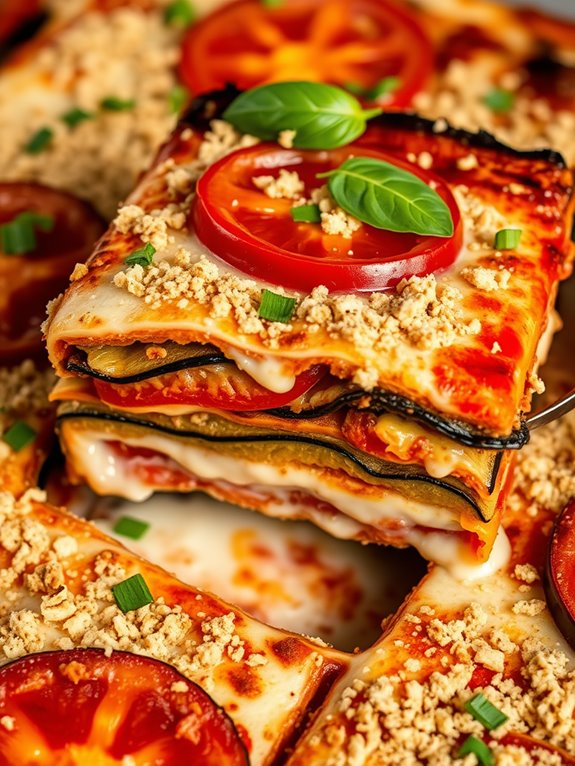
Eggplant and Tomato Lasagna is a delightful twist on the classic lasagna, perfect for those who are avoiding dairy and gluten. This dish incorporates layers of roasted eggplant, ripe tomatoes, and a creamy, dairy-free béchamel sauce to create a satisfying and wholesome meal. The combination of fresh vegetables and herbs brings a burst of flavor, making it a perfect choice for a family dinner or a gathering with friends.
The recipe isn’t only free of dairy and gluten but also packed with nutrients, making it a healthy alternative to traditional lasagna. Eggplants are rich in fiber and antioxidants, while tomatoes provide a good dose of vitamins C and K. This lasagna serves 4-6 people and is sure to be a hit with everyone, regardless of dietary preferences.
Ingredients (for 4-6 servings):
- 2 large eggplants, sliced into 1/4-inch rounds
- 4 large ripe tomatoes, sliced
- 1 tablespoon olive oil
- Salt and pepper to taste
- 1 teaspoon dried oregano
- 1 teaspoon dried basil
- 2 cups dairy-free béchamel sauce (store-bought or homemade)
- 1/4 cup nutritional yeast
- 1/4 cup fresh basil leaves, chopped
- 1/2 cup gluten-free breadcrumbs
Cooking Instructions:
- Preheat the Oven: Preheat your oven to 375°F (190°C) to guarantee even cooking of the lasagna.
- Prepare the Eggplant: Sprinkle the eggplant slices with salt and let them sit for about 20 minutes to draw out excess moisture. Rinse and pat dry with a paper towel.
- Roast the Eggplant: Arrange the eggplant slices on a baking sheet, drizzle with olive oil, and season with salt, pepper, oregano, and dried basil. Roast in the preheated oven for 20 minutes, flipping halfway through, until they’re tender and slightly golden.
- Assemble the Lasagna: In a 9×13 inch baking dish, spread a thin layer of the dairy-free béchamel sauce at the bottom. Layer half of the roasted eggplant slices over the sauce, followed by half of the tomato slices. Sprinkle with a bit of salt and pepper.
- Second Layer: Pour half of the remaining béchamel sauce over the tomatoes and sprinkle with half of the nutritional yeast and fresh basil. Repeat the layering process with the remaining eggplant, tomatoes, and béchamel sauce.
- Top with Breadcrumbs: Sprinkle the gluten-free breadcrumbs evenly over the top layer of béchamel sauce.
- Bake the Lasagna: Cover the baking dish with aluminum foil and bake in the preheated oven for 25 minutes. Remove the foil and bake for an additional 10-15 minutes until the top is golden brown and bubbly.
- Rest Before Serving: Allow the lasagna to cool for about 10 minutes before serving. This helps the layers set and makes it easier to slice.
Extra Tips:
For a richer flavor, you can add a layer of sautéed mushrooms or spinach in between the eggplant and tomato layers. If you’re making your own dairy-free béchamel sauce, consider using almond milk or oat milk for a creamy texture. Additionally, if you prefer a slightly tangy flavor, a splash of lemon juice in the béchamel sauce can enhance the overall taste of the dish.
Cheesy Vegan Macaroni Bake
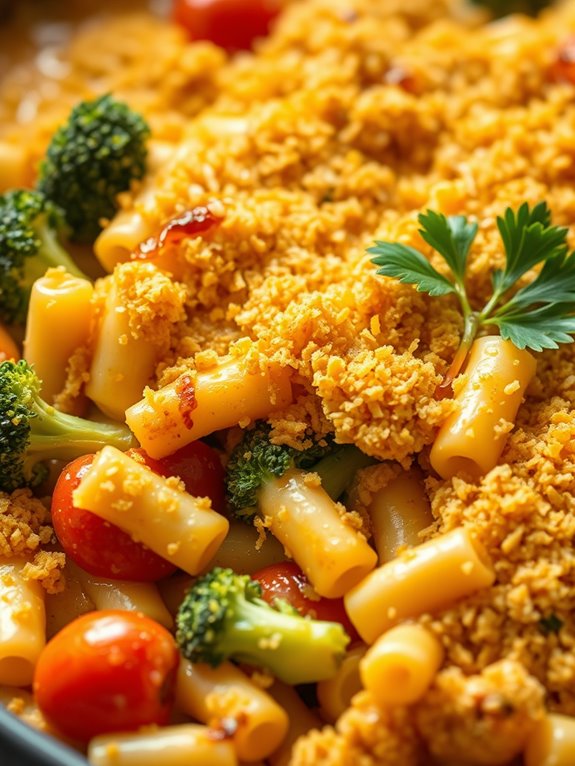
Cheesy Vegan Macaroni Bake is a delightful comfort dish that satisfies both your cravings for creaminess and cheesiness while being entirely plant-based. This casserole is perfect for those who are lactose intolerant or follow a vegan lifestyle, as it combines a creamy vegan cheese sauce with gluten-free pasta. The use of nutritional yeast gives it a cheesy flavor, while the addition of vegetables enhances its nutritional value.
This dish isn’t only delicious but also simple to prepare, making it an excellent choice for a family dinner or a potluck gathering. This recipe is designed to serve 4-6 people and can be made with ease using common pantry ingredients. The key to a successful Cheesy Vegan Macaroni Bake is in its rich and savory sauce, which coats the pasta perfectly.
Baking it in the oven guarantees that all the flavors meld together, giving you a satisfying casserole with a golden, crispy top. Whether you’re new to vegan cooking or a seasoned pro, this dish is sure to become a staple in your meal rotation.
Ingredients:
- 12 oz gluten-free macaroni
- 1 cup unsweetened almond milk
- 1 cup nutritional yeast
- 1/2 cup raw cashews
- 1/4 cup olive oil
- 2 tablespoons tapioca starch
- 1 tablespoon lemon juice
- 2 teaspoons garlic powder
- 1 teaspoon onion powder
- 1 teaspoon smoked paprika
- Salt and pepper to taste
- 1 cup broccoli florets
- 1 cup cherry tomatoes, halved
- 1/2 cup gluten-free breadcrumbs
- 1/4 cup chopped fresh parsley
Cooking Instructions:
- Preheat Oven and Cook Pasta: Preheat your oven to 350°F (175°C). Cook the gluten-free macaroni according to the package instructions until al dente. Drain and set aside.
- Prepare the Cheese Sauce: In a blender, combine the almond milk, nutritional yeast, cashews, olive oil, tapioca starch, lemon juice, garlic powder, onion powder, smoked paprika, salt, and pepper. Blend until smooth and creamy.
- Mix Pasta and Sauce: In a large mixing bowl, combine the cooked macaroni and the cheese sauce. Stir in the broccoli florets and cherry tomatoes until everything is well coated.
- Assemble the Casserole: Transfer the mixture to a baking dish and spread it out evenly. Sprinkle the gluten-free breadcrumbs over the top.
- Bake the Casserole: Place the baking dish in the preheated oven and bake for 25-30 minutes, or until the top is golden and bubbly.
- Garnish and Serve: Remove from the oven and let it cool slightly. Garnish with chopped fresh parsley before serving.
Extra Tips:
To guarantee the cashews blend smoothly into a creamy sauce, soak them in hot water for about 15 minutes before blending. If you prefer a spicier kick, consider adding a pinch of cayenne pepper to the sauce.
For added texture and flavor, you can also toss in some sautéed onions or mushrooms. Finally, feel free to customize the dish with your favorite vegetables or protein substitutes, such as vegan sausage or tofu, to make it your own.
Spaghetti Squash and Meatball Casserole
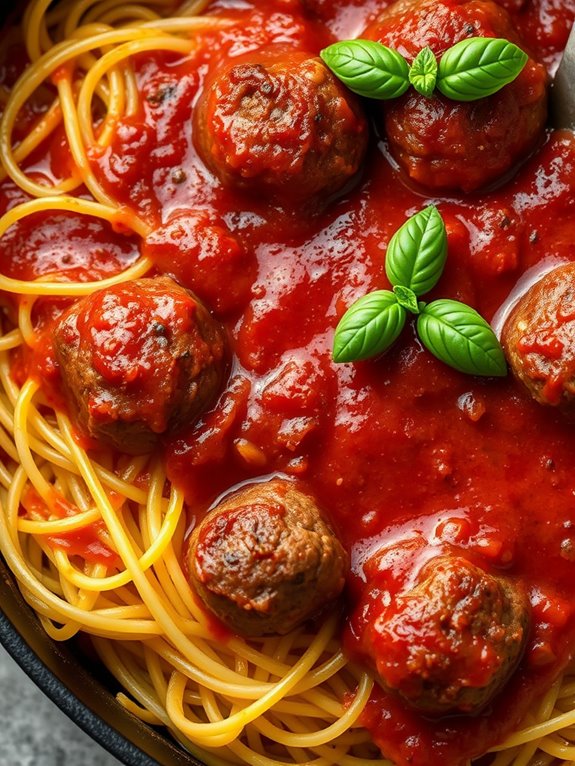
Spaghetti Squash and Meatball Casserole is a delightful, hearty dish that perfectly combines the rich flavors of meatballs with the light and stringy texture of spaghetti squash. This casserole is both dairy-free and gluten-free, making it an excellent choice for those with dietary restrictions or anyone looking to enjoy a wholesome, comforting meal.
The natural sweetness of the spaghetti squash pairs beautifully with the savory, well-seasoned meatballs, all baked together in a flavorful tomato sauce. This recipe is perfect for a family dinner or a comforting meal on a chilly evening.
To prepare this delicious casserole, you’ll start by roasting the spaghetti squash to bring out its natural sweetness. This will serve as the base of the dish, providing a satisfying, pasta-like texture without the gluten. The meatballs are made with a blend of ground meat, herbs, and spices, ensuring they’re both tender and flavorful.
Combined with a zesty tomato sauce and baked to perfection, this casserole is sure to become a family favorite. The following recipe serves 4-6 people, making it ideal for a family meal or for leftovers the next day.
Ingredients:
- 1 large spaghetti squash
- 1 tablespoon olive oil
- Salt and pepper to taste
- 1 pound ground turkey or beef
- 1/4 cup almond flour
- 1 egg
- 2 cloves garlic, minced
- 1 teaspoon dried oregano
- 1 teaspoon dried basil
- 1/2 teaspoon onion powder
- 2 cups marinara sauce (gluten-free)
- Fresh basil leaves for garnish (optional)
Cooking Instructions:
- Prepare the Spaghetti Squash: Preheat your oven to 400°F (200°C). Cut the spaghetti squash in half lengthwise and scoop out the seeds. Drizzle with olive oil and season with salt and pepper. Place the squash halves, cut side down, on a baking sheet lined with parchment paper. Roast for 35-40 minutes, or until the flesh is tender and easily shredded with a fork.
- Make the Meatballs: While the squash is roasting, prepare the meatballs. In a large bowl, combine the ground turkey or beef, almond flour, egg, minced garlic, dried oregano, dried basil, onion powder, salt, and pepper. Mix until well combined. Roll the mixture into 1-inch meatballs.
- Cook the Meatballs: Heat a large skillet over medium heat and add a little olive oil. Add the meatballs in batches and cook until they’re browned on all sides and cooked through, about 8-10 minutes. Remove the meatballs from the skillet and set aside.
- Assemble the Casserole: Once the spaghetti squash is roasted, use a fork to shred the flesh into spaghetti-like strands. Reduce the oven temperature to 375°F (190°C). In a large casserole dish, spread half of the marinara sauce on the bottom. Add the spaghetti squash strands on top, followed by the meatballs. Pour the remaining marinara sauce over the meatballs and squash.
- Bake the Casserole: Cover the dish with aluminum foil and bake in the preheated oven for 20 minutes. Remove the foil and bake for an additional 10 minutes, or until the sauce is bubbly.
- Serve and Garnish: Remove the casserole from the oven and let it cool slightly. Garnish with fresh basil leaves if desired. Serve warm and enjoy!
Extra Tips:
When cooking the spaghetti squash, be careful not to over-roast it, as it can become mushy. It should be tender enough to shred with a fork but still maintain some firmness.
For the meatballs, you can experiment with different herbs or spices based on your preference. If you have extra time, let the meatball mixture rest in the fridge for 15-20 minutes before shaping them, which can help them hold together better during cooking.
Finally, using a good-quality marinara sauce can really elevate the flavors of this dish, so choose one that you enjoy.