

Halloween season is upon us, and there’s something magical about whipping up a batch of festively decorated cookies. Bewitching Black Cat Cookies with licorice tails and Spine-Chilling Skeleton Sugar Cookies with intricate icing are sure to enchant your guests. Each cookie is like a tiny canvas, ready to tell its own story and captivate taste buds. I’ve tried making some of these delightful treats, and they always shine at any gathering. Ready to uncover more of these enchanting cookie creations?
Bewitching Black Cat Cookies

Bewitching Black Cat Cookies are a delightful treat to add to your Halloween festivities. With their whimsical design and rich chocolatey flavor, these cookies are sure to cast a spell on both children and adults alike. They aren’t only fun to decorate but also easy to make, making them a great baking project for the whole family.
Whether you’re hosting a Halloween party or looking for a spooky snack to share, these cookies are bound to leave an impression. The secret to these enchanting cookies lies in their rich, chocolatey dough and the fun of decorating them to resemble playful black cats. The addition of cocoa powder gives them a deep, satisfying taste, while the decoration with licorice and candies brings them to life.
The recipe is designed to serve 4-6 people, making it perfect for small gatherings. Just a little creativity and some simple ingredients are all you need to create these charming Halloween treats.
Ingredients (serves 4-6):
- 1 cup unsalted butter, softened
- 1 cup granulated sugar
- 1 large egg
- 1 teaspoon vanilla extract
- 2 cups all-purpose flour
- 1/2 cup unsweetened cocoa powder
- 1/2 teaspoon baking soda
- 1/4 teaspoon salt
- Black licorice laces
- Candy eyes
- Mini chocolate chips
- Black food coloring (optional)
Instructions:
- Preheat the Oven: Begin by preheating your oven to 350°F (175°C). Line two baking sheets with parchment paper to prevent the cookies from sticking.
- Cream Butter and Sugar: In a large bowl, cream together the softened butter and granulated sugar until the mixture is light and fluffy. This should take about 3-4 minutes using an electric mixer.
- Add Wet Ingredients: Beat in the egg and vanilla extract until well combined. If you want a darker color, add a few drops of black food coloring at this stage.
- Combine Dry Ingredients: In a separate bowl, whisk together the flour, cocoa powder, baking soda, and salt. Gradually add this dry mixture to the wet ingredients, mixing until a dough forms.
- Shape the Cookies: Roll the dough into small balls, about 1 inch in diameter. Place them on the prepared baking sheets, spaced about 2 inches apart to allow for spreading.
- Decorate the Cookies: Gently flatten each dough ball slightly. Press two candy eyes into the top of each cookie. Cut small pieces of licorice lace to form whiskers and a tail, pressing them into the dough. Use mini chocolate chips for the nose.
- Bake: Place the cookies in the preheated oven and bake for 10-12 minutes, or until the edges are set. Allow them to cool on the baking sheet for a few minutes before transferring them to a wire rack to cool completely.
- Serve: Once cooled, serve your Bewitching Black Cat Cookies on a spooky platter and enjoy the festivities!
Extra Tips:
For an even richer flavor, consider using dark cocoa powder instead of regular cocoa powder. If you’re not a fan of licorice, you can substitute it with thin strips of black fondant for the whiskers and tails.
Be sure to store any leftovers in an airtight container to keep them fresh. If you want to involve kids, let them have fun decorating their own cookies with various candies and edible markers for a personalized touch.
Spine-Chilling Skeleton Sugar Cookies
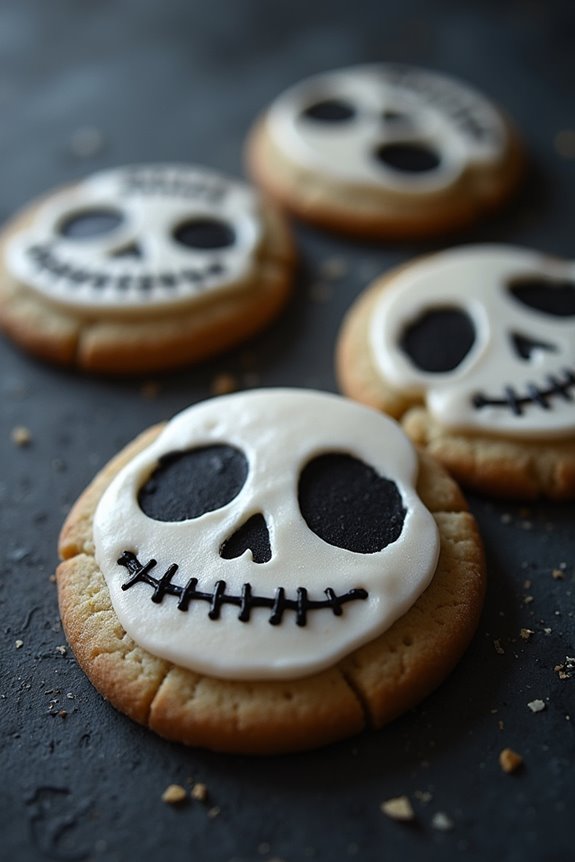
Spine-Chilling Skeleton Sugar Cookies are a delightful treat to add a spooky touch to your Halloween festivities. These cookies aren’t only delicious but also fun to make and decorate. The combination of sweet sugar cookies with a chilling skeleton design makes them a perfect addition to any Halloween party or gathering.
Whether you’re baking with family or friends, these cookies are guaranteed to be a hit. The recipe involves creating a traditional sugar cookie dough, which is then shaped and baked to perfection. Once cooled, the cookies are decorated with royal icing to create the skeleton design. The process is simple but requires some patience and creativity to achieve the desired eerie effect.
These cookies are perfect for serving 4-6 people, ensuring everyone gets to enjoy a bit of Halloween fun.
Ingredients:
- 2 ¾ cups all-purpose flour
- 1 teaspoon baking powder
- ½ teaspoon salt
- 1 cup unsalted butter, softened
- 1 ½ cups granulated sugar
- 1 large egg
- 2 teaspoons vanilla extract
- ½ teaspoon almond extract
- Black and white gel food coloring
- 3 cups powdered sugar
- 2 tablespoons meringue powder
- 6 tablespoons water
Instructions:
- Prepare the Cookie Dough: In a medium bowl, whisk together the flour, baking powder, and salt. In a separate large bowl, beat the softened butter and granulated sugar until light and fluffy. Mix in the egg, vanilla extract, and almond extract until well combined. Gradually add the dry ingredients to the wet mixture, mixing until a dough forms.
- Chill the Dough: Divide the dough into two portions, wrap each in plastic wrap, and refrigerate for at least 1 hour. This will make the dough easier to roll and cut.
- Roll and Cut the Cookies: Preheat your oven to 350°F (175°C). On a lightly floured surface, roll out the dough to about ¼-inch thickness. Use skeleton-shaped cookie cutters to cut out the cookies and place them on a baking sheet lined with parchment paper.
- Bake the Cookies: Bake in the preheated oven for 8-10 minutes or until the edges are lightly golden. Remove from the oven and let them cool on a wire rack.
- Prepare the Royal Icing: In a bowl, mix powdered sugar, meringue powder, and water until smooth. Divide the icing into two bowls. Add white gel food coloring to one bowl and black gel food coloring to the other, stirring until fully incorporated.
- Decorate the Cookies: Once the cookies are completely cooled, use a piping bag with a fine tip to outline and fill in the skeleton design with the white icing. Use the black icing for details such as eyes and mouth.
- Dry the Icing: Allow the decorated cookies to sit at room temperature until the icing is completely set, which should take a few hours.
Extra Tips:
To make your Spine-Chilling Skeleton Sugar Cookies extra special, consider using edible glitter or shimmer to add a magical touch. If you’re new to decorating with royal icing, practice on parchment paper before applying it to the cookies.
For a fun twist, you could add a few drops of food-grade peppermint oil to the icing for a reviving flavor. When storing the cookies, make sure they’re in a single layer in an airtight container to keep them fresh and prevent the icing from smudging.
Magical Witch Hat Treats

Whip up a spooky batch of Magical Witch Hat Treats this Halloween and delight both kids and adults alike with these whimsical and delicious cookies. Perfect for parties or just a fun night in, these cookies are as enchanting to look at as they’re tasty to eat. The classic chocolate flavors combined with the crisp cookie base create a delightful treat that will cast a spell on your taste buds.
This recipe is designed to serve 4-6 people, making it ideal for small gatherings or family treats. The key to creating these magical witch hats lies in the artistry of combining simple ingredients in a creative way. With just a few steps, you’ll be able to conjure up these charming cookies that not only look like witch hats but taste like a chocolatey dream come true.
Ingredients:
- 12 sugar cookies (store-bought or homemade)
- 12 chocolate sugar cones
- 1 cup semi-sweet chocolate chips
- 1 tablespoon vegetable oil
- 1 cup colored icing (purple, orange, or green)
- 1/2 cup assorted sprinkles or edible glitter
Instructions:
- Prepare the Chocolate Coating: In a microwave-safe bowl, combine the semi-sweet chocolate chips and vegetable oil. Microwave in 30-second intervals, stirring in between, until the chocolate is completely melted and smooth.
- Coat the Cones: Take each sugar cone and dip the wide opening into the melted chocolate, guaranteeing it’s fully coated. Allow any excess chocolate to drip off, then set the cones aside on a baking sheet lined with parchment paper. This will form the top of the witch’s hat. Let them cool until the chocolate is set.
- Decorate the Cookie Base: Spread a thin layer of the colored icing on top of each sugar cookie. This icing will serve as the glue to hold the hat together and add a pop of color.
- Assemble the Hats: Once the chocolate-coated cones are set, gently press the open end of each cone onto the icing-covered sugar cookie. Verify they’re centered and secure.
- Add Sprinkles and Glitter: While the icing is still tacky, sprinkle your choice of sprinkles or edible glitter around the base of the cone. This adds a magical touch to the witch’s hat.
- Let Set: Allow the assembled witch hats to set completely, either at room temperature or in the refrigerator to speed up the process.
Extra Tips:
For added flair, you can pipe additional icing around the base of the cone to create a decorative band on the hat. If you prefer homemade cookies, consider using a sugar cookie recipe of your choice, making sure they’re large enough to support the cone.
Be sure to work quickly when decorating with sprinkles to guarantee they adhere properly before the icing sets. These cookies can be stored in an airtight container for up to three days, making them a convenient make-ahead treat for your Halloween festivities.
Hauntingly Delicious Ghost Cookies
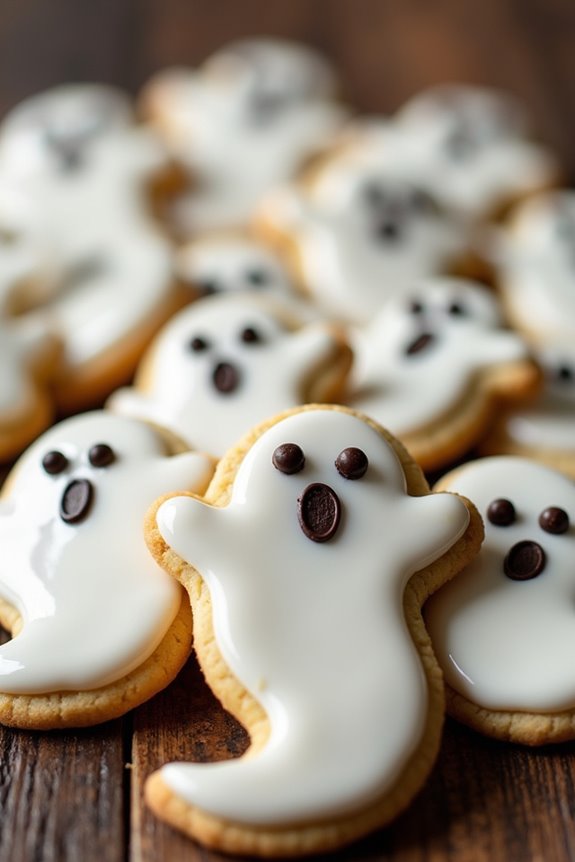
Hauntingly Delicious Ghost Cookies are the perfect treat to spook-ify your Halloween celebrations. These ghost-shaped cookies aren’t only fun to make but also provide a sweet and slightly eerie addition to your dessert table. With a light, buttery texture and a hint of vanilla, these cookies are as delicious as they’re cute. Perfect for a Halloween party or an afternoon of festive baking, these ghost cookies will delight both kids and adults alike.
The recipe is simple enough for bakers of all skill levels and allows for creative customization with icing and decorations to bring your ghost cookies to life. Whether you prefer spooky or silly ghosts, these cookies are sure to be a hit. This recipe yields approximately 24 cookies, making it ideal for a gathering of 4-6 people.
Ingredients:
- 2 1/2 cups all-purpose flour
- 1/2 teaspoon baking powder
- 1/4 teaspoon salt
- 3/4 cup unsalted butter, softened
- 3/4 cup granulated sugar
- 1 large egg
- 1 teaspoon vanilla extract
- 1/4 teaspoon almond extract (optional)
- White royal icing or white chocolate for decorating
- Black gel icing or mini chocolate chips for ghost faces
Cooking Instructions:
- Prepare the Dough: In a medium-sized bowl, whisk together the all-purpose flour, baking powder, and salt until well combined. In a separate large mixing bowl, cream the softened butter and granulated sugar together using an electric mixer on medium speed until light and fluffy, about 3 minutes.
- Add Wet Ingredients: Add the egg, vanilla extract, and almond extract (if using) to the butter-sugar mixture and continue to beat until fully incorporated and smooth.
- Combine Ingredients: Gradually add the dry ingredients to the wet ingredients, mixing on low speed until a dough forms. Verify not to overmix to keep the cookies tender.
- Chill the Dough: Divide the dough in half, shape each piece into a disk, wrap them in plastic wrap, and refrigerate for at least 1 hour. Chilling helps to prevent the cookies from spreading too much during baking.
- Preheat and Roll Out Dough: Preheat your oven to 350°F (175°C). Line two baking sheets with parchment paper. On a lightly floured surface, roll out one disk of dough to about 1/4-inch thickness. Use ghost-shaped cookie cutters to cut out the cookies and place them on the prepared baking sheets, spaced about 1 inch apart.
- Bake the Cookies: Bake the cookies in the preheated oven for 8-10 minutes, or until the edges are just turning golden brown. Allow the cookies to cool on the baking sheet for 5 minutes before transferring them to a wire rack to cool completely.
- Decorate the Cookies: Once cooled, use white royal icing or melted white chocolate to coat each cookie. Add black gel icing or mini chocolate chips to create the eyes and mouth, giving your ghosts their expressions.
Extra Tips:
For best results, make sure your butter is at room temperature before you begin mixing. This guarantees it creams properly with the sugar, resulting in a better-textured cookie.
If you find the dough too sticky to work with, dust it with a little more flour while rolling it out. Royal icing dries firm, making it ideal for detailed decorating, but if you’re in a rush, melted white chocolate is a quick and tasty alternative.
Finally, let your creativity shine with the ghost faces, whether they’re spooky, surprised, or just plain silly!
Enchanting Pumpkin Patch Delights
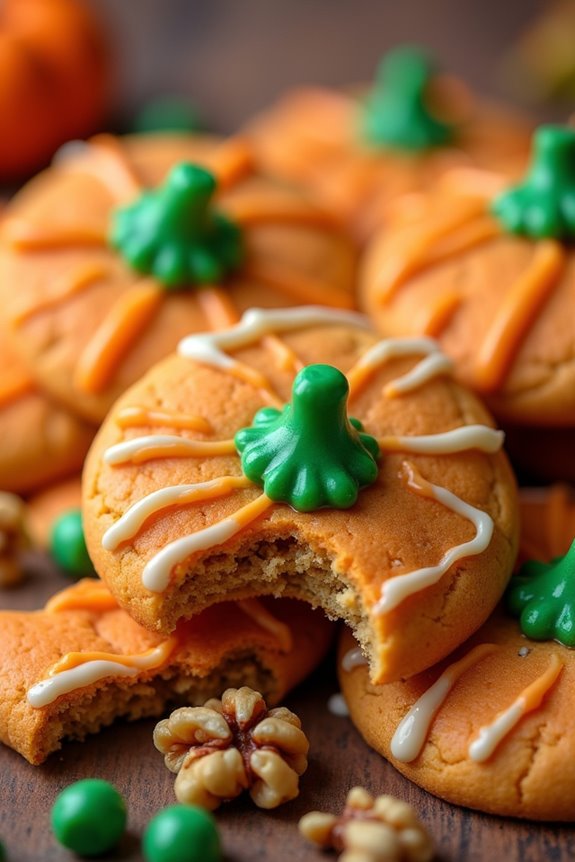
Indulge in the magical charm of Halloween with these Enchanting Pumpkin Patch Delights. These cookies are a perfect blend of pumpkin, spices, and a dash of whimsy, making them an ideal treat for your Halloween festivities. Their delicate sweetness and moist texture, paired with a hint of spice, will delight both young and old, guaranteeing your Halloween celebrations are truly memorable.
These cookies not only capture the essence of autumn but also bring a playful twist to your dessert spread, enchanting every guest with their spellbinding flavor and festive appearance. Perfect for a crowd, this recipe serves 4-6 people, allowing you to share the joy and wonder of the season with family and friends.
Whether you’re hosting a Halloween party or simply looking to add a bit of magic to your day, these cookies are sure to be a hit. Gather your ingredients, roll up your sleeves, and prepare to set out on a culinary adventure that combines tradition with a sprinkle of wonder, resulting in a delightful treat that will have everyone coming back for more.
Ingredients (Serves 4-6):
- 1 cup pumpkin puree
- 1 cup granulated sugar
- 1/2 cup unsalted butter, softened
- 1 large egg
- 1 teaspoon vanilla extract
- 2 cups all-purpose flour
- 1 teaspoon baking soda
- 1 teaspoon baking powder
- 1/2 teaspoon salt
- 1 teaspoon ground cinnamon
- 1/2 teaspoon ground nutmeg
- 1/4 teaspoon ground cloves
- 1 cup mini chocolate chips
- 1/2 cup chopped walnuts (optional)
- Orange and green food coloring gel
- 1 cup powdered sugar
- 2-3 tablespoons milk
Cooking Instructions:
- Preheat the Oven: Begin by preheating your oven to 350°F (175°C). Line two baking sheets with parchment paper or silicone baking mats to prevent the cookies from sticking.
- Prepare the Wet Ingredients: In a large mixing bowl, combine the pumpkin puree, granulated sugar, and softened butter. Beat with an electric mixer on medium speed until the mixture is light and fluffy, about 2 minutes. Add the egg and vanilla extract, then beat until well incorporated.
- Mix the Dry Ingredients: In a separate bowl, whisk together the flour, baking soda, baking powder, salt, cinnamon, nutmeg, and cloves. Gradually add the dry ingredients to the wet ingredients, mixing on low speed until just combined.
- Add Mix-ins: Gently fold in the mini chocolate chips and chopped walnuts, if using, making sure they’re evenly distributed throughout the dough.
- Color the Dough: Divide the dough into two equal portions. Add a few drops of orange food coloring to one half and green food coloring to the other half. Mix each portion until the color is evenly incorporated.
- Shape the Cookies: Using a tablespoon or cookie scoop, drop rounded spoonfuls of orange dough onto the prepared baking sheets, leaving about 2 inches between each cookie. Decoratively add small amounts of green dough on top of each orange portion to resemble pumpkin stems.
- Bake: Place the baking sheets in the preheated oven and bake for 12-15 minutes, or until the cookies are set and slightly golden around the edges. Remove from the oven and allow them to cool on the baking sheets for 5 minutes before transferring to a wire rack to cool completely.
- Prepare the Icing: In a small bowl, whisk together the powdered sugar and milk until smooth and slightly thickened. Drizzle the icing over the cooled cookies for added sweetness and decoration.
Extra Tips:
For an added touch of magic, consider using festive cookie cutters to shape your cookies before baking, enhancing their Halloween-themed appearance.
If you prefer a nuttier flavor, feel free to toast the walnuts before adding them to the dough. Additionally, confirm your butter is at room temperature for easier mixing and a smoother dough texture.
Creepy Crawly Spider Web Cookies
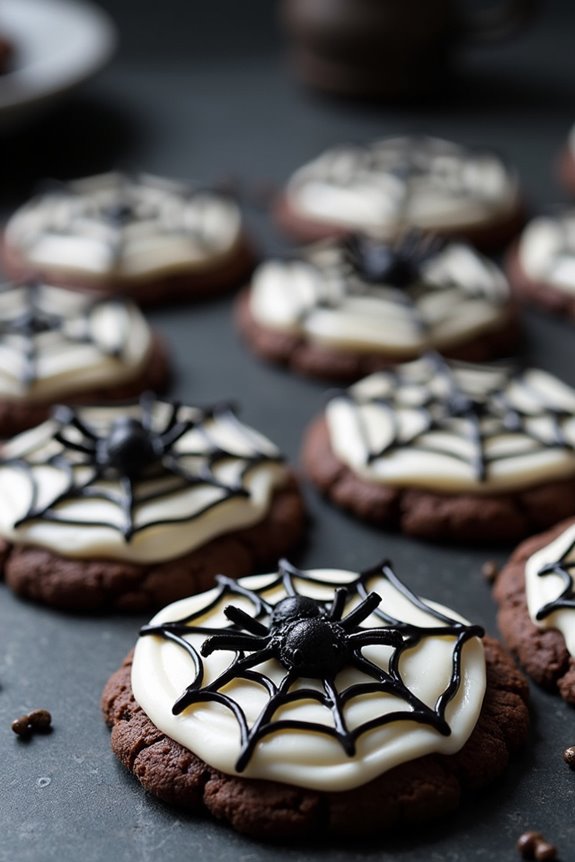
Creepy Crawly Spider Web Cookies are the perfect treat to add an eerie touch to your Halloween festivities. With a rich chocolate flavor and a spooky design, these cookies are sure to be a hit among both children and adults. The intricate spider web pattern is created using a simple technique that will impress your guests and add a festive flair to your Halloween dessert table.
Whether you’re hosting a Halloween party or just looking for a fun baking project, these cookies are a delicious and delightful choice. Creating these cookies involves a basic chocolate cookie dough, which serves as the base for the spider web design. The cookies are then topped with a smooth white icing that’s carefully patterned to resemble a spider web. This recipe serves 4-6 people, making it ideal for a small gathering or family treat.
Get ready to embrace the spooky season with this fun and delicious recipe that will have everyone spinning their own webs!
Ingredients:
- 1 cup unsalted butter, softened
- 1 cup granulated sugar
- 1 large egg
- 1 teaspoon vanilla extract
- 2 cups all-purpose flour
- 1/2 cup unsweetened cocoa powder
- 1/2 teaspoon baking soda
- 1/4 teaspoon salt
- 1 cup powdered sugar
- 2-3 tablespoons milk
- 1 teaspoon vanilla extract
- Black food coloring gel
Instructions:
- Prepare the Oven and Baking Sheets: Preheat your oven to 350°F (175°C) and line two baking sheets with parchment paper to prevent the cookies from sticking.
- Make the Cookie Dough: In a large mixing bowl, cream together the softened butter and granulated sugar until light and fluffy. Add the egg and vanilla extract, and mix until well combined.
- Combine Dry Ingredients: In a separate bowl, sift together the all-purpose flour, unsweetened cocoa powder, baking soda, and salt. Gradually add the dry ingredients to the wet mixture, stirring until a dough forms.
- Shape the Cookies: Scoop tablespoon-sized portions of dough and roll them into balls. Place the balls onto the prepared baking sheets, leaving enough space between them to allow for spreading.
- Bake the Cookies: Bake in the preheated oven for 8-10 minutes, or until the edges are firm. Remove from the oven and let them cool on the baking sheets for 5 minutes before transferring them to a wire rack to cool completely.
- Prepare the Icing: In a small bowl, mix together the powdered sugar, milk, and vanilla extract until smooth. Divide the icing into two bowls, adding black food coloring to one to create black icing, while leaving the other white.
- Decorate the Cookies: Using a spoon or piping bag, spread or pipe a circle of white icing onto each cooled cookie. Immediately pipe a spiral of black icing on top of the white icing.
- Create the Spider Web Design: Using a toothpick, start from the center of the cookie and drag it outward towards the edge to create a web pattern. Repeat this step to complete the spider web design on each cookie.
- Set the Icing: Allow the decorated cookies to sit at room temperature until the icing has fully set before serving.
Extra Tips:
For an added creepy effect, consider placing small plastic spiders or edible spider decorations in the center of the web. If you want to save time, you can use store-bought cookie dough and focus on the intricate icing designs.
Remember to use gel-based food coloring for the icing to guarantee vibrant colors without altering the consistency. These cookies can be stored in an airtight container for up to a week, making them a perfect make-ahead treat for your Halloween celebrations.
Frightfully Fun Frankenstein Faces

Bring a spooky touch to your Halloween festivities with these Frightfully Fun Frankenstein Faces cookies. These deliciously eerie treats are perfect for both kids and adults, adding a playful yet ghostly flair to your party spread.
Combining the rich flavors of vanilla and chocolate, these cookies not only look the part with their green-tinted icing and quirky candy features but also taste irresistibly delightful. Whether you’re hosting a Halloween bash or just looking to enjoy some seasonal baking, these cookies will surely conjure smiles and satisfy cravings.
The beauty of these cookies lies in their simple yet effective transformation into everyone’s favorite monster — Frankenstein. By using a mix of tinted icing, candy eyes, and pretzel rods, you can create a collection of ghoulish faces that are as fun to make as they’re to eat.
Gather your family or friends, and enjoy a baking session that promises to be as creative as it’s delicious. With this recipe, you’ll be able to whip up these spooky treats for a serving size of 4-6 people, guaranteeing everyone gets a taste of Halloween spirit.
Ingredients:
- 2 ½ cups all-purpose flour
- 1 teaspoon baking powder
- ½ teaspoon salt
- 1 cup unsalted butter, softened
- 1 cup granulated sugar
- 1 large egg
- 1 teaspoon vanilla extract
- Green food coloring
- 1 cup powdered sugar
- 2 tablespoons milk
- ½ cup semi-sweet chocolate chips
- Candy eyes
- Black decorating gel
- Mini pretzel sticks
Instructions:
- Prepare the Cookie Dough: In a medium bowl, whisk together the all-purpose flour, baking powder, and salt. In a separate large bowl, cream the softened butter and granulated sugar until light and fluffy. Beat in the egg and vanilla extract until well combined. Gradually add the dry ingredients to the wet mixture, mixing until a smooth dough forms.
- Chill the Dough: Shape the dough into a disk, wrap in plastic wrap, and refrigerate for at least 1 hour. This will help the dough hold its shape during baking.
- Preheat and Roll: Preheat your oven to 350°F (175°C). Roll out the chilled dough on a lightly floured surface to about ¼ inch thick. Use a square or rectangle cookie cutter to cut out the shapes for Frankenstein’s head.
- Bake the Cookies: Place the cut-out cookies onto a baking sheet lined with parchment paper. Bake in the preheated oven for 10-12 minutes, or until the edges are lightly golden. Allow the cookies to cool completely on a wire rack.
- Make the Icing: In a small bowl, mix the powdered sugar and milk until smooth. Add green food coloring until the desired shade is achieved.
- Decorate the Cookies: Spread the green icing over each cooled cookie. Place candy eyes on the icing to form Frankenstein’s eyes. Melt the chocolate chips and use a piping bag or a spoon to create Frankenstein’s hair and mouth. Use black decorating gel to add scars.
- Add the Finishing Touches: Break the mini pretzel sticks in half and insert them into the sides of each cookie to create Frankenstein’s bolts.
Extra Tips:
For best results, confirm your butter is at room temperature before you begin baking. This helps achieve the right cookie texture.
If you’d like to add some extra flair to your Frankenstein cookies, consider using a variety of candy decorations, such as colored sprinkles for the hair or small candies for additional facial features. Be creative with the expressions to give each Frankenstein face a unique personality.
Finally, store any leftover cookies in an airtight container to keep them fresh and delicious for a few days after your Halloween celebration. Enjoy your spooky creation!
Terrifyingly Tasty Mummy Munchies
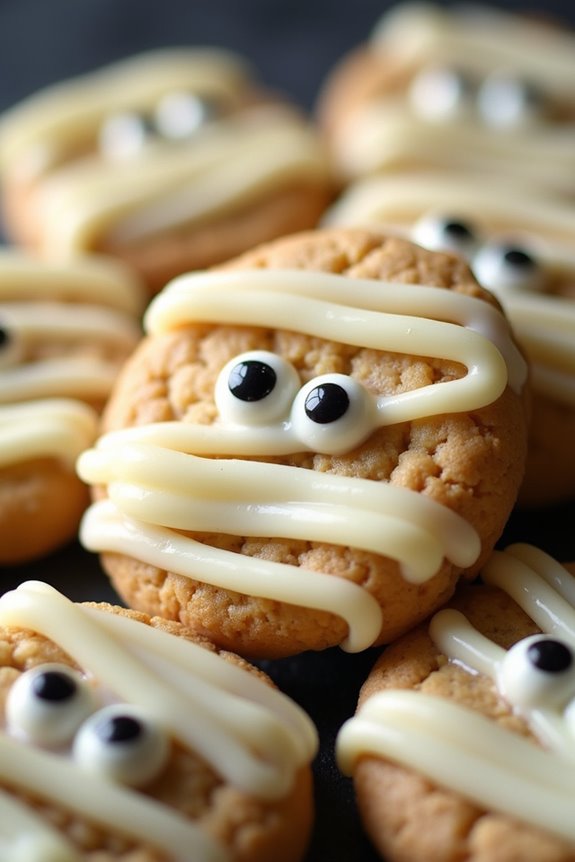
If you’re looking to add a spooky twist to your Halloween treats, these Terrifyingly Tasty Mummy Munchies are just what you need. These delightful cookies aren’t only cute and creepy but also incredibly delicious, making them the perfect addition to any Halloween party.
With a simple sugar cookie base and a creative decorating technique, these cookies are sure to impress both kids and adults alike. The inspiration for these mummy cookies comes from the classic sugar cookie, with a fun and festive makeover. The cookies are wrapped in white chocolate “bandages” and adorned with little candy eyes, giving them a delightful mummy-like appearance.
These cookies are perfect for a serving size of 4-6 people, ensuring everyone at your gathering gets to enjoy a piece of these eerie yet adorable treats.
Ingredients for Terrifyingly Tasty Mummy Munchies:
- 1 cup unsalted butter, softened
- 1 cup granulated sugar
- 1 large egg
- 1 teaspoon vanilla extract
- 2 3/4 cups all-purpose flour
- 1 teaspoon baking powder
- 1/2 teaspoon salt
- 1 cup white chocolate chips or candy melts
- Candy eyes
Cooking Instructions:
- Preheat the Oven: Begin by preheating your oven to 350°F (175°C). Line a baking sheet with parchment paper to prevent the cookies from sticking.
- Prepare the Cookie Dough: In a large mixing bowl, cream together the softened butter and sugar until light and fluffy. Add in the egg and vanilla extract, mixing well until fully combined.
- Mix Dry Ingredients: In a separate bowl, whisk together the all-purpose flour, baking powder, and salt. Gradually add the dry ingredients to the wet mixture, stirring until a soft dough forms.
- Shape the Cookies: Scoop tablespoon-sized amounts of dough and roll them into balls. Place them on the prepared baking sheet, leaving about 2 inches of space between each cookie.
- Bake the Cookies: Bake in the preheated oven for 10-12 minutes, or until the edges are lightly golden. Remove from the oven and allow the cookies to cool on the baking sheet for 5 minutes before transferring them to a wire rack to cool completely.
- Melt the White Chocolate: While the cookies are cooling, melt the white chocolate chips or candy melts in a microwave-safe bowl, microwaving in 30-second intervals and stirring in between until smooth.
- Decorate the Cookies: Once the cookies are completely cool, drizzle the melted white chocolate over each cookie using a piping bag or a spoon to create a mummy bandage effect. Before the chocolate sets, place two candy eyes on each cookie for a spooky finish.
- Let Set: Allow the white chocolate to set completely before serving or storing the cookies.
Extra Tips:
When melting the white chocolate, be sure to do it slowly to avoid burning. If the chocolate is too thick, you can add a teaspoon of vegetable oil to thin it out and make drizzling easier.
Also, feel free to get creative with the decoration; you can use different colored candy melts for a vibrant look or add additional spooky details like tiny fondant spiders. Store the cookies in an airtight container to keep them fresh for up to a week. Enjoy these fun and festive treats with friends and family!
Eerie Eyeball Confections
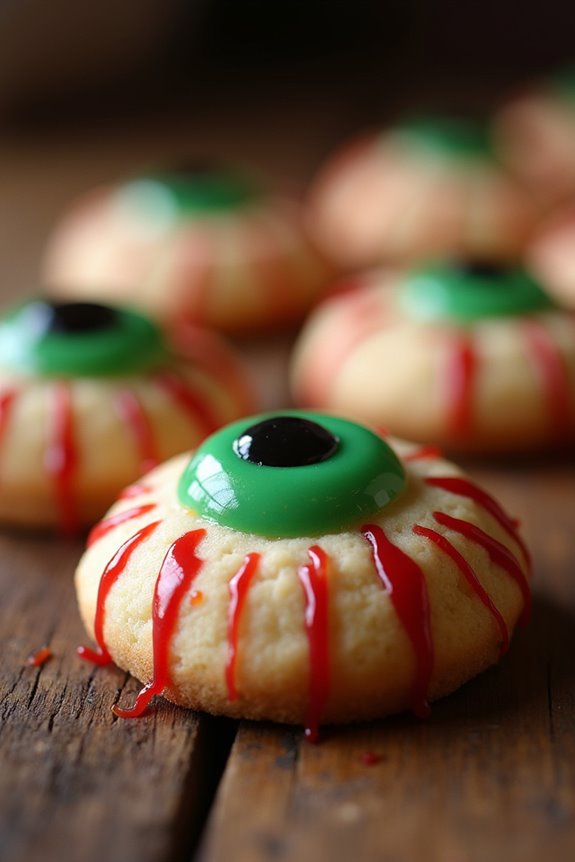
Halloween is the perfect time to let your culinary creativity run wild, and what better way to do that than by whipping up a batch of Eerie Eyeball Confections? These spooky cookies aren’t only a treat for the taste buds but also a visual feast that will leave your guests both delighted and slightly unnerved.
With a tender cookie base and a creepy candy eyeball staring back at you, these treats are sure to be the highlight of your Halloween spread. The beauty of Eerie Eyeball Confections lies in their simplicity. You start with a basic sugar cookie dough, which you can either make from scratch or purchase pre-made for convenience.
The real magic happens in the decoration: a combination of colored icing and candy eyeballs transforms ordinary cookies into a ghoulish delight. Whether you’re hosting a Halloween party or just getting into the spooky spirit, these cookies are a fun and festive way to celebrate the season.
Ingredients (serving size: 4-6 people)
- 2 1/2 cups all-purpose flour
- 1/2 teaspoon baking soda
- 1/4 teaspoon salt
- 3/4 cup unsalted butter, softened
- 1 cup granulated sugar
- 1 large egg
- 1 teaspoon vanilla extract
- 1/2 teaspoon almond extract (optional)
- 24 candy eyeballs
- Red, green, and black icing (store-bought or homemade)
Cooking Instructions
- Preheat and Prepare: Preheat your oven to 350°F (175°C). Line two baking sheets with parchment paper or silicone baking mats to prevent sticking and guarantee even baking.
- Mix Dry Ingredients: In a medium bowl, whisk together the flour, baking soda, and salt. This step guarantees that the baking soda and salt are evenly distributed throughout the flour.
- Cream Butter and Sugar: In a large mixing bowl, beat the softened butter and granulated sugar together using an electric mixer on medium speed until light and fluffy, about 2-3 minutes.
- Add Wet Ingredients: Beat in the egg, vanilla extract, and almond extract (if using) until well combined.
- Combine Mixtures: Gradually add the dry ingredients to the wet mixture, mixing on low speed until just combined. Don’t overmix, as this can result in tough cookies.
- Shape and Bake: Scoop tablespoon-sized amounts of dough and roll into balls. Place them on the prepared baking sheets about 2 inches apart. Flatten each ball slightly with your fingers or the back of a spoon. Bake for 10-12 minutes, or until the edges are lightly golden.
- Cool and Decorate: Allow the cookies to cool on the baking sheets for 5 minutes before transferring them to a wire rack to cool completely. Once cooled, use the colored icing to draw red and green veins on the cookies, creating a bloodshot effect. Place a candy eyeball in the center of each cookie, securing it with a small dot of icing.
Extra Tips
For an extra spooky effect, you can use glow-in-the-dark icing if available. If you prefer a different flavor profile, consider adding a pinch of cinnamon or nutmeg to the dough for a warm, autumnal taste.
Make sure not to overbake the cookies; they should be soft and slightly chewy for the best texture. Finally, if you want to involve kids in the process, let them help with the decorating—it’s a fun way to get them excited about baking and Halloween!
Gory Goodness Vampire Teeth
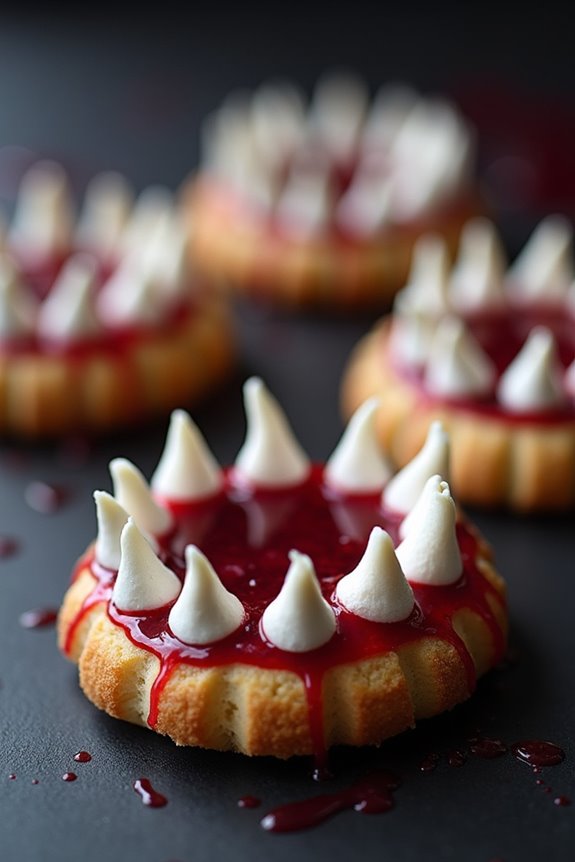
Halloween is a time for creativity in the kitchen, and nothing captures the spooky spirit quite like Gory Goodness Vampire Teeth cookies. These fun and frightful treats are sure to be a hit at any Halloween gathering, delighting both kids and adults with their gruesome appearance and delicious taste.
Imagine a set of pearly whites transformed into a pair of bloodthirsty vampire fangs with a gooey red filling and a crunchy almond ‘fang’. Whether you’re hosting a haunted house or just want to add a little horror to your holiday, these cookies are the perfect way to turn your kitchen into a monster’s lab.
The secret to the Gory Goodness Vampire Teeth lies in the clever use of simple ingredients and a bit of crafty assembly. Based on a classic shortbread cookie recipe, these treats feature a soft, buttery base that holds together marshmallow ‘teeth’ and almond ‘fangs’, all cemented with a rich red jam that oozes just like fresh blood.
This recipe serves 4-6 people, making it ideal for a small Halloween party or a fun family baking session.
Ingredients:
- 1 cup unsalted butter, softened
- 1/2 cup granulated sugar
- 1 teaspoon vanilla extract
- 2 cups all-purpose flour
- 1/4 teaspoon salt
- 1/2 cup seedless raspberry jam
- 1 cup miniature marshmallows
- 1/2 cup sliced almonds
Cooking Instructions:
- Prepare the Dough: In a large mixing bowl, cream together the softened butter and granulated sugar until light and fluffy. Mix in the vanilla extract. Gradually add in the flour and salt, mixing until the dough comes together.
- Shape the Cookies: Divide the dough into 12 equal pieces. Roll each piece into a ball, then flatten slightly into a disc shape. Use your fingers to gently press the centers down, creating a small indentation for the jam and marshmallows.
- Bake the Cookies: Preheat your oven to 350°F (175°C). Place the shaped cookies on a baking sheet lined with parchment paper. Bake for 12-15 minutes or until the edges are lightly golden. Remove from the oven and allow them to cool completely on a wire rack.
- Assemble the Vampire Teeth: Once the cookies are cool, spread about a teaspoon of raspberry jam in the indentation of each cookie. Arrange 5-6 miniature marshmallows along the edge of the cookie to form the ‘teeth’.
- Add the Fangs: Insert two sliced almonds, pointed side up, between the marshmallows to resemble sharp fangs. Press gently to secure them in place.
Extra Tips:
For an extra creepy touch, consider adding a drop of red food coloring to the raspberry jam to enhance its blood-like appearance.
If you prefer a different flavor, strawberry or cherry jam can be substituted for raspberry. Be sure to use seedless jam for a smooth, gory effect.
If you find the marshmallows aren’t sticking well, a tiny dab of jam can act as glue. Remember, the more grotesque they look, the more fun they’re to eat, so don’t worry about perfection!
Monster Mashup Cookie Creations
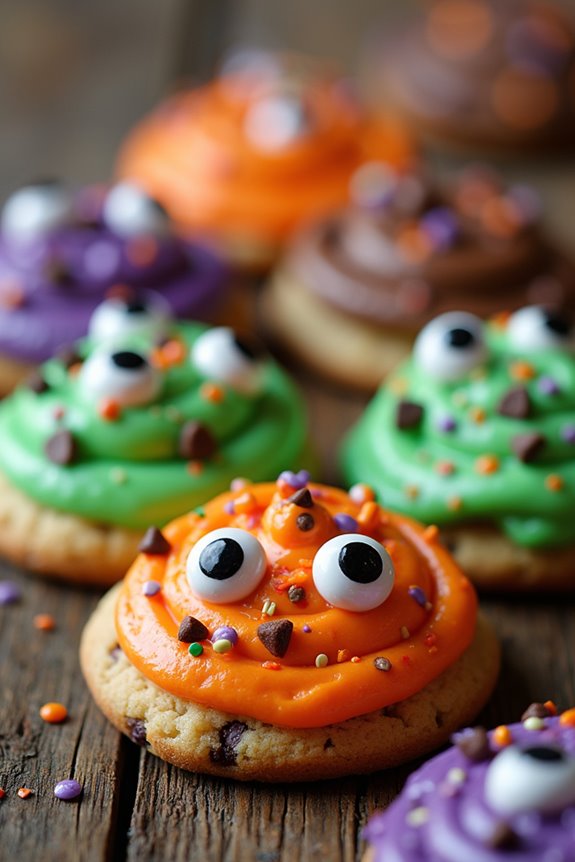
Bring a spooky twist to your Halloween celebrations with our Monster Mashup Cookie Creations! These cookies aren’t just any ordinary treats; they’re a delightful blend of flavors and textures that will surely be the star of your Halloween party. Perfectly combining the fun of cookie decorating with the whimsical spirit of Halloween, these cookies will bring out the inner monster in everyone.
Whether you’re hosting a party or just looking to indulge in some festive fun, these cookies are the perfect way to celebrate.
Our Monster Mashup Cookie Creations are designed to serve 4-6 people, making them ideal for a small gathering or a family treat. This recipe combines classic cookie dough with colorful icing and a variety of toppings to create fun and spooky monster faces. Each cookie can be uniquely decorated, offering endless possibilities for creativity.
Gather your family or friends, and let’s plunge into the world of monstrous fun with these delicious and eye-catching cookies.
Ingredients:
- 2 1/2 cups all-purpose flour
- 1 teaspoon baking soda
- 1/2 teaspoon baking powder
- 1 cup unsalted butter, softened
- 1 1/2 cups granulated sugar
- 1 egg
- 2 teaspoons vanilla extract
- 1/4 teaspoon salt
- Food coloring (green, orange, purple, and black)
- Assorted candy eyes
- Sprinkles (various colors)
- Chocolate chips
- Icing tubes (various colors)
Instructions:
- Preheat and Prepare: Preheat your oven to 350°F (175°C). Line two baking sheets with parchment paper to prevent the cookies from sticking.
- Mix Dry Ingredients: In a medium bowl, whisk together the all-purpose flour, baking soda, baking powder, and salt. Set aside.
- Cream Butter and Sugar: In a large bowl, beat the softened butter and granulated sugar together until light and fluffy. This should take about 3 minutes on medium speed.
- Add Wet Ingredients: Add the egg and vanilla extract to the butter mixture. Beat until fully combined, confirming there are no lumps.
- Combine Ingredients: Gradually add the dry ingredients to the wet ingredients, mixing until just combined. Be careful not to overmix the dough.
- Divide and Color Dough: Divide the dough into four equal portions. Add a few drops of different food coloring to each portion (green, orange, purple, black) and knead until the color is evenly distributed.
- Shape the Cookies: Using a tablespoon, scoop portions of dough and roll them into balls. Place them on the prepared baking sheets, leaving space between each cookie.
- Bake the Cookies: Bake in the preheated oven for 10-12 minutes, or until the edges are golden brown. Allow the cookies to cool on a wire rack.
- Decorate: Once the cookies are completely cooled, use the icing tubes to create monster faces. Decorate with candy eyes, sprinkles, and chocolate chips to add character to each monster.
- Let Set: Allow the icing and decorations to set for about 10 minutes before serving.
Extra Tips:
To confirm your cookies are perfectly shaped, chill the dough in the refrigerator for 30 minutes before baking. This helps prevent the cookies from spreading too much.
When decorating, encourage creativity by mixing different decorations to create unique monster faces. Remember, the key to Monster Mashup Cookie Creations is to have fun, so don’t worry about making them perfect—quirky and spooky is the goal!
If you have any leftover dough, you can freeze it for up to a month and bake more cookies whenever you want to relive the Halloween spirit.