

The holiday season is almost here, and there’s nothing quite like the joy of baking Christmas cookies. It’s a beloved tradition that warms the heart and fills the home with sweet aromas. I’ve gathered 10 super easy cookie recipes that are perfect for anyone to try. From timeless sugar cookies to indulgent chocolate crinkle treats, each recipe is a little bundle of happiness. Let’s discover these delightful cookies and spread some festive cheer together.
Classic Sugar Cookies
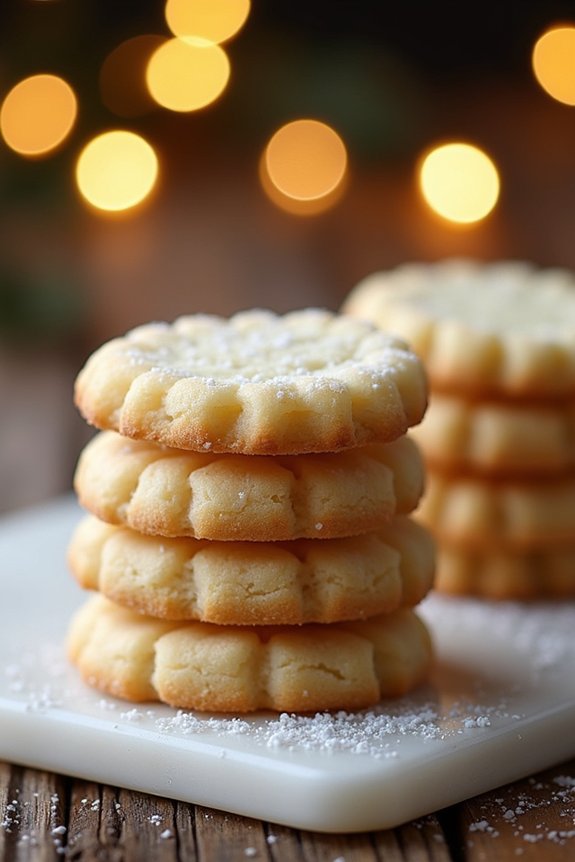
There’s nothing quite like the timeless appeal of classic sugar cookies, especially during the holiday season. These cookies are cherished for their buttery texture, sweet flavor, and the delightful aroma that fills your home as they bake. Perfectly crisp on the edges and tender in the center, sugar cookies are a versatile treat that can be enjoyed plain or adorned with colorful icing and sprinkles to add a festive touch.
Whether you’re baking them for a Christmas party, to share with friends and family, or just to enjoy with a cup of hot cocoa, these cookies are sure to bring joy to your holiday celebrations.
Making classic sugar cookies is a rewarding experience that involves simple ingredients and easy-to-follow steps. With a few pantry staples and some creativity, you can whip up a batch of these delightful cookies in no time. The key to perfect sugar cookies lies in using high-quality ingredients and taking care in each step to guarantee the best texture and flavor.
This recipe yields approximately 24 cookies, making it ideal for serving 4-6 people. Gather your ingredients, roll up your sleeves, and get ready to create a holiday classic that everyone will love.
Ingredients (Serves 4-6):
- 2 1/2 cups all-purpose flour
- 1 cup unsalted butter, softened
- 1 cup granulated sugar
- 1 large egg
- 1 teaspoon vanilla extract
- 1/2 teaspoon almond extract (optional)
- 1/2 teaspoon baking powder
- 1/2 teaspoon salt
- Decorative sugar or icing (optional)
Instructions:
- Prepare the Dough: In a large mixing bowl, cream together the softened butter and granulated sugar using an electric mixer on medium speed, until the mixture is light and fluffy, about 2-3 minutes.
- Add Wet Ingredients: Beat in the egg, vanilla extract, and almond extract (if using) until well combined.
- Combine Dry Ingredients: In a separate bowl, whisk together the all-purpose flour, baking powder, and salt.
- Mix Dry and Wet Ingredients: Gradually add the dry ingredients to the wet mixture, mixing on low speed until dough forms and all ingredients are well incorporated.
- Chill the Dough: Divide the dough in half, flatten it into discs, wrap in plastic wrap, and refrigerate for at least 1 hour. Chilling the dough helps prevent the cookies from spreading too much while baking.
- Preheat the Oven: Preheat your oven to 350°F (175°C) and line baking sheets with parchment paper.
- Roll and Cut the Dough: On a lightly floured surface, roll out one disc of dough to about 1/4-inch thickness. Use cookie cutters to cut out shapes and place them on the prepared baking sheets, leaving about 1 inch apart.
- Bake the Cookies: Bake in the preheated oven for 8-10 minutes, or until the edges are just starting to turn golden. Remove from the oven and let the cookies cool on the baking sheets for 5 minutes before transferring to a wire rack to cool completely.
- Decorate (Optional): Once the cookies are completely cool, you can decorate them with icing or sprinkle with decorative sugar as desired.
Extra Tips:
For the best results, make sure your butter is at room temperature before creaming it with the sugar. If you find the dough too soft or sticky to work with, returning it to the refrigerator for a little longer can make it easier to handle.
When rolling out the dough, try to keep it as even as possible to guarantee uniform baking. If you’re planning to ice the cookies, allow them to cool completely to prevent the icing from melting.
Finally, store the cookies in an airtight container to maintain their freshness and enjoy them throughout the holiday season.
Gingerbread Men

Gingerbread men are a classic holiday treat, perfect for adding a festive touch to your Christmas dessert table. These delightful cookies aren’t only fun to make with the whole family, but they also fill your home with the warm, spicy aroma of ginger and cinnamon.
Whether you like them soft or crunchy, decorating them with icing and candy makes them extra special and a joy to eat. This recipe yields about 4 to 6 servings, making it ideal for a small family gathering or a cozy holiday treat with friends.
The dough is easy to handle and can be prepared in advance, allowing you to focus on the creative aspect of decorating. Let’s explore the ingredients and steps needed to create these charming and delicious gingerbread men.
Ingredients:
- 3 cups all-purpose flour
- 3/4 teaspoon baking soda
- 1 tablespoon ground ginger
- 1 tablespoon ground cinnamon
- 1/2 teaspoon ground cloves
- 1/2 teaspoon salt
- 1/4 teaspoon ground nutmeg
- 1/2 cup unsalted butter, softened
- 1/2 cup packed dark-brown sugar
- 1 large egg
- 1/2 cup unsulfured molasses
- 2 teaspoons vanilla extract
- Icing (for decoration)
- Assorted candies (for decoration)
Cooking Instructions:
- Prepare the Dry Ingredients: In a large bowl, sift together the flour, baking soda, ginger, cinnamon, cloves, salt, and nutmeg. This will guarantee that the spices are evenly distributed throughout the dough.
- Cream the Butter and Sugar: In a separate bowl, using an electric mixer, cream the softened butter and brown sugar on medium speed until light and fluffy. This should take about 2 to 3 minutes.
- Add Wet Ingredients: Beat in the egg, molasses, and vanilla extract to the butter and sugar mixture. Mix until well combined.
- Combine Mixtures: Gradually add the dry ingredients to the wet mixture, blending on low speed until a dough forms. You may need to use your hands to bring the dough together.
- Chill the Dough: Divide the dough in half, flatten into disks, wrap in plastic wrap, and refrigerate for at least 1 hour. This step is essential as it firms up the dough, making it easier to roll and cut.
- Preheat the Oven: Preheat your oven to 350°F (175°C) and line two baking sheets with parchment paper.
- Roll and Cut: On a lightly floured surface, roll out one disk of dough to about 1/4-inch thickness. Use gingerbread man cookie cutters to cut out shapes, transferring them to the prepared baking sheets.
- Bake: Bake the cookies in the preheated oven for 8 to 10 minutes, or until the edges are just starting to brown. Let them cool on the baking sheets for a few minutes before transferring to a wire rack to cool completely.
- Decorate: Once the cookies are completely cool, use icing and assorted candies to decorate the gingerbread men as desired. Let the icing set before serving.
Extra Tips:
To make the rolling process easier, roll out the dough between two sheets of parchment paper. This prevents sticking and allows for easy transfer to the baking sheets.
If you’re planning to hang the gingerbread men as decorations, remember to poke a hole at the top of each cookie before baking. Additionally, feel free to adjust the spices to suit your taste preference or add a pinch of black pepper for an extra kick.
Enjoy your festive baking and have fun with the decorating process!
Snickerdoodles

Snickerdoodles are a timeless classic that brings warmth and joy to any Christmas celebration. Known for their soft, chewy texture and the perfect balance of sweetness and spice, these cinnamon-sugar coated cookies are a favorite among both children and adults. The delightful blend of flavors makes Snickerdoodles a must-have treat during the holiday season.
Whether you’re baking them for a family gathering or as a gift for friends, these cookies are certain to spread festive cheer.
The origins of Snickerdoodles can be traced back to German or Dutch immigrants in the United States, where they quickly gained popularity due to their unique taste and simplicity. This recipe serves 4-6 people and provides a wonderful opportunity to share the joy of baking with loved ones. Gather your ingredients, preheat your oven, and get ready to fill your home with the irresistible aroma of freshly baked Snickerdoodles.
Ingredients (Serves 4-6 people):
- 1 cup unsalted butter, softened
- 1 1/2 cups granulated sugar
- 2 large eggs
- 2 3/4 cups all-purpose flour
- 2 teaspoons cream of tartar
- 1 teaspoon baking soda
- 1/4 teaspoon salt
- 2 tablespoons ground cinnamon
- 1/4 cup granulated sugar (for rolling)
Cooking Instructions:
- Preheat Oven: Begin by preheating your oven to 375°F (190°C). This guarantees that the cookies bake evenly once they’re ready to be placed in the oven.
- Prepare the Dough: In a large mixing bowl, cream together the softened butter and 1 1/2 cups of granulated sugar until the mixture is light and fluffy. Add the eggs one at a time, beating well after each addition.
- Combine Dry Ingredients: In a separate bowl, sift together the all-purpose flour, cream of tartar, baking soda, and salt. Gradually add the dry mixture to the wet ingredients, mixing until a soft dough forms.
- Chill the Dough: Cover the bowl with plastic wrap and chill the dough in the refrigerator for about 30 minutes. This helps to firm up the dough and makes it easier to handle.
- Shape the Cookies: In a small bowl, mix together the remaining 1/4 cup of granulated sugar with the ground cinnamon. Roll the chilled dough into 1-inch balls, then roll each ball in the cinnamon-sugar mixture until well-coated.
- Arrange on Baking Sheet: Place the coated dough balls onto a baking sheet lined with parchment paper, leaving about 2 inches of space between each cookie to allow for spreading.
- Bake: Bake the cookies in the preheated oven for 8-10 minutes, or until the edges are lightly golden. Be careful not to overbake, as Snickerdoodles should remain soft and chewy.
- Cool and Serve: Remove the cookies from the oven and let them cool on the baking sheet for a couple of minutes before transferring them to a wire rack to cool completely. Enjoy them warm or store in an airtight container for later.
Extra Tips: For the best Snickerdoodles, ascertain that your butter is at room temperature before creaming it with the sugar. This will help achieve the desired fluffy texture.
If you prefer a stronger cinnamon flavor, feel free to adjust the amount of cinnamon in the rolling mixture to suit your taste. Additionally, chilling the dough not only makes it easier to work with but also prevents the cookies from spreading too much during baking, resulting in a thicker, chewier cookie.
Enjoy your Snickerdoodles with a glass of milk or a hot cup of cocoa for the ultimate holiday treat!
Chocolate Crinkle Cookies
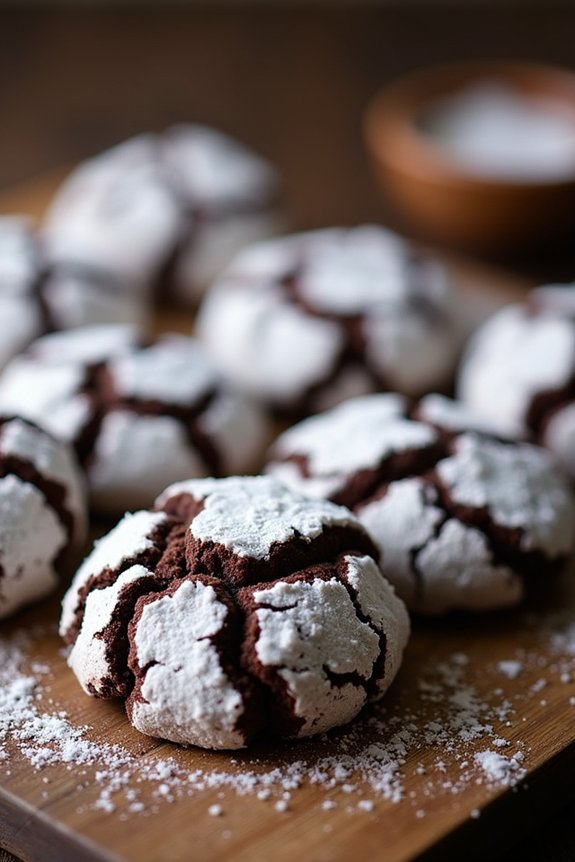
Chocolate Crinkle Cookies are a classic holiday treat that brings a delightful mix of rich chocolate flavor and a beautiful powdered sugar coating. These cookies are known for their unique appearance, with a crinkled surface that reveals the fudgy chocolate interior beneath the sugar-dusted exterior. Perfect for Christmas gatherings or as a sweet gift, Chocolate Crinkle Cookies are loved by both kids and adults alike. Their chewy texture and intense chocolate taste make them a favorite addition to any holiday cookie platter.
Making Chocolate Crinkle Cookies is a joyful baking activity that can be enjoyed by families and friends during the festive season. They’re relatively easy to prepare, and the dough can even be made ahead of time, making it convenient for those busy holiday schedules. With just a few simple ingredients and some patience while the dough chills, you can create these delectable cookies that are sure to impress. This recipe yields approximately 24 cookies, making it suitable for serving 4-6 people.
Ingredients:
- 1 cup all-purpose flour
- 1/2 cup unsweetened cocoa powder
- 1 teaspoon baking powder
- 1/2 teaspoon salt
- 1 cup granulated sugar
- 1/4 cup vegetable oil
- 2 large eggs
- 1 teaspoon vanilla extract
- 1/2 cup powdered sugar
Instructions:
- Prepare the Dry Ingredients: In a medium mixing bowl, whisk together the all-purpose flour, unsweetened cocoa powder, baking powder, and salt. This will guarantee that the dry ingredients are well combined and will contribute to the even texture of the cookies.
- Mix the Wet Ingredients: In a separate large bowl, combine the granulated sugar and vegetable oil, mixing until the sugar is well incorporated with the oil. Add the eggs one at a time, beating well after each addition. Stir in the vanilla extract until the mixture is smooth.
- Combine and Chill the Dough: Gradually add the dry ingredients to the wet ingredients, stirring until a sticky dough forms. Cover the bowl with plastic wrap and refrigerate for at least 3-4 hours or overnight. Chilling the dough is crucial for achieving the crinkled surface of the cookies.
- Preheat and Prepare Baking Sheets: Preheat your oven to 350°F (175°C). Line baking sheets with parchment paper to prevent the cookies from sticking.
- Shape the Cookies: Once the dough is thoroughly chilled, scoop out tablespoon-sized portions and roll them into balls. Roll each ball generously in powdered sugar until fully coated.
- Bake the Cookies: Place the powdered sugar-coated balls onto the prepared baking sheets, spacing them about 2 inches apart. Bake in the preheated oven for 10-12 minutes, or until the edges are set but the centers remain soft.
- Cool and Serve: Allow the cookies to cool on the baking sheet for a few minutes before transferring them to a wire rack to cool completely. Enjoy your Chocolate Crinkle Cookies with a glass of milk or a cup of hot cocoa.
Extra Tips:
For the best results, confirm that the dough is thoroughly chilled before baking, as this will help the cookies maintain their shape and develop the characteristic crinkle appearance. If you’re short on time, placing the dough in the freezer for about 30 minutes can speed up the chilling process.
Additionally, make sure your powdered sugar coating is generous, as it will enhance the crinkle effect and add a lovely sweetness to the cookies. These cookies can be stored in an airtight container for up to a week, making them a great make-ahead option for holiday entertaining.
Peanut Butter Blossoms
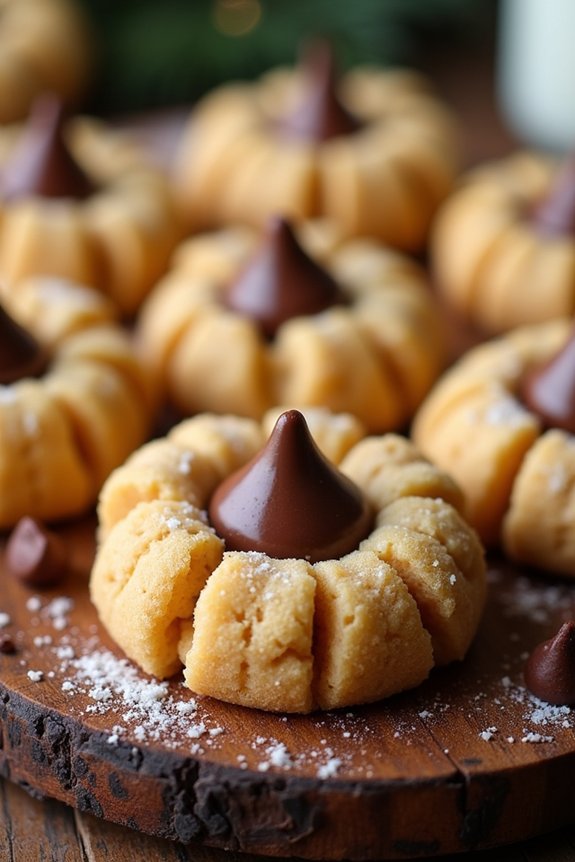
Peanut Butter Blossoms are a classic holiday treat that combines the rich, nutty flavor of peanut butter with the sweetness of a chocolate kiss. These cookies aren’t only delicious but also visually appealing with their signature chocolate center.
They’re perfect for holiday gatherings, cookie exchanges, or simply enjoying at home with family and friends. The warm, aromatic smell of these cookies baking will fill your home with the spirit of the season.
This recipe yields approximately 24-30 cookies, making it ideal for serving 4-6 people. Peanut Butter Blossoms are easy to make, requiring just a few simple ingredients that you might already have in your pantry.
The combination of textures and flavors, with a soft peanut butter cookie and a smooth chocolate center, is what makes these cookies a favorite during the Christmas season.
Ingredients:
- 1/2 cup unsalted butter, softened
- 1/2 cup creamy peanut butter
- 1/2 cup granulated sugar
- 1/2 cup brown sugar, packed
- 1 large egg
- 1 teaspoon vanilla extract
- 1 1/2 cups all-purpose flour
- 1 teaspoon baking soda
- 1/4 teaspoon salt
- Additional granulated sugar for rolling
- 24-30 chocolate kisses, unwrapped
Instructions:
- Preheat and Prepare: Preheat your oven to 375°F (190°C) and line two baking sheets with parchment paper to prevent sticking.
- Cream the Butters and Sugars: In a large mixing bowl, cream together the unsalted butter, creamy peanut butter, granulated sugar, and brown sugar until the mixture is light and fluffy, about 2-3 minutes using an electric mixer.
- Add Wet Ingredients: Beat in the egg and vanilla extract until well combined. This will guarantee the cookies have a smooth and uniform texture.
- Mix Dry Ingredients: In a separate bowl, whisk together the flour, baking soda, and salt. Gradually add the dry ingredients to the wet mixture, mixing until just combined. Avoid overmixing to prevent tough cookies.
- Shape Dough: Scoop out tablespoon-sized portions of dough and roll them into balls using your hands. The dough should be pliable but not sticky.
- Roll in Sugar: Roll each ball in additional granulated sugar to coat, which will give the cookies a delightful sugary crust.
- Bake: Place the dough balls onto the prepared baking sheets, spacing them about 2 inches apart. Bake in the preheated oven for 8-10 minutes or until the edges are light golden brown.
- Add Chocolate Kisses: Immediately after removing the cookies from the oven, press a chocolate kiss into the center of each cookie. The heat from the cookies will slightly melt the chocolate, helping it adhere to the cookie.
- Cool: Allow the cookies to cool on the baking sheets for 5 minutes before transferring them to a wire rack to cool completely.
Extra Tips: To guarantee your Peanut Butter Blossoms are perfectly soft, it’s essential not to overbake them. The cookies will continue to cook on the baking sheet after being removed from the oven.
For a different twist, try using different flavored kisses, such as dark chocolate or white chocolate. If you prefer your cookies to be more uniform, use a small ice cream scoop to portion the dough before rolling.
Enjoy these cookies with a glass of milk for the ultimate holiday experience.
Shortbread Cookies
Shortbread cookies are a timeless holiday treat, known for their buttery goodness and melt-in-your-mouth texture. Perfect for Christmas, these cookies are simple yet elegant, making them a favorite among cookie enthusiasts. Whether you’re a seasoned baker or a novice in the kitchen, this shortbread cookie recipe is easy to follow and guaranteed to please your friends and family.
Originating from Scotland, shortbread cookies are traditionally made with just three ingredients: butter, sugar, and flour. The simplicity of the recipe allows the rich, buttery flavor to shine through, providing a delightful contrast to the more complex flavors of other holiday treats. This recipe will guide you through creating approximately 24-30 cookies, enough to serve 4-6 people.
Ingredients:
- 1 cup (2 sticks) unsalted butter, softened
- 1/2 cup granulated sugar
- 2 cups all-purpose flour
- 1/2 teaspoon vanilla extract (optional)
- A pinch of salt
Instructions:
- Preheat the Oven: Start by preheating your oven to 325°F (163°C). This temperature allows the cookies to bake evenly, ensuring a perfect texture.
- Prepare the Dough: In a large mixing bowl, cream the softened butter and sugar together until light and fluffy. This should take about 3-4 minutes using an electric mixer. Add the vanilla extract and a pinch of salt, mixing until just combined.
- Incorporate the Flour: Gradually add the flour to the butter mixture, mixing at a low speed until the dough starts to come together. Be careful not to over-mix, as this can result in tough cookies.
- Shape the Cookies: Transfer the dough onto a lightly floured surface. Roll it out to about 1/4-inch thickness. Use a cookie cutter to cut out shapes, and place them onto a baking sheet lined with parchment paper.
- Chill the Dough: Place the baking sheet with the cookies in the refrigerator for about 15-20 minutes. Chilling the dough helps the cookies maintain their shape during baking.
- Bake: Remove the cookies from the refrigerator and bake in the preheated oven for 12-15 minutes, or until the edges are lightly golden. Keep a close eye on them to avoid over-baking.
- Cool and Enjoy: Allow the cookies to cool on the baking sheet for a few minutes before transferring them to a wire rack to cool completely. Enjoy your classic shortbread cookies with a cup of hot cocoa or tea.
Extra Tips:
For the best results, use high-quality butter, as it greatly impacts the flavor of the shortbread. If you prefer a more festive touch, consider adding a sprinkle of colored sugar or a drizzle of melted chocolate once the cookies have cooled.
Additionally, you can experiment with other flavorings, such as almond extract or lemon zest, to add a unique twist to your shortbread cookies. Remember, chilling the dough is essential for the cookies to hold their shape, so don’t skip this step!
Oatmeal Raisin Cookies
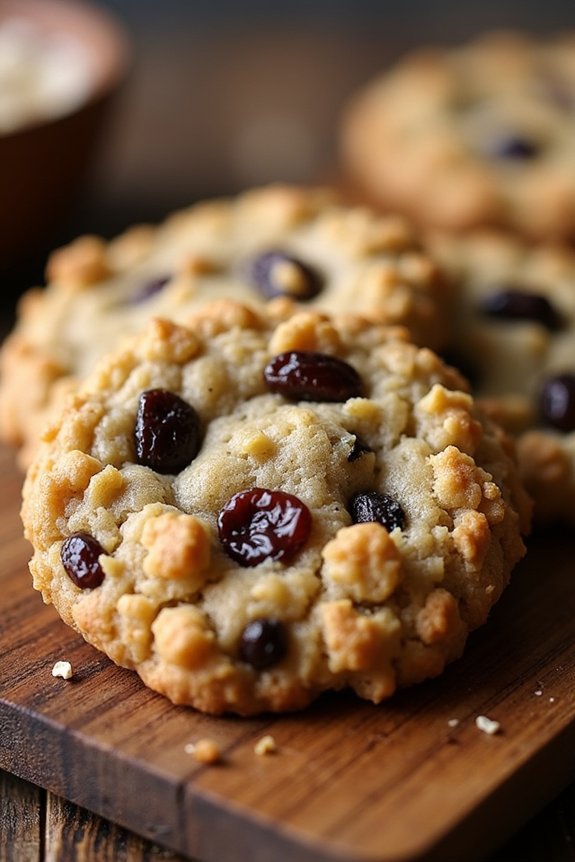
Oatmeal Raisin Cookies are a classic treat that combine the wholesome texture of oats with the sweet chewiness of raisins. Perfect for holiday gatherings or a cozy night in, these cookies aren’t only delicious but also evoke a sense of nostalgia.
With a hint of cinnamon and a warm, buttery flavor, they’re guaranteed to be a hit with both kids and adults alike. Whether you’re an experienced baker or new to the kitchen, this recipe is straightforward and yields a delightful batch of cookies that everyone will enjoy.
This recipe is designed to serve 4-6 people, making it perfect for a small gathering or a family treat. The combination of oats and raisins not only provides a tasty flavor but also offers a heartwarming aroma that fills your home with the spirit of the holidays.
The preparation is simple and requires only a few common pantry ingredients, guaranteeing that you can whip up these cookies whenever the craving strikes. Gather your ingredients, preheat your oven, and prepare to delight in these scrumptious Oatmeal Raisin Cookies.
Ingredients:
- 1 cup (2 sticks) unsalted butter, softened
- 1 cup packed brown sugar
- 1/2 cup granulated sugar
- 2 large eggs
- 1 teaspoon vanilla extract
- 1 1/2 cups all-purpose flour
- 1 teaspoon baking soda
- 1 teaspoon ground cinnamon
- 1/2 teaspoon salt
- 3 cups old-fashioned oats
- 1 cup raisins
Cooking Instructions:
- Preheat the Oven: Start by preheating your oven to 350°F (175°C). Line two baking sheets with parchment paper or silicone baking mats to prevent the cookies from sticking.
- Cream the Butter and Sugars: In a large mixing bowl, beat the softened butter, brown sugar, and granulated sugar until the mixture is light and creamy. This should take about 2-3 minutes using an electric mixer on medium speed.
- Add Wet Ingredients: Beat in the eggs one at a time, making sure each is well incorporated before adding the next. Stir in the vanilla extract until everything is well mixed.
- Combine Dry Ingredients: In a separate bowl, whisk together the flour, baking soda, cinnamon, and salt. Gradually add the dry mixture to the wet ingredients, mixing until just combined.
- Incorporate Oats and Raisins: Stir in the oats and raisins by hand using a spatula or wooden spoon. Make sure they’re evenly distributed throughout the dough.
- Scoop and Arrange: Using a tablespoon or cookie scoop, drop rounded spoonfuls of dough onto the prepared baking sheets, leaving about 2 inches between each cookie to allow for spreading.
- Bake the Cookies: Place the baking sheets in the preheated oven and bake for 10-12 minutes, or until the edges turn golden brown. The centers may look slightly undercooked, but they’ll firm up as they cool.
- Cool the Cookies: Remove the cookies from the oven and allow them to cool on the baking sheets for about 5 minutes before transferring them to a wire rack to cool completely.
Extra Tips:
For an even richer flavor, consider soaking the raisins in warm water for about 10 minutes before adding them to the dough. This will plump them up and enhance their sweetness.
If you prefer a crunchier texture, you can also toast the oats lightly before mixing them into the batter. Always verify your baking soda is fresh to get the best rise in your cookies.
Store any leftover cookies in an airtight container to keep them soft and chewy for several days. Enjoy your holiday baking!
Thumbprint Cookies
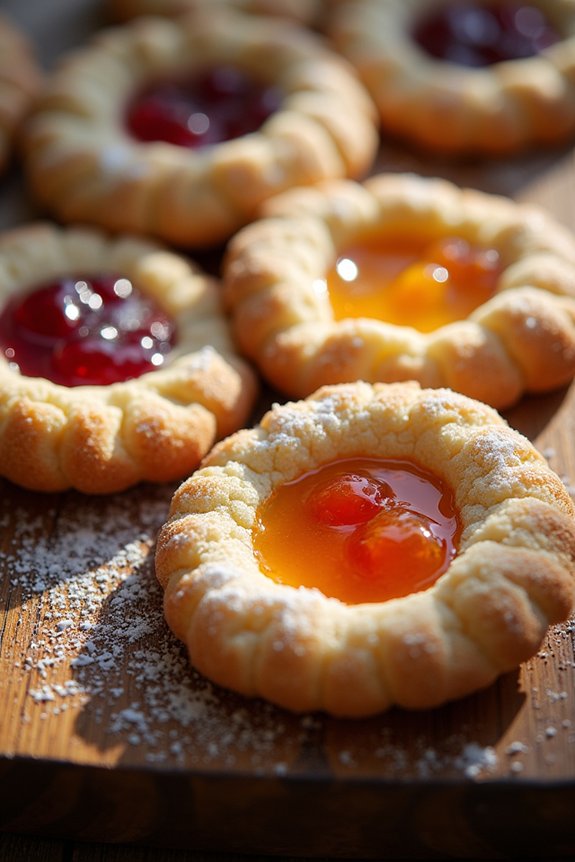
Thumbprint cookies are a delightful addition to any Christmas cookie platter. These buttery, sweet treats are named for the indentations made by your thumb, which are filled with a rich jam of your choice. The combination of the crisp cookie and the sweet, sticky jam creates a perfect bite-sized dessert that’s as pleasing to the eye as it’s to the palate.
They’re versatile, allowing you to customize each batch with different jams, from raspberry to apricot, or even chocolate ganache for a twist. These cookies aren’t only delicious but also fun to make, especially with family or friends.
They’re simple enough for beginners and a great way to introduce children to baking. The recipe yields about 24 cookies, making it ideal for serving 4-6 people. Whether you’re baking them for a holiday gathering or just as a treat for yourself, thumbprint cookies are sure to be a hit.
Ingredients (Serves 4-6):
- 1 cup unsalted butter, softened
- 2/3 cup granulated sugar
- 1 teaspoon vanilla extract
- 2 cups all-purpose flour
- 1/2 teaspoon salt
- 1/2 cup of your favorite jam (such as raspberry, apricot, or strawberry)
- Optional: 1/4 cup confectioners’ sugar for dusting
Instructions:
- Preheat the Oven: Start by preheating your oven to 350°F (175°C). Line two baking sheets with parchment paper and set them aside.
- Cream Butter and Sugar: In a large mixing bowl, cream together the softened butter and granulated sugar using an electric mixer on medium speed until the mixture is light and fluffy, about 2-3 minutes.
- Add Vanilla: Mix in the vanilla extract until fully incorporated.
- Combine Dry Ingredients: In another bowl, whisk together the flour and salt. Gradually add this to the butter mixture, beating on low speed until the dough comes together.
- Shape the Dough: Roll the dough into 1-inch balls and place them on the prepared baking sheets, spacing them about 2 inches apart.
- Create Thumbprints: Using your thumb or the back of a small spoon, gently press an indentation into the center of each ball.
- Fill with Jam: Carefully fill each indentation with about 1/2 teaspoon of jam. Be careful not to overfill to prevent the jam from overflowing during baking.
- Bake the Cookies: Bake in the preheated oven for 12-15 minutes, or until the edges are lightly golden.
- Cool and Dust (Optional): Remove from the oven and allow the cookies to cool on the baking sheet for 5 minutes before transferring them to a wire rack to cool completely. If desired, dust with confectioners’ sugar before serving.
Extra Tips:
When making thumbprint cookies, it’s important to guarantee that the butter is soft, but not melted, for the best texture. If your dough seems too crumbly, try adding a teaspoon of milk to help it come together.
To avoid the jam from bubbling over, make sure the indentations are deep enough and avoid overfilling them. These cookies can be stored in an airtight container at room temperature for up to a week, making them a convenient make-ahead treat for your holiday festivities.
Chocolate Chip Cookies
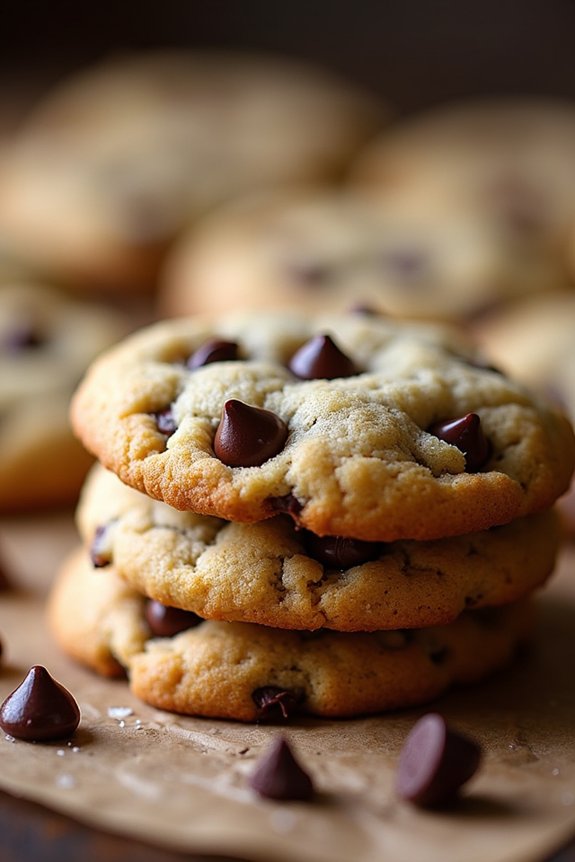
Nothing says Christmas like the warm, comforting aroma of freshly baked cookies wafting through the house. Chocolate chip cookies are a classic favorite that never fails to bring joy to both children and adults alike. Perfect for holiday parties or as a sweet treat to leave out for Santa, these chewy, gooey cookies are sure to become a staple in your holiday baking repertoire.
With the right balance of rich chocolate and a hint of vanilla, these cookies are crispy on the edges and delightfully soft in the center, embodying the essence of holiday cheer.
This particular recipe is designed to serve 4-6 people, making it ideal for a family gathering or a cozy evening with friends. The ingredients are simple and likely already in your pantry, which makes this recipe convenient and easy to whip up at a moment’s notice.
So, gather your ingredients, preheat your oven, and get ready to bake a batch of delicious Chocolate Chip Christmas Cookies that will undoubtedly be a hit at your holiday celebrations.
Ingredients (Serves 4-6):
- 1 cup unsalted butter, softened
- 3/4 cup granulated sugar
- 3/4 cup brown sugar, packed
- 2 large eggs
- 1 teaspoon vanilla extract
- 2 1/4 cups all-purpose flour
- 1 teaspoon baking soda
- 1/2 teaspoon salt
- 2 cups semi-sweet chocolate chips
Cooking Instructions:
- Preheat the Oven: Start by preheating your oven to 350°F (175°C). This guarantees that the oven is the right temperature when your cookie dough is ready, allowing for even baking.
- Cream the Butter and Sugars: In a large mixing bowl, combine the softened butter, granulated sugar, and brown sugar. Use an electric mixer to cream them together until the mixture is light and fluffy, which usually takes about 3 minutes.
- Add Eggs and Vanilla: Beat in the eggs one at a time, making sure each egg is fully incorporated before adding the next. Mix in the vanilla extract for that extra depth of flavor.
- Combine Dry Ingredients: In a separate bowl, whisk together the flour, baking soda, and salt. This step is essential to distribute the leavening agent evenly throughout the dough.
- Mix Wet and Dry Ingredients: Gradually add the dry ingredients to the wet mixture, stirring gently until just combined. Overmixing can lead to tough cookies, so be careful.
- Fold in Chocolate Chips: Gently fold in the chocolate chips using a spatula or wooden spoon, making sure they’re evenly distributed throughout the dough.
- Shape and Bake: Drop rounded tablespoons of dough onto ungreased baking sheets, leaving about 2 inches of space between each cookie. Bake in the preheated oven for 10-12 minutes, or until the edges are golden brown.
- Cool and Serve: Allow the cookies to cool on the baking sheet for about 5 minutes before transferring them to a wire rack to cool completely. Serve warm or store in an airtight container for up to a week.
Extra Tips:
For the best results, use room temperature butter and eggs, as this helps the ingredients combine more smoothly. If you prefer a softer cookie, slightly underbake them and let them cool on the baking sheet.
For a festive twist, consider adding a handful of holiday-themed sprinkles or a dash of cinnamon to the dough. Remember, the quality of your chocolate chips can greatly affect the taste, so opt for a brand you love.
Happy baking and enjoy your delightful Chocolate Chip Christmas Cookies!
Linzer Cookies
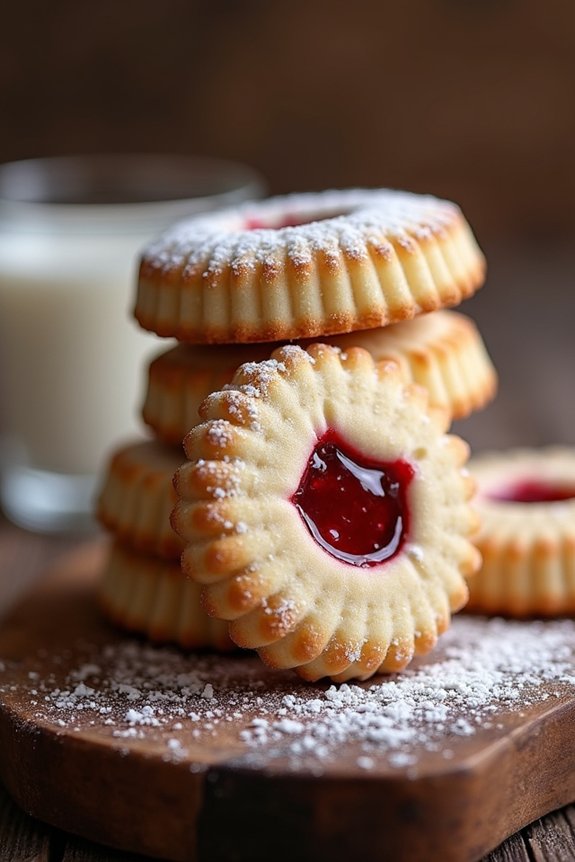
Linzer cookies are a classic treat that originates from Austria and are especially popular during the Christmas season. These delightful sandwich cookies are characterized by their buttery, nutty base and a sweet, tangy jam filling, often raspberry or apricot, peeking through a small cut-out on the top cookie. The contrast of flavors and textures makes them a festive favorite, perfect for gifting or enjoying with a warm cup of tea.
The traditional Linzer cookie dough is enriched with finely ground nuts, typically almonds or hazelnuts, giving it a unique taste and crumbly texture. The dough is rolled out and cut into shapes, with half of the cookies featuring a small window to reveal the jam filling once assembled. After baking, the cookies are dusted with powdered sugar, creating a snowy, wintery appearance that’s both beautiful and delicious.
Ingredients (for a serving size of 4-6 people):
- 1 ½ cups all-purpose flour
- ¾ cup finely ground almonds or almond flour
- ½ teaspoon cinnamon
- ¼ teaspoon salt
- ¾ cup unsalted butter, softened
- ½ cup granulated sugar
- 1 large egg yolk
- 1 teaspoon vanilla extract
- ½ cup raspberry or apricot jam
- Powdered sugar, for dusting
Cooking Instructions:
- Prepare the Dough: In a medium-sized bowl, whisk together the all-purpose flour, finely ground almonds, cinnamon, and salt. Set aside.
- Cream the Butter and Sugar: In a large bowl, beat the softened butter and granulated sugar together using an electric mixer until light and fluffy, about 2-3 minutes. Add the egg yolk and vanilla extract, and continue to mix until well incorporated.
- Combine Ingredients: Gradually add the dry ingredients to the butter mixture, mixing on low speed until the dough comes together. If the dough seems too dry, you can add a teaspoon of water.
- Chill the Dough: Divide the dough into two equal portions, flatten each into a disk, wrap in plastic wrap, and refrigerate for at least 1 hour or until firm.
- Preheat the Oven: Preheat your oven to 350°F (175°C) and line two baking sheets with parchment paper.
- Roll and Cut the Dough: On a lightly floured surface, roll out one disk of dough to about 1/8 inch thick. Use a round cookie cutter to cut out cookies, and then use a smaller cutter to create windows in half of the cookies.
- Bake the Cookies: Place the cookies on the prepared baking sheets and bake for 10-12 minutes, or until the edges are lightly golden. Let them cool on the baking sheet for a few minutes before transferring to a wire rack to cool completely.
- Assemble the Cookies: Spread a small amount of jam on the full cookies, then top with the windowed cookies. Press gently to adhere.
- Dust with Powdered Sugar: Once assembled, dust the tops of the cookies with powdered sugar for a festive finish.
Extra Tips:
For the best flavor, consider toasting the almonds or hazelnuts before grinding them to bring out their natural oils and enhance the nutty taste.
Always guarantee the dough is well chilled before rolling; this makes it easier to handle and helps the cookies maintain their shape during baking.
If you want to experiment, you can try different jams or add a hint of lemon zest to the dough for an extra zing.
These cookies are best enjoyed fresh but can be stored in an airtight container for up to a week.