

As Halloween approaches, I’ve been exploring some easy yet spooky appetizers that anyone can create. Transform ordinary deviled eggs into eerie spiders with just a few olive slices or craft mummy jalapeño poppers that are as delicious as they are fun to look at. These Halloween treats are sure to delight your guests and add a touch of frightful fun to your gathering. Looking for more ghoulish goodies? Let’s get creative in the kitchen!
Spooky Spider Deviled Eggs
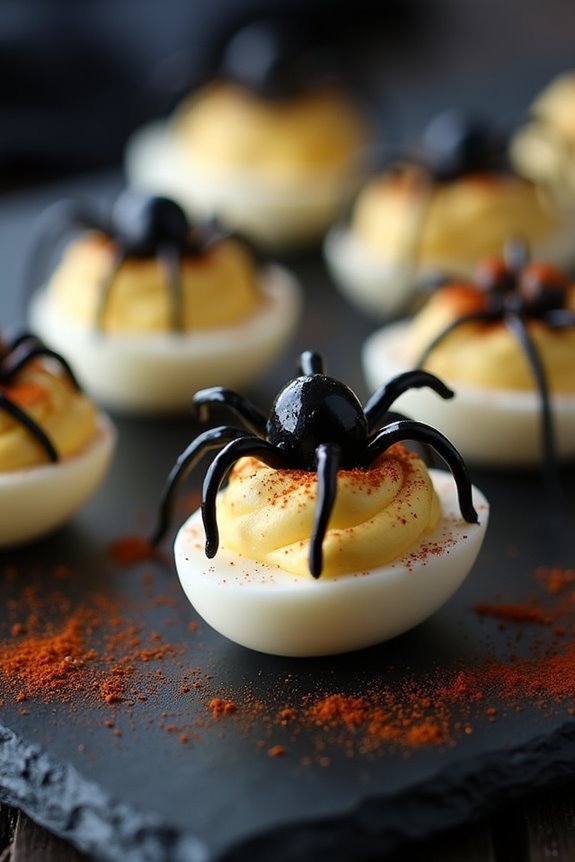
Spooky Spider Deviled Eggs are the perfect Halloween appetizers to add a bit of eerie delight to your party spread. These devilish treats not only taste delicious but are also sure to impress your guests with their creative presentation. Made with creamy yolks and adorned with olive spiders, they bring a touch of fun and fright to your Halloween festivities.
Whether you’re hosting a large party or a small gathering, these deviled eggs are bound to be a hit among both kids and adults. The classic deviled egg recipe gets a spooky twist, making it a versatile dish that fits right into the Halloween theme.
The spiders, crafted from black olives, perched atop each egg, are simple to create yet make a striking visual impact. These eggs are both easy and quick to prepare, allowing you to focus on enjoying the festivities rather than spending too much time in the kitchen.
Ingredients (for 4-6 people):
- 6 large eggs
- 1/4 cup mayonnaise
- 1 teaspoon Dijon mustard
- 1 teaspoon white vinegar
- Salt and pepper to taste
- Paprika for garnish
- 1 can of large black olives
Instructions:
- Boil the Eggs: Place the eggs in a saucepan and cover them with water. Bring the water to a boil over medium-high heat. Once boiling, reduce the heat to a low simmer and cook for 10 minutes. Remove the eggs from the hot water and transfer them to an ice bath to cool.
- Prepare the Yolks: Once the eggs are cool, peel them carefully. Slice each egg in half lengthwise and gently remove the yolks, placing them in a bowl. Set the egg whites aside on a serving platter.
- Make the Filling: Mash the yolks with a fork and add mayonnaise, Dijon mustard, white vinegar, salt, and pepper. Mix until smooth and creamy.
- Fill the Egg Whites: Spoon or pipe the yolk mixture back into the hollowed-out egg whites, filling them generously.
- Create the Spider Topping: Cut the black olives in half. Use one half of an olive as the spider’s body. For the legs, slice the other half into thin strips. Arrange the olive pieces on top of the filled eggs to create spider shapes.
- Garnish and Serve: Lightly sprinkle paprika over the deviled eggs for added color and flavor. Chill in the refrigerator for at least 30 minutes before serving to allow the flavors to meld.
Extra Tips: For perfectly boiled eggs, it’s essential to use eggs that aren’t too fresh, as older eggs peel more easily. You can also experiment with the filling by adding a dash of hot sauce or a bit of relish for extra flavor.
If you want to get creative with the presentation, consider using green olives for a more colorful spider or adding edible eyes made from cream cheese and a tiny dot of black olive. These little details can make your Spooky Spider Deviled Eggs even more festive and fun.
Ghostly Guacamole Dip
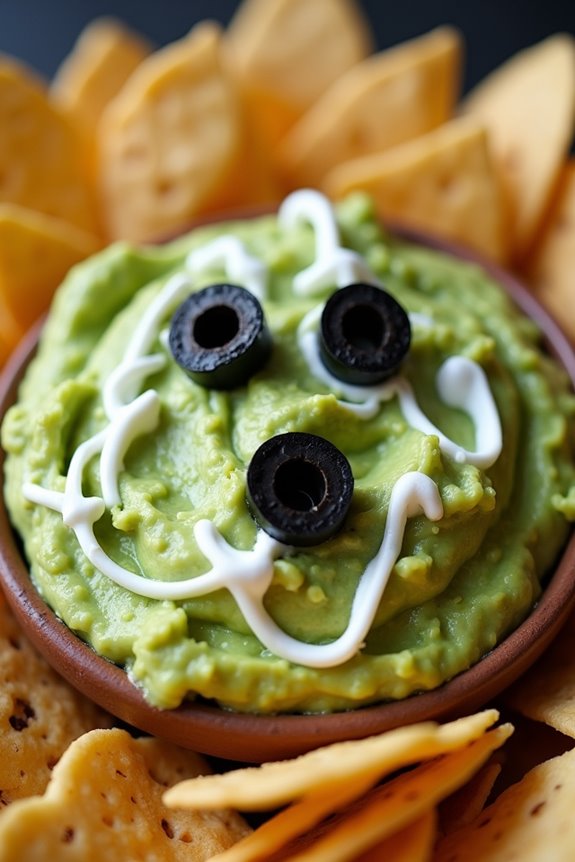
Ghostly Guacamole Dip is a spooktacular appetizer perfect for your Halloween festivities. This creamy, green dip isn’t only delicious but also easy to transform into a creepy treat with the addition of a few creative touches. By using simple ingredients, you can create a guacamole that’s both visually appealing and a hit at any Halloween party.
Whether you’re hosting a gathering or just want to enjoy a festive snack, this recipe promises to deliver both flavor and fun.
The key to making Ghostly Guacamole Dip is in the presentation. While the guacamole itself is made with traditional ingredients, you’ll use clever garnishes to give it a ghostly appearance. Serve it with chips shaped like tombstones or ghosts, and watch your guests delight in the spooky scene. This dish serves 4-6 people, making it ideal for small parties or family get-togethers.
Ingredients for Ghostly Guacamole Dip (Serves 4-6):
- 3 ripe avocados
- 1 lime, juiced
- 1 teaspoon salt
- 1/2 cup diced red onion
- 2 Roma tomatoes, diced
- 1 tablespoon chopped cilantro
- 1 clove garlic, minced
- 1 pinch ground cayenne pepper (optional)
- Black olives (for decoration)
- Sour cream (for decoration)
- Tortilla chips (preferably in Halloween shapes)
Cooking Instructions:
- Prepare the Avocados: Start by cutting the avocados in half, removing the pit, and scooping the flesh into a mixing bowl. Use a fork or a potato masher to mash the avocado to your desired texture. Some prefer it creamy, while others like it a bit chunky.
- Mix the Ingredients: Add lime juice and salt to the mashed avocados to enhance the flavor and prevent browning. Stir in the diced red onion, diced tomatoes, chopped cilantro, minced garlic, and a pinch of cayenne pepper if you like a bit of heat.
- Decorate the Guacamole: To give your guacamole a ghostly appearance, use black olives to create eyes and a mouth on the surface of the dip. You can also use a piping bag or a plastic sandwich bag with a corner snipped off to pipe sour cream onto the guacamole in the shape of ghostly figures or spider webs.
- Serve with Style: Arrange the guacamole in a serving dish and place the Halloween-themed tortilla chips around it. Confirm that the presentation is spooky yet appetizing.
Extra Tips:
To keep your Ghostly Guacamole Dip fresh and vibrant, cover it tightly with plastic wrap, pressing the wrap directly onto the surface of the guacamole to minimize exposure to air. This helps prevent browning.
If you’re short on time, you can prepare the guacamole a few hours in advance and refrigerate it until serving. For an extra festive touch, consider using cookie cutters to shape homemade tortilla chips into ghosts, bats, or pumpkins before baking them. This added effort will certainly impress your guests and enhance the Halloween theme.
Mummy Jalapeño Poppers
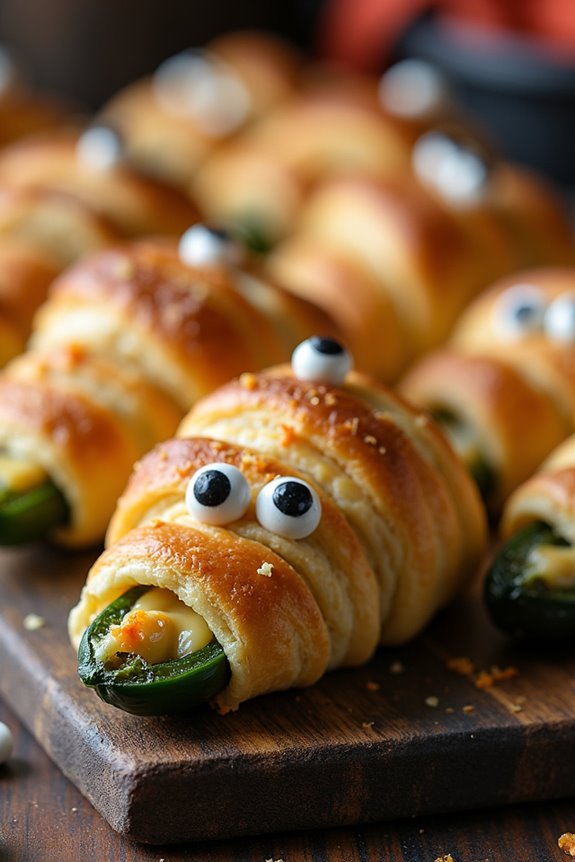
Mummy Jalapeño Poppers are a fun and spooky appetizer perfect for any Halloween gathering. These delicious treats combine the spicy kick of jalapeños with creamy cheese, all wrapped up in a playful crescent roll mummy disguise.
They’re easy to make and are certain to be a hit with both kids and adults alike. With their adorable appearance and decadent flavor, these poppers are the perfect addition to your Halloween spread, adding a touch of whimsy and spice to the night.
To make these Mummy Jalapeño Poppers, you’ll need a few simple ingredients and a bit of creativity. The recipe involves stuffing jalapeños with a rich cheese mixture, then wrapping them in crescent roll dough to resemble mummies.
Once baked, these poppers aren’t only visually appealing but also bursting with flavor, offering a delightful contrast between the creamy filling and the crisp, golden pastry. Whether you’re hosting a party or just looking for a fun snack to enjoy, these poppers will undoubtedly become a Halloween favorite.
Ingredients (serving size: 4-6 people):
- 10-12 large jalapeños
- 8 ounces cream cheese, softened
- 1 cup shredded cheddar cheese
- 1 teaspoon garlic powder
- 1 teaspoon onion powder
- 1/2 teaspoon smoked paprika
- Salt and pepper to taste
- 1 package crescent roll dough
- 1 egg, beaten
- Candy eyeballs or black olives (for decoration)
Cooking Instructions:
1. Preheat the Oven: Start by preheating your oven to 375°F (190°C). This will guarantee that the oven is hot and ready when it’s time to bake the poppers.
2. Prepare the Jalapeños: Slice each jalapeño in half lengthwise and remove the seeds and membranes. This will reduce the heat level and create space for the cheese filling.
3. Make the Cheese Mixture: In a medium-sized bowl, combine the softened cream cheese, shredded cheddar cheese, garlic powder, onion powder, smoked paprika, salt, and pepper. Mix until well combined and smooth.
4. Fill the Jalapeños: Using a spoon, carefully fill each jalapeño half with the cheese mixture. Be generous but make sure the filling is level with the edges of the jalapeños.
5. Wrap with Crescent Roll Dough: Unroll the crescent roll dough and cut it into thin strips. Wrap each filled jalapeño with the dough strips, leaving small gaps to resemble a mummy.
Make sure the ends are tucked under the jalapeños to secure the dough.
6. Add Decorative Eyes****: Place two candy eyeballs or small pieces of black olive on each popper to create the mummy’s eyes.
7. Brush with Egg Wash: Lightly brush the wrapped jalapeños with beaten egg. This will give them a beautiful golden color when baked.
8. Bake the Poppers: Place the wrapped jalapeños on a baking sheet lined with parchment paper. Bake in the preheated oven for 15-20 minutes or until the dough is golden brown and crispy.
9. Serve: Allow the poppers to cool slightly before serving. Enjoy them warm for the best taste and texture.
Extra Tips:
When handling jalapeños, it’s advisable to wear gloves to avoid any irritation from the peppers’ oils. If you prefer a milder flavor, you can soak the halved jalapeños in cold water for about 30 minutes before filling them.
This will help reduce some of the heat. Additionally, feel free to experiment with different cheeses or spices to suit your taste preferences. These poppers can be prepared a few hours in advance and baked just before serving, making them a convenient option for party planning.
Witch’s Broomstick Breadsticks

To make Witch’s Broomstick Breadsticks, you’ll need some basic ingredients that capture the essence of Halloween with a savory twist. The recipe is designed to serve about 4-6 people, making it a suitable choice for small parties or family gatherings. The combination of breadsticks, cheese, and pretzel sticks creates a delightful texture that’s both crunchy and chewy, guaranteeing they vanish as quickly as they appear.
Ingredients (serves 4-6):
- 1 package of refrigerated breadstick dough
- 12 pretzel sticks
- 6 slices of mozzarella cheese
- 2 tablespoons butter, melted
- 1 teaspoon garlic powder
- 1 teaspoon Italian seasoning
- 1 tablespoon grated Parmesan cheese
Cooking Instructions:
- Preheat the Oven: Begin by preheating your oven to 375°F (190°C). Line a baking sheet with parchment paper to prevent sticking.
- Prepare the Breadstick Dough: Unroll the refrigerated breadstick dough and separate it into strips according to the package instructions. If necessary, stretch each strip gently to lengthen them slightly.
- Shape the Broomstick Bristles: Cut each slice of mozzarella cheese in half, then into thin strips to create the appearance of broom bristles. Lay these strips on one end of each breadstick, leaving about 1 inch of the dough uncovered.
- Wrap the Dough: Take the uncovered end of the breadstick dough and wrap it around the cheese strips and a pretzel stick, securing it tightly to form the broom handle. Verify the cheese is evenly distributed to create a realistic broom bristle effect.
- Season the Breadsticks: In a small bowl, mix the melted butter with garlic powder and Italian seasoning. Brush this mixture generously over each breadstick to add flavor and help them brown in the oven.
- Bake the Breadsticks: Place the prepared breadsticks on the lined baking sheet and bake in the preheated oven for about 10-12 minutes or until golden brown and crispy.
- Finish with Parmesan: Once baked, remove the breadsticks from the oven and immediately sprinkle with grated Parmesan cheese for an extra cheesy touch. Allow them to cool slightly before serving.
Extra Tips:
For a more authentic look, use a sharp knife to gently score the dough at intervals along the broom handle to give it a wooden texture.
You can also experiment with different cheeses, such as cheddar or pepper jack, for a varied flavor profile.
If you want to make the breadsticks ahead of time, they can be prepared and assembled, then stored in the refrigerator for up to 24 hours before baking. Just make sure to bring them to room temperature before placing them in the oven.
Enjoy the festive Halloween atmosphere by serving these with a side of marinara sauce or a creamy garlic dip for added flavor.
Creepy Crawly Cheese Ball
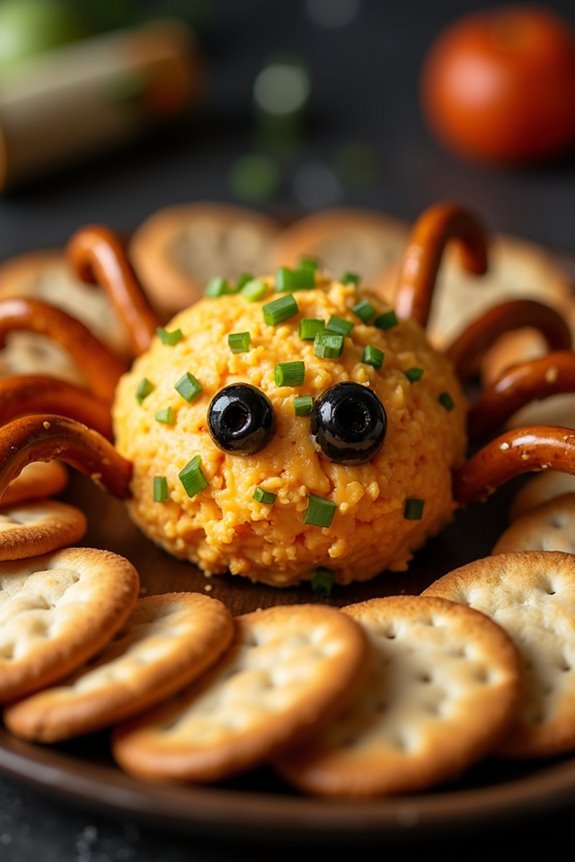
Creepy Crawly Cheese Ball is a fun and spooky appetizer perfect for Halloween parties. This delightful dish combines the smooth and creamy texture of cheese with the eerie appearance of a spooky spider, making it a hit with both kids and adults.
The cheese ball is seasoned with a blend of herbs and spices to enhance its flavor, and decorated with olives and pretzels to mimic the look of a creepy crawly creature. Not only does it look impressive, but it also tastes delicious, making it an ideal centerpiece for your Halloween spread.
This recipe is designed to serve 4-6 people, making it perfect for small gatherings or family celebrations. The Creepy Crawly Cheese Ball is easy to prepare and can be made in advance, saving you time on the day of your party.
With a few simple ingredients and a little creativity, you can turn an ordinary cheese ball into a festive work of art that will delight your guests and add a touch of Halloween magic to your table.
Ingredients
- 2 cups of shredded sharp cheddar cheese
- 8 oz of cream cheese, softened
- 1/4 cup of chopped green onions
- 1 tablespoon of Worcestershire sauce
- 1 teaspoon of garlic powder
- 1/2 teaspoon of paprika
- Salt and pepper to taste
- Black olives (pitted, for decoration)
- Pretzel sticks (for decoration)
- Crackers for serving
Instructions
- Prepare the Cheese Mixture: In a large mixing bowl, combine the shredded cheddar cheese, softened cream cheese, chopped green onions, Worcestershire sauce, garlic powder, paprika, salt, and pepper. Mix well until all ingredients are thoroughly combined and the mixture is smooth.
- Form the Cheese Ball: Using your hands, shape the cheese mixture into a ball. You may want to lightly coat your hands with vegetable oil or wear disposable gloves to prevent sticking.
- Chill the Cheese Ball: Wrap the cheese ball in plastic wrap and refrigerate for at least 1-2 hours. This will allow the flavors to meld and the cheese ball to firm up, making it easier to decorate.
- Create the Creepy Crawly Look: Once the cheese ball is firm, remove it from the refrigerator and unwrap it. Use black olives to create the eyes and any other features you desire on the spider. Insert pretzel sticks into the cheese ball to form the legs, arranging them in a way that resembles a spider.
- Serve: Place the decorated cheese ball on a platter and surround it with an assortment of crackers. Serve immediately or keep refrigerated until ready to serve.
Extra Tips
To make your Creepy Crawly Cheese Ball even more festive, consider using a mix of different cheeses for added flavor complexity, such as adding some pepper jack for a spicy kick.
If you’re making this dish ahead of time, decorate it just before serving to guarantee the pretzels stay crunchy. Confirm that the cream cheese is completely softened before mixing to achieve the smoothest texture.
If the cheese ball becomes too soft while shaping or decorating, simply place it back in the refrigerator for a few minutes to firm up. Enjoy your spooky creation!
Monster Eyeball Caprese Bites
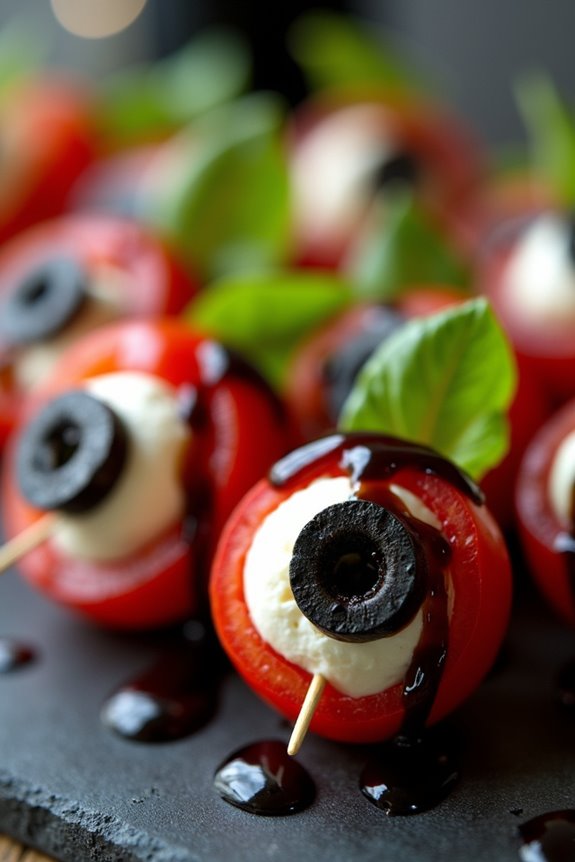
Monster Eyeball Caprese Bites are a spooktacular twist on the classic Caprese salad, perfect for adding a festive flair to your Halloween gathering. These creepy yet delicious appetizers are sure to impress your guests with their eerie appearance and delightful flavor. Fresh mozzarella balls are transformed into eyeballs, paired with juicy cherry tomatoes, fresh basil leaves, and a touch of balsamic glaze for an extra burst of flavor.
Not only are they easy to make, but they also provide a healthy and satisfying option for your Halloween spread. Serve these Monster Eyeball Caprese Bites as a fun starter at your Halloween party or as a spooky snack for a family movie night. The combination of fresh ingredients creates a wonderful blend of flavors that will be loved by both kids and adults alike. This recipe yields enough servings for 4-6 people, making it ideal for small gatherings or as part of a larger appetizer spread.
Ingredients (serving size for 4-6 people):
- 12 cherry tomatoes
- 12 fresh mozzarella balls (bocconcini)
- 12 fresh basil leaves
- 24 black olive slices
- 2 tablespoons balsamic glaze
- 12 toothpicks or small skewers
- Salt and pepper to taste
Cooking Instructions:
- Prepare the Ingredients: Begin by washing the cherry tomatoes and basil leaves thoroughly. Pat them dry with a paper towel to remove any excess moisture.
- Assemble the Eyeballs: Take a mozzarella ball and gently press a slice of black olive onto the center of one side to form the “pupil” of the eyeball. Repeat this process for all 12 mozzarella balls.
- Skewer the Ingredients: Take a toothpick or small skewer and start by threading a basil leaf onto it. Next, add a mozzarella ball with the olive slice facing outward, then finish with a cherry tomato. Confirm the olive slice is visible to complete the eyeball effect. Repeat until all ingredients are used.
- Season and Drizzle: Arrange the skewered Monster Eyeball Caprese Bites on a serving platter. Lightly season with salt and pepper to taste. Drizzle the balsamic glaze over the skewers, making sure each one receives a touch of sweetness to complement the savory flavors.
- Serve Immediately: For the best flavor and presentation, serve the Monster Eyeball Caprese Bites immediately after preparation. If you need to prepare them in advance, store them in the refrigerator and add the balsamic glaze just before serving.
Extra Tips:
- For an added touch of spookiness, consider using a small amount of red food coloring to create “bloodshot” lines on the mozzarella balls using a toothpick.
- If you’re short on time, pre-sliced olives can save you the effort of cutting them yourself.
- These bites can be made a few hours in advance and stored in the refrigerator, but the fresh basil should be added just before serving to guarantee it remains vibrant and fresh.
- Feel free to experiment with different types of tomatoes or even add a touch of spicy chili flakes for a kick!
Pumpkin Patch Hummus Cups

Pumpkin Patch Hummus Cups are a delightful and festive appetizer perfect for any Halloween gathering. These cups combine the creamy, savory goodness of hummus with the visual appeal of a mini pumpkin patch, making them both delicious and a conversation starter.
They aren’t only fun to make but also provide a healthy snacking option for guests of all ages, combining the flavors of fall with a creative twist. The process involves crafting individual hummus cups that mimic a miniature pumpkin patch, complete with edible decorations.
This recipe serves 4-6 people and requires simple ingredients that are easily available at your local grocery store. With minimal cooking involved, these Pumpkin Patch Hummus Cups are an ideal appetizer to prepare in advance, allowing you more time to enjoy the festivities.
Ingredients:
- 2 cups of hummus (store-bought or homemade)
- 1 large cucumber
- 1 large carrot
- 1 small bunch of fresh parsley
- 1/2 cup of black olives
- 1/2 cup of cherry tomatoes
- 1/4 cup of pumpkin seeds
- 6 small clear plastic cups
Cooking Instructions:
- Prepare the Vegetables: Start by thoroughly washing the cucumber, carrot, and cherry tomatoes. Slice the cucumber into thin rounds and the carrot into small sticks. These will serve as the “stems” and “vines” in your pumpkin patch.
- Arrange the Hummus Cups: Evenly distribute the hummus among the 6 small clear plastic cups. Use a spoon to smooth the surface of the hummus, creating a flat base.
- Decorate with Vegetables: Insert a cucumber slice vertically into each cup to represent a “pumpkin.” Position the carrot sticks around the cucumber slices to mimic vines growing around the pumpkins.
- Add Finishing Touches: Place a few cherry tomatoes around the cucumber “pumpkin” as additional pumpkins scattered throughout the patch. Add some black olives for contrast and sprinkle a few pumpkin seeds on top for texture.
- Garnish with Herbs: Finally, add a few sprigs of fresh parsley around the arrangement to simulate the leaves of the pumpkin plants, enhancing the visual appeal.
Extra Tips:
For an added layer of flavor, consider adding a sprinkle of smoked paprika or cumin to the hummus before assembling the cups. This will give the hummus a slightly spiced note that complements the freshness of the vegetables.
Additionally, using a variety of colored cherry tomatoes can make your pumpkin patch more vibrant and visually appealing. If you’re making these ahead of time, keep them refrigerated and add the parsley just before serving to keep it fresh and vibrant.
Bloody Eyeball Bruschetta

Imagine a platter filled with eye-catching appetizers that not only tantalize your taste buds but also set the mood for a night of Halloween fun. The Bloody Eyeball Bruschetta is easy to prepare and can be made ahead of time, allowing you to focus on other party preparations.
With just a few simple ingredients, you can create a dish that’s both festive and flavorful, making it a standout addition to your Halloween menu.
Ingredients (serves 4-6):
- 1 French baguette
- 2 tablespoons olive oil
- 3 cloves garlic, minced
- 2 cups cherry tomatoes, halved
- 1 tablespoon balsamic vinegar
- Salt and pepper to taste
- 1/2 cup fresh basil leaves
- 1 cup mini mozzarella balls (bocconcini)
- 1/4 cup black olives, sliced
- 1/4 cup balsamic glaze
Cooking Instructions:
- Prepare the Baguette: Preheat your oven to 400°F (200°C). Slice the baguette into 1/2-inch thick slices. Arrange the slices on a baking sheet and brush both sides with olive oil. Toast in the oven for about 5-7 minutes on each side, or until golden brown.
- Make the Tomato Mixture: In a medium-sized bowl, combine the halved cherry tomatoes, minced garlic, balsamic vinegar, salt, and pepper. Gently toss to verify the tomatoes are evenly coated with the mixture. Allow it to marinate while preparing the other ingredients.
- Assemble the Bruschetta: Once the baguette slices are toasted, arrange them on a serving platter. Spoon a generous amount of the tomato mixture onto each slice. Place a fresh basil leaf on top of the tomatoes for added flavor and color.
- Create the Eyeballs: Take a mini mozzarella ball and place it on top of each basil leaf. Press a sliced black olive into the center of each mozzarella ball to create the appearance of an eyeball.
- Drizzle with Balsamic Glaze: Finish off the bruschetta with a light drizzle of balsamic glaze to enhance the flavors and add a dramatic, “bloody” effect to the dish.
Extra Tips:
For best results, use fresh, high-quality ingredients, as they’ll make a significant difference in the flavor of your Bloody Eyeball Bruschetta.
You can prepare the tomato mixture a few hours in advance to allow the flavors to meld together. If you want to add more color to your platter, consider using a mix of yellow and red cherry tomatoes.
Finally, serve the bruschetta immediately after assembling to keep the bread crisp and the toppings fresh.
Bat Wing Nachos

Bat Wing Nachos are a spooky and delicious addition to any Halloween gathering. This fun twist on traditional nachos will delight your guests with their eerie appearance and savory flavors. The combination of blue corn tortilla chips, black beans, and a variety of cheeses gives the dish its “bat wing” look, making it perfect for the occasion.
These nachos aren’t only visually appealing but also packed with flavor, guaranteeing they’ll be a hit with both kids and adults alike. To create Bat Wing Nachos, you’ll start by layering your ingredients to build the ultimate nacho platter. The key is to use blue corn tortilla chips, which mimic the dark color of bat wings.
Toppings like seasoned beef or chicken, black beans, and shredded cheese add richness, while garnishes such as sour cream, guacamole, and diced tomatoes provide freshness and contrast. This recipe serves 4-6 people, making it ideal for a small Halloween party or family gathering.
Ingredients:
- 1 bag of blue corn tortilla chips
- 1 pound ground beef or chicken
- 1 packet taco seasoning
- 1 can (15 oz) black beans, drained and rinsed
- 2 cups shredded Mexican blend cheese
- 1 cup salsa
- 1 cup sour cream
- 1 cup guacamole
- 1/2 cup diced tomatoes
- 1/4 cup sliced black olives
- 1/4 cup sliced green onions
Instructions:
- Prepare the Protein: In a skillet over medium heat, cook the ground beef or chicken until browned and fully cooked. Drain any excess fat. Add the taco seasoning according to package instructions, stirring until the meat is evenly coated. Set aside.
- Preheat the Oven: Preheat your oven to 350°F (175°C).
- Layer the Nachos: On a large baking sheet or oven-safe platter, spread a layer of blue corn tortilla chips. Evenly distribute the seasoned meat over the chips. Sprinkle the black beans across the top, followed by the shredded cheese.
- Bake the Nachos: Place the baking sheet in the preheated oven and bake for about 10-12 minutes, or until the cheese is melted and bubbly.
- Add the Toppings: Remove the nachos from the oven and let them cool slightly. Spoon the salsa, sour cream, and guacamole over the top. Sprinkle with diced tomatoes, sliced black olives, and green onions.
- Serve: Serve immediately while the nachos are warm and the cheese is gooey.
Extra Tips:
For added flavor, consider using homemade guacamole and salsa. If you prefer a vegetarian version, simply omit the meat and add more beans or roasted vegetables like bell peppers and corn.
When arranging your nachos, try to distribute the toppings evenly to guarantee each chip is well-coated. Additionally, these nachos can be made spicier by adding sliced jalapeños or a drizzle of hot sauce. Enjoy the spooky fun with these Bat Wing Nachos as a centerpiece for your Halloween festivities!
Ghostly White Pizza Bites
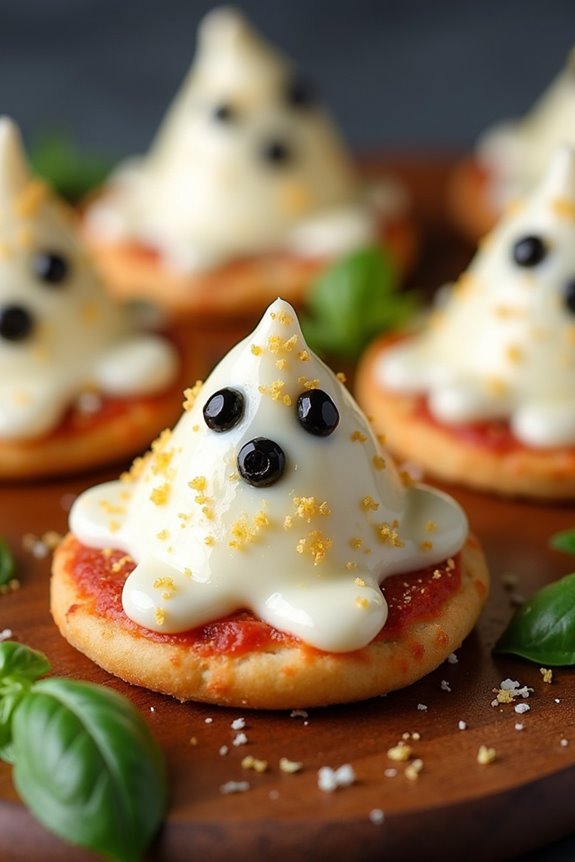
Ghostly White Pizza Bites are the perfect Halloween appetizer, combining the fun of spooky themes with the deliciousness of a classic pizza. These bite-sized treats are both visually appealing and scrumptious, making them a hit at any Halloween gathering. With a fluffy, golden crust and a creamy white sauce topped with gooey cheese, every bite is a delightful mix of flavors. The ghostly appearance is enhanced by using mozzarella cheese shaped into little ghost figures, making them as adorable as they’re tasty.
To create these Ghostly White Pizza Bites, you’ll need a few simple ingredients. The base is a pre-made pizza dough, which makes the preparation quick and easy. The white sauce is a blend of ricotta cheese and garlic, providing a rich and savory foundation. Topped with mozzarella and a sprinkle of Parmesan, these pizza bites offer a cheesy goodness that’s sure to please both kids and adults alike. This recipe serves 4-6 people, making it ideal for a small gathering.
Ingredients:
- 1 package of pre-made pizza dough
- 1 cup ricotta cheese
- 2 cloves garlic, minced
- 1 teaspoon olive oil
- 1 1/2 cups shredded mozzarella cheese
- 1/4 cup grated Parmesan cheese
- Salt and pepper to taste
- Black olives (for eyes)
- Fresh basil leaves (optional, for garnish)
Cooking Instructions:
- Preheat the Oven: Start by preheating your oven to 425°F (220°C), ensuring it’s hot enough to cook the dough to perfection.
- Prepare the Dough: Roll out the pre-made pizza dough on a floured surface to about 1/4 inch thick. Use a round cookie cutter or a glass to cut out small circles, about 3 inches in diameter.
- Make the White Sauce: In a small bowl, combine the ricotta cheese, minced garlic, and olive oil. Season this mixture with a pinch of salt and pepper for added flavor.
- Assemble the Pizza Bites: Place the dough circles on a baking sheet lined with parchment paper. Spread a generous amount of the ricotta mixture on each circle, leaving a small border around the edges.
- Add the Cheese: Cut mozzarella cheese into ghost shapes using a small knife or cookie cutter, and place them over the ricotta layer. Sprinkle a bit of grated Parmesan on top for extra cheesiness.
- Bake: Transfer the baking sheet to the oven and bake for about 10-12 minutes, or until the edges of the dough are golden brown and the cheese is bubbly.
- Decorate: Remove from the oven and use small pieces of black olives to create eyes for the ghost shapes. If desired, place a fresh basil leaf on each bite for a pop of color.
- Serve: Allow the pizza bites to cool slightly before serving on a festive platter.
Extra Tips:
To make the ghost shapes more defined, you can use a ghost-shaped cookie cutter for the mozzarella cheese, which will give a more distinct appearance.
If you prefer a bit more flavor, consider adding a pinch of nutmeg to the ricotta mixture for a hint of warmth.
For a gluten-free option, use a gluten-free pizza dough.
Skeleton Veggie Platter
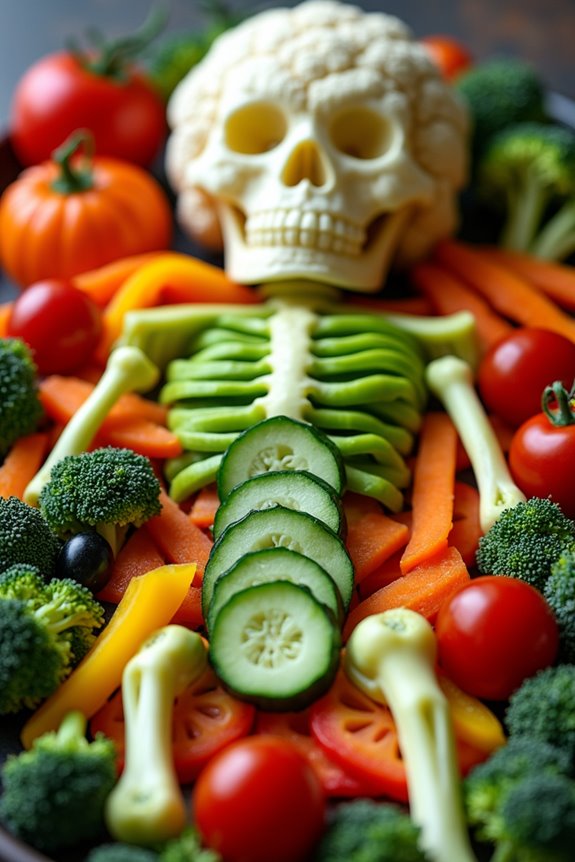
The Skeleton Veggie Platter is a creative and healthy addition to your Halloween appetizer spread. This dish not only serves as a nutritious snack but also adds a festive touch to your table. The assortment of colorful vegetables arranged in the shape of a skeleton is sure to be a hit with both kids and adults. It’s a fun way to encourage everyone to munch on vegetables while celebrating Halloween.
Creating a Skeleton Veggie Platter is simple and requires minimal cooking, mainly focusing on arranging the vegetables in an appealing manner. The platter is perfect for a gathering of 4-6 people, offering a variety of textures and flavors from the selection of fresh produce. This dish can be easily customized based on the vegetables you have on hand, making it both versatile and practical.
Ingredients (for 4-6 servings):
- 1 head of cauliflower
- 1 large cucumber
- 1 red bell pepper
- 1 yellow bell pepper
- 1 small bunch of broccoli
- 1 carrot
- 1 cup cherry tomatoes
- 1 black olive
- 1 small bowl of your favorite dip (hummus, ranch, etc.)
Cooking Instructions:
- Prepare the Vegetables: Wash all vegetables thoroughly under cold water. Pat them dry with a clean towel to remove excess moisture.
- Cut the Cauliflower: Separate the cauliflower into small florets. These will form the skull of the skeleton.
- Slice the Cucumber and Carrot: Slice the cucumber and carrot into thin rounds. The cucumber rounds will form the spine and arms, while the carrot rounds will be used for the fingers.
- Cut the Bell Peppers: Slice the red and yellow bell peppers into strips. These will be used to form the ribs and legs of the skeleton.
- Arrange the Broccoli and Cherry Tomatoes: Use the broccoli florets to create feet, and the cherry tomatoes can be used as joints or decorations around the skeleton.
- Create the Skeleton Shape: On a large platter, start by arranging the cauliflower at the top to form the skull. Place the cucumber rounds in a line down the center for the spine. Add the bell pepper strips on either side for ribs and legs. Use carrot rounds to form fingers and toes, and position the broccoli and cherry tomatoes creatively around.
- Add the Face: Use two cherry tomatoes or a slice of black olive for eyes on the cauliflower skull.
- Serve with Dip: Place a small bowl of your chosen dip at the bottom or side of the platter for guests to enjoy with the veggies.
Extra Tips:
When creating your Skeleton Veggie Platter, feel free to experiment with different vegetables and dips to suit your taste preferences.
To save time, pre-cut the vegetables a day in advance and store them in airtight containers in the refrigerator. This will make assembly quick and easy on the day of your event.
To keep the vegetables fresh and crunchy, consider serving the platter on a chilled surface or use a tray with ice beneath it.
Don’t forget to have fun with the arrangement—it’s a spooky and healthy way to get into the Halloween spirit!
Zombie Meatball Skewers

These skewers aren’t only visually appealing but also packed with flavor. The meatballs are seasoned with garlic, onion, and Italian herbs, offering a savory taste that pairs well with a tangy marinara sauce for dipping.
Whether you’re hosting a full-blown Halloween bash or a cozy get-together, Zombie Meatball Skewers will certainly make a memorable impression.
Ingredients (serving size: 4-6 people):
- 1 pound ground beef
- 1/2 pound Italian sausage, casings removed
- 1/2 cup breadcrumbs
- 1/4 cup grated Parmesan cheese
- 1/4 cup milk
- 1 large egg
- 2 cloves garlic, minced
- 1 small onion, finely chopped
- 1 tablespoon Italian seasoning
- Salt and pepper to taste
- 12 green olives, pitted and halved
- 12 wooden skewers
- 1 cup marinara sauce (for serving)
Cooking Instructions:
- Prepare the Meatball Mixture: In a large mixing bowl, combine the ground beef, Italian sausage, breadcrumbs, Parmesan cheese, milk, egg, minced garlic, chopped onion, Italian seasoning, salt, and pepper. Mix until all ingredients are well incorporated.
- Shape the Meatballs: Using your hands, form the mixture into approximately 24 small meatballs, about 1 inch in diameter. Confirm each meatball is of uniform size for even cooking.
- Add the Eyes: Take each meatball and press a halved green olive into the top, cut side up, to resemble an eye. Verify the olives are secure and won’t fall off during cooking.
- Preheat the Oven: Preheat your oven to 375°F (190°C) and line a baking sheet with parchment paper or lightly grease it.
- Skewer the Meatballs: Carefully thread two meatballs onto each wooden skewer, ensuring the “eyes” face outward.
- Bake the Skewers: Place the skewers on the prepared baking sheet and bake in the preheated oven for 20-25 minutes, or until the meatballs are cooked through and golden brown.
- Serve: Warm the marinara sauce in a small saucepan or microwave. Serve the Zombie Meatball Skewers hot, with the marinara sauce on the side for dipping.
Extra Tips:
When shaping the meatballs, try to keep them slightly larger than the olive halves to maintain the creepy eye effect.
If the meatball mixture is too sticky, dampen your hands with water to make shaping easier.
For added flavor, consider brushing the skewers with a bit of olive oil before baking.
If hosting a larger party, you can double the recipe and prepare the meatballs in advance, storing them in the refrigerator until ready to bake.
Vampire Bat Cheese Twists

Vampire Bat Cheese Twists are the perfect spooky appetizer to serve at your Halloween gathering. These cheesy, flaky pastries shaped like bats aren’t only fun to look at, but they’re also deliciously addictive. With a combination of puff pastry and a savory cheese filling, these twists capture the eerie essence of Halloween while providing a tasty treat for guests of all ages.
Crafted to serve 4-6 people, these Vampire Bat Cheese Twists are easy to make and require minimal ingredients, making them an ideal last-minute addition to your Halloween party menu. Whether you’re hosting a monster mash or a small get-together, these twists are sure to be a hit. Their crispy, golden exterior and cheesy interior will leave everyone asking for more, making them a staple in your Halloween recipe collection.
Ingredients (serves 4-6):
- 1 sheet of puff pastry, thawed
- 1 cup shredded cheddar cheese
- 1/4 cup grated Parmesan cheese
- 1 tablespoon Dijon mustard
- 1 teaspoon smoked paprika
- 1 egg, beaten
- Black sesame seeds (optional, for decoration)
Cooking Instructions:
- Preheat the Oven: Begin by preheating your oven to 400°F (200°C). Line a baking sheet with parchment paper to prevent sticking.
- Prepare the Puff Pastry: On a lightly floured surface, roll out the puff pastry sheet to smooth out any creases. It should be about 12×12 inches in size.
- Create the Cheese Mixture: In a small bowl, mix together the shredded cheddar cheese, grated Parmesan, Dijon mustard, and smoked paprika until well combined.
- Spread the Mixture: Evenly spread the cheese mixture over half of the puff pastry sheet. Fold the other half of the pastry over the cheese-covered side, pressing gently to seal.
- Cut and Shape the Twists: Using a sharp knife or a pizza cutter, slice the folded pastry into strips about 1 inch wide. Twist each strip a few times to create a spiral effect.
- Shape into Bats: Pinch the middle of each twist to form a bat-like shape. Place them on the prepared baking sheet, leaving some space between each twist.
- Egg Wash and Decorate: Brush the beaten egg over each twist for a golden finish. If desired, sprinkle black sesame seeds on the ends of each twist to resemble bat eyes.
- Bake: Place the baking sheet in the preheated oven and bake for 12-15 minutes, or until the twists are puffed and golden brown.
- Cool and Serve: Allow the Vampire Bat Cheese Twists to cool slightly on the baking sheet before serving them warm.
Extra Tips:
For added flavor, you can incorporate your favorite herbs into the cheese mixture, such as thyme or rosemary. If you want a spicier twist, consider adding a pinch of cayenne pepper.
Keep an eye on the twists as they bake to avoid over-browning, and serve them with a variety of dips like marinara sauce or a spicy aioli for an extra treat. These cheese twists can also be made ahead of time and stored in an airtight container for up to two days.