

When it comes to crafting the perfect Halloween charcuterie board, blending whimsy with a touch of eerie charm is the secret. Start with a pumpkin-shaped board to set the scene, then add clusters of candy corn and ghostly cheese slices. Your guests will be enchanted by monster mash medleys and witch’s broomstick bites. Ready to create these magical displays yourself? Let’s discover these bewitching ideas together!
Classic Candy Corn Board
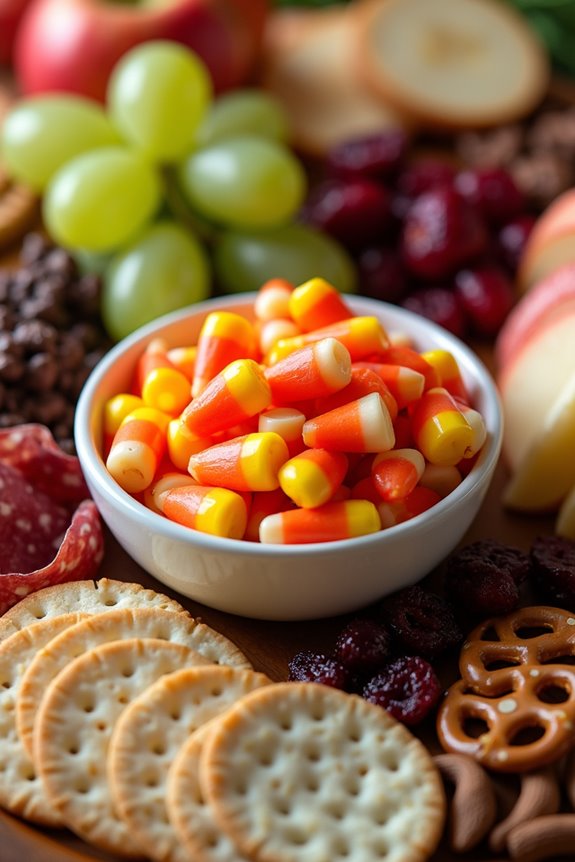
The Classic Candy Corn Board is a delightful and visually stunning Halloween treat that perfectly captures the festive spirit of the season. This charcuterie board combines the iconic candy corn with a variety of complementary flavors and textures, creating a sweet and savory masterpiece that’s bound to impress your guests.
Whether you’re hosting a Halloween party or simply indulging in a spooky treat at home, this candy corn-themed board is an easy and creative way to celebrate.
To create this board, you’ll need a mix of classic Halloween candies, fresh fruits, cheeses, and nuts that pair well with the sweet and crunchy candy corn. The goal is to balance the sweetness of the candy with savory and fresh elements, achieving a harmonious blend of flavors.
With a few simple steps, you can assemble a vibrant and delicious charcuterie board that’s both a feast for the eyes and the taste buds.
Ingredients (Serves 4-6):
- 1 cup candy corn
- 1 cup mini marshmallows
- 1 cup chocolate-covered pretzels
- 1 cup salted peanuts
- 1 cup dried cranberries
- 1 cup white cheddar cheese cubes
- 1 cup orange cheddar cheese cubes
- 1 cup green grapes
- 1 cup sliced apples
- 1 cup thinly sliced salami
- 1 cup assorted crackers
Instructions:
- Prepare the Base: Start by selecting a large, flat serving board or platter. Arrange the board on a clean, flat surface, making sure there’s enough space for all the ingredients.
- Arrange the Main Elements: Place the candy corn in a small bowl and position it in the center of the board. This will serve as the focal point. Around the candy corn, place the mini marshmallows in another small bowl.
- Cheese and Fruits: On one side of the board, arrange the white and orange cheddar cheese cubes in small piles. Next to the cheese, create sections for the green grapes and sliced apples, ensuring they’re easy to reach.
- Savory Additions: On the opposite side, arrange the thinly sliced salami. Add the salted peanuts and chocolate-covered pretzels nearby, providing a savory contrast to the candy.
- Fill in the Gaps: Use the dried cranberries to fill in any remaining gaps on the board, adding a pop of color and sweetness. Finally, arrange the assorted crackers in a fan shape around the edges of the board.
- Final Touches: Confirm that each section is balanced and visually appealing. Adjust the ingredients as necessary to create an inviting and cohesive look.
Extra Tips:
When assembling your Classic Candy Corn Board, consider using a variety of shapes and sizes for the cheeses and fruits to add visual interest. You can also experiment with different nuts or dried fruits, depending on your personal preference or dietary needs.
If you’re serving the board at a party, prepare it just before guests arrive to guarantee the freshest presentation. Don’t forget to provide serving utensils, such as small tongs or toothpicks, to make it easy for guests to help themselves.
Ghostly Cheese Platter
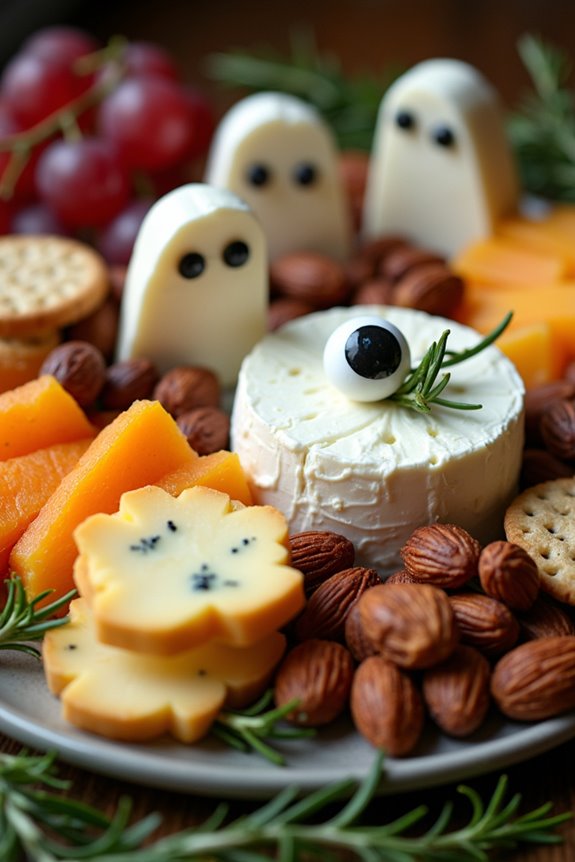
The Ghostly Cheese Platter is a spooktacular addition to your Halloween charcuterie board. This fun and festive dish combines a variety of cheeses, crackers, fruits, and Halloween-themed treats to create a visually appealing and delicious centerpiece. Perfect for entertaining, this platter is designed for a serving size of 4-6 people, ensuring everyone at your gathering can enjoy a taste of the creepy culinary delight.
To create the Ghostly Cheese Platter, you’ll need to select cheeses that not only offer a range of flavors and textures but also work well with the spooky theme. Think about using a mix of soft, creamy cheeses and harder varieties, as well as incorporating some unique elements like ghost-shaped cheese slices or crackers.
Don’t forget to add some seasonal fruits and nuts for color and variety, and perhaps a few sweet treats like chocolate-covered almonds or candy eyeballs for an extra touch of Halloween whimsy.
Ingredients (serves 4-6):
- 8 oz. Brie cheese
- 8 oz. sharp cheddar cheese
- 8 oz. Gouda cheese
- 4 oz. blue cheese
- 1 package of ghost-shaped crackers
- 1 cup seedless grapes (red or black)
- 1 cup dried apricots
- 1/2 cup mixed nuts
- 1/2 cup chocolate-covered almonds
- 1/4 cup candy eyeballs
- Fresh rosemary sprigs for garnish
Cooking Instructions:
- Prepare the Cheeses: Begin by slicing the cheddar and Gouda cheeses into thin, ghost-like shapes using a small ghost-shaped cookie cutter. Arrange the Brie, blue cheese, and sliced cheeses on a large platter, spacing them out to allow room for other components.
- Arrange the Crackers: Place the ghost-shaped crackers around the cheeses, making sure they’re easily accessible. You can create small piles or spread them evenly around the platter.
- Add Fruits and Nuts: Cluster the grapes in several sections around the platter for easy grabbing. Tuck the dried apricots and mixed nuts into any open spaces, ensuring they’re evenly distributed for both visual appeal and convenience.
- Incorporate Sweet Treats: Scatter the chocolate-covered almonds throughout the platter, adding a sweet surprise to the savory elements. Place the candy eyeballs strategically on top of the cheese or among the crackers for a playful, spooky effect.
- Garnish and Final Touches: Finish off your Ghostly Cheese Platter by adding fresh rosemary sprigs around the edges of the platter. This not only adds a pop of color but also a fragrant aroma to the display.
Extra Tips:
When assembling your Ghostly Cheese Platter, try to balance the colors and textures across the board to make it visually appealing. Use a large platter or cutting board to give yourself plenty of space for arranging the elements creatively.
Consider labeling your cheeses with small flags or tags, especially if guests may not be familiar with certain varieties. Finally, remember that cheese is best served at room temperature, so let your platter sit out for about 30 minutes before serving to allow the flavors to fully develop.
Spooky Spiderweb Spread
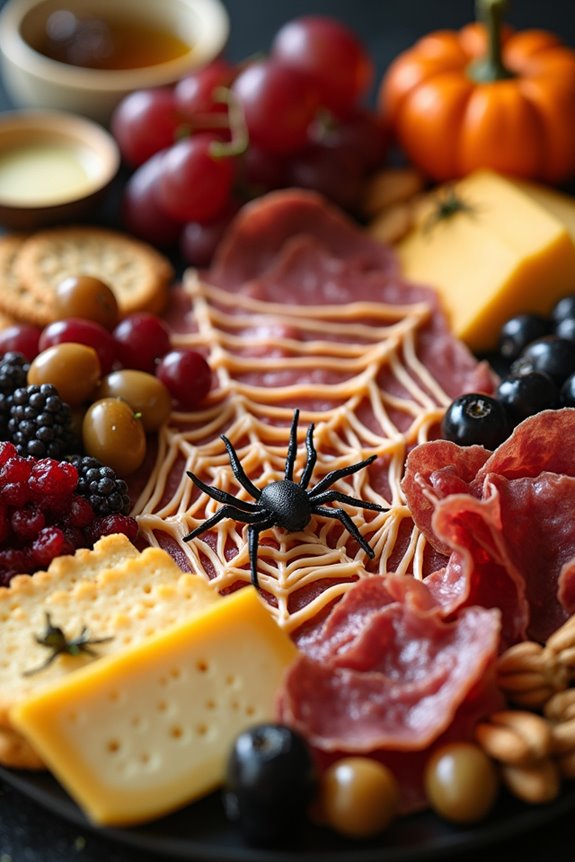
Create a hauntingly delicious centerpiece for your Halloween gathering with this Spooky Spiderweb Spread! This festive charcuterie board combines a variety of savory and sweet treats, arranged artfully to resemble a spiderweb. The board features a mix of cured meats, cheeses, fruits, nuts, and a few spooky surprises to delight your guests. Perfect for a party with 4-6 people, this spread is sure to be a hit with both kids and adults alike.
The key to a successful Spooky Spiderweb Spread is the artful arrangement of the ingredients to mimic a web design. You’ll need a large round platter or cutting board, and a bit of creativity to bring this spooky design to life. With a blend of textures and flavors, this charcuterie board isn’t only visually impressive but also a tasty treat for everyone to enjoy. Let’s plunge into the ingredients and steps to create your very own edible spiderweb masterpiece.
Ingredients for 4-6 People:
- 8 ounces of sliced salami
- 8 ounces of prosciutto
- 6 ounces of assorted cheeses (cheddar, brie, gouda)
- 1 bunch of seedless grapes
- 1 cup of assorted nuts (almonds, walnuts, pecans)
- 1 cup of dried fruits (apricots, figs, cranberries)
- 1 package of crackers or breadsticks
- 1 jar of fig or berry jam
- 1 small jar of honey
- 1 cup of olives (green and black)
- 1 large round platter or cutting board
- 1 small pumpkin or gourd for decoration
- Plastic or edible spider decorations
Cooking Instructions:
- Prepare the Base: Start by placing your large round platter or cutting board on a flat surface. This will be the base for your spiderweb spread.
- Arrange the Meats: Fold the sliced salami and prosciutto into halves or quarters and place them in a circular pattern around the edge of the platter, leaving space in the center for the cheese and other ingredients.
- Place the Cheeses: Cut the assorted cheeses into cubes or slices and arrange them in the center of the board. You can use small bowls or ramekins to hold softer cheeses like brie.
- Add the Fruits and Nuts: Scatter the grapes, dried fruits, and nuts around the meats and cheeses, filling in the gaps. This will add color and texture to your board.
- Add the Crackers and Breadsticks: Arrange the crackers and breadsticks in a fan shape around the perimeter of the board for easy access.
- Incorporate the Jams and Honey: Place small bowls filled with jam and honey on the board. These can be used as spreads for the crackers and breadsticks.
- Olives and Decorations: Add the olives in small clusters around the board. For the final touch, place the small pumpkin or gourd in the center, and scatter a few plastic or edible spider decorations around the board for a spooky effect.
- Create the Spiderweb: Use thin strips of cheese or icing to create a spiderweb pattern across the board. Start from the center and work your way outward, adding intersecting lines to complete the web effect.
Extra Tips:
When creating your Spooky Spiderweb Spread, consider the color and texture of each ingredient to create an aesthetically pleasing arrangement. Use a mix of soft, hard, and creamy cheeses to offer a variety of flavors.
To save time, pre-slice the cheeses and meats before assembling the board. If you’re feeling extra creative, use cookie cutters to shape the cheeses into festive Halloween shapes like pumpkins or ghosts.
Finally, verify your board is chilled in the refrigerator until it’s time to serve, to keep everything fresh and delicious!
Witch’s Broomstick Snack Board
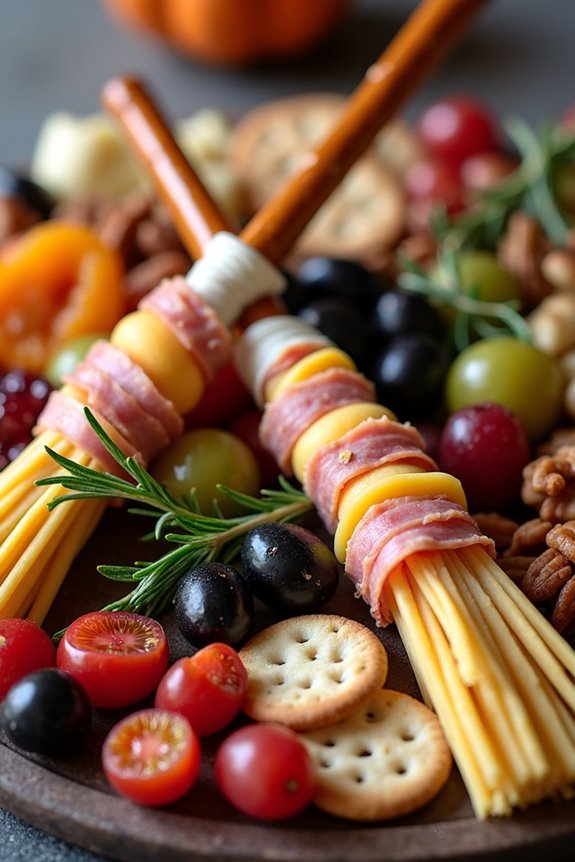
The Witch’s Broomstick Snack Board is a whimsical yet delicious take on the traditional charcuterie board, perfect for your Halloween festivities. This delightful arrangement is designed to resemble a witch’s broomstick with a spooky yet savory twist, combining a variety of meats, cheeses, and snacks that are both visually engaging and mouth-wateringly tasty.
The board includes an assortment of flavors and textures, from the sharp tang of cheddar to the smoky richness of cured meats, guaranteeing that there’s something for everyone to enjoy.
Creating this snack board is a fun and interactive experience that allows you to get creative with your presentation. Whether you’re hosting a Halloween party or simply want to bring some festive flair to your evening, the Witch’s Broomstick Snack Board is a surefire way to impress your guests.
With its playful theme and delicious components, it’s a great conversation starter and a crowd-pleaser. Gather your ingredients and follow these easy steps to assemble a spooky snack board that’s sure to cast a spell on all who partake.
Ingredients for 4-6 people:
- 12 pretzel rods (for broomsticks)
- 12 slices of deli meat (such as turkey or ham)
- 12 slices of cheddar cheese
- 12 thinly sliced pieces of mozzarella cheese
- 1 cup of mixed nuts
- 1 cup of green and black olives
- 1 cup of grapes (red or green)
- 1 cup of cherry tomatoes
- 1/2 cup of dried apricots
- 1/2 cup of dried cranberries
- 1/2 cup of assorted crackers
- Fresh rosemary sprigs (for garnish)
Instructions:
- Prepare the Broomsticks: Start by taking a pretzel rod and wrapping a slice of deli meat around one end. Then, wrap a slice of cheddar cheese over the deli meat, creating the bristle effect of a broomstick. Secure the cheese and meat with a thinly sliced piece of mozzarella cheese, tying it in a knot or securing with a toothpick if needed.
- Assemble the Board: Choose a large cutting board or platter to create your charcuterie display. Begin by placing the broomsticks evenly across the board. These will be the central feature of your snack board.
- Add Nuts and Olives: Around the broomsticks, scatter mixed nuts and arrange the green and black olives. This adds a salty and savory contrast to the board.
- Incorporate Fruits and Vegetables: Place grapes and cherry tomatoes in small clusters around the board, providing a sweet and fresh component. Guarantee they’re evenly distributed for a pop of color.
- Include Dried Fruits: Add dried apricots and cranberries in small piles or scattered among the other ingredients. This provides a chewy texture and a burst of sweetness.
- Arrange the Crackers: Finally, tuck assorted crackers into any remaining spaces on the board. This offers a crunchy element and pairs well with the meats and cheeses.
- Garnish and Serve: Add a few sprigs of fresh rosemary around the board for an aromatic touch and a hint of green. Serve immediately or cover and refrigerate until ready to serve.
Extra Tips:
When assembling your Witch’s Broomstick Snack Board, consider the visual appeal by balancing colors and textures across the board.
Feel free to personalize the board with additional Halloween-themed items such as candy corn or pumpkin seeds for an extra festive touch.
To make the broomsticks more stable, you can use cream cheese or a soft spreadable cheese as an adhesive to keep the components together.
Monster Mash Medley
Get ready to spook and delight your guests with a Monster Mash Medley Charcuterie Board, perfect for a Halloween gathering. This playful platter combines a variety of savory and sweet treats, all styled with a spooky twist. The goal is to create an eye-catching and delicious spread that captures the spirit of Halloween with minimal effort.
This charcuterie board is designed to serve 4-6 people and includes a mix of meats, cheeses, fruits, nuts, sweets, and themed decorations. With a little creativity, you can turn ordinary ingredients into a festive feast. From mummy-wrapped meats to ghostly cheese slices, this board offers a variety of textures and flavors to keep your guests entertained and satisfied.
Ingredients (serving size: 4-6 people):
- 200g prosciutto or thinly sliced ham
- 200g salami
- 200g assorted cheeses (cheddar, gouda, brie)
- 1 cup black and green olives
- 1 cup grapes (red or green)
- 1 cup cherry tomatoes
- 1/2 cup almonds or walnuts
- 1/2 cup dried apricots or figs
- 100g dark chocolate or Halloween-themed candies
- 1 small baguette or crackers
- Decorative items: plastic spiders, mini pumpkins, and edible eyes
Instructions:
- Prepare the Meats: Roll the prosciutto or ham slices into small, tight rolls. Arrange them in a pattern on the board to resemble mummy wraps. For the salami, fold each slice into quarters and place them in small clusters.
- Slice the Cheeses: Cut the cheeses into various shapes — triangles, squares, or rounds. Use a small ghost-shaped cookie cutter to cut a few slices of cheese into ghost shapes for an added Halloween touch. Arrange them evenly across the board.
- Add the Fruits and Nuts: Scatter the grapes and cherry tomatoes across the board, adding bursts of color and freshness. Fill in any gaps with clusters of almonds or walnuts and dried apricots or figs, providing a balance of sweetness and crunch.
- Incorporate the Sweets: Break the dark chocolate into pieces and place them strategically around the board. Add Halloween-themed candies like candy corn or gummy worms for a festive flair.
- Arrange the Bread or Crackers: Slice the baguette into thin rounds or arrange an assortment of crackers along the edges of the board, providing a base for the meats and cheeses.
- Decorate: Finish by placing decorative items like plastic spiders or mini pumpkins around the board. Add edible eyes to some of the cheese slices or olives for a fun and spooky touch.
Extra Tips:
To make your Monster Mash Medley Charcuterie Board even more engaging, consider using a variety of serving platters with different textures and materials, such as wood, slate, or marble. This adds depth and contrast to your presentation.
Also, be mindful of color balance; distribute the colorful ingredients evenly to create visual appeal. Don’t hesitate to let your creativity run wild with the decorations, as they’re key to capturing the Halloween spirit.
Finally, remember that charcuterie boards are intended to be fun and flexible, so feel free to swap ingredients based on personal preferences or dietary restrictions.
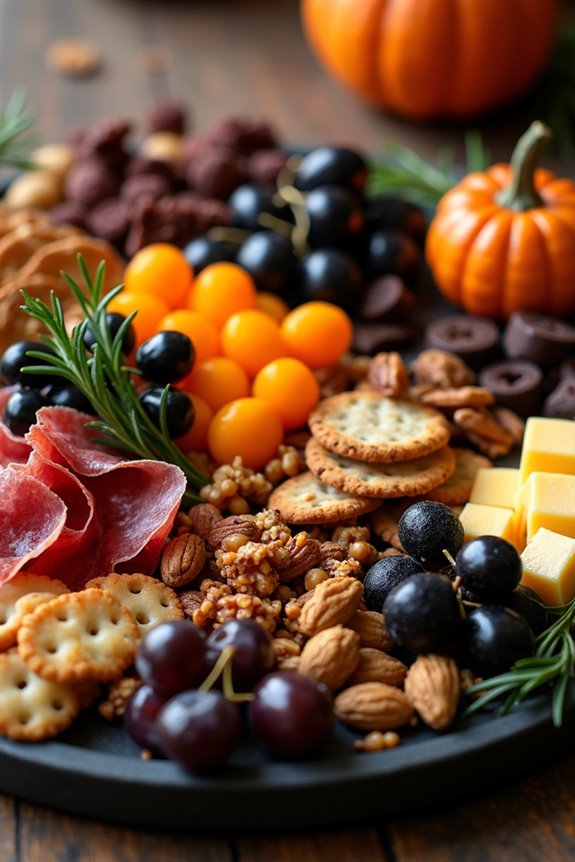
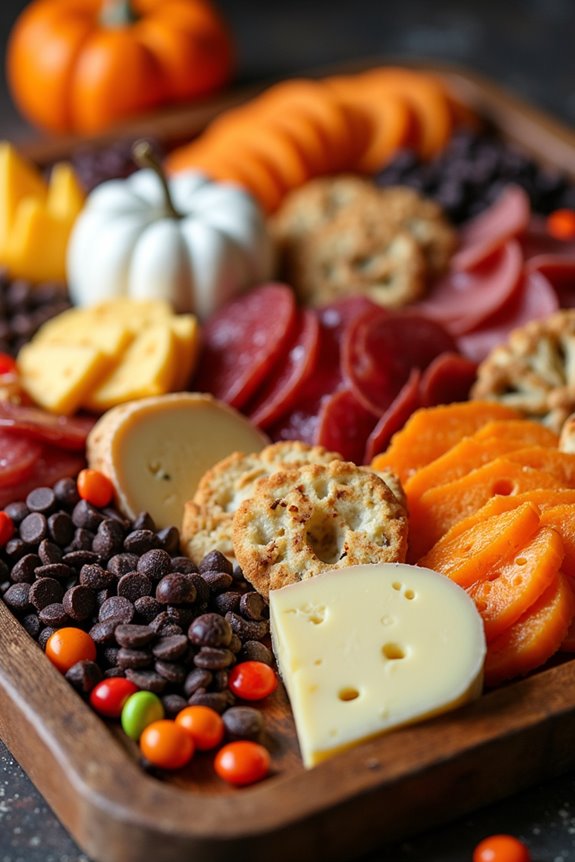
Pumpkin Patch Party Platter
Celebrate Halloween with a creative and delicious Pumpkin Patch Party Platter that’s perfect for any spooky gathering. This charcuterie board brings together an array of autumn-inspired flavors and colors to delight your guests. Featuring a selection of cheeses, meats, fruits, and themed treats, the platter is designed to look like a festive pumpkin patch, complete with edible pumpkins and a variety of textures. The mix of sweet and savory elements guarantees there’s something for everyone, making it an ideal centerpiece for your Halloween festivities.
To create the Pumpkin Patch Party Platter, you’ll be combining a variety of ingredients that complement each other and bring the spirit of the season to life. By using mini pumpkins, assorted cheeses, cured meats, and seasonal fruits, you’ll craft a board that’s as visually appealing as it’s tasty. This platter is designed to serve 4-6 people, making it perfect for a small party or family gathering. With a few simple steps, you can assemble a platter that not only tastes great but also adds a festive touch to your Halloween celebration.
Ingredients for 4-6 People:
- 3 mini pumpkins (real or edible, such as cheese or chocolate pumpkins)
- 8 oz sharp cheddar cheese, cut into cubes
- 8 oz gouda cheese, sliced
- 8 oz brie cheese, cut into wedges
- 6 oz prosciutto
- 6 oz salami
- 1 cup dried apricots
- 1 cup mixed nuts (almonds, walnuts, etc.)
- 1 cup seedless grapes
- 1 small baguette, sliced
- 1/2 cup fig jam
- 1/2 cup pumpkin seeds
- Fresh rosemary sprigs for garnish
Instructions:
- Prepare the Board: Start by selecting a large wooden or slate board as the base for your platter. This will serve as the canvas for your Pumpkin Patch Party Platter. Place the mini pumpkins strategically across the board, as these will act as the focal points.
- Arrange the Cheeses: Position the cubes of sharp cheddar, slices of gouda, and wedges of brie around the pumpkins. Confirm the cheeses are spread out to create a balanced look and make it easy for guests to access each type.
- Add the Meats: Roll or fold the prosciutto and salami into bite-sized portions, and nestle them among the cheeses. Space them out evenly to maintain the visual appeal and guarantee there’s enough for everyone.
- Incorporate Fruits and Nuts: Scatter the dried apricots, mixed nuts, and grapes around the board. These elements add sweetness and texture, complementing the savory meats and cheeses.
- Complete with Extras: Place the sliced baguette in a small basket or directly on the board. Add small bowls of fig jam and pumpkin seeds. These accompaniments provide additional flavors and textures, enhancing the overall experience.
- Garnish and Serve: Finish by adding fresh rosemary sprigs as garnish. These not only add a pop of green but also a pleasant aroma. Once assembled, serve the platter immediately or cover and refrigerate until ready to serve.
Extra Tips:
To make your Pumpkin Patch Party Platter even more festive, consider using edible pumpkins made of cheese or chocolate for an extra touch of whimsy. If you don’t have a large enough board, you can use a large baking sheet or a piece of parchment paper as a base.
Feel free to customize the platter by adding your favorite seasonal items like apple slices or caramel popcorn to enhance the autumn theme. Remember, the key to a great charcuterie board is variety, so don’t be afraid to mix and match flavors and textures to suit your taste and entertain your guests.
Vampire’s Delight Charcuterie
Vampire’s Delight Charcuterie is a tantalizing and visually enchanting board that’s perfect for your Halloween festivities. This board is designed to evoke the eerie yet charming essence of vampires, featuring a delightful combination of sweet, savory, and gory-looking treats. It’s an ideal centerpiece for your spooky gathering, guaranteed to impress your guests with its creativity and flavor.
The blood-red hues and dark elements will set the perfect Halloween mood, while the assortment of flavors will satisfy everyone’s palate. This themed charcuterie board is crafted with an array of cheeses, cured meats, fruits, and various accompaniments that create a balance between sweet and savory.
The presentation is key, with items arranged to mimic a vampire’s desire for blood and darkness. Red fruits like grapes and strawberries mimic fresh blood, while dark chocolates and beet hummus add depth and richness to the board. With a few clever tricks, you can transform ordinary ingredients into a culinary masterpiece that Dracula himself would be proud to feast upon.
Ingredients for 4-6 people:
- 1 wheel of brie cheese
- 100g smoked gouda
- 100g sharp cheddar cheese
- 100g cured meats (such as salami and prosciutto)
- 200g dark chocolate
- 1 cup beet hummus
- 1 cup blood-red strawberry jam
- 1 cup black olives
- 1 cup red grapes
- 1 cup fresh strawberries
- 1 small baguette or crackers
- 1 cup roasted almonds
- 1/2 cup dried cranberries
- Fresh rosemary sprigs for garnish
Cooking Instructions:
- Prepare the Board: Choose a large wooden board or platter to display your charcuterie. Arrange it with some space for each item to be easily accessible.
- Cheese Arrangement: Cut the smoked gouda and sharp cheddar into bite-sized cubes and place them on the board. Keep the brie whole, but consider scoring the top and spreading a little bit of strawberry jam over it for a ‘bloody’ effect.
- Cured Meats: Roll or fold the slices of salami and prosciutto and place them in clusters around the cheese. This creates visual interest and makes it easy for guests to grab.
- Fruits and Chocolate: Scatter the red grapes and strawberries across the board. Break the dark chocolate into chunks and place them strategically to add depth and a rich flavor.
- Dips and Spreads: Pour the beet hummus into a small bowl and place it on the board. Similarly, pour the strawberry jam into another small container. This adds a splash of vibrant color and a sweet contrast to the savory elements.
- Olives and Nuts: Fill in the gaps with black olives and roasted almonds, providing a variety of textures and flavors.
- Finishing Touches: Sprinkle the dried cranberries over the board. Finally, add a few sprigs of fresh rosemary to give an earthy aroma and enhance the visual appeal.
Extra Tips:
To elevate your Vampire’s Delight Charcuterie, consider adding a few thematic decorations, like small plastic bats or vampire teeth, to enhance the Halloween vibe.
Feel free to substitute ingredients based on dietary preferences; for instance, you could include vegan cheese or gluten-free crackers. Confirm that the board is color-coordinated to maintain the spooky theme—stick to deep reds, blacks, and rich browns.
Finally, remember to offer a variety of knives and serving utensils to make it easier for guests to serve themselves, keeping hygiene in mind during your Halloween celebration.
Ghoulish Grazing Board
This Halloween, impress your guests with a spine-tingling Ghoulish Grazing Board, a perfect blend of sweet and savory treats that promises to be the star of your spooky gathering. This board combines a variety of textures and flavors, from rich cheeses and cured meats to fresh fruits and haunted-themed sweets, guaranteeing there’s something for everyone to enjoy.
Not only is this grazing board visually appealing, but it also allows guests to pick and choose their favorite bites, making it an interactive and fun centerpiece for your Halloween party.
Creating the perfect Ghoulish Grazing Board involves selecting the right components and presenting them in a way that’s as eerie as it’s appetizing. With a nod to all things Halloween, this board will feature an array of dark-colored foods, creepy crawlies made from simple ingredients, and festive touches like mini pumpkins and edible googly eyes. Gather your ingredients, and let’s get started on assembling this bewitching spread that serves 4-6 people.
Ingredients:
- 200g assorted cured meats (e.g., salami, prosciutto)
- 200g assorted cheeses (e.g., aged cheddar, brie, gouda)
- 1 cup black olives
- 1 cup green grapes
- 1 cup dried apricots
- 1 cup assorted nuts (e.g., almonds, walnuts)
- 1 small loaf of bread or crackers
- 1 cup assorted Halloween candies (e.g., candy corn, gummy worms)
- 1 small jar of fig jam or honey
- 1 small pumpkin or gourd for decoration
- Edible googly eyes
- A few sprigs of fresh rosemary or thyme
Instructions:
- Prepare Your Board: Begin by selecting a large wooden cutting board or a platter as your base. This will serve as the canvas for your grazing board. Make sure it’s clean and dry before you start arranging your ingredients.
- Arrange the Cheese and Meats: Start by placing the cheeses on the board, spacing them evenly apart. Slice some of the cheese into small, bite-sized pieces, and leave some whole for variety. Roll or fold the cured meats and arrange them around the cheeses.
- Add Fruits and Nuts: Fill in the spaces between the cheese and meats with your selected fruits. Place clusters of grapes and dried apricots around the board. Scatter the assorted nuts into any remaining gaps to add texture and crunch.
- Incorporate Olives and Sweets: Place the black olives in a small bowl or ramekin to contain them, and nestle it on the board. Integrate Halloween candies like gummy worms or candy corn into the board to enhance the festive theme.
- Finish with Bread and Spreads: Slice the bread or arrange crackers in a fan shape on the board. Add a small bowl of fig jam or honey with a spoon for easy serving. This will complement the flavors of the cheeses and meats.
- Decorate with Seasonal Touches: Place the small pumpkin or gourd near the center of the board as a decorative element. Use fresh rosemary or thyme sprigs to add a touch of greenery and fragrance. Scatter edible googly eyes around the board to give the spread a spooky, fun look.
Extra Tips:
When assembling your Ghoulish Grazing Board, remember to balance the colors and textures for an appealing display. Consider using a variety of shapes and sizes for your ingredients to keep things interesting.
Don’t be afraid to get creative with the decorations; you can carve small faces into your pumpkin or gourd for extra spookiness. Make sure to have extra serving utensils on hand, like small tongs or toothpicks, to keep the board tidy as guests serve themselves.
Finally, prepare the board shortly before your event to guarantee the freshest presentation. Enjoy the process, and have fun creating a delicious and hauntingly beautiful spread!
Haunted Harvest Selection

The Haunted Harvest Selection is a spooktacular way to celebrate Halloween with a delicious and visually enchanting charcuterie board. This board is designed to bring together the flavors of autumn with an eerie twist, perfect for a Halloween gathering of 4-6 people.
Featuring an assortment of seasonal meats, cheeses, fruits, nuts, and a few spooky touches, this charcuterie board is sure to be a hit at your Halloween party. With a balance of sweet, savory, and spicy elements, it promises to delight the taste buds while adding a ghostly charm to your table.
Building the Haunted Harvest Selection is all about creativity and presentation. Use a large wooden board or platter as the base to arrange your ingredients. The key is to create a variety of textures and colors, incorporating elements like dark green kale leaves as a backdrop, orange and black foods for a Halloween theme, and small decorations like plastic spiders or mini pumpkins.
Follow the steps below to craft your own hauntingly delicious charcuterie board.
Ingredients (Serving size: 4-6 people)
- 8 oz sharp cheddar cheese, cut into cubes
- 8 oz gouda cheese, sliced
- 8 oz prosciutto
- 8 oz salami, sliced
- 1 small bunch of red grapes
- 1 small bunch of green grapes
- 1 cup dried apricots
- 1 cup mixed nuts (almonds, walnuts, and pecans)
- 1/2 cup black olives
- 1/2 cup green olives
- 1 small pumpkin, hollowed out and cleaned
- 1/4 cup honey
- 1/4 cup spicy mustard
- 1 baguette, sliced
- Kale leaves for garnish
- Decorative elements: plastic spiders, mini pumpkins, etc.
Cooking Instructions
- Prepare the Board Base: Lay kale leaves over the board to create a lush, green backdrop. This will serve as the foundation for your ingredients and add a pop of color.
- Place the Larger Items: Begin by placing the small pumpkin on the board. Fill it with the honey or spicy mustard, offering guests a choice of dipping sauces. Position the cheese cubes and slices around the pumpkin for easy access.
- Add Meats and Fruits: Arrange prosciutto and salami in rolled or folded shapes to add texture. Distribute the grapes in clusters around the board, ensuring they’re easily reachable.
- Incorporate Nuts and Olives: Scatter mixed nuts across the board, filling in any gaps. Place black and green olives in small ramekins or directly on the board, adding a salty contrast.
- Add Sweet Elements: Include dried apricots for a touch of sweetness, balancing the savory components. Position them in small piles or neatly in a line.
- Arrange Bread and Dips: Lay out the baguette slices in a fan shape or stack them neatly. Make sure they’re close to the pumpkin with honey or mustard for dipping.
- Decorative Touches: Finally, add any decorative elements like plastic spiders or mini pumpkins to enhance the Halloween theme.
Extra Tips
Remember that presentation is key for a charcuterie board. Use different heights and textures to create visual interest.
Feel free to swap out ingredients based on personal preferences or dietary restrictions, such as using gluten-free crackers instead of a baguette. If you have time, consider making themed labels for each item to add an extra touch of Halloween magic.
Ultimately, keep an eye out for food safety, especially when serving perishable items like meats and cheeses, making certain they remain at a safe temperature throughout your event.
Creepy Crawly Crudités
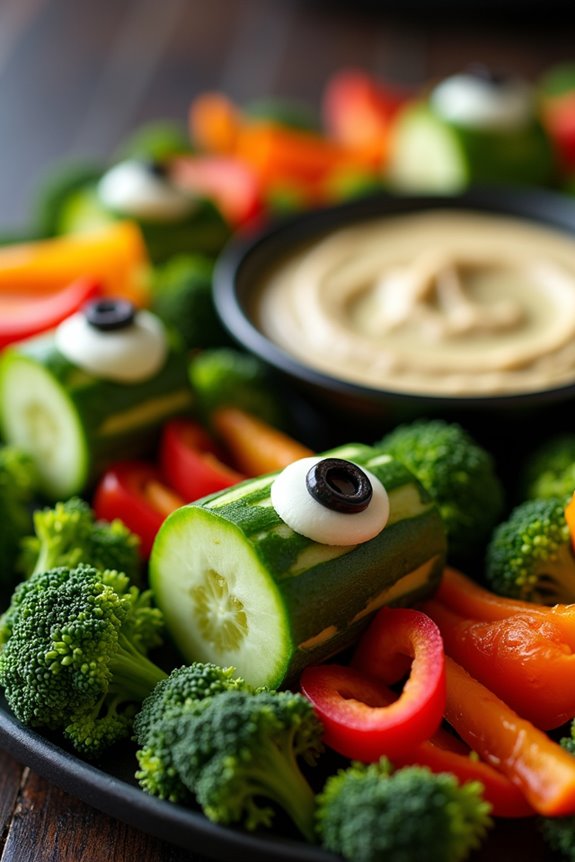
Creepy Crawly Crudités is a fun and spooky addition to your Halloween charcuterie board. This dish combines the freshness of vegetables with an eerie presentation, making it perfect for any ghoulish gathering. By creatively arranging everyday veggies into creepy crawlers and other eerie shapes, you can transform a simple snack into a frightful feast that will both delight and terrify your guests.
With a mix of vibrant colors and textures, these crudités not only appeal to the eye but also provide a healthy option amidst the candy-heavy festivities.
In this recipe, you’ll learn how to assemble a platter of vegetables that resemble creepy critters, using simple techniques and tools. This dish serves 4-6 people, making it ideal for small gatherings or as part of a larger Halloween spread. The preparation is straightforward, but the presentation is where the magic happens. With a little bit of creativity and some spooky inspiration, you’ll be able to make a platter that’s both delicious and visually enchanting.
Ingredients:
- 1 large cucumber
- 1 red bell pepper
- 1 yellow bell pepper
- 1 small bunch of radishes
- 1 cup cherry tomatoes
- 1 bunch of asparagus
- 2 medium carrots
- 1 small head of broccoli
- Black olives (for decoration)
- 1 cup hummus or dip of choice
Cooking Instructions:
- Prepare the Vegetables:
- Wash all vegetables thoroughly under cold water and pat them dry with a clean towel.
- Slice the cucumber into thin rounds to create the bodies of the creepy crawlers.
- Cut the red and yellow bell peppers into strips for legs and wings.
- Trim the tops and ends of the radishes, and slice them in half to form the heads of the critters.
- Halve the cherry tomatoes for added body parts or eyes.
- Shape the Creepy Crawlers:
- Arrange cucumber slices in a wavy line to form the body of a caterpillar or snake.
- Use the bell pepper strips to form the legs or wings of your critters by tucking them under the cucumber slices.
- Attach radish halves or cherry tomato halves to the cucumber with toothpicks to form heads.
- Cut small pieces of black olives to create eyes, and attach them with a dab of hummus or by inserting a toothpick.
- Assemble the Crudités Platter:
- Arrange the asparagus spears around the platter to resemble a “grass” base.
- Place the broccoli florets sporadically around the platter to add texture and mimic haunted shrubbery.
- Position the assembled creepy crawlers on top of the “grass” and “shrubbery.”
- Place a small bowl of hummus or your chosen dip in the center of the platter.
- Final Touches:
- Verify all components are securely placed and adjust any pieces to enhance the overall appearance.
- Add any additional vegetable pieces to fill gaps and enhance the creepy theme of the platter.
Extra Tips:
When creating your Creepy Crawly Crudités, be sure to use a sharp knife to achieve clean and precise cuts, which will help in forming the shapes you desire.
For extra detail, consider carving small details into the vegetables, like scales on the cucumber or patterns on the bell pepper strips. Additionally, you can use small cookie cutters to cut out shapes from the veggies for added variety.
If you have kids helping, supervise them carefully with the cutting, or assign them the task of arranging the platter elements. Finally, feel free to experiment with different veggies and dips to tailor the dish to your taste and dietary preferences.
Bewitching Breakfast Board
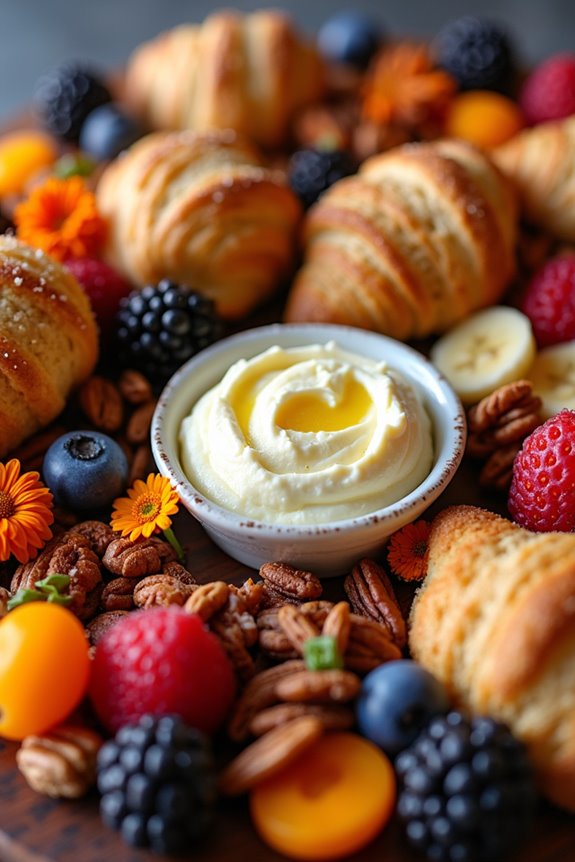
The Bewitching Breakfast Board is a delightful twist on the traditional charcuterie board, perfect for a spooky yet satisfying Halloween morning. This board combines a variety of sweet and savory breakfast items arranged in a visually enchanting manner, certain to please both the eyes and the palate.
With a mix of seasonal fruits, pastries, and themed treats, the Bewitching Breakfast Board is an excellent way to start your Halloween festivities with family or friends. Creating this board is a fun and interactive experience that allows for creativity and customization. Feel free to adjust the ingredients to suit your taste preferences or dietary needs.
Whether you’re hosting a Halloween brunch or simply want to surprise your loved ones with a festive breakfast, this board will set the mood for a magical day ahead. The instructions below will guide you through assembling a board that serves 4-6 people.
Ingredients:
- 6 mini croissants
- 6 slices of pumpkin bread
- 12 mini muffins (assorted flavors)
- 1 cup of mixed berries (strawberries, blueberries, raspberries)
- 2 bananas, sliced
- 1/2 cup of dried apricots
- 1/2 cup of mixed nuts
- 8 ounces of cream cheese, softened
- 1/4 cup of honey
- 1/2 cup of assorted Halloween candies (such as candy corn, chocolate eyeballs)
- Edible flowers for garnish (optional)
- A variety of jams or spreads (e.g., strawberry jam, Nutella)
Instructions:
- Prepare the Base: Begin by selecting a large wooden board or platter. This will be the base for your breakfast spread. Lay down a sheet of parchment paper if you prefer easy cleanup and to prevent any staining.
- Arrange the Breads and Pastries: Place the mini croissants and slices of pumpkin bread in different sections of the board. Add the mini muffins, distributing them evenly to create balance.
- Add the Fresh Fruits: Arrange the mixed berries and banana slices around the bread and pastries. Try to create clusters for visual appeal, and ascertain there’s a mix of colors to make the board vibrant.
- Include Dried Fruits and Nuts: Fill in some of the gaps with dried apricots and mixed nuts. These add texture and variety to the board.
- Prepare the Cream Cheese and Honey: In a small bowl, mix the softened cream cheese with honey until smooth. Then, transfer it to a small dish and place it on the board. You can also add small bowls of jams or spreads nearby.
- Decorate with Candies and Edible Flowers: Scatter the Halloween-themed candies around the board. If you have edible flowers, add them as a final touch to enhance the board’s magical appearance.
- Serve and Enjoy: Once everything is arranged to your satisfaction, serve the board immediately. Encourage guests to mix and match the different elements to create their perfect breakfast bite.
Extra Tips:
For an added festive touch, consider using cookie cutters to shape some of the fruits or bread into Halloween-themed shapes, such as bats or pumpkins. You can also incorporate other seasonal items, like apple slices or roasted pumpkin seeds, to further customize your breakfast board.
Mystical Moonlit Munchies
Immerse yourself in the mysterious allure of a moonlit night with the Mystical Moonlit Munchies Charcuterie Board. This enchanting spread is perfect for a Halloween gathering, offering an array of flavors that captivate both the eyes and taste buds.
Combining the earthly tones of autumn with a touch of spooky elegance, this charcuterie board is sure to be the centerpiece of your party. The blend of sweet and savory elements, along with a few eerie touches, will transport your guests to a domain of mystical delight.
Ideal for serving 4-6 people, the Mystical Moonlit Munchies Charcuterie Board features a selection of cheeses, meats, fruits, nuts, and unique Halloween-themed treats. Each component is thoughtfully chosen to create a harmonious balance, while also adding a dash of whimsy and intrigue.
With just a little creativity and attention to detail, you can craft a charcuterie board that isn’t only delicious but also visually stunning, weaving a spell of culinary magic over your Halloween festivities.
Ingredients:
- 8 ounces aged cheddar cheese
- 8 ounces brie cheese
- 6 ounces salami, sliced
- 6 ounces prosciutto
- 1 bunch of black grapes
- 1 cup dried apricots
- 1/2 cup black olives
- 1/2 cup roasted nuts (almonds or walnuts)
- 4-6 black licorice sticks
- 4-6 small decorative pumpkins or gourds
- 1 small jar of fig jam
- Assorted crackers and breadsticks
- 1/2 cup dark chocolate bark, broken into pieces
- Fresh rosemary sprigs for garnish
Instructions:
- Prepare the Cheeses: Begin by slicing the aged cheddar into bite-sized cubes and arranging them in a cluster on your serving board. Next, cut the brie into small wedges and place them in another section of the board.
- Arrange the Meats: Roll the slices of salami and prosciutto into small rosettes and scatter them around the cheeses. This adds texture and visual interest to your board.
- Add the Fruits and Nuts: Wash the black grapes thoroughly and place them in a cluster on the board. Add the dried apricots, ensuring they’re evenly distributed. Sprinkle the roasted nuts in small piles around the board for easy snacking.
- Incorporate the Savory Elements: Drain the black olives and add them to a small dish or pile them directly onto the board. Position the black licorice sticks in a fan-like arrangement for a whimsical touch.
- Decorate with Seasonal Items: Strategically place the decorative pumpkins or gourds around the board to enhance the Halloween theme. Add small dabs of fig jam in a small dish or directly onto the board for a sweet accompaniment.
- Finish with Chocolates and Crackers: Break the dark chocolate bark into irregular pieces and scatter them across the board. Arrange assorted crackers and breadsticks in any remaining spaces, ensuring everything is accessible.
- Garnish and Serve: Tuck sprigs of fresh rosemary throughout the board for a pop of color and a fresh aroma. Serve the charcuterie board immediately or cover it and refrigerate until your guests arrive.
Extra Tips:
When assembling your Mystical Moonlit Munchies Charcuterie Board, consider the balance of flavors, colors, and textures. Aim for variety in each category, from creamy to sharp cheeses and from sweet to salty snacks.
Use a large wooden or slate board for a rustic feel, and consider elevating the look with a tiered stand for more dimension. Remember to include cheese knives and small spoons for serving jams and spreads.
Personalize your board with additional spooky elements, such as edible flowers or themed picks, to enhance the Halloween spirit. Enjoy the process and let your creativity flow!
Fright Night Fruit Fiesta

The Fright Night Fruit Fiesta is a spooktacular addition to any Halloween charcuterie board, designed to tantalize taste buds and add a touch of frightful fun to your holiday spread. This fruit-forward dish combines an array of seasonal fruits with playful Halloween-themed decorations, making it not only delicious but also visually engaging.
Perfect for parties or family gatherings, this fruit fiesta is a healthy way to indulge in the Halloween spirit without a sugar overload.
Creating this dish is all about balancing flavors and presentation. By selecting a variety of fruits that offer different textures and tastes, you can create a delightful experience for your guests. The Fright Night Fruit Fiesta is ideal for serving 4-6 people and can be easily customized to suit any dietary preferences or restrictions. The key is to choose fruits that aren’t only fresh and ripe but also fit the Halloween theme, either through their natural colors or with a little creative carving.
Ingredients (for 4-6 people):
- 1 small watermelon
- 1 pint of blackberries
- 1 pint of strawberries
- 1 cup of green grapes
- 2 kiwis
- 2 tangerines
- 1 apple
- 1/2 cup of pomegranate seeds
- 1/2 cup of dark chocolate chips
- Edible googly eyes
Cooking Instructions:
- Prepare the Watermelon: Cut the watermelon in half and scoop out the flesh using a melon baller. Set aside the melon balls and discard the rind. Alternatively, you can carve a spooky face into the watermelon rind to use as a serving bowl for added Halloween flair.
- Wash and Dry the Berries: Rinse the blackberries and strawberries thoroughly under cold water. Pat them dry with a paper towel to remove excess moisture.
- Slice the Fruits: Peel the kiwis and slice them into rounds. Peel the tangerines and separate them into segments. Core and thinly slice the apple.
- Assemble the Board: Begin by placing the watermelon balls in a large bowl or on a platter. Arrange the blackberries, strawberries, and grape clusters around the watermelon. Fan out the kiwi slices and apple slices for an eye-catching presentation.
- Add the Final Touches: Sprinkle the pomegranate seeds over the fruit for a pop of color. Scatter the dark chocolate chips throughout the board. For a playful twist, stick edible googly eyes on some of the fruit pieces, like the strawberries or grapes, to create ‘monster’ fruit bites.
- Chill Before Serving: If possible, refrigerate the assembled board for at least 30 minutes before serving to enhance the flavors and keep the fruits fresh.
Extra Tips: To maintain the Fright Night Fruit Fiesta fresh throughout your Halloween event, consider placing the fruit board over a tray of ice or using chilled serving platters. Additionally, if you’re carving the watermelon, make sure to do so just before serving to maintain its freshness and prevent it from drying out.
Feel free to get creative with the decorations; adding small Halloween-themed props or using cookie cutters to shape the fruits can elevate the presentation even further. Enjoy the fusion of flavors while entertaining your guests with this fun and healthy dish!
Skeleton’s Savory Selection
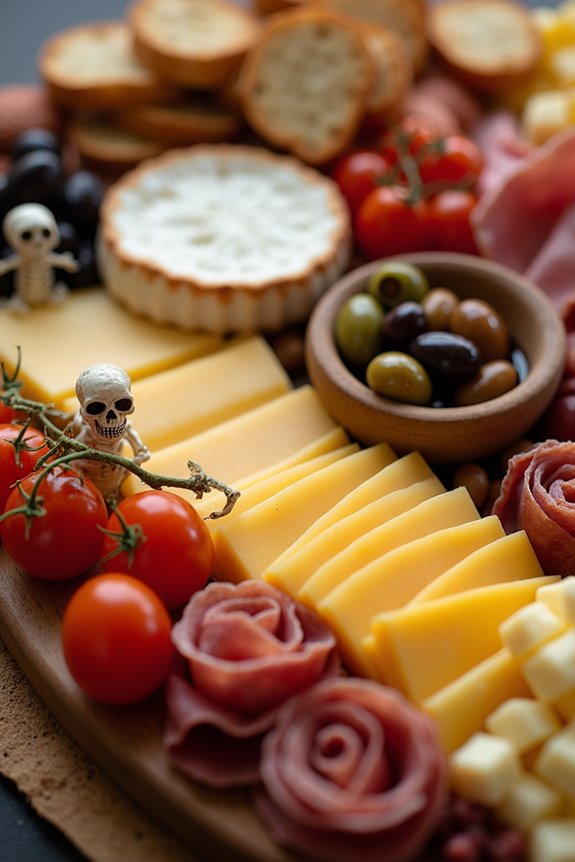
This Halloween, bring a touch of ghoulish charm to your table with our Skeleton’s Savory Selection charcuterie board. Perfect for a gathering of 4-6 people, this eerie yet delicious spread features a mix of crackers, meats, cheeses, and ghoulishly-themed accompaniments that will spook and delight your guests.
The combination of textures, flavors, and creepy aesthetics makes it not only a feast for the eyes but also a flavorful experience for your taste buds. Whether you’re hosting a haunted house party or a cozy family gathering, this charcuterie board is sure to be the star of the night.
To craft this spooky charcuterie board, you’ll need a variety of high-quality ingredients to guarantee every bite is a treat. The selection includes a range of cured meats, artisanal cheeses, and a mix of sweet and savory accompaniments to balance the flavors.
You’ll also incorporate Halloween-themed decorations such as mini skeletons or candy eyes to give it that extra eerie touch. Setting up the board is an art in itself, as it involves arranging the components in a visually appealing and thematic manner. With a bit of creativity and attention to detail, you can have your guests marveling at your culinary masterpiece.
Ingredients for 4-6 People:
- 8 oz prosciutto
- 8 oz salami
- 8 oz smoked gouda, sliced
- 8 oz brie or camembert cheese
- 8 oz aged cheddar, cut into cubes
- 1 cup mixed olives (green and black)
- 1 cup grape tomatoes
- 1 cup dried apricots
- 1 cup assorted nuts (almonds, walnuts, pecans)
- 1/2 cup fig jam
- 1/2 cup honey
- 1 baguette, sliced
- 1 box assorted crackers
- Mini decorative skeletons or candy eyes for decoration
Instructions:
- Prepare the Base: Begin by choosing a large wooden or slate board to arrange your ingredients. This will serve as the canvas for your charcuterie board. Confirm the board is clean and dry before you start arranging.
- Arrange the Cheeses: Place the cheeses on the board first. Position them at different corners or sections of the board to create balance. Slice the smoked gouda and arrange it in a fan shape. Leave the brie or camembert whole for guests to slice themselves, and scatter the cheddar cubes around.
- Add the Meats: Fold or roll the prosciutto and salami and place them near the cheeses. Try to create small clusters or rosettes for visual appeal. This will add height and texture to your board.
- Incorporate the Accompaniments: Place small bowls or ramekins on the board and fill them with olives, fig jam, and honey. Arrange the grape tomatoes, dried apricots, and nuts around the meats and cheeses, filling in any gaps.
- Add Crackers and Bread: Arrange slices of baguette and assorted crackers around the perimeter of the board. This will frame the other ingredients and provide easy access for guests.
- Decorate: For a Halloween touch, add mini skeletons or place candy eyes among the food items. Be creative with your placement to enhance the spooky theme.
- Final Touches: Review the board for balance and fullness, making any necessary adjustments. Confirm there are no empty spaces and that all ingredients are easily accessible.
Extra Tips:
When assembling your Skeleton’s Savory Selection, remember that balance is key. Try to alternate colors and textures to create an eye-catching display.
If you’re using fresh produce, such as grape tomatoes, guarantee they’re washed and dried thoroughly. For the meats and cheeses, allow them to come to room temperature before serving for the best flavor.
Finally, consider placing the board in a cool, shaded area if you’re serving outdoors to prevent the cheeses from melting. Enjoy your spooky creation!
Trick-or-Treat Tasting Tray
The Trick-or-Treat Tasting Tray is an exciting and festive way to celebrate Halloween with a creative twist. This charcuterie board combines a variety of sweet and savory treats, making it perfect for a Halloween party or a cozy night in with family and friends. The idea is to craft a tasting board that delights the eye with its spooky presentation and satisfies the palate with an enticing mix of flavors. Think of it as a playful and delicious way to experience the spirit of Halloween.
To create this Halloween-themed charcuterie board, you’ll assemble an assortment of cheeses, meats, fruits, candies, and snacks that capture the essence of the holiday. Each element of the board is chosen not only for its taste but also for its visual appeal, aiming to mimic the colors and themes of Halloween. This Trick-or-Treat Tasting Tray serves 4-6 people, making it an ideal centerpiece for a small gathering or a family treat.
Ingredients:
- 8 ounces of assorted cheeses (cheddar, brie, gouda)
- 6 ounces of cured meats (salami, prosciutto)
- 1 cup of mixed nuts (almonds, cashews, pecans)
- 1 cup of assorted candies (candy corn, gummy worms, chocolate eyeballs)
- 1 cup of fresh fruits (sliced apples, grapes)
- 1 cup of dried fruits (apricots, cranberries)
- 6-8 Halloween-themed cookies or crackers
- ½ cup of dark chocolate chips
- ½ cup of pumpkin seeds
- Small decorative pumpkins or gourds (optional)
Instructions:
- Prepare the Cheese and Meats: Start by slicing the cheeses into bite-sized pieces. Roll the cured meats into small cylinders or fold them into quarters for easy picking. Arrange them on the board, ensuring a balance between the two.
- Add Fresh and Dried Fruits: Place the fresh fruit slices and grapes around the cheeses and meats. This not only adds color but also complements the savory elements. Scatter the dried fruits in small clusters around the board.
- Incorporate Nuts and Seeds: Fill in the gaps on the board with mixed nuts and pumpkin seeds. These add texture and a nutty flavor that pairs well with the other items on the board.
- Include Sweet Treats: Add the assorted candies in small piles around the board. Mix in the dark chocolate chips for extra sweetness. This will give the board a festive look and satisfy anyone with a sweet tooth.
- Arrange Cookies or Crackers: Position the Halloween-themed cookies or crackers strategically around the board. These can be used to scoop up cheese or just enjoyed on their own.
- Final Touches: If using, place small decorative pumpkins or gourds around the board to enhance the Halloween theme. This step is optional but adds to the visual effect.
Extra Tips: When assembling your Trick-or-Treat Tasting Tray, consider the balance of flavors and textures. Arrange items in a way that allows for easy access to all components. Feel free to swap out ingredients based on preference or dietary restrictions. For a more dramatic effect, use a dark-colored board or tray to contrast with the bright colors of the Halloween treats. Remember, the goal is to have fun and be creative while preparing this spooky and scrumptious charcuterie board!