

When Halloween creeps closer, the thrill of festive treats fills the air. Crafting delightful desserts can be a breeze, even on a tight schedule. Picture crafting spooky spider cookies or mummy Oreo cookies in just minutes. These quick and easy sweets are sure to impress and bring a touch of Halloween magic to your home. Ready to uncover the secrets behind these simple yet eerie creations?
Spooky Spider Cookies
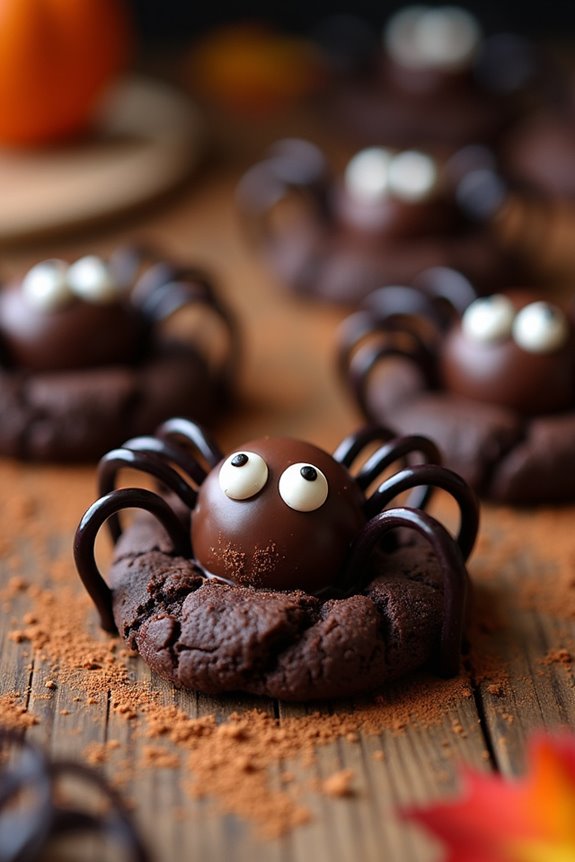
Spooky Spider Cookies are a festive and fun treat perfect for Halloween! These delightful cookies are sure to impress your family and friends with their creepy-crawly appearance and delicious taste. Made with a rich chocolate cookie base and topped with chocolate truffle “bodies” and licorice “legs,” these cookies aren’t only a visual treat but also a tasty one.
Whether you’re hosting a Halloween party or just want to surprise your loved ones with a seasonal snack, Spooky Spider Cookies are a wonderful choice. The key to making the perfect Spooky Spider Cookies lies in the combination of flavors and textures. The chocolate cookie base is soft and chewy, providing a nice contrast to the smooth and creamy chocolate truffle on top.
The licorice legs add a unique twist, making each bite a delightful surprise. These cookies aren’t only easy to make but also a great way to involve kids in the kitchen, as they can help with shaping the spiders and adding the legs. Let’s plunge into the recipe and start creating these spook-tacular treats!
Ingredients (serving size: 4-6 people):
- 1 cup all-purpose flour
- 1/2 cup unsweetened cocoa powder
- 1/2 teaspoon baking soda
- 1/4 teaspoon salt
- 1/2 cup unsalted butter, softened
- 1/2 cup granulated sugar
- 1/2 cup brown sugar
- 1 large egg
- 1 teaspoon vanilla extract
- 1/2 cup chocolate chips
- 12 chocolate truffles
- Black licorice strings
- Small candy eyes
Instructions:
- Preheat the Oven: Start by preheating your oven to 350°F (175°C) and line a baking sheet with parchment paper. This will guarantee that your cookies bake evenly and don’t stick to the pan.
- Mix Dry Ingredients: In a medium bowl, whisk together the all-purpose flour, unsweetened cocoa powder, baking soda, and salt. Set aside. This helps to evenly distribute the baking soda and salt throughout the flour.
- Cream Butter and Sugars: In a large bowl, beat the softened butter with granulated sugar and brown sugar until creamy and smooth. This should take about 2-3 minutes. Make sure the butter is well combined to create a smooth texture in the cookies.
- Add Egg and Vanilla: Add the egg and vanilla extract to the butter mixture, and beat until fully incorporated. This will add flavor and help bind the ingredients together.
- Combine Dry and Wet Ingredients: Gradually add the dry ingredient mixture to the wet ingredients, mixing until just combined. Stir in the chocolate chips. Avoid overmixing to guarantee the cookies remain tender.
- Shape the Cookies: Using a tablespoon, scoop the dough and roll it into balls. Place them on the prepared baking sheet, leaving enough space between each cookie to allow for spreading.
- Bake the Cookies: Bake in the preheated oven for 10-12 minutes, or until the edges are set and the centers are slightly soft. The cookies will continue to set as they cool.
- Add Spider Bodies: Remove the cookies from the oven and immediately press a chocolate truffle into the center of each cookie. Allow the cookies to cool on the baking sheet for 5 minutes before transferring them to a wire rack.
- Create Spider Legs: Cut the black licorice strings into small pieces to create legs. Insert 4 pieces on each side of the truffle to form the spider legs.
- Attach Candy Eyes: Use a small dab of melted chocolate or frosting to attach the candy eyes to the truffle bodies. This will bring your spooky spiders to life!
Extra Tips:
For the best results, make certain that your butter is at room temperature before creaming with the sugars. This helps in achieving a smooth and consistent dough.
If you’re not a fan of licorice, you can substitute the legs with pretzel sticks or thin strips of chocolate. When inserting the spider legs, use a toothpick to gently create a small hole to make it easier to insert the licorice pieces.
Finally, if you want extra flavor and texture, consider adding a pinch of cinnamon or espresso powder to the cookie dough for a subtle boost in taste. Enjoy these Spooky Spider Cookies as part of your Halloween festivities!
Monster Marshmallow Pops
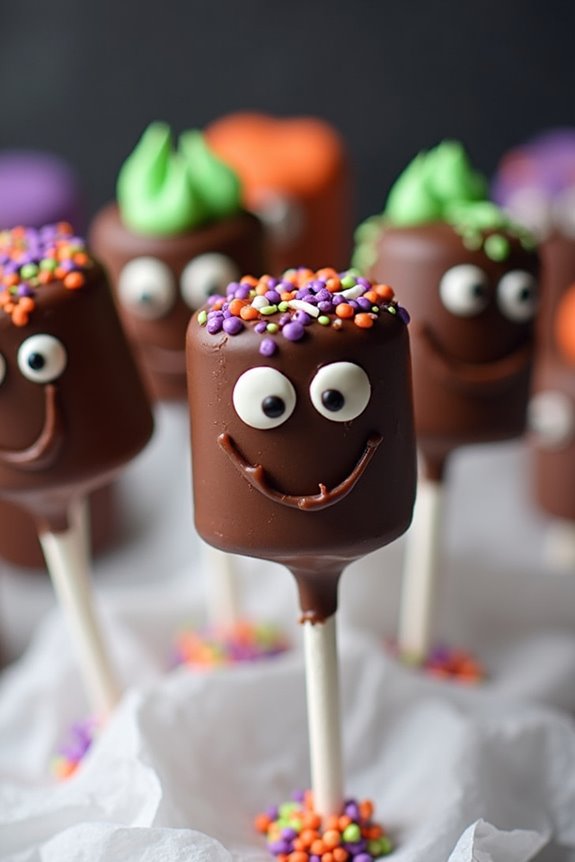
Monster Marshmallow Pops are the perfect Halloween treat that combines creativity, fun, and deliciousness. These spooky delights are sure to be a hit at any Halloween party, whether it’s for kids or adults. The combination of fluffy marshmallows, rich chocolate, and colorful candy decorations makes these pops both visually appealing and tasty.
Plus, they’re easy to make and can be customized in countless ways to suit your Halloween theme. The base of Monster Marshmallow Pops is simple: marshmallows attached to sticks, dipped in chocolate, and adorned with edible decorations to resemble monsters. You can get creative with colors and designs, using candies, sprinkles, and icing to craft unique faces and features for each pop.
This recipe is designed to serve 4-6 people, making it perfect for a small gathering or as a part of a larger dessert spread.
Ingredients for Monster Marshmallow Pops (serving size: 4-6 people):
- 12 large marshmallows
- 12 lollipop sticks or wooden skewers
- 1 cup of semi-sweet chocolate chips
- 1 tablespoon coconut oil or vegetable shortening
- Assorted candy eyes
- Colored sprinkles
- Edible markers (optional)
- Assorted candy melts (green, orange, purple)
- Small candies (like mini M&Ms or chocolate chips) for decoration
Cooking Instructions:
- Prepare the Marshmallows: Begin by inserting a lollipop stick or wooden skewer into each marshmallow, being careful not to push the stick all the way through. Arrange them upright on a parchment-lined baking sheet.
- Melt the Chocolate: In a microwave-safe bowl, combine the chocolate chips and coconut oil or vegetable shortening. Microwave in 30-second intervals, stirring in between until the mixture is smooth and fully melted.
- Dip the Marshmallows: Hold each marshmallow by the stick and dip it into the melted chocolate, ensuring it’s fully coated. Allow any excess chocolate to drip off before placing it back onto the parchment paper. Let them set for a few minutes.
- Decorate: While the chocolate is still slightly soft, press candy eyes and other decorations onto the marshmallows to create monster faces. Use different colored candy melts to add hair or additional features, melting them in the microwave as you did with the chocolate. Allow the pops to set completely.
- Add Final Touches: Once the chocolate has hardened, use edible markers to draw any additional details like mouths or scars on the monster faces. For extra fun, roll the base of the marshmallows in colored sprinkles for a festive touch.
Extra Tips:
When making Monster Marshmallow Pops, the key is to work relatively quickly once the chocolate is melted, as it will begin to set. If the chocolate starts to harden before you’re finished decorating, simply pop it back in the microwave for a few seconds to soften it up.
Experiment with different candy and icing combinations to craft a variety of monster expressions. These pops can be stored in an airtight container at room temperature for up to three days, but they’re best enjoyed fresh. Enjoy the process and let your creativity run wild!
Witch Hat Cupcakes
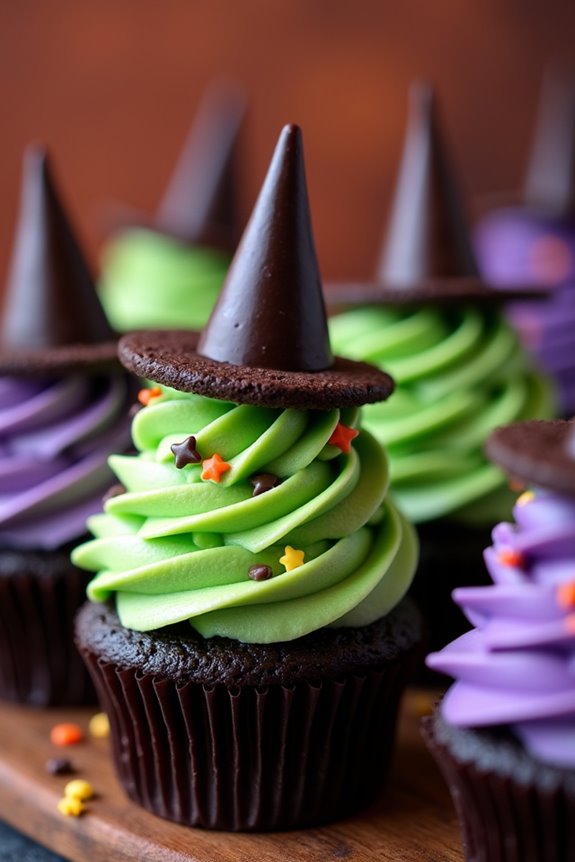
Witch Hat Cupcakes are a delightful addition to your Halloween dessert table. These whimsical treats aren’t only fun to make but also eye-catching with their vibrant colors and creative design. Perfect for kids and adults alike, these cupcakes will add a touch of magic to your spooky celebrations. With a moist chocolate base, creamy frosting, and a charming witch hat topper, they’re certain to be a hit at any Halloween party.
To create these enchanting cupcakes, you’ll start by baking a batch of your favorite chocolate cupcakes. Once cooled, you’ll top them with a swirl of colored frosting before placing a witch hat on top, which is made using an ice cream cone and a cookie. With a little bit of creativity and some simple ingredients, you can bring these tasty and festive treats to life.
Ingredients for 4-6 servings:
- 12 chocolate cupcakes (homemade or store-bought)
- 1 batch of vanilla or chocolate frosting
- Green or purple food coloring
- 12 chocolate sugar cones
- 12 round chocolate cookies
- 1 cup of small candy stars or sprinkles
- 1/2 cup of chocolate chips (melted)
- Piping bag with a star tip
Cooking Instructions:
- Prepare the Cupcakes: If making homemade cupcakes, bake and cool 12 chocolate cupcakes according to your preferred recipe. If using store-bought, verify they’re completely cooled before decorating.
- Color the Frosting: Divide your batch of frosting into a bowl and add a few drops of green or purple food coloring. Mix well until the frosting reaches your desired color. Adjust with more coloring if needed.
- Frost the Cupcakes: Fill a piping bag fitted with a star tip with the colored frosting. Pipe a generous swirl of frosting onto each cupcake, starting from the outer edge and spiraling inward to the center.
- Prepare the Witch Hats: Melt the chocolate chips in a microwave-safe bowl in 30-second intervals, stirring between each, until smooth. Dip the open end of each chocolate cone into the melted chocolate and place it on top of a round chocolate cookie, allowing the chocolate to act as glue. Let them set until firm.
- Assemble the Cupcakes: Once the witch hats are set, gently place one on top of each frosted cupcake. Use a small amount of melted chocolate to attach candy stars or sprinkles around the base of each cone for extra decoration.
- Finishing Touches: If desired, use any remaining frosting to pipe small dots around the cones or add additional sprinkles for a festive touch.
Extra Tips:
To make your Witch Hat Cupcakes even more spooky, you can experiment with different colored frostings, such as orange or black.
When melting chocolate for the witch hats, be cautious not to overheat and seize the chocolate; if this happens, stir in a small amount of vegetable oil to smooth it out.
For an even more magical touch, consider adding edible glitter or using different types of candies to embellish the hats.
These cupcakes are great for involving kids in the decorating process, making it a fun family activity!
Ghostly Rice Krispie Treats
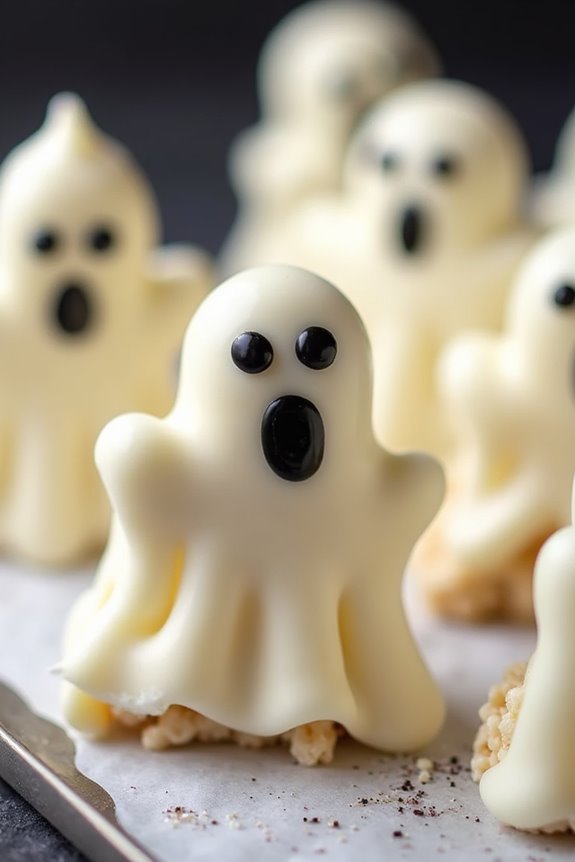
Ghostly Rice Krispie Treats are a spooktacular addition to any Halloween celebration. These delightful treats aren’t only fun to make but also a delicious way to indulge your sweet tooth. With their ghostly shapes and marshmallowy goodness, they’re sure to be a hit with both kids and adults. Perfect for parties or just as a festive snack, they bring a whimsical touch to your Halloween festivities.
These treats are easy to prepare, requiring only a few simple ingredients and minimal cooking time. The classic combination of Rice Krispies and marshmallows is transformed into spooky ghosts with the help of some clever shaping and decoration. Whether you’re looking for a fun family activity or a quick and easy dessert to impress your guests, Ghostly Rice Krispie Treats are the perfect choice.
Ingredients for a serving size of 4-6 people:
- 6 cups Rice Krispies cereal
- 4 cups mini marshmallows
- 3 tablespoons unsalted butter
- 1 teaspoon vanilla extract
- 1 cup white chocolate chips
- Black icing or edible black marker
- Cooking spray
Cooking Instructions:
- Prepare the Baking Sheet: Line a baking sheet with parchment paper or lightly grease it with cooking spray. Set it aside, as this is where your ghostly treats will take shape.
- Melt the Butter and Marshmallows: In a large saucepan, melt the unsalted butter over low heat. Once melted, add the mini marshmallows and stir continuously until fully melted and smooth. Stir in the vanilla extract for added flavor.
- Mix in the Cereal: Remove the saucepan from the heat and quickly add the Rice Krispies cereal to the melted marshmallow mixture. Stir until the cereal is evenly coated.
- Form the Ghosts: With slightly damp or buttered hands, scoop portions of the mixture and shape them into ghostly figures on the prepared baking sheet. Be creative with the shapes, making some taller or shorter to add variety.
- Melt the White Chocolate: Place the white chocolate chips in a microwave-safe bowl and melt them in the microwave in 30-second intervals, stirring in between, until smooth.
- Coat the Ghosts: Using a spoon, drizzle or spread the melted white chocolate over the Rice Krispie ghosts to give them a ghostly white coating. Allow the chocolate to set slightly.
- Add the Faces: Once the chocolate is set, use black icing or an edible black marker to draw spooky faces on your ghosts. Get creative with different expressions to add personality to each ghost.
- Set and Serve: Let the treats cool completely at room temperature before serving. This helps the ghosts hold their shape and makes them easier to handle.
Extra Tips: When shaping the ghosts, working with slightly damp or buttered hands can prevent the sticky marshmallow mixture from sticking to your fingers. If you prefer, you can use a ghost-shaped cookie cutter for more uniform shapes.
For added fun, consider adding some edible glitter or sprinkles to the white chocolate coating for a little extra sparkle. These treats can be stored in an airtight container for up to three days, making them a great make-ahead option for busy Halloween celebrations.
Chocolate Pretzel Broomsticks
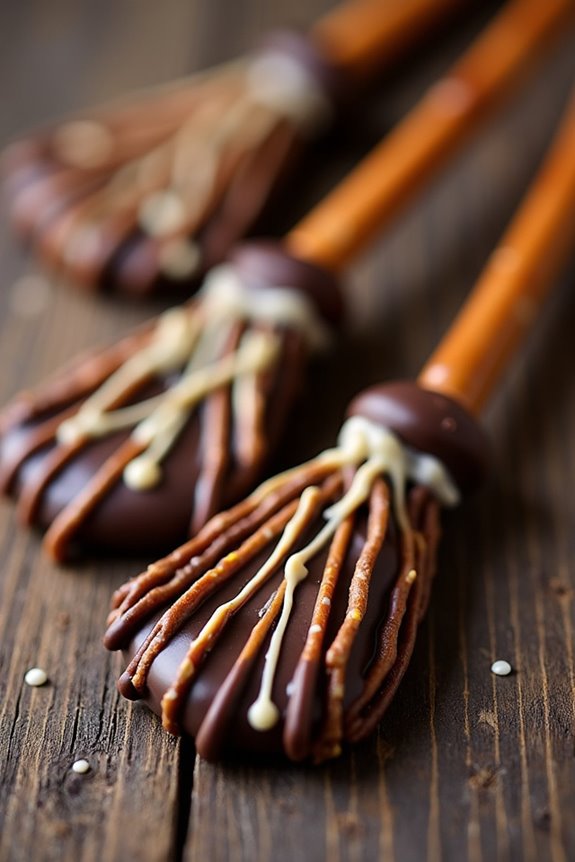
Halloween is the perfect time to get creative with your desserts, and Chocolate Pretzel Broomsticks are a fun, festive treat that combines both sweet and salty flavors. The combination of chocolate and pretzels delights the taste buds while also resembling a classic Halloween symbol — the witch’s broomstick. This easy-to-make dessert isn’t only delicious but also visually appealing, making it a hit at any Halloween gathering.
These broomsticks are ideal for a serving size of 4-6 people. They require minimal ingredients and can be prepared quickly, making them a convenient option for busy hosts. Whether you’re planning a Halloween party or just want to surprise the kids with a spooky treat, Chocolate Pretzel Broomsticks are certain to be a crowd-pleaser.
Ingredients (Serves 4-6):
- 12 pretzel rods
- 1 cup dark chocolate chips
- 1/2 cup butterscotch chips
- 1/2 cup white chocolate chips
- 12 licorice strings (about 6 inches each, cut in half)
- 1 tablespoon vegetable shortening (optional, for melting consistency)
Instructions:
- Prepare the Chocolate Coating:
- In a microwave-safe bowl, combine the dark chocolate chips and optional vegetable shortening. Microwave in 30-second intervals, stirring in between, until the chocolate is completely melted and smooth.
- Coat the Pretzel Rods:
- Dip each pretzel rod halfway into the melted dark chocolate, using a spoon to help coat evenly. Allow any excess chocolate to drip back into the bowl.
- Add the Licorice Broom Bristles:
- Quickly attach 4 licorice strings around the chocolate-covered end of each pretzel rod, pressing gently to secure. The chocolate will act as glue to hold the licorice in place. You may need to hold the licorice until it adheres.
- Cool and Set:
- Place the chocolate-dipped pretzels on a parchment-lined baking sheet. Allow them to cool and set at room temperature or speed up the process by placing them in the refrigerator for about 15 minutes.
- Decorate with Butterscotch and White Chocolate:
- Melt the butterscotch chips and white chocolate chips separately in microwave-safe bowls using the same method as step 1.
- Drizzle the melted butterscotch and white chocolate over the pretzel broomsticks for added decoration and flavor. Use a fork or a piping bag for controlled drizzling.
- Final Touches:
- Let the drizzled chocolate set completely before serving. This can be done at room temperature or in the fridge if you need them to set quickly.
Extra Tips:
For a smoother chocolate coating, consider adding a tablespoon of vegetable shortening when melting the chocolate. This helps achieve a glossy finish and guarantees the chocolate is easy to work with.
If you want to add a bit more flair, you can sprinkle edible glitter or colored sugar over the broomsticks before the chocolate sets completely. Always store the finished broomsticks in a cool, dry place to prevent the chocolate from melting or the pretzels from becoming stale. Enjoy your spooky and delightful Halloween treat!
Eyeball Cake Pops
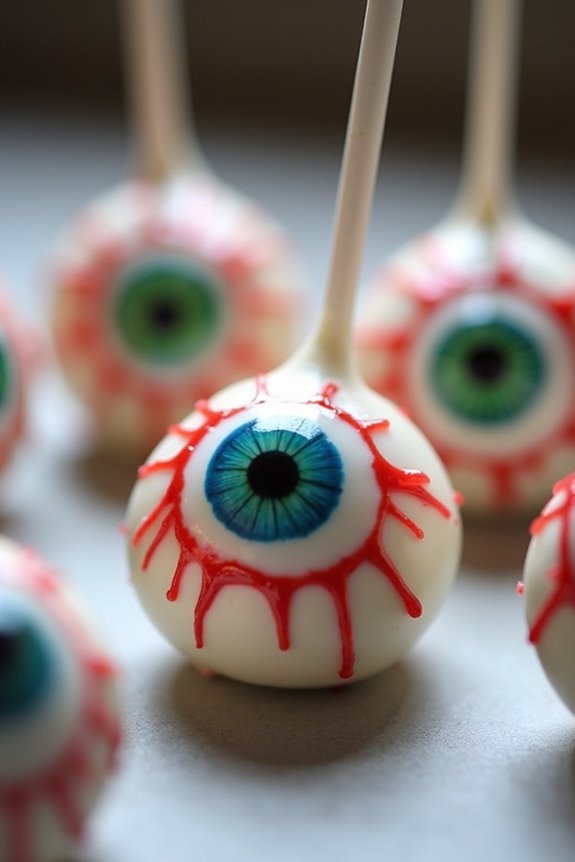
Halloween is a time for spooky fun and creative treats, and these Eyeball Cake Pops are the perfect addition to your festive table. Combining the fun of cake pops with a creepy twist, these treats are both delicious and delightfully eerie. With a moist cake center coated in chocolate and decorated to resemble eyeballs, they’re sure to be a hit at your Halloween party.
Preparing these cake pops is a fun activity that can be enjoyed by both adults and children, offering a chance to get creative with your Halloween dessert spread.
These Eyeball Cake Pops aren’t only visually enchanting but also packed with flavor. You can choose your favorite cake flavor for the base, whether it’s classic vanilla, rich chocolate, or even red velvet for an extra gory effect. Covered in smooth white chocolate and detailed with colored icing to mimic bloodshot eyes, these pops are a treat for both the taste buds and the imagination.
Here’s how to make these spooky sweets for a serving size of 4-6 people.
Ingredients:
- 1 box of cake mix (any flavor you prefer)
- Ingredients required for the cake mix (as per box instructions)
- 1/2 cup of frosting (vanilla or cream cheese)
- 1 1/2 cups of white chocolate chips or candy melts
- Red food coloring gel
- Blue or green food coloring gel
- Black gel icing or edible marker
- Lollipop sticks
- Styrofoam block or cake pop stand
Instructions:
- Bake the Cake: Begin by preparing the cake according to the instructions on the box. Once baked, allow it to cool completely.
- Crumble the Cake: In a large bowl, crumble the cooled cake into fine crumbs using your hands or a food processor.
- Mix with Frosting: Add the frosting to the cake crumbs and mix until you achieve a dough-like consistency that holds together when pressed.
- Form the Cake Balls: Roll the mixture into small balls, roughly the size of a golf ball. Place them on a baking sheet lined with parchment paper.
- Chill the Cake Balls: Refrigerate the cake balls for at least 30 minutes or until firm.
- Melt the Chocolate: In a microwave-safe bowl, melt the white chocolate chips or candy melts in 30-second intervals, stirring in between, until smooth.
- Insert the Sticks: Dip the tip of each lollipop stick into the melted chocolate and insert it halfway into each cake ball. This will help secure the stick in the cake ball.
- Coat the Cake Pops: Dip each cake ball into the melted white chocolate, ensuring it’s completely covered. Allow any excess chocolate to drip off before placing it on the styrofoam block or cake pop stand to set.
- Decorate: Once the chocolate coating has set, use the red food coloring gel to create bloodshot lines on the surface of the cake pops. Use blue or green food coloring gel for the iris and a dot of black gel icing or an edible marker for the pupil.
- Final Touches: Allow the decorations to dry and set completely before serving.
Extra Tips:
For a smoother finish on your Eyeball Cake Pops, make sure the chocolate is evenly melted and not too thick. If the coating seems too thick, add a small amount of vegetable oil to thin it out.
When decorating, use a fine-tipped squeeze bottle or a piping bag for precise control over the details. If you find that the cake balls are sliding off the sticks, make sure they’re sufficiently chilled before dipping in chocolate.
Finally, have fun with the designs—each eyeball can have its own unique and creepy look!
Pumpkin Patch Brownies
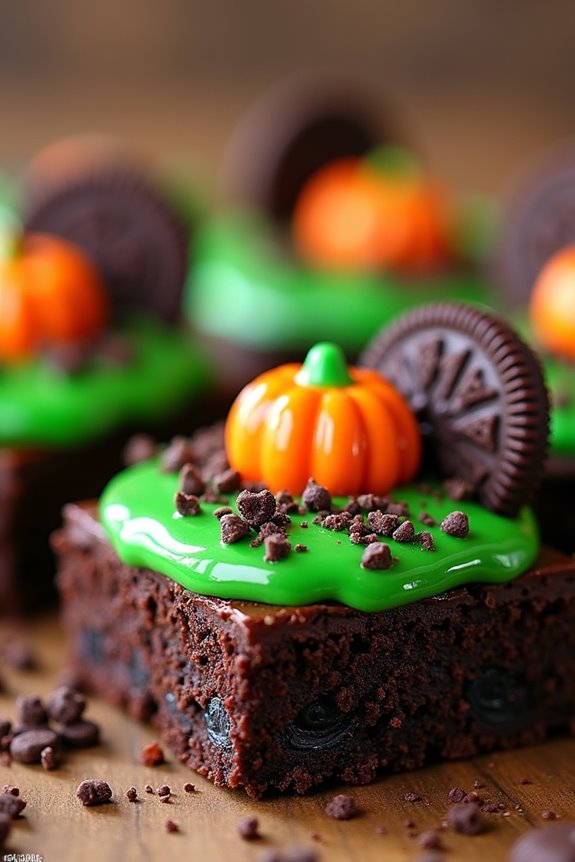
Pumpkin Patch Brownies are a delightful and spooky treat perfect for Halloween festivities. These brownies blend the rich, chocolatey goodness of traditional brownies with a festive twist, featuring a pumpkin patch theme that both kids and adults will love. Ideal for parties or a fun family dessert, these brownies not only taste delicious but also add a whimsical touch to your Halloween spread. The combination of fudgy brownie layers and decorative toppings makes this dessert both visually appealing and irresistibly tasty.
Creating Pumpkin Patch Brownies involves crafting a batch of your favorite brownies and creatively decorating them to resemble a miniature pumpkin patch. The process is simple and fun, making it a great activity to involve children or friends. With some basic ingredients and a little bit of creativity, you can transform ordinary brownies into a themed Halloween masterpiece that will impress all your guests. This recipe serves 4-6 people, making it perfect for a small gathering or family dessert.
Ingredients:
- 1 cup unsalted butter
- 2 cups granulated sugar
- 4 large eggs
- 1 teaspoon vanilla extract
- 1 cup all-purpose flour
- 1 cup unsweetened cocoa powder
- 1/2 teaspoon salt
- 1/2 teaspoon baking powder
- 1 cup semi-sweet chocolate chips
- Green icing or frosting
- Candy pumpkins or candy corn
- Crushed chocolate cookies (for the “dirt”)
Instructions:
- Preheat and Prepare: Preheat your oven to 350°F (175°C). Grease a 9×13-inch baking dish with butter or non-stick spray, and set it aside.
- Mix Wet Ingredients: In a large microwave-safe bowl, melt the butter. Stir in the sugar, then add the eggs one at a time, mixing well after each addition. Add the vanilla extract and mix until smooth.
- Combine Dry Ingredients: In a separate bowl, whisk together the flour, cocoa powder, salt, and baking powder. Gradually add this dry mixture to the wet ingredients, stirring until just combined.
- Add Chocolate Chips: Fold in the semi-sweet chocolate chips. Be careful not to overmix the batter.
- Bake the Brownies: Pour the brownie batter into the prepared baking dish, spreading it evenly. Bake in the preheated oven for 25-30 minutes, or until a toothpick inserted into the center comes out with a few moist crumbs.
- Cool and Decorate: Allow the brownies to cool completely in the pan. Once cooled, spread a thin layer of green icing or frosting over the top to resemble grass.
- Create the Pumpkin Patch: Arrange candy pumpkins or candy corn on top of the green icing, spacing them out to mimic a pumpkin patch. Sprinkle crushed chocolate cookies around the candy to simulate dirt.
- Serve and Enjoy: Cut the brownies into squares and serve them on a festive platter. Enjoy the Halloween spirit with each delicious bite!
Extra Tips:
When making Pumpkin Patch Brownies, verify your brownies have completely cooled before decorating to avoid melting the icing. For a more vibrant display, consider adding edible glitter or using different colors of icing to create a more varied pumpkin patch. If you don’t have candy pumpkins, you can use orange-colored fondant to shape your own.
Finally, these brownies can be made a day in advance, allowing the flavors to meld together for an even richer taste. Store them in an airtight container to keep them fresh and soft.
Mummy Oreo Cookies
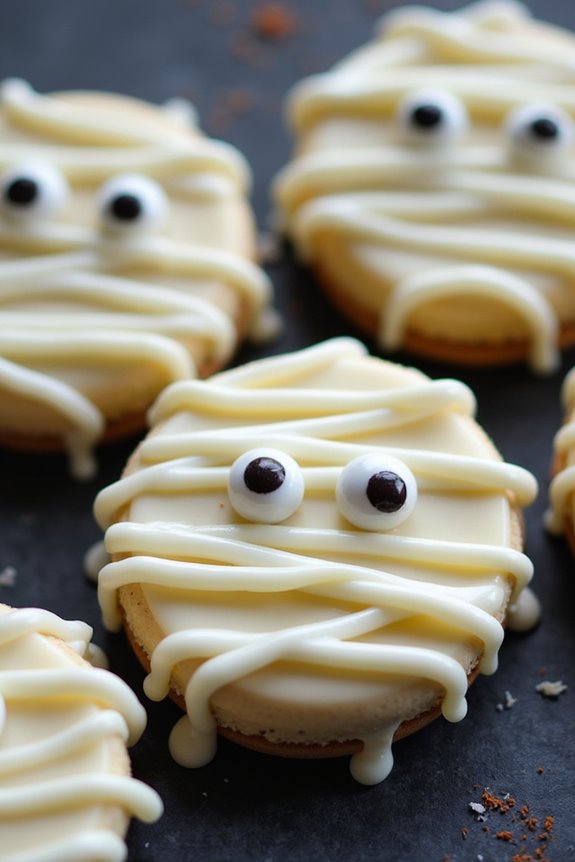
Mummy Oreo Cookies are a spooktacular treat perfect for Halloween celebrations. These adorable cookies are incredibly easy to make and require just a few ingredients. Perfect for a party or for a fun family baking session, Mummy Oreo Cookies are certain to delight both kids and adults alike.
With their cute mummy design, these cookies are assured to be a hit at any Halloween gathering. The recipe involves covering classic Oreo cookies in white chocolate and decorating them with candy eyes to resemble wrapped-up mummies. This no-bake dessert isn’t only simple but also quick to prepare, making it an excellent last-minute addition to your Halloween menu.
With just a little creativity, you can whip up a batch of these eerie yet delightful treats in no time.
Ingredients (Serves 4-6 people):
- 24 Oreo cookies
- 2 cups white chocolate chips or white candy melts
- 48 small candy eyes
- 1 teaspoon coconut oil (optional, for thinning chocolate)
Instructions:
- Prepare the Ingredients: Gather all your ingredients. If using white chocolate chips, pour them into a microwave-safe bowl. Add coconut oil if using.
- Melt the Chocolate: Microwave the white chocolate chips in 30-second intervals, stirring well after each interval, until the chocolate is fully melted and smooth. Be careful not to overheat to prevent it from seizing.
- Prepare the Cookies: Line a baking sheet with parchment paper. This will prevent the cookies from sticking as the chocolate sets.
- Dip the Cookies: Using a fork, dip each Oreo cookie into the melted white chocolate, making sure it’s fully coated. Let the excess chocolate drip off before placing the cookie onto the prepared baking sheet.
- Decorate the Cookies: While the chocolate is still wet, place two candy eyes on each cookie to create the mummy’s eyes. For the mummy bandages, drizzle additional melted white chocolate over the cookies in a zigzag pattern using a spoon or a piping bag.
- Set the Cookies: Allow the cookies to sit at room temperature or refrigerate them for about 10-15 minutes until the chocolate is fully set.
- Serve and Enjoy: Once the chocolate is firm, your Mummy Oreo Cookies are ready to serve. Arrange them on a spooky platter for a festive presentation.
Extra Tips:
For an even smoother chocolate coating, use coconut oil as it helps thin the chocolate for better coverage. Make sure the candy eyes are placed before the chocolate sets to guarantee they stick properly.
If you don’t have a piping bag for the bandages, a small plastic sandwich bag with a tiny corner cut off works just as well. Get creative with your drizzle patterns to give each mummy its own unique look. Enjoy these fun and festive treats with your loved ones this Halloween!
Candy Corn Parfaits
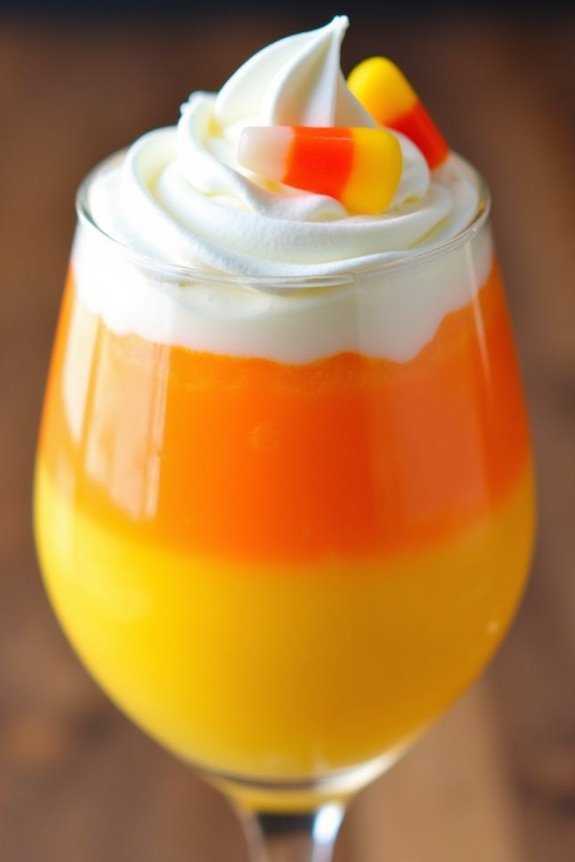
Celebrate Halloween with a delightful and festive dessert that captures the spirit of the season: Candy Corn Parfaits. These colorful parfaits are inspired by the classic candy corn, with layers of creamy goodness and vibrant hues that mimic the iconic treat. Perfect for a Halloween party or a fun family dessert night, these parfaits aren’t only pleasing to the eye but also deliciously satisfying.
Candy Corn Parfaits are easy to prepare and can be made ahead of time, making them a convenient option for any Halloween gathering. The recipe combines simple ingredients to create a layered dessert that resembles candy corn, featuring layers of orange and yellow pudding, topped with a dollop of whipped cream. The result is a visually striking and flavorful treat that will delight both kids and adults alike.
Ingredients (for 4-6 servings):
- 1 package (3.4 oz) instant vanilla pudding mix
- 2 cups cold milk
- Yellow food coloring
- Orange food coloring
- 1 cup whipped cream or whipped topping
- 1/2 cup candy corn for garnish
- Clear serving glasses or cups
Cooking Instructions:
- Prepare the Pudding: In a medium-sized mixing bowl, combine the instant vanilla pudding mix with the cold milk. Whisk the mixture for about 2 minutes until it thickens and becomes smooth.
- Color the Pudding: Divide the prepared pudding into two equal portions. In one portion, add a few drops of yellow food coloring and stir until the color is evenly mixed. In the other portion, add a few drops of orange food coloring and mix until fully combined.
- Assemble the Parfaits: Begin layering the parfaits by spooning the yellow pudding into the bottom of each clear serving glass or cup, filling it about one-third of the way. Next, add a layer of the orange pudding, filling the glass to about two-thirds full.
- Top with Whipped Cream: Spoon or pipe a generous dollop of whipped cream on top of the orange pudding layer in each glass, creating the final white layer of the candy corn parfait.
- Add Garnish: Finish each parfait by adding a few pieces of candy corn on top of the whipped cream for an extra festive touch.
- Chill and Serve: Refrigerate the parfaits for at least 30 minutes to allow the layers to set and the flavors to meld. Serve chilled and enjoy!
Extra Tips:
For an extra touch of elegance, consider using piping bags to layer the pudding and whipped cream, which will give you more control and precision.
If you’re looking to make these parfaits a bit healthier, you can substitute the instant pudding with a homemade version or use a lower-sugar whipped topping.
Additionally, if you’re serving these at a party, prepare them in advance and keep them chilled until ready to serve, ensuring they stay fresh and delicious.
Feel free to experiment with the amounts of food coloring to achieve your desired shade of yellow and orange for a perfect candy corn look.
Vampire Bite Donuts
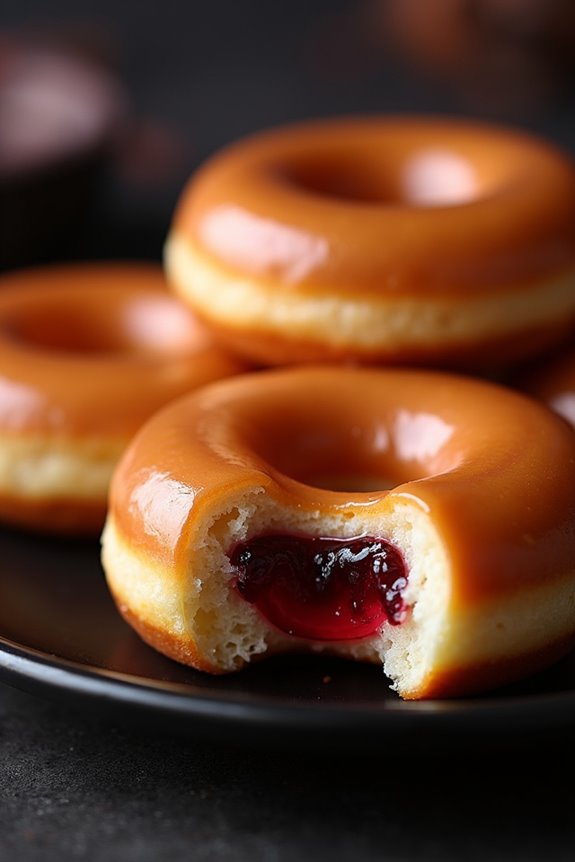
Vampire Bite Donuts are a spooktacular addition to your Halloween dessert table, combining the fun of the holiday with a deliciously indulgent treat. These cleverly crafted donuts aren’t only visually exciting but also offer a delightful surprise with every bite. Perfect for Halloween parties or just a fun baking session with the kids, these donuts capture the spirit of the season with their creative twist.
The allure of Vampire Bite Donuts lies in their whimsical design and the burst of flavor from the “blood” filling. This recipe is tailored for serving 4-6 people, making it ideal for small gatherings. The process involves making soft, fluffy donuts, filling them with a vibrant red jelly or jam, and finishing with a spooky decoration that mimics a vampire’s bite. The combination of textures and flavors guarantees these donuts are a hit with both adults and children alike.
Ingredients (Serving size: 4-6 people):
- 2 cups all-purpose flour
- 1/2 cup granulated sugar
- 1 tablespoon baking powder
- 1/2 teaspoon salt
- 1/2 cup whole milk
- 2 large eggs
- 1/4 cup unsalted butter, melted
- 1 teaspoon vanilla extract
- 1 cup red jelly or jam (such as raspberry or strawberry)
- Red food coloring (optional)
- 1/2 cup powdered sugar
- 1-2 tablespoons milk for glaze
- Red and black decorating gel or icing
Cooking Instructions:
- Prepare the Dough: In a large mixing bowl, whisk together the flour, granulated sugar, baking powder, and salt. In a separate bowl, mix the milk, eggs, melted butter, and vanilla extract until well combined. Gradually add the wet ingredients to the dry ingredients, stirring until a smooth dough forms.
- Shape the Donuts: Turn the dough onto a lightly floured surface and roll it out to about 1/2-inch thickness. Use a donut cutter to cut out donut shapes. If you don’t have a donut cutter, a large and a small round cutter will work. Re-roll the scraps and continue cutting until all dough is used.
- Fry the Donuts: Heat oil in a deep fryer or large pot to 350°F (175°C). Carefully place the donuts into the hot oil, frying in batches to avoid overcrowding. Fry each side for about 1-2 minutes until golden brown. Remove and drain on paper towels.
- Fill with Jelly: Once the donuts have cooled slightly, use a piping bag fitted with a small round tip to inject the red jelly or jam into each donut. For an extra spooky touch, you can mix a few drops of red food coloring into the jelly before filling.
- Prepare the Glaze: In a small bowl, mix the powdered sugar and milk to create a smooth glaze. Dip the top of each donut in the glaze and allow excess to drip off.
- Decorate: Use the red and black decorating gel or icing to create vampire bite marks on each donut. Make two small red puncture marks on each donut and add a bit of black gel for a realistic effect.
Extra Tips:
For the best texture, verify your oil is at the correct temperature before frying; too hot and the donuts will burn, too cool and they’ll absorb too much oil. You can make the donuts in advance and fill them just before serving to keep them fresh and tasty.
If you prefer baked donuts, use a greased donut pan and bake at 350°F (175°C) for about 10-12 minutes instead of frying. Get creative with your decorations – using edible glitter or Halloween-themed sprinkles can add a fun twist to your Vampire Bite Donuts.
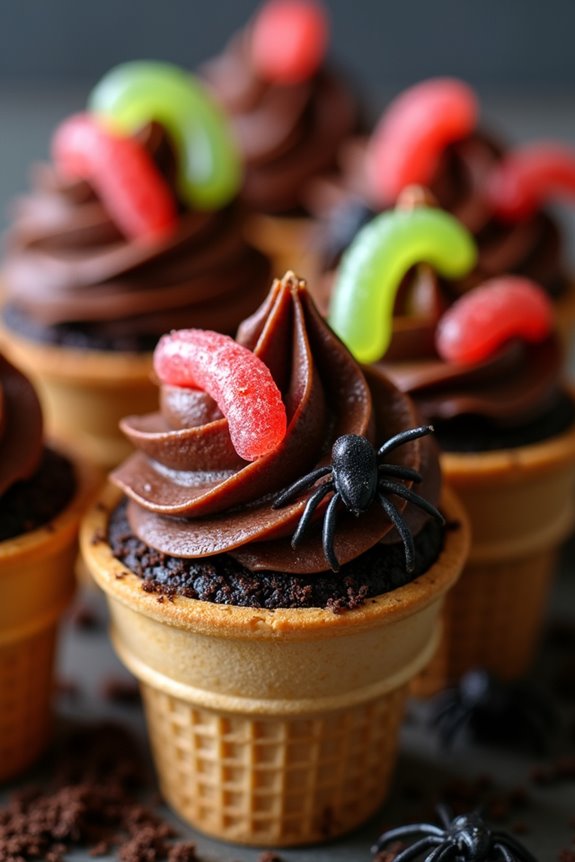
Creepy Crawly Cupcake Cones
Creepy Crawly Cupcake Cones are the perfect Halloween treat to send shivers down your spine while delighting your taste buds. These spooky desserts combine the fun of cupcakes with the convenience of cones, making them easy to hold and even easier to devour.
Whether you’re hosting a Halloween party or just want to surprise your family with a festive treat, these cupcakes are bound to be a hit with both kids and adults. The edible “creepy crawlies” decorations add a thrilling element to the dessert, making it look like something straight out of a haunted forest.
The base of the Creepy Crawly Cupcake Cones is a moist and fluffy chocolate cupcake batter, baked right inside ice cream cones for a unique twist. Once baked, the cupcakes are topped with a rich, chocolate frosting that acts as a delicious “soil” for the gummy worms and candy spiders.
The frosting also helps to hold the creepy crawly decorations in place, adding to the eerie effect. These cones aren’t only delicious but also a fun project to make with little helpers who can assist in decorating.
Ingredients for 4-6 servings:
- 1 1/4 cups all-purpose flour
- 1 cup granulated sugar
- 1/2 cup unsweetened cocoa powder
- 1 teaspoon baking powder
- 1/2 teaspoon baking soda
- 1/2 teaspoon salt
- 1/2 cup buttermilk
- 1/2 cup vegetable oil
- 1 large egg
- 1 teaspoon vanilla extract
- 3/4 cup boiling water
- 12 flat-bottom ice cream cones
- 1 cup chocolate frosting
- Gummy worms
- Candy spiders
Cooking Instructions:
1. Preheat the Oven: Start by preheating your oven to 350°F (175°C). This guarantees that your cones bake evenly.
2. Prepare the Batter: In a large bowl, whisk together the flour, sugar, cocoa powder, baking powder, baking soda, and salt. In a separate bowl, mix the buttermilk, vegetable oil, egg, and vanilla extract until well combined.
Gradually add the wet ingredients to the dry ingredients, stirring until smooth. Finally, stir in the boiling water until the batter is thin.
3. Fill the Cones: Place each ice cream cone upright in a muffin tin to keep them stable. Fill each cone two-thirds full with the cupcake batter. Be careful not to overfill, as the batter will rise during baking.
4. Bake the Cones: Place the muffin tin in the preheated oven and bake for 18-20 minutes, or until a toothpick inserted into the center of a cupcake comes out clean. Remove from the oven and allow to cool completely.
5. Frost the Cupcakes: Once the cupcakes are cool, spread a generous amount of chocolate frosting on top of each cone, creating a mound to resemble a small pile of soil.
6. Decorate with Creepy Crawlies: Press gummy worms and candy spiders into the frosting to create the look of creepy crawlies emerging from the “soil.” Be creative with your placement to enhance the spooky effect.
Extra Tips:
To guarantee your Creepy Crawly Cupcake Cones stand out, use a variety of gummy and candy decorations to add color and texture. You can also add edible glitter or black sprinkles to the frosting for an extra touch of Halloween magic.
If you’re making these treats with kids, let them have fun with the decorating process, encouraging them to create their own scary or silly designs. Store any leftovers in an airtight container to keep them fresh for up to three days. Enjoy the spooky fun!