

I’m beyond excited to share some spooktacular ideas for your Halloween gathering! Picture delighting your guests with Mummy Jalapeño Poppers or Spooky Spider Deviled Eggs. These easy finger foods not only look amazing but also taste incredible. With a blend of creativity and flavor, these treats will set the festive mood. Ready to start crafting a memorable experience?
Mummy Jalapeño Poppers
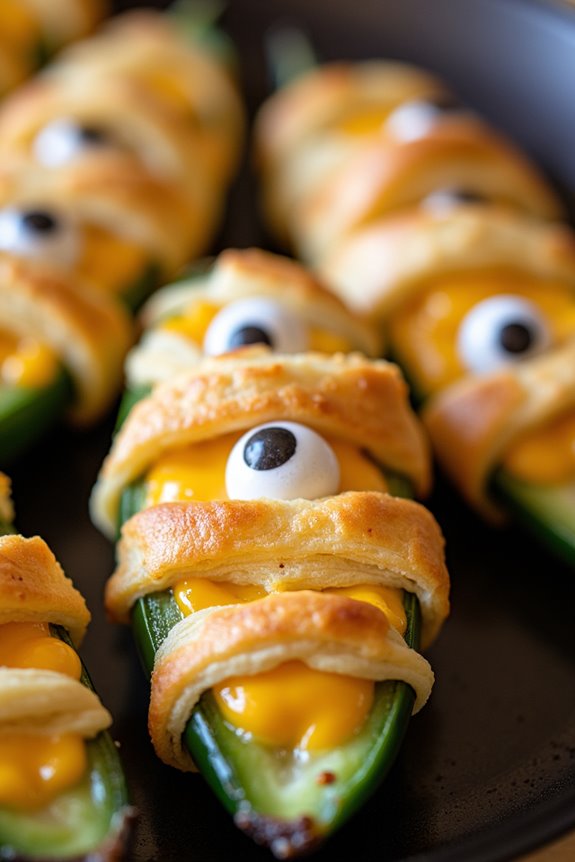
Mummy Jalapeño Poppers are a spooktacular addition to any Halloween gathering. These bite-sized treats transform the classic jalapeño popper into a fun and festive appetizer that’s certain to be a hit with both adults and kids. Wrapped in strips of crescent dough to resemble tiny mummies, these poppers aren’t only visually appealing but also pack a flavorful punch with a cheesy, spicy filling.
Perfect for serving at Halloween parties or as a snack during the spooky season, they embody a delightful combination of heat, creaminess, and buttery dough.
Creating these Mummy Jalapeño Poppers is quite straightforward, making them an excellent choice for both experienced cooks and beginners looking to impress guests with minimal effort. The balance of the spicy jalapeños, the creamy cheese filling, and the flaky, golden crust is simply irresistible. The recipe below is designed to serve 4-6 people, offering enough for everyone to have a couple of these delicious mummies.
Ingredients:
- 10-12 jalapeño peppers
- 8 oz cream cheese, softened
- 1 cup shredded cheddar cheese
- 1 teaspoon garlic powder
- 1/2 teaspoon onion powder
- 1/2 teaspoon smoked paprika
- 1/4 teaspoon salt
- 1 package crescent roll dough
- 20-24 candy eyeballs
Cooking Instructions:
- Preheat the Oven: Start by preheating your oven to 400°F (200°C). This guarantees that the oven is hot and ready to bake the poppers evenly once they’re assembled.
- Prepare the Jalapeños: Cut each jalapeño pepper in half lengthwise and remove the seeds and membranes. This reduces the heat of the peppers and creates a cavity for the cheese filling.
- Make the Cheese Filling: In a mixing bowl, combine the softened cream cheese, shredded cheddar cheese, garlic powder, onion powder, smoked paprika, and salt. Mix until all ingredients are well combined and smooth.
- Fill the Jalapeños: Using a spoon or a piping bag, fill each jalapeño half with the cheese mixture, ensuring it’s evenly distributed and slightly mounded over the top.
- Wrap with Dough: Open the crescent roll dough and cut it into thin strips. Wrap each filled jalapeño half with 2-3 strips of dough, leaving a small gap near the top to place the candy eyeballs after baking.
- Bake the Poppers: Place the wrapped jalapeños on a baking sheet lined with parchment paper. Bake in the preheated oven for 12-15 minutes, or until the dough is golden brown and the cheese is bubbly.
- Add the Eyes: Remove the poppers from the oven and let them cool slightly. Press two candy eyeballs into the exposed filling of each popper to create the mummy effect.
Extra Tips:
When working with jalapeños, consider wearing gloves to protect your skin from the capsaicin, which can cause irritation. If you prefer a milder version, you can soak the jalapeño halves in cold water for 15 minutes after de-seeding to further reduce their spiciness.
Additionally, feel free to experiment with the cheese mixture by adding different types of cheese or spices to suit your taste preferences. These Mummy Jalapeño Poppers can be prepped ahead of time and baked just before serving, making them a convenient option for party planning.
Spooky Spider Deviled Eggs
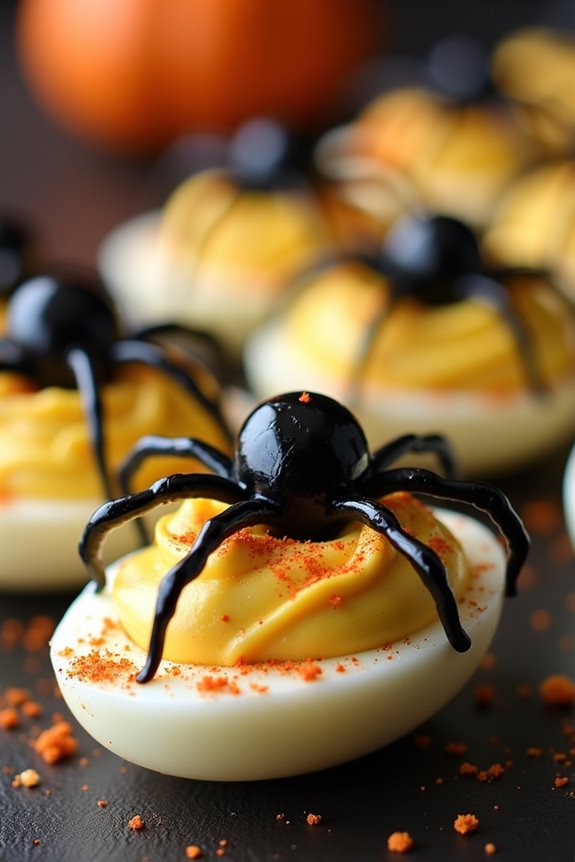
Transform your Halloween gathering into a spook-tacular event with these Spooky Spider Deviled Eggs. This eerie take on a classic appetizer is sure to be a hit with both children and adults.
These devilish treats aren’t only visually appealing, with their creepy spider topping, but they also deliver on flavor with their creamy, tangy filling. Perfect for a party, these eggs are easy to make, and the spooky spider decoration adds a fun and festive touch to your Halloween spread.
The spiders are crafted from black olives, which stand out against the pale yellow filling of the deviled eggs, making them an eye-catching addition to your Halloween buffet. These deviled eggs are as enjoyable to make as they’re to eat, providing a great opportunity for creativity in the kitchen.
Whether you’re hosting a party or simply want to add a little fright to your family dinner, these Spooky Spider Deviled Eggs will definitely delight your guests and leave them craving more.
Ingredients for 4-6 servings:
- 6 large eggs
- 1/4 cup mayonnaise
- 1 teaspoon Dijon mustard
- 1 teaspoon white vinegar
- Salt and pepper to taste
- Paprika for garnish
- 1 can (2.25 ounces) black olives, pitted
Instructions:
- Boil the Eggs: Place the eggs in a large saucepan and cover them with cold water. Bring the water to a boil over medium-high heat. Once boiling, cover the pan, remove it from the heat, and let the eggs sit for 12 minutes.
- Cool and Peel the Eggs: After 12 minutes, transfer the eggs to a bowl of ice water to cool completely, about 5 minutes. Once they’re cool, carefully peel the eggs.
- Prepare the Filling: Slice the eggs in half lengthwise and gently remove the yolks, placing them in a medium bowl. Set the egg whites aside. Mash the yolks with a fork and mix in the mayonnaise, Dijon mustard, white vinegar, salt, and pepper until smooth and creamy.
- Fill the Egg Whites: Using a spoon or a piping bag, fill each egg white half with the yolk mixture.
- Create the Spider Decoration: Cut the black olives in half. Use one half as the spider’s body. Slice the remaining halves into thin strips to create the spider’s legs. Arrange one olive half on top of each filled egg and place four olive slices on each side to resemble spider legs.
- Garnish and Serve: Lightly sprinkle paprika over the filled eggs for added color and flavor. Arrange the deviled eggs on a platter and serve them chilled.
Extra Tips:
When preparing the Spooky Spider Deviled Eggs, make sure that the eggs are thoroughly cooled before peeling to prevent the whites from tearing.
For a smoother filling, consider using a food processor to blend the yolk mixture. If you prefer a little more tanginess, add a dash more vinegar or mustard to taste.
When slicing the olives, use a sharp knife to achieve clean cuts for the spider legs. These deviled eggs can be made a few hours in advance and kept in the refrigerator until serving time, making them a convenient choice for any busy Halloween host.
Witch Fingers Breadsticks

Halloween is the perfect time to get creative in the kitchen and delight your guests with some spooky treats. Witch Fingers Breadsticks are a fun and eerie appetizer that will add a touch of magic to your Halloween party spread. These breadsticks are shaped like fingers and topped with an almond “nail,” making them look both realistic and deliciously creepy. Not only are they visually striking, but they’re also incredibly tasty, offering a savory blend of herbs and spices in every bite.
Whether you’re hosting a Halloween bash or simply want to surprise your family with a themed dinner, Witch Fingers Breadsticks are a must-try. They’re easy to make, requiring minimal ingredients, and the recipe is straightforward enough for even novice cooks to master. Served with a side of marinara sauce for “blood,” these breadsticks are sure to be a hit with kids and adults alike. Prepare a batch of these ghoulish breadsticks and watch them disappear faster than a witch’s spell.
Ingredients (Serves 4-6):
- 1 can (13.8 oz) refrigerated pizza dough
- 24 whole blanched almonds
- 2 tablespoons unsalted butter, melted
- 1 tablespoon fresh rosemary, chopped
- 1 tablespoon fresh thyme, chopped
- 1/2 teaspoon garlic powder
- 1/4 teaspoon salt
- Black food coloring (optional)
- Marinara sauce for dipping
Cooking Instructions:
- Preheat your oven: Start by preheating your oven to 375°F (190°C). Line a baking sheet with parchment paper to prevent sticking and set aside.
- Prepare the dough: Open the can of refrigerated pizza dough and roll it out onto a lightly floured surface. Use a sharp knife or pizza cutter to slice the dough into strips about 4-5 inches long and 1/2 inch wide.
- Shape the fingers: Using your hands, gently roll each strip into a finger shape, making one end slightly wider to resemble a knuckle. Press slightly to create knuckle indentations and use the knife to score lines across the dough to mimic the appearance of a finger.
- Add the nails: Press a whole blanched almond into the narrower end of each dough strip to create the appearance of a fingernail. If desired, use a small brush to paint the almonds with black food coloring for an added spooky effect.
- Season the breadsticks: In a small bowl, mix the melted butter, chopped rosemary, chopped thyme, garlic powder, and salt. Brush the mixture generously over each finger-shaped breadstick to add flavor.
- Bake: Place the prepared breadsticks on the lined baking sheet, ensuring there’s space between each one. Bake in the preheated oven for 12-15 minutes, or until they’re golden brown and cooked through.
- Serve: Remove the breadsticks from the oven and let them cool slightly. Serve with a side of marinara sauce for dipping, resembling “blood.”
Extra Tips:
For an extra creepy effect, you can add a drop of red food coloring to the base of each almond to mimic a bloody fingernail. If you prefer your breadsticks extra crunchy, consider baking them for an additional 2-3 minutes.
To accommodate different tastes, feel free to experiment with other herbs or spices in the butter mixture, such as adding a pinch of cayenne pepper for a hint of heat. These Witch Fingers Breadsticks are best enjoyed fresh from the oven, but they can also be made ahead and reheated briefly in the oven before serving.
Pumpkin Cheese Ball
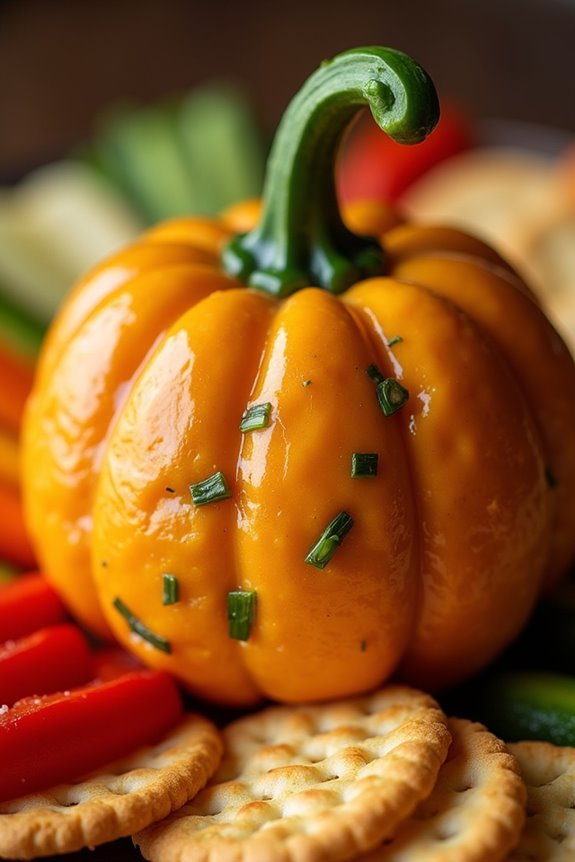
Halloween is a time for spooky fun and festive treats, and what better way to celebrate than with a delicious Pumpkin Cheese Ball? This delightful appetizer combines the creamy goodness of cheese with the festive charm of a pumpkin shape, making it the perfect addition to your Halloween party spread.
Whether you’re hosting a gathering or simply enjoying a cozy night in, this recipe is bound to impress your guests and add a touch of whimsy to your holiday table.
The Pumpkin Cheese Ball isn’t only easy to prepare, but it also allows for some creative flair. Shaped to resemble a pumpkin, this cheese ball is a conversation starter and a treat that both kids and adults will love.
Pair it with an assortment of crackers, pretzels, or fresh vegetables to create a platter that’s visually appealing and mouth-wateringly delicious. The combination of cream cheese, cheddar, and spices gives this cheese ball a rich, tangy flavor, making it an irresistible snack for any Halloween-themed event.
Ingredients for 4-6 People:
- 2 packages (8 oz each) cream cheese, softened
- 2 cups shredded sharp cheddar cheese
- 1 cup crushed crackers (like Ritz or saltines)
- 1/4 cup finely chopped green onions
- 1 tablespoon Worcestershire sauce
- 1 teaspoon garlic powder
- 1/2 teaspoon paprika
- 1/4 teaspoon cayenne pepper
- 1/4 teaspoon salt
- 1/4 teaspoon black pepper
- 1 small bell pepper stem (for the pumpkin stem)
- Crackers or vegetables for serving
Cooking Instructions:
- Prepare the Cheese Mixture: In a large mixing bowl, combine the softened cream cheese, shredded cheddar cheese, crushed crackers, chopped green onions, Worcestershire sauce, garlic powder, paprika, cayenne pepper, salt, and black pepper. Use a spatula or hand mixer to blend the ingredients until they’re well combined and smooth.
- Shape the Cheese Ball: Transfer the cheese mixture onto a large piece of plastic wrap. Gather the edges of the plastic wrap and shape the cheese mixture into a ball. Twist the top of the plastic wrap to secure the shape and refrigerate for at least 2 hours, or until firm.
- Form the Pumpkin Shape: Once the cheese ball is firm, remove it from the refrigerator and unwrap it from the plastic wrap. Using your hands, gently shape the cheese ball into a slightly flattened, round form to resemble a pumpkin.
- Decorate the Cheese Ball: Place a small bell pepper stem on top of the cheese ball to mimic the stem of a pumpkin. If desired, use a knife to gently create vertical lines around the cheese ball to enhance the pumpkin appearance.
- Serve: Transfer the Pumpkin Cheese Ball to a serving platter and surround it with an assortment of crackers or fresh vegetables. Serve immediately or refrigerate until ready to serve.
Extra Tips:
For an extra festive touch, consider rolling the cheese ball in crushed nuts or chopped herbs before shaping it into a pumpkin. This not only adds texture but also enhances the flavor profile of the cheese ball.
If you find the cheese mixture too soft to shape, try refrigerating it for a bit longer or adding more shredded cheese to thicken it up.
To make the cheese ball in advance, prepare it up to two days ahead and store it in the refrigerator until ready to serve. Just remember to add the bell pepper stem and any decorative touches shortly before serving to guarantee they remain fresh and vibrant.
Monster Eyeball Tacos
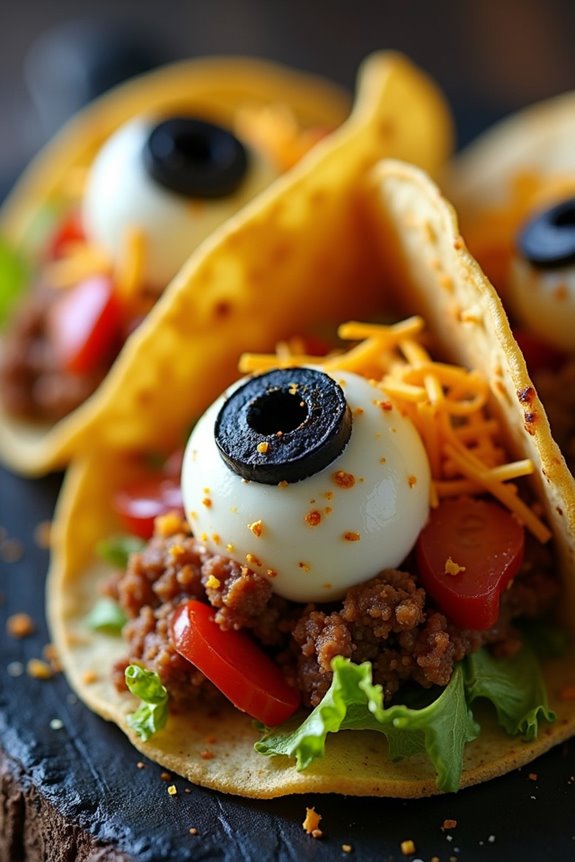
Looking to add a spooky twist to your Halloween party menu? Monster Eyeball Tacos are the perfect eerie appetizer to delight and frighten your guests. This fun and creepy dish combines delicious taco flavors with a ghoulish presentation that will have everyone talking. With a blend of seasoned beef, fresh toppings, and edible “eyeballs,” these tacos are as enjoyable to make as they’re to eat.
The key to creating these Monster Eyeball Tacos lies in the details. By using simple ingredients like black olives and mozzarella balls, you can transform ordinary tacos into something truly monstrous. Whether you’re hosting a Halloween bash for kids or adults, these tacos promise to be a hit. Plus, they offer a great opportunity for creativity, allowing you to customize and decorate each taco with your own spooky flair.
Ingredients for Monster Eyeball Tacos (Serves 4-6):
- 1 pound ground beef
- 1 packet taco seasoning mix
- 12 small taco shells
- 1 cup shredded lettuce
- 1 cup diced tomatoes
- 1/2 cup shredded cheddar cheese
- 1/2 cup sour cream
- 12 mozzarella balls (bocconcini)
- 12 black olives, sliced
- 1 tablespoon olive oil
- Salt and pepper to taste
Cooking Instructions:
- Prepare the Ground Beef: Heat the olive oil in a skillet over medium heat. Add the ground beef and cook until browned, breaking it up with a spoon as it cooks. Drain any excess fat.
- Season the Beef: Add the taco seasoning mix to the cooked beef along with a little water according to the packet instructions. Stir well to combine and let it simmer for a few minutes until the beef is well seasoned. Taste and adjust with salt and pepper as needed.
- Prepare the Toppings: While the beef is simmering, prepare your toppings. Dice the tomatoes, shred the lettuce, and have the shredded cheese and sour cream ready for assembly.
- Create the Eyeballs: For the monster eyeballs, take each mozzarella ball and place a slice of black olive on top, securing it in place with a toothpick if necessary. Set aside.
- Assemble the Tacos: Warm the taco shells according to package instructions. Fill each taco shell with a spoonful of seasoned beef. Top with shredded lettuce, diced tomatoes, and shredded cheese.
- Decorate with Eyeballs: Place two mozzarella “eyeballs” on top of each taco, using the sour cream as a “glue” to hold them in place if needed. Drizzle a little sour cream around the edges for added effect.
- Serve: Arrange the Monster Eyeball Tacos on a platter and serve immediately to guarantee the cheese remains fresh and the tacos stay crispy.
Extra Tips:
For a vegetarian version, you can substitute the ground beef with cooked lentils or black beans. Make sure to season them well to maintain the taco’s rich flavor.
If you want to add an extra spooky touch, consider using colored taco shells or sprinkle some edible glitter on top. Remember, the presentation is key, so have fun arranging the mozzarella eyeballs and creating a creepy yet delicious display for your guests to enjoy!
Ghostly Pizza Bagels
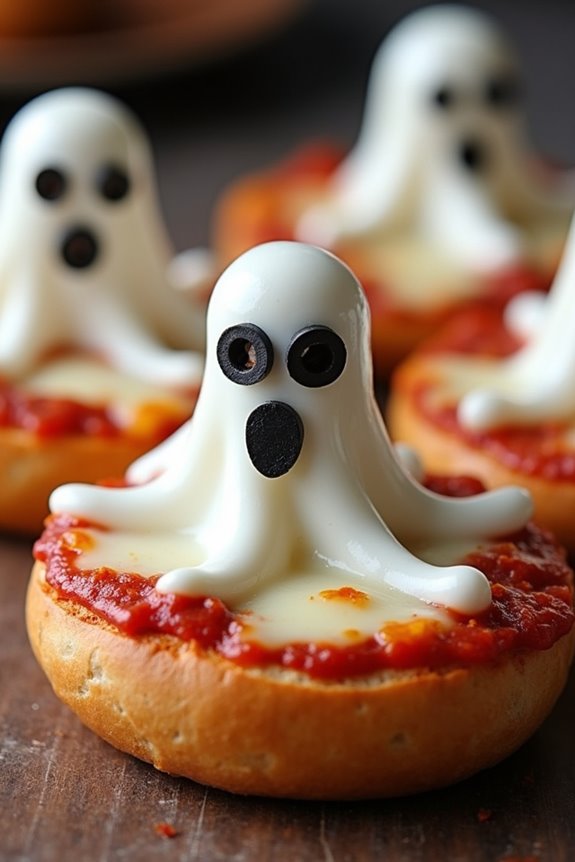
Ghostly Pizza Bagels are the perfect spooky treat to serve at your Halloween party. These delightful mini pizzas aren’t only easy to make but also add a fun and eerie touch to your festivities. With just a few simple ingredients, you can create an appetizer that both kids and adults will love.
The best part is that you can customize these little ghostly delights with your favorite toppings, making them a versatile option for any gathering. These bite-sized pizzas are perfect for a serving size of 4-6 people, allowing everyone to enjoy a couple of ghostly faces.
The base is a crispy bagel half, topped with a zesty tomato sauce and gooey melted cheese. Olive slices create the eyes, and a bit of imagination transforms the cheese into ghostly shapes. This recipe isn’t only a crowd-pleaser but also a fun activity for kids, who can help design the ghost faces on these mini pizzas.
Ingredients:
- 6 plain bagels, halved
- 1 cup pizza sauce
- 2 cups shredded mozzarella cheese
- 24 black olive slices
- 1/2 cup mini pepperoni slices (optional)
- Cooking spray
Instructions:
- Preheat the Oven: Set your oven to 375°F (190°C) to heat up while you prepare the pizzas. This guarantees the oven is nice and hot, providing the perfect environment for melting the cheese and crisping the bagels.
- Prepare the Bagels: Lay the bagel halves on a large baking sheet, cut side up. Lightly spray the tops with cooking spray to help them crisp up nicely in the oven.
- Add Sauce and Cheese: Spread about 1-2 tablespoons of pizza sauce onto each bagel half. Then, evenly sprinkle the shredded mozzarella cheese over the sauce, leaving some edges free to resemble ghostly shapes.
- Create Ghost Faces: Arrange olive slices on the cheese to form eyes and a mouth for each ghost. If desired, add mini pepperoni slices for extra decoration or to create different ghostly expressions.
- Bake the Bagels: Place the baking sheet in the preheated oven and bake for 10-12 minutes, or until the cheese is fully melted and bubbly. Keep an eye on them to avoid burning the cheese.
- Serve and Enjoy: Remove the bagels from the oven and let them cool slightly. Serve warm and watch your guests enjoy these spooky, tasty treats.
Extra Tips:
For an extra crispy base, you can toast the bagels in the oven for a few minutes before adding the sauce and cheese. If you’re aiming for a healthier option, use whole wheat bagels or even mini bagels for smaller portions.
Feel free to get creative with toppings—consider adding tiny bell pepper pieces or mushrooms to give your ghost faces more character. And remember, these Ghostly Pizza Bagels are best enjoyed fresh out of the oven, but they can also be reheated if needed.
Bat Wings With Spicy Dip
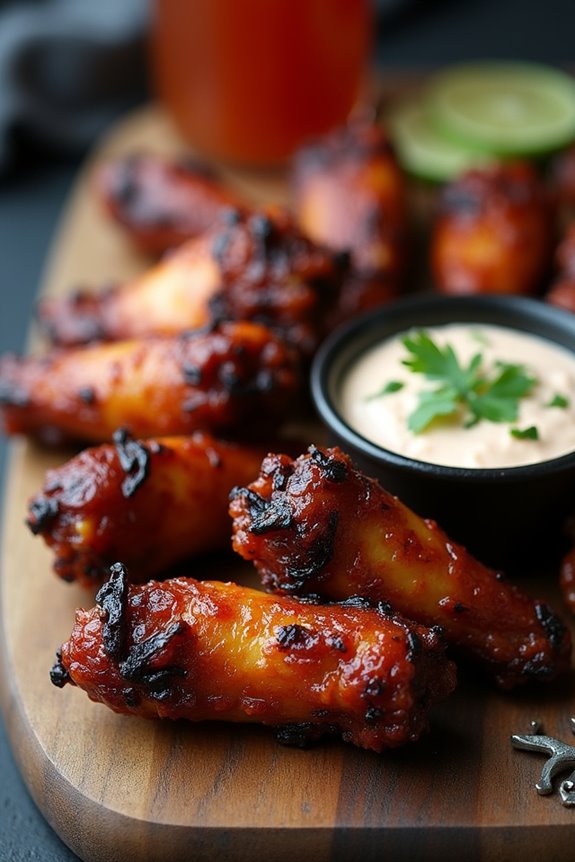
Bat Wings With Spicy Dip are a spooky and delicious addition to any Halloween party. The dish features chicken wings that are marinated and baked to perfection, giving them a dark and crispy exterior, reminiscent of bat wings. Paired with a spicy dip, these wings offer a delightful blend of flavors that’s sure to be a hit with guests.
The key to this dish is in the marinade, which imbues the wings with a deep, savory flavor, while the dip adds an exciting kick that complements the wings beautifully. This recipe is designed to serve 4-6 people, making it perfect for a small gathering.
The preparation involves marinating the wings, then baking them until they reach the desired crispiness. The spicy dip is quick to prepare and adds a fiery contrast to the savory wings. Whether you’re hosting a Halloween party or simply enjoying a themed dinner with family, these Bat Wings With Spicy Dip are sure to impress and satisfy.
Ingredients:
- 2 pounds of chicken wings
- 1/2 cup soy sauce
- 1/4 cup balsamic vinegar
- 1 tablespoon Worcestershire sauce
- 2 tablespoons olive oil
- 1 teaspoon garlic powder
- 1 teaspoon onion powder
- 1 teaspoon smoked paprika
- 1/2 teaspoon black pepper
- 1/2 teaspoon salt
- 1/2 teaspoon cayenne pepper
- 1 cup sour cream
- 2 tablespoons hot sauce
- 1 tablespoon lime juice
- 1 tablespoon chopped fresh cilantro
Instructions:
- Prepare the Marinade: In a large bowl, mix together the soy sauce, balsamic vinegar, Worcestershire sauce, olive oil, garlic powder, onion powder, smoked paprika, black pepper, salt, and cayenne pepper. This mixture will serve as your marinade, infusing the chicken wings with rich flavor.
- Marinate the Wings: Add the chicken wings to the marinade, ensuring they’re fully coated. Cover the bowl with plastic wrap and refrigerate for at least 2 hours, or overnight for more intense flavor absorption.
- Preheat the Oven: Preheat your oven to 400°F (200°C). Line a baking sheet with aluminum foil and place a wire rack on top. This setup will allow the wings to cook evenly and become crispy.
- Bake the Wings: Arrange the marinated wings on the wire rack, ensuring they’re spaced apart. Bake in the preheated oven for 40-45 minutes or until the wings are dark and crispy, turning them halfway through the cooking time for even browning.
- Prepare the Spicy Dip: While the wings are baking, prepare the spicy dip. In a small bowl, combine the sour cream, hot sauce, lime juice, and chopped cilantro. Mix well until all ingredients are thoroughly combined.
- Serve: Once the wings are done, remove them from the oven and allow them to cool for a few minutes. Serve the bat wings alongside the spicy dip, garnished with additional cilantro if desired.
Extra Tips:
For best results, let the wings marinate overnight, as this allows the flavors to penetrate deeply into the meat. If you prefer a milder dip, reduce the amount of hot sauce, or substitute it with a mild salsa.
To enhance the presentation, consider adding edible black food coloring to the marinade for an even darker “bat wing” appearance. Additionally, using fresh lime juice in the dip enhances its freshness and tang, perfectly balancing the spiciness.
Creepy Crudités Platter
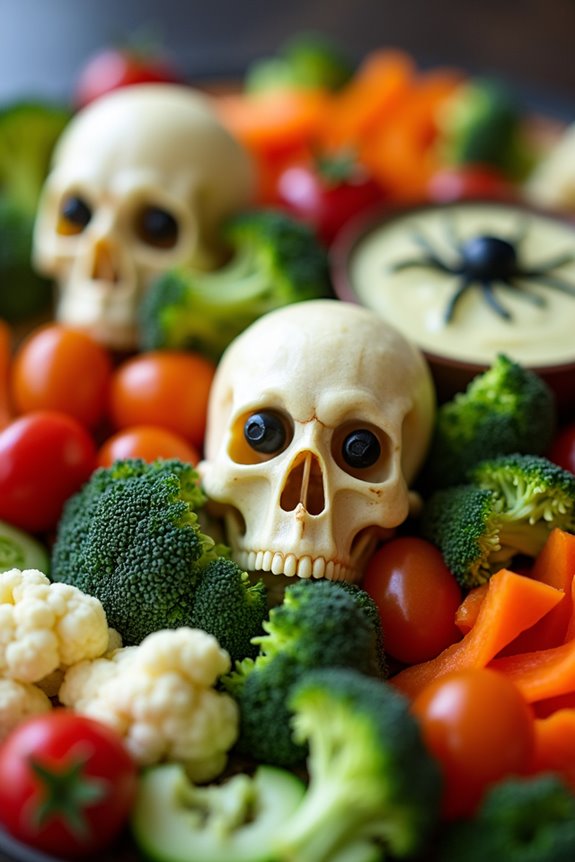
Bring some spookiness to your Halloween party with a Creepy Crudités Platter. This dish combines the freshness of raw vegetables with the eerie charm of Halloween, turning a simple platter into a conversation starter. Perfect for guests who appreciate a healthy snack amidst the candy overload, this platter will add a touch of frightful fun to your festivities.
The key to a successful Creepy Crudités Platter is in the presentation. With a little creativity, you can transform ordinary veggies into creepy creatures and ghoulish delights. Serve them with a side of haunted hummus or spooky spinach dip to complete the eerie effect. This recipe serves 4-6 people, making it an ideal choice for intimate gatherings or as part of a larger buffet spread.
Ingredients (for 4-6 people):
- 1 bunch of celery
- 1 cucumber
- 1 pint of cherry tomatoes
- 1 red bell pepper
- 1 yellow bell pepper
- 1 bunch of radishes
- 1 cup of baby carrots
- 1 cup of broccoli florets
- 1 cup of cauliflower florets
- 1 cup of black olives
- 1 tub of hummus
- 1 tub of spinach dip
- 4-6 small whole pickles
Instructions:
- Prepare the Vegetables: Wash all the vegetables thoroughly. Peel the cucumber and celery if desired, then slice them into sticks about 3-4 inches long. Halve the cherry tomatoes and slice the bell peppers and radishes into rings or strips.
- Shape the Vegetables: Use a small paring knife to carve eyes and mouths into the radishes, making them look like little skulls. Cut the olives into halves and use them to create ‘spider’ decorations on top of the hummus and spinach dip.
- Arrange on a Platter: On a large platter, arrange the vegetables in clusters, keeping similar colors together for a vibrant display. Place the carved radish skulls prominently and scatter the olive spiders throughout for a creepy effect.
- Add Dips: Place the tubs of hummus and spinach dip in the center of the platter. For added spookiness, insert a few baby carrots or celery sticks into the dips to look like fingers reaching out.
- Finish with Pickles: Finally, add the pickles to the plate, either whole or sliced, for an additional touch of green and to complement the flavors of the other vegetables.
Extra Tips:
For an enhanced spooky presentation, consider using a black or dark-colored platter to contrast with the bright vegetables. You can also sprinkle a few plastic spiders or other Halloween-themed decorations around the platter for added effect.
If you want to get even more creative, carve small jack-o’-lantern faces into the bell peppers before slicing them into rings. This dish isn’t only visually appealing but also allows guests to mix and match their favorite veggies with dips, making it a versatile addition to any Halloween spread.
Bloody Mary Shrimp Shooters

Elevate your Halloween party with these spine-chilling Bloody Mary Shrimp Shooters. This creative appetizer combines the classic flavors of a Bloody Mary cocktail with succulent shrimp, offering a quick and delightful bite that will impress your guests.
These shooters aren’t only visually striking with their vibrant color, but they also provide a revitalizing and zesty taste that pairs perfectly with the spooky theme of the night.
Perfect for serving 4-6 people, these Bloody Mary Shrimp Shooters are easy to prepare and can be made ahead of time to allow you to enjoy the festivities without being tied to the kitchen.
The combination of tangy tomato juice, a hint of spicy horseradish, and the umami-rich Worcestershire sauce make these shooters an irresistible treat. Serve them in shot glasses for an elegant presentation, and let the party begin!
Ingredients (for 4-6 servings):
- 1 pound medium shrimp, peeled and deveined
- 2 cups tomato juice
- 2 tablespoons vodka (optional)
- 1 tablespoon prepared horseradish
- 1 tablespoon Worcestershire sauce
- 1 teaspoon hot sauce (like Tabasco)
- 1 tablespoon lemon juice
- Celery salt, to taste
- Freshly ground black pepper, to taste
- 6-8 cherry tomatoes, halved
- 1-2 stalks of celery, cut into small sticks for garnish
- 1 lemon, cut into wedges for garnish
- Fresh parsley, for garnish
Instructions:
1. Cook the Shrimp: Begin by bringing a large pot of water to a boil. Once boiling, add the shrimp and cook for about 2-3 minutes, or until they turn pink and opaque.
Drain and immediately transfer the shrimp to a bowl of ice water to stop the cooking process. Once cool, drain and set aside.
2. Prepare the Bloody Mary Mixture: In a large mixing bowl, combine the tomato juice, vodka (if using), horseradish, Worcestershire sauce, hot sauce, lemon juice, celery salt, and black pepper.
Stir well until all ingredients are thoroughly mixed. Adjust the seasoning to your liking.
3. Assemble the Shooters: In each shot glass, place a halved cherry tomato at the bottom. Pour the Bloody Mary mixture into the shot glasses, filling them about three-quarters full.
4. Add the Shrimp: Place one or two cooked shrimp on the rim of each shot glass. Confirm that the tails are hanging over the edge for easy grabbing.
5. Garnish: Finish by adding a celery stick, a lemon wedge, and a sprig of parsley to each glass for Garnish. This not only adds flavor but also enhances the visual appeal of the dish.
Extra Tips:
For an extra kick, consider rimming the shot glasses with a blend of celery salt and chili powder before filling them with the Bloody Mary mixture. This adds an additional layer of flavor and spice.
If you prefer a non-alcoholic version, simply omit the vodka, and the shooters will still be delicious. Feel free to customize the level of spice by adjusting the amount of hot sauce to cater to your taste preferences.
Ultimately, these shooters are best served chilled, so keep them refrigerated until ready to serve.
Frankenstein Guacamole Cups

When it comes to serving spooky-themed snacks, Frankenstein Guacamole Cups are both a delicious and visually appealing choice. These fun and ghoulish little appetizers are perfect for Halloween parties, offering a creative twist on classic guacamole. The cups are made to resemble Frankenstein’s monster, complete with a vibrant green hue and a spooky face. Not only do they taste great, but they also make for an engaging centerpiece on your Halloween snack table.
This recipe is designed to serve 4-6 people, making it an ideal choice for small gatherings. The guacamole is served in individual cups, making it easy for guests to grab and enjoy. The guacamole itself is rich, creamy, and full of fresh flavors, while the presentation adds a playful element to your spread. With just a few ingredients and simple steps, you can whip up a batch of these delightful Frankenstein Guacamole Cups in no time.
Ingredients:
- 3 ripe avocados
- 1 lime, juiced
- 1 small red onion, finely chopped
- 1 roma tomato, diced
- 2 tablespoons fresh cilantro, chopped
- Salt and pepper to taste
- 6 mini tortilla cups or small plastic cups
- Black olives, sliced (for eyes and mouth)
- 1 cucumber, sliced (for bolts)
- 1 red bell pepper, cut into small strips (for hair)
Cooking Instructions:
- Prepare the Guacamole: In a medium bowl, mash the avocados with a fork until smooth. Stir in lime juice, red onion, roma tomato, cilantro, salt, and pepper. Mix until well combined and adjust seasoning to taste.
- Fill the Cups: Spoon the guacamole evenly into the mini tortilla cups or small plastic cups, filling almost to the top.
- Create the Face: Arrange two black olive slices on each cup to form the eyes. Use additional olive slices to create a mouth shape. For the bolts, insert a cucumber slice into each side of the cup, imitating Frankenstein’s neck bolts.
- Add the Hair: Finish by arranging strips of red bell pepper around the top edge of each cup to mimic Frankenstein’s hair.
- Serve: Place the completed Frankenstein Guacamole Cups on a festive platter and serve immediately.
Extra Tips:
To maintain your guacamole’s freshness and vibrant color, prepare it close to the time you plan to serve it, as avocados can brown quickly. If you need to prepare it in advance, cover the surface of the guacamole with plastic wrap, pressing it against the surface to minimize air exposure.
You can also get creative with the toppings—try using different vegetables or herbs to customize the face and make it even more unique. Enjoy the creativity, and have fun with this spooky treat!
Skeleton Bone Pretzels
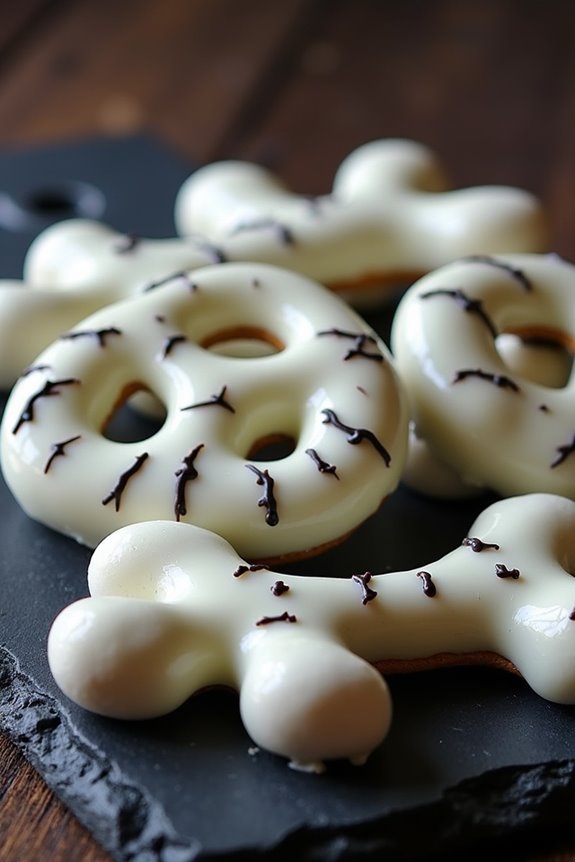
Skeleton Bone Pretzels make for a spine-chilling yet delicious addition to your Halloween finger foods spread. These eerie treats aren’t only visually enchanting but also tantalizingly tasty, perfect for adding a spooky touch to your festivities. With just the right combination of sweet and salty flavors, they’re sure to be a hit among both kids and adults.
Imagine the delight on your guests’ faces as they reach for these cleverly crafted snacks, only to discover they’re as delightful to eat as they’re to look at. The secret to creating these bony delights lies in the use of pretzel rods, white chocolate, and mini marshmallows. By cleverly arranging these simple ingredients, you can transform ordinary snacks into a hauntingly creative masterpiece.
Whether you’re hosting a Halloween party or simply looking to surprise your family with a themed treat, Skeleton Bone Pretzels are an easy-to-make option that doesn’t skimp on flavor or presentation. Let’s plunge into the recipe and see how you can bring these spooky snacks to life.
Ingredients (Serving size: 4-6 people):
- 12 pretzel rods
- 1 cup white chocolate chips or candy melts
- 24 mini marshmallows
- 2 teaspoons coconut oil or vegetable shortening
- Optional: Black gel icing for decoration
Instructions:
- Prepare the Work Area: Begin by lining a baking sheet with parchment paper. This will be where you place your pretzels after dipping them in chocolate, so make sure it’s ready before you start.
- Assemble the Bones: Take each pretzel rod and place a mini marshmallow on each end. Gently press the marshmallows onto the pretzel to make sure they stick, resembling the ends of a bone.
- Melt the Chocolate: In a microwave-safe bowl, combine the white chocolate chips with the coconut oil or vegetable shortening. Microwave in 20-second intervals, stirring in between, until the mixture is smooth and fully melted.
- Coat the Pretzels: Holding the center of the pretzel rod, dip each assembled pretzel into the melted white chocolate. Use a spoon to help cover the marshmallows and the pretzel thoroughly. Allow any excess chocolate to drip back into the bowl.
- Set the Bones: Place the coated pretzels onto the prepared baking sheet. Once all pretzels are coated, place the baking sheet in the refrigerator for about 15 minutes or until the chocolate is set.
- Decorate (Optional): If desired, use black gel icing to add spooky details to your bones once the chocolate has hardened. You can draw cracks or lines to enhance their bony appearance.
Extra Tips:
To guarantee the best results, make sure the white chocolate is fully melted and smooth before dipping the pretzels. Adding a bit of coconut oil or shortening helps achieve a glossy finish and smoother coating.
If you find the chocolate is thickening too quickly while dipping, you can briefly reheat it to maintain the right consistency. For an extra spooky touch, consider adding a drop of red food coloring to some of the white chocolate for a blood-like effect on the bones, or serve with a side of raspberry sauce for dipping.
Enjoy your monstrously delicious Skeleton Bone Pretzels!
Dracula’s Bloody Meatballs

Dracula’s Bloody Meatballs are the perfect Halloween finger food to add a touch of spooky delight to your party spread. These sinister-looking yet delicious meatballs are drenched in a rich, blood-red sauce that will have your guests coming back for more. The combination of savory flavors in the meatballs paired with the sweet and tangy sauce creates an irresistible dish that’s both fun and flavorful.
Whether you’re hosting a Halloween bash or simply want to add a bit of themed fun to your dinner table, these meatballs are bound to impress. The recipe serves 4-6 people, making it ideal for a small gathering or family meal.
The meatballs are made with a blend of ground beef and pork, seasoned to perfection, then simmered in a sauce made from tomatoes and a hint of vinegar, which gives it that perfect blood-red color. Serve these with a toothpick for easy handling, and watch them disappear from the plate as quickly as a vampire in sunlight!
Ingredients:
- 1 pound ground beef
- 1/2 pound ground pork
- 1/2 cup breadcrumbs
- 1/4 cup grated Parmesan cheese
- 2 cloves garlic, minced
- 1 large egg
- 1 teaspoon salt
- 1/2 teaspoon black pepper
- 1/2 teaspoon dried oregano
- 1/2 teaspoon dried basil
- 1/4 teaspoon crushed red pepper flakes
- 2 tablespoons olive oil
- 1 cup tomato sauce
- 1/4 cup ketchup
- 2 tablespoons red wine vinegar
- 2 tablespoons brown sugar
- 1/4 teaspoon red food coloring (optional)
Cooking Instructions:
- Preheat the Oven: Start by preheating your oven to 375°F (190°C). This guarantees that the oven is hot enough to cook the meatballs evenly.
- Prepare the Meatball Mixture: In a large mixing bowl, combine the ground beef, ground pork, breadcrumbs, Parmesan cheese, minced garlic, egg, salt, black pepper, oregano, basil, and red pepper flakes. Mix the ingredients using your hands until well combined, but be careful not to overwork the mixture, as this can make the meatballs tough.
- Shape the Meatballs: Roll the mixture into meatballs about 1 inch in diameter. You should be able to make roughly 24-30 meatballs, depending on their size.
- Brown the Meatballs: Heat the olive oil in a large skillet over medium heat. Add the meatballs in batches, being careful not to overcrowd the pan. Brown them on all sides, which should take about 5 minutes. Remove them from the skillet and place them on a baking sheet lined with parchment paper.
- Bake the Meatballs: Transfer the baking sheet to the preheated oven and bake the meatballs for about 15-20 minutes, or until they’re fully cooked through.
- Prepare the Bloody Sauce: While the meatballs are baking, make the sauce. In the same skillet used for browning the meatballs, add the tomato sauce, ketchup, red wine vinegar, brown sugar, and a few drops of red food coloring if using. Stir the mixture and bring it to a simmer over medium heat. Let it cook for about 5 minutes until it thickens slightly.
- Combine Meatballs and Sauce: Once the meatballs are done baking, transfer them to the skillet with the sauce. Toss the meatballs gently in the sauce to guarantee they’re well coated.
- Serve: Serve the meatballs hot, with toothpicks for easy grabbing, and watch your guests enjoy the spooky delight!
Extra Tips:
For an even spookier presentation, try serving the meatballs on a rustic wooden platter or in a cauldron-shaped dish. If you want to add more heat to Dracula’s Bloody Meatballs, increase the amount of crushed red pepper flakes or add a dash of hot sauce to the sauce.
For a quick version, you can use store-bought meatballs and simply make the sauce, but homemade always tastes better!
Zombie Brain Jell-O Shots
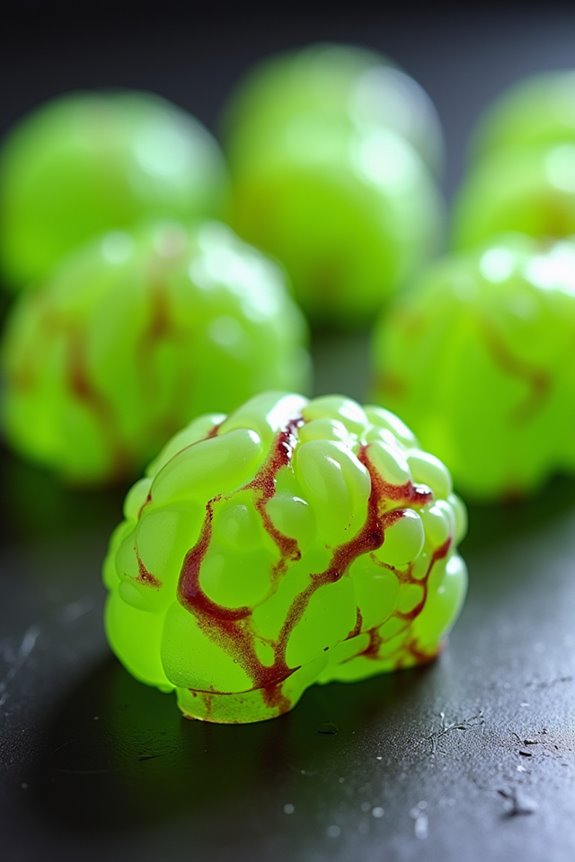
Zombie Brain Jell-O Shots are the perfect addition to your Halloween party spread, combining the spooky factor with a deliciously fun treat. These gory-looking shots are both creepy and tasty, making them a hit with both adults and older kids. The gelatinous texture and eerie appearance will undoubtedly impress your guests, while the fruity flavor will keep them coming back for more.
Whether you’re hosting a full-fledged Halloween bash or a small gathering, these Zombie Brain Jell-O Shots are bound to add a touch of frightful fun to your festivities.
Creating these spine-chilling shots is surprisingly easy and doesn’t require a lot of time. The recipe involves preparing a gelatin mixture that you’ll mold into brain shapes using a silicone mold. With a few simple ingredients and some chilling time, you’ll have a batch of delightfully gruesome Zombie Brain Jell-O Shots to serve. The recipe is designed to serve 4-6 people, making it ideal for an intimate group of fiends.
Ingredients:
- 1 package (3 oz) of lime-flavored Jell-O
- 1 cup boiling water
- 1/2 cup cold water
- 1/2 cup vodka (or substitute with apple juice for a non-alcoholic version)
- 1/4 cup sweetened condensed milk
- Green food coloring (optional)
- Red food coloring
- Brain-shaped silicone mold
Instructions:
- Prepare the Gelatin Base: Begin by dissolving the lime-flavored Jell-O in 1 cup of boiling water. Stir well until the gelatin is fully dissolved, leaving no gritty texture.
- Mix in Cold Ingredients: Add 1/2 cup of cold water and 1/2 cup of vodka to the dissolved gelatin. If you prefer a non-alcoholic version, substitute the vodka with apple juice. Stir the mixture thoroughly to guarantee all the ingredients are well-combined.
- Add Sweetness and Color: Incorporate 1/4 cup of sweetened condensed milk into the mixture. This will give your Jell-O shots a creepy, milky appearance. For a more vibrant color, add a few drops of green food coloring. Mix until the color is even throughout.
- Prepare the Mold: Lightly grease the brain-shaped silicone mold to make removing the Jell-O easier once set. Carefully pour the gelatin mixture into the mold, filling each cavity to the top.
- Create the Bloody Effect: Add a couple of drops of red food coloring to each brain cavity. Use a toothpick to swirl the red color slightly, giving it a bloody, marbled appearance.
- Chill to Set: Place the filled mold into the refrigerator and allow it to chill for at least 4 hours, or until the Jell-O has fully set.
- Unmold and Serve: Once set, gently remove each brain-shaped Jell-O shot from the mold. Arrange them on a serving platter for your guests to enjoy.
For the best results, make sure to use a high-quality silicone mold to achieve the most realistic brain shapes. If you want a more intense flavor, consider using a flavored vodka that complements the lime Jell-O.
These shots can be made a day in advance, allowing you to focus on other party preparations. Remember to keep them chilled until serving time to maintain their shape and texture.
Black Cat Oreo Truffles
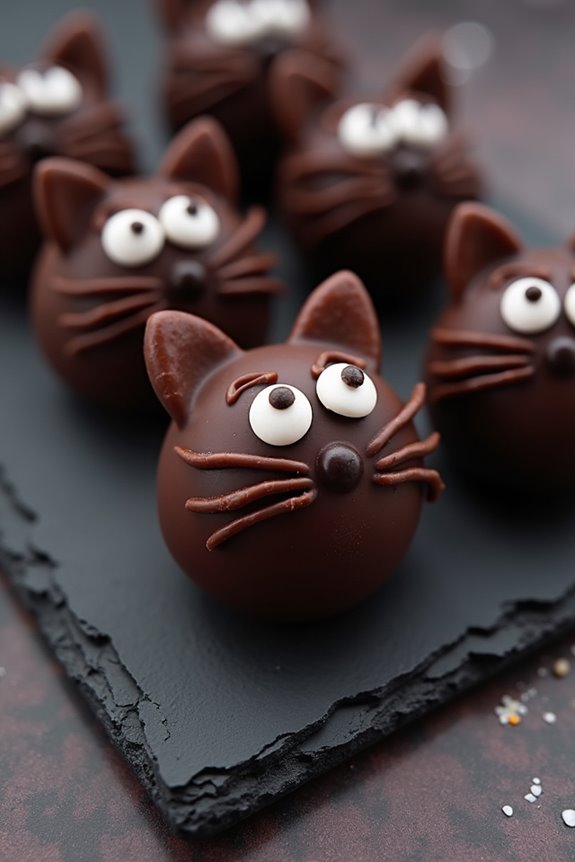
Halloween is the perfect time to indulge in spooky yet delicious treats, and Black Cat Oreo Truffles are an excellent addition to your festive finger food spread. These delightful truffles aren’t only adorable but also incredibly easy to make. With a rich Oreo cream cheese center and a smooth chocolate coating, these truffles are guaranteed to be a hit at any Halloween gathering. Their cute black cat design will leave your guests impressed and reaching for more.
This recipe for Black Cat Oreo Truffles serves 4-6 people, making it suitable for a small Halloween party or family get-together. The combination of crushed Oreo cookies and cream cheese creates a luscious filling, while the chocolate coating adds a delightful crunch. The truffles are then decorated with candy eyes and licorice whiskers to transform them into charming black cats. Follow the instructions below to create these spooky treats.
Ingredients:
- 36 Oreo cookies
- 8 oz cream cheese, softened
- 12 oz semisweet chocolate chips
- 24 candy eyes
- Black licorice strings, cut into small pieces for whiskers
- 12 chocolate-covered almonds (for ears)
- Black food coloring (optional)
Instructions:
- Prepare the Oreo Mixture:
- Place the Oreo cookies in a food processor and pulse until they’re finely crushed. Alternatively, you can place them in a resealable plastic bag and crush them with a rolling pin.
- In a large bowl, combine the crushed Oreos with the softened cream cheese. Mix until fully combined and smooth, forming a dough-like consistency.
- Shape the Truffles:
- Using your hands, roll the mixture into small balls, about 1 inch in diameter. Place the balls on a baking sheet lined with parchment paper.
- Chill the Truffles:
- Transfer the baking sheet to the refrigerator and chill the truffles for about 30 minutes. This will make them easier to handle when coating with chocolate.
- Melt the Chocolate:
- In a microwave-safe bowl, melt the semisweet chocolate chips in 30-second intervals, stirring in between, until fully melted and smooth. If desired, add a drop of black food coloring to darken the chocolate.
- Coat the Truffles:
- Using a fork, dip each chilled truffle into the melted chocolate, making certain it’s completely coated. Gently tap the fork on the edge of the bowl to remove any excess chocolate, then return the truffle to the parchment-lined baking sheet.
- Decorate the Truffles:
- Before the chocolate sets, quickly place two candy eyes on each truffle. Insert a chocolate-covered almond on top for each ear and arrange small pieces of licorice to resemble whiskers.
- Set the Truffles:
- Allow the chocolate to harden by placing the baking sheet back in the refrigerator for at least 15 minutes.
Extra Tips:
To make your Black Cat Oreo Truffles extra special, consider using different colored candy eyes for a fun variation. If you prefer a different flavor, you can substitute the semisweet chocolate with milk or dark chocolate chips.
For a smoother finish, you can double-coat the truffles by dipping them in chocolate a second time after the first layer sets. Confirm that the cream cheese is at room temperature before mixing it with the crushed Oreos to achieve a smooth, even consistency.
Enjoy these adorable and tasty treats at your Halloween celebration!
Vampire Bat Cheese Bites
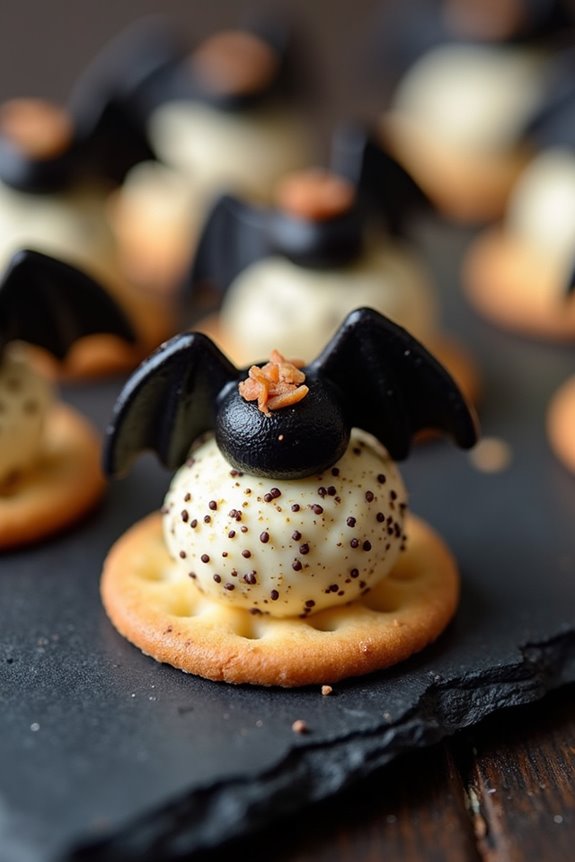
Vampire Bat Cheese Bites are the perfect appetizer to set a spooky mood at your Halloween party. These little bites aren’t only delicious but also bring a whimsical touch to your snack table. With their savory taste and fun presentation, they’re sure to be a hit with both kids and adults alike. The combination of creamy cheese and crispy crackers, all shaped into eerie bats, makes them an irresistible treat.
These cheese bites are simple to make and require only a handful of ingredients. You can prepare them ahead of time, leaving you more time to enjoy the festivities with your guests. The bite-sized servings make them easy to handle and perfect for mingling. Whether you’re hosting a large gathering or a small get-together, these Vampire Bat Cheese Bites are an essential addition to your Halloween menu.
Ingredients (Serving Size: 4-6 people)
- 8 ounces cream cheese, softened
- 1 cup shredded sharp cheddar cheese
- 1 tablespoon hot sauce (optional)
- 1 teaspoon garlic powder
- 1 teaspoon onion powder
- 1/2 teaspoon salt
- 24 round crackers
- 24 black olives, halved
- 1/4 cup poppy seeds
- 24 almond slivers
Cooking Instructions
- Prepare the Cheese Mixture: In a large mixing bowl, combine the softened cream cheese, shredded cheddar cheese, hot sauce (if using), garlic powder, onion powder, and salt. Mix until well blended and smooth.
- Shape the Bites: Roll the cheese mixture into small balls, about 1 inch in diameter. You should have around 24 balls when finished.
- Assemble the Bats: Place each cheese ball onto a round cracker. Gently press down to slightly flatten the top of the cheese ball, making it secure on the cracker.
- Decorate with Olives and Almonds: Insert two black olive halves into each cheese ball to create the bat’s “wings.” Use two almond slivers to form the “ears” at the top of each ball.
- Finish with Poppy Seeds: Sprinkle poppy seeds generously over the cheese balls to give a textured effect, resembling bat fur.
- Chill Before Serving: Place the assembled Vampire Bat Cheese Bites in the refrigerator for at least 30 minutes to firm up before serving.
Extra Tips
For an extra spooky presentation, consider serving the Vampire Bat Cheese Bites on a platter lined with black or dark-colored napkins to enhance the bat theme.
If you want to add more flavor, you can experiment with different types of cheese, such as pepper jack or gouda, for a twist on the classic recipe.
To save time, prepare the cheese balls a day in advance and store them in the refrigerator, assembling them with the crackers and decorations on the day of the party.
Enjoy your festive and frightful cheese bites!