

Halloween is creeping up, and I’m bubbling over with excitement to share some frightfully fun snack ideas with you. Picture mummy hot dogs and creepy-crawly cupcakes gracing your festive table. Each recipe is easy to whip up and will surely cast a spell on your guests. Are you ready to explore more ghoulish goodies that will make your Halloween unforgettable? Let’s begin creating these enchanting treats!
Creepy-Crawly Cupcakes
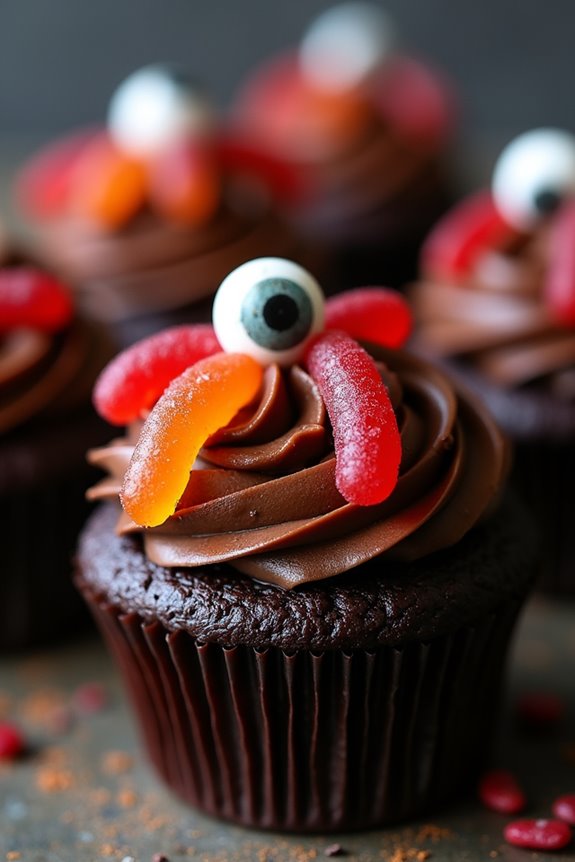
Celebrate Halloween with a touch of spooky delight by preparing Creepy-Crawly Cupcakes! These fun and eerie cupcakes are perfect for any Halloween gathering, adding a whimsical yet ghoulish vibe to your dessert table. With a moist chocolate base topped with a rich, dark frosting, these cupcakes are adorned with gummy worms and candy eyes that will send shivers down anyone’s spine. Not only do they look scary, but they taste devilishly good, making them a hit among kids and adults alike.
To create these Halloween treats, you’ll start by baking a batch of chocolate cupcakes and then whip up a deliciously dark frosting. The decorating part is where the magic happens—transforming the simple cupcakes into a creepy-crawly masterpiece. These cupcakes are designed to serve 4-6 people, making them a great addition to any Halloween party or family gathering. Gather your ingredients and get ready to delight your guests with these spine-chilling, yet delectable treats!
Ingredients (Serves 4-6):
- 1 cup all-purpose flour
- 1 cup granulated sugar
- 1/3 cup unsweetened cocoa powder
- 1/2 teaspoon baking soda
- 1/4 teaspoon salt
- 1/2 cup unsalted butter, melted
- 2 large eggs
- 1 teaspoon vanilla extract
- 1/2 cup buttermilk
- 1/2 cup boiling water
- 1 cup unsalted butter, softened (for frosting)
- 3 1/2 cups powdered sugar
- 1/2 cup unsweetened cocoa powder (for frosting)
- 1/4 cup heavy cream
- Gummy worms
- Candy eyeballs
Instructions:
- Preheat and Prepare: Preheat your oven to 350°F (175°C). Line a muffin tin with 12 cupcake liners to guarantee the cupcakes don’t stick and are easy to remove.
- Mix Dry Ingredients: In a large mixing bowl, whisk together the flour, sugar, cocoa powder, baking soda, and salt until well combined.
- Combine Wet Ingredients: In a separate bowl, mix the melted butter, eggs, and vanilla extract until smooth. Add the buttermilk and stir until fully incorporated.
- Combine and Blend: Gradually add the wet ingredients to the dry ingredients, mixing until just combined. Slowly pour in the boiling water and mix until the batter is smooth and slightly thin.
- Bake: Divide the batter evenly among the cupcake liners, filling each about two-thirds full. Bake in the preheated oven for 18-20 minutes, or until a toothpick inserted into the center comes out clean. Allow the cupcakes to cool completely on a wire rack.
- Prepare Frosting: In a large bowl, beat the softened butter with a hand mixer until creamy. Gradually add the powdered sugar and cocoa powder, mixing on low speed until combined. Slowly add the heavy cream and beat until the frosting is fluffy and spreadable.
- Decorate: Once the cupcakes are cool, frost them generously with the chocolate frosting. Place gummy worms on top of each cupcake, letting some hang over the edges for a creepy effect. Add candy eyeballs for an extra spooky touch.
- Serve: Arrange the Creepy-Crawly Cupcakes on a Halloween-themed platter and serve them to your guests.
Extra Tips:
For the best results, make sure that all your ingredients, especially the butter, are at room temperature before you begin. This will help in achieving a smooth batter and frosting.
When adding the boiling water, do so gradually and mix gently to avoid splashes. You can customize the decorations by using different types of gummy candies or edible glitter for an extra eerie effect.
If you’re hosting a larger gathering, simply double the recipe to make more creepy cupcakes. Enjoy the spooktacular fun of baking and decorating these Halloween treats!
Ghostly Popcorn Balls

Ghostly Popcorn Balls are a spooktacular treat perfect for any Halloween gathering. These delicious and festive snacks combine the classic crunch of popcorn with a sweet, marshmallowy coating, all shaped into ghostly spheres.
Whether you’re hosting a Halloween party or just want to enjoy a themed snack with your family, these Ghostly Popcorn Balls are certain to be a hit. Not only are they easy to make, but they also add a playful touch to your Halloween spread.
The beauty of Ghostly Popcorn Balls lies in their simplicity and versatility. You can easily customize them with different colors and decorations to suit your Halloween theme. The marshmallow coating holds the popcorn together, while a touch of food coloring and candy eyes bring these ghostly treats to life.
Ideal for a serving size of 4-6 people, this recipe is perfect for a small gathering or a cozy family night in.
Ingredients:
- 10 cups popped popcorn
- 1/2 cup unsalted butter
- 1 package (10 oz) mini marshmallows
- 1/2 teaspoon vanilla extract
- Pinch of salt
- Black food coloring gel
- Candy eyes
Instructions:
- Pop the Popcorn: Begin by popping 10 cups of popcorn using your preferred method, whether it be stovetop, air-popped, or microwave. Once done, verify the popcorn is free from any unpopped kernels and place it in a large mixing bowl.
- Prepare the Marshmallow Mixture: In a medium saucepan over medium heat, melt 1/2 cup of unsalted butter. Add the entire package of mini marshmallows and stir continuously until they’re completely melted and smooth. Remove from heat and stir in the vanilla extract and a pinch of salt.
- Add Food Coloring: To give your popcorn balls a ghoulish appearance, add a small amount of black food coloring gel to the marshmallow mixture. Stir well to achieve an even color distribution.
- Combine Popcorn and Marshmallow Mixture: Pour the colored marshmallow mixture over the popped popcorn. Using a spatula, gently fold the popcorn and marshmallow mixture until all the popcorn is evenly coated.
- Shape the Popcorn Balls: Let the mixture cool slightly before handling. Grease your hands with a bit of butter or cooking spray to prevent sticking. Take a handful of the popcorn mixture and shape it into balls of your desired size. Place them on a lined baking sheet to set.
- Decorate: Before the popcorn balls fully set, press candy eyes into each ball to create the ghostly appearance. Allow them to cool completely at room temperature before serving.
Extra Tips: When shaping the popcorn balls, work quickly as the marshmallow mixture will harden as it cools. If you find the mixture sticking to your hands, reapply butter or cooking spray as needed.
Additionally, you can experiment with different decorations, like drizzling white chocolate or using other Halloween-themed candies, to personalize your Ghostly Popcorn Balls. Enjoy these treats fresh for the best taste and texture.
Spooky Spider Deviled Eggs
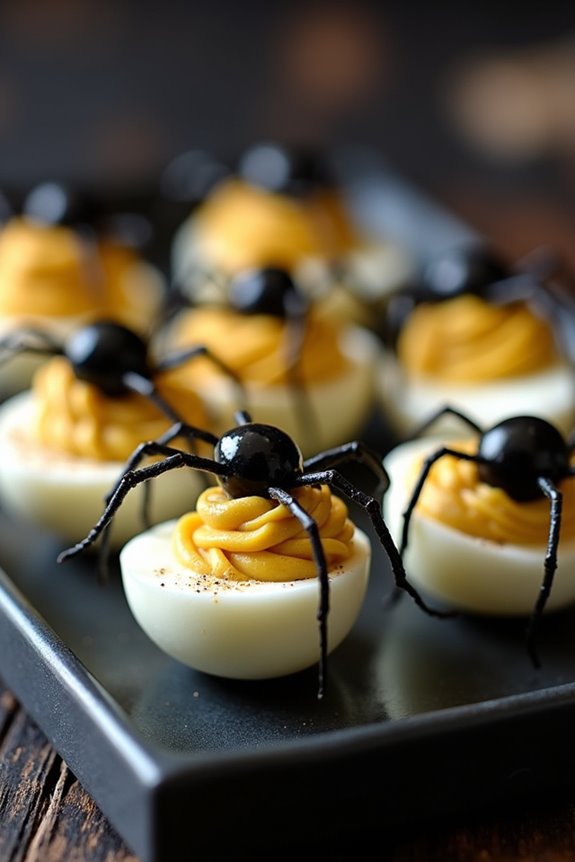
Halloween is the perfect occasion to delight your family and friends with creative and eerie treats. Spooky Spider Deviled Eggs are a fun, savory snack that adds a creepy touch to your Halloween spread. These deviled eggs aren’t only delicious but also incredibly eye-catching, with their spider-shaped olive toppings that make them look like something right out of a haunted kitchen. The combination of creamy yolk filling and the slightly salty olives is bound to be a hit at your Halloween gathering.
Creating Spooky Spider Deviled Eggs is a simple yet effective way to impress your guests. This recipe is perfect for a serving size of 4-6 people, making it an ideal appetizer or snack option. With just a few ingredients and a bit of creativity, you can transform ordinary deviled eggs into a spooky delight. The preparation is straightforward, allowing even novice cooks to craft this hauntingly tasty treat.
Ingredients (Serving Size: 4-6 people):
- 6 large eggs
- 3 tablespoons mayonnaise
- 1 teaspoon Dijon mustard
- 1/2 teaspoon apple cider vinegar
- Salt and pepper, to taste
- 12 black olives (pitted)
Instructions:
- Boil the Eggs: Place the eggs in a single layer in a saucepan and cover them with water. Bring the water to a boil over medium-high heat. Once boiling, turn off the heat, cover the pan, and let the eggs sit for about 10-12 minutes.
- Cool and Peel: Transfer the eggs to a bowl of ice water to stop the cooking process and make them easier to handle. Once cooled, peel the eggs carefully and set them aside.
- Prepare the Filling: Cut the eggs in half lengthwise and gently remove the yolks, placing them into a small mixing bowl. Set the egg whites on a serving tray.
- Mix the Filling: Mash the egg yolks with a fork until smooth. Add mayonnaise, Dijon mustard, apple cider vinegar, salt, and pepper to the yolks. Mix until the filling is creamy and well combined.
- Fill the Egg Whites: Spoon or pipe the yolk mixture back into the hollow of each egg white half. Smooth the tops with a small spoon or spatula.
- Create the Spider Toppings: Cut the black olives in half. Use one half for the spider body and slice the other half into thin strips to create the legs. Arrange one olive half on top of each deviled egg and place the strips around it to resemble spider legs.
- Chill Before Serving: Refrigerate the deviled eggs for at least 30 minutes before serving to allow the flavors to meld and the filling to set.
Extra Tips:
When making Spooky Spider Deviled Eggs, it’s important to use eggs that are a few days old, as they’re easier to peel than fresh eggs.
Be sure to cut the olives carefully and evenly to guarantee the spider legs look realistic. You can enhance the spookiness by using red or green olives for a more vibrant look.
If you want to prepare them ahead of time, store the filled eggs in an airtight container in the refrigerator and add the olive spiders just before serving to maintain their freshness and appearance.
Mummy Hot Dogs
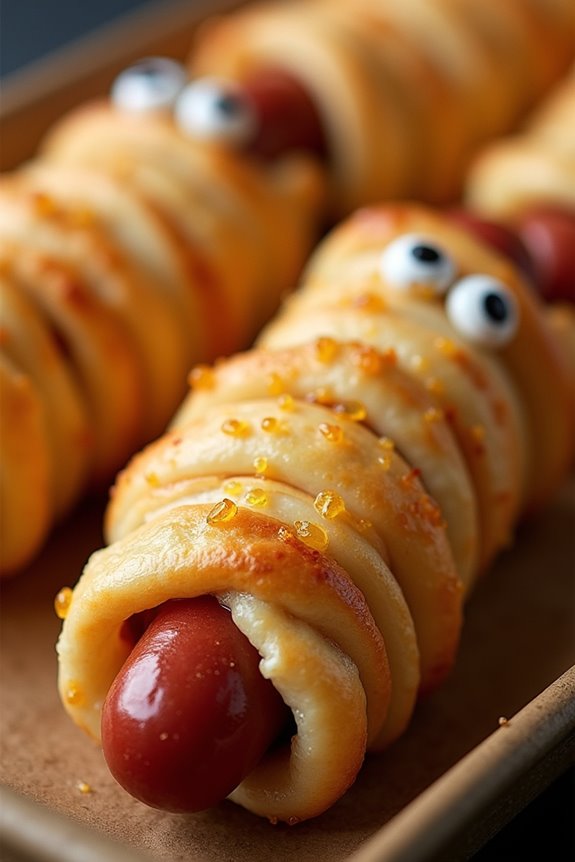
Mummy Hot Dogs are a spooky and delightful treat perfect for any Halloween gathering. This fun and easy recipe transforms a classic snack into a festive and creepy finger food that will impress both kids and adults alike. With just a few simple ingredients, you can create a batch of these adorable little mummies that are bound to be a hit at your Halloween party. The combination of flaky pastry, juicy hot dogs, and a hint of mustard makes for a tasty and enjoyable experience.
Whether you’re hosting a Halloween party or just looking for a fun snack to make with the family, Mummy Hot Dogs are a great choice. They’re quick to prepare, easy to cook, and can be customized to suit your taste preferences. You can even involve the kids in the preparation, making it a fun activity for the whole family. Serve these little mummies with your favorite dipping sauce for an extra touch of flavor, and watch them disappear off the plate!
Ingredients (Serves 4-6 people):
- 8 hot dogs
- 1 can of refrigerated crescent roll dough
- 2 tablespoons of yellow mustard
- 1 egg (optional, for egg wash)
- Candy eyes or dots of mustard/ketchup for eyes
Cooking Instructions:
- Preheat the Oven: Preheat your oven to 375°F (190°C) to guarantee it’s ready for baking the mummies.
- Prepare the Dough: Unroll the crescent roll dough on a clean work surface. Using a sharp knife or pizza cutter, slice the dough into thin strips, about 1/4 inch wide.
- Wrap the Mummies: Take a hot dog and begin wrapping it with the strips of dough, leaving a small gap towards the top for the face. The strips should overlap slightly to give the appearance of a mummy’s bandages.
- Add Eyes: Place two candy eyes at the exposed hot dog area to create the mummy’s face. If you don’t have candy eyes, you can use small dots of mustard or ketchup later after baking.
- Egg Wash (Optional): For a golden finish, brush the dough lightly with beaten egg. This step is optional but recommended for a shiny appearance.
- Bake: Place the wrapped hot dogs on a baking sheet lined with parchment paper. Bake in the preheated oven for 12-15 minutes, or until the dough is golden brown and cooked through.
- Cool and Serve: Let the mummy hot dogs cool slightly before serving. Add mustard or ketchup dots for eyes if not using candy eyes. Serve with additional mustard or ketchup for dipping.
Extra Tips:
For a more flavorful twist, you can use cheese-filled hot dogs or even add a slice of cheese under the dough before wrapping. If you prefer a spicier version, consider using spicy mustard or adding a dash of hot sauce to the mustard before applying it.
It’s also fun to experiment with different types of sausages to cater to various tastes. Keep an eye on the baking time as oven temperatures can vary, and adjust accordingly to prevent over-browning. Enjoy these Mummy Hot Dogs fresh out of the oven for the best taste and texture!
Witch’s Brew Punch
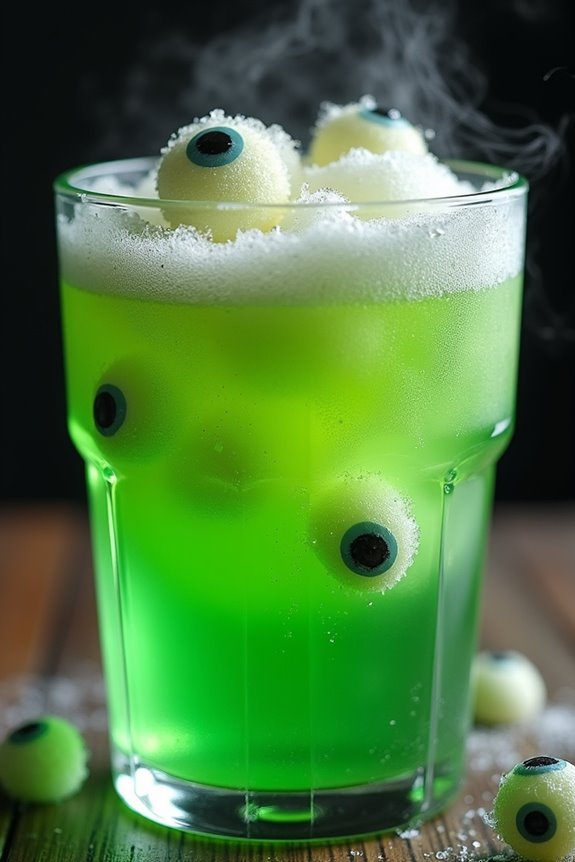
Halloween is the perfect time to get creative in the kitchen, and this Witch’s Brew Punch is sure to be a hit at any spooky gathering. This delightfully eerie concoction combines vibrant colors and bubbling effects to create an enchanting drink that’s as fun to make as it’s to drink.
With its fruity flavors and fizzy texture, this punch is perfect for both kids and adults who want to enjoy a festive beverage without the alcohol. Serve it in a large cauldron-like bowl for added effect, and watch as your guests are captivated by your culinary magic.
This Witch’s Brew Punch recipe is designed to serve 4-6 people, making it ideal for small parties or family gatherings. The ingredients are simple and can be found easily at your local grocery store. Whether you’re hosting a Halloween party or simply looking for a fun drink to enjoy on a cozy autumn evening, this punch will undoubtedly cast a spell on everyone who tries it.
Ingredients (Serves 4-6):
- 2 cups of green apple soda
- 2 cups of lemon-lime soda
- 2 cups of pineapple juice
- 1 cup of lime sherbet
- 1/2 cup of gummy worms
- 1/2 cup of lychee fruit (canned or fresh)
- 1/4 cup of lime juice
- 1 handful of dry ice pellets (optional for effect)
Instructions:
- Prepare the Base: In a large punch bowl, combine the green apple soda, lemon-lime soda, and pineapple juice. Stir gently to mix the liquids without losing the fizz.
- Add Flavor: Gradually stir in the lime juice, making certain it’s evenly distributed throughout the punch. This will add a tangy twist to the sweet base.
- Create the Brew: Add the lime sherbet in small scoops, allowing it to float and slowly melt into the punch. This will create a frothy, mystical layer on the surface.
- Add the Spooky Touches: Scatter the gummy worms and lychee fruit into the punch. The lychee fruit can resemble eyeballs, adding to the Halloween theme.
- Create the Eerie Effect: If desired, use dry ice for a haunting, smoky effect. Carefully add a handful of dry ice pellets to the punch bowl. Use caution and avoid direct contact with the dry ice, as it can cause burns.
- Serve: Use a ladle to serve the punch into cups, making sure each cup has a fair share of the gummy worms and lychee “eyeballs” for the full effect.
Extra Tips:
When using dry ice, take care to handle it with caution. Use tongs or gloves to avoid skin contact, and ensure it’s completely dissolved before serving the punch to avoid ingestion.
For a more adult version, consider adding a splash of vodka or rum. You can also experiment with different sodas and juices to customize the flavor. For added decoration, consider garnishing the rim of each glass with colored sugar or using themed straws for an extra festive touch.
Pumpkin Cheese Ball
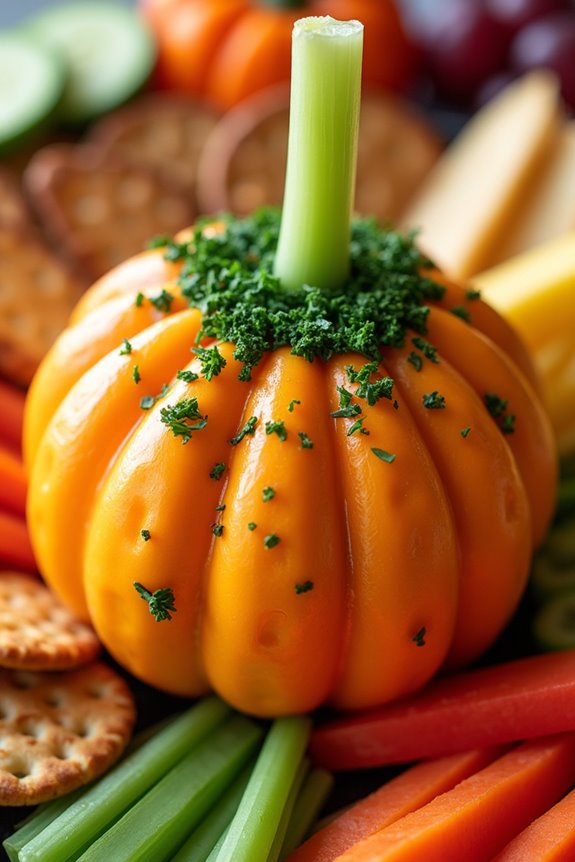
Pumpkin Cheese Ball is a delightful and festive appetizer perfect for Halloween gatherings. This savory treat combines the rich flavors of cream cheese, cheddar, and spices, all shaped into a charming pumpkin form. It’s not only delicious but also adds a touch of seasonal whimsy to your snack table. Serve it with an assortment of crackers, pretzels, or sliced veggies for a complete party experience.
Crafting this Pumpkin Cheese Ball is a breeze, making it a great choice for both novice and seasoned cooks. The dish is visually appealing, thanks to its vibrant orange color and pumpkin-like shape, achieved with a simple trick using food-safe rubber bands. With its creamy texture and flavorful punch, this cheese ball is sure to be a hit at any Halloween gathering, leaving your guests impressed and satisfied.
Ingredients (serves 4-6 people):
- 2 (8 oz) packages of cream cheese, softened
- 2 cups sharp cheddar cheese, shredded
- 1/2 cup grated Parmesan cheese
- 1 tablespoon Worcestershire sauce
- 1 teaspoon garlic powder
- 1/2 teaspoon onion powder
- 1/2 teaspoon smoked paprika
- Salt and pepper to taste
- 1/2 cup finely chopped fresh parsley
- 1 stalk of celery (for the pumpkin stem)
- 4-6 food-safe rubber bands
- Crackers, pretzels, or sliced veggies for serving
Instructions:
- Prepare the Cheese Mixture: In a large mixing bowl, combine the softened cream cheese, shredded cheddar cheese, and grated Parmesan cheese. Mix well until smooth and well combined.
- Add Seasonings: Stir in the Worcestershire sauce, garlic powder, onion powder, smoked paprika, salt, and pepper. Continue mixing until all ingredients are evenly distributed throughout the cheese mixture.
- Shape the Cheese Ball: Transfer the cheese mixture onto a piece of plastic wrap. Wrap it tightly, shaping it into a ball. Use the rubber bands to create grooves around the ball, mimicking the ridges of a pumpkin. Chill in the refrigerator for at least 2 hours, or until firm.
- Add Finishing Touches: Once chilled, remove the cheese ball from the refrigerator and carefully remove the rubber bands and plastic wrap. Roll the cheese ball in the finely chopped parsley until evenly coated.
- Create the Pumpkin Stem: Cut the celery stalk to a suitable length and insert it into the top of the cheese ball to act as the pumpkin’s stem.
- Serve: Place the Pumpkin Cheese Ball on a serving platter and surround it with an assortment of crackers, pretzels, or sliced veggies. Enjoy your festive creation!
Extra Tips: For a more intense flavor, prepare the cheese ball a day in advance to allow the flavors to meld together. Be sure to use freshly shredded cheddar cheese, as pre-shredded varieties often contain anti-caking agents that can affect the texture of the cheese ball.
If you prefer a spicier version, consider adding a pinch of cayenne pepper to the mixture. And don’t forget to place the cheese ball back in the fridge if it begins to soften too much during your party, ensuring it maintains its firm shape throughout the event.
Bat Wings (Buffalo Chicken Wings)

Transform your Halloween party into a spooky feast with these delicious Bat Wings, also known as Buffalo Chicken Wings. These wings are a perfect balance of crispy skin and juicy meat, coated in a tangy and spicy buffalo sauce.
Whether you’re hosting a large gathering or a small get-together, these wings are sure to be a hit among guests of all ages. Not only do they make for a festive addition to your Halloween menu, but they’re also incredibly easy to prepare.
The key to achieving the perfect texture for these Bat Wings lies in the cooking process. By baking them at a high temperature, you guarantee the skin becomes crispy while the inside remains tender and flavorful.
Pair these wings with a side of celery sticks and a creamy ranch or blue cheese dressing for a classic touch. Follow this recipe to make a serving size of 4-6 people, and enjoy a spooky yet tasty treat!
Ingredients:
- 3 pounds of chicken wings
- 1 tablespoon of baking powder
- 1 teaspoon of salt
- 1/2 teaspoon of black pepper
- 1 cup of hot sauce (such as Frank’s RedHot)
- 1/2 cup of unsalted butter
- 1 tablespoon of white vinegar
- Celery sticks (optional)
- Ranch or blue cheese dressing (optional)
Cooking Instructions:
- Preheat the Oven: Preheat your oven to 400°F (200°C). This high heat will help to crisp up the chicken wings.
- Prepare the Wings: Pat the chicken wings dry with paper towels to remove excess moisture. This step is essential for achieving crispy skin.
- Coat the Wings: In a large bowl, combine the baking powder, salt, and black pepper. Toss the chicken wings in the mixture until they’re evenly coated.
- Arrange on Baking Sheet: Place a wire rack on a baking sheet. Arrange the coated chicken wings in a single layer on the rack. This setup allows air to circulate around the wings, promoting even cooking and crispiness.
- Bake the Wings: Bake the wings in the preheated oven for 45-50 minutes, turning them halfway through, until they’re golden brown and crispy.
- Prepare the Sauce: While the wings are baking, make the buffalo sauce. In a small saucepan, melt the butter over medium heat. Stir in the hot sauce and vinegar until well combined. Remove from heat.
- Toss the Wings in Sauce: Once the wings are done baking, transfer them to a large bowl. Pour the prepared buffalo sauce over the wings and toss until they’re fully coated.
- Serve: Arrange the buffalo chicken wings on a serving platter. Serve immediately with celery sticks and your choice of ranch or blue cheese dressing on the side.
Extra Tips:
For an extra crispy texture, allow the coated wings to sit in the refrigerator uncovered for an hour before baking. This drying time helps the skin crisp up even more in the oven.
If you prefer a milder sauce, adjust the ratio of hot sauce to butter according to your taste. Additionally, make sure to use a wire rack on the baking sheet to guarantee the wings cook evenly and don’t sit in excess fat.
Enjoy your spooky and delicious Bat Wings!
Frankenstein Marshmallow Pops
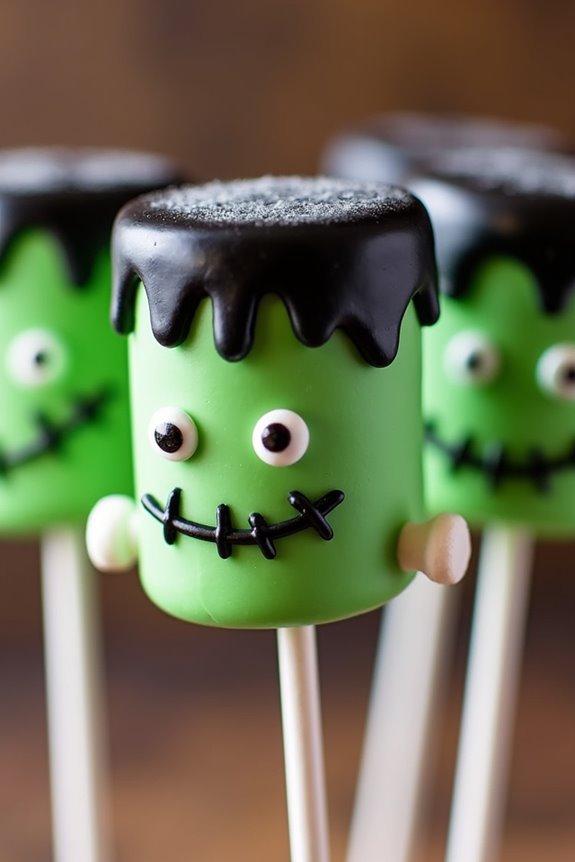
Frankenstein Marshmallow Pops are a delightful and spooky treat that are perfect for any Halloween party. These adorable pops aren’t only fun to make but also a fantastic activity to engage kids in the kitchen. Their charming appearance, inspired by the classic Frankenstein’s monster, will surely be a hit with both children and adults alike.
With a mix of marshmallows, candy melts, and a creative touch, these pops bring a playful twist to your Halloween menu. Crafting these Frankenstein Marshmallow Pops is a straightforward process that doesn’t require any baking, making it a convenient option for a last-minute festive treat. The pops can be customized with different colors and decorations, allowing you to add your own personal flair.
By following a few simple steps, you’ll have a batch of these creepy yet cute snacks ready to serve to your guests. Here’s what you’ll need to make a serving size of 4-6 Frankenstein Marshmallow Pops.
Ingredients:
- 12 large marshmallows
- 1 cup of green candy melts
- 1 cup of black candy melts
- 12 lollipop sticks
- Edible candy eyes
- Black edible marker or black decorating gel
- 1/4 cup of mini chocolate chips
- 1/4 cup of mini marshmallows (for bolts)
- Wax paper
Instructions:
- Prepare the Candy Melts: In separate microwave-safe bowls, melt the green and black candy melts according to the package instructions. Stir until smooth and fully melted.
- Insert Lollipop Sticks: Gently insert a lollipop stick into each marshmallow, ensuring it’s secure but not piercing through the top.
- Coat the Marshmallows: Dip each marshmallow into the melted green candy melts, coating it entirely. Allow any excess candy melt to drip off before placing the marshmallow on wax paper to set.
- Create Frankenstein’s Hair: Using a spoon, drizzle the top of the marshmallow with the melted black candy melts to create Frankenstein’s hair. Allow it to drip down slightly for a more natural look.
- Attach the Eyes: Before the candy melts harden, gently press two edible candy eyes onto the face of each marshmallow.
- Draw the Mouth and Scars: Using a black edible marker or black decorating gel, draw a mouth and small stitches or scars on each marshmallow to give it a Frankenstein-like appearance.
- Add the Bolts: Cut mini marshmallows in half and attach them to the sides of each Frankenstein head using a small dab of melted black candy melts as glue. These will serve as the bolts in Frankenstein’s neck.
- Final Touches: Allow the pops to set completely on wax paper. Once hardened, your Frankenstein Marshmallow Pops are ready to serve.
Extra Tips:
When making Frankenstein Marshmallow Pops, it’s important to work quickly with the candy melts as they can harden at room temperature. If they start to thicken, simply reheat them in the microwave for a few seconds to restore their smooth consistency.
Additionally, feel free to get creative with the decorations by adding different colors or using various candies to personalize each pop. For an added touch, consider wrapping each pop individually in cellophane with a festive ribbon for a fun party favor.
Monster Mouths (Apple and Peanut Butter Snacks)
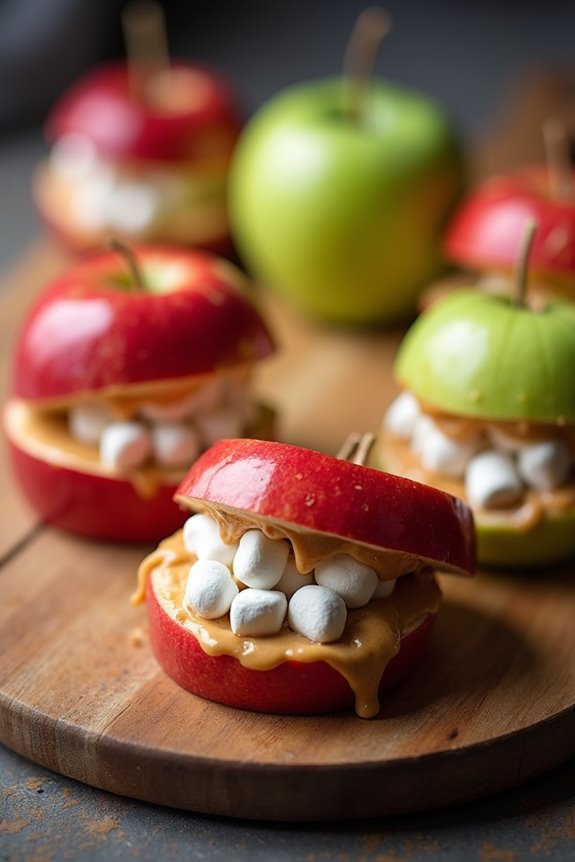
Halloween is the perfect time to get creative in the kitchen with fun and spooky snacks. One delightful and healthy treat you can prepare is Monster Mouths, made with apples and peanut butter. This snack isn’t only easy to make but also a fantastic way to add some nutritious elements to your Halloween spread. With the natural sweetness of apples and the creamy texture of peanut butter, these monster-themed snacks are a hit for kids and adults alike.
Monster Mouths are a playful and simple snack that can be prepared in just a few minutes, making them perfect for any Halloween gathering. The combination of fruit and nuts provides a balanced treat that satisfies cravings without the sugary overload. Plus, using edible decorations like marshmallows or almonds adds a fun and festive touch. This recipe serves 4-6 people, making it ideal for small parties or family gatherings.
Ingredients (serving size: 4-6 people):
- 3 large apples
- 6 tablespoons of peanut butter
- 1/3 cup of mini marshmallows
- 1/4 cup of slivered almonds
- 2 tablespoons of lemon juice
Cooking Instructions:
- Prepare the Apples: Start by washing the apples thoroughly. Slice each apple into quarters and then cut each quarter in half again to create thinner slices. You should have 8 slices per apple. Remove any seeds and the core from each slice.
- Prevent Browning: To keep the apple slices from browning, lightly brush or dip each slice in lemon juice. This will maintain their fresh appearance as you assemble the Monster Mouths.
- Spread the Peanut Butter: Take one apple slice and spread a generous layer of peanut butter on one side. This will act as the “glue” for your Monster Mouth.
- Assemble the Mouths: Place mini marshmallows along the peanut butter side of the apple slice to create “teeth.” Position another apple slice on top, peanut butter side down, to form the “mouth.”
- Add Details: For a more monstrous look, you can add slivered almonds around the edges of the mouth for extra “fangs.” Feel free to use additional marshmallows or almonds to create a variety of funny and scary expressions.
- Serve: Arrange the completed Monster Mouths on a platter and serve immediately, or store them in the refrigerator until ready to serve.
Extra Tips:
For a different twist, try using other nut butters like almond or cashew butter, or even a chocolate spread for a sweeter treat. If you’re preparing these snacks ahead of time, keep them covered in an airtight container in the fridge to maintain freshness.
When selecting apples, choose firm varieties like Granny Smith or Honeycrisp for the best texture. If you’re concerned about allergies, sunflower seed butter is an excellent peanut-free alternative. Enjoy crafting these whimsical treats and watching your guests’ delighted reactions!
Eyeball Caprese Bites
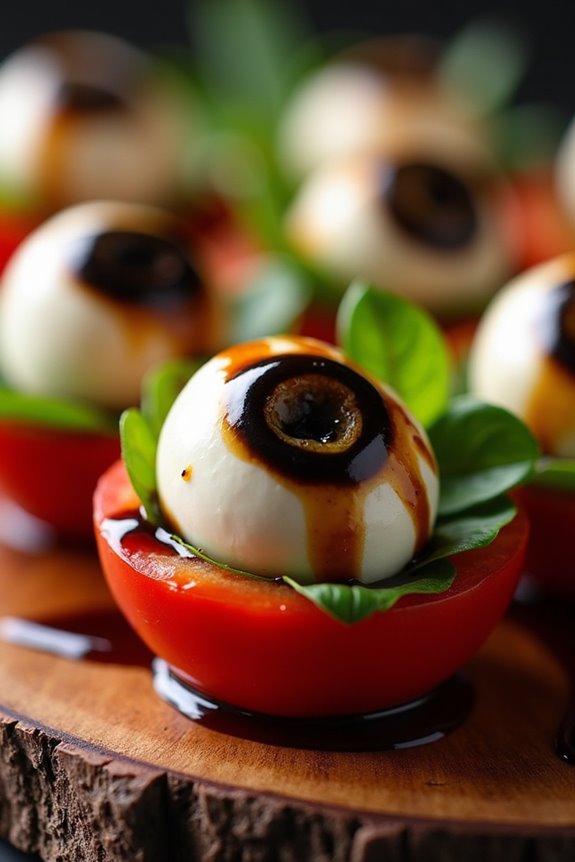
Halloween is the perfect time to get creative in the kitchen, and these Eyeball Caprese Bites will add a spooky yet delicious touch to your festive spread. This recipe transforms the classic caprese salad into a fun and eerie appetizer. By using mozzarella balls, cherry tomatoes, and black olives, you can craft these bites to resemble creepy eyeballs that are sure to impress your Halloween guests.
Not only are they visually striking, but they also pack a flavorful punch with fresh basil and a drizzle of balsamic glaze.
Assembling these Eyeball Caprese Bites isn’t only simple but also a fun activity you can enjoy with family or friends. This recipe is designed to serve 4-6 people, making it an ideal choice for a small gathering. The combination of fresh ingredients guarantees that these bites are both tasty and nutritious. Get ready to have some fun in the kitchen and bring these spooky treats to life!
Ingredients for 4-6 servings:
- 20 cherry tomatoes
- 20 mini mozzarella balls
- 10 black olives
- 20 fresh basil leaves
- 2 tablespoons balsamic glaze
- Salt and pepper to taste
- 20 toothpicks
Instructions:
- Prepare the Ingredients: Rinse and dry the cherry tomatoes and fresh basil leaves. Drain the mini mozzarella balls and set them aside. Slice the black olives into thin rings to form the “pupils” of the eyeballs.
- Assemble the Eyeballs: Take a cherry tomato and cut a small slice off the bottom to create a flat surface, so it stands upright. Place a mini mozzarella ball on top of the cherry tomato, securing it with a toothpick.
- Add the Pupil: Gently place a sliced olive ring on top of each mozzarella ball to create the appearance of an eyeball. You can adjust the positioning to make each “eye” look in different directions for added effect.
- Add the Basil Leaves: Insert a fresh basil leaf between the mozzarella ball and the cherry tomato on each toothpick. This adds a fresh, aromatic flavor to the bites.
- Season and Glaze: Lightly sprinkle the assembled bites with salt and pepper to enhance the flavors. Drizzle the balsamic glaze over the top of the eyeballs for a tangy finish.
- Serve: Arrange the Eyeball Caprese Bites on a platter, spacing them out to showcase each spooky creation. They’re best served fresh, so prepare them close to serving time.
Extra Tips: For a more intense flavor, consider marinating the mozzarella balls in olive oil and herbs for a few hours before assembly. If you prefer a sweeter glaze, you can reduce balsamic vinegar with a bit of honey to create your homemade balsamic glaze.
Remember to adjust the seasoning to your taste preferences, and don’t be afraid to get creative with the presentation for maximum visual impact.
Skeleton Veggie Platter
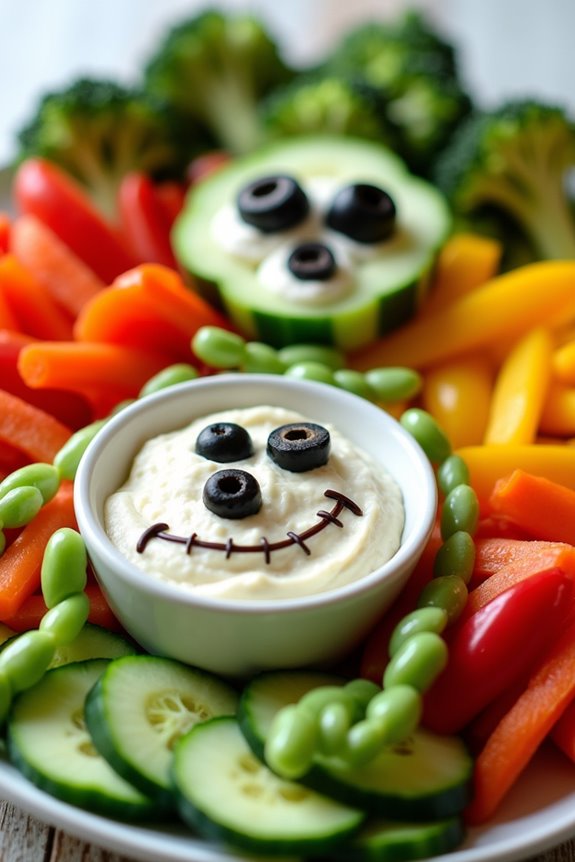
Halloween is the perfect time to get creative in the kitchen, and a Skeleton Veggie Platter is a fun, healthy, and festive way to celebrate the spooky season. This dish isn’t only visually appealing but also a great way to incorporate fresh vegetables into your Halloween spread.
Perfect for parties and family gatherings, the platter is designed to resemble a skeleton and can be customized with your favorite vegetables. It’s a delightful centerpiece that encourages kids and adults alike to enjoy their veggies in a whole new way.
This Skeleton Veggie Platter serves 4-6 people and is easy to assemble. The key to making this dish stand out is in the presentation, as you artfully arrange a variety of colorful vegetables to form the skeleton’s bones, limbs, and head. The platter is paired with a creamy dip, which acts as the skull, completing the skeleton look.
Whether you’re hosting a Halloween party or simply enjoying a night in with family, this platter is sure to be a hit.
Ingredients:
- 1 cup cherry tomatoes
- 1 cucumber
- 1 red bell pepper
- 1 yellow bell pepper
- 1 bunch of celery
- 1 cup baby carrots
- 1 small broccoli head
- 1 small cauliflower head
- 1 cup snap peas
- 1 cup black olives
- 1 cup ranch or hummus dip
Instructions:
- Prepare the Vegetables: Begin by washing all the vegetables thoroughly under running water. Pat them dry with a clean towel. Slice the cucumber into thin rounds, and cut the bell peppers into strips.
- Separate the broccoli and cauliflower into small florets. Trim the ends of the snap peas and cut the celery into sticks about 4 inches long.
- Create the Skeleton Head: Place the dip of your choice in a small bowl to serve as the skeleton’s skull. Position the bowl at the top center of your serving platter.
- Assemble the Rib Cage: Arrange the celery sticks vertically below the dip bowl to form the rib cage. Position them in parallel lines, leaving space in between each stick.
- Form the Spine and Limbs: Use the cucumber slices to create the spine by placing them in a line beneath the rib cage. For the arms and legs, use bell pepper strips, and arrange them at angles extending from the rib cage and spine.
- Add the Hands and Feet: Use baby carrots to form the hands and feet at the ends of the arms and legs. Position them to mimic finger and toe bones.
- Fill in the Gaps: Use broccoli and cauliflower florets to fill in any gaps around the skeleton, adding texture and color. Place cherry tomatoes and snap peas around the platter to add more visual appeal.
- Create Facial Features: Use black olives to create eyes, a nose, and a mouth on the dip, bringing the skeleton’s face to life.
Extra Tips:
When making the Skeleton Veggie Platter, feel free to get creative with the vegetables you use. If you have other vegetables on hand, such as radishes or zucchini, incorporate them to add variety and color.
It’s important to slice the vegetables evenly for a more polished look, and consider using a platter or tray with raised edges to keep everything in place. For an extra spooky touch, use a small paring knife to carve out more detailed facial features on the dip.
Enjoy the process and have fun bringing this edible skeleton to life!
Bloody Finger Cookies
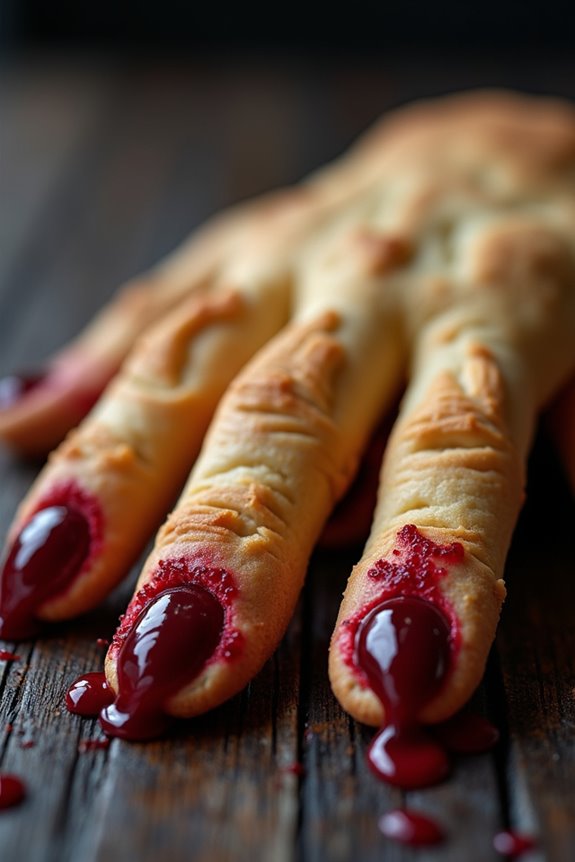
Bloody Finger Cookies are a spooky and fun treat to serve at your Halloween party. These eerie cookies resemble severed fingers, complete with almond nails and a bloody jam effect. Not only do they look delightfully creepy, but they also taste delicious, with a buttery shortbread base that’s sure to please kids and adults alike.
Perfect for adding a touch of horror to your festive table, these cookies will certainly be a talking point among your guests. Making Bloody Finger Cookies is easier than you might think, and the results are well worth the effort. The secret to these cookies lies in the detailing – a bit of strategic shaping, some red food coloring, and a dollop of raspberry jam mimic the look of bloodied fingers.
Whether you’re a baking novice or a seasoned pro, you’ll find this recipe straightforward and enjoyable, with plenty of opportunities to get creative with your decorations. Gather your ingredients and let’s get started on making these ghoulishly good cookies for 4-6 people.
Ingredients:
- 1 cup unsalted butter, softened
- 1 cup powdered sugar
- 1 large egg
- 1 teaspoon vanilla extract
- 1 teaspoon almond extract
- 2 2/3 cups all-purpose flour
- 1 teaspoon baking powder
- 1 teaspoon salt
- 3/4 cup whole almonds
- 1/2 cup raspberry jam
- Red food coloring
Cooking Instructions:
- Prepare the Dough: In a large mixing bowl, cream together the softened butter and powdered sugar until light and fluffy. Add the egg, vanilla extract, and almond extract, then mix until well combined.
- Mix Dry Ingredients: In a separate bowl, whisk together the flour, baking powder, and salt. Gradually add the dry ingredients to the butter mixture, mixing thoroughly until a dough forms.
- Chill the Dough: Divide the dough into two portions, wrap each in plastic wrap, and refrigerate for at least 30 minutes. This will make the dough easier to handle and shape.
- Preheat and Prepare: Preheat your oven to 325°F (165°C). Line two baking sheets with parchment paper.
- Shape the Fingers: Remove one portion of dough from the refrigerator. Take a tablespoon of dough and roll it into a finger-like shape, about 3 inches long. Press a whole almond into one end to create a fingernail. Use a knife to make three shallow cuts in the middle to form knuckles.
- Bake the Cookies: Place the shaped fingers on the prepared baking sheets, leaving space between each one. Bake in the preheated oven for 20-25 minutes, or until lightly golden.
- Add the Bloody Effect: Allow the cookies to cool slightly. Remove the almond, place a small drop of raspberry jam in the indentation, and reinsert the almond to create a bloody look. Use a small brush or toothpick dipped in red food coloring to add drips of blood around the nail and knuckle areas.
- Cool Completely: Transfer the cookies to a wire rack to cool completely before serving.
Extra Tips: For the best results, verify your butter is softened to room temperature before starting, as this will help create a smooth dough. When shaping the fingers, try to make them slightly thinner than you think they should be, as the cookies will expand slightly during baking.
If the dough becomes too soft to handle, return it to the refrigerator for a few minutes. For an extra spooky touch, you can use different types of jam or even chocolate for the blood effect. Enjoy your creepy creations!
Haunted Trail Mix
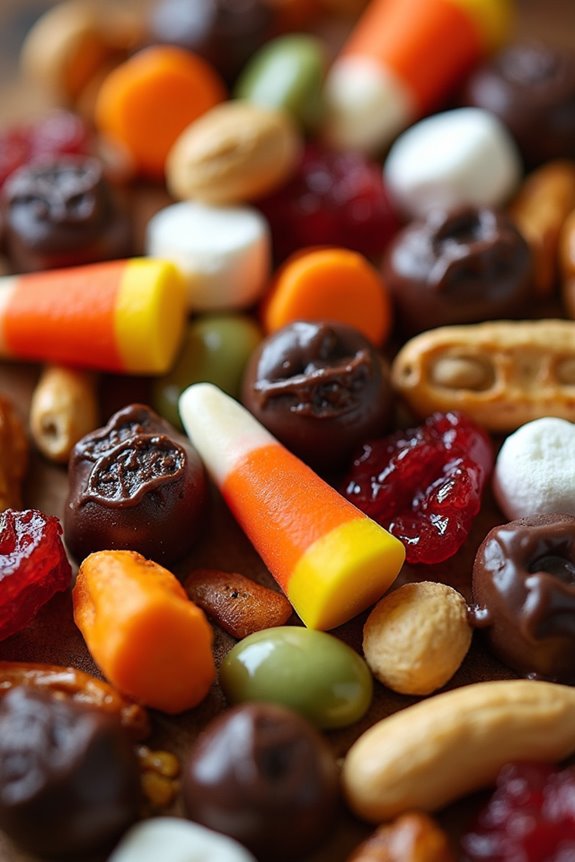
Haunted Trail Mix is the perfect spooky snack to serve at your Halloween party or to take along on a fall hike. This eerie blend combines sweet, salty, and crunchy elements, ensuring a delightful surprise in every bite. Not only is it easy to make, but it’s also a fun way to get creative with your favorite Halloween-themed treats and candies.
Whether you’re hosting a gathering or just enjoying a cozy night in, this trail mix is sure to be a crowd-pleaser. This recipe is designed to make enough Haunted Trail Mix for 4-6 people, making it ideal for small gatherings.
Feel free to mix and match the ingredients to suit your taste preferences or to accommodate any dietary restrictions. The versatility of this trail mix means you can customize it to include your favorite nuts, dried fruits, cereals, and candies. The key to a successful Haunted Trail Mix is in the balance of flavors and textures, so be sure to include a variety of components.
Ingredients (serving size: 4-6 people):
- 1 cup pretzel sticks
- 1 cup honey-roasted peanuts
- 1 cup candy corn
- 1 cup chocolate-covered raisins
- 1 cup mini marshmallows
- 1 cup dried cranberries
- 1 cup pumpkin seeds
- 1 cup Halloween-themed chocolate candies (like M&M’s)
Cooking Instructions:
- Prepare Your Workspace: Start by gathering all the ingredients and ensuring you have a large mixing bowl on hand. This will make it easier to combine everything evenly.
- Mix the Base Ingredients: Add the pretzel sticks, honey-roasted peanuts, and pumpkin seeds to the mixing bowl. These ingredients provide the salty and crunchy base for your trail mix.
- Add the Sweet Components: Next, include the candy corn, chocolate-covered raisins, mini marshmallows, and dried cranberries. These sweets will give your trail mix a chewy and sugary dimension.
- Incorporate the Fun Elements: Ultimately, toss in the Halloween-themed chocolate candies. These colorful additions won’t only enhance the flavor but also add a festive touch to your mix.
- Combine Thoroughly: Gently mix all the ingredients together until they’re well combined. Be careful not to crush any of the more delicate elements like the mini marshmallows or chocolate candies.
- Serve and Store: Once mixed, serve the Haunted Trail Mix in a large bowl for guests to enjoy. If you have leftovers, store them in an airtight container to keep the mix fresh for up to a week.
Extra Tips:
For a healthier version of Haunted Trail Mix, consider using unsalted nuts or opting for dark chocolate-covered raisins. You can also add more dried fruits or whole grain cereals to increase the nutritional value.
If you’re preparing this mix for children, be cautious with the size and type of nuts used to prevent choking hazards. Finally, for a touch of seasonal spice, sprinkle a bit of cinnamon or pumpkin pie spice over the mix before serving. Enjoy this festive snack, and let your creativity run wild with the ingredients!