

Halloween is just around the corner, and I’m beyond excited to share some frightfully fun recipes that are as simple as they are spooktacular. From Spooky Spider Deviled Eggs to Mummy Hot Dogs, these treats are sure to charm both little ones and grown-ups alike. Each dish is an easy twist on a beloved classic, perfect for sprinkling a bit of Halloween magic on your table. Are you ready to transform your menu into a boo-tiful feast? Let’s get cooking!
Spooky Spider Deviled Eggs
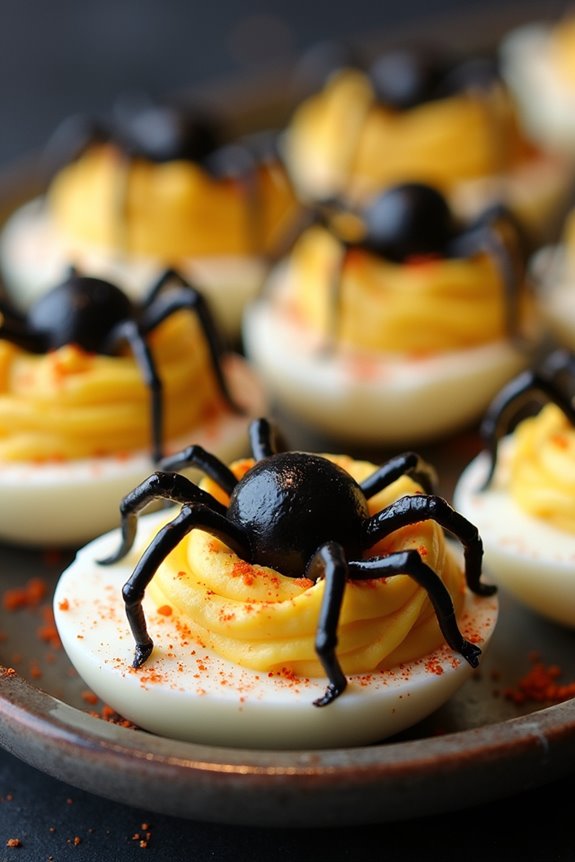
Spooky Spider Deviled Eggs are a fun and eerie twist on the classic appetizer, perfect for your Halloween festivities. These devilishly delicious treats are sure to impress your guests with their creepy-crawly appearance, while still offering the traditional savory flavors of deviled eggs. The spooky spiders are crafted from black olives, making them both visually striking and deliciously edible.
With their simple preparation and impressive presentation, these eggs will be the talk of your Halloween gathering. Ideal for a party of 4 to 6 people, this recipe combines the rich creaminess of the yolk filling with the zing of mustard and the tang of vinegar to create a mouth-watering base. The addition of black olives adds a subtle briny flavor, while also creating the perfect spider decoration.
The key is to balance the flavors and textures, guaranteeing each egg is both spooky and scrumptious.
Ingredients:
- 6 large eggs
- 1/4 cup mayonnaise
- 1 teaspoon Dijon mustard
- 1 teaspoon white vinegar
- Salt and pepper, to taste
- 12 black olives, pitted
- Paprika, for garnish (optional)
Instructions:
- Boil the Eggs: Place the eggs in a saucepan and cover them with cold water by about an inch. Bring the water to a boil over medium-high heat. Once boiling, turn off the heat, cover the saucepan, and let the eggs sit for 10-12 minutes.
- Cool and Peel: Transfer the eggs to a bowl of ice water to cool completely. Once cooled, gently tap each egg on a hard surface and peel away the shell.
- Prepare the Filling: Slice the peeled eggs in half lengthwise. Carefully remove the yolks and place them in a mixing bowl. Set the egg whites aside on a serving platter.
- Mix the Yolk Filling: Mash the yolks with a fork until they’re a fine crumble. Add mayonnaise, Dijon mustard, white vinegar, salt, and pepper to the yolks. Mix until the filling is smooth and creamy.
- Fill the Egg Whites: Spoon or pipe the yolk mixture back into the hollowed-out egg whites, mounding slightly.
- Create the Spiders: Slice each black olive in half. Use one half for the spider body and cut the other half into thin strips for the legs. Arrange the olive pieces on top of the deviled eggs to resemble a spider.
- Garnish (Optional): Lightly dust the eggs with paprika for additional color and flavor.
Extra Tips:
For a more intense flavor, consider adding a pinch of cayenne pepper or a dash of hot sauce to the yolk mixture. If you have trouble peeling the eggs, try using older eggs as they tend to peel more easily.
To guarantee the filling is perfectly smooth, use a piping bag or a plastic bag with the tip cut off for more precise filling. Finally, keep the deviled eggs refrigerated until ready to serve to maintain their freshness.
Mummy Hot Dogs

Halloween is the perfect time for spooky and fun-themed foods, and Mummy Hot Dogs are a delightful addition to any festive gathering. These adorable and tasty treats are a creative twist on the classic hot dog, wrapped in strips of dough to resemble a mummy. Not only do they make for a visually appealing snack, but they’re also incredibly easy to make, requiring minimal ingredients and effort. Perfect for a Halloween party, these Mummy Hot Dogs are sure to be a hit with both kids and adults alike.
The beauty of Mummy Hot Dogs lies in their simplicity and versatility. You can customize them with your choice of hot dogs (regular, beef, chicken, or even vegetarian options) and use either store-bought crescent roll dough or puff pastry for the wrapping. With just a few steps, you’ll have a plate full of mummies ready to serve. Pair them with your favorite dipping sauces, such as ketchup or mustard, for added flavor. Let’s plunge into the recipe and create a spooky snack fit for any Halloween celebration!
Ingredients (Serves 4-6):
- 8 hot dogs
- 1 can of crescent roll dough (or puff pastry)
- 1 egg, beaten
- Mustard or ketchup (for decoration)
Cooking Instructions:
- Preheat the Oven: Begin by preheating your oven to 375°F (190°C). This guarantees the dough will bake evenly and the hot dogs will be perfectly cooked.
- Prepare the Dough: Unroll the crescent roll dough on a clean surface. If using puff pastry, roll it out into a thin layer. Use a pizza cutter or sharp knife to slice the dough into thin strips, about 1/4 inch wide.
- Wrap the Hot Dogs: Take each hot dog and wrap the dough strips around it, leaving a small gap at the top for the “face.” Overlap the strips slightly to create a mummy-like appearance. It’s okay if they’re not perfect – uneven wraps add to the spooky charm!
- Add Eyes: Once wrapped, use a small amount of mustard or ketchup to dot on eyes for each mummy, or leave the face blank to add them after baking.
- Brush with Egg Wash: Place the wrapped hot dogs on a baking sheet lined with parchment paper. Brush each mummy lightly with the beaten egg to give them a golden, glossy finish once baked.
- Bake: Place the baking sheet in the preheated oven and bake for 12-15 minutes, or until the dough is golden brown and cooked through.
- Decorate and Serve: Once baked, remove from the oven and let them cool slightly. If you didn’t add the eyes before baking, now is the time to do so. Serve with your choice of dipping sauces.
Extra Tips:
For a healthier version, consider using whole wheat dough or turkey hot dogs. If you’re catering to dietary restrictions, vegetarian or vegan hot dogs can be a great substitute.
To make the mummies more festive, you can add slices of cheese under the dough or sprinkle sesame seeds on top for added texture. If you’re preparing these for a large group, feel free to double the recipe.
Mummy Hot Dogs can be made in advance and reheated, making them a convenient option for busy hosts. Enjoy your spooky creation and have a happy Halloween!
Witch’s Broomstick Snacks
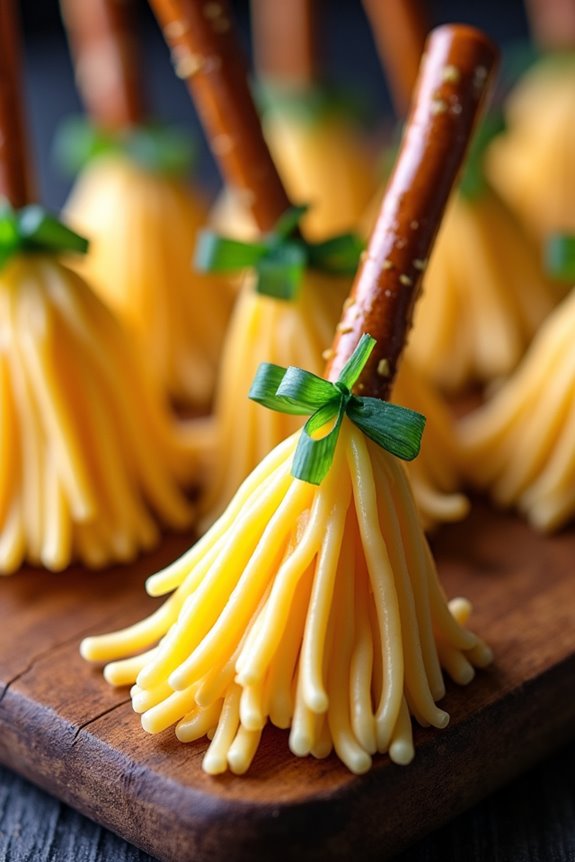
Witch’s Broomstick Snacks are the perfect combination of whimsical and delicious, making them an ideal treat for any Halloween gathering.
These easy-to-make snacks not only look festive but also cater to a variety of tastes. Combining the smoky flavor of pretzel sticks with the rich creaminess of cheese, these snacks are sure to delight both children and adults alike.
The visual appeal of these broomsticks will add a spooky charm to your Halloween spread, making them a memorable party favorite.
Crafting these snacks is as much fun as eating them. With just a few simple ingredients, you can whip up a batch of Witch’s Broomstick Snacks in no time.
This recipe is suitable for a serving size of 4-6 people, providing ample munchies for your haunted celebrations. Whether you’re hosting a party or simply enjoying a spooky movie night, these broomsticks will add a magical touch to your festivities.
Ingredients:
- 12 pretzel sticks
- 6 slices of string cheese
- 6 chives or thin strips of green onion
Instructions:
- Prepare the Cheese: Start by unwrapping the string cheese and cutting each piece in half. This will give you two shorter pieces from each string cheese slice, resulting in a total of 12 pieces.
- Shape the Broom Bristles: Gently pull apart one end of each cheese piece to create a broom bristle effect. Do this by carefully separating the strings without breaking the cheese completely. The other end should remain intact to hold the pretzel stick.
- Assemble the Broomsticks: Insert a pretzel stick into the intact end of each cheese piece. This will serve as the broom handle. Push it gently to confirm it’s secure but avoid breaking the pretzel.
- Tie the Broomsticks: Use a chive or a thin strip of green onion to tie around the top of the cheese, just below where the pretzel is inserted. This will help keep the cheese in place and add a pop of color to your snacks.
- Serve the Broomsticks: Arrange the completed broomsticks on a platter for serving. Confirm they’re evenly spaced to prevent them from sticking together.
Extra Tips:
To keep the broomsticks looking fresh and appetizing, prepare them just before serving, as the cheese can dry out if left out for too long.
If you prefer a different flavor, try substituting the string cheese with mozzarella or cheddar cheese sticks. For a gluten-free option, use gluten-free pretzel sticks.
You can also experiment with different herbs or edible flowers to tie around the cheese for a more personalized touch. Enjoy your enchanting Halloween treats!
Ghostly Cheese Pizza
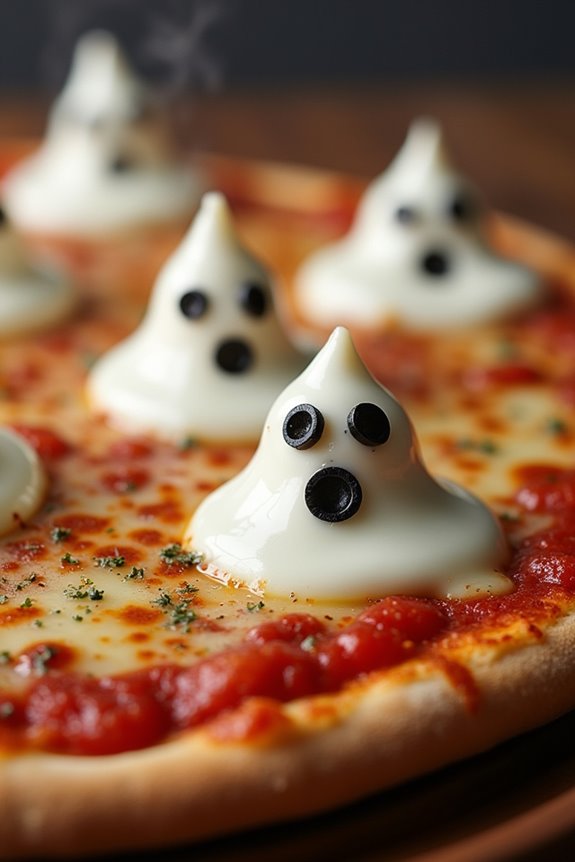
Halloween is the perfect time to get creative in the kitchen, and what better way to celebrate than with a spooky Ghostly Cheese Pizza? This delightful dish combines the classic flavors of a cheese pizza with a fun, eerie twist that’s sure to be a hit at any Halloween gathering.
Shaped like little ghosts, the mozzarella cheese on this pizza adds a playful and festive touch to your dining table. Plus, it’s a great way to get the whole family involved in the kitchen, as kids will love helping to create the ghostly shapes and decorating the pizza.
The Ghostly Cheese Pizza isn’t only visually appealing but also deliciously satisfying. The combination of a crispy crust, tangy tomato sauce, and gooey cheese makes for a comforting meal that everyone will enjoy.
Whether you’re hosting a Halloween party or simply want to make dinner a bit more exciting, this pizza is sure to please. Plus, it’s easy to customize with your favorite toppings or keep it simple with just the cheese. So grab your pizza dough and get ready to conjure up some Halloween magic in your kitchen!
Ingredients (Servings: 4-6 people):
- 1 pound pizza dough
- 1 cup tomato pizza sauce
- 2 cups shredded mozzarella cheese
- 6-8 slices of mozzarella cheese
- 1/2 cup black olives (pitted)
- 1 tablespoon olive oil
- 1 teaspoon dried oregano
- 1 teaspoon garlic powder
- 1 teaspoon cornmeal (for dusting)
Cooking Instructions:
- Prepare the Dough: Preheat your oven to 475°F (245°C). Roll out the pizza dough on a lightly floured surface into a round shape, approximately 12 inches in diameter. Transfer the dough to a baking sheet or pizza stone sprinkled with cornmeal to prevent sticking.
- Add the Sauce: Spread the tomato pizza sauce evenly over the dough, leaving about a 1/2-inch border around the edges. This will allow for a nice crust once baked.
- Cheese Base Layer: Sprinkle the shredded mozzarella cheese evenly over the sauce, ensuring good coverage for the base of your pizza.
- Create Ghost Shapes: Use a ghost-shaped cookie cutter to cut ghost shapes out of the mozzarella cheese slices. If you don’t have a cookie cutter, you can use a knife to carve out ghostly shapes freehand.
- Decorate with Olives: Slice the black olives into small circles to create the eyes and mouth for each ghost. Place the ghost shapes on top of the pizza and add the olive features to bring your ghosts to life.
- Season the Pizza: Drizzle the olive oil over the top of the pizza and sprinkle with dried oregano and garlic powder to enhance the flavors.
- Bake the Pizza: Place the pizza in the preheated oven and bake for 12-15 minutes or until the crust is golden brown and the cheese is melted and bubbly.
- Serve: Remove the pizza from the oven and let it cool for a few minutes before slicing. Serve warm and enjoy your spooky creation!
Extra Tips:
For an extra crispy crust, pre-bake the pizza dough for 5 minutes before adding the sauce and toppings. This will help prevent the crust from becoming soggy.
If you’re using store-bought dough, let it sit at room temperature for about 20 minutes before rolling it out; this will make it easier to handle.
Feel free to get creative with your ghost decorations by adding different toppings like sliced bell peppers or mushrooms for a colorful twist.
Finally, always keep an eye on the pizza while it bakes to prevent overcooking the cheese, as burnt cheese can detract from the presentation and taste.
Monster Mouths
Add a touch of spooky fun to your Halloween celebrations with these creative and delicious Monster Mouths. Perfect for a party snack or a light-hearted treat, these Monster Mouths are sure to delight kids and adults alike.
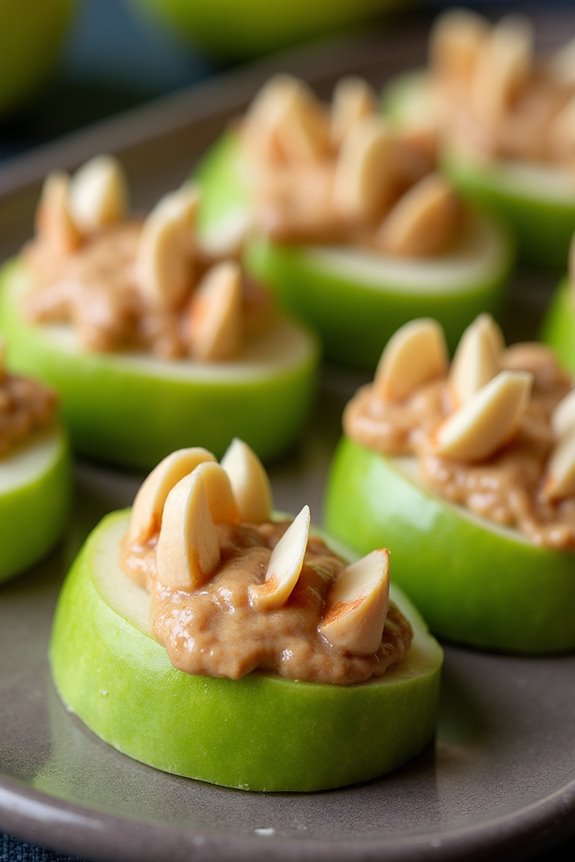
Combining the natural sweetness of apples with the crunch of almonds, these treats aren’t only frighteningly fun but also nutritious. Easy to assemble and requiring no cooking, they make for a quick and healthy addition to your Halloween menu.
Monster Mouths are made by using apple slices as the base, representing the monstrous lips, with almonds as the jagged teeth. The peanut butter serves as the “glue” that holds everything together, adding a creamy texture and a hint of savory flavor.
These Halloween-themed treats are a fantastic way to incorporate fruit into your celebrations, guaranteeing that even your Halloween snacks can be a little more health-conscious. With simple ingredients and minimal preparation, Monster Mouths are an ideal choice for a last-minute Halloween treat.
Ingredients for 4-6 servings:
- 4 medium-sized apples (Granny Smith or Red Delicious recommended)
- 1 cup of peanut butter (or your preferred nut butter)
- 1 cup of sliced almonds
- 1 lemon (to prevent apple browning)
Cooking Instructions:
- Prepare the Apples: Wash the apples thoroughly. Cut each apple into quarters and remove the core from each quarter. Then, slice each quarter into thin wedges, approximately 1/4 inch thick.
- Prevent Browning: To keep the apple slices fresh and prevent browning, squeeze the juice from the lemon over the apple slices. Toss them gently to guarantee they’re evenly coated with lemon juice.
- Assemble the Monster Mouths: Take one apple slice and spread a thin layer of peanut butter on one side. This will act as the adhesive for the “teeth.”
- Add the Teeth: Press the sliced almonds into the peanut butter side of the apple slice, arranging them to look like sharp, jagged teeth. Use about 5-6 almond slices per apple slice for best effect.
- Complete the Mouth: Take another apple slice and spread a thin layer of peanut butter on one side. Place this slice, peanut butter side down, on top of the almonds to create the top lip of the mouth.
- Serve: Arrange the Monster Mouths on a platter, guaranteeing they’re stable and don’t topple over. Serve immediately, or cover with plastic wrap and store in the refrigerator until ready to serve.
Extra Tips:
To add an extra level of creativity, you can use sunflower seeds or marshmallow bits instead of almonds for the teeth, offering a different texture and flavor.
If you prefer a nut-free version, substitute the peanut butter with sunflower seed butter or cream cheese. For a sweeter variation, consider adding a drizzle of honey over the peanut butter before placing the almond slices.
Always keep an eye on the apple slices to prevent browning, and consider serving the Monster Mouths immediately after assembly for the freshest taste and best presentation.
Eyeball Pasta
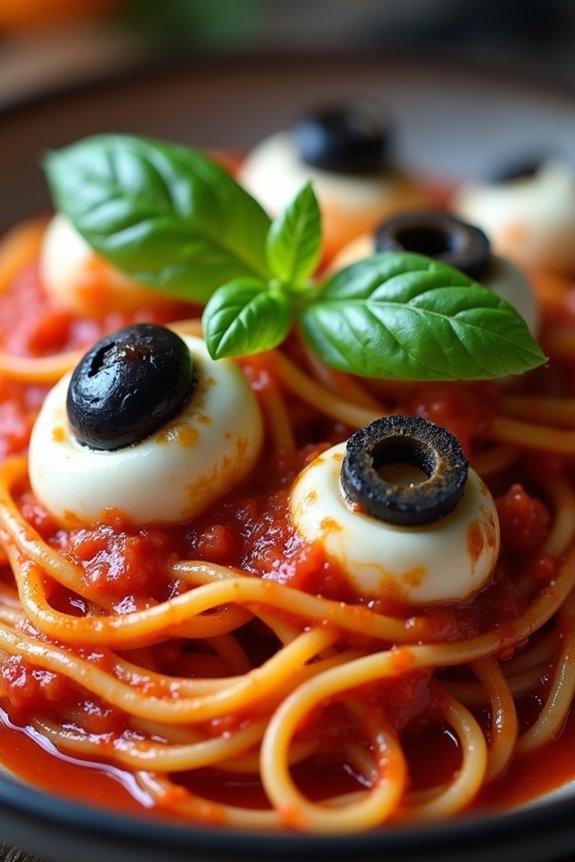
Eyeball Pasta is a delightfully spooky dish that’s perfect for Halloween gatherings or any time you want to add a little fright to your meal. This fun and creepy pasta dish combines classic spaghetti with “eyeballs” made from mozzarella balls and olives, creating an eerie appearance that will both entertain and satisfy your guests. The eyeball effect is achieved by using black olives that are cleverly placed on mozzarella balls, giving them an uncanny resemblance to real eyes.
This dish isn’t only visually appealing but also delicious and easy to prepare. The pasta is tossed in a rich tomato sauce, providing a savory base that pairs perfectly with the creamy mozzarella and the briny olives. This recipe serves 4-6 people, making it an excellent choice for a family dinner or a small Halloween party. Kids and adults alike will enjoy eating this creepy yet tasty meal.
Ingredients for Eyeball Pasta (Serves 4-6)
- 400g spaghetti
- 2 tablespoons olive oil
- 1 onion, finely chopped
- 3 cloves garlic, minced
- 800g canned crushed tomatoes
- 2 teaspoons dried oregano
- 1 teaspoon dried basil
- Salt and pepper to taste
- 12 mini mozzarella balls
- 12 black olives, pitted and halved
- Fresh basil leaves for garnish
Cooking Instructions
- Prepare the Sauce: Heat olive oil in a large saucepan over medium heat. Add the chopped onion and sauté until translucent, about 5 minutes. Add the minced garlic and cook for another minute until fragrant.
- Make the Tomato Base: Pour the crushed tomatoes into the saucepan. Stir in the dried oregano, dried basil, salt, and pepper. Bring the sauce to a simmer and let it cook for about 15-20 minutes, stirring occasionally, until it thickens.
- Cook the Pasta: While the sauce is simmering, bring a large pot of salted water to a boil. Add the spaghetti and cook according to the package instructions until al dente. Drain the pasta and set aside.
- Assemble the Eyeballs: While the pasta is cooking, cut the mozzarella balls in half. Place a halved black olive on each mozzarella half to create the “eyeballs.” Set aside.
- Combine Pasta and Sauce: Add the cooked spaghetti to the tomato sauce in the saucepan. Toss well to coat the pasta evenly with the sauce.
- Serve the Dish: Divide the pasta among plates or a large serving platter. Arrange the mozzarella “eyeballs” on top of the pasta. Garnish with fresh basil leaves.
Extra Tips
When making Eyeball Pasta, you can prepare the sauce ahead of time and store it in the refrigerator for up to two days, which will save you time on the day of serving.
If you want to enhance the spooky theme, consider adding a few drops of red food coloring to the sauce for a bloodier appearance. Additionally, for a more intense flavor, try using fresh herbs in the sauce instead of dried.
This dish is versatile, so feel free to add your favorite ingredients such as roasted vegetables or cooked sausage to make it even more hearty.
Creepy Crawly Nachos
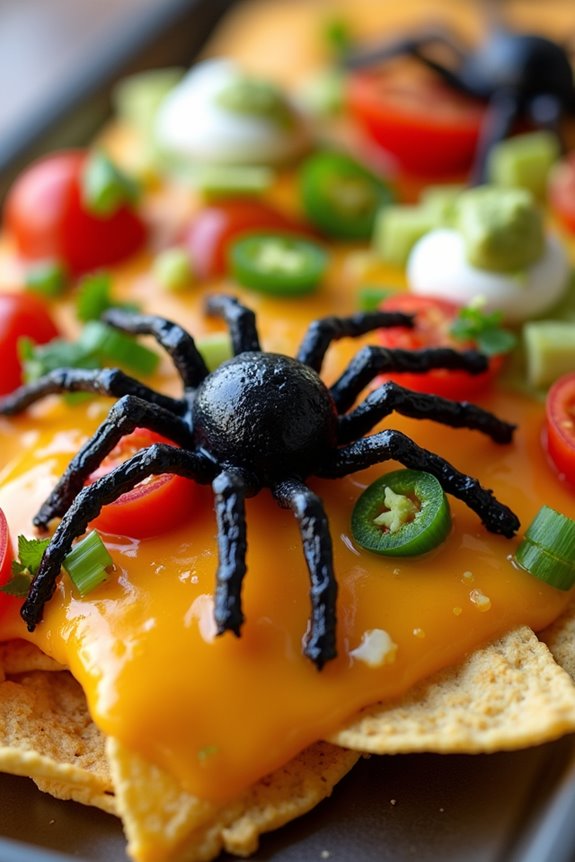
Halloween is the perfect time to get creative in the kitchen and conjure up some fun and festive dishes. Creepy Crawly Nachos are a playful way to turn a classic party snack into something spooktacular. These nachos combine all the cheesy, crunchy goodness you love with a few eerie twists, inspired by the creepy crawlers of Halloween.
Serve them at your next Halloween party, and they’re sure to be a hit with both kids and adults alike, thanks to their hauntingly delicious flavors and whimsical presentation.
To create a serving size that caters to 4-6 people, you’ll be assembling a platter of nachos adorned with cheese, beans, olives, and topped with scary yet tasty spider-like embellishments. This recipe isn’t only a delight to the taste buds but also a feast for the eyes.
So, let’s plunge into this ghoulishly good recipe that’s sure to add a spooky flair to your Halloween festivities.
Ingredients:
- 1 bag (about 14 oz) of tortilla chips
- 2 cups shredded cheddar cheese
- 1 can (15 oz) black beans, drained and rinsed
- 1 cup cherry tomatoes, halved
- 1/2 cup sliced black olives
- 1/2 cup pickled jalapeños
- 2 avocados
- 1 lime
- 1 cup sour cream
- 1/4 cup chopped fresh cilantro
- 1/4 cup sliced green onions
- 1 small can of whole black olives (for the spiders)
- 1 small can of sliced black olives (for the spider legs)
- Salt and pepper to taste
Cooking Instructions:
- Preheat the Oven: Set your oven to 350°F (175°C) and let it preheat while you prepare the other ingredients.
- Prepare the Avocado Mixture: In a medium bowl, mash the avocados and mix them with the juice of one lime. Add salt and pepper to taste. This will be your “slime” topping for the nachos.
- Assemble the Nachos: On a large baking sheet or oven-safe platter, spread out the tortilla chips in an even layer. Sprinkle the black beans evenly over the chips, followed by the cherry tomatoes, black olives, and pickled jalapeños.
- Add the Cheese: Generously sprinkle the shredded cheddar cheese over the top of the nachos, ensuring even coverage so that every bite is cheesy and delicious.
- Bake the Nachos: Place the nachos in the preheated oven and bake for about 10 minutes, or until the cheese is melted and bubbly.
- Create the Spooky Spiders: While the nachos are baking, create your creepy spiders. Use whole black olives for the spider bodies and cut the sliced olives into thin strips to form the legs. Arrange them on a plate, ready to decorate your nachos.
- Garnish the Nachos: Once the nachos are baked, remove them from the oven. Drizzle the avocado mixture over the top. Add dollops of sour cream and sprinkle with chopped cilantro and green onions for added flavor.
- Add the Creepy Crawlers: Finally, arrange the olive spiders randomly across the top of the nachos to give them a creepy crawly appearance.
Extra Tips:
For a truly frightening presentation, you can use a piping bag to neatly drizzle the avocado “slime” and sour cream over the nachos in web-like patterns. If you don’t have a piping bag, a plastic sandwich bag with a small corner cut off works just as well.
Additionally, if you’re serving these nachos to children, consider leaving the jalapeños on the side to accommodate those who prefer their nachos without the heat. Enjoy your Creepy Crawly Nachos with a side of spooky stories for the ultimate Halloween experience!
Jack-O’-Lantern Stuffed Peppers
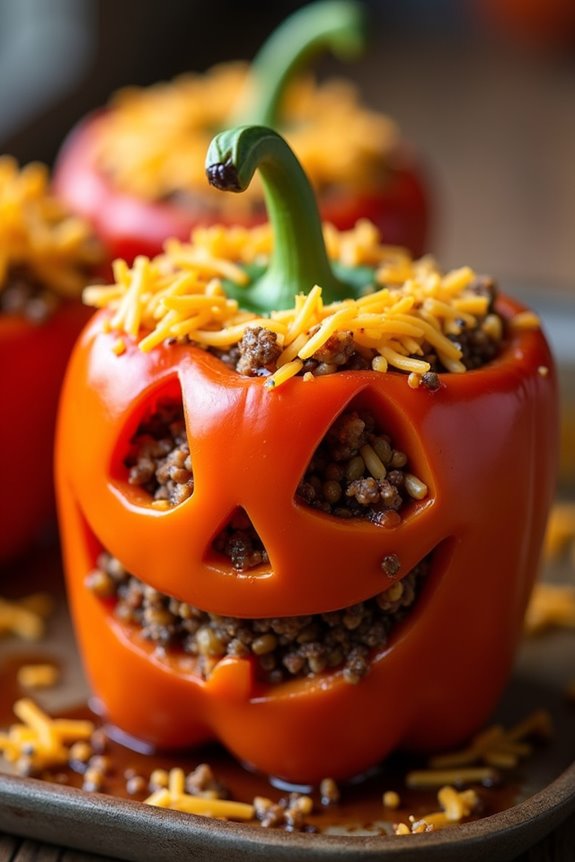
As the leaves turn golden and the air gets crisp, it’s the perfect time to bring some Halloween spirit into your kitchen with Jack-O’-Lantern Stuffed Peppers. This festive dish combines the fun of carving pumpkins with the savory delight of stuffed peppers. Perfect for a Halloween party or a family dinner, these adorable edible “lanterns” will charm your guests and tickle their taste buds. The peppers are carved to resemble jack-o’-lanterns, then filled with a delicious mixture of ground meat, rice, and seasonings, creating a hearty and nutritious meal.
The beauty of Jack-O’-Lantern Stuffed Peppers lies in its versatility. You can customize the filling to suit your taste, whether you prefer beef, turkey, or a vegetarian option. The vibrant colors of the peppers make for a stunning presentation, and the playful design will be a hit with kids and adults alike. Not only do these stuffed peppers make a great main course, but they also serve as a creative way to celebrate the spooky season with a touch of culinary flair.
Ingredients (Serving Size: 4-6 people)
- 6 large orange bell peppers
- 1 pound ground beef or turkey
- 1 cup cooked rice
- 1 can (15 ounces) black beans, drained and rinsed
- 1 can (14.5 ounces) diced tomatoes
- 1 small onion, chopped
- 2 cloves garlic, minced
- 1 teaspoon chili powder
- 1 teaspoon cumin
- 1 cup shredded cheddar cheese
- Salt and pepper to taste
- Olive oil
Cooking Instructions
- Prepare the Peppers: Preheat your oven to 375°F (190°C). Slice the tops off the bell peppers and remove the seeds and membranes. Using a small sharp knife, carefully carve jack-o’-lantern faces into one side of each pepper. Lightly brush the outside of the peppers with olive oil to help them roast evenly.
- Cook the Filling: In a large skillet over medium heat, add a tablespoon of olive oil and sauté the chopped onion and minced garlic until fragrant and translucent. Add the ground beef or turkey, breaking it apart with a spoon, and cook until browned. Drain any excess fat.
- Mix the Filling: Stir in the cooked rice, black beans, diced tomatoes, chili powder, cumin, salt, and pepper. Let the mixture simmer for about 5 minutes, allowing the flavors to meld together. Taste and adjust seasoning if necessary.
- Stuff the Peppers: Place the carved peppers upright in a baking dish. Spoon the meat and rice mixture evenly into each pepper, packing it gently but firmly. Sprinkle the tops with shredded cheddar cheese.
- Bake the Peppers: Cover the dish with aluminum foil and bake in the preheated oven for 25 minutes. Remove the foil and bake for an additional 10-15 minutes, or until the peppers are tender and the cheese is melted and bubbly.
- Serve and Enjoy: Allow the peppers to cool slightly before serving. These Jack-O’-Lantern Stuffed Peppers are best enjoyed warm, with a side of sour cream or a simple green salad.
Extra Tips
When carving the jack-o’-lantern faces, take your time to guarantee clean cuts, which will yield better results when the peppers roast. If you prefer a vegetarian version, simply omit the meat and increase the amount of beans or add vegetables like corn or mushrooms to the filling.
For added heat, consider incorporating jalapeños or a dash of hot sauce. This dish can be prepared a day in advance and baked just before serving, making it a convenient option for a busy Halloween schedule.
Bloody Finger Breadsticks

Are you looking to add a little spooky touch to your Halloween party? These Bloody Finger Breadsticks are the perfect eerie addition to your feast. Not only are they visually striking, but they’re also deliciously savory with a hint of parmesan and garlic.
These breadsticks are shaped to resemble creepy fingers and are topped with a red sauce to mimic blood, making them a fun and tasty treat for guests of all ages.
The great thing about Bloody Finger Breadsticks is how easy they’re to make. With just a few ingredients and a pinch of creativity, you can whip up a batch of these gory appetizers in no time.
Whether you’re hosting a Halloween party or just want to surprise your family with a themed dinner, these breadsticks are sure to be a hit. Follow the recipe below to create a serving size that comfortably feeds 4-6 people.
Ingredients:
- 1 can refrigerated breadstick dough
- 1/4 cup grated parmesan cheese
- 1 tablespoon garlic powder
- 1 egg, beaten
- 6 whole almonds
- 1/4 cup marinara sauce (or any preferred red sauce)
- Red food coloring (optional)
- Cooking spray or olive oil
Cooking Instructions:
- Preheat the Oven: Start by preheating your oven to 375°F (190°C). This guarantees the breadsticks will bake evenly and achieve a nice golden color.
- Prepare the Dough: Open the can of refrigerated breadstick dough and separate each piece. Roll each piece slightly to give it a more elongated finger-like shape.
- Shape the Fingers: Using a small knife, lightly score three horizontal lines in the middle of each breadstick to create knuckle indentations. These will make your breadsticks look more like fingers.
- Add the Nails: Press a whole almond into one end of each breadstick to create the appearance of a fingernail. Make sure the almond is secure, but be gentle to prevent the dough from tearing.
- Egg Wash & Season: Brush each breadstick with the beaten egg. This will give them a nice glossy finish. Sprinkle the parmesan cheese and garlic powder evenly over the breadsticks for added flavor.
- Bake: Place the breadsticks on a baking sheet lined with parchment paper. Lightly spray or brush with olive oil to prevent sticking. Bake in the preheated oven for about 12-15 minutes, or until golden brown.
- Prepare the Bloody Sauce: While the breadsticks are baking, pour the marinara sauce into a small saucepan and heat it over medium heat. If desired, add a few drops of red food coloring to intensify the “blood” effect.
- Serve: Once the breadsticks are done, let them cool slightly. Serve with the warm red sauce on the side for dipping, or drizzle the sauce over the breadsticks for a more dramatic effect.
Extra Tips:
For a more realistic look, you can also carve small cuts into the dough at the “knuckles” and gently pull them apart to create a gnarly, aged finger appearance.
If you want to make these breadsticks ahead of time, they can be prepared and shaped the day before, then stored in the fridge until you’re ready to bake them. Just be sure to bring them to room temperature before baking to guarantee even cooking.
Additionally, if you don’t have almonds, you can substitute them with pumpkin seeds for a similar effect. Enjoy your creepy finger food!
Graveyard Dirt Cups
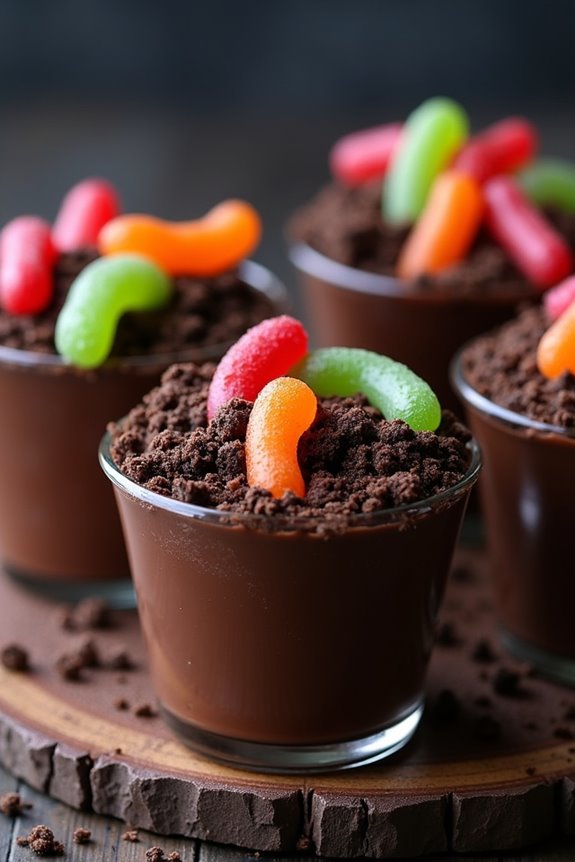
Graveyard Dirt Cups are a fun and spooky treat perfect for Halloween festivities. These no-bake desserts aren’t only simple to make but also delightfully creepy, combining layers of chocolate pudding, crushed cookies, and gummy worms to resemble a freshly dug grave.
The playful presentation is sure to be a hit with both kids and adults, making them a must-have for any Halloween party. This recipe is designed to serve 4-6 people and can be easily adjusted to suit a larger crowd. The Graveyard Dirt Cups can be prepared ahead of time, allowing you to focus on other aspects of your celebration.
They’re a great way to involve children in the kitchen, as the assembly process is straightforward and fun, encouraging creativity with decorations.
Ingredients (for 4-6 servings):
- 1 package (3.9 oz) instant chocolate pudding mix
- 2 cups cold milk
- 1 package (14 oz) chocolate sandwich cookies
- 1 cup whipped topping
- 12 gummy worms
- 6 small clear cups or jars
- Optional: Halloween-themed sprinkles or edible decorations
Instructions:
- Prepare the Pudding: In a medium-sized bowl, combine the instant chocolate pudding mix with 2 cups of cold milk. Whisk together until the mixture is smooth and begins to thicken, about 2 minutes. Refrigerate for 5 minutes to allow it to set.
- Crush the Cookies: While the pudding sets, place the chocolate sandwich cookies in a resealable plastic bag. Use a rolling pin or a food processor to crush the cookies into fine crumbs, resembling dirt. Set aside about 1/4 cup of crumbs for topping later.
- Layer the Cups: Begin assembling the dirt cups by adding a layer of cookie crumbs at the bottom of each cup. Spoon a layer of chocolate pudding over the crumbs, followed by another layer of cookie crumbs. Continue layering until the cups are filled, ending with a layer of cookie crumbs on top.
- Decorate: Gently press a few gummy worms into the top layer of crumbs, allowing them to dangle over the sides to mimic worms crawling out of the ground. Add any additional decorations, such as Halloween-themed sprinkles or edible tombstone decorations for an extra spooky touch.
- Chill: Once assembled, place the cups in the refrigerator for at least 1 hour to chill and allow the flavors to meld together before serving.
Extra Tips:
For an even more eerie effect, consider using a mix of different colored gummy worms or adding a few candy bones to the top layer.
If you’re serving these to a crowd, prepare them in a large baking dish instead of individual cups for a communal “graveyard” experience. If you’d like to make a healthier version, try using low-fat milk and light whipped topping.
Additionally, the pudding and cookie layers can be prepared a day in advance, but wait to add the gummy worms until just before serving to guarantee they remain fresh and chewy.
Batty Brownie Bites

Searching for a spooktacular treat to serve at your Halloween gathering? Search no more than Batty Brownie Bites! These delicious, bite-sized brownies aren’t only incredibly chocolatey and fudgy but also decorated to fit the Halloween theme perfectly.
Ideal for a party or as a fun family baking project, these Batty Brownie Bites will be a hit with both kids and adults alike. They’re easy to make and can be prepared in advance, allowing you to enjoy the festivities without worrying about last-minute preparations.
The best part about Batty Brownie Bites is their versatility. You can customize them with various toppings and decorations to match your Halloween decor or suit your guests’ preferences.
Whether you want to keep it simple with a dusting of powdered sugar or go all out with bat-shaped candies and sprinkles, these brownie bites are sure to be a delightful addition to your holiday table. Here’s how to whip up a batch for 4-6 people.
Ingredients
- 1/2 cup unsalted butter
- 3/4 cup granulated sugar
- 1/2 cup brown sugar
- 1 teaspoon vanilla extract
- 2 large eggs
- 3/4 cup all-purpose flour
- 1/2 cup cocoa powder
- 1/4 teaspoon salt
- 1/4 teaspoon baking powder
- 1/2 cup mini chocolate chips
- Halloween-themed sprinkles or edible decorations
- Bat-shaped candies or icing decorations
Instructions
- Preheat the Oven: Start by preheating your oven to 350°F (175°C). Line a mini muffin tin with paper liners or lightly grease it to prevent sticking.
- Make the Brownie Batter: In a medium saucepan, melt the butter over low heat. Remove from heat and stir in both sugars and vanilla extract until combined. Beat in the eggs one at a time, making sure each is fully incorporated before adding the next.
- Mix Dry Ingredients: In a separate bowl, whisk together the flour, cocoa powder, salt, and baking powder. Gradually add the dry ingredients to the wet mixture, stirring until just combined. Be careful not to overmix, as this can make the brownies tough.
- Add Chocolate Chips: Gently fold in the mini chocolate chips to distribute them evenly throughout the batter.
- Fill the Muffin Tin: Spoon the batter into the prepared mini muffin tin, filling each cup about three-quarters full. This allows room for the brownies to rise without overflowing.
- Bake: Place the muffin tin in the preheated oven and bake for 12-15 minutes, or until a toothpick inserted into the center of a brownie bite comes out with a few moist crumbs. Avoid overbaking to keep the bites fudgy.
- Cool and Decorate: Allow the brownie bites to cool in the pan for about 10 minutes before transferring them to a wire rack to cool completely. Once cooled, decorate with Halloween-themed sprinkles and attach bat-shaped candies using a small dab of icing as needed.
Extra Tips
For an extra touch of Halloween magic, consider using black or orange cupcake liners to enhance the festive appearance.
If you’re short on time, store-bought brownie mix can be substituted for the homemade batter, following the package instructions and adjusting for the mini muffin size.
To make the bat decorations stick better, use a small piping bag with a fine tip to apply icing or melted chocolate as an adhesive.
Finally, if you’re planning to make these ahead, store the undecorated brownie bites in an airtight container and decorate them just before serving to guarantee they appear fresh and festive.
Pumpkin Patch Cupcakes

Welcome the spirit of Halloween into your kitchen with these delightful Pumpkin Patch Cupcakes. These cupcakes aren’t only visually appealing, resembling a mini pumpkin patch, but they also capture the essence of fall with their warm spices and rich pumpkin flavor. Perfect for a Halloween party or a cozy autumn gathering, these cupcakes will be a hit with both kids and adults alike.
The base of these cupcakes is a moist and fluffy pumpkin cake, complemented by a creamy and spiced cream cheese frosting. Once baked and cooled, the cupcakes are artfully decorated with candy pumpkins, green icing vines, and crushed cookie “dirt” to create the appearance of a miniature pumpkin patch. This recipe serves 4-6 people, making it a great choice for a small get-together or family celebration.
Ingredients:
- 1 ¾ cups all-purpose flour
- 1 teaspoon baking powder
- 1 teaspoon baking soda
- ½ teaspoon salt
- 1 teaspoon ground cinnamon
- ½ teaspoon ground nutmeg
- ½ cup unsalted butter, softened
- 1 cup granulated sugar
- 2 large eggs
- 1 cup canned pumpkin puree
- 1 teaspoon vanilla extract
- ½ cup milk
For the Cream Cheese Frosting:
- 8 oz cream cheese, softened
- ½ cup unsalted butter, softened
- 4 cups powdered sugar
- 1 teaspoon vanilla extract
- 1 teaspoon ground cinnamon
For Decoration:
- Green food coloring
- Candy pumpkins
- Chocolate sandwich cookies, crushed (for “dirt”)
- Green icing (store-bought or homemade)
Instructions:
- Preheat and Prep: Preheat your oven to 350°F (175°C). Line a cupcake pan with paper liners.
- Mix Dry Ingredients: In a medium-sized bowl, whisk together the flour, baking powder, baking soda, salt, cinnamon, and nutmeg.
- Cream Butter and Sugar: In a large bowl, beat the softened butter and granulated sugar together with an electric mixer until light and fluffy, about 2-3 minutes.
- Incorporate Eggs and Pumpkin: Add the eggs one at a time to the butter mixture, beating well after each addition. Then, mix in the pumpkin puree and vanilla extract until well combined.
- Combine Mixtures: Gradually add the dry ingredients to the wet mixture, alternating with the milk, starting and ending with the dry ingredients. Mix until just combined.
- Fill and Bake: Divide the batter evenly among the prepared cupcake liners, filling each about 2/3 full. Bake in the preheated oven for 18-22 minutes, or until a toothpick inserted into the center comes out clean.
- Prepare Frosting: While cupcakes are baking, beat together the cream cheese and butter until creamy. Gradually add powdered sugar, vanilla extract, and cinnamon, and continue to beat until smooth and fluffy.
- Decorate: Once cupcakes are completely cooled, spread or pipe the cream cheese frosting on top. Use green food coloring to tint some of the frosting, and pipe vines on the cupcakes. Decorate with candy pumpkins and sprinkle crushed cookies around to resemble dirt.
Extra Tips:
When making the frosting, ascertain that both the cream cheese and butter are at room temperature for a smooth and creamy consistency. If your frosting is too soft to hold its shape, refrigerate it for about 10-15 minutes before using.
Additionally, make sure your cupcakes are completely cooled before frosting to prevent the frosting from melting. For a fun twist, consider adding a touch of orange food coloring to the frosting to enhance the pumpkin theme. Enjoy your spooky and delicious creation!
Witch Hat Cookies

Witch Hat Cookies are a delightful and spooky treat perfect for any Halloween celebration. These whimsical cookies aren’t only fun to make but also add a touch of magic to your dessert table. Made with simple ingredients, they combine the rich flavors of chocolate and buttery cookies to create a deliciously enchanting snack. With their conical shape and decorative details, Witch Hat Cookies are certain to be a hit with both children and adults alike.
The beauty of Witch Hat Cookies lies in their simplicity and versatility. They can be customized with different colors and decorations to suit your Halloween theme, making them a creative project for the whole family. Whether you’re hosting a Halloween party or simply want to surprise your loved ones with a festive treat, these cookies are easy to prepare and assured to impress. Follow this recipe to create a batch of 24 Witch Hat Cookies, perfect for serving 4-6 people.
Ingredients:
- 24 round chocolate wafer cookies
- 24 milk chocolate kisses
- 1 cup powdered sugar
- 2 tablespoons milk
- 1/2 teaspoon vanilla extract
- Food coloring gel (orange, green, or purple recommended)
- Sprinkles or colored sugar for decoration
Instructions:
- Prepare the Icing: In a medium-sized bowl, combine the powdered sugar, milk, and vanilla extract. Stir until the mixture is smooth and well blended. Add a few drops of food coloring gel to the icing and mix until you achieve your desired color.
- Assemble the Cookies: Lay the chocolate wafer cookies flat on a large baking sheet or tray. Using a small spoon or piping bag, apply a small amount of colored icing to the center of each cookie.
- Attach the Chocolate Kisses: Unwrap the chocolate kisses and gently press one onto the icing in the center of each cookie. The icing will help the chocolate kiss adhere to the cookie, forming the peak of the witch hat.
- Decorate the Witch Hats: Once all the chocolate kisses are secured, use the remaining icing to create decorative bands around the base of each kiss. You can add sprinkles or colored sugar for extra flair.
- Set the Cookies: Allow the cookies to sit at room temperature for about 30 minutes to let the icing set. If you’re in a hurry, you can place the cookies in the refrigerator for 15 minutes to speed up the process.
Extra Tips:
For best results, make sure that your icing is thick enough to hold the chocolate kisses in place but not too thick that it’s hard to pipe or spread. If needed, adjust the consistency by adding more powdered sugar to thicken or a little more milk to thin.
Experiment with different colors and decorations to make each witch hat unique, and consider using different flavored kisses for a variety of taste experiences. If you’re making these cookies with children, consider pre-measuring the ingredients and having all materials ready for a smoother process. Enjoy the creative process, and have a spellbinding Halloween!