


Autumn gatherings are a good time to try recipes that also help style your kitchen for Halloween. These ideas focus on simple dishes and drinks you can make ahead. Each one includes practical tips for plating and table details that feel elegant without extra effort. You will see ways to use seasonal ingredients in both sweet and savory options. They work well for small groups or larger get togethers this fall.
Helpful Tips Before You Start
A few choices early on keep the styling elegant and easy to manage during gatherings.
Pick a Limited Color Palette
Stick to three shades such as deep green, warm rust, and cream. This keeps the kitchen looking pulled together instead of busy.
Use Natural Materials
Choose real pumpkins, wooden trays, and linen napkins over plastic or glitter items. These textures photograph well and feel seasonal.
Plan Lighting First
Set out candles or low lamps before arranging food. Soft light makes the space feel welcoming without needing extra decorations.
Clear Counter Space
Remove small appliances and group serving pieces on one surface. This creates room for displays and makes cleanup simpler later.
Spiced Pumpkin Ravioli with Brown Butter and Crispy Sage
This dish brings warm autumn spices into tender pasta pockets for a refined touch at fall gatherings. It suits elegant Halloween dinners or intimate seasonal meals where guests expect something special yet comforting.
The filling blends creamy pumpkin with gentle spices while the brown butter adds a nutty depth. Crispy sage leaves provide a light crunch that balances the soft ravioli.


Equipment
- Mixing Bowl
- Large Pot
- Large Skillet
Ingredients
- 1 1/2 cups pumpkin puree
- 3/4 cup ricotta cheese
- 1 teaspoon ground cinnamon
- 1/2 teaspoon ground nutmeg
- 1/4 teaspoon ground cloves
- Salt and black pepper to taste
- 24 wonton wrappers
- 1 large egg
- 8 tablespoons unsalted butter
- 20 fresh sage leaves
- 1/4 cup grated Parmesan cheese
Instructions
- Mix the pumpkin puree, ricotta cheese, cinnamon, nutmeg, cloves, salt, and pepper in a bowl until smooth.
- Lay out half the wonton wrappers on a lightly floured surface. Place one tablespoon of filling in the center of each wrapper.
- Beat the egg with one tablespoon of water. Brush the edges of each filled wrapper with the egg wash.
- Top each with a second wrapper and press the edges firmly to seal. Trim any excess if needed.
- Bring a large pot of salted water to a boil. Cook the ravioli in batches for three minutes until they float.
- Melt the butter in a large skillet over medium heat. Cook until it turns golden brown and smells nutty.
- Add the sage leaves to the brown butter and fry for one minute until crisp. Remove the leaves and set aside.
- Drain the ravioli and add them to the skillet. Toss gently to coat with the brown butter.
- Plate the ravioli and top with the crispy sage leaves and grated Parmesan cheese.
Notes
Cuisine: Italian
Equipment: Mixing Bowl, Large Pot, Large Skillet
Charred Octopus with Black Garlic and Pickled Apple Slaw
This dish brings a refined touch to autumn gatherings with its smoky char and bright contrast of flavors. The tender octopus pairs with earthy black garlic and a crisp slaw that cuts through the richness. It suits elegant Halloween spreads where guests want something seasonal yet sophisticated.
The texture stays tender inside with a light crust from charring. The pickled apples add a sharp sweetness that balances the savory notes.


Equipment
- Large Pot
- Grill or Cast Iron Pan
- Mixing Bowl
Ingredients
- 1.5 pounds octopus tentacles, cleaned
- 3 tablespoons olive oil
- 4 cloves black garlic, minced
- 2 Granny Smith apples, julienned
- 1 cup apple cider vinegar
- 2 tablespoons sugar
- 1 teaspoon salt
- 2 cups shredded red cabbage
- 1 tablespoon fresh thyme leaves
Instructions
- Bring a large pot of salted water to a boil. Add the octopus and simmer for 45 minutes until tender. Drain and pat dry.
- In a small bowl, mix the minced black garlic with 2 tablespoons olive oil to form a paste. Brush this over the cooled octopus.
- Heat a grill or cast iron pan over high heat. Char the octopus for 2 to 3 minutes per side until edges crisp.
- Meanwhile, combine apple cider vinegar, sugar, and salt in a bowl. Add the julienned apples and let them sit for 10 minutes to pickle.
- Drain the apples and toss them with the shredded red cabbage and thyme in a serving bowl.
- Slice the charred octopus into pieces and arrange over the slaw. Drizzle with the remaining olive oil before serving.
Notes
Cuisine: Mediterranean
Equipment: Large Pot, Grill or Cast Iron Pan, Mixing Bowl
Roasted Beet Tart with Whipped Goat Cheese and Thyme
This tart brings deep autumn colors to the table with roasted beets arranged over a flaky base. The tangy whipped goat cheese balances the earthy sweetness of the beets, while fresh thyme adds a subtle herbal note that feels right for cool-weather gatherings.
It works well as a starter or light bite during Halloween dinners and autumn parties. The contrast of creamy topping and tender roasted slices gives it an elegant yet simple appeal that photographs nicely.


Equipment
- Baking Sheet
- Oven
- Mixing Bowl
Ingredients
- 1 sheet puff pastry, thawed
- 3 medium beets, peeled and cut into thin rounds
- 5 ounces goat cheese
- 2 tablespoons olive oil
- 1 tablespoon fresh thyme leaves
- 1/4 teaspoon salt
- 1/4 teaspoon black pepper
Instructions
- Preheat the oven to 400 degrees F. Line a baking sheet with parchment paper.
- Place the beet rounds on the baking sheet, drizzle with 1 tablespoon olive oil, and sprinkle with salt and pepper. Roast for 25 minutes until tender.
- Unroll the puff pastry on the same baking sheet and lightly score a border around the edge. Bake for 12 minutes until lightly golden.
- While the pastry bakes, place the goat cheese in a bowl with the remaining tablespoon of olive oil. Whip with a fork or hand mixer until smooth and spreadable.
- Remove the pastry from the oven and let it cool for 5 minutes. Spread the whipped goat cheese evenly over the center.
- Arrange the roasted beet rounds on top of the cheese. Scatter the fresh thyme leaves over the tart before serving.
Notes
Cuisine: Mediterranean
Equipment: Baking Sheet, Oven, Mixing Bowl
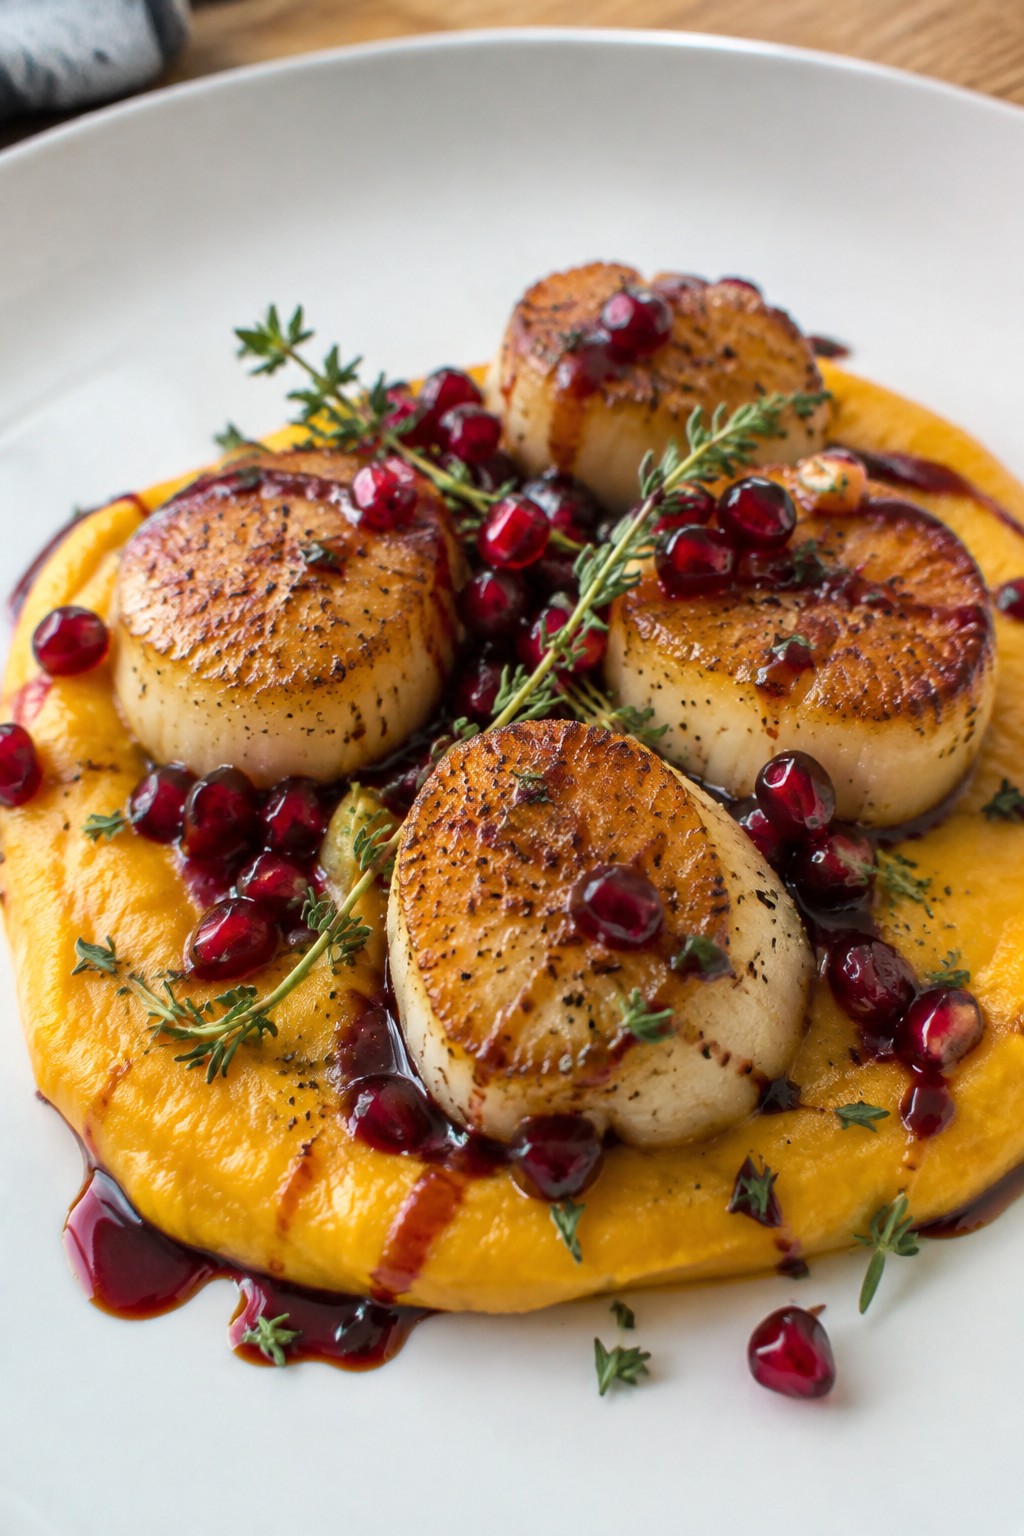
Seared Scallops over Butternut Purée with Pomegranate Reduction
This dish brings an elegant touch to autumn gatherings. The creamy butternut base pairs with sweet-tart pomegranate and golden scallops for a balanced plate that feels special without much fuss. It works well for a Halloween dinner or a cozy fall evening with friends.
The flavors stay grounded in seasonal produce. You get silky texture from the purée, a slight crust on the scallops, and a bright finish from the reduction.

Equipment
- Large pot
- Small saucepan
- Large skillet
- Blender or potato masher
Ingredients
- 1 medium butternut squash (about 2 lbs), peeled, seeded, and cubed
- 3 tablespoons unsalted butter, divided
- 1/2 cup heavy cream
- Salt and black pepper to taste
- 12 large sea scallops, patted dry
- 2 tablespoons olive oil
- 1 cup pomegranate juice
- 1 tablespoon balsamic vinegar
- 1/4 cup pomegranate seeds
- 4 fresh thyme sprigs
Instructions
- Place the cubed butternut squash in a large pot and cover with water. Bring to a boil and cook until tender, about 15 minutes. Drain well.
- Return the squash to the pot. Add 2 tablespoons butter and the heavy cream. Mash or blend until smooth. Season with salt and pepper. Keep warm.
- In a small saucepan, combine the pomegranate juice and balsamic vinegar. Simmer over medium heat until reduced by half and slightly syrupy, about 10 minutes. Set aside.
- Heat the olive oil and remaining tablespoon of butter in a large skillet over medium-high heat. Season the scallops with salt and pepper.
- Add the scallops to the hot skillet in a single layer. Sear for 2 to 3 minutes per side until golden brown and just cooked through. Remove from heat.
- Spoon the butternut purée onto four plates. Arrange three scallops on each plate. Drizzle with pomegranate reduction. Scatter pomegranate seeds on top and finish with a thyme sprig.
Notes
Cuisine: American
Equipment: Large pot, Small saucepan, Large skillet, Blender or potato masher
Wild Mushroom and Chestnut Galette with Gruyère
This galette brings together earthy mushrooms and sweet chestnuts in a flaky crust topped with nutty Gruyère. It works well for autumn gatherings where guests want something savory yet easy to slice and share. The filling stays hearty without feeling heavy, and the edges turn golden and crisp in the oven.


Equipment
- Baking sheet
- Large skillet
- Parchment paper
Ingredients
- 1 store-bought pie crust
- 2 cups mixed wild mushrooms, sliced
- 1 cup cooked chestnuts, roughly chopped
- 1 cup shredded Gruyère cheese
- 2 shallots, thinly sliced
- 2 cloves garlic, minced
- 2 tbsp butter
- 1 tsp fresh thyme leaves
- Salt and black pepper to taste
- 1 egg, beaten
Instructions
- Preheat the oven to 400°F and line a baking sheet with parchment paper.
- Melt the butter in a large skillet over medium heat. Add the shallots and garlic and cook until softened.
- Add the mushrooms to the skillet and cook until they release their liquid and start to brown.
- Stir in the chestnuts, thyme, salt, and pepper. Remove the skillet from the heat.
- Unroll the pie crust onto the prepared baking sheet. Sprinkle half the Gruyère over the center, leaving a 2-inch border.
- Spoon the mushroom mixture over the cheese. Top with the remaining Gruyère.
- Fold the edges of the crust over the filling, leaving the center open. Brush the crust with the beaten egg.
- Bake for 25 to 30 minutes until the crust is golden and the cheese has melted. Let the galette rest for 5 minutes before slicing.
Notes
Cuisine: French
Equipment: Baking sheet, Large skillet, Parchment paper
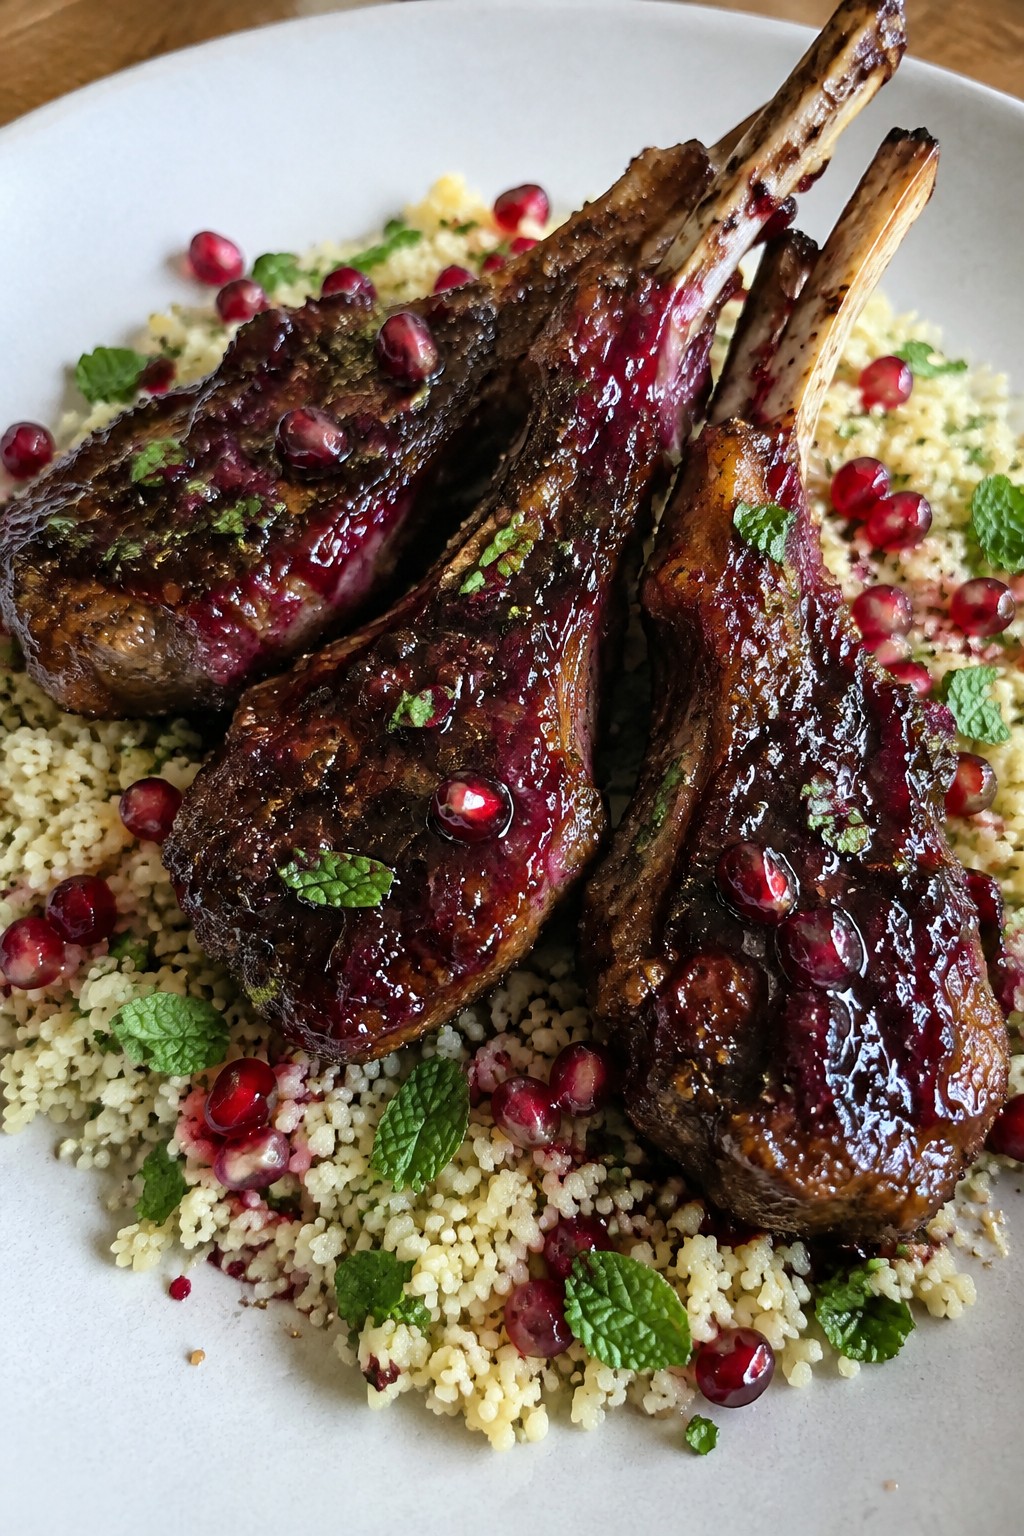
Pomegranate-Glazed Lamb Chops with Mint Couscous
This dish brings an elegant touch to autumn gatherings with its balance of savory lamb and a sweet-tart pomegranate glaze. The fresh mint in the couscous adds brightness that pairs well with cooler evening dinners or Halloween hosting.
It works nicely for a small group because the components come together without much fuss. The lamb stays juicy while the glaze creates a glossy finish, and the couscous offers a light, fluffy contrast.

Equipment
- Large skillet
- Small saucepan
- Mixing bowl
Ingredients
- 8 lamb rib chops
- 1 cup pomegranate juice
- 2 tablespoons honey
- 2 cloves garlic, minced
- 1 tablespoon olive oil
- 1 cup couscous
- 1 1/4 cups vegetable broth
- 1/4 cup fresh mint leaves, chopped
- 1/2 cup pomegranate seeds
- Salt and black pepper to taste
Instructions
- Season the lamb chops on both sides with salt and black pepper. Set them aside while you prepare the glaze.
- Combine the pomegranate juice, honey, and minced garlic in a small saucepan. Bring the mixture to a simmer over medium heat and cook until it reduces by half and thickens slightly, about 8 minutes. Remove from heat.
- Heat the olive oil in a large skillet over medium-high heat. Add the lamb chops and cook for 3 to 4 minutes per side until they reach your preferred doneness. Brush the glaze over the chops during the last minute of cooking on each side.
- While the lamb rests, bring the vegetable broth to a boil in a separate saucepan. Stir in the couscous, cover, and remove from heat. Let it sit for 5 minutes.
- Fluff the couscous with a fork and stir in the chopped mint and pomegranate seeds. Serve the lamb chops alongside the couscous.
Notes
Cuisine: Mediterranean
Equipment: Large skillet, Small saucepan, Mixing bowl
Black Sesame-Crusted Tuna with Blood Orange and Fennel Salad
This dish brings an elegant touch to autumn gatherings with its deep black crust and bright citrus notes. The combination of nutty sesame and crisp fennel works well for a Halloween table where you want something refined yet seasonal. The flavors balance rich seared tuna with the sweet-tart pop of blood orange and the cool crunch of fennel.


Equipment
- Large Skillet
- Mixing Bowl
- Sharp Knife
Ingredients
- 4 (6-ounce) tuna steaks
- 1/4 cup black sesame seeds
- 3 blood oranges
- 1 large fennel bulb
- 1/4 cup olive oil
- Salt and freshly ground black pepper
Instructions
- Pat the tuna steaks dry and season both sides with salt and pepper. Press the black sesame seeds firmly onto all sides of each steak so they stick well.
- Heat 2 tablespoons of olive oil in a large skillet over medium-high heat. Add the tuna and sear for 1 to 2 minutes per side until the crust is set and the center stays rare.
- Remove the tuna from the skillet and let it rest on a cutting board. While it rests, segment two blood oranges over a bowl to catch the juice and place the segments in a mixing bowl.
- Thinly slice the fennel bulb and add it to the same mixing bowl. Squeeze the juice from the remaining blood orange into the bowl, then add the remaining 2 tablespoons of olive oil along with a pinch of salt and pepper. Toss gently to coat the salad.
- Slice the tuna against the grain into thin pieces. Arrange the slices over the blood orange and fennel salad and serve right away.
Notes
Cuisine: Fusion
Equipment: Large Skillet, Mixing Bowl, Sharp Knife
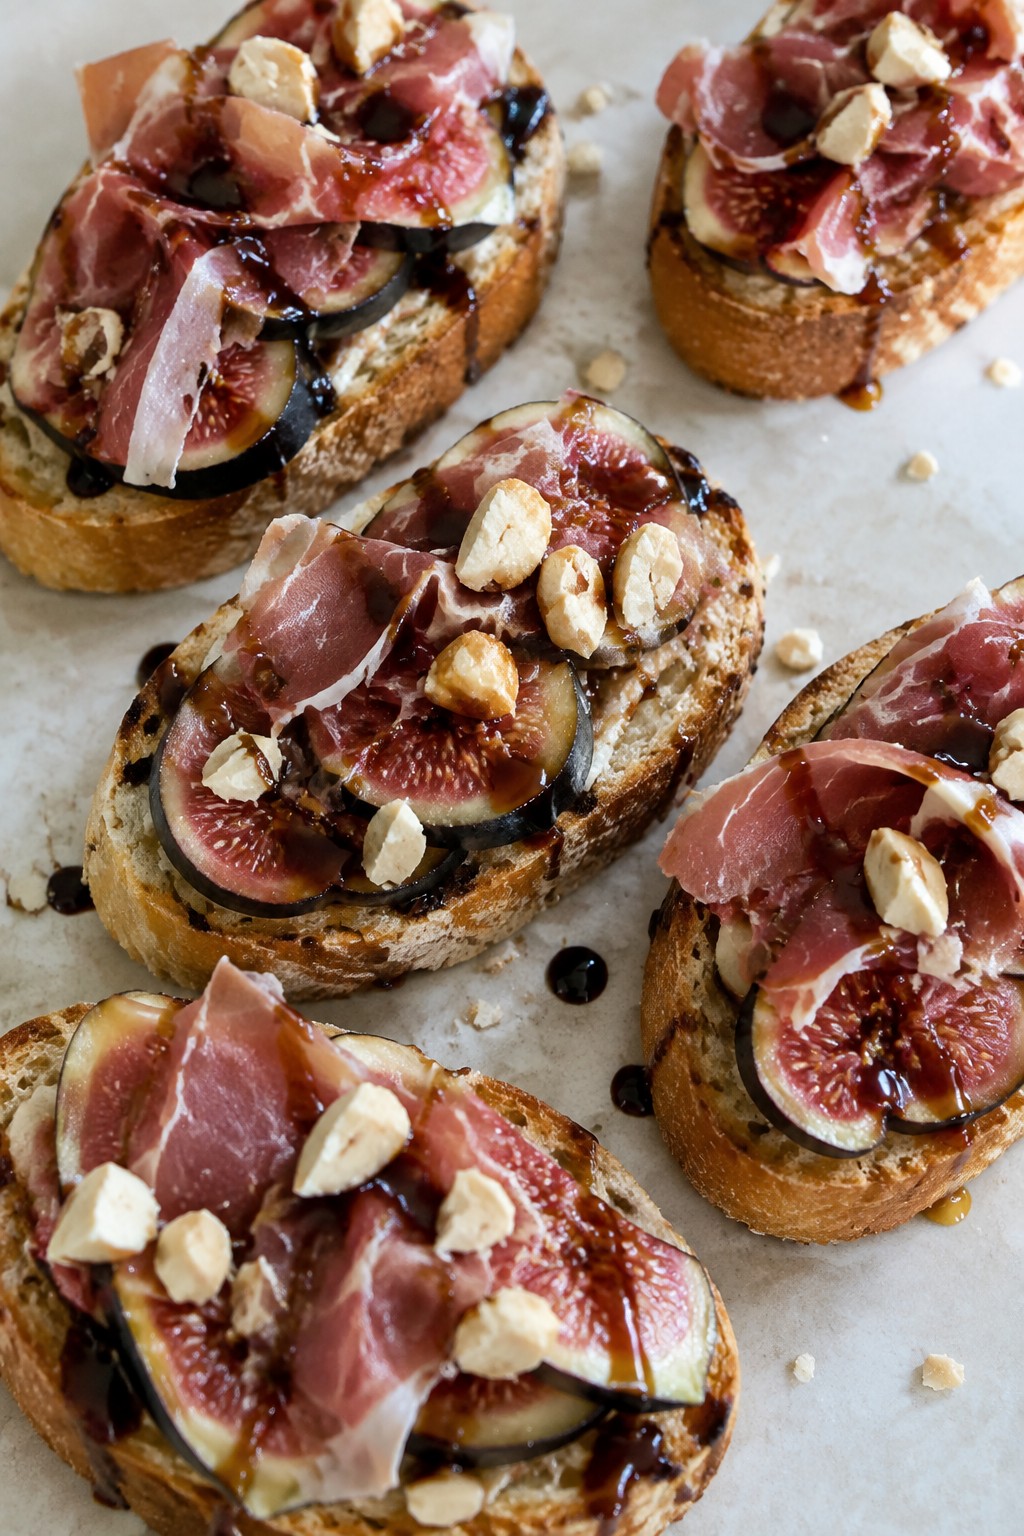
Fig and Prosciutto Crostini with Balsamic and Marcona Almonds
This crostini combines ripe autumn figs with salty prosciutto for a simple starter that feels special at fall gatherings. The toasted bread base stays crisp under the toppings, while the Marcona almonds add a buttery crunch that balances the sweet and savory notes.
It works well as an easy appetizer before a larger meal or as part of a styled grazing table with seasonal elements. The flavors stay light yet satisfying, with the balsamic tying everything together.

Equipment
- Baking Sheet
- Oven
- Knife
Ingredients
- 1 baguette, sliced into 12 pieces
- 2 tablespoons olive oil
- 6 fresh figs, thinly sliced
- 4 ounces prosciutto, torn into strips
- 1/4 cup Marcona almonds, roughly chopped
- 2 tablespoons balsamic glaze
Instructions
- Preheat the oven to 375 degrees. Arrange the baguette slices on a baking sheet and brush each one lightly with olive oil.
- Bake the slices for 8 to 10 minutes until the edges turn golden and the centers feel crisp. Remove the sheet from the oven and let the crostini cool for a few minutes.
- Lay a strip of prosciutto on each cooled slice. Top with several fig slices.
- Drizzle a small amount of balsamic glaze over the figs on each crostini.
- Sprinkle the chopped Marcona almonds evenly across the tops before serving.
Notes
Cuisine: Italian
Equipment: Baking Sheet, Oven, Knife
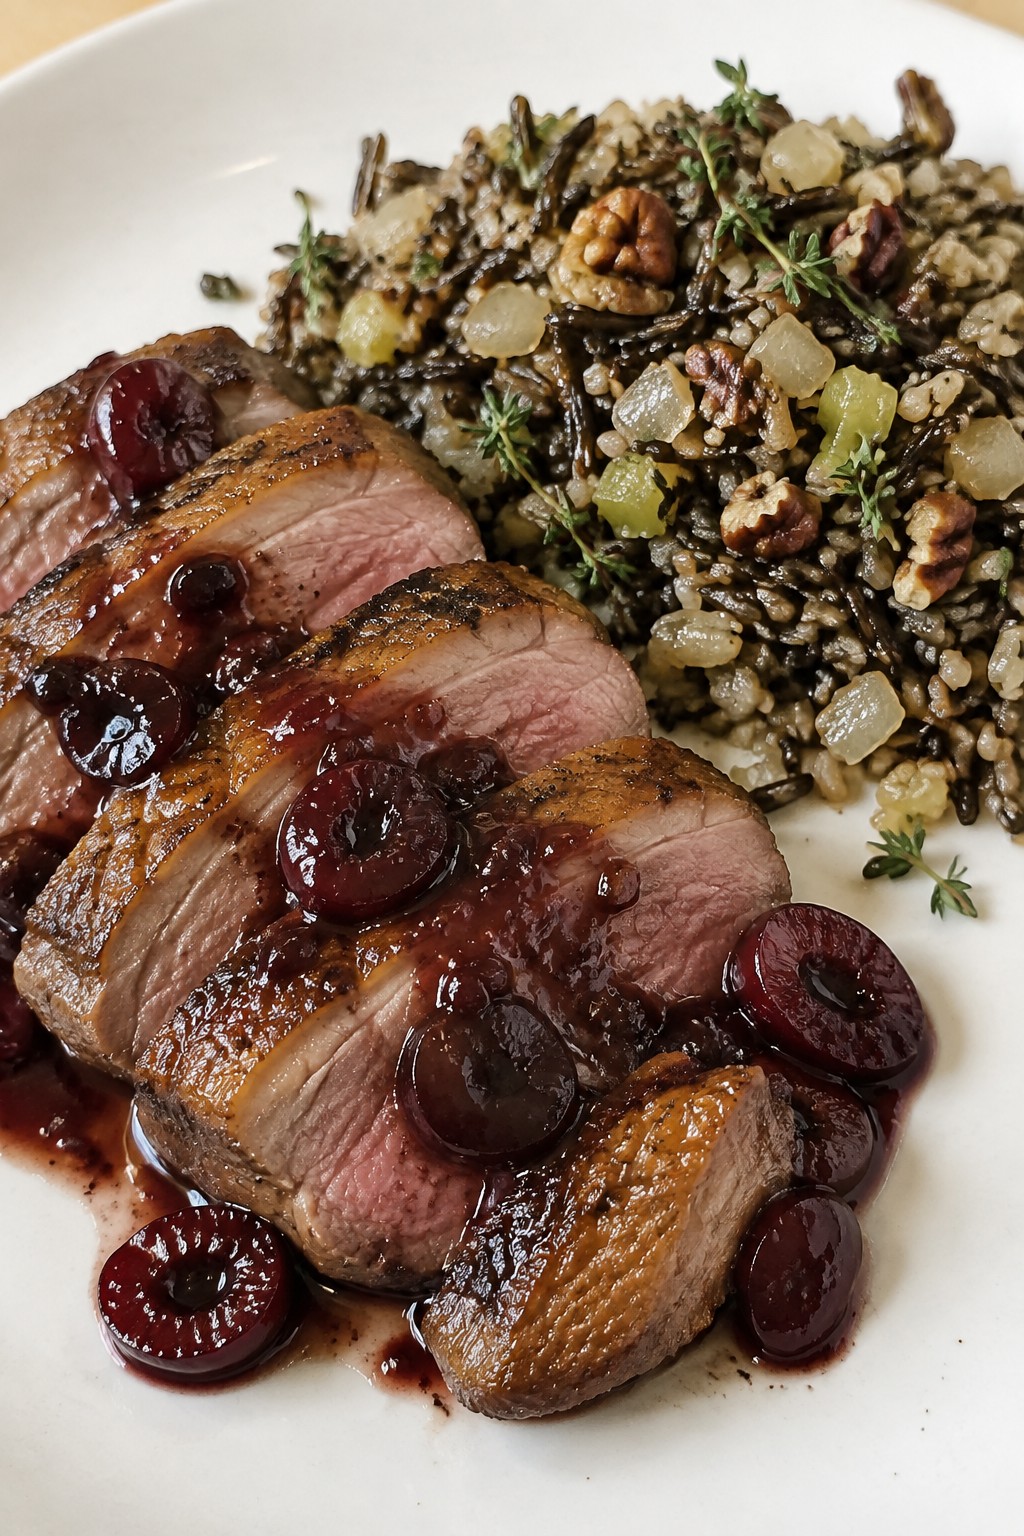
Duck Breast with Cherry-Port Sauce and Wild Rice Pilaf
This dish brings a refined touch to autumn gatherings with its balance of rich duck, sweet-tart cherry sauce, and nutty wild rice. It works well for a seated dinner or holiday table where you want something elegant yet straightforward to prepare ahead of time. The flavors lean savory with a hint of fruit and wine, while the textures contrast crisp duck skin against tender rice and juicy cherries.

Equipment
- Large skillet
- Medium saucepan
Ingredients
- 4 skin-on duck breasts
- Kosher salt and black pepper
- 1 shallot, minced
- 1 cup port wine
- 1 1/2 cups fresh cherries, pitted and halved
- 2 tablespoons unsalted butter
- 1 cup wild rice
- 2 1/2 cups chicken stock
- 1 small onion, diced
- 2 celery stalks, diced
- 1/4 cup chopped pecans
- 1 tablespoon fresh thyme leaves
Instructions
- Rinse the wild rice and place it in a medium saucepan with the chicken stock, diced onion, and diced celery. Bring to a boil, then reduce to a simmer, cover, and cook for 45 minutes until the rice is tender and the liquid is absorbed.
- While the rice cooks, score the duck skin in a crosshatch pattern and season both sides generously with kosher salt and black pepper. Let the duck sit at room temperature for 15 minutes.
- Heat a large skillet over medium heat. Place the duck breasts skin side down and cook for 6 to 8 minutes until the skin is golden and much of the fat has rendered. Flip and cook 4 minutes more for medium-rare, then remove to a plate to rest.
- Pour off all but 1 tablespoon of duck fat from the skillet. Add the minced shallot and cook 1 minute. Pour in the port wine, scraping the pan, then add the halved cherries. Simmer 3 to 4 minutes until the sauce thickens slightly.
- Stir the butter into the cherry sauce until melted and glossy. Season with a pinch of salt and pepper if needed.
- Fluff the wild rice pilaf and stir in the chopped pecans and fresh thyme leaves. Slice the duck breasts and serve over the pilaf with the cherry-port sauce spooned on top.
Notes
Cuisine: French
Equipment: Large skillet, Medium saucepan
Caramelized Onion and Gruyère Tartlets with Thyme
These tartlets offer a savory option for autumn gatherings. Slow-cooked onions develop a natural sweetness that balances the rich, nutty Gruyère while fresh thyme adds an earthy note. The flaky pastry base keeps each bite light enough for a multi-course meal.
They suit Halloween parties or smaller dinners where guests want something warm and handheld. The golden tops and visible thyme make them look polished without extra effort.


Equipment
- Large skillet
- Baking sheet
- Rolling pin
Ingredients
- 1 sheet all-butter puff pastry, thawed
- 4 medium yellow onions, thinly sliced
- 3 tablespoons unsalted butter
- 1 tablespoon olive oil
- 1 cup grated Gruyère cheese
- 2 teaspoons fresh thyme leaves, divided
- 1 egg, beaten
- Salt and freshly ground black pepper
Instructions
- Melt the butter with the olive oil in a large skillet over medium heat. Add the sliced onions and a pinch of salt. Cook, stirring often, until the onions turn deep golden and soft, about 25 minutes.
- Stir in half the thyme leaves and a few grinds of black pepper. Remove the skillet from the heat and let the onions cool slightly.
- Heat the oven to 400°F and line a baking sheet with parchment paper. Unroll the puff pastry on a lightly floured surface and cut it into four equal rectangles or circles.
- Place the pastry pieces on the baking sheet. Brush the edges with the beaten egg. Spread the caramelized onions evenly over the centers, leaving a small border around the edges.
- Sprinkle the grated Gruyère over the onions and scatter the remaining thyme on top. Bake for 15 to 18 minutes until the pastry is puffed and golden and the cheese has melted.
Notes
Cuisine: French
Equipment: Large skillet, Baking sheet, Rolling pin
Roasted Delicata Squash with Crispy Kale and Candied Pecans
This roasted delicata squash dish brings warm autumn flavors to your table. The tender squash pairs with crunchy kale and sweet candied pecans for a balanced bite. It works well as a side at fall gatherings or Halloween dinners.
The textures stand out here. Roasted squash offers softness while the kale adds crispness and the pecans bring a sugary crunch. A touch of cinnamon ties everything to the season.


Equipment
- Baking sheets
- Oven
- Skillet
Ingredients
- 2 medium delicata squashes, halved, seeded, and cut into half-moons
- 1 large bunch curly kale, stems removed and leaves torn into pieces
- 1 cup pecan halves
- 3 tablespoons maple syrup
- 2 tablespoons olive oil
- 1 teaspoon ground cinnamon
- 1/2 teaspoon salt
- 1/4 teaspoon black pepper
Instructions
- Preheat the oven to 400°F. Line two baking sheets with parchment paper. Toss the squash slices with 1 tablespoon olive oil, salt, and pepper. Spread them in a single layer on one baking sheet and roast for 25 minutes, flipping halfway through.
- While the squash roasts, place the kale pieces on the second baking sheet. Drizzle with the remaining tablespoon of olive oil and toss to coat. Roast for the final 10 to 12 minutes until the edges turn crisp.
- Warm a skillet over medium heat. Add the maple syrup and cinnamon, then stir in the pecans. Cook for 3 to 4 minutes, stirring often, until the nuts are coated and slightly darkened. Remove from heat.
- Arrange the roasted squash and crispy kale on a serving platter. Scatter the candied pecans over the top just before serving.
Notes
Cuisine: American
Equipment: Baking sheets, Oven, Skillet
Truffled Cauliflower Soup in Mini Pumpkin Bowls
This creamy cauliflower soup gains depth from truffle oil and comes served in hollowed mini pumpkins. It suits elegant autumn gatherings where you want a seasonal touch that still feels refined rather than themed.
The smooth texture and earthy flavor make it a good starter or light main for dinner parties. The pumpkin bowls add visual interest while keeping the focus on the soup itself.


Equipment
- Large pot
- Immersion blender
- Sharp knife
Ingredients
- 4 mini pumpkins
- 1 large head cauliflower, cut into florets
- 1 yellow onion, diced
- 2 garlic cloves, minced
- 4 cups vegetable broth
- ½ cup heavy cream
- 2 tablespoons truffle oil
- Salt and black pepper to taste
- Fresh thyme sprigs for garnish
Instructions
- Cut the tops off each mini pumpkin and scoop out the seeds and stringy pulp. Set the hollowed pumpkins aside for serving.
- In a large pot over medium heat, cook the diced onion and minced garlic until the onion softens.
- Add the cauliflower florets and vegetable broth to the pot. Bring to a simmer and cook until the cauliflower is tender.
- Remove the pot from heat and blend the mixture until smooth using an immersion blender.
- Stir in the heavy cream and truffle oil. Season with salt and black pepper.
- Place the hollowed pumpkins on plates. Ladle the hot soup into each pumpkin and top with a few thyme sprigs.
Notes
Cuisine: American
Equipment: Large pot, Immersion blender, Sharp knife
Beef Tenderloin Medallions with Horseradish Cream and Arugula
This dish brings a refined touch to autumn gatherings. The seared beef stays tender while the horseradish cream adds a sharp contrast and the arugula brings freshness. It works well for an elegant Halloween dinner or a cozy fall evening with friends.
The flavors balance richness with a light bite. Peppery greens cut through the creamy sauce, and the beef provides a satisfying center without feeling heavy.


Equipment
- Large Skillet
- Mixing Bowl
- Tongs
Ingredients
- 4 beef tenderloin medallions, about 6 ounces each
- 2 tablespoons olive oil
- 1 teaspoon salt
- 1/2 teaspoon black pepper
- 1/2 cup sour cream
- 2 tablespoons prepared horseradish
- 1 teaspoon lemon juice
- 4 cups fresh arugula
Instructions
- Pat the beef medallions dry and season both sides evenly with salt and black pepper.
- Heat the olive oil in a large skillet over medium-high heat until it shimmers.
- Place the medallions in the skillet and sear for 3 to 4 minutes per side for medium-rare. Remove them to a plate and let them rest for 5 minutes.
- While the beef rests, stir the sour cream, horseradish, and lemon juice together in a small bowl until smooth.
- Arrange a handful of arugula on each plate. Set one medallion on top and spoon the horseradish cream over the beef.
Notes
Cuisine: American
Equipment: Large Skillet, Mixing Bowl, Tongs
Pear and Blue Cheese Galette with Honey and Walnuts
This galette brings together ripe pears and tangy blue cheese in a rustic crust that feels right at home on an autumn table. The walnuts add crunch while honey ties the flavors together with a gentle sweetness. It works well as a starter or light bite during evening gatherings when you want something elegant but unfussy.
The finished galette has a flaky crust, soft pear slices, and pockets of bold cheese that balance each other nicely. It looks polished without much effort and suits the season’s colors and mood.


Equipment
- Baking sheet
- Parchment paper
- Knife
Ingredients
- 1 refrigerated pie crust
- 3 medium pears, thinly sliced
- 1/2 cup crumbled blue cheese
- 1/4 cup walnuts, roughly chopped
- 3 tablespoons honey
- 1 egg, beaten
- 2 sprigs fresh thyme
Instructions
- Preheat the oven to 400 degrees and line a baking sheet with parchment paper.
- Unroll the pie crust onto the prepared sheet. Arrange the pear slices in a single layer over the center, leaving a two-inch border around the edge.
- Scatter the blue cheese and walnuts evenly over the pears. Drizzle two tablespoons of honey across the top.
- Fold the crust edges over the filling, overlapping slightly as you go. Brush the exposed crust with the beaten egg.
- Bake for 25 to 30 minutes until the crust turns golden and the pears soften. Remove from the oven and let it rest for five minutes.
- Drizzle the remaining tablespoon of honey over the warm galette and sprinkle with thyme leaves before slicing.
Notes
Cuisine: French
Equipment: Baking sheet, Parchment paper, Knife
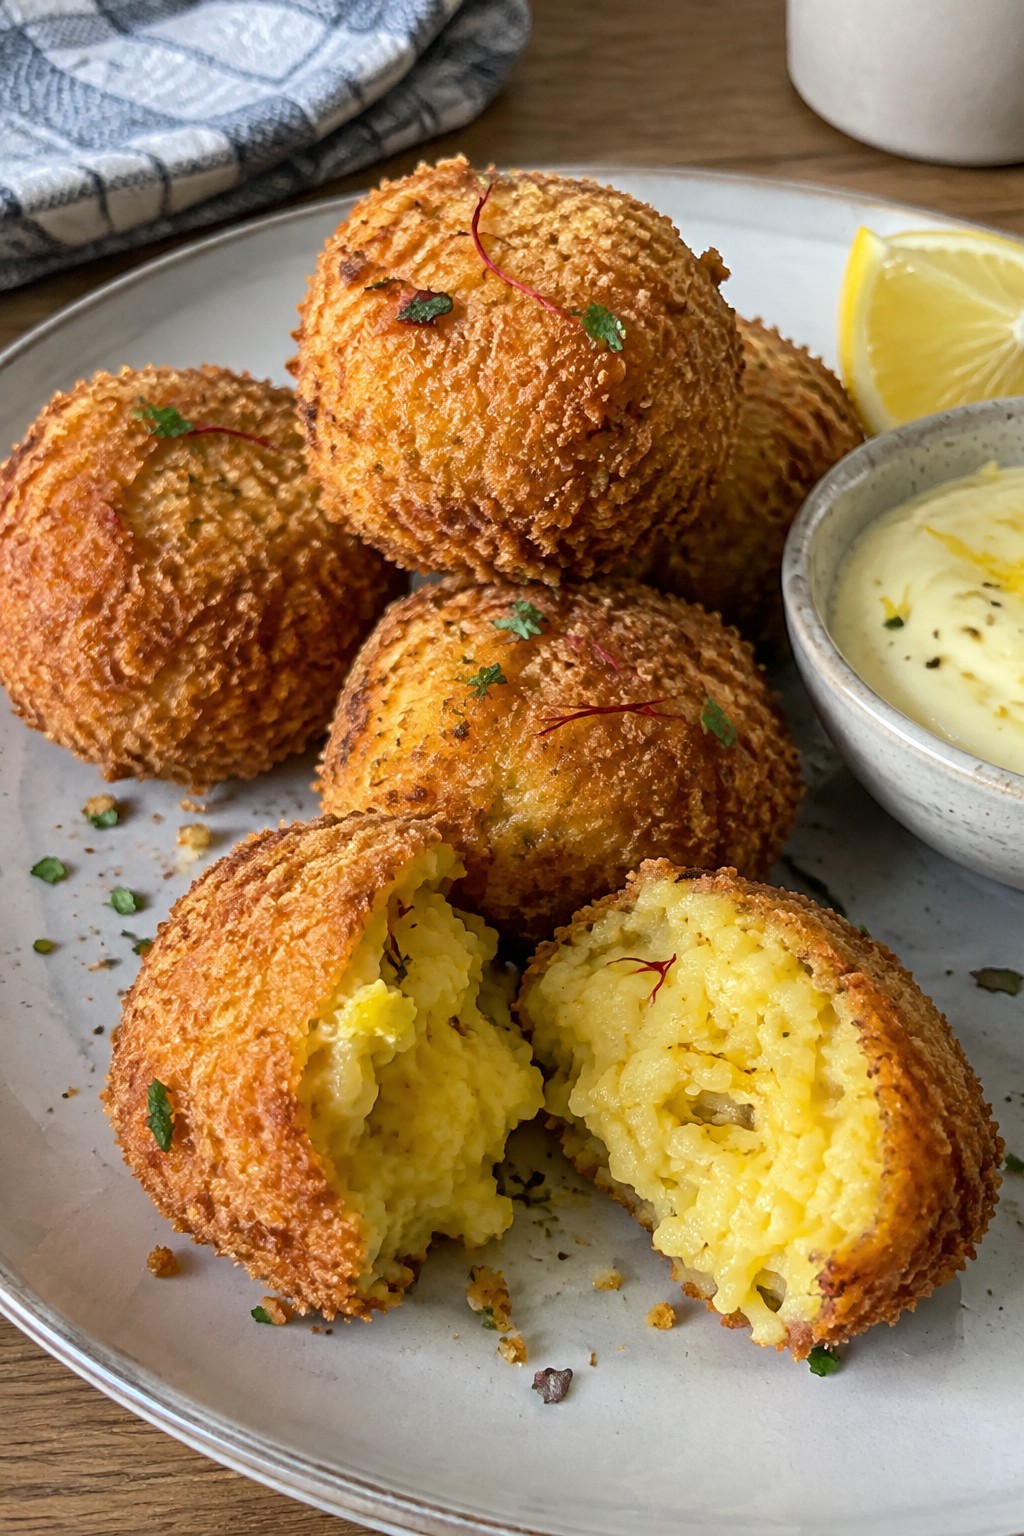
Saffron Risotto Fritters with Lemon Aioli
These saffron risotto fritters bring a touch of elegance to autumn gatherings with their golden color and crisp edges. They work well as a starter or passed bite at Halloween dinners, where guests can enjoy something warm without needing a full plate. The inside stays creamy from the risotto while the lemon aioli adds a bright finish that balances the richness.
The flavor leans savory with earthy saffron notes and a hint of cheese, paired with a light citrus tang from the aioli. The texture contrasts nicely between the crunchy coating and soft center, making them a practical choice for seasonal entertaining.

Equipment
- Large pot
- Saucepan
- Skillet
- Mixing bowl
- Baking tray
Ingredients
- 1 cup Arborio rice
- Pinch of saffron threads
- 4 cups vegetable broth
- 1 small onion, finely chopped
- 2 cloves garlic, minced
- 2 tablespoons butter
- 1/2 cup grated Parmesan cheese
- 2 large eggs
- 1 cup panko breadcrumbs
- 1/2 cup mayonnaise
- Zest and juice of 1 lemon
- Salt and pepper to taste
- 1/4 cup olive oil for frying
Instructions
- Warm the vegetable broth in a saucepan over low heat. In a large pot, melt the butter over medium heat and cook the onion until soft. Add the garlic and Arborio rice, stirring for two minutes until the grains look slightly translucent.
- Add the saffron threads to the warm broth. Ladle the broth into the rice one cup at a time, stirring often and waiting until each addition is absorbed before adding more. Continue until the rice is tender and creamy. Stir in the Parmesan cheese and season with salt and pepper. Spread the risotto on a tray to cool completely.
- Once cooled, mix the risotto with the eggs in a bowl. Form the mixture into small patties and coat each one in panko breadcrumbs. Heat the olive oil in a skillet over medium heat. Fry the patties in batches until golden on both sides, about three minutes per side. Drain on paper towels.
- Stir the mayonnaise with the lemon zest and juice to make the aioli. Serve the fritters warm with the aioli on the side.
Notes
Cuisine: Italian
Equipment: Large pot, Saucepan, Skillet, Mixing bowl, Baking tray
Mulled Wine Poached Pears with Mascarpone and Pistachios
This dessert brings a touch of elegance to autumn gatherings with its deep red color and warm spice notes. The pears turn tender while soaking up the mulled wine flavors, creating a dish that feels festive without much effort. The creamy mascarpone balances the spiced fruit, while the pistachios add a nice crunch on top.
It works well for Halloween dinners or cozy fall evenings when you want something simple yet impressive. The texture stays soft with a slight bite from the pears, and the flavors stay rich from the wine reduction.


Equipment
- Large pot
- slotted spoon
- paring knife
- mixing bowl
Ingredients
- 4 Bosc pears, peeled and cored
- 1 bottle (750 ml) dry red wine
- 1/2 cup granulated sugar
- 2 cinnamon sticks
- 4 whole cloves
- 1 star anise
- Peel from 1 orange
- 1 cup mascarpone cheese
- 1/4 cup shelled pistachios, chopped
Instructions
- Place the peeled and cored pears in a large pot. Pour the red wine over them until they are mostly covered.
- Add the sugar, cinnamon sticks, cloves, star anise, and orange peel to the pot. Bring the mixture to a gentle simmer over medium heat.
- Reduce the heat to low, cover the pot, and let the pears poach for 20 to 25 minutes until they become tender when pierced with a knife.
- Remove the pears from the liquid with a slotted spoon and set them aside. Strain out the spices and peel, then return the liquid to the pot.
- Simmer the wine mixture uncovered for 10 to 15 minutes until it reduces and thickens slightly into a syrup.
- In a small bowl, stir the mascarpone cheese until smooth. Place each pear on a plate, spoon some reduced wine syrup over the top, add a dollop of mascarpone, and finish with chopped pistachios.
Notes
Cuisine: French
Equipment: Large pot, slotted spoon, paring knife, mixing bowl
Smoked Salmon Roulades with Dill Crème Fraîche and Rye
These roulades offer a refined way to start an autumn gathering. The smoky salmon wraps around a light herbed spread, while rye provides a sturdy, earthy base that suits cooler evenings and elegant table settings.
The dish brings together creamy texture, fresh herb notes, and a hint of smoke. It fits neatly into a Halloween kitchen display without overpowering the overall styling.


Equipment
- Mixing bowl
- Serving platter
Ingredients
- 8 ounces thinly sliced smoked salmon
- ½ cup crème fraîche
- 2 tablespoons fresh dill, finely chopped
- 4 slices rye bread
- Freshly ground black pepper
Instructions
- Place the crème fraîche in a mixing bowl and stir in the chopped dill along with a few grinds of black pepper until evenly combined.
- Lay the smoked salmon slices flat on a clean work surface.
- Spread a thin, even layer of the dill crème fraîche mixture across each salmon slice.
- Starting from one short end, roll each slice tightly into a neat roulade.
- Toast the rye bread slices lightly, then cut each piece into two or three sections depending on size.
- Set one roulade on each rye section and arrange on a serving platter.
Notes
Cuisine: Scandinavian
Equipment: Mixing bowl, Serving platter
Dark Chocolate and Chili Pots with Candied Orange and Sea Salt
These chocolate pots bring a gentle heat that pairs well with the sweetness of candied orange. The flaky sea salt on top adds a nice contrast, making each spoonful balanced rather than overly rich. They work nicely for autumn gatherings when you want a dessert that feels a little special but still simple to prepare ahead.
This recipe serves 4 people.


Equipment
- Saucepan
- Mixing Bowl
- Ramekins
Ingredients
- 200g dark chocolate, chopped
- 300ml heavy cream
- 100ml whole milk
- 3 large egg yolks
- 50g granulated sugar
- 1/2 tsp chili powder
- 40g candied orange peel, chopped
- Sea salt flakes, for serving
Instructions
- Preheat the oven to 160°C. Place four small ramekins or pots in a baking dish.
- Combine the dark chocolate, heavy cream, and milk in a saucepan. Warm over low heat, stirring until the chocolate melts and the mixture is smooth. Remove from heat.
- In a mixing bowl, whisk the egg yolks with the sugar and chili powder until the mixture lightens slightly.
- Slowly pour the warm chocolate mixture into the egg yolks while whisking to avoid curdling. Stir until fully combined and smooth.
- Divide the mixture evenly among the ramekins. Pour hot water into the baking dish until it reaches halfway up the sides of the ramekins.
- Bake for 25 to 30 minutes until the edges are set but the centers still have a slight wobble. Remove from the water bath and let cool to room temperature.
- Chill the pots in the refrigerator for at least two hours. Top with chopped candied orange peel and a pinch of sea salt flakes before serving.
Notes
Cuisine: American
Equipment: Saucepan, Mixing Bowl, Ramekins
