

As the holiday season draws near, I’m on the lookout for desserts that are both delicious and eye-catching. There’s something special about serving a dessert that makes guests stop and admire. From the rich flavors of a Chocolate Hazelnut Yule Log to the refreshing taste of Lemon and Rosemary Shortbread Cookies, each treat has its own charm. Which dessert will steal the spotlight at your gathering this year?
Chocolate Hazelnut Yule Log
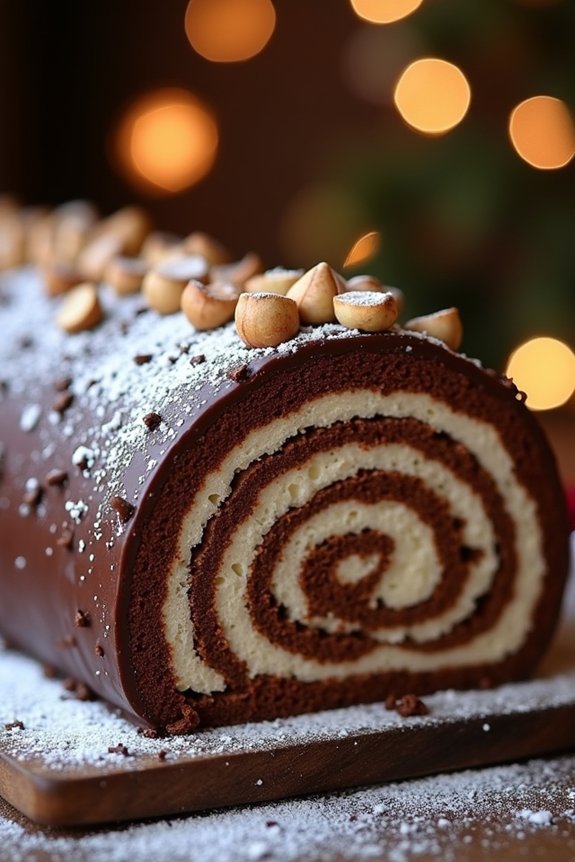
Indulge in the rich and festive flavors of a Chocolate Hazelnut Yule Log, a delightful dessert perfect for the Christmas season. This classic holiday treat combines a light and fluffy sponge cake with a decadent chocolate hazelnut filling, all enveloped in a smooth chocolate ganache. The Yule Log, or Bûche de Noël, is a traditional French dessert that symbolizes the yule log that families would burn on the hearth during the holiday season.
Its charming appearance and irresistible taste make it a show-stopper for any holiday gathering.
Creating a Chocolate Hazelnut Yule Log involves several steps, but the result is well worth the effort. The combination of chocolate and hazelnut is reminiscent of beloved holiday flavors, making this dessert a family favorite. The sponge cake is rolled with a luscious hazelnut spread and whipped cream filling, then finished with a rich chocolate ganache that’s artfully decorated to resemble a log.
With a bit of patience and attention to detail, you can create a stunning centerpiece that will impress your guests and bring joy to your holiday table.
Ingredients (serves 4-6):
- 4 large eggs
- 100g granulated sugar
- 1 tsp vanilla extract
- 85g all-purpose flour
- 25g cocoa powder
- 1/4 tsp salt
- 1/2 tsp baking powder
- 200ml heavy cream
- 100g chocolate hazelnut spread
- 150g dark chocolate, chopped
- 150ml heavy cream (for ganache)
- 30g toasted hazelnuts, chopped
- Powdered sugar for dusting
Instructions:
- Preheat the Oven: Preheat your oven to 180°C (350°F). Line a 10×15 inch jelly roll pan with parchment paper, ensuring it covers the sides of the pan.
- Prepare the Sponge Cake: In a large bowl, beat the eggs and sugar together until thick and pale. Stir in the vanilla extract. In a separate bowl, sift together the flour, cocoa powder, salt, and baking powder.
- Combine Ingredients: Gently fold the dry ingredients into the egg mixture until fully combined, taking care not to deflate the batter.
- Bake the Sponge: Pour the batter into the prepared pan, spreading it evenly. Bake for 10-12 minutes, or until the cake springs back when touched lightly.
- Roll the Cake: While the cake is still warm, turn it out onto a clean kitchen towel dusted with powdered sugar. Peel off the parchment paper, and starting at a short end, roll the cake up with the towel and let it cool completely.
- Prepare the Filling: Whip the 200ml of heavy cream until stiff peaks form. Gently fold in the chocolate hazelnut spread until well combined.
- Unroll and Fill the Cake: Once the cake is cool, unroll it gently. Spread the hazelnut cream evenly over the surface. Reroll the cake without the towel and place it seam side down on a serving platter.
- Make the Ganache: Heat 150ml of heavy cream until just simmering, then pour over the chopped dark chocolate. Let it sit for a minute, then stir until smooth and glossy.
- Decorate the Log: Spread the ganache over the cake, covering it completely. Use a fork to create a bark-like texture. Sprinkle with chopped toasted hazelnuts and dust with powdered sugar for a snowy effect.
- Chill and Serve: Refrigerate the Yule Log for at least 1 hour to set the ganache. Slice and serve, allowing guests to admire the beautiful swirl pattern inside.
Extra Tips: For an even more festive touch, decorate your Yule Log with edible holly leaves or marzipan mushrooms. Make sure that the sponge cake is completely cool before spreading the filling to prevent it from melting.
If the cake cracks slightly during rolling, don’t worry—the ganache will help cover any imperfections. Remember to toast the hazelnuts for added depth of flavor, and serve the Yule Log slightly chilled for the best texture and taste.
Raspberry Pistachio Tart
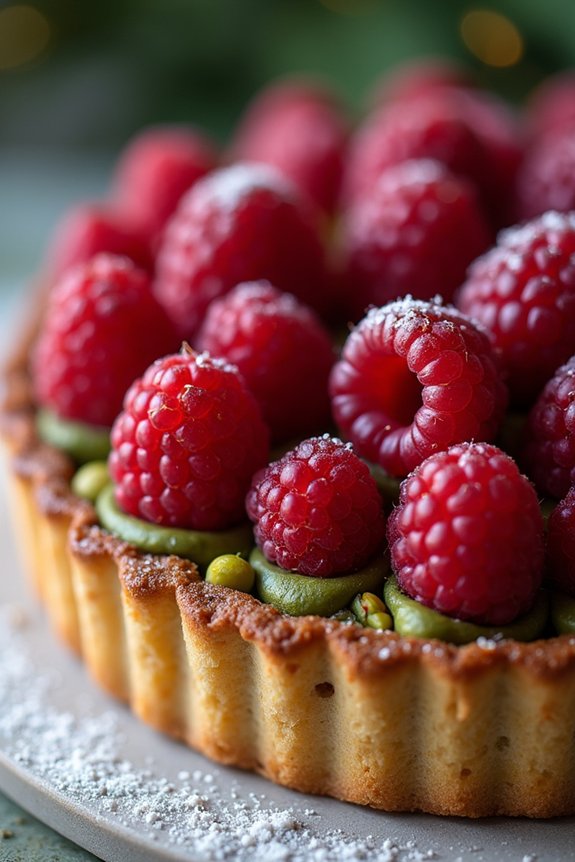
Indulge in the delightful flavors of this Raspberry Pistachio Tart, a perfect dessert for your Christmas celebrations. This elegant tart combines the rich, nutty taste of pistachios with the sweet, tangy flavor of fresh raspberries, all nestled in a buttery, flaky crust.
The vibrant colors and exquisite taste of this tart make it an excellent centerpiece for your holiday dessert table, guaranteed to impress your family and friends. This tart isn’t only visually appealing but also a delicious blend of textures and flavors. The creamy pistachio filling complements the juicy raspberries perfectly, creating a harmony of taste that will leave your guests asking for more.
Prepare this simple yet sophisticated dessert for an intimate gathering of 4-6 people, and watch it become a staple in your festive repertoire.
Ingredients for 4-6 servings:
- 1 1/4 cups all-purpose flour
- 1/2 cup unsalted butter, chilled and cubed
- 1/4 cup granulated sugar
- 1/4 teaspoon salt
- 1 large egg yolk
- 2 tablespoons cold water
- 1 cup unsalted shelled pistachios
- 1/2 cup heavy cream
- 1/4 cup powdered sugar
- 1 teaspoon vanilla extract
- 1 cup fresh raspberries
- 2 tablespoons apricot jam
Cooking Instructions:
1. Prepare the Tart Crust: In a food processor, combine the flour, sugar, and salt. Add the cubed butter and pulse until the mixture resembles coarse crumbs. Add the egg yolk and water, pulsing until the dough begins to come together.
Shape the dough into a disk, wrap it in plastic wrap, and refrigerate for at least 30 minutes.
2. Roll Out the Dough: Preheat your oven to 350°F (175°C). Roll out the chilled dough on a lightly floured surface to fit a 9-inch tart pan. Carefully transfer the dough to the pan, pressing it into the edges. Trim the excess dough and prick the base with a fork.
Line with parchment paper and fill with pie weights or dried beans. Bake for 15 minutes, remove weights and parchment, and bake for an additional 5-7 minutes until golden. Allow to cool completely.
3. Make the Pistachio Filling: In a clean food processor bowl, finely grind the pistachios. Add the heavy cream, powdered sugar, and vanilla extract, processing until smooth and creamy.
Spread the pistachio mixture evenly over the cooled tart crust.
4. Assemble the Tart: Gently wash and pat dry the raspberries. Arrange them over the pistachio filling, pressing slightly to adhere. In a small saucepan, gently warm the apricot jam over low heat until it becomes liquid.
Brush the warm jam over the raspberries to give a glossy finish.
5. Chill and Serve: Place the tart in the refrigerator for at least 1 hour to set the filling. Before serving, allow the tart to stand at room temperature for about 10 minutes. Slice and serve as a decadent dessert.
Extra Tips:
To achieve a perfect tart crust, confirm that the butter is well chilled before incorporating it into the flour mixture. This will help create a flaky texture.
If you find the dough sticking while rolling, dust the surface and rolling pin lightly with flour. When grinding the pistachios, be cautious not to over-process, as the nuts can release oils and become pasty.
Additionally, if fresh raspberries are unavailable, thawed frozen raspberries can be used, but make sure to drain any excess liquid to prevent the tart from becoming soggy.
Eggnog Cheesecake With Gingersnap Crust

Indulge in the rich and creamy delight of Eggnog Cheesecake with Gingersnap Crust, an exquisite dessert that brings the festive spirit to life. This luscious cheesecake combines the familiar warmth of eggnog with a crunchy, spicy gingersnap crust, creating a harmonious blend of flavors that’s perfect for holiday gatherings.
As you take a bite, the smooth and velvety texture of the cheesecake melts in your mouth, while the gingersnap base adds an unexpected yet delightful contrast. This dessert isn’t only a treat for the palate but also a feast for the eyes, with its golden hue and festive garnish.
Whether you’re hosting a Christmas dinner or simply want to enjoy a special treat, this Eggnog Cheesecake with Gingersnap Crust is guaranteed to impress your guests and leave everyone asking for seconds. Follow this recipe to create a stunning dessert that serves 4-6 people.
Ingredients:
- 1 1/2 cups gingersnap cookies, crushed
- 1/4 cup unsalted butter, melted
- 24 oz cream cheese, softened
- 1 cup granulated sugar
- 1 cup eggnog
- 2 tablespoons all-purpose flour
- 1 teaspoon vanilla extract
- 1/2 teaspoon ground nutmeg
- 3 large eggs
Cooking Instructions:
- Prepare the Crust: Preheat your oven to 325°F (163°C). In a medium bowl, combine the crushed gingersnap cookies and melted butter until the mixture resembles wet sand. Press the mixture into the bottom of a 9-inch springform pan to form an even crust. Bake the crust for 10 minutes, then remove from the oven and let it cool.
- Prepare the Cheesecake Filling: In a large mixing bowl, beat the softened cream cheese with an electric mixer on medium speed until smooth and creamy. Gradually add in the granulated sugar, continuing to beat until well incorporated.
- Add the Eggnog and Flavorings: Slowly pour in the eggnog while mixing. Add the flour, vanilla extract, and ground nutmeg, and continue to beat the mixture until smooth.
- Incorporate the Eggs: Add the eggs one at a time, beating on low speed after each addition just until combined. Be careful not to overmix, as this can introduce too much air into the batter.
- Assemble and Bake: Pour the cheesecake filling over the cooled gingersnap crust, spreading it evenly. Place the springform pan on a baking sheet and bake in the preheated oven for 50-60 minutes, or until the center is set and the edges are lightly golden. The center should still have a slight wobble.
- Cool and Chill: Remove the cheesecake from the oven and run a knife around the edge to loosen it from the pan. Allow it to cool to room temperature, then refrigerate for at least 4 hours or overnight.
Extra Tips: For an even more festive presentation, consider garnishing the cheesecake with a sprinkle of ground nutmeg or a dollop of whipped cream just before serving. Confirm that all ingredients, especially the cream cheese, are at room temperature before mixing to achieve a smooth texture.
If you notice any cracks on the surface of the cheesecake, they can easily be covered with toppings, providing both aesthetic and taste appeal. Enjoy this holiday treat with family and friends, as the rich flavors are best shared with loved ones.
Spiced Pear and Almond Torte
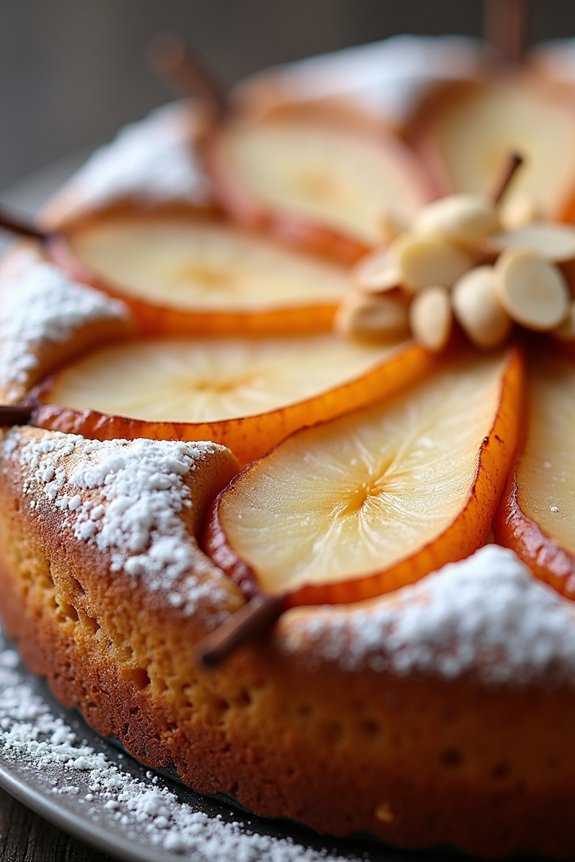
Indulge in the festive flavors of the holiday season with a delightful Spiced Pear and Almond Torte. This dessert combines the subtle sweetness of ripe pears with the nutty richness of almonds, all spiced with a hint of cinnamon and nutmeg to create a truly memorable treat.
Perfect for a cozy winter gathering, this torte is both elegant and comforting, making it an ideal choice for your Christmas dessert spread. The combination of soft, juicy pears nestled in a moist almond cake creates a harmonious balance of flavors and textures that will have your guests coming back for seconds.
The torte is easy to prepare yet impressive enough to serve at any holiday celebration. Whether you’re an experienced baker or a novice in the kitchen, this recipe is straightforward and rewarding. Serve it warm with a dollop of whipped cream or a scoop of vanilla ice cream for an extra special touch.
Follow this recipe to create a Spiced Pear and Almond Torte that serves 4-6 people.
Ingredients:
- 3 ripe pears, peeled, cored, and sliced
- 1 cup almond flour
- 1/2 cup all-purpose flour
- 1/2 cup unsalted butter, softened
- 2/3 cup granulated sugar
- 2 large eggs
- 1 teaspoon vanilla extract
- 1 teaspoon ground cinnamon
- 1/2 teaspoon ground nutmeg
- 1/2 teaspoon baking powder
- 1/4 teaspoon salt
- 1/4 cup sliced almonds
- Powdered sugar for dusting (optional)
Instructions:
- Preheat and Prepare the Pan: Preheat your oven to 350°F (175°C). Grease a 9-inch springform pan with butter and line the bottom with parchment paper. This will prevent the torte from sticking and make it easier to remove after baking.
- Prepare the Pears: Peel, core, and slice the pears into thin slices. Set them aside in a bowl.
- Mix the Dry Ingredients: In a medium bowl, whisk together the almond flour, all-purpose flour, baking powder, cinnamon, nutmeg, and salt. This step guarantees that the spices are evenly distributed throughout the flour.
- Cream the Butter and Sugar: In a large mixing bowl, beat the softened butter and granulated sugar together using an electric mixer until light and fluffy. This should take about 2-3 minutes.
- Add Eggs and Vanilla: Add the eggs one at a time to the butter-sugar mixture, beating well after each addition. Then mix in the vanilla extract.
- Combine Wet and Dry Ingredients: Gradually add the dry ingredients to the wet mixture, mixing until just combined. Be careful not to overmix, as this can result in a dense cake.
- Assemble the Torte: Pour the batter into the prepared springform pan and spread it evenly. Arrange the pear slices on top of the batter in a circular pattern, slightly pressing them into the batter.
- Add the Almonds: Sprinkle the sliced almonds evenly over the top of the torte.
- Bake: Place the torte in the preheated oven and bake for 40-45 minutes, or until a toothpick inserted into the center comes out clean. The edges should be golden brown.
- Cool and Serve: Allow the torte to cool in the pan for about 10 minutes before removing the sides of the springform pan. Dust with powdered sugar if desired, and serve warm with whipped cream or ice cream.
Extra Tips:
For the best results, use ripe, but firm pears to prevent them from becoming mushy during baking. If you find your pears are too soft, simply reduce the baking time slightly to maintain their texture.
Additionally, feel free to experiment with different spices or even add a splash of almond extract to enhance the almond flavor. This torte can be made a day in advance; simply cover it and store it at room temperature. Reheat it before serving for that freshly-baked warmth that will surely delight your guests.
Cranberry Orange Pavlova
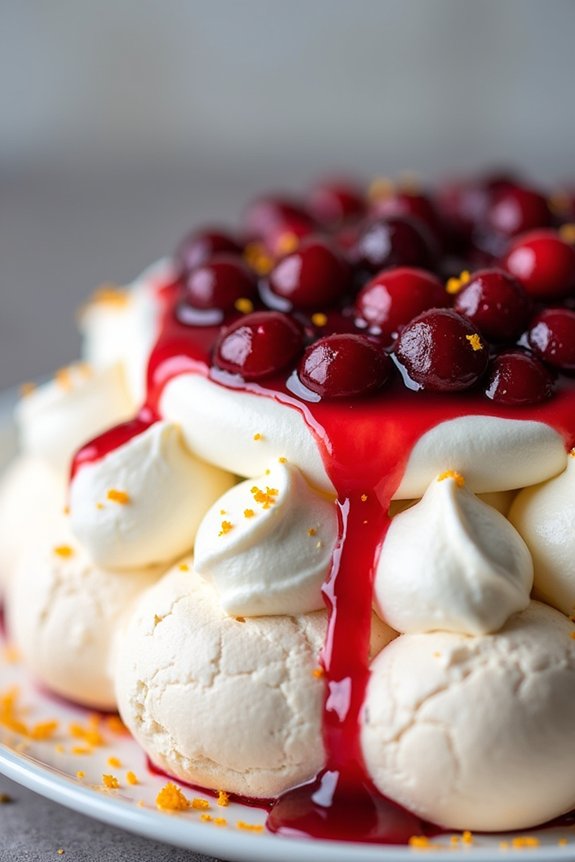
Pavlova is a delightful dessert that boasts a crisp meringue shell with a soft, marshmallow-like interior. It’s named after the Russian ballerina Anna Pavlova and is a popular treat in many countries, especially during festive seasons.
Our Cranberry Orange Pavlova adds a holiday twist to the classic recipe, incorporating the tartness of cranberries and the zest of oranges to create an invigorating and elegant dessert. Perfect for your Christmas celebrations, this pavlova is a showstopper, both in flavor and appearance.
The Cranberry Orange Pavlova isn’t only stunning to look at, but it also combines the perfect blend of sweet and tangy flavors. The meringue base is topped with a layer of whipped cream and a flavorful cranberry-orange compote, making each bite a burst of holiday joy.
This dessert serves 4-6 people and is perfect for sharing with family and friends. It’s an ideal way to end a festive meal, leaving your guests impressed and satisfied.
Ingredients (Serves 4-6):
- 4 large egg whites
- 1 cup granulated sugar
- 1 teaspoon white vinegar
- 1 teaspoon cornstarch
- 1 teaspoon vanilla extract
- Zest of 1 orange
- 1 cup fresh or frozen cranberries
- 1/4 cup orange juice
- 1/2 cup granulated sugar (for the cranberry sauce)
- 1 cup heavy cream
- 2 tablespoons powdered sugar
- 1 teaspoon vanilla extract (for the whipped cream)
Cooking Instructions:
- Preheat the oven: Preheat your oven to 250°F (120°C) and line a baking sheet with parchment paper. Draw a 9-inch circle on the parchment paper as a guide for shaping the meringue and flip it over so the pencil side is down.
- Make the meringue: In a clean, dry bowl, beat the egg whites on medium speed until soft peaks form. Gradually add the granulated sugar, one tablespoon at a time, while continuing to beat. Once all the sugar is added, increase the speed to high and beat until stiff, glossy peaks form.
- Add flavorings: Gently fold in the white vinegar, cornstarch, vanilla extract, and orange zest using a spatula. Be careful not to deflate the meringue.
- Shape the pavlova: Spoon the meringue onto the prepared baking sheet, using the circle as a guide. Shape it into a round with slightly raised edges to hold the toppings later.
- Bake the meringue: Bake in the preheated oven for about 1 hour and 15 minutes. The pavlova should be dry to the touch and slightly golden. Turn off the oven and let the pavlova cool completely inside the oven with the door slightly ajar.
- Prepare the cranberry sauce: In a saucepan over medium heat, combine the cranberries, orange juice, and sugar. Cook until the cranberries burst and the mixture thickens slightly, about 10 minutes. Remove from heat and let cool.
- Whip the cream: In a separate bowl, beat the heavy cream with the powdered sugar and vanilla extract until soft peaks form.
- Assemble the pavlova: Once the meringue is completely cooled, spread the whipped cream over the top, leaving a small border around the edges. Spoon the cranberry sauce over the whipped cream, allowing it to drip slightly over the sides of the meringue.
Extra Tips: When making meringue, make sure your mixing bowl and beaters are completely clean and dry, as any trace of grease or moisture can prevent the egg whites from reaching their full volume.
Be patient while baking the meringue; it’s vital to let it cool slowly in the oven to avoid cracks. For added texture, you can sprinkle some finely chopped nuts or grated chocolate over the finished pavlova.
Store any leftovers in an airtight container in the refrigerator, though it’s best enjoyed on the day it’s made for maximum crispness.
Peppermint Mocha Trifle
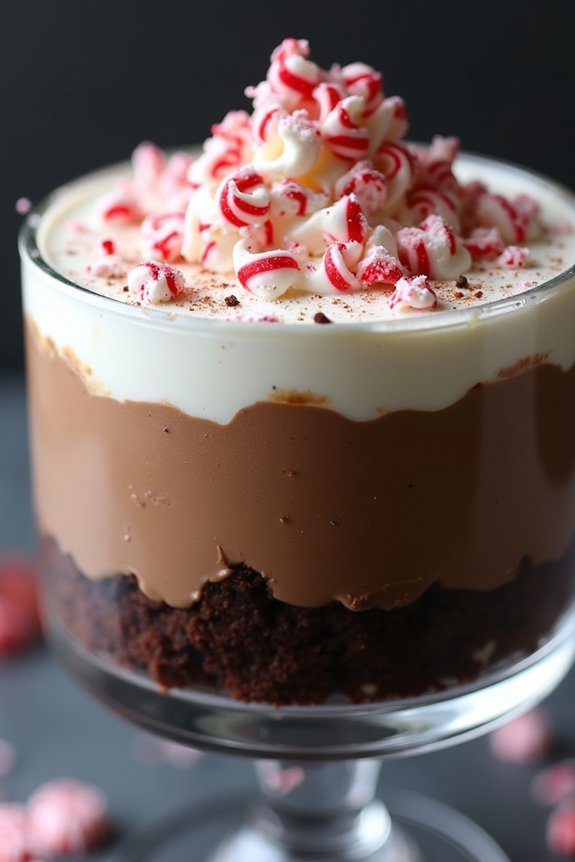
Peppermint Mocha Trifle is a delightful dessert that combines the rich flavors of chocolate, coffee, and peppermint into a visually stunning and delicious treat. Perfect for the festive Christmas season, this trifle is layered with decadent chocolate cake, creamy peppermint mocha mousse, and invigorating peppermint candy bits.
It’s an ideal choice for holiday gatherings or any occasion where you want to impress your guests with a beautiful and tasty dessert. The following recipe serves 4-6 people and is designed to be a show-stopper on your dessert table. The combination of textures and flavors in the Peppermint Mocha Trifle makes it a crowd-pleaser, sure to satisfy both chocolate lovers and those who enjoy a hint of mint.
Prepare this dessert ahead of time to allow the flavors to meld together, creating a harmonious and indulgent experience.
Ingredients:
- 1 chocolate cake, baked and cooled
- 1 cup heavy cream
- 1/2 cup powdered sugar
- 2 tablespoons instant coffee granules
- 1/2 teaspoon peppermint extract
- 1 cup chocolate pudding
- 1/2 cup crushed peppermint candies
- 1/2 cup chocolate shavings
- 1 teaspoon vanilla extract
- Peppermint candy canes, for garnish
Instructions:
- Prepare the Chocolate Cake: Begin by baking your favorite chocolate cake recipe or using a store-bought mix, making sure that it’s baked and completely cooled before starting the trifle assembly. Once cooled, cut the cake into small cubes and set aside.
- Make the Peppermint Mocha Mousse: In a large mixing bowl, whip the heavy cream until soft peaks form. Gradually add the powdered sugar, instant coffee granules, peppermint extract, and vanilla extract, continuing to whip until the mixture forms stiff peaks. This will become the peppermint mocha mousse layer of your trifle.
- Assemble the Trifle: In a large glass trifle dish or individual serving glasses, start by placing a layer of chocolate cake cubes at the bottom. Spoon a layer of chocolate pudding over the cake, spreading it evenly. Next, add a layer of the peppermint mocha mousse, smoothing it out gently.
- Add Crunch with Peppermint Candies: Sprinkle a generous layer of crushed peppermint candies over the mousse layer. This will add an invigorating crunch to each bite of the trifle.
- Repeat Layers: Continue layering the ingredients in the same order—cake cubes, chocolate pudding, peppermint mocha mousse, and crushed peppermint candies—until the dish is filled or you run out of ingredients. Finish with a final topping of mousse and a sprinkle of chocolate shavings for an elegant touch.
- Chill the Trifle: Cover the trifle with plastic wrap and refrigerate for at least 2 hours, or overnight, to allow the flavors to meld and the mousse to set properly.
- Garnish and Serve: Before serving, garnish the top of the trifle with whole peppermint candy canes or additional chocolate shavings for an extra festive look.
Extra Tips:
When making the Peppermint Mocha Trifle, it’s important to make certain that each layer is evenly distributed. This not only enhances the appearance of the dish but also guarantees that every bite is balanced with all the flavors and textures.
To save time, you can use store-bought chocolate cake and pudding, but homemade versions will add a personal touch. If you’re serving this dessert at a party, consider preparing it a day in advance to let the flavors develop fully.
Finally, adjust the peppermint extract according to your taste preference, as it can be quite potent.
Gingerbread Soufflé
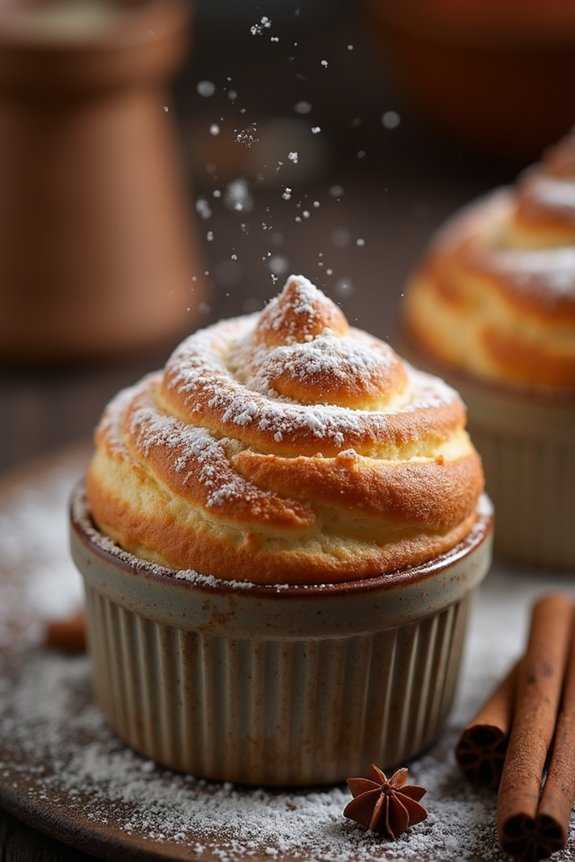
Gingerbread Soufflé is a delightful twist on the classic French dessert, incorporating the warm, spiced flavors of gingerbread that are synonymous with the festive season.
This soufflé offers a luxurious, airy texture and is perfect for a Christmas dessert that will impress your family and friends. Whether you’re hosting a holiday gathering or enjoying a cozy evening at home, this recipe is sure to bring a comforting and festive touch to your celebrations.
This recipe is designed to serve 4-6 people, making it ideal for a small gathering or family dinner. The soufflé is crafted by combining rich spices with a light, fluffy batter, creating a delicious balance of flavors and textures.
Follow the instructions closely to achieve the perfect rise and delicate consistency that characterize this beloved dessert.
Ingredients:
- 3 tablespoons unsalted butter, plus extra for greasing
- 1/3 cup granulated sugar, plus extra for dusting
- 1/4 cup all-purpose flour
- 1/2 cup whole milk
- 1/4 cup molasses
- 1 teaspoon ground ginger
- 1/2 teaspoon ground cinnamon
- 1/4 teaspoon ground cloves
- 1/4 teaspoon ground nutmeg
- 1/4 teaspoon salt
- 4 large eggs, separated
- 1/4 teaspoon cream of tartar
- Powdered sugar, for dusting
Cooking Instructions:
1. Preheat and Prepare the Ramekins: Preheat your oven to 375°F (190°C). Grease six 6-ounce ramekins with butter and dust them with granulated sugar, ensuring the inside is evenly coated. This will help the soufflé rise properly.
2. Create the Base Mixture: In a medium saucepan, melt the 3 tablespoons of butter over medium heat. Stir in the flour and cook for about 1 minute to form a roux. Gradually whisk in the milk until smooth.
Add the molasses, ginger, cinnamon, cloves, nutmeg, and salt. Cook, stirring constantly, until the mixture thickens, about 2-3 minutes. Remove from heat and let it cool slightly.
3. Prepare the Egg Yolks: In a large bowl, beat the egg yolks until they’re pale and thick. Gradually whisk in the slightly cooled spice mixture until fully incorporated. Set aside.
4. Whip the Egg Whites: In a separate clean bowl, beat the egg whites and cream of tartar using an electric mixer on medium-high speed until soft peaks form. Gradually add the 1/3 cup granulated sugar and continue to beat until stiff peaks form.
5. Fold and Combine: Gently fold the egg whites into the spice and yolk mixture using a spatula. Be careful not to deflate the mixture by folding gently until no streaks remain.
6. Fill the Ramekins: Divide the soufflé batter evenly among the prepared ramekins, filling each about three-quarters full. Run your thumb around the edge of each ramekin for an even rise.
7. Bake the Soufflés: Place the ramekins on a baking sheet and bake in the preheated oven for about 18-22 minutes, or until the soufflés are puffed and golden brown on top. Avoid opening the oven door while baking as this may cause them to collapse.
8. Serve Immediately: Once baked, dust the soufflés with powdered sugar and serve immediately for the best texture and flavor.
Extra Tips:
For the best results, make sure all your ingredients are at room temperature before you start, as this will help in achieving the right consistency for the soufflé.
Be gentle when folding the egg whites into the base mixture to maintain the airy texture. Also, remember to serve the soufflés as soon as they come out of the oven, as they’ll begin to deflate after a few minutes.
If you want to add an extra touch, consider serving with a dollop of whipped cream or a scoop of vanilla ice cream for added decadence.
White Chocolate Raspberry Mousse

White Chocolate Raspberry Mousse is a delightful and elegant dessert that brings together the creamy richness of white chocolate with the tartness of fresh raspberries. This luxurious treat is perfect for impressing guests at your Christmas dinner or any special occasion.
The smooth, velvety texture of the mousse combined with the burst of raspberry flavor creates a harmonious balance that’s both indulgent and invigorating. Whether you’re a seasoned chef or a novice in the kitchen, this recipe is simple yet sophisticated, making it an ideal choice for your holiday dessert table.
This recipe is designed to serve 4-6 people, providing generous portions for each guest to enjoy. The preparation involves creating a light and airy mousse that’s beautifully complemented by the vibrant taste of pureed raspberries. The use of white chocolate adds a sweet and creamy depth, while the raspberries provide a natural sweetness and a hint of tartness that cuts through the richness of the mousse.
Follow these instructions to create a dessert that’s sure to impress and delight your family and friends.
Ingredients:
- 200g white chocolate, chopped
- 300ml heavy cream
- 2 egg whites
- 50g granulated sugar
- 1 tsp vanilla extract
- 200g fresh raspberries
- 2 tbsp powdered sugar
- Additional fresh raspberries for garnish
- Mint leaves for garnish (optional)
Cooking Instructions:
1. Prepare the Raspberry Puree: In a small saucepan, combine the fresh raspberries and powdered sugar over medium heat. Cook until the raspberries break down, and the mixture becomes syrupy, stirring occasionally.
Once done, strain the mixture through a fine mesh sieve to remove seeds, and set aside to cool.
2. Melt the White Chocolate: In a heatproof bowl, melt the chopped white chocolate over a pot of simmering water, stirring until smooth. Be sure to melt it gently to avoid scorching.
Remove from heat and let it cool slightly.
3. Whip the Cream: In a large mixing bowl, whip the heavy cream until it forms soft peaks. Add the vanilla extract and continue to whip until stiff peaks form.
Be careful not to over-whip, as this can cause the cream to become grainy.
4. Beat the Egg Whites: In another clean bowl, beat the egg whites until they become frothy. Gradually add granulated sugar and continue beating until stiff peaks form and the mixture is glossy.
5. Combine the Ingredients: Gently fold the melted white chocolate into the whipped cream until well combined.
Then, carefully fold in the beaten egg whites until the mixture is smooth and airy.
6. Assemble the Mousse: In serving glasses or bowls, layer the white chocolate mousse alternately with the raspberry puree.
Start with a layer of mousse, followed by a drizzle of raspberry puree, repeating until glasses are filled. Use a skewer or toothpick to gently swirl the layers together for a marbled effect.
7. Chill and Serve: Refrigerate the assembled mousse for at least 2 hours, or until set.
Before serving, garnish with fresh raspberries and mint leaves for a festive touch.
Extra Tips:
When making White Chocolate Raspberry Mousse, verify that all the ingredients are at room temperature before you begin to achieve a smooth and consistent texture.
Be gentle when folding the mixtures together to maintain the mousse’s light and airy quality. If you prefer a sweeter dessert, adjust the sugar content of the raspberry puree to taste.
For an added dimension of flavor, consider adding a splash of raspberry liqueur to the puree. Enjoy this elegant dessert with a glass of sparkling wine or a cup of coffee for a truly indulgent experience.
Caramel Apple Bread Pudding

Caramel Apple Bread Pudding is a delightful twist on the traditional bread pudding, perfect for a cozy Christmas dessert. This dish combines the warm, comforting flavors of caramel and apples with the rich, custardy texture of bread pudding. It’s a crowd-pleaser that’s sure to bring a touch of sweetness to your holiday table.
The gooey caramel sauce perfectly complements the tartness of the apples, creating a balanced dessert that’s both decadent and satisfying.
This recipe is designed to serve 4-6 people, making it an ideal choice for a family gathering or holiday party. The preparation involves a few simple steps, and the end result is a dessert that feels both festive and indulgent.
With the aroma of baked apples and caramel wafting through your home, this dish is truly a celebration of holiday flavors.
Ingredients:
- 6 cups day-old bread, cubed (such as French or brioche)
- 3 large eggs
- 2 cups whole milk
- 1 cup heavy cream
- 1 cup granulated sugar
- 1 tsp vanilla extract
- 1/2 tsp ground cinnamon
- 1/4 tsp ground nutmeg
- 2 large apples, peeled, cored, and diced
- 1/2 cup caramel sauce, plus extra for drizzling
- 1/4 cup unsalted butter, melted
- 1/4 cup raisins (optional)
- Pinch of salt
Instructions:
- Preheat the Oven: Preheat your oven to 350°F (175°C). Grease a 9×13-inch baking dish or a similarly sized casserole dish.
- Prepare the Bread: Place the cubed bread in a large mixing bowl. If your bread isn’t day-old, you can lightly toast the cubes in the oven for about 10 minutes to dry them out a bit, ensuring they absorb the custard well.
- Make the Custard: In another bowl, whisk together the eggs, milk, heavy cream, sugar, vanilla extract, cinnamon, nutmeg, and a pinch of salt until well combined.
- Combine Ingredients: Pour the custard mixture over the bread cubes. Add the diced apples and raisins (if using), and gently toss everything together until the bread is thoroughly coated and the apples are evenly distributed.
- Settle the Mixture: Allow the bread mixture to sit for about 15-20 minutes so the bread can soak up the custard.
- Add Caramel and Butter: Drizzle the melted butter and 1/2 cup of caramel sauce over the soaked bread mixture. Gently mix again to incorporate the flavors.
- Bake the Pudding: Transfer the mixture into the prepared baking dish, spreading it out evenly. Bake in the preheated oven for 45-55 minutes or until the pudding is set in the center and the top is golden brown.
- Serve: Allow the pudding to cool slightly before serving. Drizzle extra caramel sauce over each serving for an added touch of sweetness.
Extra Tips:
For best results, use a sturdy bread like French or brioche, as they hold up well against the custard. If you prefer a less sweet dessert, adjust the amount of caramel sauce to your taste.
You can also experiment by adding nuts like pecans or walnuts for added texture. To enhance the flavors, consider using a variety of apples, such as a mix of tart Granny Smith and sweet Honeycrisp.
Finally, this dessert pairs beautifully with a scoop of vanilla ice cream or a dollop of whipped cream.
Pistachio and Pomegranate Layer Cake
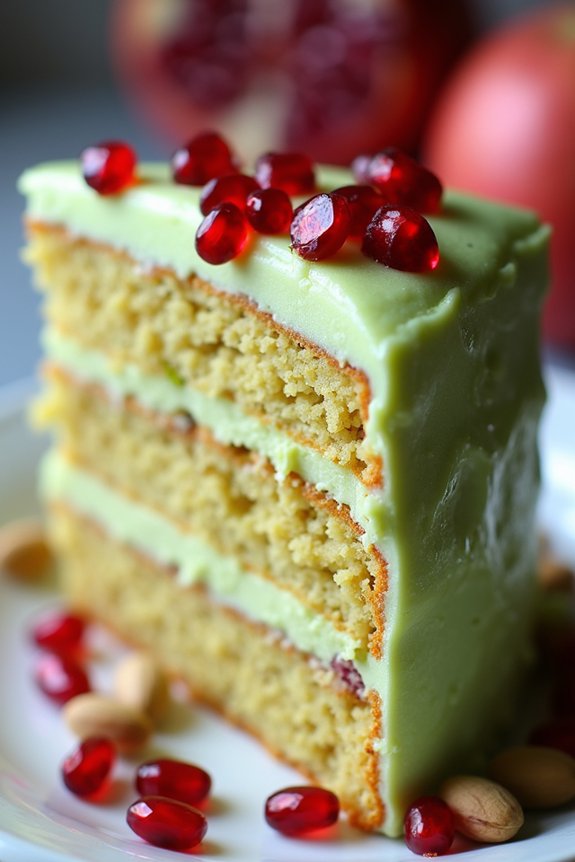
Indulge in the festive spirit with a delightful Pistachio and Pomegranate Layer Cake, a perfect centerpiece for your Christmas dessert table. This cake combines the nutty richness of pistachios with the sweet and tangy burst of pomegranates, creating a harmonious blend of flavors that will impress your guests. The cake is layered with a creamy pistachio frosting and topped with jewel-like pomegranate seeds, offering both visual appeal and a burst of freshness in every bite.
Each layer of this cake is a celebration of textures and flavors. The cake itself is tender and moist, infused with ground pistachios for a subtle nutty flavor. The frosting is whipped to perfection, providing a rich and creamy contrast to the cake layers. The crowning glory of this dessert is the scattering of pomegranate seeds on top, which not only adds a pop of color but also a delightful crunch and tang that balances the sweetness of the cake.
Whether you’re serving this at a family gathering or a holiday party, this Pistachio and Pomegranate Layer Cake is sure to be a hit.
Ingredients (Serves 4-6):
- 2 cups all-purpose flour
- 1 ½ teaspoons baking powder
- ½ teaspoon baking soda
- ½ teaspoon salt
- ¾ cup unsalted butter, softened
- 1 cup granulated sugar
- 3 large eggs
- 1 teaspoon vanilla extract
- 1 cup whole milk
- 1 cup shelled pistachios, finely ground
- 1 cup unsalted butter, softened (for frosting)
- 3 cups powdered sugar
- 2 tablespoons milk (for frosting)
- 1 teaspoon vanilla extract (for frosting)
- 1 cup pomegranate seeds
Instructions:
- Preheat and Prepare Pans: Preheat your oven to 350°F (175°C). Grease and flour two 8-inch round cake pans to guarantee the cakes release easily after baking.
- Mix Dry Ingredients: In a medium bowl, whisk together the flour, baking powder, baking soda, and salt. Set this mixture aside.
- Cream Butter and Sugar: In a large mixing bowl, cream together the softened butter and granulated sugar until light and fluffy. This should take about 3-5 minutes using an electric mixer.
- Add Eggs and Vanilla: Beat in the eggs, one at a time, verifying each egg is fully incorporated before adding the next. Stir in the vanilla extract.
- Combine Dry and Wet Ingredients: Gradually add the dry ingredients to the butter mixture, alternating with the milk, beginning and ending with the dry ingredients. Mix until just combined.
- Incorporate Pistachios: Gently fold in the ground pistachios until evenly distributed throughout the batter.
- Bake the Cakes: Divide the batter evenly between the prepared cake pans. Bake in the preheated oven for 25-30 minutes, or until a toothpick inserted into the center comes out clean. Allow the cakes to cool in the pans for 10 minutes, then turn out onto a wire rack to cool completely.
- Prepare the Frosting: In a clean mixing bowl, beat the softened butter until creamy. Gradually add the powdered sugar, milk, and vanilla extract, beating until the frosting is smooth and spreadable.
- Assemble the Cake: Place one cake layer on a serving plate. Spread a layer of frosting over the top, then place the second cake layer on top. Frost the top and sides of the entire cake.
- Decorate: Sprinkle the top of the cake generously with pomegranate seeds, pressing them lightly into the frosting so they adhere.
Extra Tips:
For an extra nutty flavor, lightly toast the pistachios before grinding them. This enhances their aroma and taste. When spreading the frosting, use an offset spatula for a smooth finish, and chill the cake for about 15 minutes before slicing to achieve cleaner cuts.
If pomegranates are out of season, consider using dried cranberries or a pomegranate glaze as a substitute.
Dark Chocolate and Cherry Roulade
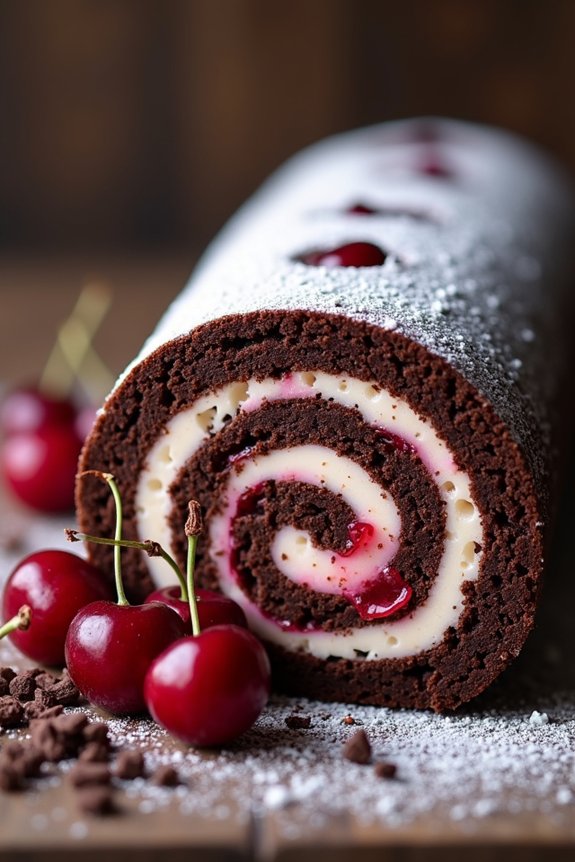
Indulge in the rich and festive flavors of a Dark Chocolate and Cherry Roulade this Christmas. This dessert combines the depth of dark chocolate with the tangy sweetness of cherries to create a show-stopping dish that will impress your guests. A roulade is fundamentally a rolled sponge cake, providing a light and airy texture that pairs perfectly with the creamy and decadent filling.
Whether you’re hosting a holiday dinner or simply want to treat your loved ones to something special, this roulade is guaranteed to add a touch of elegance to your festive table.
The roulade is surprisingly simple to make and can be a wonderful project for those looking to try their hand at baking a rolled cake. The key is in the preparation and careful rolling process, which results in a beautiful spiral of dark chocolate sponge and cherry-laden cream. This dessert is ideal for a serving size of 4-6 people, ensuring everyone gets a generous slice of this festive treat.
Ingredients for 4-6 Servings:
- 6 large eggs
- 150g (5.3 oz) caster sugar
- 50g (1.8 oz) cocoa powder
- 1 teaspoon vanilla extract
- 200g (7 oz) dark chocolate, finely chopped
- 250ml (8.5 fl oz) heavy cream
- 200g (7 oz) cherry preserves
- Fresh cherries and chocolate shavings, for garnish (optional)
- Icing sugar, for dusting
Cooking Instructions:
- Preheat and Prepare: Preheat your oven to 180°C (350°F). Line a 33x23cm (13×9 inch) jelly roll pan with baking parchment, ensuring the paper extends slightly over the edges for easy removal.
- Make the Sponge: In a large mixing bowl, beat the eggs and caster sugar using an electric mixer on high speed until the mixture becomes thick, pale, and triples in volume, about 5-7 minutes. Gently fold in the cocoa powder and vanilla extract until just combined.
- Bake the Sponge: Pour the batter evenly into the prepared jelly roll pan and smooth the top with a spatula. Bake in the preheated oven for 10-12 minutes, or until the sponge springs back when lightly touched.
- Roll the Sponge: While the sponge is still hot, place a clean kitchen towel on a flat surface and dust it generously with icing sugar. Invert the sponge onto the towel, peel off the parchment paper, and roll the cake up from the shorter side with the towel inside. Let it cool completely while rolled.
- Prepare the Filling: In a heatproof bowl over a pot of simmering water, melt the dark chocolate, stirring occasionally until smooth. Remove from heat and let it cool slightly. In a separate bowl, whip the heavy cream until soft peaks form, then fold in the melted chocolate and cherry preserves until well combined.
- Assemble the Roulade: Carefully unroll the cooled sponge and spread the chocolate-cherry filling evenly over the surface, leaving a small border around the edges. Gently roll the sponge back up without the towel, using the towel to help lift the cake as needed.
- Chill and Serve: Refrigerate the roulade for at least 1 hour to set. Before serving, trim the ends for a neat presentation, dust with icing sugar, and garnish with fresh cherries and chocolate shavings if desired.
Extra Tips:
When rolling the sponge, do so while it’s still warm to prevent cracking. If any cracks occur during the unrolling or re-rolling, they can be disguised with icing sugar or additional whipped cream.
For a more intense flavor, consider adding a tablespoon of kirsch or cherry liqueur to the whipped cream filling. This roulade can be made a day in advance and stored in the refrigerator, making it a convenient option for holiday planning.
Enjoy the festive flair and the delightful combination of flavors in every bite!
Lemon and Rosemary Shortbread Cookies
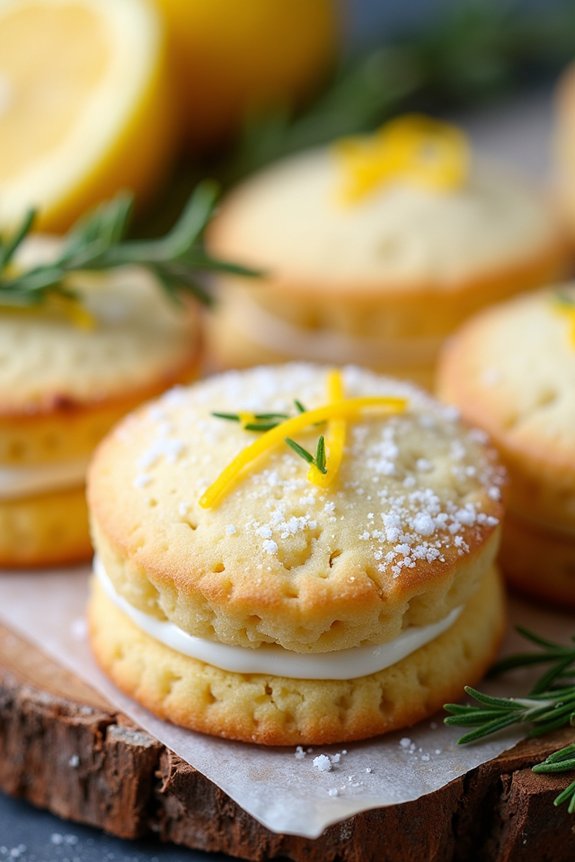
Lemon and Rosemary Shortbread Cookies are a delightful twist on the classic shortbread, bringing a touch of zestiness from lemon and an aromatic hint of rosemary. These cookies are perfect for the holiday season, offering a revitalizing flavor that complements the festive spirit.
The crumbly texture combined with the bright lemon flavor and subtle earthiness of rosemary makes these cookies a crowd-pleaser at any Christmas gathering. Ideal for a serving size of 4-6 people, these cookies are easy to make and require minimal ingredients, making them a perfect choice for both novice bakers and seasoned chefs.
Whether served as an elegant dessert or a casual snack, Lemon and Rosemary Shortbread Cookies will surely become a holiday favorite.
Ingredients:
- 1 cup unsalted butter, softened
- 1/2 cup granulated sugar
- Zest of 2 lemons
- 1 tablespoon fresh lemon juice
- 2 cups all-purpose flour
- 1 tablespoon finely chopped fresh rosemary
- 1/2 teaspoon salt
- Additional granulated sugar, for sprinkling
Instructions:
- Prepare the Dough:
- In a large mixing bowl, cream together the softened butter and granulated sugar until light and fluffy. This should take about 2-3 minutes with an electric mixer on medium speed.
- Add the lemon zest, lemon juice, and finely chopped rosemary to the butter mixture. Mix until well combined, allowing the flavors to infuse the dough.
- Incorporate Dry Ingredients:
- Gradually add the all-purpose flour and salt into the wet mixture. Mix on low speed until the dough begins to come together. It should be smooth and slightly sticky.
- Chill the Dough:
- Divide the dough in half and shape each half into a log, approximately 2 inches in diameter. Wrap each log in plastic wrap and refrigerate for at least 1 hour. This will make the dough easier to slice.
- Preheat the Oven:
- Preheat your oven to 350°F (175°C) and line two baking sheets with parchment paper.
- Slice and Bake:
- Remove the dough from the refrigerator and slice each log into 1/4-inch thick rounds. Place the slices on the prepared baking sheets, leaving about 1 inch of space between each cookie.
- Sprinkle a little granulated sugar on top of each cookie for added sweetness and a slight crunch.
- Bake in the preheated oven for 10-12 minutes, or until the edges are lightly golden. Be careful not to overbake, as shortbread can easily become too crisp.
- Cool and Serve:
- Allow the cookies to cool on the baking sheets for about 5 minutes before transferring them to a wire rack to cool completely. Serve them as they’re or pair them with a cup of tea or coffee.
Extra Tips:
For the best flavor, use fresh rosemary rather than dried, as it provides a more vibrant aroma and taste. If you don’t have fresh lemons, bottled lemon juice can be used, but the zest of fresh lemons is essential for the full flavor profile.
These cookies can be stored in an airtight container at room temperature for up to a week, making them a great option for advance preparation during the busy holiday season. If you want to add a decorative touch, consider drizzling a simple lemon glaze over the cooled cookies.