

Planning family dinners can get overwhelming when life gets busy. These freezer friendly recipes are designed to make things easier. You can prep them ahead and have meals ready when you need them. Each one is a full dinner idea that works well for freezing. Here are 11 options to help with your meal planning.
Helpful Tips Before You Start
These tips will help you store and reheat the meals with better results.
Portion for Your Family
Divide each recipe into meal sized portions before freezing. This makes it easy to pull out exactly what you need on busy nights.
Label Clearly
Write the dish name, date, and simple reheating steps on every container or bag. You will thank yourself later when the freezer is full.
Cool Before Freezing
Let cooked food cool to room temperature first. Placing hot dishes straight into the freezer can raise the temperature and affect other items.
Thaw Safely
Move portions from the freezer to the fridge the night before you plan to serve them. This keeps texture and flavor closer to fresh.
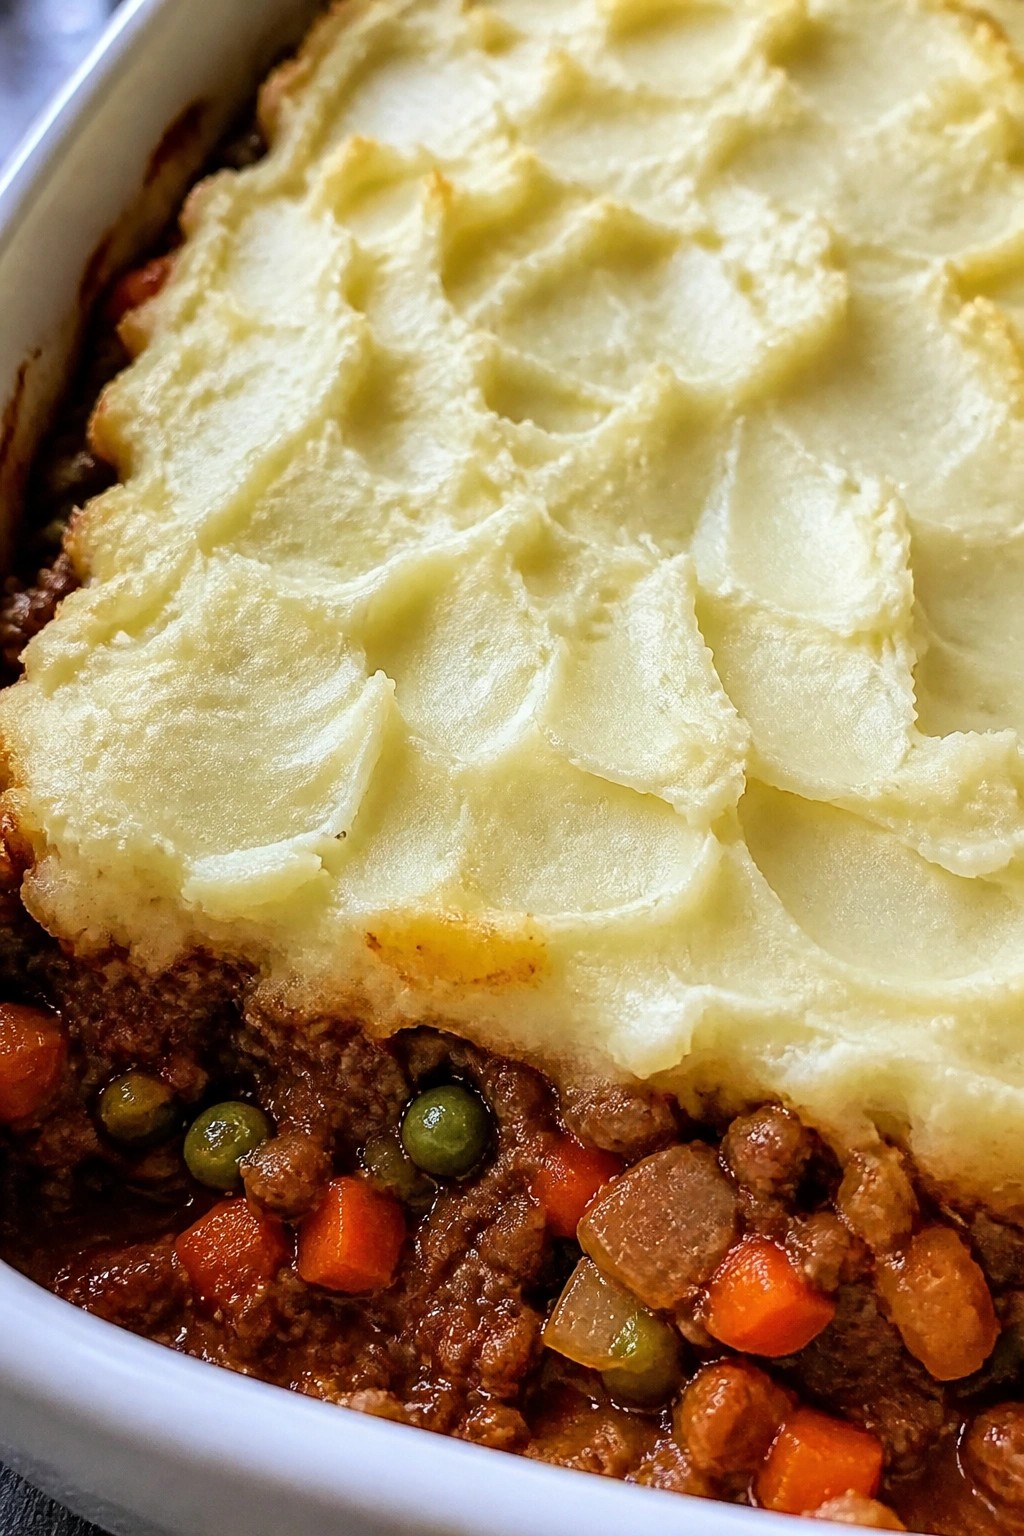
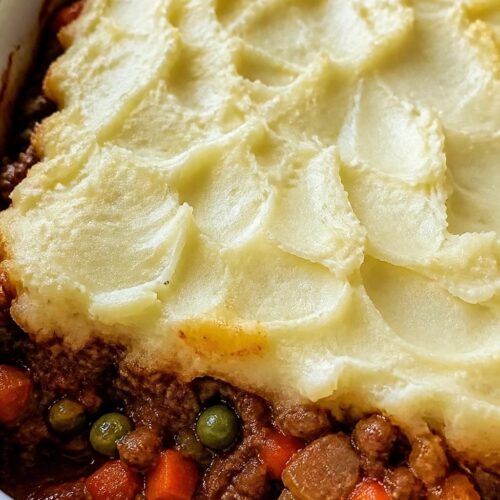
Beef and Vegetable Shepherd’s Pie
This beef and vegetable shepherd’s pie combines savory ground beef with carrots, peas, and onions under a layer of creamy mashed potatoes. It offers a hearty, balanced meal that appeals to both kids and adults.
The dish suits busy families who want to prepare dinners ahead of time. It stores well in the freezer and delivers consistent results after reheating.
Equipment
- Large skillet
- Medium pot
- Baking dish
- Potato masher
Ingredients
- 1 pound ground beef
- 1 medium onion, diced
- 2 carrots, peeled and diced
- 1 cup frozen peas
- 2 cloves garlic, minced
- 2 tablespoons all-purpose flour
- 1 cup beef broth
- 1 tablespoon Worcestershire sauce
- 1 teaspoon dried thyme
- Salt and pepper to taste
- 4 large potatoes, peeled and cubed
- 1/4 cup milk
- 2 tablespoons butter
Instructions
- Place the potatoes in a medium pot, cover with water, and boil until fork tender. Drain, then mash with the milk and butter until smooth. Set aside.
- In a large skillet, cook the ground beef over medium heat until browned. Add the onion, carrots, and garlic. Cook for 5 minutes until the vegetables begin to soften.
- Stir in the flour and cook for 1 minute. Add the beef broth, Worcestershire sauce, thyme, salt, and pepper. Simmer for 5 minutes until the mixture thickens.
- Stir the frozen peas into the beef mixture and remove the skillet from heat.
- Transfer the beef and vegetable filling to a baking dish. Spread the mashed potatoes evenly over the top.
- Bake at 400 degrees Fahrenheit for 20 minutes until the topping turns lightly golden.
Notes
Cuisine: British
Equipment: Large skillet, Medium pot, Baking dish, Potato masher
Chicken Enchilada Casserole with Black Beans
This casserole is a reliable choice for busy weeks because you can assemble it ahead and freeze it whole. It layers shredded chicken with black beans and corn tortillas in enchilada sauce, then finishes with melted cheese on top. The result is a hearty, mildly spiced dish that reheats well without drying out.
It suits family meal planning since one pan feeds everyone with minimal extra work on the night you serve it. The texture stays soft and comforting after freezing and baking, with the beans adding a little creaminess against the tortillas.


Equipment
- 9×9 Baking Dish
- Skillet
- Mixing Bowl
Ingredients
- 2 cups cooked shredded chicken
- 1 (15-ounce) can black beans, drained and rinsed
- 2 cups red enchilada sauce, divided
- 6 corn tortillas
- 1 1/2 cups shredded Mexican cheese blend
- 1 small onion, diced
- 1 teaspoon ground cumin
Instructions
- Preheat the oven to 375 degrees and lightly grease a 9×9 baking dish.
- Warm a skillet over medium heat and cook the diced onion with the cumin for 3 minutes until the onion softens.
- In a large bowl, combine the shredded chicken, black beans, cooked onion, and 1 cup of enchilada sauce.
- Spread 1/4 cup of the remaining enchilada sauce across the bottom of the baking dish.
- Layer 2 corn tortillas over the sauce, then spread half the chicken mixture on top and sprinkle with 1/2 cup cheese.
- Repeat the layers once more with 2 tortillas, the rest of the chicken mixture, and another 1/2 cup cheese.
- Top with the final 2 tortillas, the remaining 3/4 cup enchilada sauce, and the last 1/2 cup cheese.
- Cover the dish with foil and bake for 20 minutes, then remove the foil and bake 10 more minutes until the cheese is bubbly.
Notes
Cuisine: Mexican
Equipment: 9×9 Baking Dish, Skillet, Mixing Bowl
Hearty Minestrone Soup with Parmesan Croutons
This soup packs plenty of vegetables and beans into one pot for a filling meal that still feels light. The Parmesan croutons add a crisp, cheesy finish that makes the whole dish feel complete. It works well for weeknight dinners or weekend meal prep since the soup base freezes cleanly and the croutons can be baked fresh when needed.


Equipment
- Large pot
- Baking sheet
- Mixing bowl
Ingredients
- 2 tablespoons olive oil
- 1 medium onion, diced
- 2 carrots, peeled and diced
- 2 celery stalks, diced
- 3 garlic cloves, minced
- 1 zucchini, diced
- 1 (14-ounce) can diced tomatoes
- 4 cups vegetable broth
- 1 (15-ounce) can cannellini beans, drained and rinsed
- 1/2 cup small pasta such as ditalini
- 2 cups fresh spinach
- 2 cups cubed day-old bread
- 1/4 cup grated Parmesan cheese
- 1 tablespoon olive oil
- 1 teaspoon dried Italian herbs
Instructions
- Heat 2 tablespoons olive oil in a large pot over medium heat. Add the onion, carrots, and celery and cook for 5 minutes until the vegetables begin to soften.
- Stir in the garlic and zucchini and cook for 2 more minutes.
- Pour in the diced tomatoes and vegetable broth. Add the cannellini beans and bring the mixture to a simmer.
- Add the pasta and cook for 8 to 10 minutes until the pasta is tender.
- Stir in the spinach and cook for 1 minute until wilted. Remove the pot from the heat.
- While the soup simmers, preheat the oven to 375°F. Toss the bread cubes with 1 tablespoon olive oil, the Parmesan cheese, and the Italian herbs.
- Spread the bread on a baking sheet and bake for 10 to 12 minutes until golden and crisp.
- Ladle the soup into bowls and top each serving with a handful of Parmesan croutons.
Notes
Cuisine: Italian
Equipment: Large pot, Baking sheet, Mixing bowl
Indian Butter Chicken with Basmati Rice
This freezer friendly butter chicken turns out tender pieces of chicken in a creamy spiced tomato sauce. It pairs with simple basmati rice for a complete meal that reheats well after freezing. Families appreciate the mild warmth and rich texture that still feels like a treat on busy nights.
Make a batch on the weekend, portion it out, and pull it from the freezer when you need a no stress dinner. The sauce holds up nicely and the rice cooks fresh or reheats without much effort.


Equipment
- Large Skillet
- Saucepan
- Cutting Board
- Knife
Ingredients
- 1.5 pounds boneless skinless chicken thighs, cut into bite size pieces
- 2 tablespoons butter
- 1 medium onion, diced
- 3 garlic cloves, minced
- 1 tablespoon fresh ginger, minced
- 1 14 ounce can crushed tomatoes
- 1 cup heavy cream
- 2 teaspoons garam masala
- 1 teaspoon ground cumin
- 1 teaspoon turmeric
- 1/2 teaspoon chili powder
- 1 teaspoon salt
- 1 cup basmati rice
- 2 cups water
- Fresh cilantro, chopped, for serving
Instructions
- Melt the butter in a large skillet over medium heat. Add the diced onion and cook until soft, about 5 minutes.
- Stir in the minced garlic and ginger and cook for 1 minute until fragrant.
- Add the chicken pieces to the skillet and cook until lightly browned on all sides, about 6 minutes.
- Sprinkle in the garam masala, cumin, turmeric, chili powder, and salt. Stir to coat the chicken evenly.
- Pour in the crushed tomatoes and bring the mixture to a simmer. Let it cook for 10 minutes, stirring occasionally.
- Reduce the heat to low and stir in the heavy cream. Simmer gently for 5 more minutes until the sauce thickens slightly.
- While the sauce simmers, rinse the basmati rice under cold water until the water runs clear. Place it in a saucepan with 2 cups of water and a pinch of salt. Bring to a boil, then cover and reduce to low heat. Cook for 15 minutes without lifting the lid.
- Remove the rice from heat and let it rest covered for 5 minutes before fluffing with a fork.
- Serve the butter chicken over the cooked basmati rice and top with chopped cilantro.
Notes
Cuisine: Indian
Equipment: Large Skillet, Saucepan, Cutting Board, Knife
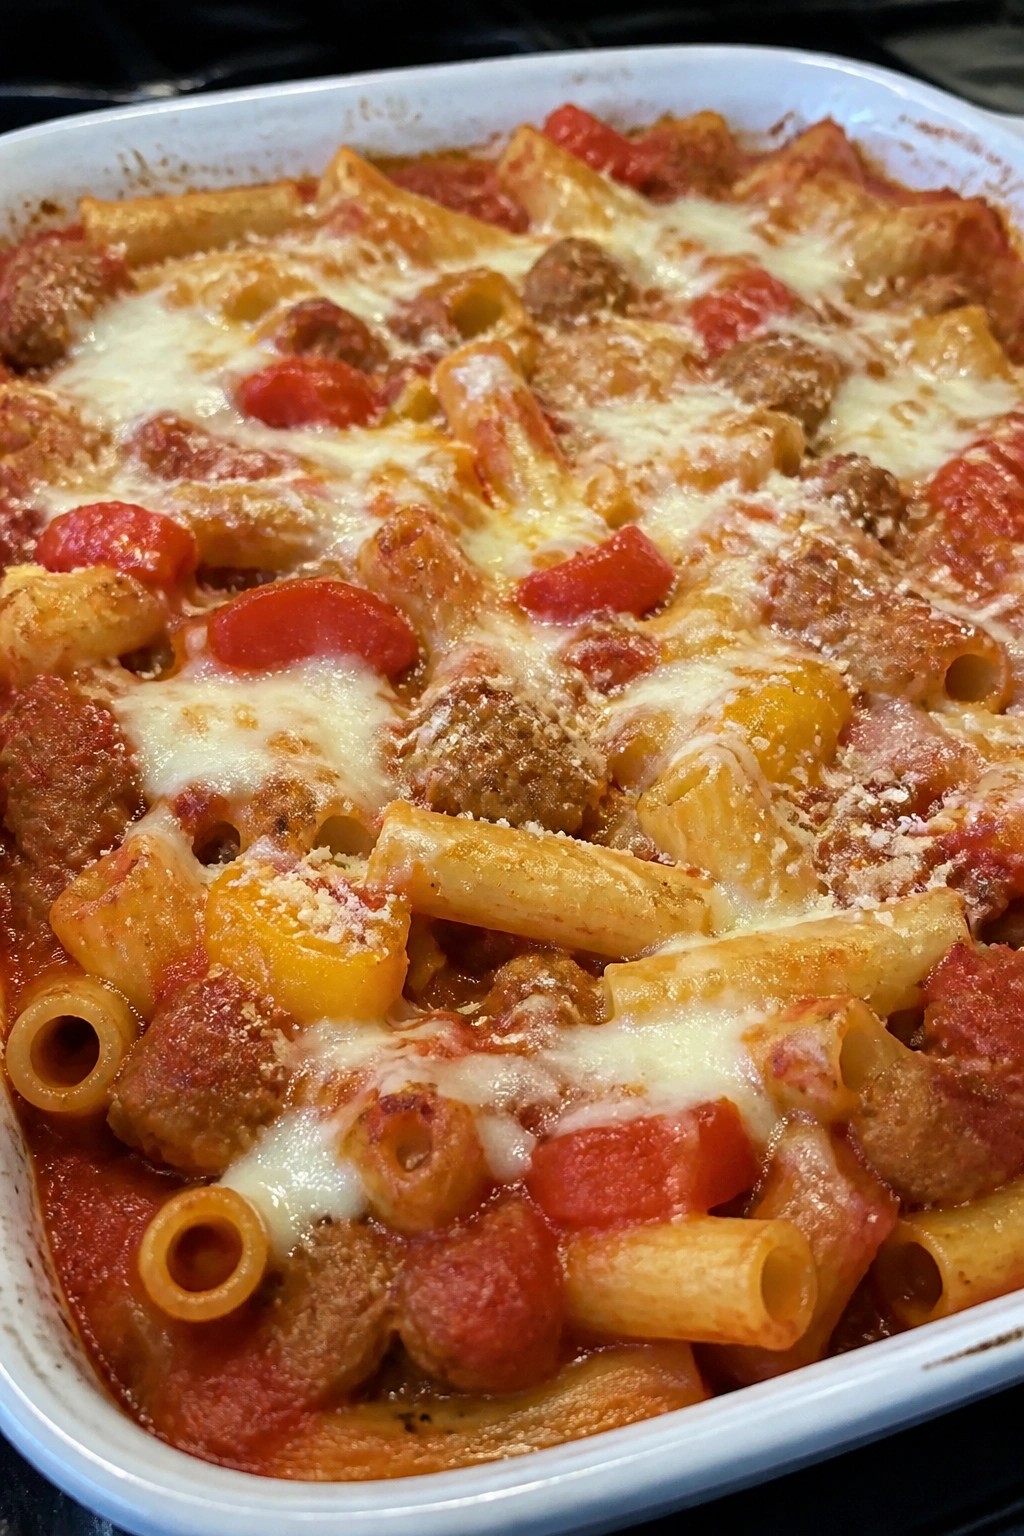
Italian Sausage and Pepper Baked Ziti
This baked ziti combines spicy Italian sausage with sweet bell peppers in a hearty tomato sauce. It comes together in one pan before going into the oven, making it a reliable choice for busy weeknights or prepping ahead.
The dish freezes well, so you can assemble it now and bake it later when you need a no-fuss family meal. The finished result is saucy pasta with pockets of melted cheese and tender vegetables.

Equipment
- Large Skillet
- Large Pot
- 9×13 Baking Dish
Ingredients
- 12 ounces ziti pasta
- 1 pound Italian sausage, casings removed
- 2 bell peppers, sliced
- 1 small onion, diced
- 3 cups marinara sauce
- 1 cup ricotta cheese
- 2 cups shredded mozzarella cheese
- 1/2 cup grated Parmesan cheese
- 1 teaspoon Italian seasoning
- 1/2 teaspoon salt
- 1/4 teaspoon black pepper
Instructions
- Preheat the oven to 375 degrees. Bring a large pot of salted water to a boil and cook the ziti until just al dente. Drain and set aside.
- In a large skillet over medium heat, cook the Italian sausage, breaking it up with a spoon, until browned. Add the diced onion and sliced bell peppers. Cook for 5 minutes until the vegetables soften.
- Stir the marinara sauce, Italian seasoning, salt, and black pepper into the skillet. Simmer for 3 minutes, then remove from heat.
- In a large bowl, combine the cooked ziti with the sausage and pepper mixture. Fold in the ricotta cheese until evenly distributed.
- Transfer half the pasta mixture to a greased 9×13 baking dish. Sprinkle with half the mozzarella and Parmesan. Add the remaining pasta mixture and top with the rest of the cheeses.
- Cover with foil and bake for 20 minutes. Remove the foil and bake 10 more minutes until the cheese is bubbly and lightly browned.
Notes
Cuisine: Italian
Equipment: Large Skillet, Large Pot, 9×13 Baking Dish
Turkey and Wild Rice Stuffed Cabbage Rolls
These Turkey and Wild Rice Stuffed Cabbage Rolls bring a hearty, wholesome option to your freezer stash. The nutty wild rice pairs with lean ground turkey for a filling that stays satisfying after reheating. They make an easy choice for weeknight dinners when you want something prepared ahead.
The finished rolls offer soft cabbage leaves around a savory filling in a light tomato sauce. The texture stays balanced, with the rice adding a slight chew that holds up well once frozen and thawed.


Equipment
- Large pot
- Skillet
- Mixing bowl
- Baking dish
Ingredients
- 1 large head green cabbage
- 1 pound ground turkey
- 2 cups cooked wild rice
- 1 medium onion, finely chopped
- 2 cloves garlic, minced
- 2 cups tomato sauce
- 1 teaspoon dried oregano
- 1/2 teaspoon salt
- 1/4 teaspoon black pepper
- 1 tablespoon olive oil
Instructions
- Bring a large pot of water to a boil. Carefully separate 8 large leaves from the cabbage and blanch them for 2 minutes until pliable. Drain and set aside to cool.
- Heat the olive oil in a skillet over medium heat. Add the onion and garlic and cook for 3 minutes until softened.
- In a mixing bowl, combine the ground turkey, cooked wild rice, cooked onion and garlic, oregano, salt, and pepper. Mix until evenly blended.
- Lay each cabbage leaf flat and place about 1/3 cup of filling near the stem end. Fold in the sides and roll tightly to enclose the filling.
- Spread 1/2 cup tomato sauce across the bottom of a baking dish. Arrange the rolls seam side down in the dish. Pour the remaining tomato sauce over the top.
- Cover the dish with foil and bake at 375°F for 35 minutes until the turkey is cooked through and the rolls are tender.
Notes
Cuisine: American
Equipment: Large pot, Skillet, Mixing bowl, Baking dish
Thai Coconut Vegetable Curry with Tofu
This Thai Coconut Vegetable Curry with Tofu is a reliable choice for batch cooking. The creamy coconut sauce holds up well in the freezer, and the mix of vegetables and protein makes it a complete meal once thawed. It brings mild heat from curry paste balanced with fresh lime and a touch of sweetness.
The dish works especially well for weeknight planning since it comes together in one pan and reheats without losing texture. Families appreciate the familiar flavors, and the tofu absorbs the sauce during storage for extra flavor later.


Equipment
- Large Skillet
- Cutting Board
- Knife
Ingredients
- 14 oz firm tofu, pressed and cubed
- 1 tablespoon vegetable oil
- 1 onion, diced
- 3 cloves garlic, minced
- 1 tablespoon fresh ginger, grated
- 3 tablespoons Thai red curry paste
- 2 cans (13.5 oz each) full-fat coconut milk
- 2 cups broccoli florets
- 1 red bell pepper, sliced
- 2 carrots, sliced into rounds
- 2 tablespoons soy sauce
- Juice of 1 lime
- Cooked rice, for serving
- Fresh cilantro, for garnish
Instructions
- Heat the vegetable oil in a large skillet over medium heat. Add the cubed tofu and cook until lightly browned on all sides, about 5-6 minutes. Remove the tofu and set it aside.
- In the same skillet, add the diced onion and cook until softened, about 3 minutes. Stir in the minced garlic and grated ginger, cooking for 1 minute until fragrant.
- Add the Thai red curry paste and stir to coat the onions. Pour in both cans of coconut milk and bring the mixture to a gentle simmer.
- Add the broccoli florets, sliced red bell pepper, and carrot rounds. Simmer for 8-10 minutes until the vegetables are tender but still hold their shape.
- Return the browned tofu to the skillet. Stir in the soy sauce and lime juice. Simmer for 2 more minutes to combine flavors.
- Serve the curry over cooked rice and top with fresh cilantro if desired.
Notes
Cuisine: Thai
Equipment: Large Skillet, Cutting Board, Knife
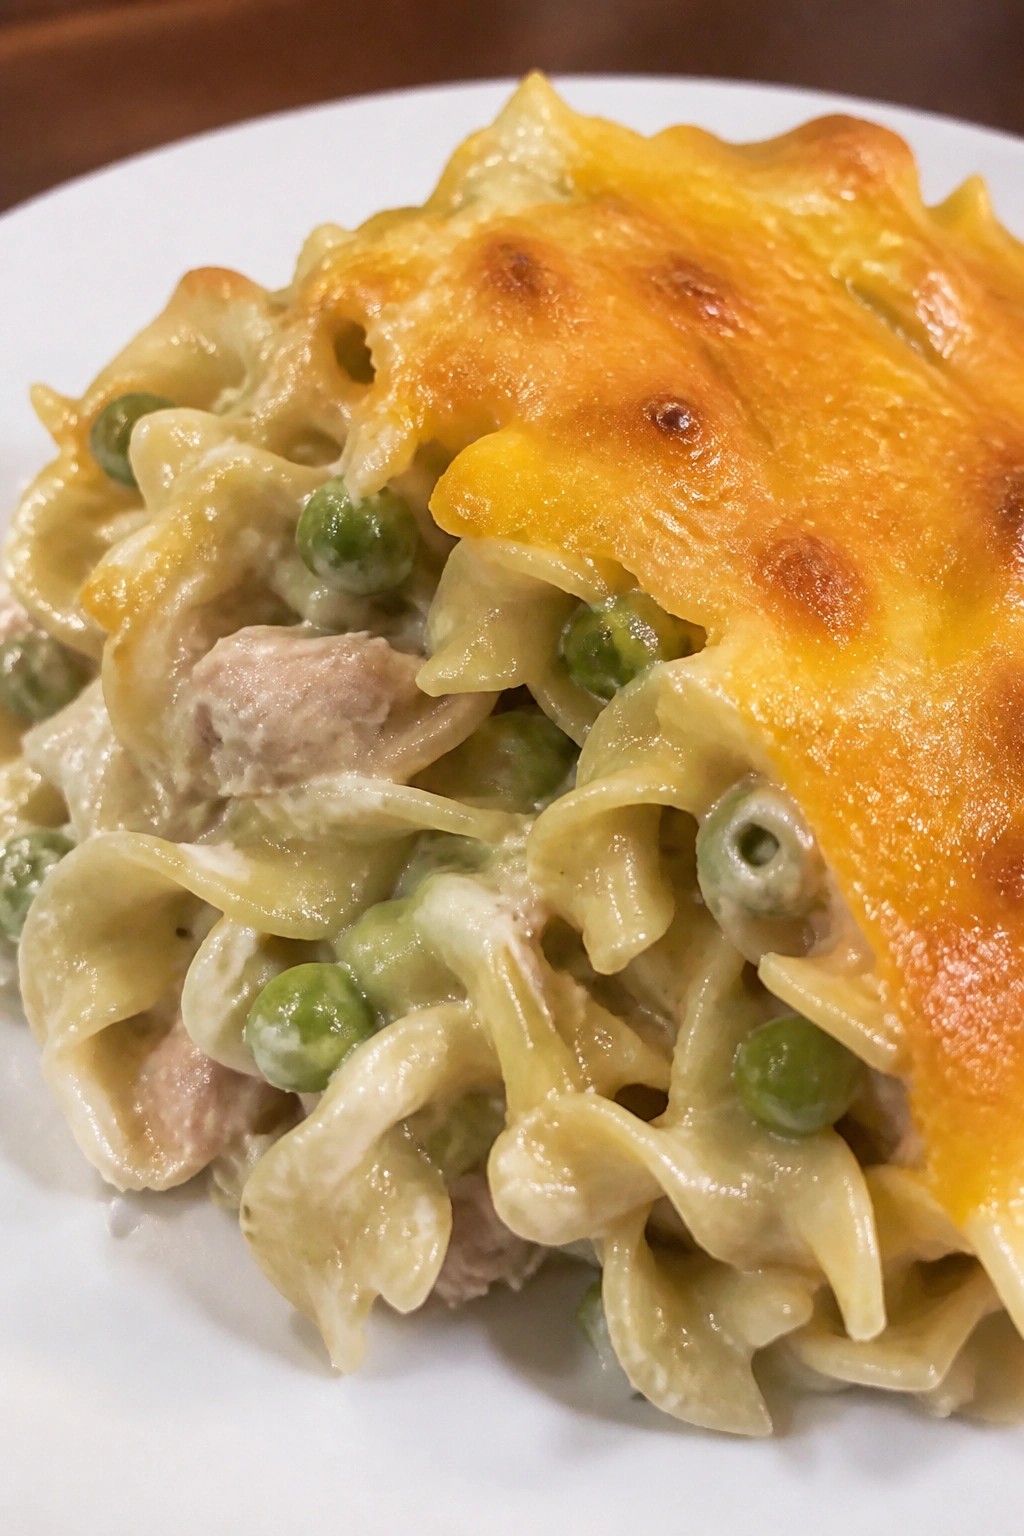
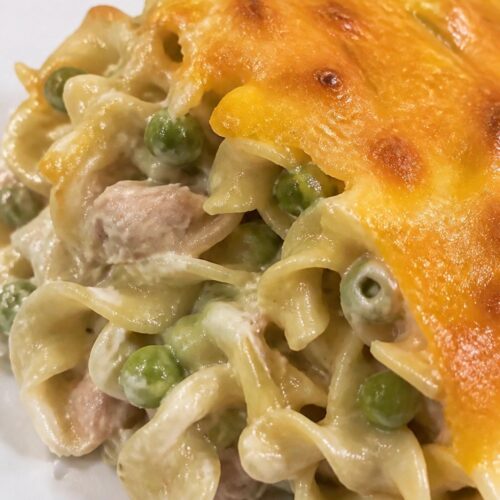
Cheesy Tuna Noodle Casserole with Peas
This casserole combines tender egg noodles, flaky tuna, and sweet peas in a creamy cheese sauce. It comes together quickly and freezes well, making it a reliable choice for busy weeknights or prepping meals in advance.
The finished dish has a soft, hearty texture with a golden cheese topping that appeals to both kids and adults. It works as a complete one-pan meal that reheats nicely without much fuss.
Equipment
- Large pot
- 9×9 baking dish
- Mixing spoon
Ingredients
- 8 oz egg noodles
- 2 (5 oz) cans tuna in water, drained
- 1 cup frozen peas
- 2 cups shredded cheddar cheese, divided
- 1 (10.5 oz) can cream of mushroom soup
- 1/2 cup milk
- 1/2 tsp garlic powder
- 1/2 tsp salt
- 1/4 tsp black pepper
Instructions
- Preheat the oven to 375°F and lightly grease a 9×9 baking dish.
- Cook the egg noodles in a large pot of boiling water until just tender, then drain and return them to the pot.
- Stir the cream of mushroom soup, milk, garlic powder, salt, and pepper into the noodles until evenly combined.
- Add the drained tuna, frozen peas, and 1 1/2 cups of the cheddar cheese. Mix gently until the ingredients are distributed.
- Transfer the mixture to the prepared baking dish and spread it into an even layer.
- Sprinkle the remaining 1/2 cup of cheddar cheese over the top.
- Bake for 20 to 25 minutes until the cheese is melted and the edges are bubbling. Let it rest for 5 minutes before serving.
Notes
Cuisine: American
Equipment: Large pot, 9×9 baking dish, Mixing spoon
Pork Carnitas Burrito Bowls with Cilantro Lime Rice
These bowls deliver tender shredded pork with warm spices alongside bright cilantro lime rice. They work well for busy weeks because the carnitas cook mostly hands-off and both the meat and rice freeze and reheat without losing much texture.
The finished dish gives you savory, juicy pork with a hint of citrus against fluffy rice and simple toppings. Families can customize each bowl while still having a complete meal that stores easily for another night.


Equipment
- Slow Cooker
- Medium Pot
- Small Saucepan
Ingredients
- 2 lbs boneless pork shoulder, cut into large chunks
- 1 large onion, quartered
- 4 garlic cloves, peeled
- 2 tsp ground cumin
- 1 tsp dried oregano
- 1 tsp salt
- 1/2 tsp black pepper
- 1 cup chicken broth
- 2 cups uncooked white rice
- 4 cups water
- 1/4 cup chopped fresh cilantro
- 2 limes, juiced
- 1 can (15 oz) black beans, drained and rinsed
- 1 cup corn kernels
- 1 avocado, sliced
- 1/2 cup shredded cheddar cheese
- 1/2 cup salsa
Instructions
- Place the pork shoulder chunks in a slow cooker with the onion, garlic cloves, cumin, oregano, salt, pepper, and chicken broth. Cover and cook on low for 8 hours until the meat shreds easily with a fork.
- Remove the pork from the slow cooker and shred it with two forks. Return the shredded meat to the juices in the slow cooker and stir to coat. Keep warm until ready to serve.
- While the pork finishes cooking, combine the white rice and water in a medium pot. Bring to a boil, then reduce heat to low, cover, and simmer for 18 minutes until the rice is tender.
- Fluff the cooked rice with a fork, then stir in the chopped cilantro and lime juice. Set aside.
- Warm the black beans and corn in a small saucepan over medium heat for 5 minutes.
- Divide the cilantro lime rice among four bowls. Top each bowl with shredded pork, black beans, corn, avocado slices, shredded cheddar cheese, and salsa.
Notes
Cuisine: Mexican
Equipment: Slow Cooker, Medium Pot, Small Saucepan
Lentil and Sweet Potato Shepherd’s Pie
This lentil and sweet potato shepherd’s pie brings a hearty vegetarian twist to a classic comfort dish. The savory lentil filling pairs with a naturally sweet mashed topping, making it a satisfying option for busy weeknights or planned-ahead meals. It freezes well, so you can prepare it in advance and have a ready-to-heat dinner on hand.
The recipe works especially well for family meal planning because it uses simple pantry staples and produces a complete one-dish meal. The earthy lentils and vegetables create a thick, flavorful base while the sweet potato mash adds creaminess without needing much added fat.


Equipment
- Large skillet
- Large pot
- Baking dish
- Oven
Ingredients
- 1 cup dried green lentils, rinsed
- 2 large sweet potatoes, peeled and cubed
- 1 onion, diced
- 2 carrots, diced
- 2 celery stalks, diced
- 3 garlic cloves, minced
- 2 tbsp tomato paste
- 2 cups vegetable broth
- 1 tsp dried thyme
- 1/2 cup frozen peas
- 2 tbsp olive oil
- Salt and pepper to taste
- 2 tbsp butter
- 1/4 cup milk
Instructions
- Preheat the oven to 400°F. Heat the olive oil in a large skillet over medium heat. Add the onion, carrots, and celery and cook until softened, about 5 minutes.
- Stir in the garlic and tomato paste and cook for 1 minute. Add the lentils, vegetable broth, thyme, salt, and pepper. Bring to a simmer and cook for 20 minutes until the lentils are tender and most of the liquid is absorbed.
- Stir the frozen peas into the lentil mixture and remove the skillet from heat.
- While the lentils cook, place the sweet potatoes in a large pot and cover with water. Boil until fork-tender, about 12 minutes. Drain and return to the pot.
- Mash the sweet potatoes with the butter and milk until smooth. Season with salt and pepper.
- Transfer the lentil filling to a baking dish. Spread the mashed sweet potatoes evenly over the top.
- Bake for 20 minutes until the topping is lightly browned and the filling is bubbling at the edges.
Notes
Cuisine: British
Equipment: Large skillet, Large pot, Baking dish, Oven
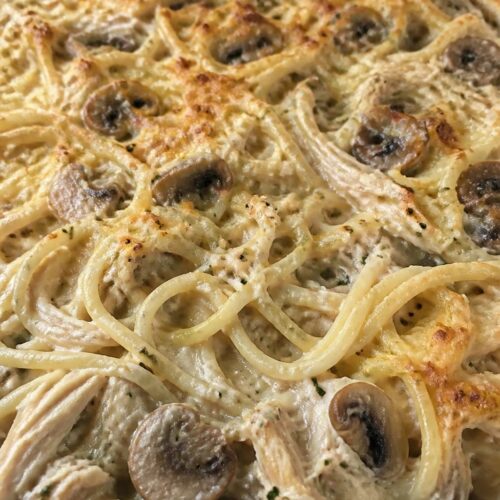
Creamy Chicken Tetrazzini with Mushrooms
This dish brings together tender chicken, earthy mushrooms, and pasta in a rich cream sauce. It is an easy option for families who want to prepare meals ahead and store them in the freezer for busy weeknights. The finished casserole has a creamy texture with a light golden top after baking.
It works well when you need a complete dinner that reheats evenly and still tastes fresh. The flavors stay mild enough for children yet satisfying for adults.

Equipment
- Large pot
- Large skillet
- 9×9-inch baking dish
Ingredients
- 8 ounces spaghetti
- 2 cups cooked shredded chicken
- 8 ounces button mushrooms, sliced
- 1 small onion, diced
- 2 cloves garlic, minced
- 2 tablespoons butter
- 2 tablespoons all-purpose flour
- 1 1/2 cups chicken broth
- 1 cup heavy cream
- 1/2 cup grated Parmesan cheese
- 1/2 teaspoon salt
- 1/4 teaspoon black pepper
- 1 tablespoon chopped parsley (for serving)
Instructions
- Cook the spaghetti in a large pot of salted boiling water until just al dente. Drain and set aside.
- Melt the butter in a large skillet over medium heat. Add the diced onion and cook until softened, about 3 minutes.
- Add the sliced mushrooms and minced garlic to the skillet. Cook until the mushrooms release their liquid and begin to brown, about 5 minutes.
- Sprinkle the flour over the vegetables and stir for 1 minute to form a roux.
- Slowly pour in the chicken broth while stirring, then add the heavy cream. Continue stirring until the sauce thickens, about 4 minutes.
- Stir in the salt, black pepper, and Parmesan cheese until the cheese melts. Add the shredded chicken and cooked spaghetti. Toss until everything is evenly coated.
- Transfer the mixture to a greased 9×9-inch baking dish. Cover tightly with foil and freeze for up to 2 months, or bake immediately at 375°F for 20 minutes until hot and lightly browned on top.
- If baking from frozen, add 20 extra minutes to the bake time. Sprinkle with chopped parsley before serving.
Notes
Cuisine: American
Equipment: Large pot, Large skillet, 9×9-inch baking dish