

Baking Christmas cookies with loved ones is one of my favorite ways to embrace the holiday spirit. The smell of freshly baked Gingerbread Men and the crunch of Snowflake Sugar Cookies is pure joy. These treats are more than just tasty—they’re perfect for bonding and letting your creativity shine. Have you tried Peppermint Pinwheels or Chocolate Crinkle Cookies? Let’s explore more delectable options that will make your holiday season extra special.
Classic Gingerbread Men

When it comes to Christmas cookies, Classic Gingerbread Men are a timeless favorite that brings joy to both young and old. Their aromatic blend of spices and sweet molasses creates a delightful combination that’s as fun to make as it’s to eat. Perfect for decorating with family, these cookies are a festive treat that can be personalized with icing, candies, or even raisins to give each gingerbread man a unique personality.
Whether you’re serving them at a holiday gathering or leaving them out for Santa, these cookies are sure to be a hit. Creating these Classic Gingerbread Men is a wonderful holiday tradition. The process involves mixing up a fragrant dough, cutting it into playful shapes, and baking them to a perfect crisp.
Once cooled, the real fun begins with decorating! This recipe makes enough for a serving size of 4-6 people, ensuring that there are plenty of cookies to share. Gather your ingredients, roll up your sleeves, and get ready to fill your home with the warm, inviting scent of gingerbread.
Ingredients:
- 3 cups all-purpose flour
- 3/4 cup packed brown sugar
- 3/4 teaspoon baking soda
- 1 tablespoon ground ginger
- 1 tablespoon ground cinnamon
- 1/2 teaspoon ground cloves
- 1/2 teaspoon salt
- 3/4 cup unsalted butter, softened
- 3/4 cup molasses
- 1 large egg
- 1 teaspoon vanilla extract
- Royal icing or decorations of choice
Instructions:
- Prepare the Dough: In a large mixing bowl, combine the all-purpose flour, brown sugar, baking soda, ginger, cinnamon, cloves, and salt. Add the softened butter, molasses, egg, and vanilla extract. Mix the ingredients thoroughly until a smooth, cohesive dough forms.
- Chill the Dough: Divide the dough in half and shape each half into a disk. Wrap the disks in plastic wrap and refrigerate for at least 2 hours or until firm. This chilling process is essential as it makes the dough easier to roll out and helps the cookies maintain their shape during baking.
- Preheat the Oven: Preheat your oven to 350°F (175°C). Line two baking sheets with parchment paper.
- Roll Out the Dough: On a lightly floured surface, roll out one disk of dough to about 1/4-inch thickness. Use gingerbread men cookie cutters to cut out shapes. Transfer the cut-out cookies to the prepared baking sheets, spacing them about 1 inch apart.
- Bake the Cookies: Bake the cookies in the preheated oven for 8-10 minutes, or until the edges are set and slightly darker. Be careful not to overbake, as gingerbread can become too hard. Allow the cookies to cool on the baking sheets for 5 minutes before transferring them to a wire rack to cool completely.
- Decorate: Once the cookies are completely cooled, decorate them using royal icing and your choice of decorations. Allow the icing to set before serving or storing.
Extra Tips:
For the best results, use fresh spices for a more robust flavor. If you’re decorating with kids, set up a decorating station with small bowls of candies and icing to keep things organized.
If the dough becomes too warm while rolling, return it to the fridge to firm up again. Store the decorated cookies in an airtight container at room temperature for up to a week, or freeze the undecorated cookies for up to three months. Enjoy your festive baking!
Snowflake Sugar Cookies

Snowflake Sugar Cookies are a delightful and festive treat perfect for the holiday season. These cookies aren’t only beautiful to look at, with their intricate snowflake designs, but they’re also deliciously sweet and buttery.
Whether you’re baking them as a gift or for your family to enjoy, these cookies are sure to bring a touch of winter wonderland to any occasion. The delicate sugar cookie base is enhanced with a hint of vanilla, making them a classic favorite that never goes out of style.
Creating Snowflake Sugar Cookies is a fun and rewarding process that the whole family can get involved in. The dough is easy to make and can be rolled out to your desired thickness, allowing for customization in both size and shape.
Once baked, the cookies can be decorated with royal icing to create intricate snowflake patterns that are sure to impress. This recipe serves 4-6 people, making it perfect for a small gathering or as a part of a larger dessert spread.
Ingredients:
- 2 1/2 cups all-purpose flour
- 1/2 teaspoon baking powder
- 1/4 teaspoon salt
- 3/4 cup unsalted butter, softened
- 1 cup granulated sugar
- 1 large egg
- 1 teaspoon vanilla extract
- Royal icing (for decorating)
- Blue and white food coloring
- Sprinkles or edible glitter (optional)
Cooking Instructions:
- Prepare the Dough: In a medium bowl, whisk together the flour, baking powder, and salt. In a large mixing bowl, cream the softened butter and granulated sugar together until light and fluffy. Add the egg and vanilla extract, mixing well until fully incorporated.
- Combine Ingredients: Gradually add the dry ingredients to the wet ingredients, mixing until a dough forms. Divide the dough in half, flatten each half into a disk, wrap in plastic wrap, and refrigerate for at least 1 hour or until firm.
- Roll Out the Dough: Preheat your oven to 350°F (175°C). On a lightly floured surface, roll out one disk of dough to about 1/4 inch thickness. Use snowflake-shaped cookie cutters to cut out cookies and place them on a baking sheet lined with parchment paper. Repeat with the second disk of dough.
- Bake the Cookies: Bake the cookies in the preheated oven for 8-10 minutes, or until the edges begin to turn golden. Remove from the oven and allow them to cool on the baking sheet for a few minutes before transferring to a wire rack to cool completely.
- Decorate the Cookies: Once the cookies are completely cooled, prepare the royal icing according to the package instructions. Divide the icing into separate bowls and tint with blue and white food coloring as desired. Using a piping bag, decorate the cookies with snowflake patterns, and add sprinkles or edible glitter if using.
Extra Tips:
When making Snowflake Sugar Cookies, it’s important to keep the dough chilled as it helps in maintaining the shape of the cookies while baking. If the dough becomes too soft while working, return it to the refrigerator for a few minutes to firm it up.
For intricate snowflake designs, use a piping tip with a fine nozzle for better control over the icing details. Additionally, allow the decorated cookies to dry completely at room temperature before storing them in an airtight container to preserve their freshness and design.
Peppermint Pinwheels
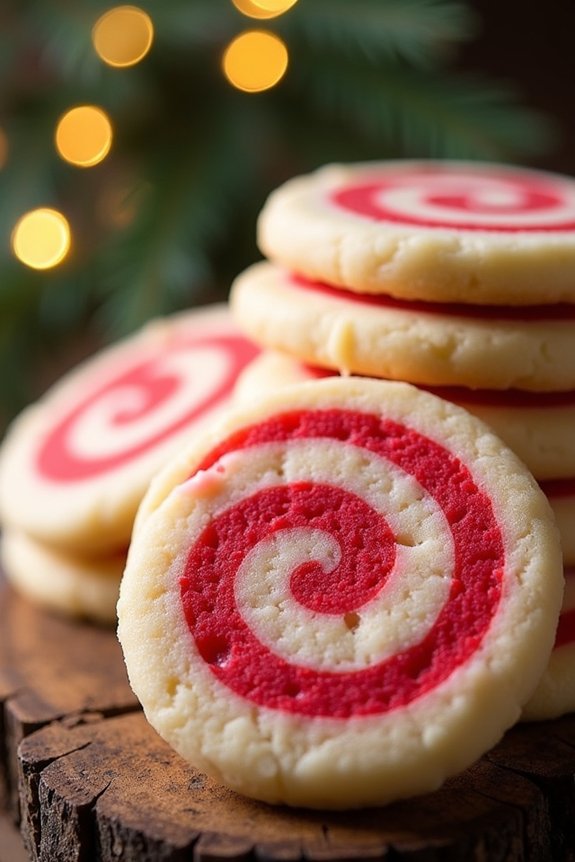
Peppermint Pinwheels are a delightful twist on the classic holiday cookie, combining the invigorating taste of peppermint with the buttery richness of a sugar cookie.
These eye-catching treats are perfect for adding a festive flair to your holiday dessert spread, boasting vibrant red and white swirls that are as fun to make as they’re to eat.
The pinwheels not only taste amazing but also add a beautiful pop of color to your cookie platter, making them a hit at any Christmas gathering.
Making Peppermint Pinwheels involves creating a simple sugar cookie dough, which is then divided and colored to create the signature swirl effect.
With a hint of peppermint extract, these cookies capture the essence of the holiday season in every bite.
This recipe yields approximately 24 cookies, serving 4-6 people, making it a perfect choice for a small holiday party or family gathering.
Ingredients (Serving size: 4-6 people)
- 2 ¾ cups all-purpose flour
- 1 teaspoon baking powder
- ½ teaspoon salt
- 1 cup unsalted butter, softened
- 1 ½ cups granulated sugar
- 1 large egg
- 1 teaspoon vanilla extract
- 1 teaspoon peppermint extract
- Red food coloring
- 1/4 cup powdered sugar (for rolling)
Instructions
- Prepare the Dry Ingredients: In a medium bowl, whisk together the all-purpose flour, baking powder, and salt. Set this mixture aside as you’ll incorporate it into the wet ingredients later.
- Cream the Butter and Sugar: In a large mixing bowl, beat the softened butter and granulated sugar together using an electric mixer, until the mixture is light and fluffy. This should take about 2 to 3 minutes.
- Add Egg and Extracts: Beat in the egg, vanilla extract, and peppermint extract until well combined. This will infuse the dough with flavor and help bind the ingredients together.
- Combine with Dry Ingredients: Gradually add the flour mixture to the wet ingredients, mixing on low speed until just combined. Be careful not to overmix, as this could make the cookies tough.
- Divide and Color the Dough: Divide the dough into two equal portions. Leave one portion plain and add a few drops of red food coloring to the other, kneading until the color is evenly distributed.
- Roll the Dough: Roll out each portion of dough separately between two sheets of parchment paper, into rectangles of approximately ¼-inch thickness. Aim for similar sizes for both portions.
- Create the Swirl: Carefully peel the top parchment paper off each dough rectangle. Place the red dough rectangle on top of the plain dough rectangle. Trim the edges to make them even, then gently press them together using a rolling pin.
- Roll into a Log: Starting from one long side, carefully roll the dough into a tight log, peeling away the parchment paper as you go. Wrap the log tightly in plastic wrap and refrigerate for at least 2 hours, or until firm.
- Preheat and Slice: Preheat your oven to 350°F (175°C). Line baking sheets with parchment paper. Remove the chilled dough log from the refrigerator and slice into ¼-inch thick rounds.
- Bake the Cookies: Arrange the slices on the prepared baking sheets, spacing them about 2 inches apart. Bake for 10-12 minutes, or until the edges are just beginning to turn golden. Allow cookies to cool on the baking sheet for a few minutes before transferring them to a wire rack to cool completely.
Extra Tips
For a more pronounced peppermint flavor, consider sprinkling crushed peppermint candies or candy canes on top of the cookies before baking.
If you prefer a softer cookie, be careful not to overbake; remove them from the oven when they just start to turn golden at the edges.
When rolling out the dough, if it becomes too soft, pop it back into the refrigerator to firm up before continuing. This will make the dough easier to handle and guarantee clean, sharp swirls in your finished cookies.
Chocolate Crinkle Cookies
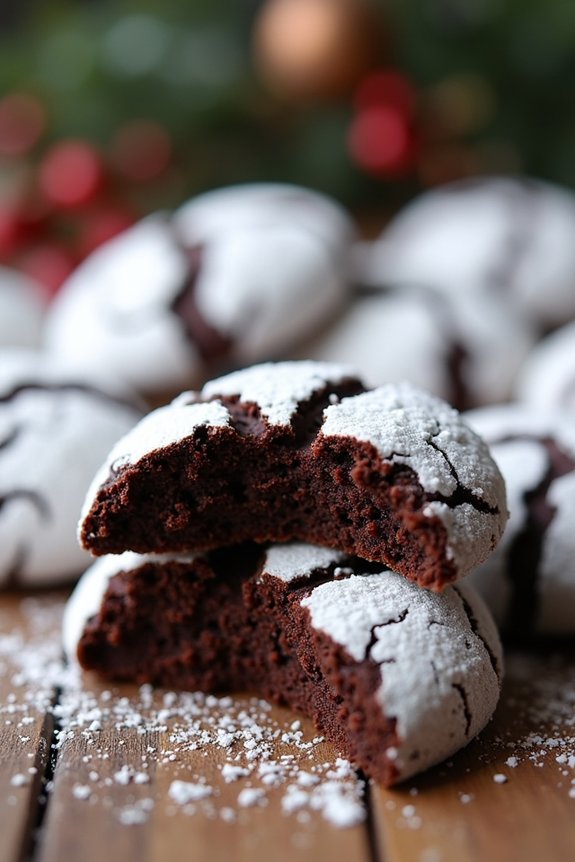
Chocolate Crinkle Cookies are a classic holiday treat that are both delightful to look at and delicious to eat. These cookies are known for their unique appearance, with a dark chocolate interior that peeks through a crackled white powdered sugar exterior. The contrast between the soft, fudgy center and the slightly crisp outer layer makes these cookies a favorite during the Christmas season.
Perfect for gift-giving or simply enjoying with a cup of hot cocoa, these cookies are sure to be a hit at any holiday gathering.
To achieve the perfect crinkle effect, the dough is chilled before being rolled in powdered sugar. As the cookies bake, they spread and crack, creating the signature crinkle look. While they may seem fancy, Chocolate Crinkle Cookies are surprisingly easy to make and require just a handful of ingredients. This recipe yields approximately 24 cookies, making it ideal for serving 4-6 people, depending on how many cookies each person enjoys.
Ingredients:
- 1 cup all-purpose flour
- 1/2 cup unsweetened cocoa powder
- 1 teaspoon baking powder
- 1/4 teaspoon salt
- 1 cup granulated sugar
- 1/4 cup vegetable oil
- 2 large eggs
- 1 teaspoon vanilla extract
- 1/2 cup powdered sugar (for rolling)
Instructions:
- Mix Dry Ingredients: In a medium-sized bowl, whisk together the all-purpose flour, unsweetened cocoa powder, baking powder, and salt. Set this dry mixture aside.
- Combine Wet Ingredients: In a large bowl, mix the granulated sugar and vegetable oil together until well combined. Add the eggs one at a time, mixing thoroughly after each addition. Stir in the vanilla extract.
- Form Dough: Gradually add the dry ingredients to the wet mixture, stirring until a thick dough forms. This dough will be quite sticky.
- Chill Dough: Cover the dough with plastic wrap and refrigerate for at least 2 hours or until firm. This step is essential as it helps the dough to be more manageable and enhances the crinkle effect during baking.
- Preheat Oven: Preheat your oven to 350°F (175°C) and line a baking sheet with parchment paper.
- Shape Cookies: Roll the chilled dough into 1-inch balls. Roll each ball generously in powdered sugar, making sure each ball is well-coated.
- Bake Cookies: Place the sugar-coated balls onto the prepared baking sheet, spacing them about 2 inches apart. Bake in the preheated oven for 10-12 minutes. The cookies should be soft and slightly underbaked in the center but firm around the edges.
- Cool Cookies: Allow the cookies to cool on the baking sheet for a few minutes before transferring them to a wire rack to cool completely.
Extra Tips:
For the best results, make sure to chill the dough thoroughly; this step is essential for achieving the classic crinkle look. The dough can be made ahead of time and stored in the refrigerator for up to 24 hours before baking.
Additionally, if you find the dough too sticky to handle, lightly oil your hands or use a small cookie scoop to shape the dough into balls. Finally, be generous with the powdered sugar coating for a more striking crinkle effect.
Thumbprint Jam Cookies

Thumbprint Jam Cookies are a delightful addition to any Christmas cookie platter. These cookies aren’t only delicious but also visually appealing with their jewel-like centers filled with vibrant jam. The buttery, crumbly texture of the cookie pairs perfectly with the sweet and slightly tangy jam, making them a favorite during the holiday season.
Whether you choose raspberry, strawberry, or apricot jam, these cookies are certain to be a hit with family and friends. Perfect for a serving size of 4-6 people, this recipe is both simple and engaging, making it a fun activity to share with loved ones. The process involves creating a rich dough, forming small thumbprint wells, and filling them with your favorite jam before baking to perfection.
These cookies not only taste amazing but also add a festive touch to your holiday table.
Ingredients:
- 2 cups all-purpose flour
- 1/2 teaspoon salt
- 1 cup unsalted butter, softened
- 1/2 cup granulated sugar
- 1 teaspoon vanilla extract
- 1/2 cup of your favorite jam (e.g., raspberry, strawberry, apricot)
- Optional: 1/2 cup confectioners’ sugar for dusting
Instructions:
- Preheat the Oven: Start by preheating your oven to 350°F (175°C). Line two baking sheets with parchment paper to prevent the cookies from sticking and to guarantee even baking.
- Prepare the Dough: In a medium mixing bowl, whisk together the flour and salt. In a separate large mixing bowl, cream the softened butter and granulated sugar together using an electric mixer on medium speed until light and fluffy, about 3 minutes. Mix in the vanilla extract.
- Combine Ingredients: Gradually add the flour mixture to the butter mixture, mixing on low speed until just combined. The dough should be soft and pliable.
- Form the Cookies: Roll the dough into 1-inch balls and place them on the prepared baking sheets, leaving about 2 inches between each ball. Use your thumb or the back of a 1/2 teaspoon measuring spoon to make an indentation in the center of each ball.
- Fill with Jam: Carefully fill each indentation with about 1/2 teaspoon of your chosen jam, being careful not to overfill to prevent spilling over during baking.
- Bake: Place the cookies in the preheated oven and bake for 12-15 minutes, or until the edges begin to turn golden brown. Remove from the oven and allow them to cool on the baking sheet for 5 minutes before transferring them to a wire rack to cool completely.
- Optional Dusting: Once the cookies are completely cool, you may dust them with confectioners’ sugar for an extra festive touch.
Extra Tips:
When making Thumbprint Jam Cookies, verify that your butter is softened but not melted, as this will affect the texture of your dough. If your dough seems too soft to handle, refrigerate it for about 15 minutes before forming the cookies.
Additionally, experiment with different jam flavors to find your favorite combination, or try using a variety of jams for a colorful cookie platter. Store your cookies in an airtight container to maintain their freshness and enjoy them within a week for the best taste.
Reindeer Noses

Reindeer Noses are a whimsical and delightful addition to your Christmas cookie collection that are certain to bring smiles to both kids and adults alike.
These festive treats combine sweet and salty flavors with a hint of chocolate, making them an irresistible option for holiday parties or family gatherings. The magical appearance of these cookies, resembling Rudolph’s iconic red nose, adds a cheerful touch to any dessert table.
Easy to make and fun to assemble, Reindeer Noses are perfect for getting the whole family involved in holiday baking.
This recipe for Reindeer Noses is designed to serve 4-6 people, making it ideal for small gatherings or as a part of a larger cookie platter. The preparation involves minimal ingredients and requires no baking, making these cookies a convenient and stress-free option during the bustling holiday season.
With their colorful aesthetic and delightful taste, Reindeer Noses are certain to become a new holiday favorite and a tradition you’ll want to carry on for years to come.
Ingredients (serves 4-6):
- 24 round pretzels
- 24 milk chocolate Hershey’s Kisses
- 24 red candy-coated chocolate pieces (such as M&M’s)
- Optional: White chocolate chips for decoration
Cooking Instructions:
- Preheat and Prepare: Preheat your oven to 200°F (93°C). Line a baking sheet with parchment paper to prevent sticking and make cleanup easier.
- Arrange Pretzels: Place the pretzels in a single layer on the prepared baking sheet, making sure they aren’t overlapping.
- Add Chocolate Kisses: Unwrap the Hershey’s Kisses and place one in the center of each pretzel ring. Make sure the pointed end is facing upward.
- Melt Chocolate: Put the baking sheet in the preheated oven and let the chocolate Kisses soften for about 4-5 minutes. Keep a close eye on them to make certain they don’t melt completely; they should be soft but still hold their shape.
- Add Red Noses: Once the Kisses are soft, carefully remove the baking sheet from the oven. Quickly and gently press a red candy-coated chocolate piece into the center of each Kiss, flattening it slightly to resemble Rudolph’s nose.
- Cool and Set: Allow the cookies to cool at room temperature for about 15 minutes, then transfer the baking sheet to the refrigerator for an additional 10-15 minutes to let the chocolate completely harden.
- Optional Decoration: If desired, melt some white chocolate chips and drizzle them over the cookies for an extra festive touch. Let the white chocolate set before serving.
Extra Tips:
To make certain your Reindeer Noses turn out perfectly, be sure to monitor the chocolate in the oven closely. You want it soft enough to press in the candy but not so melted that it loses its shape.
If you prefer a different flavor, try using dark chocolate or white chocolate Kisses. Additionally, you can experiment with different colored candy-coated chocolate pieces to match other holiday themes or personal preferences.
Keep any leftovers stored in an airtight container at room temperature for up to a week.
Christmas Tree Spritz Cookies

Christmas Tree Spritz Cookies are a festive and delightful treat that are perfect for any holiday gathering. These cookies are light, buttery, and have a melt-in-your-mouth texture that makes them irresistible. Their charming Christmas tree shape makes them a fun and decorative addition to your holiday dessert table, and they pair perfectly with a warm cup of cocoa or a glass of milk.
With just a few simple ingredients and a cookie press, you can create these delicious cookies that are certain to impress your family and friends. All you need is a little bit of time and creativity to bring these Christmas Tree Spritz Cookies to life. Whether you’re baking them alone or with loved ones, these cookies offer a wonderful opportunity to spend quality time in the kitchen during the festive season.
The recipe is easy to follow, making it suitable for bakers of all skill levels. Once baked, you can add your own personal touch by decorating the cookies with colored sugar, sprinkles, or edible glitter to really make them shine.
Ingredients (for serving 4-6 people):
- 1 cup unsalted butter, softened
- 3/4 cup granulated sugar
- 1 egg
- 1 teaspoon vanilla extract
- 1/2 teaspoon almond extract (optional)
- 2 1/4 cups all-purpose flour
- 1/4 teaspoon baking powder
- Green food coloring
- Colored sugar or sprinkles for decoration
Instructions:
- Preheat the Oven: Begin by preheating your oven to 375°F (190°C). This guarantees that the oven is at the right temperature when you’re ready to bake, which helps the cookies bake evenly.
- Cream the Butter and Sugar: In a large mixing bowl, use an electric mixer to cream together the softened butter and granulated sugar until light and fluffy. This should take about 2-3 minutes. The mixture should be pale and creamy.
- Add Egg and Extracts: Beat in the egg, vanilla extract, and almond extract (if using) until well combined. This helps to incorporate air into the mixture, giving the cookies a lighter texture.
- Incorporate Dry Ingredients: In a separate bowl, whisk together the all-purpose flour and baking powder. Gradually add this dry mixture to the wet ingredients, mixing until just combined. Be careful not to overmix, as this can make the cookies tough.
- Add Food Coloring: Add a few drops of green food coloring to the dough and mix until the color is evenly distributed. Adjust the amount of food coloring to achieve your desired shade of green.
- Prepare the Cookie Press: Fill a cookie press fitted with a Christmas tree-shaped disc with the dough. Press the cookies onto ungreased baking sheets, spacing them about 1 inch apart.
- Decorate: Before baking, sprinkle the cookies with colored sugar or sprinkles to add a festive touch.
- Bake the Cookies: Bake in the preheated oven for 8-10 minutes, or until the edges are just beginning to turn golden. Avoid overbaking to keep the cookies tender.
- Cool: Allow the cookies to cool on the baking sheet for a few minutes before transferring them to a wire rack to cool completely.
Extra Tips: To guarantee the best results, use room-temperature ingredients as they mix together more uniformly. If you find the dough is too soft and sticky to work with, let it chill in the refrigerator for about 10 minutes before using the cookie press.
Additionally, if the dough isn’t releasing well from the cookie press, try pressing cookies onto a cold baking sheet. This can help the dough adhere to the sheet better, making for perfectly formed Christmas tree cookies every time.
Linzer Cookies
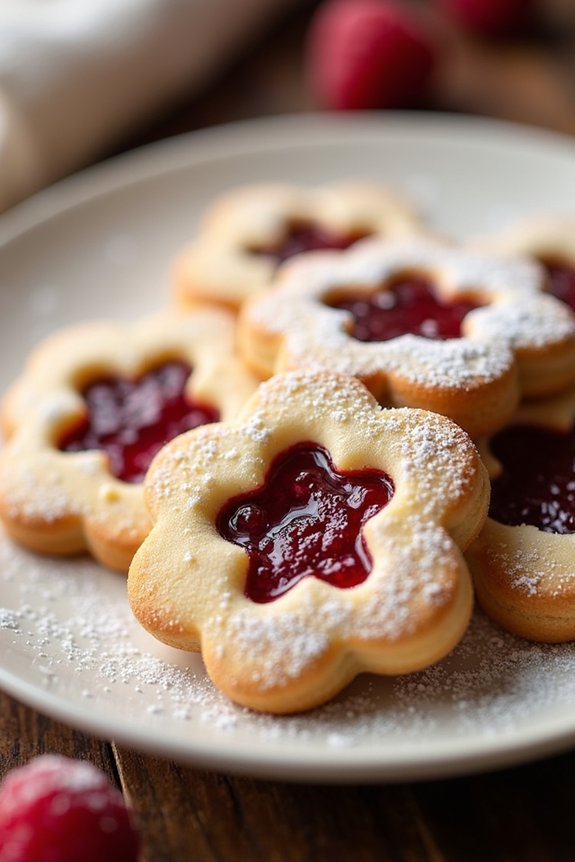
Linzer cookies are a classic holiday treat that bring a delightful combination of flavors and textures to any festive table. Originating from Austria, these cookies are known for their buttery dough, which is sandwiched with a layer of sweet jam and dusted with powdered sugar. The traditional Linzer cookie features a cut-out design on the top cookie, allowing the vibrant jam to peek through, adding a touch of elegance to these delicious sandwich cookies.
Perfect for Christmas gatherings or as a homemade gift, Linzer cookies are sure to be a crowd-pleaser.
To make a batch of Linzer cookies that serves 4-6 people, you’ll need to prepare a dough similar to shortbread, enriched with ground nuts for extra flavor. The choice of jam can vary depending on personal preference, but raspberry or apricot are commonly used for their tangy contrast against the rich, buttery cookies.
Whether you’re an experienced baker or trying your hand at baking for the first time, Linzer cookies are a satisfying project that yields delectable results and a sense of accomplishment.
Ingredients:
- 1 cup unsalted butter, softened
- 2/3 cup granulated sugar
- 1 teaspoon vanilla extract
- 2 cups all-purpose flour
- 1 cup ground almonds or almond meal
- 1/4 teaspoon salt
- 1/2 teaspoon ground cinnamon
- 1/2 cup raspberry or apricot jam
- Powdered sugar for dusting
Cooking Instructions:
- Prepare the Dough: In a large bowl, cream together the softened butter and granulated sugar until light and fluffy. Add the vanilla extract and mix well.
- Combine Dry Ingredients: In a separate bowl, whisk together the all-purpose flour, ground almonds, salt, and ground cinnamon. Gradually add the dry ingredients to the butter mixture, mixing until the dough comes together.
- Chill the Dough: Divide the dough into two discs, wrap each in plastic wrap, and refrigerate for at least 1 hour to firm up, which makes it easier to roll out.
- Preheat and Prepare Baking Sheets: Preheat your oven to 350°F (175°C). Line baking sheets with parchment paper.
- Roll Out the Dough: On a lightly floured surface, roll out one disc of dough to about 1/8-inch thickness. Use a round cookie cutter to cut out the cookies. For half of the cookies, use a smaller cutter to make a center cut-out.
- Bake the Cookies: Arrange the cookies on the prepared baking sheets and bake for 10-12 minutes, or until the edges are lightly golden. Allow them to cool on the baking sheet for a few minutes before transferring to a wire rack to cool completely.
- Assemble the Cookies: Spread a thin layer of jam on the full cookie rounds. Place a cookie with a cut-out center on top to create a sandwich, pressing gently to adhere.
- Finish with Powdered Sugar: Dust the tops of the cookies with powdered sugar before serving.
Extra Tips:
For the best flavor, use a high-quality jam, preferably homemade or one with a natural fruit taste, to fill your Linzer cookies. If you prefer a nut-free version, substitute the ground almonds with an equal amount of all-purpose flour, though keep in mind this will slightly alter the traditional flavor profile.
When rolling out the dough, work quickly to prevent it from becoming too soft, which can make cutting and transferring the cookies more challenging. Finally, store the assembled cookies in an airtight container for up to a week, though they’re often enjoyed long before then!
Eggnog Cookies
Eggnog Cookies are a delightful treat that capture the festive spirit of the holiday season. These cookies combine the rich, creamy flavor of eggnog with a hint of nutmeg and cinnamon, offering a unique twist on traditional holiday cookies. Perfect for Christmas gatherings or as a homemade gift, these cookies are sure to impress with their soft, chewy texture and aromatic spices.
They’re an excellent way to enjoy the classic holiday beverage in a new and exciting form. This recipe makes a batch that serves 4-6 people, providing enough cookies to share with friends or family. Whether you’re a seasoned baker or a novice in the kitchen, these Eggnog Cookies are simple to prepare and bake.
The key to their deliciousness lies in using high-quality eggnog and freshly grated nutmeg, which enhance the flavor profile. Let’s explore the ingredients and steps to create these festive cookies.
Ingredients:
- 2 1/4 cups all-purpose flour
- 1 teaspoon baking powder
- 1/2 teaspoon ground cinnamon
- 1/2 teaspoon ground nutmeg
- 1/4 teaspoon salt
- 3/4 cup unsalted butter, softened
- 1 cup granulated sugar
- 1/2 cup brown sugar
- 2 large egg yolks
- 1 teaspoon vanilla extract
- 1/2 cup eggnog
- 1/4 teaspoon rum extract
Instructions:
- Preheat and Prepare: Preheat your oven to 350°F (175°C). Line two baking sheets with parchment paper and set aside.
- Mix Dry Ingredients: In a medium-sized bowl, whisk together the flour, baking powder, cinnamon, nutmeg, and salt until well combined.
- Cream Butter and Sugars: In a large mixing bowl, using an electric mixer, beat the softened butter, granulated sugar, and brown sugar together until light and fluffy, approximately 3 minutes.
- Add Yolks and Extracts: Mix in the egg yolks, vanilla extract, and rum extract until fully incorporated.
- Incorporate Eggnog: Gradually add the eggnog to the butter mixture, mixing on low speed. The mixture may look slightly curdled but will smooth out with the addition of flour.
- Combine Wet and Dry Ingredients: Slowly add the dry ingredients to the wet mixture, mixing until just combined. Don’t overmix.
- Scoop and Shape: Using a tablespoon or cookie scoop, drop dough onto the prepared baking sheets, spacing them about 2 inches apart.
- Bake: Bake in the preheated oven for 10-12 minutes, or until the edges are lightly golden. The centers may look slightly underbaked, but they’ll firm up as they cool.
- Cool: Allow the cookies to cool on the baking sheets for 5 minutes before transferring them to a wire rack to cool completely.
Extra Tips:
For an extra burst of flavor, consider sprinkling a little extra nutmeg on top of the cookies before baking. If you prefer a stronger eggnog taste, add an additional tablespoon of eggnog to the dough.
To keep the cookies fresh, store them in an airtight container at room temperature for up to a week. These cookies can also be frozen for up to three months; just make sure they’re wrapped well. Enjoy these Eggnog Cookies with a glass of warm eggnog or a cup of hot cocoa for the ultimate holiday treat!
Candy Cane Biscotti
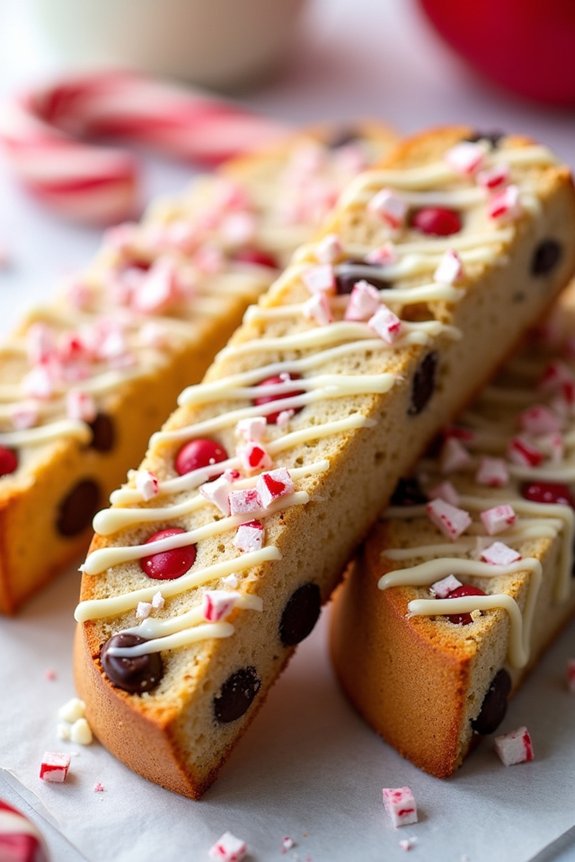
Candy Cane Biscotti is a delightful holiday treat that blends the festive flavors of peppermint and chocolate into a crisp, twice-baked cookie. Perfect for dipping into a steaming mug of hot chocolate or coffee, these biscotti are a wonderful addition to your Christmas cookie platter.
With their striking red and white appearance, they bring a touch of holiday cheer to any gathering and are sure to be a hit with both adults and children alike. This recipe yields enough biscotti for 4-6 people, making it ideal for small gatherings or as a thoughtful homemade gift.
The combination of crushed candy canes and chocolate chips gives these biscotti a distinctive and irresistible flavor. Whether you’re an experienced baker or trying your hand at biscotti for the first time, these Candy Cane Biscotti are easy to make and will definitely become a holiday favorite.
Ingredients (Serves 4-6):
- 2 cups all-purpose flour
- 1 teaspoon baking powder
- 1/2 teaspoon salt
- 1/2 cup unsalted butter, softened
- 3/4 cup granulated sugar
- 2 large eggs
- 1 teaspoon vanilla extract
- 1/2 teaspoon peppermint extract
- 1 cup mini chocolate chips
- 1/2 cup crushed candy canes
- 1/2 cup white chocolate, melted (optional, for drizzling)
Instructions:
- Preheat and Prepare. Preheat your oven to 350°F (175°C). Line a baking sheet with parchment paper to prevent sticking.
- Mix Dry Ingredients. In a medium bowl, whisk together the flour, baking powder, and salt. Set aside.
- Cream Butter and Sugar. In a large bowl, beat the butter and sugar together with an electric mixer on medium speed until light and fluffy, about 3 minutes.
- Add Eggs and Extracts. Add the eggs one at a time, beating well after each addition. Mix in the vanilla and peppermint extracts until combined.
- Combine Ingredients. Gradually add the dry ingredients to the wet ingredients, mixing on low speed until just incorporated. Stir in the mini chocolate chips and crushed candy canes with a spatula or wooden spoon.
- Form the Dough. Divide the dough in half and shape each half into a log about 9 inches long and 2 inches wide. Place the logs on the prepared baking sheet, spacing them about 3 inches apart.
- First Bake. Bake for 25-30 minutes, or until the logs are golden brown and firm to the touch. Remove from the oven and let them cool on the baking sheet for 10 minutes.
- Slice and Second Bake. Reduce the oven temperature to 325°F (160°C). Transfer the logs to a cutting board and use a serrated knife to slice them diagonally into 1/2-inch thick slices. Arrange the slices cut side down on the baking sheet.
- Second Bake. Return the biscotti to the oven and bake for an additional 10-12 minutes per side, until dry and crisp. Allow them to cool completely on a wire rack.
- Optional Drizzle. If desired, drizzle the cooled biscotti with melted white chocolate for an extra festive touch. Allow the chocolate to set before serving or storing.
Extra Tips:
When crushing candy canes, place them in a sealed plastic bag and use a rolling pin to gently crush them to the desired consistency; this minimizes the mess and guarantees evenly sized pieces.
Remember to allow the biscotti to cool completely before drizzling with white chocolate to make sure it sets properly. Store the biscotti in an airtight container at room temperature for up to two weeks to maintain their crispiness.
If you prefer a softer texture, reduce the second baking time slightly. Enjoy your delicious Candy Cane Biscotti with a warm beverage for the ultimate holiday treat!
Stained Glass Window Cookies
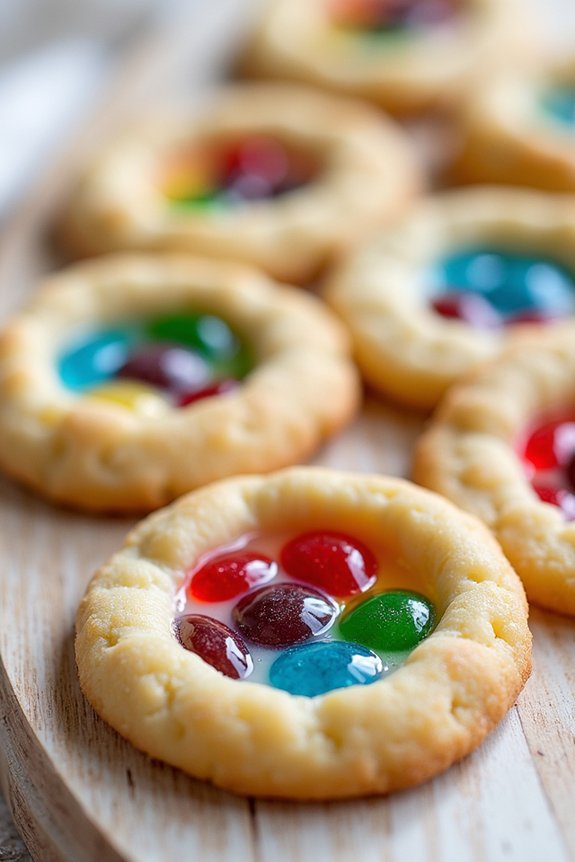
Stained Glass Window Cookies are a delightful and festive treat that not only taste delicious but also look stunning. These cookies are perfect for the holiday season, offering a creative twist to traditional sugar cookies with their vibrant, colorful centers resembling stained glass windows. This recipe is easy to follow and fun for both kids and adults, making it a wonderful activity for family gatherings during Christmas time.
The cookies are made by cutting out shapes from sugar cookie dough and filling the centers with crushed hard candies that melt during baking, forming a translucent, glass-like effect. The result is a cookie that’s both visually appealing and delectable. This recipe makes enough cookies to serve 4-6 people, making it ideal for a small gathering or as part of a larger dessert spread.
Ingredients:
- 1 cup unsalted butter, softened
- 1 cup granulated sugar
- 1 large egg
- 1 teaspoon vanilla extract
- 2 ½ cups all-purpose flour
- ½ teaspoon baking powder
- ¼ teaspoon salt
- Assorted hard candies (like Jolly Ranchers), crushed
- Parchment paper
Instructions:
- Prepare the Dough: In a large mixing bowl, cream together the softened butter and granulated sugar until light and fluffy. This should take about 2-3 minutes with an electric mixer. Add the egg and vanilla extract, and mix until well combined.
- Combine Dry Ingredients: In a separate bowl, whisk together the all-purpose flour, baking powder, and salt. Gradually add the dry ingredients to the butter mixture, mixing until a dough forms. Be careful not to overmix.
- Chill the Dough: Divide the dough into two portions, wrap each in plastic wrap, and refrigerate for at least 1 hour. This will make the dough easier to handle and help the cookies maintain their shape during baking.
- Preheat the Oven: Preheat your oven to 350°F (175°C) and line two baking sheets with parchment paper.
- Roll and Cut the Dough: On a lightly floured surface, roll out one portion of the dough to about 1/4-inch thick. Use cookie cutters to cut out shapes. Then, use smaller cutters to cut out shapes from the centers of the larger cookies.
- Fill the Centers: Place the cut-out cookies onto the prepared baking sheets. Fill the center of each cookie with crushed hard candies, making sure the candies are level with the dough.
- Bake the Cookies: Bake in the preheated oven for 8-10 minutes, or until the cookies are lightly golden and the candy centers have melted. Allow the cookies to cool on the baking sheet for 5 minutes before transferring them to a wire rack to cool completely.
Extra Tips:
When making Stained Glass Window Cookies, it’s important to crush the hard candies into small, even pieces to guarantee they melt properly and fill the entire cut-out space.
Using parchment paper is vital, as the melted candy can stick to baking sheets. If you want to add a bit of extra decoration, consider dusting the cooled cookies with a light sprinkle of powdered sugar or adding a simple glaze.
These cookies also make great holiday gifts when packaged in a decorative box or tin.
Shortbread Stars
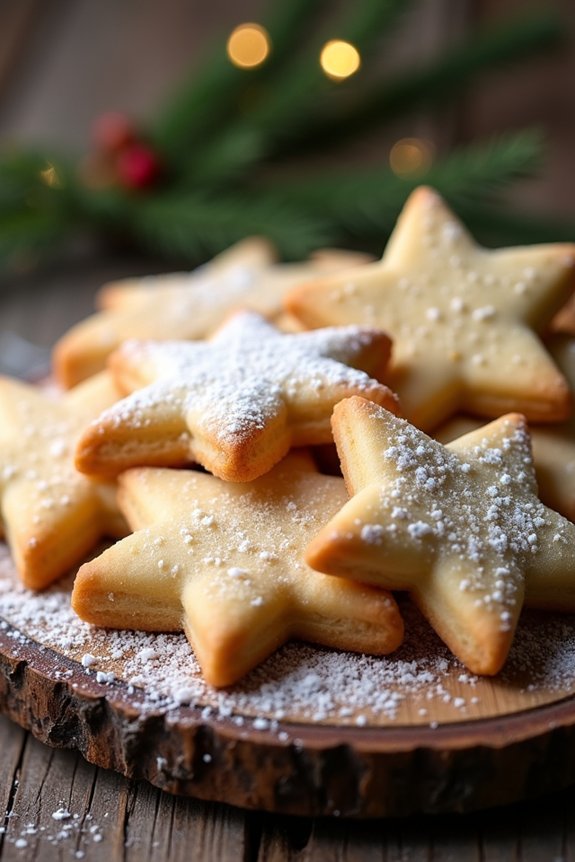
Shortbread Stars are a delightful addition to any holiday cookie platter. Their rich, buttery flavor and tender, crumbly texture make them a favorite among Christmas cookie enthusiasts. With their simple yet elegant star shape, these cookies are perfect for festive gatherings and make a beautiful homemade gift.
Whether you enjoy them plain or dusted with a little powdered sugar, these cookies are sure to bring holiday cheer to your home. This recipe yields approximately 24-30 cookies, making it ideal for serving 4-6 people. The key to a perfect shortbread is using high-quality butter, as it’s the primary flavor in this classic cookie.
With just a few simple ingredients and easy steps, you can create these delicious Shortbread Stars that will impress family and friends alike.
Ingredients (Serves 4-6 people):
- 1 cup (2 sticks) unsalted butter, at room temperature
- 3/4 cup powdered sugar
- 1 teaspoon vanilla extract
- 2 cups all-purpose flour
- 1/4 teaspoon salt
- Optional: Powdered sugar for dusting
Cooking Instructions:
- Preheat the Oven: Begin by preheating your oven to 350°F (175°C). Line two baking sheets with parchment paper to prevent the cookies from sticking.
- Cream the Butter and Sugar: In a large mixing bowl, use an electric mixer to cream together the room-temperature butter and powdered sugar until light and fluffy. This should take about 2-3 minutes. Add the vanilla extract and mix until well combined.
- Combine Dry Ingredients: In a separate bowl, whisk together the all-purpose flour and salt. Gradually add this dry mixture to the butter and sugar mixture, mixing on low speed until a dough forms. Be careful not to overmix, as this can toughen the cookies.
- Roll Out the Dough: On a lightly floured surface, roll out the dough to about 1/4 inch thickness. Use a star-shaped cookie cutter to cut out cookies and place them on the prepared baking sheets, leaving a little space between each cookie.
- Chill the Dough: Transfer the baking sheets to the refrigerator for about 15 minutes to chill. This helps the cookies maintain their shape while baking.
- Bake the Cookies: Once chilled, bake the cookies in the preheated oven for 12-15 minutes or until the edges are lightly golden. Keep a close eye on them to prevent over-baking.
- Cool and Serve: Remove the cookies from the oven and let them cool on the baking sheets for a few minutes before transferring them to a wire rack to cool completely. If desired, dust with powdered sugar before serving.
Extra Tips:
For the best results, verify your butter is at room temperature before starting the recipe. This allows for better creaming with the sugar, resulting in a smoother dough.
If you find the dough too sticky to handle, you can refrigerate it for about 30 minutes before rolling it out. To add a festive touch, consider sprinkling a bit of colored sugar or edible glitter on the cookies before baking.
Finally, store your Shortbread Stars in an airtight container at room temperature to keep them fresh and delicious throughout the holiday season.
Hot Cocoa Cookies
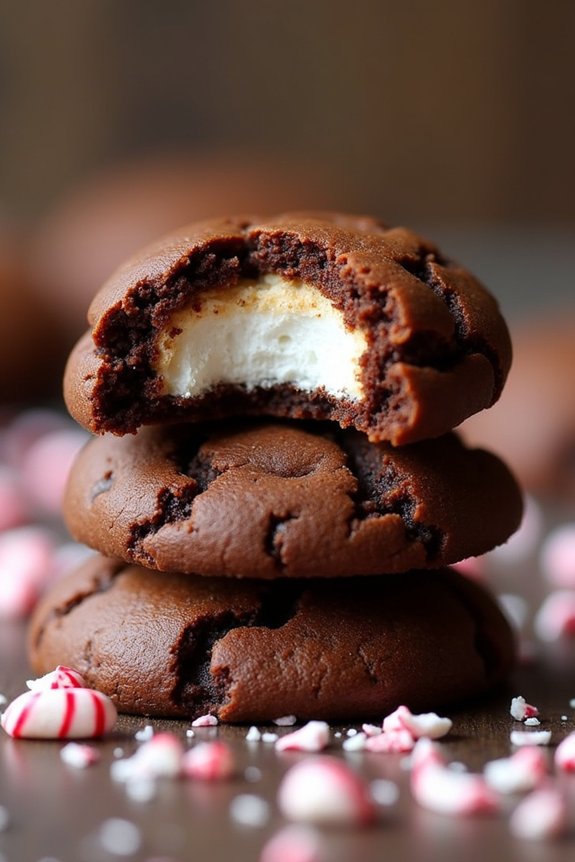
Hot Cocoa Cookies are a delightful holiday treat that captures the comforting essence of a warm cup of cocoa in a delectable cookie form. These cookies are rich, chocolaty, and topped with a gooey marshmallow, reminiscent of the classic winter beverage. Perfect for a cozy night in or a festive holiday gathering, these cookies are certain to be a hit with family and friends.
The secret to these cookies lies in the blend of rich cocoa and chocolate chips, which give them a fudgy, decadent quality. The marshmallow topping adds a soft, sweet contrast, making each bite a heavenly experience. Whether you’re looking to impress your guests or indulge in a little holiday cheer yourself, these Hot Cocoa Cookies won’t disappoint.
Ingredients (Serves 4-6):
- 1 cup unsalted butter, softened
- 1 cup granulated sugar
- 1 cup packed light brown sugar
- 2 large eggs
- 2 teaspoons vanilla extract
- 2 ¾ cups all-purpose flour
- 1 teaspoon baking soda
- ½ teaspoon salt
- ⅔ cup unsweetened cocoa powder
- 1 cup semi-sweet chocolate chips
- 12 large marshmallows, cut in half
- 1 cup mini chocolate chips (optional)
- 1 cup crushed candy canes or peppermint candies (optional)
Cooking Instructions:
- Preheat the Oven: Start by preheating your oven to 350°F (175°C). Line two baking sheets with parchment paper to guarantee your cookies don’t stick.
- Cream the Butter and Sugars: In a large mixing bowl, combine the softened butter, granulated sugar, and brown sugar. Using an electric mixer, beat until the mixture is light and fluffy, about 2-3 minutes.
- Add Eggs and Vanilla: Mix in the eggs one at a time, confirming each is fully incorporated before adding the next. Then, add the vanilla extract and mix until combined.
- Combine Dry Ingredients: In a separate bowl, whisk together the flour, baking soda, salt, and cocoa powder. Gradually add the dry ingredients to the wet ingredients, mixing until just combined.
- Fold in Chocolate Chips: Stir in the semi-sweet chocolate chips, and if desired, the mini chocolate chips for an extra chocolaty treat.
- Shape the Cookies: Using a tablespoon, scoop and shape the dough into balls and place them about 2 inches apart on the prepared baking sheets.
- Bake the Cookies: Bake the cookies for 10 minutes. After 10 minutes, remove the cookies from the oven, and quickly press a marshmallow half into the center of each cookie.
- Finish Baking: Return the cookies to the oven and bake for an additional 2-3 minutes, or until the marshmallows are slightly puffed and golden.
- Cool and Decorate: Allow the cookies to cool on the baking sheet for 5 minutes before transferring them to a wire rack. For a festive touch, sprinkle crushed candy canes or peppermint candies on top of the marshmallows while they’re still warm.
Extra Tips:
When making Hot Cocoa Cookies, be sure to use room temperature butter for easier creaming with the sugars, resulting in a better texture. The dough can be made a day in advance and stored in the refrigerator, which can enhance the flavor profile.
If you prefer a more pronounced chocolate flavor, consider using dark chocolate chips instead of semi-sweet. Additionally, to achieve a gooey marshmallow center, make sure not to overbake the cookies; they should be slightly underdone when you first place the marshmallow on top.
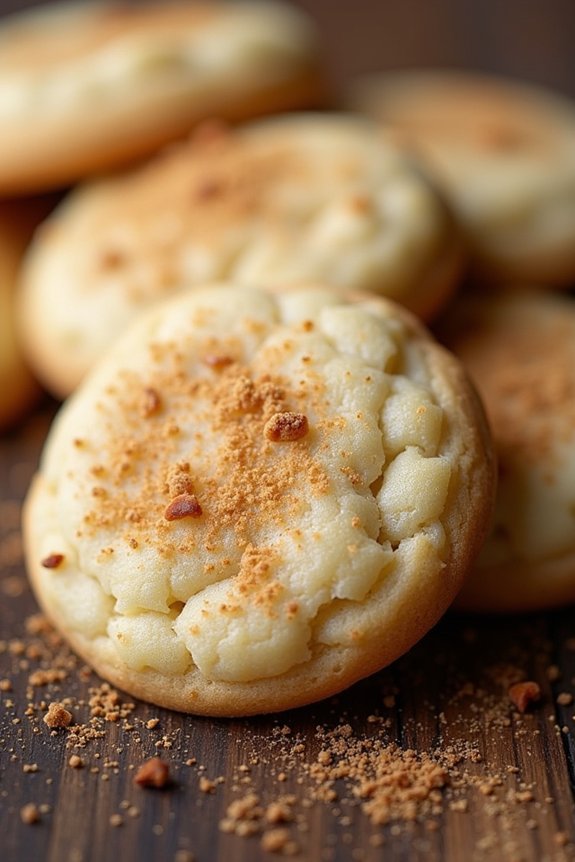
Snowball Cookies
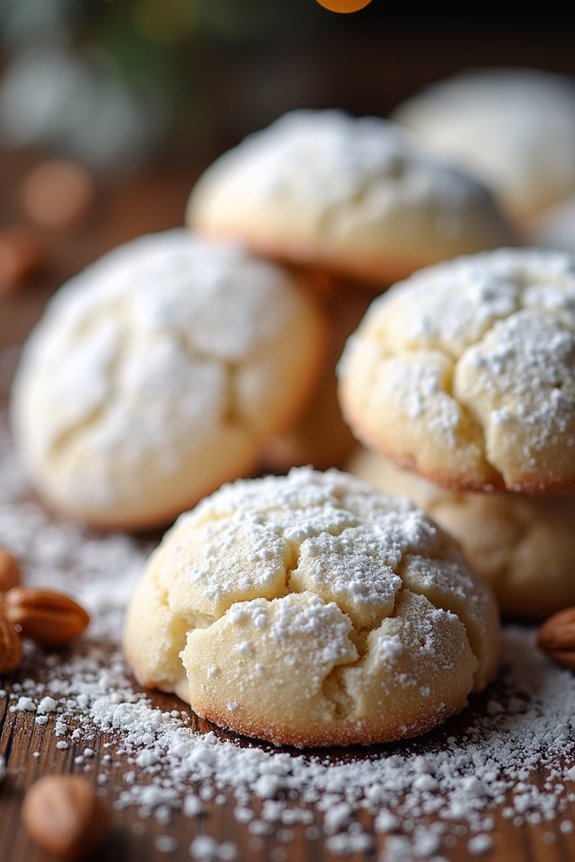
Snowball cookies, also known as Russian tea cakes or Mexican wedding cookies, are a delightful holiday treat that melt in your mouth with each bite. These buttery, nutty confections are rolled in powdered sugar to resemble little snowballs, making them a festive addition to any Christmas cookie tray. Their unique texture and rich flavor make them a favorite among cookie lovers, and they’re surprisingly easy to make with just a few simple ingredients.
Perfect for sharing at holiday gatherings or gifting to loved ones, snowball cookies offer a bite-sized burst of sweetness that pairs perfectly with a cup of hot cocoa or tea. This recipe yields enough to serve 4-6 people, guaranteeing that everyone gets a taste of this classic holiday favorite. Gather your ingredients and set aside some time this holiday season to create a batch of these delightful cookies.
Ingredients for Snowball Cookies (serving size: 4-6 people):
- 1 cup (2 sticks) unsalted butter, softened
- 1/2 cup powdered sugar, plus more for dusting
- 1 teaspoon vanilla extract
- 2 1/4 cups all-purpose flour
- 1/4 teaspoon salt
- 1 cup finely chopped nuts (pecans or walnuts work best)
Cooking Instructions:
1. Preheat the Oven:
Begin by preheating your oven to 350°F (175°C). This guarantees that your oven is at the right temperature when you’re ready to bake the cookies.
2. Cream the Butter and Sugar:
In a large mixing bowl, cream together the softened butter and 1/2 cup powdered sugar until the mixture is light and fluffy. This process incorporates air into the mixture, contributing to the cookies’ tender texture.
3. Add Vanilla Extract:
Stir in the vanilla extract to the butter and sugar mixture. This adds a subtle depth of flavor to the cookies.
4. Mix Dry Ingredients:
In a separate bowl, whisk together the all-purpose flour and salt. This helps to evenly distribute the salt throughout the flour.
5. Combine Wet and Dry Ingredients:
Gradually add the dry ingredients to the butter mixture, mixing well after each addition. The dough will become thick and crumbly.
6. Incorporate Nuts:
Fold in the finely chopped nuts until evenly distributed throughout the dough. The nuts add a delightful crunch to the cookies.
7. Form Cookies:
Roll the dough into 1-inch balls and place them on an ungreased baking sheet, about 1 inch apart. The cookies won’t spread much during baking.
8. Bake:
Bake the cookies in the preheated oven for 12-15 minutes, or until the bottoms are light golden brown. Be careful not to overbake as they can become dry.
9. Cool and Coat:
Allow the cookies to cool on the baking sheet for 5 minutes, then transfer them to a wire rack. While still warm, roll the cookies in additional powdered sugar until well coated.
10. Final Dusting:
Once the cookies are completely cooled, give them another dusting of powdered sugar for a beautiful snowy appearance.
Extra Tips:
For the best flavor, use fresh nuts and chop them finely to guarantee they’re evenly distributed throughout the dough. If you prefer a stronger nut flavor, consider toasting the nuts lightly before chopping.
When rolling the cookies in powdered sugar, do so while they’re still warm to guarantee the sugar adheres well. For a fun variation, try adding a hint of cinnamon to the powdered sugar for coating.
To keep your snowball cookies fresh, store them in an airtight container at room temperature for up to a week. Enjoy these delightful treats with family and friends during the holiday season!