

Halloween is creeping up, and I’ve conjured up some culinary magic for you that’s way more exciting than just candy. Picture a table filled with Ghostly Marshmallow Pops, Monster Eye Cupcakes, and Spooky Spider Pizza. Each dish is a delightful blend of creativity and flavor. Whether you’re planning a party or just want to add some festive flair to your day, these recipes are sure to enchant both kids and adults. Ready to discover the tasty magic behind these treats?
Ghostly Marshmallow Pops
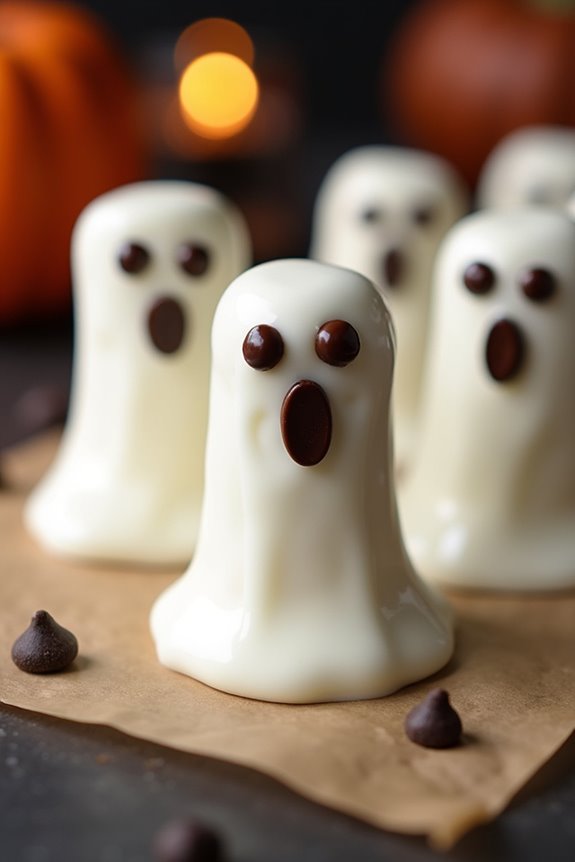
Get ready to thrill your Halloween guests with these delightfully spooky Ghostly Marshmallow Pops. Perfect for a party or a fun activity with the kids, these treats are as fun to make as they’re to eat. The combination of fluffy marshmallows, creamy white chocolate, and adorable ghostly faces will conjure up smiles and satisfy sweet cravings.
Plus, they’re easy enough for even little goblins to help assemble, making them a perfect family-friendly activity. These marshmallow pops aren’t only delicious but also visually enchanting. The key is in the details—from the smooth coating of white chocolate to the precise placement of the chocolate chip eyes and mouth that give each pop its own unique personality.
This recipe yields enough for 4-6 people, making it ideal for small gatherings, or you can easily scale it up for larger parties. Let’s get started on these hauntingly tasty treats!
Ingredients for 4-6 people:
- 12 large marshmallows
- 1 cup white chocolate chips
- 1 tablespoon coconut oil
- 24 mini chocolate chips (for eyes)
- 12 lollipop sticks
- Wax paper
- Optional: Edible black food marker
Cooking Instructions:
- Prepare the Marshmallows: Begin by inserting a lollipop stick into each marshmallow, taking care to push it in only about halfway to make sure they stay secure.
- Melt the White Chocolate: In a microwave-safe bowl, combine the white chocolate chips and coconut oil. Microwave in 30-second intervals, stirring after each, until the chocolate is completely melted and smooth. Be careful not to overheat, as this can cause the chocolate to seize.
- Coat the Marshmallows: Dip each marshmallow into the melted white chocolate, using a spoon to help coat them evenly. Allow any excess chocolate to drip back into the bowl.
- Create the Ghost Faces: While the chocolate is still soft, press two mini chocolate chips onto each marshmallow to create the eyes. Use a third mini chocolate chip to make a circular mouth, giving each pop its ghostly expression.
- Set the Pops: Place the decorated marshmallows on a sheet of wax paper and allow them to set completely. You can speed up this process by placing them in the refrigerator for about 10-15 minutes.
- Add Final Touches: If you want more detailed ghostly features, use an edible black food marker to draw additional details like eyebrows or a spooky mouth.
Extra Tips:
For best results, make sure the white chocolate is at the right consistency—not too thick—to create a smooth coating on the marshmallows. If it begins to thicken as you work, return it to the microwave for a few seconds to loosen it up.
When applying the chocolate chips for the eyes and mouth, do so promptly while the chocolate coating is still soft to make sure they adhere properly. If you’re planning to make these ahead of time, store them in an airtight container to maintain freshness and prevent the chocolate from becoming sticky.
Enjoy your ghostly creations!
Monster Eye Cupcakes
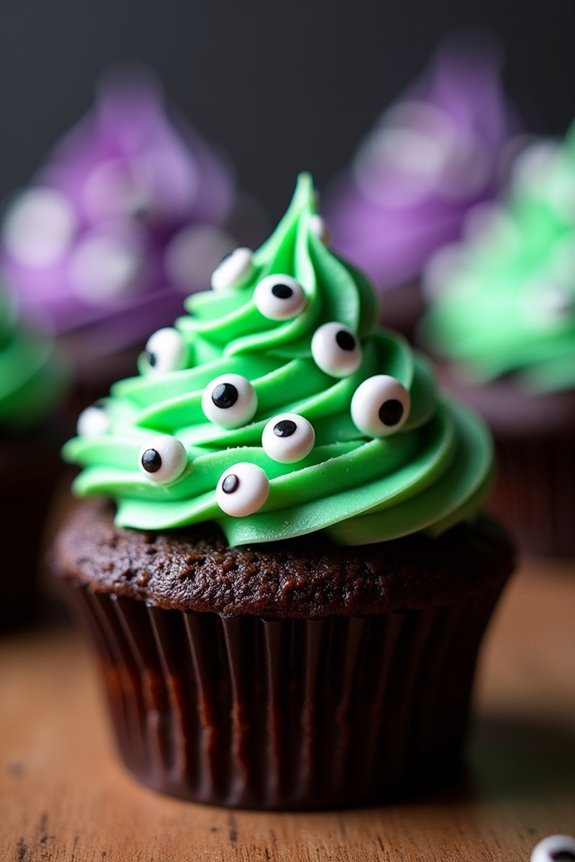
Monster Eye Cupcakes are a fun and spooky treat perfect for Halloween parties or any eerie gathering. These cupcakes aren’t only delightful to look at but also delicious to devour. With their whimsical monster eye decoration, they’re sure to be a hit among both children and adults. The combination of moist chocolate cupcakes topped with colored frosting and candy eyes creates a perfect blend of flavors and textures, making them an irresistible treat.
Creating Monster Eye Cupcakes involves baking a batch of chocolate cupcakes, whipping up a colorful frosting, and embellishing them with candy eyes to achieve that ‘monster’ look. This recipe is designed to serve 4-6 people, making it ideal for a small gathering or family treat. Whether you’re a seasoned baker or a novice in the kitchen, this recipe is simple to follow and assures a monstrous success.
Ingredients for Monster Eye Cupcakes (Serves 4-6):
- 1 cup all-purpose flour
- 1 cup granulated sugar
- 1/3 cup unsweetened cocoa powder
- 1/2 teaspoon baking soda
- 1/4 teaspoon baking powder
- 1/4 teaspoon salt
- 1/2 cup vegetable oil
- 1/2 cup buttermilk
- 1 large egg
- 1 teaspoon vanilla extract
- 1/2 cup boiling water
- 2 cups confectioners’ sugar
- 1/2 cup unsalted butter, softened
- 2 tablespoons heavy cream
- Food coloring (green, purple, or any desired color)
- Candy eyes
Cooking Instructions:
- Preheat and Prepare: Preheat your oven to 350°F (175°C). Line a muffin tin with cupcake liners to prevent sticking and guarantee easy removal after baking.
- Mix Dry Ingredients: In a large mixing bowl, combine the all-purpose flour, granulated sugar, unsweetened cocoa powder, baking soda, baking powder, and salt. Whisk together until well blended.
- Combine Wet Ingredients: In another bowl, whisk together the vegetable oil, buttermilk, egg, and vanilla extract until smooth.
- Create Batter: Gradually add the wet ingredients to the dry ingredients, stirring until just combined. Carefully stir in the boiling water until the batter is smooth and slightly thin.
- Bake Cupcakes: Pour the batter evenly into the cupcake liners, filling each about two-thirds full. Bake in the preheated oven for 18-20 minutes, or until a toothpick inserted into the center of a cupcake comes out clean. Allow them to cool completely on a wire rack.
- Prepare Frosting: While the cupcakes cool, make the frosting. In a large bowl, beat the softened butter until creamy. Gradually add confectioners’ sugar and heavy cream, mixing until smooth. Divide the frosting into separate bowls and add a few drops of food coloring to each, mixing to achieve the desired shades.
- Frost and Decorate: Once the cupcakes are cool, spread or pipe the colored frosting onto each cupcake. Finish by placing candy eyes on top of the frosting to create the monster eyes effect.
Extra Tips:
For the best result, verify that all your ingredients are at room temperature before you start mixing. This will help the batter come together smoothly and guarantee even baking.
If you want to vary the look of the cupcakes, consider using different sizes and colors of candy eyes. Additionally, you can add a dash of cinnamon or instant coffee to the batter for a flavor variation.
Keep the cupcakes stored in an airtight container to maintain freshness. Enjoy creating these spooktacular treats!
Spooky Spider Pizza
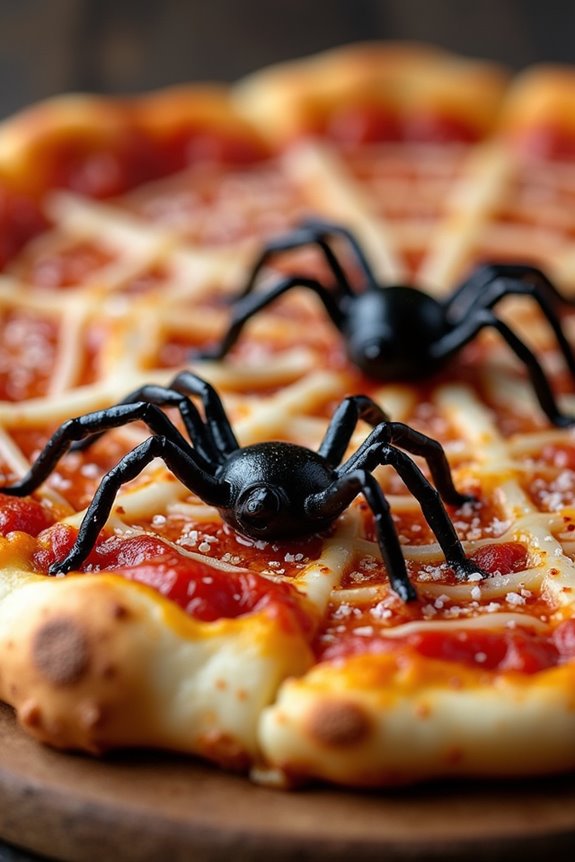
If you’re looking to add a creepy yet delicious twist to your Halloween menu, the Spooky Spider Pizza is the perfect choice. This dish combines the classic flavors of a traditional pizza with a fun, festive design that’s sure to delight both kids and adults. Imagine a pizza that looks like a web, with olive spiders crawling across the surface—it’s a guaranteed hit at any Halloween party. Not only is it visually appealing, but it also offers a delightful mix of tangy tomato sauce, gooey cheese, and your favorite toppings.
Creating a Spooky Spider Pizza isn’t only fun, but it’s also a chance to get creative in the kitchen. You can customize the toppings to suit your taste, whether you prefer pepperoni, veggies, or something more adventurous. The key to this recipe is in the decoration—using black olives to form the spiders and string cheese to create the web effect. This dish serves 4-6 people, making it an ideal option for a small gathering or family dinner on Halloween night.
Ingredients for 4-6 servings:
- 1 pound pizza dough
- 1 cup tomato sauce
- 2 cups shredded mozzarella cheese
- 1/2 cup sliced black olives
- 8 whole black olives
- 1/4 cup grated Parmesan cheese
- 2 sticks of string cheese
- Pepperoni slices (optional)
- Olive oil for brushing
- Flour for dusting
Cooking Instructions:
- Prepare the Dough: Preheat your oven to 475°F (245°C). Lightly flour your work surface and roll out the pizza dough to your desired thickness. Transfer the dough to a baking sheet or pizza stone.
- Add the Sauce and Cheese: Spread the tomato sauce evenly over the surface of the dough, leaving a small border around the edges for the crust. Sprinkle the shredded mozzarella cheese evenly over the sauce.
- Create the Spider Web: Tear the string cheese into thin strips and arrange them on top of the pizza in a web-like pattern. This step will create the spooky web design.
- Make the Spiders: Cut the whole black olives in half lengthwise. Use one half for the spider’s body and slice the other half into thin strips for the legs. Place the olive bodies strategically on the pizza, then arrange the olive strips around each body to form the legs.
- Add Additional Toppings: If desired, place pepperoni slices or any additional toppings around the olive spiders, confirming they don’t overlap with your web design.
- Bake the Pizza: Brush the edges of the crust with olive oil for a golden finish, and sprinkle the grated Parmesan cheese over the entire pizza. Place the pizza in the preheated oven and bake for 12-15 minutes, or until the crust is golden brown and the cheese is bubbly.
- Serve and Enjoy: Remove the pizza from the oven and let it cool slightly. Slice and serve your Spooky Spider Pizza to delighted guests.
Extra Tips:
For an extra crispy crust, consider pre-baking the pizza dough for 5 minutes before adding the toppings. This step will guarantee your crust is perfectly cooked and sturdy enough to hold all the Halloween decorations.
If you want to add a bit more flavor, consider adding some garlic powder or Italian seasoning to the olive oil before brushing it on the crust. Finally, feel free to experiment with different cheeses or use a combination of cheeses for added depth in flavor. Enjoy your spooky creation!
Mummy Hot Dogs

Mummy Hot Dogs are a fun and spooky treat that are perfect for Halloween parties or a festive dinner with family and friends. These adorable creations are fundamentally hot dogs wrapped in crescent roll dough to resemble mummies, with tiny mustard or ketchup eyes giving them a playful personality. Not only are they visually appealing, but they’re also incredibly easy to make, making them an ideal choice for anyone looking to add a touch of Halloween spirit to their meal without spending hours in the kitchen.
This recipe for Mummy Hot Dogs yields a serving size of 4-6 people, depending on how many mummies you’d like for each guest. The combination of savory hot dogs with the buttery, flaky crescent dough is sure to be a hit with both kids and adults alike. Best of all, you can customize the recipe by including cheese or various condiments, making it a versatile dish to suit any preference.
Ingredients:
- 8 hot dogs
- 1 can (8 oz) refrigerated crescent roll dough
- Mustard or ketchup for eyes
- Optional: slices of cheese
Cooking Instructions:
- Preheat the Oven: Preheat your oven to 375°F (190°C) to make sure it’s hot enough for baking the mummy hot dogs to a perfect golden brown.
- Prepare the Dough: Unroll the crescent roll dough and separate it into individual triangles. Using a knife or pizza cutter, slice each triangle into thin strips, about 1/4 inch wide. These will be used to wrap around the hot dogs, creating the mummy effect.
- Wrap the Hot Dogs: Take one hot dog and start wrapping the dough strips around it, leaving a small gap near the top for the eyes. Overlap the dough slightly as you wrap to mimic the look of bandages. If you’re using cheese, place a small slice on the hot dog before wrapping it with dough.
- Arrange on Baking Sheet: Place the wrapped hot dogs on an ungreased baking sheet, with the seam side down to make sure they don’t unwrap during baking.
- Bake: Place the baking sheet in the preheated oven and bake for 12-15 minutes, or until the dough is golden brown and cooked through.
- Add the Eyes: Remove the mummy hot dogs from the oven and allow them to cool for a few minutes. Using mustard or ketchup, dot small eyes onto the exposed areas of the hot dogs to give them their mummy-like appearance.
Extra Tips:
When making Mummy Hot Dogs, consider using cocktail sausages or vegetarian hot dogs as alternatives if you’re catering to dietary preferences.
For an extra cheesy twist, add a slice of cheese under the dough before wrapping.
Make sure the dough is evenly wrapped to prevent any areas from being undercooked.
If you’re preparing these for a party, you can make them a few hours in advance and reheat them quickly in the oven when your guests arrive.
Enjoy these delightful and spooky treats as part of your Halloween festivities!
Witch’s Brew Punch

Halloween isn’t just about the costumes and spooky decorations; it’s also about the eerie and enchanting treats that make the celebration complete. One such concoction that’s sure to thrill your guests and add a magical touch to your Halloween gathering is the Witch’s Brew Punch. This vibrant, bubbling beverage is as delicious as it’s visually striking, making it a must-have for any Halloween party.
The punch is a delightful blend of fruity flavors, with a hint of fizz to mimic the magical brews often associated with witches’ cauldrons. Creating Witch’s Brew Punch is as fun as it’s simple, making it an excellent choice for both seasoned mixologists and those new to creating themed drinks.
It’s a versatile recipe that can be easily customized to suit your taste preferences or dietary needs. Whether you’re hosting a large gathering or a small family get-together, this punch is sure to cast a spell on your guests, leaving them enchanted by its taste and presentation.
Ingredients for 4-6 Servings:
- 2 cups pineapple juice
- 2 cups orange juice
- 2 cups ginger ale
- 1 cup grape juice
- 1/2 cup lemon-lime soda
- 1/4 cup grenadine
- 1 cup of ice cubes
- Gummy worms or other Halloween-themed candies for garnish
- Optional: Dry ice for special effects (handle with care)
Instructions:
- Prepare the Base: Begin by chilling all the liquid ingredients in the refrigerator for at least an hour. This guarantees that your punch will be cool and ready to serve immediately.
- Mix the Juices: In a large punch bowl, combine the pineapple juice, orange juice, grape juice, and ginger ale. Stir gently with a large spoon to blend the flavors without losing the fizz from the ginger ale.
- Add the Fizz: Pour in the lemon-lime soda and grenadine. Stir slowly to incorporate them into the juice mixture. The grenadine will give the punch a deep, blood-red hue, perfect for Halloween.
- Add Ice and Garnish: Add the ice cubes to the punch to keep it cold. Then, float gummy worms or other Halloween-themed candies on top for a spooky touch.
- Optional Special Effects: If you’re using dry ice, carefully add a small piece to the punch for a foggy, bubbling effect. Make sure that the dry ice doesn’t come into direct contact with the liquid or is consumed. Use a slotted spoon to remove any remaining dry ice before serving.
Extra Tips:
When using dry ice, make sure to handle it with gloves or tongs as it can cause severe burns if touched directly. Always allow the dry ice to sublimate completely before serving the punch to guarantee safety.
Additionally, you can experiment with different fruit juices or sodas to customize the flavor of your Witch’s Brew Punch. For a non-alcoholic version, avoid any adult-friendly additions, keeping the drink family-friendly and suitable for all ages.
Candy Corn Parfaits
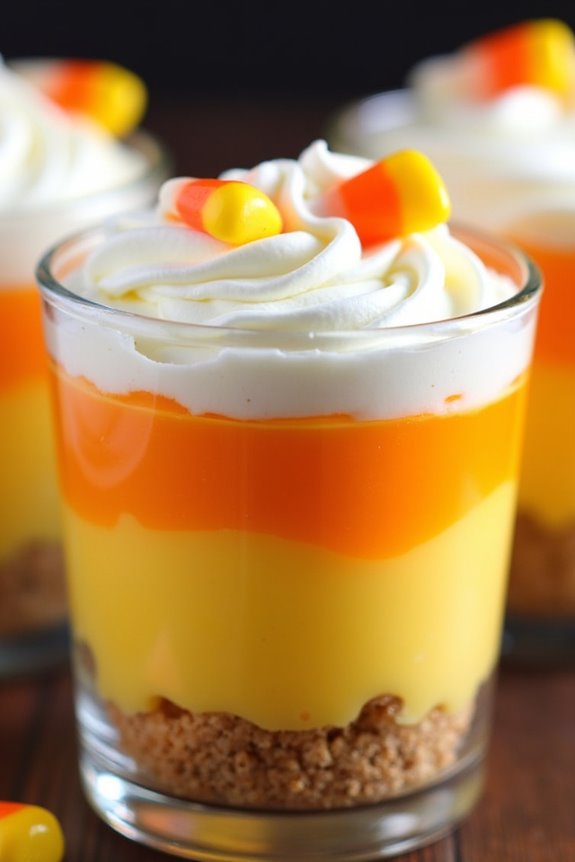
Candy Corn Parfaits are a festive and delightful treat perfect for Halloween celebrations. This layered dessert is visually appealing with its vibrant colors mimicking the classic candy corn. The parfait combines creamy layers with a touch of sweetness, making it a hit with both kids and adults.
Whether you’re hosting a Halloween party or simply want to enjoy a themed dessert, these parfaits are easy to assemble and will definitely impress your guests.
The base of this dessert is a smooth and rich pudding, layered with whipped cream and accented by vibrant yellow, orange, and white hues. The combination of flavors and textures creates a delightful experience with each spoonful. Prepare these ahead of time and store them in the refrigerator for a quick and easy dessert that will add a touch of Halloween spirit to your table.
Ingredients (Serves 4-6):
- 1 package (3.4 oz) instant vanilla pudding mix
- 2 cups cold milk
- Red and yellow food coloring
- 1 cup whipped cream or whipped topping
- 1 cup candy corn
- 1 cup crushed graham crackers
- 4-6 clear cups or parfait glasses
Instructions:
- Prepare the Pudding: In a medium-sized bowl, combine the instant vanilla pudding mix with cold milk. Whisk for about 2 minutes until the pudding thickens. Let it stand for 5 minutes to set.
- Color the Pudding: Divide the pudding evenly into two separate bowls. Add a few drops of yellow food coloring to one bowl and mix until you achieve a bright yellow color. In the second bowl, add a combination of red and yellow food coloring to create an orange hue. Stir well to guarantee even coloring.
- Layer the Parfaits: Start by adding a layer of crushed graham crackers at the bottom of each glass, distributing evenly. Next, spoon the yellow pudding over the graham cracker layer. Follow with a layer of whipped cream, then add the orange pudding. Finish with another layer of whipped cream on top.
- Decorate with Candy Corn: Gently place a few pieces of candy corn on top of each parfait for decoration. This will enhance the candy corn theme and add a bit of crunch.
- Chill the Parfaits: Refrigerate the parfaits for at least 30 minutes before serving. This allows the flavors to meld and the dessert to firm up slightly.
Extra Tips:
For best results, use clear glasses or cups so the vibrant layers are visible, enhancing the visual appeal of the dessert. You can prepare these parfaits a few hours in advance, but avoid adding the candy corn too early as it may become sticky.
If you prefer a lighter dessert, substitute the whipped cream with a lighter whipped topping. Feel free to get creative with the layers by adding additional elements like crumbled cookies or chocolate chips for extra flavor and texture.
Jack-O’-Lantern Quesadillas
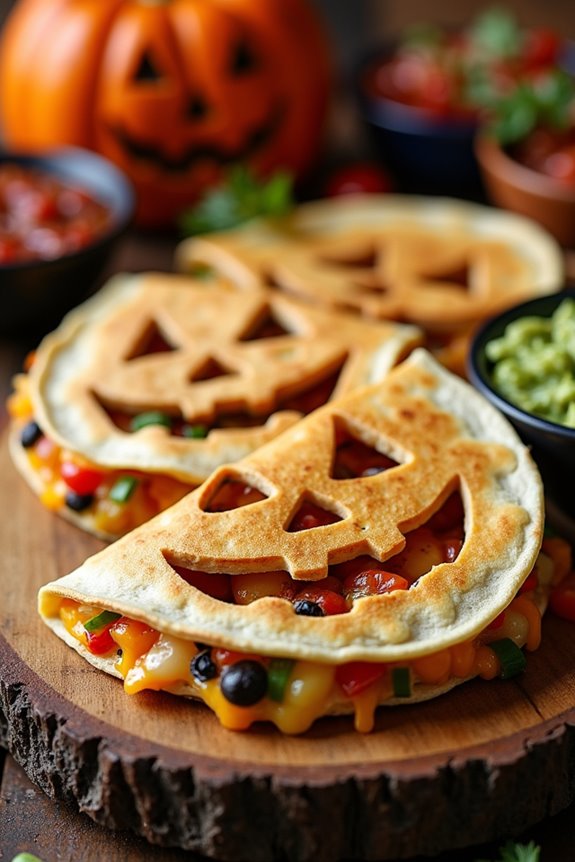
Jack-O’-Lantern Quesadillas are a fun and festive way to celebrate Halloween with a delicious twist. These cheesy delights are carved to resemble the classic Halloween pumpkin face, making them a hit at any spooky gathering. Not only do they bring a playful element to your Halloween menu, but they’re also incredibly simple to prepare, making them perfect for a quick snack or a party platter.
The quesadillas are filled with a blend of gooey cheese and your choice of additional fillings like chicken, beans, or vegetables. The outer layer, made from flour tortillas, is carved to create the face of a Jack-O’-Lantern, adding a creative touch to your Halloween festivities. Serve them hot with salsa or guacamole for a complete treat that’s sure to delight both kids and adults alike.
Ingredients (Serving Size: 4-6 people):
- 8 large flour tortillas
- 2 cups shredded cheddar cheese
- 1 cup cooked shredded chicken (optional)
- 1/2 cup black beans, rinsed and drained (optional)
- 1/2 cup diced bell peppers (optional)
- 1/4 cup chopped green onions
- 2 tablespoons butter
- Salsa, for serving
- Guacamole, for serving
Cooking Instructions:
- Prepare Ingredients: Begin by gathering all your ingredients. If you’re using optional fillings like chicken or beans, verify they’re cooked and ready to go.
- Carve the Faces: On four of the tortillas, use a sharp knife to cut out Jack-O’-Lantern faces. You can create eyes, a nose, and a mouth to give them a spooky look. Be careful while cutting to avoid tearing the tortilla.
- Assemble the Quesadillas: Lay out the remaining four tortillas on a flat surface. Sprinkle half of the cheese evenly over these tortillas. Add your optional fillings like chicken, beans, and bell peppers on top of the cheese. Finish with a sprinkle of the remaining cheese and chopped green onions.
- Top with Carved Tortillas: Place the carved tortillas on top of the filling-covered tortillas, aligning the edges.
- Cook the Quesadillas: Heat a large skillet over medium heat and add a small amount of butter. Place a quesadilla in the skillet and cook for 2-3 minutes on each side, or until the cheese is melted and the tortillas are golden brown. Repeat with the remaining quesadillas, adding more butter to the skillet as needed.
- Serve: Once cooked, remove the quesadillas from the skillet and cut them into triangles. Serve immediately with salsa and guacamole on the side.
Extra Tips:
For an extra crispy texture, you can lightly brush the tortillas with olive oil before cooking. If you’re serving a crowd, keep the cooked quesadillas warm in a 200°F (93°C) oven while you prepare the remaining batches.
Feel free to get creative with the fillings, or even let guests create their own combinations for a fun interactive meal. Adjust the level of spiciness by adding jalapeños or a spicy salsa to your quesadillas.
Bloody Finger Cookies

Creating a spooky treat for Halloween can be both fun and delicious with these Bloody Finger Cookies. These cookies are shaped like creepy, realistic fingers and are perfect for adding a touch of gory delight to your Halloween festivities. Not only do they look frightfully fantastic, but they also taste scrumptious, with a buttery, almond-flavored shortbread base and a hint of sweet jam that mimics blood. This recipe will guide you through crafting these delectable yet eerie cookies, making sure they’re the highlight of your Halloween spread.
Bloody Finger Cookies are a great addition to any Halloween party menu, bringing a sense of whimsy and fright to the table. The dough is easy to work with, allowing you to sculpt the fingers to your desired level of spookiness. The almond nails and red jam add the perfect finishing touches to make these cookies as visually appealing as they’re tasty.
Let’s explore the ingredients and step-by-step instructions needed to prepare a batch of these creepy cookies for a crowd of 4 to 6 people.
Ingredients (serving size: 4-6 people):
- 1 cup unsalted butter, softened
- 1 cup powdered sugar
- 1 large egg
- 1 teaspoon almond extract
- 1 teaspoon vanilla extract
- 2 2/3 cups all-purpose flour
- 1 teaspoon baking powder
- 1 teaspoon salt
- 3/4 cup whole blanched almonds
- 1/2 cup raspberry or strawberry jam
Cooking Instructions:
- Preheat the Oven: Start by preheating your oven to 325°F (165°C). This guarantees that your oven is at the right temperature once you finish preparing the cookie dough.
- Mix the Wet Ingredients: In a large bowl, cream together the softened butter and powdered sugar until fluffy. Add the egg, almond extract, and vanilla extract, mixing well until all ingredients are combined.
- Combine the Dry Ingredients: In a separate bowl, whisk together the flour, baking powder, and salt. Gradually add the dry ingredients to the wet mixture, stirring until a dough forms.
- Shape the Fingers: Take a small amount of dough and roll it into a thin log, about the length and width of a finger. Shape to resemble a finger by pinching and forming knuckles and joints. Repeat with the remaining dough.
- Add the Almond Nails: Press a whole blanched almond into one end of each cookie to create a fingernail. Use a knife to make light cuts in the dough, simulating knuckles and creases.
- Bake the Cookies: Place the shaped cookies on a baking sheet lined with parchment paper. Bake for 20-25 minutes or until the cookies are lightly golden.
- Add the Bloody Effect: Once baked, remove the almonds, place a small amount of jam in the spot, and then press the almond back into place. This will create the appearance of blood oozing from underneath the nail.
- Cool and Serve: Allow the cookies to cool completely on a wire rack before serving them to your guests.
Extra Tips:
For the most realistic effect, take your time shaping each finger and adding knuckle creases. You can use a toothpick or small knife to add extra details, such as lines and wrinkles, for a more realistic look.
Be sure to use a jam with a vibrant color for that perfect bloody appearance. If you want to make the cookies ahead of time, store them in an airtight container to maintain freshness.
These cookies are sure to be a hit at any Halloween gathering, delighting both kids and adults with their spooky charm.
Creepy Crawly Chocolate Bark
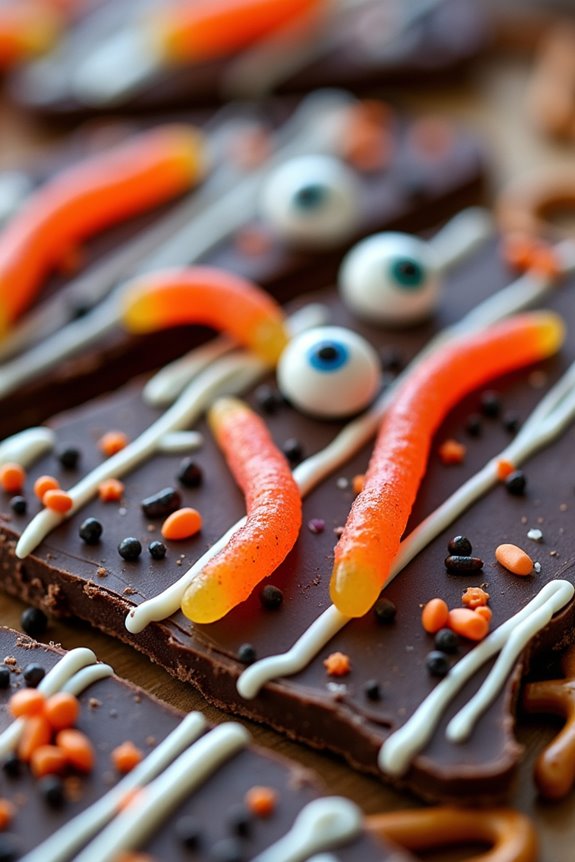
Looking for a spooky yet delicious treat to make this Halloween? Try your hand at Creepy Crawly Chocolate Bark, a festive and fun dessert that will surely add a touch of eerie delight to your holiday celebrations.
This chocolate bark isn’t only simple to prepare but also allows for creativity as you can customize it with a variety of toppings to suit your Halloween theme. Whether you’re hosting a party or simply want to surprise your family with a hauntingly delightful dessert, this recipe is perfect for getting into the spooky spirit.
Creepy Crawly Chocolate Bark is a fantastic way to get the kids involved in the kitchen as well. With its colorful and creepy toppings like gummy worms and candy eyeballs, this treat is as fun to make as it’s to eat.
The combination of rich dark chocolate and playful candies creates a perfect balance of flavors and textures. The best part is, you can whip up a batch in no time and store it for whenever you need a sweet, spooky snack.
Ingredients for 4-6 servings:
- 16 ounces of dark chocolate, chopped
- 1 cup of white chocolate chips
- ½ cup of gummy worms
- ½ cup of candy eyeballs
- ¼ cup of orange and black sprinkles
- ¼ cup of crushed pretzels
Cooking Instructions:
- Prepare the Baking Sheet: Line a baking sheet with parchment paper. This will prevent the chocolate from sticking and make it easier to remove the bark once set.
- Melt the Dark Chocolate: Using a double boiler, melt the dark chocolate over medium heat, stirring continuously until smooth. Alternatively, you can melt the chocolate in the microwave in 30-second intervals, stirring in between until fully melted.
- Spread the Chocolate: Pour the melted dark chocolate onto the prepared baking sheet, spreading it evenly with a spatula to about 1/4-inch thickness.
- Melt the White Chocolate: Melt the white chocolate chips using the same method as the dark chocolate. Once melted, drizzle it over the dark chocolate base in a zigzag pattern.
- Add Toppings: While the chocolate is still warm, sprinkle the gummy worms, candy eyeballs, orange and black sprinkles, and crushed pretzels evenly over the surface.
- Set the Chocolate: Place the baking sheet in the refrigerator for about 1 hour or until the chocolate is completely set and firm.
- Break into Pieces: Once set, remove the bark from the refrigerator and break it into irregular pieces. Serve immediately or store in an airtight container for later.
Extra Tips:
For a more vibrant look, consider adding colored candy melts to the chocolate drizzle. To prevent the chocolate from seizing, make sure no water comes into contact with it during the melting process.
Additionally, you can customize the chocolate bark by replacing gummy worms with other Halloween-themed candies or adding nuts for extra crunch. If you’re short on time, using pre-mixed Halloween candy assortments can be a quick alternative for toppings.
Enjoy your Creepy Crawly Chocolate Bark with a side of spooky fun!
Frankenstein Rice Krispie Treats
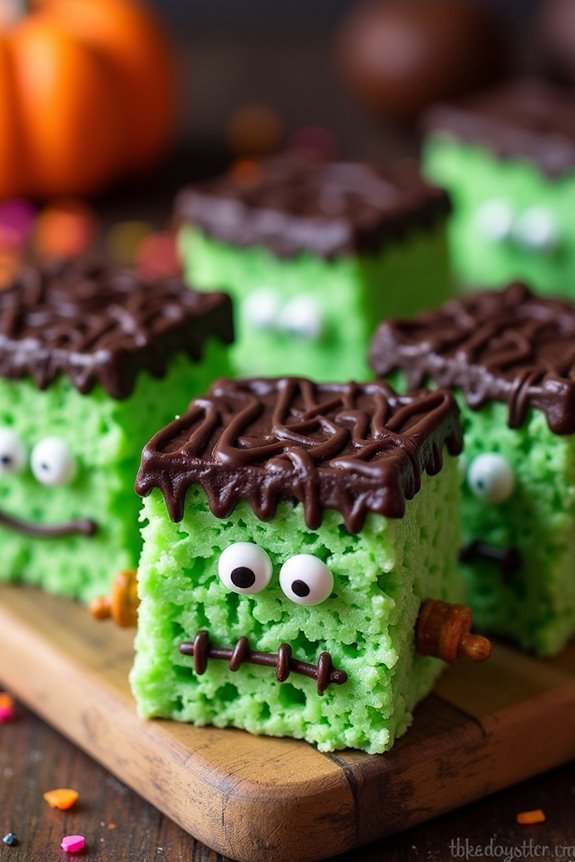
Frankenstein Rice Krispie Treats are a spooky twist on the classic cereal treat, perfect for Halloween festivities. These gooey, marshmallowy squares are transformed into cute little Frankensteins with the help of green food coloring, chocolate, and some creative decorating. Ideal for both kids and adults, these treats are as fun to make as they’re to eat.
They’re great for Halloween parties, school events, or just a festive treat to enjoy at home. Creating these Frankenstein Rice Krispie Treats involves a few simple steps and some basic decorating skills, making them a great project for the whole family. Not only do they capture the spirit of Halloween, but they also offer a deliciously sweet and crunchy texture that everyone loves.
With a serving size that caters to 4-6 people, this recipe guarantees there’s plenty to go around for all the little ghouls and goblins at your gathering.
Ingredients (Serves 4-6)
- 3 tablespoons unsalted butter
- 6 cups miniature marshmallows
- 1/2 teaspoon vanilla extract
- Green food coloring
- 6 cups Rice Krispies cereal
- 1 cup semi-sweet chocolate chips
- Black decorating gel
- Candy eyes
- Mini pretzel sticks
Cooking Instructions
- Prepare the Pan: Line a 9×13-inch baking pan with parchment paper, leaving some overhang on the sides for easy removal of the treats later.
- Melt Butter and Marshmallows: In a large saucepan, melt the butter over low heat. Add the marshmallows and stir continuously until they’re completely melted and smooth. Stir in the vanilla extract.
- Add Color: Remove the saucepan from the heat and add green food coloring, a few drops at a time, until you achieve the desired shade of Frankenstein green. Stir well to mix the color evenly.
- Combine with Cereal: Gradually add the Rice Krispies cereal to the marshmallow mixture, stirring until all the cereal is well coated.
- Transfer to Pan: Pour the mixture into the prepared pan and use a greased spatula or wax paper to press the mixture evenly into the pan. Let it cool for about 30 minutes.
- Cut and Decorate: Once set, lift the treats from the pan using the parchment paper overhang. Cut into squares. Melt the chocolate chips in a microwave-safe bowl in 30-second intervals, stirring in between, until smooth. Dip the top of each square into the melted chocolate to create Frankenstein’s hair.
- Add Facial Features: Use the black decorating gel to add a mouth and any other facial details you like. Attach candy eyes onto the chocolate hair while it’s still soft. Break pretzel sticks in half and insert them into the sides for Frankenstein’s bolts.
Extra Tips
For the best results, make sure your marshmallows are fresh; stale marshmallows won’t melt as smoothly. When adding the food coloring, remember that a little goes a long way, so start with a few drops and gradually add more until you reach the desired shade.
If you prefer a darker chocolate for the hair, you can substitute semi-sweet chocolate chips with dark chocolate. Finally, make sure to decorate the treats while the chocolate is still soft to ascertain the candy eyes and other decorations stick well. Enjoy your monstrous creations!
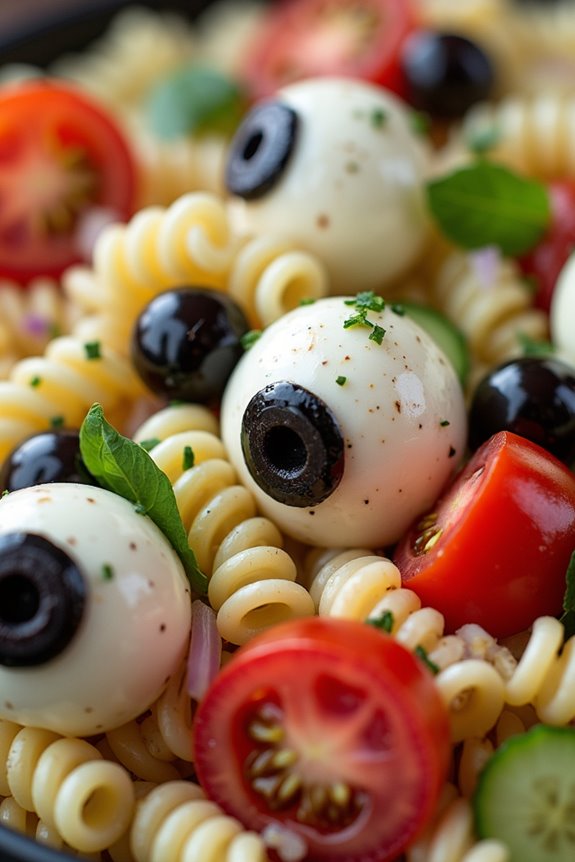
Eyeball Pasta Salad
Eyeball Pasta Salad is a fun and spooky dish perfect for Halloween gatherings. This dish combines the classic flavors of a pasta salad with a creepy twist, making it a hit at any Halloween party.
With its unique presentation, the Eyeball Pasta Salad will both delight and spook your guests, making for an unforgettable dish that’s as delicious as it’s eerie.
The dish consists of tender pasta, fresh vegetables, and a creamy dressing, all topped with eerie eyeball decorations made from mozzarella balls and olives. The contrast of flavors and textures will tantalize your taste buds while the visual appeal will set the perfect Halloween mood.
This recipe is designed to serve 4-6 people, making it ideal for small gatherings or family dinners around the spooky season.
Ingredients:
- 12 oz rotini pasta
- 1 cup cherry tomatoes, halved
- 1/2 cup black olives, sliced
- 1/2 cup green olives, sliced
- 1 cup mozzarella balls
- 1/2 cucumber, sliced
- 1/4 cup red onion, finely chopped
- 1/2 cup Italian dressing
- 1 tablespoon fresh basil, chopped
- 1 teaspoon salt
- 1/2 teaspoon black pepper
Cooking Instructions:
1. Cook the Pasta: Begin by bringing a large pot of salted water to a boil. Add the rotini pasta and cook according to package instructions until al dente.
Once cooked, drain the pasta and rinse it under cold water to stop the cooking process. Set aside to cool.
2. Prepare the Eyeballs: While the pasta is cooling, prepare the mozzarella eyeballs. Take each mozzarella ball and carefully press a slice of black olive into the center to create the appearance of an eyeball. Set these aside for later use.
3. Combine Ingredients: In a large mixing bowl, combine the cooled pasta, cherry tomatoes, black olives, green olives, cucumber, and red onion. Toss these ingredients together until well mixed.
4. Dress the Salad: Pour the Italian dressing over the pasta and vegetable mixture. Add the salt, black pepper, and fresh basil. Toss everything together until the salad is well coated with the dressing.
5. Add the Eyeballs: Gently place the mozzarella eyeballs on top of the pasta salad. Confirm they’re evenly distributed to achieve the best visual effect.
6. Chill and Serve: Cover the salad and let it chill in the refrigerator for at least 30 minutes before serving. This will allow the flavors to meld together.
Extra Tips:
For an extra spooky touch, consider using red food coloring to create “bloodshot” eyes by adding a few drops around the mozzarella balls before placing the olive slices.
Additionally, you can substitute the Italian dressing with a dressing of your choice to suit your taste preferences. If you’re preparing the dish in advance, keep the mozzarella eyeballs separate and add them just before serving to confirm they look their best.