

I recently discovered a delightful collection of Grinch-themed Christmas cookie recipes that are sure to bring a smile to everyone’s face. These vibrant and whimsical treats, from Grinch Green Sugar Cookies to adorable Heart-Shaped designs, add a fun twist to traditional holiday baking. If you’re ready to sprinkle some Seuss-inspired magic into your kitchen, let’s explore these enchanting possibilities together.
Grinch Green Sugar Cookies
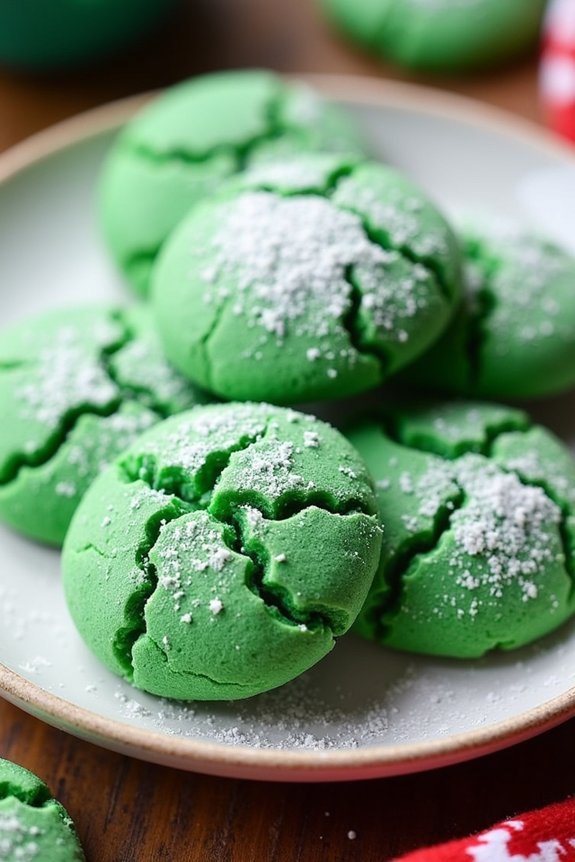
The Grinch may have a heart that’s two sizes too small, but these Grinch Green Sugar Cookies will make your heart swell with joy. Perfect for a festive holiday gathering or as a fun treat to enjoy while watching holiday movies, these cookies are a vibrant green, reminiscent of the beloved Dr. Seuss character. Their soft, chewy texture and sweet vanilla flavor are certain to make them a favorite among both kids and adults.
These cookies aren’t only a delicious addition to your Christmas cookie lineup but also quite easy to make. With a few simple ingredients and some food coloring, you can create a batch of cookies that will delight everyone with their color and taste. Whether you’re hosting a Christmas party or just want to add some fun to your holiday baking, these Grinch Green Sugar Cookies are a must-try.
Ingredients (Serving Size: 4-6 People):
- 2 ¾ cups all-purpose flour
- 1 teaspoon baking soda
- ½ teaspoon baking powder
- 1 cup unsalted butter, softened
- 1 ½ cups white sugar
- 1 egg
- 1 teaspoon vanilla extract
- 2 teaspoons almond extract
- Green food coloring
- ½ cup powdered sugar (for rolling)
Instructions:
- Preheat and Prepare: Preheat your oven to 350°F (175°C). Line two baking sheets with parchment paper or silicone baking mats to prevent the cookies from sticking.
- Mix Dry Ingredients: In a medium bowl, whisk together the flour, baking soda, and baking powder. This guarantees the baking agents are evenly distributed throughout the flour.
- Cream Butter and Sugar: In a large bowl, use an electric mixer to cream together the softened butter and white sugar until the mixture is light and fluffy, about 3-4 minutes.
- Add Wet Ingredients: Beat in the egg, vanilla extract, and almond extract until well combined. This incorporates air into the mixture, which helps the cookies rise.
- Add Color: Gradually add green food coloring to the mixture, beating until the desired shade of green is achieved. Start with a few drops and add more as needed.
- Combine Mixtures: Gradually add the dry ingredients to the wet ingredients, mixing until just combined. Be careful not to overmix, as this can make the cookies tough.
- Shape Cookies: Use a tablespoon or small ice cream scoop to portion out the dough. Roll each portion into a ball, then roll in powdered sugar until fully coated.
- Bake Cookies: Place the dough balls on the prepared baking sheets, spaced about 2 inches apart. Bake in the preheated oven for 8-10 minutes, or until the edges are set and the tops are cracked.
- Cool and Serve: Allow the cookies to cool on the baking sheets for 5 minutes before transferring them to a wire rack to cool completely. Enjoy the cookies once they’re cool to the touch.
Extra Tips:
To make the most vibrant Grinch Green Sugar Cookies, use gel food coloring instead of liquid food coloring, as it provides a richer color without altering the texture of the dough.
If you’re planning to store the cookies, place them in an airtight container to keep them soft and chewy for several days. Additionally, these cookies make great gifts—consider packaging them in festive bags or boxes to spread holiday cheer!
Heart-Shaped Grinch Cookies

The holiday season is the perfect time to whip up some Heart-Shaped Grinch Cookies, inspired by everyone’s favorite holiday character with a penchant for mischief. These cookies aren’t only a delightful treat for the eyes, but they also capture the spirit of the Grinch’s transformation—a heart that grew three sizes.
Soft, chewy, and vibrantly green, these cookies are a fantastic addition to any festive gathering, particularly for those looking to add a whimsical touch to their dessert table. With their heart shape and striking color, they’re sure to be a hit with kids and adults alike.
Creating these Heart-Shaped Grinch Cookies is a fun activity for the whole family. The process involves just the right amount of creativity, allowing everyone to partake in shaping and decorating the cookies.
Whether you’re throwing a Grinch-themed Christmas party or just want to surprise your loved ones with a unique holiday treat, these cookies fit the bill perfectly. Let’s plunge into the magical recipe that brings a bit of Whoville into your home, making a batch that serves 4-6 people.
Ingredients:
- 1 cup unsalted butter, softened
- 1 cup granulated sugar
- 1 large egg
- 1 teaspoon vanilla extract
- 2 ½ cups all-purpose flour
- ½ teaspoon baking powder
- ¼ teaspoon salt
- Green food coloring
- Heart-shaped cookie cutter
- Red heart-shaped sprinkles
Cooking Instructions:
- Prepare the Dough: In a large bowl, cream together the softened butter and granulated sugar until light and fluffy. This should take about 3-4 minutes. Add the egg and vanilla extract, mixing well until fully incorporated.
- Mix Dry Ingredients: In a separate bowl, whisk together the all-purpose flour, baking powder, and salt. Gradually add this dry mixture to the wet ingredients, mixing until a smooth dough forms.
- Add Color: Add green food coloring to the dough, mixing thoroughly until you achieve the desired shade reminiscent of the Grinch. Start with a few drops and add more if necessary.
- Chill the Dough: Wrap the dough in plastic wrap and refrigerate for at least 1 hour. This helps to firm up the dough, making it easier to roll out and cut into shapes.
- Preheat and Prepare: Preheat your oven to 350°F (175°C). Line baking sheets with parchment paper to prevent sticking.
- Shape the Cookies: Roll out the dough on a lightly floured surface to about ¼-inch thickness. Use the heart-shaped cookie cutter to cut out cookies and place them on the prepared baking sheets.
- Decorate: Press a red heart-shaped sprinkle into the top of each cookie to represent the Grinch’s growing heart.
- Bake: Bake in the preheated oven for 8-10 minutes, or until the edges are just beginning to turn golden. Avoid overbaking to keep the cookies soft.
- Cool: Allow the cookies to cool on the baking sheets for a few minutes before transferring to wire racks to cool completely.
Extra Tips:
When making Heart-Shaped Grinch Cookies, verify your butter is at room temperature to achieve the best creaming consistency. If you find the dough too sticky when rolling it out, sprinkle a little extra flour on your surface and rolling pin.
For a more pronounced green color, gel food coloring is recommended as it provides a more vibrant hue without altering the dough’s consistency. Finally, these cookies store well in an airtight container for up to a week, making them perfect for preparing in advance of holiday festivities.
Grinch Thumbprint Cookies

Grinch Thumbprint Cookies are a festive and fun treat perfect for bringing a whimsical touch to your holiday gatherings. Inspired by the beloved character from Dr. Seuss’s “How the Grinch Stole Christmas,” these cookies aren’t only delightful to look at but also delicious to eat. With their vibrant green hue, heart-shaped candy decoration, and a buttery thumbprint filled with sweet jam, these cookies will surely steal the show at your Christmas dessert table.
Making these cookies is a great way to get into the holiday spirit, and they’re simple enough to make with family and friends. The dough is easy to prepare, and the thumbprint technique adds an interactive element to the baking process. Whether you’re an experienced baker or new to cookie-making, you’ll find this recipe straightforward and enjoyable. This recipe yields enough for 4-6 people, making it ideal for a small holiday gathering or as a treat to share with neighbors and friends.
Ingredients:
- 2 cups all-purpose flour
- 1/2 teaspoon baking powder
- 1/4 teaspoon salt
- 3/4 cup unsalted butter, softened
- 2/3 cup granulated sugar
- 1 large egg
- 1 teaspoon vanilla extract
- Green food coloring
- 1/2 cup seedless raspberry jam or strawberry jam
- Heart-shaped candy decorations
Cooking Instructions:
- Prepare the Dough: In a medium bowl, whisk together the flour, baking powder, and salt. In a large bowl, beat the softened butter and granulated sugar until light and fluffy. Add in the egg and vanilla extract, and continue to beat until well combined.
- Color the Dough: Gradually add green food coloring to the butter mixture until you achieve the desired Grinch-like green color. Mix thoroughly to guarantee even coloring.
- Combine Ingredients: Gradually add the dry ingredients to the wet ingredients, mixing until a smooth dough forms. Verify that all ingredients are well incorporated.
- Chill the Dough: Wrap the dough in plastic wrap and refrigerate for at least 1 hour. This will make the dough easier to handle and shape.
- Preheat the Oven: Preheat your oven to 350°F (175°C) and line two baking sheets with parchment paper.
- Shape the Cookies: Roll the chilled dough into 1-inch balls and place them on the prepared baking sheets, spacing them about 2 inches apart.
- Create Thumbprints: Use your thumb or the back of a small spoon to press an indentation into the center of each cookie.
- Add Jam Filling: Fill each indentation with about 1/4 teaspoon of raspberry or strawberry jam.
- Bake the Cookies: Bake the cookies in the preheated oven for 12-14 minutes, or until the edges are lightly golden. Rotate the baking sheets halfway through for even baking.
- Cool and Decorate: Remove the cookies from the oven and allow them to cool on the baking sheets for 5 minutes before transferring them to wire racks to cool completely. Once cooled, gently press a heart-shaped candy into the center of each cookie for the Grinch’s heart.
Extra Tips:
To guarantee your Grinch Thumbprint Cookies turn out perfectly, make sure your butter is at room temperature before starting. This allows for a smoother dough that combines well with the other ingredients.
If your dough feels too sticky after coloring, dust your hands with a bit of flour when shaping the cookies. Additionally, be careful not to over-bake, as the cookies should remain soft and tender.
Ultimately, feel free to experiment with different jams to vary the flavors, but always choose seedless varieties for a smooth texture.
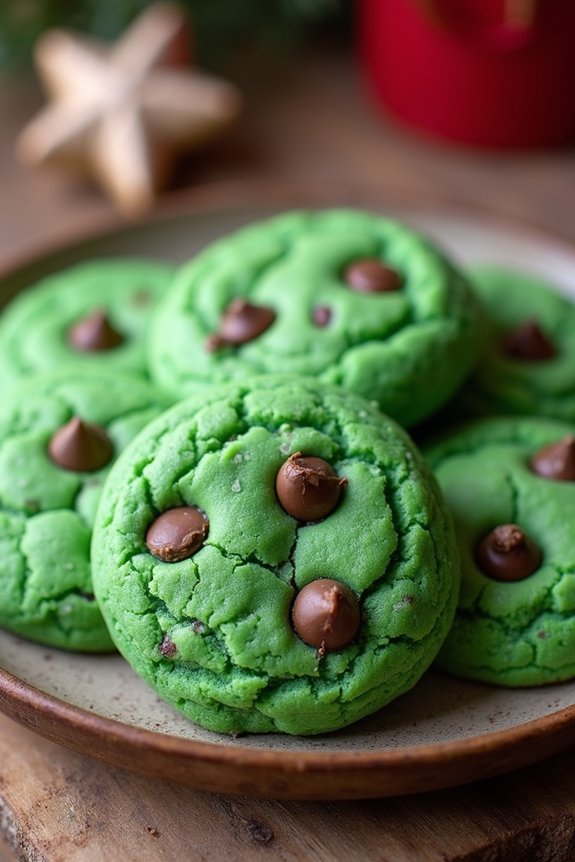
Grinch-Inspired Chocolate Chip Cookies

Get ready to bring some festive mischief to your holiday baking with these delightful Grinch-Inspired Chocolate Chip Cookies. Perfect for a Christmas gathering or a cozy night in, these cookies capture the whimsical charm of the Grinch with their vibrant green hue and irresistible taste. Each bite offers a delightful blend of classic chocolate chip cookie flavor with a playful twist, adding a splash of color and fun to your holiday dessert spread.
These cookies aren’t just a treat for the taste buds but also a feast for the eyes, making them a perfect addition to any holiday cookie platter. They’re soft, chewy, and loaded with chocolate chips, guaranteeing they’re loved by kids and adults alike. With this easy-to-follow recipe, you can whip up a batch of these Grinch-inspired cookies in no time, bringing a touch of holiday magic into your kitchen.
Ingredients (Serves 4-6):
- 1 cup unsalted butter, softened
- 3/4 cup granulated sugar
- 3/4 cup packed brown sugar
- 1 teaspoon vanilla extract
- 2 large eggs
- 2 1/4 cups all-purpose flour
- 1 teaspoon baking soda
- 1/2 teaspoon salt
- Green food coloring
- 2 cups semi-sweet chocolate chips
- Heart-shaped candy sprinkles
Instructions:
- Preheat and Prepare: Preheat your oven to 350°F (175°C). Line a baking sheet with parchment paper to prevent the cookies from sticking.
- Cream Butter and Sugars: In a large bowl, beat the softened butter, granulated sugar, and brown sugar together with an electric mixer until creamy and smooth.
- Add Vanilla and Eggs: Mix in the vanilla extract and eggs one at a time, beating well after each addition until the mixture is light and fluffy.
- Combine Dry Ingredients: In a separate bowl, whisk together the all-purpose flour, baking soda, and salt until well combined.
- Incorporate Dry Mix: Gradually add the dry ingredients to the wet mixture, stirring with a spatula or mixer on low speed until just combined. Be careful not to overmix.
- Add Color and Chocolate Chips: Stir in a few drops of green food coloring, adjusting until you reach your desired shade of Grinchy green. Fold in the chocolate chips evenly throughout the dough.
- Shape and Decorate: Scoop tablespoon-sized amounts of dough onto the prepared baking sheet, spacing them about 2 inches apart. Gently press a heart-shaped candy sprinkle onto the top of each cookie.
- Bake: Bake in the preheated oven for 10-12 minutes, or until the edges are lightly golden. The centers should remain soft.
- Cool and Serve: Allow the cookies to cool on the baking sheet for 5 minutes before transferring them to a wire rack to cool completely. Serve and enjoy!
Extra Tips:
For best results, make certain your butter is at room temperature before starting, as this helps achieve a smooth texture when creaming with the sugars.
If you prefer a deeper green color, you can gradually add more food coloring, but be cautious as a little goes a long way.
Feel free to experiment with different types of chocolate chips or mix-ins like white chocolate or nuts for extra flavor.
Finally, verify your cookies are evenly spaced on the baking sheet to allow for even baking and prevent sticking. Enjoy these cookies with a chilled glass of milk for the ultimate holiday treat!
Grinchy Matcha Cookies
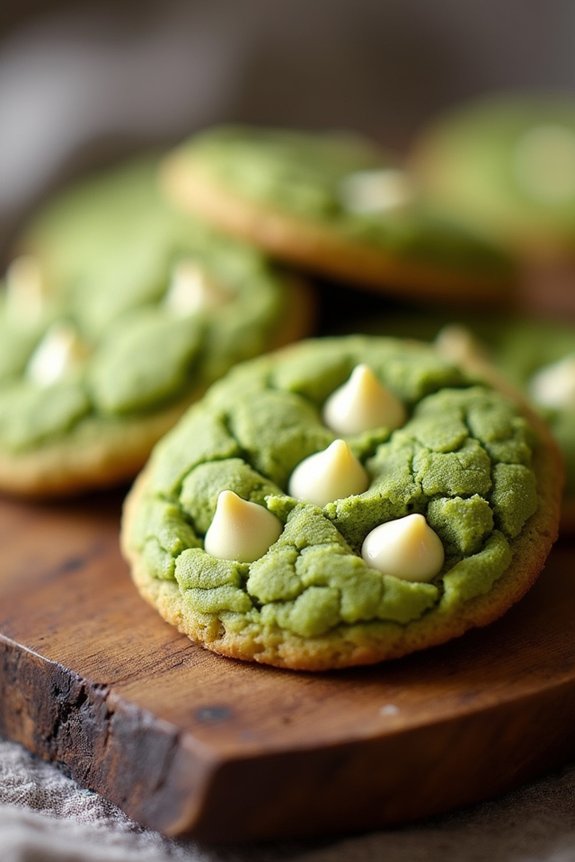
Celebrate the holiday season with a whimsical twist by baking a batch of Grinchy Matcha Cookies! These delightful treats are inspired by everyone’s favorite holiday antagonist and are sure to bring a smile to all who try them. With their vibrant green color, courtesy of the matcha powder, these cookies aren’t only visually striking but also offer a unique flavor profile that combines earthy matcha with the sweetness of white chocolate chips.
Perfect for a Christmas cookie exchange or a festive dessert table, these cookies are both fun to make and delicious to eat. The matcha powder gives the cookies their signature Grinchy green hue, while the buttery, soft texture guarantees they melt in your mouth. This recipe yields around 24-30 cookies, enough to serve 4-6 people, making it perfect for small gatherings or family treats.
The balance of sweet and slightly bitter flavor is complemented perfectly by the creamy white chocolate chips, creating an irresistible festive cookie. Whether you’re a fan of the Grinch or just looking for something new to try this holiday season, these cookies are a must-bake.
Ingredients:
- 2 cups all-purpose flour
- 1 tablespoon matcha green tea powder
- 1 teaspoon baking soda
- 1/2 teaspoon salt
- 3/4 cup unsalted butter, softened
- 3/4 cup granulated sugar
- 1/4 cup packed light brown sugar
- 1 large egg
- 1 teaspoon vanilla extract
- 1 cup white chocolate chips
Instructions:
- Preheat the Oven: Start by preheating your oven to 350°F (175°C). Line two baking sheets with parchment paper or silicone baking mats to prevent sticking.
- Mix Dry Ingredients: In a medium-sized bowl, whisk together the all-purpose flour, matcha powder, baking soda, and salt. This guarantees that the matcha is evenly distributed and prevents lumps in the dough.
- Cream the Butter and Sugars: In a large mixing bowl, use an electric mixer to cream the softened butter, granulated sugar, and brown sugar until light and fluffy. This should take about 2-3 minutes. The mixture should be pale and well combined.
- Add Egg and Vanilla: Beat in the egg and vanilla extract to the butter mixture. Mix until fully incorporated and smooth.
- Combine Wet and Dry Ingredients: Gradually add the dry ingredients to the wet ingredients, mixing on low speed until just combined. Avoid overmixing to maintain a tender cookie texture.
- Fold in White Chocolate Chips: Use a spatula to fold in the white chocolate chips, ensuring they’re evenly distributed throughout the dough.
- Shape the Cookies: Scoop tablespoon-sized amounts of dough and roll them into balls. Place them on the prepared baking sheets, spacing them about 2 inches apart to allow for spreading.
- Bake: Bake in the preheated oven for 10-12 minutes, or until the edges are lightly golden. The centers may look slightly underbaked, but they’ll set as they cool.
- Cool: Allow the cookies to cool on the baking sheets for about 5 minutes before transferring them to a wire rack to cool completely.
Extra Tips:
When measuring the matcha powder, confirm it’s fresh and of good quality for the best flavor and color. If you find the dough too sticky to handle, chill it in the refrigerator for about 30 minutes before shaping. This can help prevent the cookies from spreading too much in the oven.
For an extra festive touch, consider adding a drop of green food coloring to enhance the Grinch-like appearance. Enjoy these cookies with a cup of milk or hot cocoa for the ultimate holiday treat!
Grinch Oreo Truffles

These Grinch Oreo Truffles are a delightful and festive treat that will bring holiday cheer to your dessert table. With their vibrant green color and delicious Oreo flavor, these truffles are bound to be a hit at any Christmas gathering. Not only do they look great, but they also have a creamy and decadent taste that pairs perfectly with the holiday spirit.
Perfect for a serving size of 4-6 people, these truffles are easy to make and require no baking. They’re a fun and whimsical addition to any holiday menu, capturing the essence of the Grinch in a delicious bite-sized form. Whether you’re hosting a Christmas party or simply enjoying a cozy night in, these truffles are a must-try for Grinch fans and Oreo lovers alike.
Ingredients:
- 24 Oreo cookies
- 4 oz cream cheese, softened
- 8 oz white chocolate, melted
- Green food coloring
- Red heart sprinkles
Cooking Instructions:
- Crush the Oreos: Place the Oreo cookies in a food processor and pulse until they’re finely crushed. Alternatively, you can place them in a resealable plastic bag and crush them with a rolling pin.
- Make the Oreo mixture: In a mixing bowl, combine the crushed Oreos with the softened cream cheese. Mix well until a smooth and uniform dough forms.
- Shape the truffles: Roll the Oreo mixture into small, bite-sized balls, approximately 1 inch in diameter. Place them on a baking sheet lined with parchment paper.
- Chill the truffles: Refrigerate the Oreo balls for about 30 minutes, or until they’re firm enough to handle.
- Melt the white chocolate: In a microwave-safe bowl, melt the white chocolate in 30-second intervals, stirring in between, until smooth and fully melted.
- Color the chocolate: Add a few drops of green food coloring to the melted white chocolate and stir until you achieve the desired Grinch-like green color.
- Coat the truffles: Dip each chilled Oreo ball into the green chocolate, using a fork to roll it around until fully coated. Allow any excess chocolate to drip off before placing it back on the parchment-lined baking sheet.
- Decorate with heart sprinkles: While the chocolate is still wet, place a red heart sprinkle on top of each truffle to resemble the Grinch’s growing heart.
- Set the truffles: Allow the coated truffles to set at room temperature, or speed up the process by placing them in the refrigerator for about 15 minutes until the chocolate is firm.
Extra Tips:
When making Grinch Oreo Truffles, make certain that the cream cheese is fully softened to blend smoothly with the crushed Oreos. If you find the mixture too sticky to roll, refrigerate it for a few minutes to firm up slightly.
Be cautious with the green food coloring; a little goes a long way, so add it gradually to avoid an overly intense color. For a more uniform coating, you can use a toothpick to help dip and remove the truffles from the melted chocolate.
Enjoy these truffles as a fun holiday activity with kids or as a delightful gift for friends and family!
Grinch Peanut Butter Blossoms
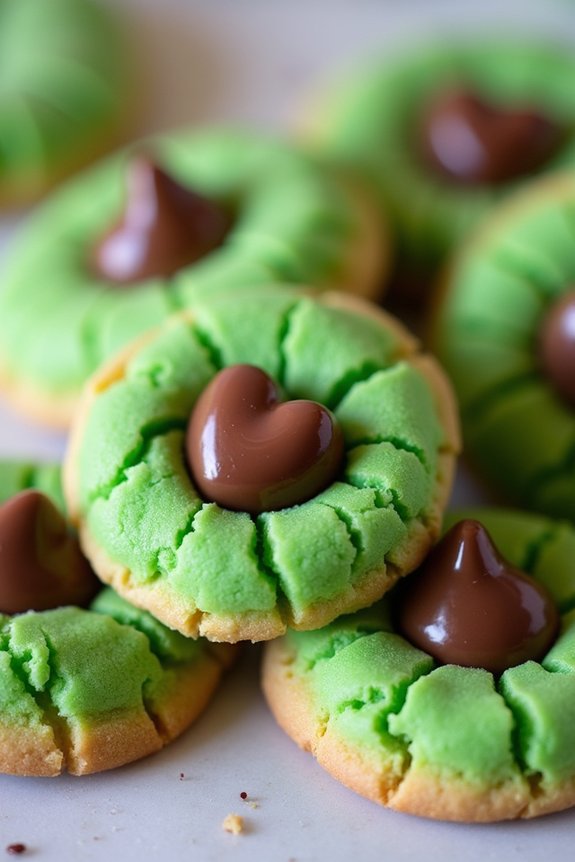
Grinch Peanut Butter Blossoms are a delightful twist on the classic cookie that brings the mischievous spirit of the Grinch to your holiday baking. These cookies aren’t only scrumptious with a perfect balance of peanut butter and chocolate, but they also feature a fun, festive green hue that captures the essence of the Grinch himself. A heart-shaped candy right in the center of each cookie gives a nod to the Grinch’s growing heart, making them perfect for sharing with friends and family during the holiday season.
These cookies are easy to make and perfect for involving kids in the kitchen. The key is using green food coloring to achieve that signature Grinch shade, and by adding a festive candy heart, you’ll have a cookie that’s both whimsical and delicious. Whether you’re hosting a Christmas party or simply adding to your holiday cookie platter, Grinch Peanut Butter Blossoms are sure to steal the show.
Ingredients (Serves 4-6):
- 1/2 cup unsalted butter, softened
- 3/4 cup creamy peanut butter
- 1/3 cup granulated sugar
- 1/3 cup brown sugar, packed
- 1 large egg
- 1 teaspoon vanilla extract
- 1 1/2 cups all-purpose flour
- 1 teaspoon baking soda
- 1/2 teaspoon salt
- Green food coloring
- 1/4 cup granulated sugar (for rolling)
- 24 heart-shaped chocolate candies (such as Hershey’s Hugs)
Instructions:
- Preheat and Prepare: Preheat your oven to 375°F (190°C). Line two baking sheets with parchment paper or silicone baking mats to prevent sticking.
- Creaming the Butter and Sugars: In a large mixing bowl, cream together the softened butter, creamy peanut butter, granulated sugar, and brown sugar until the mixture is light and fluffy. This should take about 2-3 minutes using an electric mixer on medium speed.
- Add Wet Ingredients: Add the egg and vanilla extract to the creamed mixture, beating until well combined.
- Coloring the Dough: Gradually add green food coloring to the mixture, stirring until you achieve your desired shade of Grinch green.
- Mix Dry Ingredients: In a separate bowl, whisk together the flour, baking soda, and salt. Gradually add this dry mixture to the wet ingredients, mixing until just combined.
- Forming the Cookies: Scoop out tablespoon-sized portions of dough and roll them into balls. Roll each ball in the additional granulated sugar, coating them completely.
- Baking: Place the dough balls about 2 inches apart on the prepared baking sheets. Bake in the preheated oven for 8-10 minutes, or until the edges are lightly golden.
- Adding the Heart: Immediately after removing the cookies from the oven, gently press a heart-shaped chocolate candy into the center of each cookie. Allow the cookies to cool on the baking sheet for 5 minutes before transferring them to a wire rack to cool completely.
Extra Tips:
For the best results, verify that your butter is softened but not melted, as this will help achieve the perfect texture for your cookies.
If you want to add a bit more holiday flair, consider sprinkling a touch of edible glitter or sanding sugar on top of the cookies before baking.
Additionally, if you find your dough too sticky to work with, refrigerate it for 20-30 minutes to make it easier to handle. Enjoy these cookies with a glass of milk or a hot cup of cocoa for the ultimate holiday treat!
Grinch Stained Glass Cookies
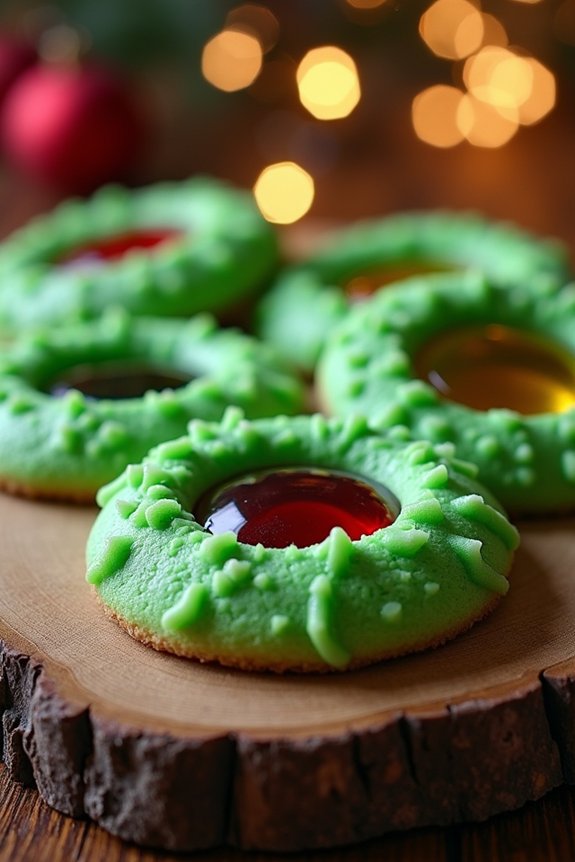
Grinch Stained Glass Cookies are the perfect festive treat to bring a whimsical touch to your holiday cookie platter. Inspired by the mischievous green character from Dr. Seuss’s beloved tale, these cookies feature a vibrant green hue and a stunning translucent center that resembles stained glass.
Whether you’re hosting a holiday party or looking for a fun baking project to enjoy with family, these cookies are sure to delight both young and old with their striking appearance and delicious taste.
The key to achieving the Grinch-like appeal lies in the use of green food coloring and colorful hard candies that melt into a beautiful glass-like center. The dough itself is a classic sugar cookie base, which provides a buttery, crisp texture that complements the candy’s sweetness.
With a little creativity, you can even use various cookie cutter shapes and additional candies to customize your cookies further. This recipe yields approximately 24 cookies, perfect for serving 4-6 people.
Ingredients:
- 2 ¾ cups all-purpose flour
- 1 teaspoon baking powder
- ½ teaspoon salt
- 1 cup unsalted butter, softened
- 1 cup granulated sugar
- 1 large egg
- 1 teaspoon vanilla extract
- ½ teaspoon almond extract
- Green food coloring
- 1 cup assorted hard candies (e.g., Jolly Ranchers, Life Savers), crushed
Instructions:
- Preheat the Oven: Start by preheating your oven to 350°F (175°C). Line two baking sheets with parchment paper to prevent sticking.
- Prepare the Dough: In a medium bowl, whisk together the flour, baking powder, and salt. In a separate large bowl, beat the softened butter and granulated sugar until light and fluffy. Mix in the egg, vanilla extract, and almond extract until well combined.
- Color the Dough: Gradually add the dry ingredients to the wet mixture, mixing until just combined. Add green food coloring, a few drops at a time, until you achieve the desired shade of Grinch green. Mix until the color is evenly distributed.
- Roll Out the Dough: Divide the dough into two portions. Roll each portion between two sheets of parchment paper to a thickness of about ¼ inch. Chill in the refrigerator for 30 minutes to make cutting easier.
- Cut Out Cookies: Using your chosen cookie cutters, cut out shapes from the chilled dough. Use a smaller cutter or knife to cut out shapes in the center of each cookie to create a window for the candy.
- Add the Candy: Place the cookies on the prepared baking sheets. Fill the cut-out centers with crushed hard candies, ensuring the candy pieces are level with the dough.
- Bake the Cookies: Bake the cookies in the preheated oven for 10-12 minutes, or until the edges are lightly golden and the candy centers have melted. Allow the cookies to cool completely on the baking sheets for the candy to harden.
Extra Tips: When crushing the hard candies, use separate plastic bags for each color to prevent them from mixing. A rolling pin or meat mallet works well for crushing the candies into small pieces.
Be sure to leave enough space between cookies on the baking sheets, as they’ll spread slightly during baking. If you want to enhance the Grinch theme, consider adding a small red heart sprinkle or candy to each cookie before baking.
Grinch Mint Chocolate Cookies
Grinch Mint Chocolate Cookies are a delightful treat that combines the mischievous spirit of the Grinch with the indulgent flavors of mint and chocolate. Perfect for a holiday gathering or a cozy night in, these cookies offer a playful twist on traditional Christmas cookies. The bright green color, reminiscent of the Grinch himself, is sure to bring a smile to anyone’s face, while the invigorating mint and rich chocolate come together to create a delectable flavor combination that’s hard to resist.
This recipe is designed to serve 4-6 people, making it ideal for a small holiday gathering or as a special treat for your family. The cookies aren’t only delicious but also visually appealing, capturing the essence of the Grinch in every bite. Whether you’re a fan of the classic Dr. Seuss character or simply love the combination of mint and chocolate, these cookies are sure to become a holiday favorite.
Ingredients:
- 1 cup unsalted butter, softened
- 1 cup granulated sugar
- 1/2 cup packed light brown sugar
- 2 large eggs
- 1 tsp vanilla extract
- 1/2 tsp peppermint extract
- Green food coloring
- 2 3/4 cups all-purpose flour
- 1 tsp baking powder
- 1/2 tsp baking soda
- 1/4 tsp salt
- 1 cup mint chocolate chips
- 1/2 cup semi-sweet chocolate chips
Cooking Instructions:
- Preheat and Prepare: Preheat your oven to 350°F (175°C) and line two baking sheets with parchment paper to prevent the cookies from sticking.
- Mix the Wet Ingredients: In a large mixing bowl, cream together the softened butter, granulated sugar, and brown sugar until the mixture is light and fluffy. This should take about 2-3 minutes. Add in the eggs, vanilla extract, and peppermint extract, and mix until well combined.
- Add Color: Gradually add green food coloring to the wet mixture until you reach the desired shade of Grinch green. Mix well to guarantee an even color throughout.
- Combine Dry Ingredients: In a separate bowl, whisk together the flour, baking powder, baking soda, and salt. This guarantees that all dry ingredients are evenly distributed before combining with the wet ingredients.
- Form the Dough: Slowly add the dry ingredients to the wet ingredients, mixing on low speed until just combined. Be careful not to overmix, which can result in tough cookies. Stir in the mint chocolate chips and semi-sweet chocolate chips until evenly distributed.
- Shape the Cookies: Using a tablespoon or a cookie scoop, drop rounded balls of dough onto the prepared baking sheets, spacing them about 2 inches apart to allow for spreading.
- Bake: Place the baking sheets in the preheated oven and bake for 10-12 minutes, or until the edges of the cookies are lightly golden. The centers may look slightly underbaked but will firm up as the cookies cool.
- Cool: Allow the cookies to cool on the baking sheets for 5 minutes before transferring them to a wire rack to cool completely.
Extra Tips: For an extra festive touch, consider adding some red heart-shaped sprinkles on top of each cookie to symbolize the Grinch’s growing heart. If you prefer a stronger mint flavor, you can increase the peppermint extract slightly, but be cautious as it can easily overpower the other flavors.
Also, if you find the dough too sticky to handle, refrigerate it for about 30 minutes to make it easier to scoop. Enjoy your Grinch Mint Chocolate Cookies with a glass of cold milk or a warm cup of cocoa for the ultimate holiday treat!
Grinch Red Velvet Crinkle Cookies

Grinch Red Velvet Crinkle Cookies are a festive and fun treat that perfectly encapsulate the mischievous spirit of the Grinch while bringing a pop of color to your Christmas cookie platter. These cookies are soft, chewy, and rich with the delightful flavor of red velvet, all wrapped up in a vibrant green hue that pays homage to everyone’s favorite holiday grouch.
The crinkle effect, achieved by rolling the dough in powdered sugar before baking, gives them an eye-catching appearance that’s sure to impress at any holiday gathering. This recipe is designed to serve 4-6 people, making it perfect for a small family get-together or a delightful treat during the holidays.
The ingredients are simple, and the process is straightforward, allowing even novice bakers to create a batch of these whimsical cookies with ease. Whether you’re a fan of the Grinch or just love a good red velvet cookie, these Grinch Red Velvet Crinkle Cookies are sure to become a holiday favorite.
Ingredients (Serves 4-6):
- 1 1/2 cups all-purpose flour
- 1/4 cup unsweetened cocoa powder
- 1 teaspoon baking powder
- 1/4 teaspoon salt
- 1/2 cup unsalted butter, softened
- 1 cup granulated sugar
- 1 large egg
- 1 teaspoon vanilla extract
- 1 tablespoon red food coloring
- 1/2 teaspoon green food coloring
- 1/2 cup powdered sugar
Cooking Instructions:
- Preheat and Prepare: Preheat your oven to 350°F (175°C). Line two baking sheets with parchment paper to prevent the cookies from sticking and to guarantee even baking.
- Mix Dry Ingredients: In a medium bowl, whisk together the all-purpose flour, cocoa powder, baking powder, and salt. This will guarantee that the dry ingredients are well combined and will help distribute the cocoa powder evenly throughout the dough.
- Cream Butter and Sugar: In a large mixing bowl, using an electric mixer, cream the softened butter and granulated sugar together until the mixture is light and fluffy, approximately 2-3 minutes. This step is vital for incorporating air into the dough, which will result in softer cookies.
- Add Wet Ingredients: Beat in the egg and vanilla extract until fully combined. Add the red and green food coloring to the mixture and mix until the desired shade of Grinch green is achieved.
- Combine Ingredients: Gradually add the dry ingredients to the wet ingredients, mixing until just combined. Be careful not to overmix, as this can lead to tougher cookies.
- Chill the Dough: Cover the dough with plastic wrap and refrigerate for at least 30 minutes. Chilling the dough helps to firm it up, making it easier to handle and roll into balls.
- Shape and Coat: Once chilled, scoop tablespoons of dough and roll them into balls. Roll each ball in powdered sugar, making sure they’re completely coated. This will create the iconic crinkle effect as the cookies bake.
- Bake: Place the coated dough balls onto the prepared baking sheets, spacing them about 2 inches apart. Bake in the preheated oven for 10-12 minutes, or until the edges are set and the tops have a crackled appearance.
- Cool: Allow the cookies to cool on the baking sheets for about 5 minutes before transferring them to a wire rack to cool completely.
Extra Tips:
For the best results, make sure your butter is at room temperature but not overly soft, as this will affect the texture of the cookies. Additionally, if you find that the dough is too sticky to handle, you can chill it for a bit longer until it’s more manageable.
Be sure to use gel food coloring for the most vibrant and consistent color. Finally, keep an eye on the cookies as they bake; you want them to be set at the edges but still soft in the center for the perfect chewy texture.
Grinch Santa Hat Cookies
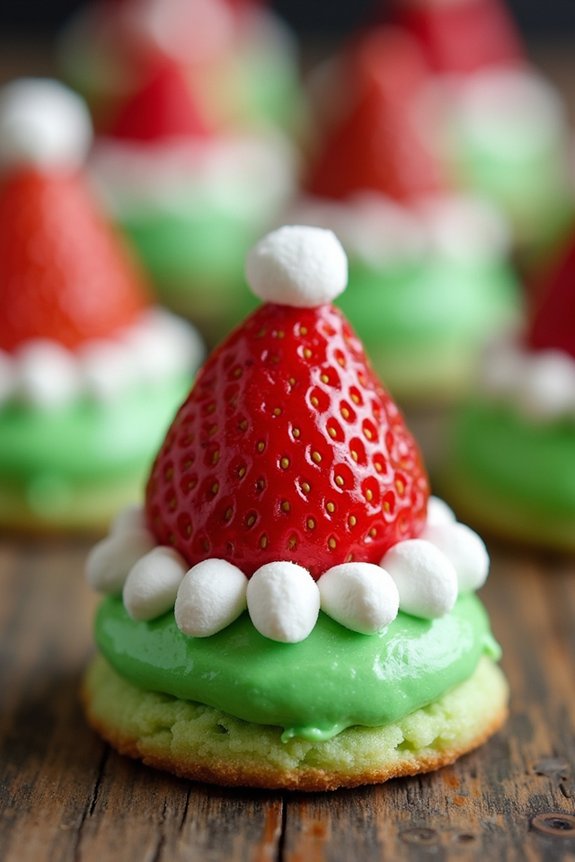
Bring a whimsical touch to your holiday celebrations with these delightful Grinch Santa Hat Cookies. Inspired by the iconic character from Dr. Seuss’s “How the Grinch Stole Christmas,” these cookies are both fun to make and delicious to eat. The combination of a soft sugar cookie base with vibrant green frosting and a cute red strawberry hat will surely be a hit at your Christmas gatherings.
Perfect for sharing with family and friends, these cookies are bound to bring smiles and holiday cheer.
These Grinch Santa Hat Cookies are designed to serve 4-6 people, making them ideal for small gatherings or as a festive treat for your family. The recipe combines simple ingredients to create a colorful and eye-catching dessert. Whether you’re hosting a holiday party or just looking to add some fun to your holiday baking, these cookies are a must-try.
Get ready to channel your inner Grinch and spread some holiday mischief with these adorable treats!
Ingredients:
- 1 cup unsalted butter, softened
- 1 cup granulated sugar
- 1 large egg
- 1 teaspoon vanilla extract
- 2½ cups all-purpose flour
- 1 teaspoon baking powder
- ½ teaspoon salt
- 2 cups powdered sugar
- 2-3 tablespoons milk
- Green food coloring
- 12-18 fresh strawberries, hulled and halved
- White mini marshmallows
Instructions:
- Prepare the Cookie Dough: In a large mixing bowl, cream together the softened butter and granulated sugar until light and fluffy, about 2-3 minutes. Add the egg and vanilla extract, mixing until well combined. In a separate bowl, whisk together the flour, baking powder, and salt. Gradually add the dry ingredients to the butter mixture, mixing until a soft dough forms.
- Chill and Shape the Dough: Wrap the dough in plastic wrap and refrigerate for at least 1 hour or until firm. Once chilled, preheat your oven to 350°F (175°C). Roll out the dough on a floured surface to about ¼-inch thickness. Use a round cookie cutter to cut out circles, then place them on a lined baking sheet.
- Bake the Cookies: Bake the cookies in the preheated oven for 8-10 minutes, or until the edges are lightly golden. Remove them from the oven and let them cool on the baking sheet for 5 minutes before transferring them to a wire rack to cool completely.
- Prepare the Frosting: In a medium bowl, combine the powdered sugar and 2 tablespoons of milk, stirring until smooth. Add additional milk if needed to reach a spreadable consistency. Tint the frosting with green food coloring until you achieve the desired shade of green.
- Assemble the Cookies: Spread a layer of green frosting on each cooled cookie. Place a strawberry half, cut side down, in the center of each cookie to form the Santa hat. Press gently to secure.
- Add the Marshmallow Pom-Pom: Cut a mini marshmallow in half and place it at the tip of each strawberry to resemble the pom-pom of a Santa hat. Serve and enjoy!
Extra Tips:
When making these Grinch Santa Hat Cookies, it’s important to verify your butter is fully softened to achieve a smooth and creamy dough. If your dough becomes too sticky while rolling, lightly dust your rolling pin and work surface with flour.
For a vegan alternative, you can substitute the butter with a plant-based alternative and use a flax egg instead of a regular egg. Additionally, make sure your cookies are completely cooled before spreading the frosting to prevent it from melting.
Enjoy these cookies as a fun and festive addition to your holiday treats!
Grinch Whoopie Pies

Grinch Whoopie Pies are a whimsical and delicious treat that will bring a touch of mischief to your holiday dessert table. These delightful confections feature soft, round cakes sandwiched together with a creamy filling, all inspired by the iconic green character himself.
With their vibrant color and sweet flavor, Grinch Whoopie Pies are sure to be a hit with kids and adults alike at any Christmas gathering. Perfect for a cozy holiday baking session, these whoopie pies are both fun to make and even more fun to eat.
The recipe combines fluffy green cakes with a creamy, sweet filling that balances the slight tanginess of the cake. To capture the essence of the Grinch, the cake batter is dyed a vivid green, and a little red candy heart is added as a playful nod to the Grinch’s transformation.
This recipe is designed to serve 4-6 people, making it perfect for small parties or family gatherings. Follow the steps below to create your own batch of Grinch-inspired magic!
Ingredients (serving size: 4-6 people):
- 2 cups all-purpose flour
- 1/2 cup unsweetened cocoa powder
- 1 1/2 teaspoons baking powder
- 1/2 teaspoon baking soda
- 1/2 teaspoon salt
- 1/2 cup unsalted butter, softened
- 1 cup granulated sugar
- 1 large egg
- 1 teaspoon vanilla extract
- 1 cup buttermilk
- Green food coloring
- 1 cup marshmallow fluff
- 1/2 cup unsalted butter, softened (for filling)
- 1 cup powdered sugar
- 1 teaspoon vanilla extract (for filling)
- Red candy hearts for decoration
Instructions:
- Preheat and Prepare Baking Sheets: Preheat your oven to 350°F (175°C). Line two baking sheets with parchment paper and set aside.
- Mix Dry Ingredients: In a medium bowl, sift together the flour, cocoa powder, baking powder, baking soda, and salt. Set this dry mixture aside.
- Cream Butter and Sugar: In a large mixing bowl, beat the butter and granulated sugar together until light and fluffy. This should take about 3-4 minutes.
- Add Egg and Vanilla: Add the egg and vanilla extract to the butter mixture and beat until well combined.
- Combine with Buttermilk: Gradually add the dry ingredients to the butter mixture, alternating with the buttermilk. Start and end with the dry ingredients, mixing just until combined.
- Color the Batter: Add a few drops of green food coloring to the batter, mixing until the desired shade of green is achieved.
- Scoop and Bake: Use a tablespoon to scoop the batter onto the prepared baking sheets, leaving about 2 inches between each piece. Bake for 10-12 minutes, or until the cakes spring back when touched lightly. Let them cool completely on a wire rack.
- Prepare the Filling: In a medium bowl, beat together the marshmallow fluff, softened butter, powdered sugar, and vanilla extract until smooth and fluffy.
- Assemble the Whoopie Pies: Once the cakes are completely cooled, spread or pipe a generous dollop of filling on the flat side of half of the cakes. Top with another cake to form a sandwich.
- Decorate: Press a red candy heart into the filling on the edge of each whoopie pie to symbolize the Grinch’s heart.
Extra Tips: For best results, make sure that all ingredients are at room temperature before starting. This will help the batter and filling come together smoothly.
If you want a deeper green color, feel free to add more food coloring in small increments. Additionally, the whoopie pies can be stored in an airtight container at room temperature for a day or two, but they’re best enjoyed fresh for the most delightful texture and flavor.
Grinch Cookie Cups
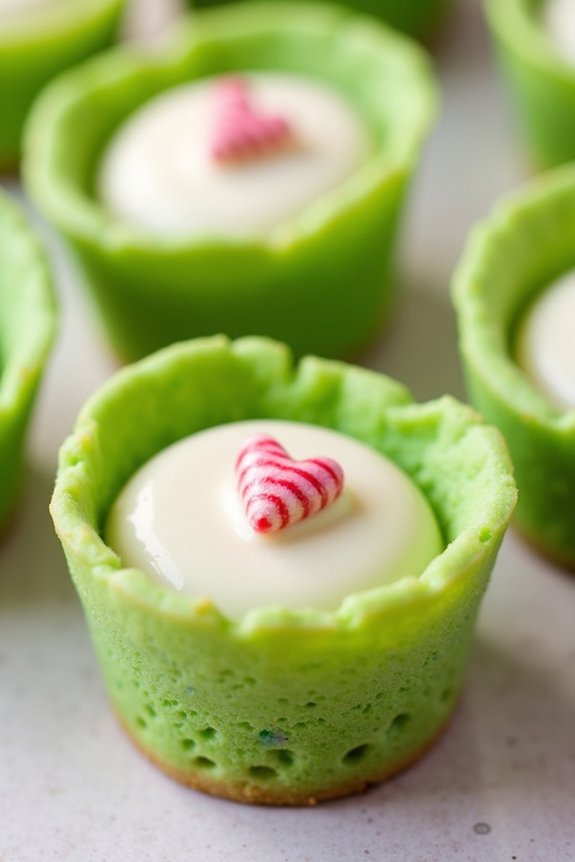
Delight your family and friends this holiday season with these whimsical Grinch Cookie Cups. Inspired by the iconic green character, these cookies aren’t only fun to make but also boast an irresistible combination of flavors and textures. With a sweet sugar cookie base and a luscious filling, these cookie cups are sure to be a hit at any holiday gathering.
The bright green color and heart-shaped decorations perfectly capture the mischievous yet endearing spirit of the Grinch, making them a festive addition to your Christmas dessert table.
These Grinch Cookie Cups serve 4-6 people and are perfect for sharing the holiday cheer. The recipe is easy to follow, making it a great activity for the whole family. Kids will especially enjoy helping out, whether it’s mixing the dough or adding the finishing touches with heart-shaped sprinkles.
So, gather your ingredients, roll up your sleeves, and let’s start baking these delightful Grinch Cookie Cups that are sure to steal the show!
Ingredients:
- 1 cup unsalted butter, softened
- 1 cup granulated sugar
- 1 large egg
- 1 teaspoon vanilla extract
- 2 cups all-purpose flour
- 1/2 teaspoon baking powder
- 1/4 teaspoon salt
- Green food coloring
- 1 cup white chocolate chips
- 1/4 cup heavy cream
- Heart-shaped sprinkles
Instructions:
- Preheat and Prepare: Preheat your oven to 350°F (175°C). Lightly grease a muffin tin to prevent sticking.
- Make the Cookie Dough: In a large mixing bowl, cream together the softened butter and granulated sugar until light and fluffy. Add the egg and vanilla extract, beating well until combined.
- Add Dry Ingredients: Gradually add the all-purpose flour, baking powder, and salt to the wet mixture. Mix until a soft dough forms.
- Add Color: Add a few drops of green food coloring to the dough and mix thoroughly until the dough is uniformly green in color.
- Shape the Cookie Cups: Take small portions of the dough and press them into the muffin tin cups, forming a small well in the center of each to make room for the filling.
- Bake: Bake the cookie cups in the preheated oven for about 10-12 minutes, or until the edges are lightly golden. Remove from the oven and let them cool slightly in the muffin tin.
- Prepare the Filling: While the cookie cups are cooling, melt the white chocolate chips with the heavy cream in a microwave-safe bowl, heating in 30-second intervals and stirring in between until smooth.
- Fill the Cookie Cups: Once the cookie cups have cooled completely, spoon the melted white chocolate mixture into the center of each cup.
- Decorate: Add a heart-shaped sprinkle on top of each cookie cup to represent the Grinch’s heart.
- Set and Serve: Allow the filling to set at room temperature before serving these delightful Grinch Cookie Cups.
Extra Tips:
When making these Grinch Cookie Cups, verify that the dough is evenly distributed in the muffin tin to achieve uniform baking. If the dough is too sticky, refrigerate it for 15-20 minutes before shaping.
For a more vibrant green color, adjust the amount of food coloring as needed. If you don’t have a muffin tin, you can use mini tart pans as an alternative.
Finally, these cookie cups can be stored in an airtight container for up to a week, making them a convenient make-ahead dessert option for your holiday festivities.
Grinch Monster Cookies

Get into the festive spirit with these delightful Grinch Monster Cookies, inspired by the mischievous character we all know and love. Perfect for holiday gatherings or a fun baking activity with the family, these cookies are sure to bring a smile to everyone’s face.
With their vibrant green color and adorable candy hearts, these cookies are as visually appealing as they’re delicious. The combination of oats, peanut butter, and chocolate chips gives these cookies a chewy and rich texture, making them a treat you’ll want to bake again and again.
These Grinch Monster Cookies aren’t only easy to make but also customizable to suit your taste. Whether you prefer your cookies chewy or slightly crunchy, this recipe allows for slight modifications to achieve your desired texture.
Serve them at your next holiday party or enjoy them with a cup of hot cocoa for a cozy winter treat. Gather your ingredients, preheat your oven, and get ready to bake a batch of cookies that are sure to steal the spotlight at any Christmas gathering.
Ingredients for 4-6 servings:
- 1 cup all-purpose flour
- 1/2 teaspoon baking powder
- 1/4 teaspoon baking soda
- 1/4 teaspoon salt
- 1/2 cup unsalted butter, softened
- 1/2 cup creamy peanut butter
- 1/2 cup granulated sugar
- 1/2 cup packed light brown sugar
- 1 large egg
- 1 teaspoon vanilla extract
- 1 1/2 cups quick oats
- 1 cup green food coloring
- 1 cup semisweet chocolate chips
- Heart-shaped candies for decoration
Cooking Instructions:
- Preheat the Oven: Preheat your oven to 350°F (175°C) and line two baking sheets with parchment paper to guarantee the cookies don’t stick.
- Mix Dry Ingredients: In a medium bowl, whisk together the flour, baking powder, baking soda, and salt. Set this mixture aside.
- Cream Butter and Sugars: In a large mixing bowl, use an electric mixer to cream together the softened butter, peanut butter, granulated sugar, and brown sugar until the mixture is light and fluffy, about 2-3 minutes.
- Add Wet Ingredients: Beat in the egg and vanilla extract until fully incorporated into the butter-sugar mixture.
- Combine Ingredients: Gradually add the dry ingredients to the wet mixture, mixing until just combined. Stir in the oats and green food coloring until the dough is evenly colored.
- Add Chocolate Chips: Fold in the chocolate chips, ensuring they’re evenly distributed throughout the dough.
- Shape Cookies: Scoop tablespoons of dough onto the prepared baking sheets, spacing them about 2 inches apart to allow for spreading.
- Decorate with Candy: Gently press a heart-shaped candy into the center of each dough ball for a cute, Grinch-themed decoration.
- Bake the Cookies: Bake in the preheated oven for 10-12 minutes, or until the edges are slightly golden. Be careful not to overbake as the cookies will continue to set as they cool.
- Cool and Serve: Allow the cookies to cool on the baking sheets for about 5 minutes before transferring them to a wire rack to cool completely.
Extra Tips:
For a chewier cookie, use only quick oats and make sure not to overbake. If you prefer a more vibrant green color, you can adjust the amount of food coloring according to your preference.
You can also use different types of chocolate chips or add nuts for additional texture. Finally, if you’re unable to find heart-shaped candies, small red candies can be a good alternative to maintain the Grinch theme. Enjoy your festive baking!