

When it comes to festive treats, nothing quite captures the joyful spirit of the holidays like Grinch-themed desserts. With vibrant greens and heartwarming shapes inspired by Dr. Seuss’s beloved character, these creations are sure to enchant your taste buds. From Grinch Green Velvet Cake to Grinchy Hot Chocolate Bombs, these delightful recipes will bring a smile to everyone’s face. Curious about adding a whimsical touch to your holiday celebrations? Let’s explore these enchanting Grinch-themed desserts together!
Grinch Green Velvet Cake
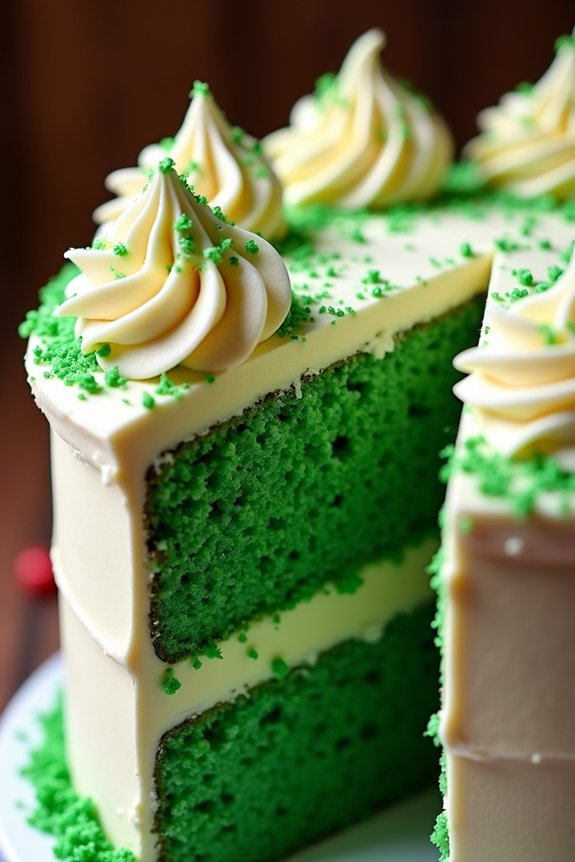
Delight your holiday guests with a whimsical twist on the traditional red velvet cake by serving a Grinch Green Velvet Cake. This vibrant and festive dessert captures the playful spirit of the Grinch while maintaining the deliciously moist and tender texture of a classic velvet cake. Perfect for a festive gathering or a fun family baking project, this cake is sure to be a hit with both kids and adults alike. The striking green color not only adds a pop of holiday cheer but also makes for a delightful centerpiece on your Christmas dessert table.
Crafting this cake is both fun and straightforward, guaranteeing that you can create a showstopping dessert without any stress. The subtle cocoa flavor of the cake pairs beautifully with a rich cream cheese frosting, making every bite a delightful experience. Whether you’re a seasoned baker or a beginner just starting to explore the world of baking, this Grinch Green Velvet Cake will be a joyful addition to your holiday repertoire. So put on your apron, gather your ingredients, and let’s get started on creating this magical treat.
Ingredients (Serves 4-6):
- 2 ½ cups all-purpose flour
- 1 ½ cups granulated sugar
- 1 tsp baking soda
- 1 tsp salt
- 1 tsp unsweetened cocoa powder
- 1 ½ cups vegetable oil
- 1 cup buttermilk, at room temperature
- 2 large eggs, at room temperature
- 2 tbsp green food coloring
- 1 tsp vanilla extract
- 1 tsp white vinegar
- 1 cup unsalted butter, softened
- 16 oz cream cheese, softened
- 4 cups powdered sugar
- 1 tsp vanilla extract
Instructions:
- Preheat and Prepare Pans: Preheat your oven to 350°F (175°C). Grease and flour two 9-inch round cake pans to guarantee easy removal of the cakes once baked.
- Mix Dry Ingredients: In a medium-sized bowl, whisk together the flour, sugar, baking soda, salt, and cocoa powder. Set aside this dry mixture.
- Combine Wet Ingredients: In a larger bowl, combine the vegetable oil, buttermilk, eggs, green food coloring, vanilla, and vinegar. Use an electric mixer on medium speed until the mixture is well blended.
- Incorporate Dry Ingredients: Gradually add the dry ingredients to the wet mixture, mixing on low speed until just combined. Be careful not to overmix to maintain a tender cake texture.
- Bake the Cakes: Divide the batter evenly between the prepared cake pans. Smooth the tops and bake in the preheated oven for 25-30 minutes, or until a toothpick inserted into the center of the cakes comes out clean.
- Cool the Cakes: Allow the cakes to cool in their pans for about 10 minutes before transferring them to a wire rack to cool completely.
- Prepare Frosting: In a large bowl, beat the softened butter and cream cheese together until fluffy. Gradually add the powdered sugar and vanilla extract, mixing until smooth and creamy.
- Assemble the Cake: Once the cakes are completely cool, place one layer on a serving plate. Spread a generous amount of cream cheese frosting on top. Place the second layer on top and cover the entire cake with the remaining frosting.
- Decorate: Feel free to decorate the cake with additional festive elements like green sprinkles or candy to enhance the Grinch theme.
Extra Tips:
To guarantee the best results, make sure all your ingredients, such as eggs and buttermilk, are at room temperature before starting. This helps with proper mixing and results in a smoother batter.
When adding the food coloring, start with a smaller amount and gradually increase until you reach the desired shade of green to avoid over-coloring.
If you find the frosting too sweet, you can reduce the amount of powdered sugar slightly.
Finally, if you’re preparing the cake in advance, store it in the refrigerator to keep it fresh, but allow it to come to room temperature before serving for the best texture and flavor.
Heart-Shaped Grinch Sugar Cookies
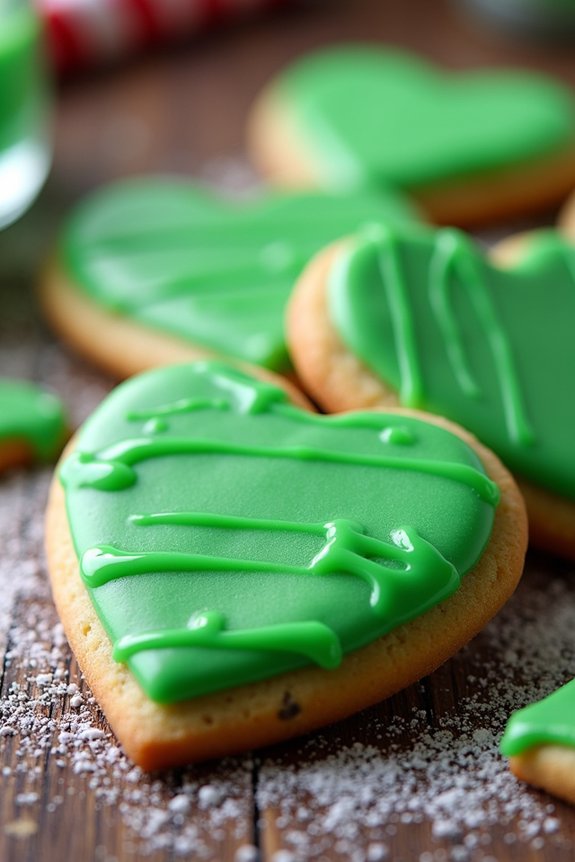
Heart-Shaped Grinch Sugar Cookies are a whimsical and festive treat perfect for adding a touch of mischievous fun to your holiday baking. Inspired by Dr. Seuss’s beloved character, these cookies capture the Grinch’s transformation with their vibrant green hue and heart shape. They offer a delightful blend of buttery sweetness and holiday spirit, making them an ideal addition to any Christmas dessert table.
Whether you’re hosting a holiday party or simply looking for a fun baking project with the family, these cookies are sure to bring smiles and laughter.
To make these cookies, you’ll start with a classic sugar cookie dough, adding a splash of green food coloring to mimic the Grinch’s iconic color. The dough is then rolled out and cut into heart shapes, symbolizing the Grinch’s heart that grows three sizes by the end of the story. Once baked, the cookies are decorated with a simple glaze or icing to enhance their festive appearance. This recipe is designed to serve 4-6 people, ensuring there’s plenty of Grinch-y goodness to go around.
Ingredients:
- 2 ¾ cups all-purpose flour
- 1 teaspoon baking soda
- ½ teaspoon baking powder
- 1 cup unsalted butter, softened
- 1 ½ cups granulated sugar
- 1 large egg
- 1 teaspoon vanilla extract
- Green food coloring
- 2-3 tablespoons milk
- 1 cup powdered sugar
- Heart-shaped cookie cutter
Instructions:
- Prepare the Dough: In a medium bowl, whisk together the flour, baking soda, and baking powder. In a separate large bowl, cream the softened butter and granulated sugar together until light and fluffy. Beat in the egg and vanilla extract until well combined.
- Color the Dough: Gradually add the dry ingredients to the wet ingredients, mixing until a dough forms. Add green food coloring a few drops at a time, mixing thoroughly until you achieve the desired shade of Grinch green.
- Chill the Dough: Wrap the dough in plastic wrap and refrigerate for at least 1 hour. This makes the dough easier to handle and helps the cookies maintain their shape when baking.
- Preheat the Oven: Preheat your oven to 375°F (190°C) and line a baking sheet with parchment paper.
- Roll and Cut the Dough: On a lightly floured surface, roll out the chilled dough to about ¼ inch thickness. Use the heart-shaped cookie cutter to cut out cookies and transfer them to the prepared baking sheet.
- Bake the Cookies: Bake in the preheated oven for 8-10 minutes, or until the edges are lightly golden. Allow the cookies to cool on the baking sheet for 5 minutes before transferring them to a wire rack to cool completely.
- Prepare the Icing: In a small bowl, mix the powdered sugar with enough milk to create a thick but pourable glaze. If desired, add a drop or two of green food coloring to match the cookies.
- Decorate the Cookies: Once the cookies are completely cool, drizzle or spread the icing over the tops. Allow the icing to set before serving.
Extra Tips:
When making Heart-Shaped Grinch Sugar Cookies, it’s important to chill the dough adequately, as this prevents the cookies from spreading too much during baking.
If you prefer a softer cookie, slightly underbake them by a minute or so and let them finish cooking on the baking sheet. For a more pronounced heart shape, gently reshape the cookies with your fingers right after they come out of the oven.
Finally, personalize your cookies by adding edible glitter or sprinkles to the icing before it sets for an extra festive touch.
Grinchy Hot Chocolate Bombs
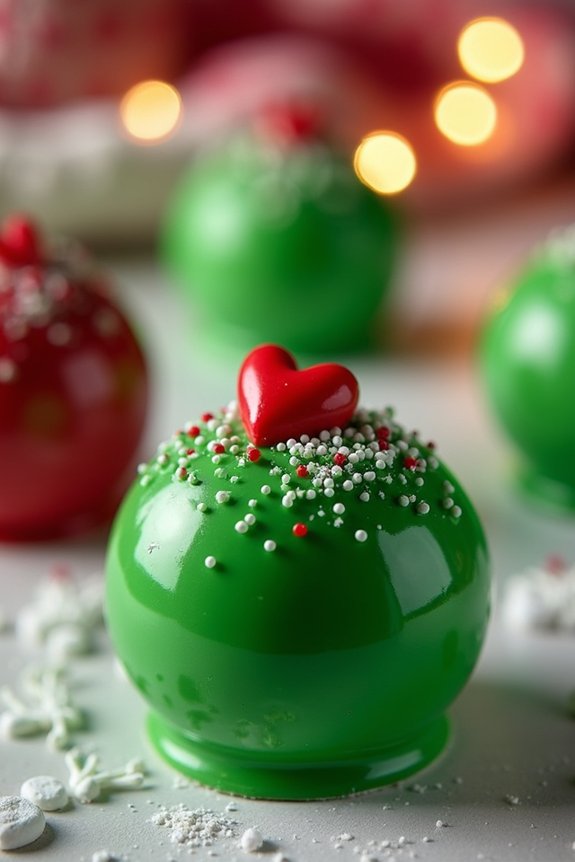
Grinchy Hot Chocolate Bombs are a delightful and whimsical way to bring a touch of the mischievous Grinch into your holiday celebrations. These vibrant green treats aren’t only visually appealing but also explode with rich, creamy hot chocolate goodness when they come into contact with warm milk.
Perfect for cozy winter gatherings or as a fun surprise for children, these hot chocolate bombs capture the essence of the Grinch’s transformation from grumpy to lovable with a heartwarming drink that everyone will enjoy.
To create these Grinchy Hot Chocolate Bombs, you’ll need to craft hollow chocolate spheres filled with hot cocoa mix and mini marshmallows, which will melt into a delicious beverage when dropped into hot milk. The green candy melts provide the signature Grinch color, while a decorative red heart symbolizes the Grinch’s growing heart, adding an extra touch of holiday cheer.
This recipe makes enough for 4-6 servings, perfect for sharing with friends and family.
Ingredients (Serves 4-6):
- 2 cups green candy melts
- 1/2 cup hot cocoa mix
- 1 cup mini marshmallows
- 1 tablespoon red heart sprinkles
- 6 cups milk (for serving)
Instructions:
- Melt the Candy: Begin by melting the green candy melts. Use a microwave-safe bowl and heat the candy melts in 30-second intervals, stirring well between each interval until fully melted and smooth.
- Prepare the Molds: Take a silicone sphere mold and spoon about 1 to 2 tablespoons of the melted candy into each cavity. Use the back of a spoon to evenly coat the inside of each mold, guaranteeing the sides are well covered.
- Set the Shells: Place the filled molds in the refrigerator for about 10-15 minutes, or until the candy shells are firm and can easily be removed from the mold without breaking.
- Fill the Bombs: Once the shells are set, carefully pop them out of the molds. Fill half of the spheres with 1 to 2 tablespoons of hot cocoa mix and a handful of mini marshmallows.
- Seal the Bombs: To seal the bombs, warm a small plate in the microwave for about 30 seconds. Gently press the open edge of an empty half sphere against the warm plate to slightly melt the edges and immediately press it onto a filled half to create a complete sphere. Hold them together for a few seconds to guarantee a good seal.
- Decorate: Use any leftover melted candy to attach a red heart sprinkle to the top of each chocolate bomb for that Grinchy touch.
- Serve: To enjoy, place one hot chocolate bomb into a mug and pour 1 cup of hot milk over the top. Stir until the bomb is fully melted and the drink is well mixed. Watch as it magically transforms into a delicious hot chocolate.
Extra Tips: When melting the candy melts, be careful not to overheat them, as they can seize and become unusable. If you find the melted candy too thick to work with, stirring in a teaspoon of coconut oil can help achieve a smoother consistency.
Make sure the edges of the chocolate shells are well-sealed to prevent any cocoa mix or marshmallows from escaping. For an extra festive touch, consider adding edible glitter or a sprinkle of crushed candy canes for added flavor and appeal.
Grinch-Inspired Cake Pops
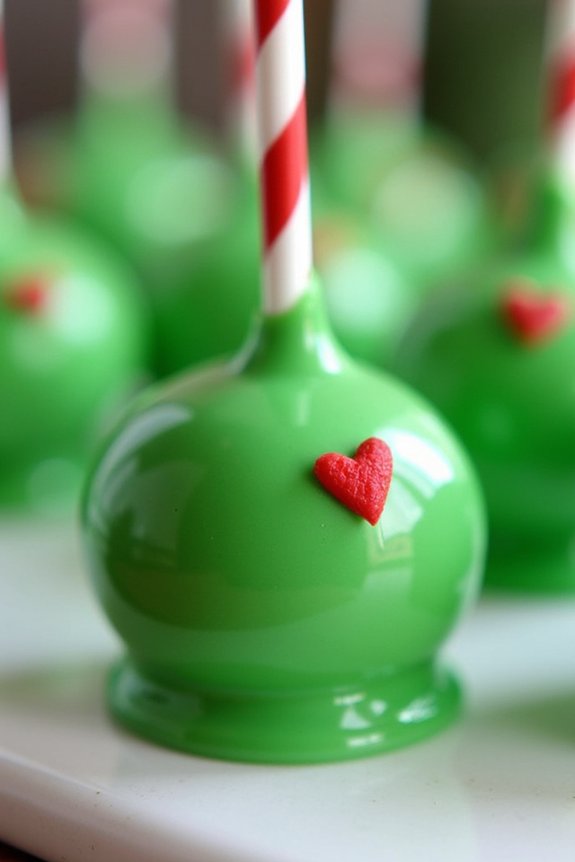
Get ready to add a whimsical touch to your holiday dessert table with these delightful Grinch-Inspired Cake Pops. These pops aren’t only fun to make but are also a hit among children and adults alike, perfect for spreading festive cheer.
Made with moist cake and vibrant green candy coating, they’re decorated with tiny heart sprinkles to represent the Grinch’s famously growing heart. Whether you’re hosting a Christmas party or simply looking for a fun baking activity, these cake pops are sure to steal the show.
Creating these Grinch-themed treats involves preparing a simple vanilla cake, crumbling it, and mixing it with frosting to form cake balls. These are then dipped in a green candy melt and topped with a small red heart sprinkle. The result is a batch of charming, bite-sized treats that are as delicious as they’re adorable.
Best of all, this recipe makes enough cake pops to serve 4-6 people, guaranteeing that there’s plenty to go around for everyone in your holiday gathering.
Ingredients:
- 1 box of vanilla cake mix
- Ingredients required by the cake mix (usually water, eggs, and oil)
- 1 cup vanilla frosting
- 2 cups green candy melts
- 1 tablespoon vegetable shortening
- Red heart sprinkles
- 16-24 lollipop sticks
Instructions:
- Bake the Cake: Preheat your oven according to the cake mix instructions. Prepare the vanilla cake mix as directed on the package and bake in a 9×13 inch pan. Allow the cake to cool completely.
- Prepare the Cake Balls: Once the cake is cooled, crumble it into a large bowl until it resembles fine crumbs. Add 1 cup of vanilla frosting to the crumbled cake and mix until fully combined. The mixture should be moist enough to hold together when squeezed.
- Form the Cake Balls: Roll the cake mixture into 1-inch balls and place them on a baking sheet lined with parchment paper. Insert a lollipop stick into each ball and then freeze the cake pops for about 20-30 minutes to firm them up.
- Melt the Candy Coating: While the cake pops are firming, melt the green candy melts in a microwave-safe bowl, adding 1 tablespoon of vegetable shortening. Microwave in 30-second intervals, stirring in between, until completely melted and smooth.
- Dip the Cake Pops: Remove the cake pops from the freezer. Dip each pop into the melted green candy, tapping gently to remove excess. Immediately place a red heart sprinkle on the top of each pop before the coating sets.
- Set the Pops: Place the dipped cake pops upright in a styrofoam block or a prepared cake pop stand to allow the coating to set completely, about 1 hour.
Extra Tips:
For the best results, make sure the cake is completely cooled before crumbling. This helps achieve a fine crumb texture necessary for forming smooth cake balls.
If the candy coating is too thick, additional shortening can be added to thin it out. Additionally, work quickly when placing the heart sprinkles, as the candy coating sets rapidly.
Finally, if making these ahead of time, store the cake pops in an airtight container in the refrigerator to keep them fresh and delicious.
Grinchy Mint Chocolate Bark
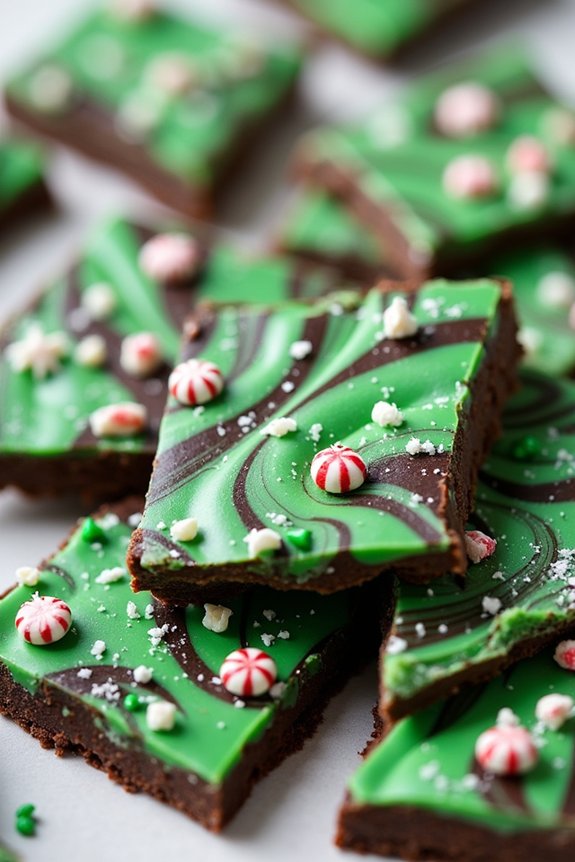
Grinchy Mint Chocolate Bark is a delightful twist on a classic holiday treat that brings a touch of whimsy and the spirit of Dr. Seuss to your Christmas celebrations. This dessert is perfect for those who love the combination of mint and chocolate and want to add a little bit of fun to their holiday spread.
The vibrant green color of the bark, inspired by the Grinch himself, is sure to catch the eye of both kids and adults alike, making it a fun centerpiece for any festive occasion.
The bark features a combination of rich dark chocolate and smooth white chocolate, with a hint of mint to create a revitalizing and indulgent treat. It’s topped with crushed peppermint candies and green sprinkles, adding texture and a pop of color.
This recipe is easy to make, requiring just a few simple steps and minimal ingredients, making it a perfect project for both novice and experienced cooks. Whether you’re hosting a holiday party or simply want to enjoy a sweet snack, Grinchy Mint Chocolate Bark is a delightful addition to your Christmas dessert menu.
Ingredients (Serves 4-6 people):
- 12 ounces of dark chocolate chips
- 12 ounces of white chocolate chips
- 1 teaspoon of peppermint extract
- Green food coloring
- 1/2 cup of crushed peppermint candies
- Green sprinkles
Cooking Instructions:
- Prepare the baking sheet: Line a baking sheet with parchment paper or a silicone baking mat to guarantee the chocolate doesn’t stick.
- Melt the dark chocolate: Use a microwave-safe bowl to melt the dark chocolate chips in 30-second intervals, stirring in between, until smooth. Be careful not to overheat the chocolate.
- Spread the dark chocolate: Pour the melted dark chocolate onto the prepared baking sheet and use a spatula to spread it evenly to your desired thickness. Allow it to set slightly but not completely harden.
- Melt the white chocolate: In another microwave-safe bowl, melt the white chocolate chips in the same manner as the dark chocolate. Once melted, stir in the peppermint extract and a few drops of green food coloring until you achieve your desired shade of Grinchy green.
- Layer the white chocolate: Drizzle the green mint white chocolate over the dark chocolate layer. Use a toothpick or a skewer to swirl the chocolates together, creating a marbled effect.
- Add toppings: Immediately sprinkle the crushed peppermint candies and green sprinkles over the top of the chocolate before it sets.
- Allow to set: Let the chocolate bark sit at room temperature until completely set, or place it in the refrigerator to speed up the process.
- Break into pieces: Once set, break the bark into irregular pieces and serve.
Extra Tips:
When melting chocolate, make sure that no water comes into contact with it, as even a small amount can cause the chocolate to seize and become grainy.
If you prefer a less minty flavor, reduce the amount of peppermint extract added to the white chocolate.
When swirling the chocolates, work quickly to prevent them from hardening before you achieve your desired pattern.
This bark can be stored in an airtight container for up to two weeks, making it a great make-ahead option for your holiday gatherings.
Grinch Cheesecake Bars
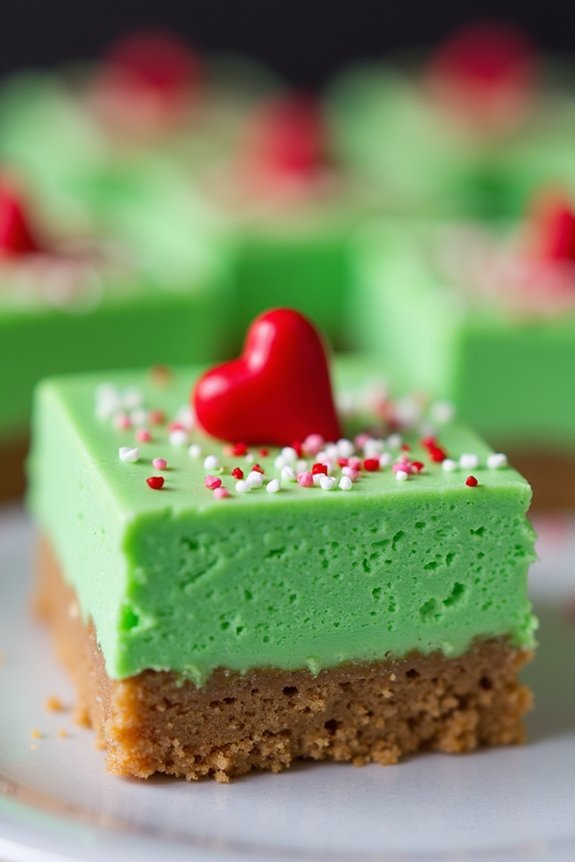
Grinch Cheesecake Bars are a delightful and whimsical dessert perfect for adding a touch of fun to your holiday gatherings. Inspired by the iconic character from Dr. Seuss’s “How the Grinch Stole Christmas,” these bars feature a vibrant green hue and a creamy cheesecake texture that will enchant both children and adults alike.
The combination of a crumbly cookie crust and a luscious cheesecake center makes these bars an irresistible treat that’s certain to brighten up your festive spread. The Grinch Cheesecake Bars aren’t only delicious but also simple to prepare, making them an excellent choice for busy hosts who want to impress their guests with minimal fuss.
With a few basic ingredients and some creative touches, you can transform ordinary cheesecake into a festive masterpiece that captures the spirit of Christmas. Whether you’re hosting a Grinch-themed party or simply looking to add some holiday cheer to your dessert table, these cheesecake bars are certain to steal the show.
Ingredients for 4-6 servings:
- 1 1/2 cups graham cracker crumbs
- 1/4 cup granulated sugar
- 1/2 cup unsalted butter, melted
- 16 oz cream cheese, softened
- 1 cup powdered sugar
- 2 large eggs
- 1 teaspoon vanilla extract
- Green food coloring
- Red heart-shaped sprinkles or candies
Cooking Instructions:
- Prepare the Crust: Preheat your oven to 325°F (163°C). In a medium mixing bowl, combine the graham cracker crumbs and granulated sugar. Stir in the melted butter until the mixture resembles wet sand. Press the mixture firmly into the bottom of a greased 9×9-inch baking pan to form an even layer. Bake in the preheated oven for 8-10 minutes, then set aside to cool.
- Make the Cheesecake Filling: In a large bowl, beat the softened cream cheese with an electric mixer until smooth and creamy. Gradually add the powdered sugar, mixing until well combined. Beat in the eggs, one at a time, ensuring each is fully incorporated before adding the next. Stir in the vanilla extract.
- Color the Cheesecake Mixture: Add a few drops of green food coloring to the cream cheese mixture and stir until you achieve the desired Grinch-like shade of green. Make sure the color is evenly distributed throughout the mixture.
- Assemble the Bars: Pour the green cheesecake mixture over the cooled crust, spreading it evenly with a spatula. Tap the pan gently on the counter to remove any air bubbles.
- Bake the Cheesecake: Return the pan to the oven and bake for 25-30 minutes, or until the edges are set and the center is slightly jiggly. Remove from the oven and allow to cool to room temperature, then refrigerate for at least 2 hours to set completely.
- Decorate and Serve: Once chilled, cut the cheesecake into bars. Decorate each bar with a red heart-shaped sprinkle or candy on top, mimicking the Grinch’s growing heart. Serve chilled and enjoy!
Extra Tips:
For an even more festive presentation, consider garnishing the cheesecake bars with a dusting of powdered sugar or a drizzle of white chocolate. If you prefer a thicker crust, simply increase the quantity of graham cracker crumbs and butter proportionally.
When mixing the green food coloring, start with a small amount and gradually add more until you reach the desired shade—it’s easier to add more color than to fix a mixture that’s too dark. Finally, make sure to allow the cheesecake to cool completely before slicing to guarantee clean, neat cuts.
Grinch-Faced Cupcakes
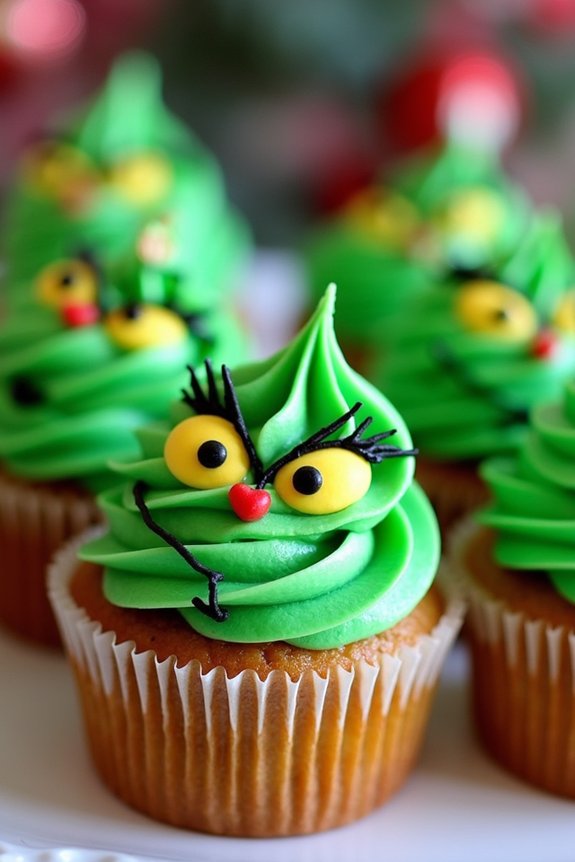
Grinch-Faced Cupcakes are a whimsical and festive addition to any holiday dessert table. Inspired by the classic character from Dr. Seuss’s “How the Grinch Stole Christmas,” these cupcakes are sure to delight both children and adults with their vibrant green color and mischievous Grinch faces. Perfect for a Christmas party or a fun family baking activity, these cupcakes not only look the part but also taste delicious, with a moist vanilla base and creamy buttercream frosting.
Creating Grinch-Faced Cupcakes involves a few simple steps that even novice bakers can master. The process starts with baking fluffy vanilla cupcakes, which are then topped with a smooth, green-tinted buttercream frosting. The real magic happens when you add the Grinch’s facial features using colored fondant or icing, bringing the character to life. This recipe is designed to serve 4-6 people, making it great for a small gathering or a special treat for the family.
Ingredients (Serves 4-6):
- 1 cup all-purpose flour
- 1 cup granulated sugar
- 1/2 cup unsalted butter, softened
- 2 large eggs
- 1 teaspoon vanilla extract
- 1/2 cup whole milk
- 1 1/2 teaspoons baking powder
- 1/4 teaspoon salt
- 1/2 cup unsalted butter, softened (for frosting)
- 2 cups powdered sugar (for frosting)
- 2 tablespoons milk (for frosting)
- Green food coloring
- Black and red decorating gel or fondant
- Yellow fondant for eyes
Cooking Instructions:
- Preheat and Prepare: Preheat your oven to 350°F (175°C). Line a cupcake tin with paper liners to prevent sticking.
- Mix the Batter: In a large mixing bowl, cream together the softened butter and granulated sugar until light and fluffy. Beat in the eggs one at a time, then stir in the vanilla extract.
- Combine Dry Ingredients: In a separate bowl, whisk together the flour, baking powder, and salt. Gradually add this dry mixture to the wet ingredients, alternating with the milk, until just combined. Be careful not to overmix.
- Bake the Cupcakes: Divide the batter evenly among the cupcake liners, filling each about two-thirds full. Bake in the preheated oven for 18-20 minutes, or until a toothpick inserted into the center of a cupcake comes out clean. Allow the cupcakes to cool completely on a wire rack.
- Prepare the Frosting: While the cupcakes are cooling, prepare the frosting. In a medium bowl, beat the softened butter until smooth and creamy. Gradually add the powdered sugar, mixing well after each addition. Stir in the milk and a few drops of green food coloring, adjusting the color to your preference.
- Decorate the Cupcakes: Frost the cooled cupcakes with the green buttercream using a piping bag or a spatula. Use the yellow fondant to create oval shapes for the eyes, and place them on the cupcakes. Use the black decorating gel or fondant to add pupils, eyebrows, and a mischievous grin. Finish with a tiny red fondant heart to capture the Grinch’s small heart.
Extra Tips:
When making Grinch-Faced Cupcakes, verify that all your ingredients are at room temperature before starting, as this will help with even mixing and texture.
For a more vibrant green frosting, begin with a small amount of food coloring and gradually add more until you achieve the desired shade, as different brands can vary in intensity.
If you’re working with fondant for the first time, practice shaping the facial features on a flat surface before applying them to the cupcakes. This will help you perfect your technique and verify that the Grinch’s face comes out just right.
Grinch-Themed Donuts
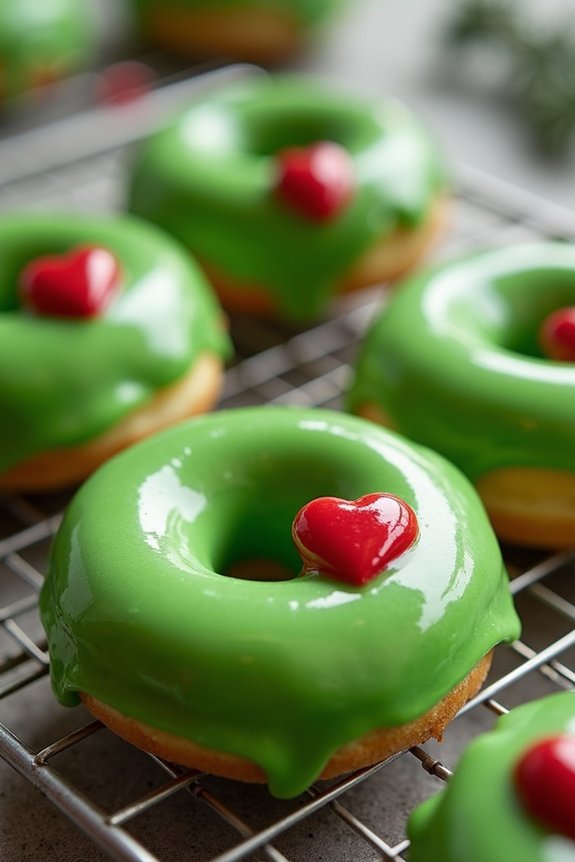
Transport your taste buds to the whimsical world of Whoville with these delightful Grinch-Themed Donuts. Perfect for a fun and festive holiday treat, these donuts are inspired by the iconic green character with a heart that grows three sizes in a day. The combination of fluffy, vibrant green donuts with a sweet glaze and a charming red candy heart will surely bring smiles to the faces of both children and adults alike.
Whether you’re hosting a Christmas party or simply want to indulge in a creative baking project, these donuts will add a touch of Grinch-inspired magic to your celebrations.
Creating these Grinch-Themed Donuts is a joyous and straightforward process. Using a simple donut batter, these baked delights are tinted with a vibrant green color to match the Grinch’s notorious hue. Once baked, they’re coated with a vanilla glaze and adorned with a single red candy heart, symbolizing the Grinch’s transformation.
This recipe yields approximately 12 donuts, making it perfect for a small gathering of 4-6 people. So, gather your ingredients and get ready to whip up a batch of these delightful treats that will surely warm even the Grinch’s heart.
Ingredients (Serves 4-6):
- 2 cups all-purpose flour
- 1 cup granulated sugar
- 2 teaspoons baking powder
- 1/2 teaspoon baking soda
- 1/2 teaspoon salt
- 1 cup buttermilk
- 2 large eggs
- 1/4 cup unsalted butter, melted
- 1 teaspoon vanilla extract
- Green food coloring
- 2 cups powdered sugar
- 3 tablespoons milk
- 1 teaspoon vanilla extract
- Red candy hearts
Cooking Instructions:
- Preheat Oven: Start by preheating your oven to 350°F (175°C). Prepare a donut pan by lightly greasing it to prevent sticking.
- Mix Dry Ingredients: In a large mixing bowl, combine the all-purpose flour, granulated sugar, baking powder, baking soda, and salt. Whisk these ingredients together until they’re well mixed.
- Prepare Wet Mixture: In a separate bowl, whisk together the buttermilk, eggs, melted butter, and vanilla extract until the mixture is smooth.
- Combine Mixtures: Gradually add the wet ingredients to the dry ingredients, stirring gently until just combined. Be careful not to overmix the batter, as this will result in dense donuts.
- Add Color: Add a few drops of green food coloring to the batter. Stir until the color is evenly distributed and the desired shade of Grinch-green is achieved.
- Fill Donut Pan: Spoon the batter into the prepared donut pan, filling each mold about 3/4 full to allow room for rising.
- Bake Donuts: Place the pan in the preheated oven and bake for about 10-12 minutes. The donuts are ready when a toothpick inserted into the center comes out clean.
- Cool Donuts: Allow the donuts to cool in the pan for 5 minutes before transferring them to a wire rack to cool completely.
- Prepare Glaze: While the donuts are cooling, prepare the glaze by mixing the powdered sugar, milk, and vanilla extract in a bowl until smooth.
- Glaze Donuts: Dip each cooled donut into the glaze, allowing any excess to drip off. Place the donuts back on the wire rack.
- Decorate: Before the glaze sets completely, place a red candy heart on each donut to represent the Grinch’s heart.
Extra Tips:
When making these Grinch-Themed Donuts, confirm your ingredients, particularly the eggs and buttermilk, are at room temperature to help the batter mix more smoothly.
For a richer color, you can adjust the amount of green food coloring to your preference, but be cautious not to overdo it to avoid any aftertaste.
If you don’t have a donut pan, you can use a muffin pan and a small piece of foil to create a center hole.
Finally, keep an eye on the baking time, as overbaking can lead to dry donuts. Enjoy the process, and don’t forget to have fun with the decorations!
Grinchy Who-Pudding Parfaits
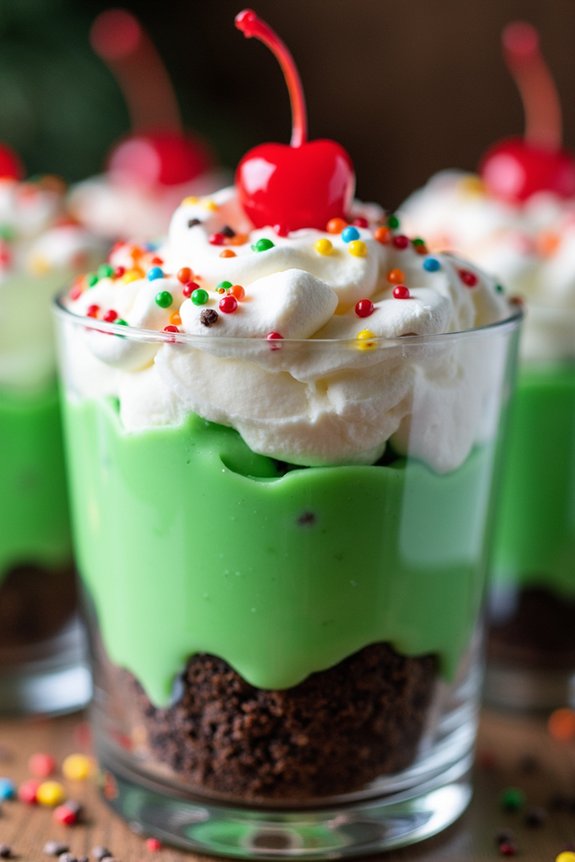
Grinchy Who-Pudding Parfaits are a whimsical and delicious dessert perfect for adding a splash of festive fun to your holiday gatherings. Inspired by the mischievous Grinch himself, these parfaits combine layers of creamy pudding, fluffy whipped topping, and a hint of green to bring the spirit of Whoville to your table. The vibrant green color and delightful flavors will surely make these parfaits a hit with both kids and adults alike.
This recipe is designed to serve 4-6 people, making it ideal for small gatherings or family dinners. The preparation is straightforward and requires minimal ingredients, allowing you to focus on enjoying the holiday festivities rather than spending too much time in the kitchen. Follow these instructions to create a dessert that’s both visually striking and irresistibly tasty.
Ingredients:
- 1 package (3.4 oz) instant vanilla pudding mix
- 2 cups cold milk
- Green food coloring
- 1 cup whipped topping
- 1 cup mini marshmallows
- 1/2 cup crushed chocolate cookies
- 1/2 cup festive sprinkles (red, green, or mixed)
- 6 maraschino cherries with stems
Instructions:
- Prepare the Pudding: In a medium mixing bowl, combine the instant vanilla pudding mix with cold milk. Whisk together until the mixture is smooth and begins to thicken, about 2-3 minutes.
- Add Color: Gradually add green food coloring to the pudding mixture, stirring until you achieve the desired shade of Grinchy green. Set aside to let the pudding set.
- Layer the Parfaits: Start by placing a layer of crushed chocolate cookies at the bottom of each serving glass or jar. This will form the base of your parfait.
- Add Pudding: Spoon a layer of the green pudding over the cookie crumbs in each glass, filling about one-third of the glass.
- Whipped Topping and Marshmallows: Add a layer of whipped topping over the pudding, then sprinkle mini marshmallows on top for added texture and sweetness.
- Repeat Layers: Repeat the layers of cookie crumbs, green pudding, and whipped topping until the glasses are filled, ending with a topping of whipped cream.
- Garnish: Finish each parfait with a sprinkle of festive sprinkles and place a maraschino cherry on top of each one for a pop of color and a hint of whimsy.
Extra Tips: For the best results, prepare the Grinchy Who-Pudding Parfaits a few hours in advance to allow the flavors to meld together and the pudding to fully set. If you prefer a lighter dessert, consider using low-fat or sugar-free pudding mix and whipped topping.
Additionally, you can customize the parfaits by adding layers of fruit or using different types of cookies to suit your taste preferences. Remember to store any leftovers in the refrigerator and consume them within two days to ascertain freshness.
Grinch Marshmallow Pops
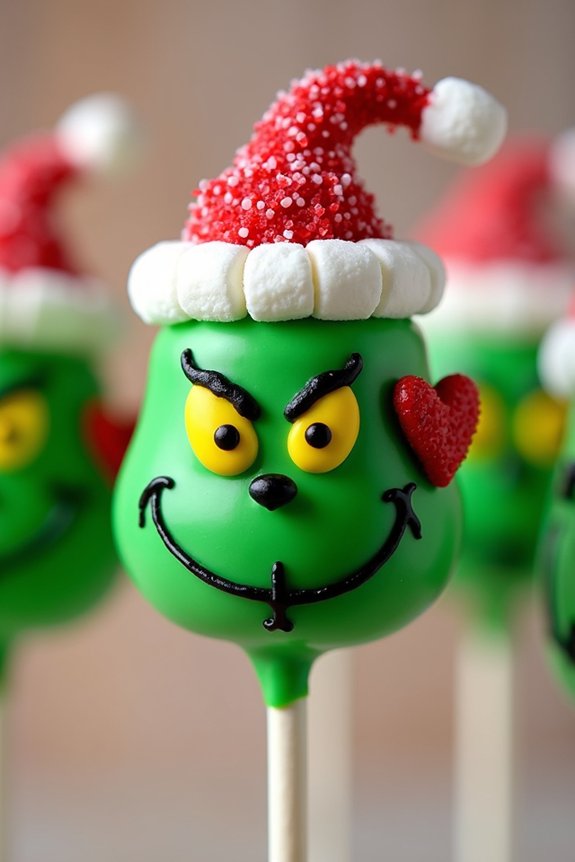
Grinch Marshmallow Pops are a delightful and whimsical treat perfect for adding a touch of mischief to your holiday dessert table. Inspired by the beloved Dr. Seuss character, these pops capture the Grinch’s green hue and heartwarming charm, making them a hit with both kids and adults alike.
Not only are they visually appealing, but they’re also fun to make, allowing you to involve the whole family in the festive spirit of Christmas baking.
These Grinch Marshmallow Pops are incredibly easy to prepare, requiring minimal ingredients and no baking. The combination of fluffy marshmallows, vibrant green candy coating, and a sprinkle of creative decorations guarantees that each pop is as delicious as it’s eye-catching.
Whether you’re hosting a Grinch-themed Christmas party or simply want to bring a smile to someone’s face, these pops are sure to spread cheer and joy.
Ingredients (Serves 4-6 people):
- 12 large marshmallows
- 1 cup green candy melts
- 12 lollipop sticks
- 1/4 cup red heart sprinkles
- 1 tablespoon coconut oil
- 1/4 cup mini marshmallows
- Edible black food pen
Instructions:
- Prepare the Workstation: Start by laying out a baking sheet lined with parchment paper. This will be where your marshmallow pops will cool and set.
- Melt the Candy Coating: In a microwave-safe bowl, combine the green candy melts and coconut oil. Microwave in 30-second intervals, stirring in between, until the mixture is smooth and fully melted. This will create the Grinch’s signature green coating.
- Assemble the Pops: Insert a lollipop stick into each of the large marshmallows. Dip each marshmallow into the melted green candy, guaranteeing it’s evenly coated. Allow any excess to drip off before placing them on the prepared baking sheet.
- Decorate the Pops: Before the candy coating sets, press a red heart sprinkle onto each marshmallow pop to represent the Grinch’s heart. Cut the mini marshmallows in half, and stick them on top of each pop to create a fluffy Santa hat.
- Add the Grinch’s Face: Once the candy coating is completely set, use the edible black food pen to draw the Grinch’s eyes and mischievous smile on each pop.
- Setting Time: Allow the pops to sit at room temperature or place them in the refrigerator for about 20 minutes to confirm the coating hardens completely.
Extra Tips:
To make the process smoother, guarantee all your ingredients and tools are organized before starting. If you find the candy coating too thick, add a bit more coconut oil to achieve a smoother consistency.
For an extra touch of creativity, consider using different colored sprinkles or edible glitter to add some sparkle to the Grinch’s hat. Remember, these pops aren’t just about taste but also about having fun, so feel free to experiment with different designs and decorations to suit your festive theme.
Grinchy Christmas Tree Brownies

Celebrate the holiday season with a whimsical twist on a classic treat—Grinchy Christmas Tree Brownies. Inspired by the beloved green character, these festive brownies are sure to bring a smile to everyone’s face, whether they’re a fan of the Grinch or just love a good holiday dessert.
With their vibrant green hue and delightful tree shape, they make for an eye-catching addition to any Christmas dessert table. Perfect for family gatherings or holiday parties, these brownies combine the rich, fudgy goodness of chocolate with a playful seasonal theme.
Making these Grinchy Christmas Tree Brownies is a fun and straightforward process that even the kids can help with. This recipe is designed to serve 4-6 people, making it ideal for small gatherings or as part of a larger dessert spread.
You’ll be constructing a simple brownie base, cutting it into festive tree shapes, and decorating them with colorful toppings to complete the look. Not only are these brownies delicious, but they also offer a creative way to bring the holiday spirit into your home.
Ingredients for Grinchy Christmas Tree Brownies (Serving Size: 4-6)
- 1 box of brownie mix (family size)
- 2 large eggs
- 1/2 cup vegetable oil
- 1/4 cup water
- Green food coloring
- 1 cup white chocolate chips
- 1/4 cup heavy cream
- Mini candy canes
- Assorted sprinkles and edible decorations
- Powdered sugar (for dusting, optional)
Cooking Instructions
- Prepare the Brownie Batter: Preheat your oven to the temperature specified on the brownie mix box. In a large mixing bowl, combine the brownie mix, eggs, vegetable oil, and water. Stir until well blended and smooth. Add green food coloring to the batter until you achieve the desired shade of Grinchy green.
- Bake the Brownies: Pour the green brownie batter into a greased 9×13 inch baking pan, spreading it evenly. Bake according to the package instructions, usually about 20-25 minutes, or until a toothpick inserted in the center comes out clean. Allow the brownies to cool completely in the pan.
- Prepare the White Chocolate Ganache: In a small saucepan, heat the heavy cream over medium heat until it begins to simmer. Remove from heat and add the white chocolate chips, stirring until the mixture is smooth and glossy. If desired, add a few drops of green food coloring to match the brownies. Set aside to cool slightly.
- Cut and Decorate: Once the brownies have cooled, remove them from the pan and cut them into triangle shapes to resemble Christmas trees. Break the curved part off mini candy canes and insert the straight part into the base of each brownie tree to create a trunk. Drizzle the white chocolate ganache over the brownies and decorate with sprinkles and edible decorations. Dust with powdered sugar for a snowy effect if desired.
- Serve and Enjoy: Arrange the Grinchy Christmas Tree Brownies on a festive platter and serve them to your delighted guests.
Extra Tips
For an extra Grinchy touch, consider adding a drop of peppermint extract to the brownie batter to complement the candy cane trunks.
When cutting the brownies into trees, use a sharp knife to guarantee clean edges. If you want to get creative, try using different types of sprinkles or edible glitter to give each tree its unique personality.
And remember, these brownies are best enjoyed with a glass of cold milk or a cup of hot cocoa!
Grinchy Lime Jello Cups
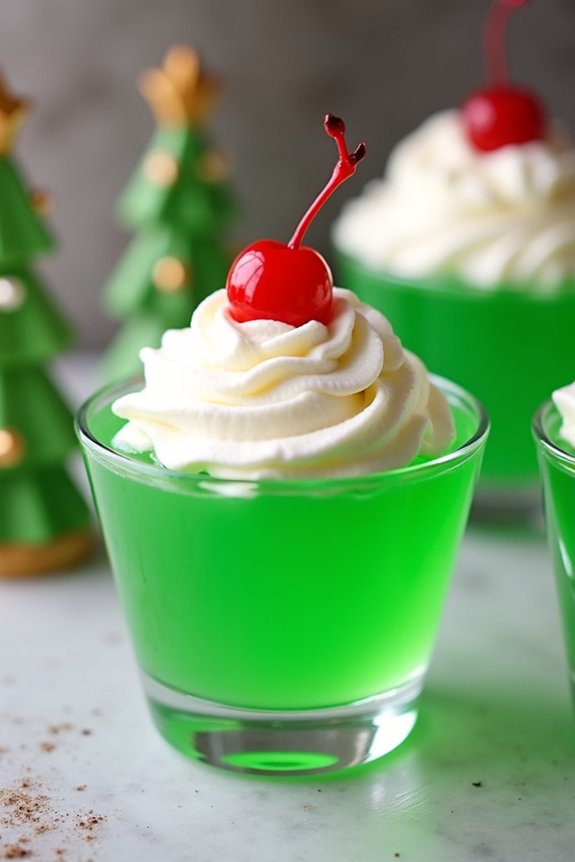
These Grinchy Lime Jello Cups can be made ahead of time, making them a convenient option for busy holiday schedules. With a serving size of 4-6 people, they’re suitable for small gatherings or a cozy family dessert.
The vibrant green hue of the jello, paired with a dollop of whipped cream and a cherry on top, captures the essence of the Grinch’s transformation from cold-hearted to warm and fuzzy. Serve these delightful cups at your next holiday party, and watch them disappear in no time!
Ingredients (Serves 4-6 people):
- 2 packages of lime-flavored jello (3 oz each)
- 2 cups boiling water
- 2 cups cold water
- 1 cup whipped cream or whipped topping
- 6 maraschino cherries
- Green food coloring (optional)
- Clear plastic cups or dessert glasses
Instructions:
- Prepare the Jello: Start by boiling 2 cups of water. Once boiling, pour the water into a bowl and add the lime jello packages. Stir until the jello is completely dissolved.
- Add Cold Water: After the jello has dissolved, add 2 cups of cold water to the mixture. Stir well to guarantee everything is combined.
- Add Food Coloring (Optional): If you want a more vibrant green color, add a few drops of green food coloring and stir until you achieve the desired shade.
- Pour into Cups: Carefully pour the jello mixture into clear plastic cups or dessert glasses, filling each about halfway. This will allow room for the whipped topping later.
- Chill the Jello: Place the cups in the refrigerator for at least 2 to 4 hours or until the jello is set and firm.
- Add Whipped Topping: Once the jello has set, remove the cups from the refrigerator. Add a generous dollop of whipped cream or whipped topping to each cup.
- Garnish with Cherries: Top each whipped cream dollop with a maraschino cherry to complete the Grinchy look.
Extra Tips:
For an added twist, you can incorporate a layer of crushed cookies or graham crackers at the bottom of the cups before pouring in the jello, adding a nice texture contrast.
If you’re preparing these ahead of time, add the whipped cream and cherry garnish just before serving to keep them looking fresh and appetizing.
Adjust the amount of food coloring based on your preference for how “grinchy” green you want your dessert to appear. Enjoy this whimsical and delicious treat as part of your holiday celebrations!