

Planning a spooky adults-only Halloween bash? You’re in for a treat. Think Mummy Brie oozing with berry “blood” sauce or Batwing Bacon-Wrapped Jalapeños that pack a flavorful punch. These eerie and delightful appetizers will make your guests scream with delight. Let’s explore these wickedly wonderful bites that are sure to elevate your party’s culinary charm.
Spooky Stuffed Mushrooms

As Halloween approaches, it’s time to think about appetizers that will thrill your adult guests with both flavor and a touch of spooky flair. Spooky Stuffed Mushrooms are the perfect addition to your Halloween spread, offering a savory bite-sized treat that’s as delicious as it’s ghoulish.
These mushrooms are filled with a rich and creamy mixture of cheese, herbs, and spices, creating a delightful contrast with the earthy taste of the mushrooms. The final touch is a sprinkle of paprika, giving them an eerie, blood-red hue that’s sure to be a conversation starter at your Halloween gathering.
Ideal for serving 4-6 people, these Spooky Stuffed Mushrooms are easy to prepare and can be made ahead of time, allowing you to enjoy the festivities with your guests. The combination of flavors and textures will satisfy the palates of even the most discerning adults, while the presentation will add a festive touch to your party table.
Whether you’re hosting a haunted house party or a more intimate Halloween dinner, these mushrooms are sure to impress.
Ingredients:
- 24 large button mushrooms
- 2 tablespoons olive oil
- 1 small onion, finely chopped
- 2 garlic cloves, minced
- 1/2 cup cream cheese, softened
- 1/4 cup grated Parmesan cheese
- 1/4 cup bread crumbs
- 2 tablespoons fresh parsley, chopped
- 1 teaspoon dried thyme
- Salt and pepper to taste
- 1/2 teaspoon paprika
Cooking Instructions:
- Preheat and Prep Mushrooms: Preheat your oven to 375°F (190°C). Clean the mushrooms with a damp paper towel and carefully remove the stems. Set the mushroom caps aside and finely chop the stems.
- Cook Onion and Garlic: In a skillet over medium heat, add 1 tablespoon of olive oil. Sauté the onion and garlic until they become translucent, about 3-4 minutes.
- Prepare Filling: Add the chopped mushroom stems to the skillet and cook for an additional 2 minutes. Remove from heat and transfer the mixture to a bowl. Add the cream cheese, Parmesan cheese, bread crumbs, parsley, thyme, salt, and pepper. Mix until well combined.
- Stuff Mushrooms: Using a spoon, fill each mushroom cap with the cheese mixture, pressing down slightly to guarantee the filling is secure.
- Bake Mushrooms: Arrange the stuffed mushrooms on a baking sheet. Drizzle with the remaining olive oil and sprinkle the tops with paprika for a spooky touch. Bake in the oven for 20-25 minutes, or until the mushrooms are tender and the tops are golden brown.
- Serve: Allow the mushrooms to cool slightly before serving. Enjoy them warm for the best flavor.
Extra Tips:
To add an extra kick, consider incorporating a pinch of red pepper flakes into the filling for a spicier version.
If you want to make these mushrooms ahead of time, simply prepare them up to the baking step, cover them, and refrigerate. When you’re ready to serve, just pop them in the oven and bake as directed.
Ghastly Guacamole Deviled Eggs
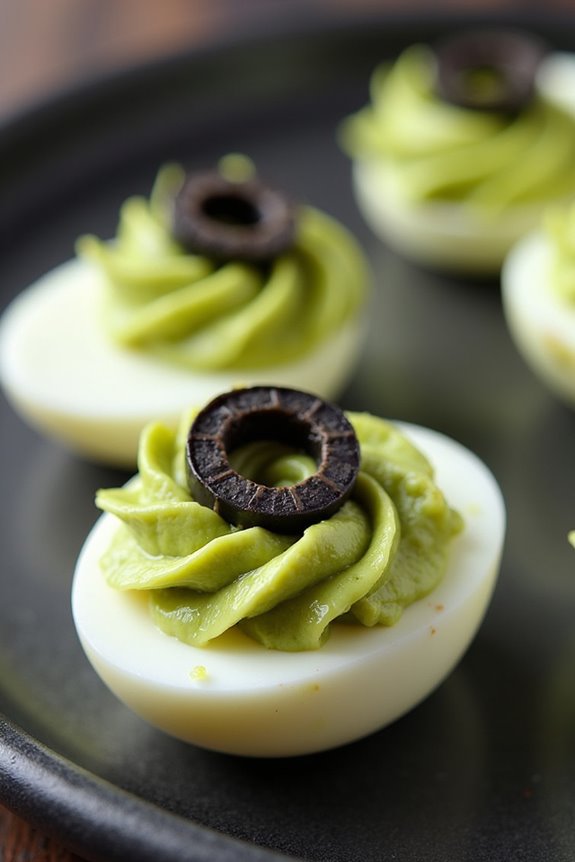
Ghastly Guacamole Deviled Eggs are a spooktacular twist on classic deviled eggs, perfect for an adult Halloween party. This appetizer combines the creamy richness of guacamole with the tangy flavor of deviled eggs, making it an irresistible treat that’s both delicious and visually striking.
The vibrant green filling, made with ripe avocados, contrasts beautifully with the white egg halves, creating an eerie and appetizing presentation that’s bound to impress your guests. This dish isn’t only a treat for the taste buds but also a visual delight, featuring creepy garnishes like black olive spiders or edible eyes to add a touch of Halloween fun.
Perfect for serving 4-6 people, these Ghastly Guacamole Deviled Eggs are the perfect way to start off your spooky gathering with a tasty and thematic bite.
Ingredients (Serves 4-6):
- 6 large eggs
- 2 ripe avocados
- 1 tablespoon lime juice
- 2 tablespoons mayonnaise
- 1 teaspoon Dijon mustard
- Salt and pepper to taste
- 1 small jalapeño, finely chopped (optional)
- 1 tablespoon cilantro, chopped
- Black olives or edible eyes for garnish
Instructions:
- Boil the Eggs: Place the eggs in a single layer in a saucepan and cover them with water. Bring to a boil over medium-high heat. Once the water boils, cover the saucepan, turn off the heat, and let the eggs sit for 10-12 minutes.
- Cool and Peel: After the eggs have cooked, transfer them to a bowl of ice water to cool for at least 5 minutes. Once cooled, gently peel the eggs and slice them in half lengthwise.
- Prepare the Filling: Scoop out the egg yolks into a medium bowl. Add the avocados, lime juice, mayonnaise, Dijon mustard, salt, and pepper. Use a fork or a hand mixer to combine the ingredients until smooth.
- Add Some Heat: If desired, mix in the finely chopped jalapeño for a spicy kick. Stir in the chopped cilantro for added flavor.
- Fill the Egg Whites: Use a spoon or a piping bag to fill the egg white halves with the guacamole mixture. Be generous with the filling to guarantee each egg is adequately stuffed.
- Garnish: Decorate each filled egg with slices of black olives or place edible eyes on top for a spooky effect.
- Serve and Enjoy: Arrange the deviled eggs on a platter and serve immediately. Enjoy the creamy, tangy, and slightly spicy flavors of these ghastly treats.
Extra Tips:
To guarantee perfectly cooked eggs, it’s vital not to overcook them, which helps prevent a greenish ring from forming around the yolk.
When selecting avocados, choose ones that yield slightly to gentle pressure for the best consistency in your filling. If you’re preparing these ahead of time, cover the filled eggs with plastic wrap to prevent the guacamole from browning.
For an extra festive touch, consider adding a few drops of green food coloring to the filling for an even more vibrant appearance.
Phantom Pumpkin Risotto Bites

Phantom Pumpkin Risotto Bites are the perfect sophisticated Halloween appetizer for adult gatherings. These tantalizing bites blend the creamy texture of risotto infused with fresh pumpkin puree, offering a subtle sweetness and rich autumn flavor.
The risotto is shaped into bite-sized balls, coated with breadcrumbs, and then baked to a golden crisp, providing a delightful contrast in textures. Each bite is a symphony of flavors that’s both spooky and comforting, making it an ideal starter for any Halloween celebration.
The name “Phantom Pumpkin” adds a touch of mystery and allure, making it a conversation starter at any Halloween party. These risotto bites aren’t only delicious but also visually striking with their warm orange hue, reminiscent of the classic Halloween pumpkin.
The recipe is designed to cater to 4-6 people, guaranteeing that there’s plenty to go around. Invite your guests to indulge in these hauntingly good morsels that perfectly set the mood for an evening of frights and delights.
Ingredients (serving size: 4-6 people):
- 1 cup Arborio rice
- 2 cups vegetable broth
- 1 cup pumpkin puree
- 1/2 cup grated Parmesan cheese
- 1/2 cup chopped onion
- 2 cloves garlic, minced
- 1 tablespoon olive oil
- 1/2 cup dry white wine
- 1 teaspoon salt
- 1/2 teaspoon black pepper
- 1 teaspoon ground nutmeg
- 1 cup breadcrumbs
- 1 egg, beaten
- 2 tablespoons butter
Instructions:
- Prepare the Risotto Base:
- In a large saucepan, heat olive oil over medium heat. Add the chopped onion and garlic, sautéing until the onion becomes translucent.
- Cook the Rice:
- Add the Arborio rice to the saucepan, stirring constantly for about 2 minutes until the rice is slightly toasted. Pour in the white wine and cook until the wine is fully absorbed.
- Add Broth and Pumpkin:
- Gradually add the vegetable broth, one ladle at a time, stirring frequently. Allow each addition to be absorbed before adding the next. Once all the broth is added, stir in the pumpkin puree, salt, pepper, and nutmeg.
- Incorporate Cheese:
- Once the rice is creamy and cooked, remove from heat. Stir in the grated Parmesan cheese and butter, mixing until the cheese is fully melted and incorporated.
- Shape and Coat:
- Allow the risotto to cool slightly before handling. Using your hands, form the risotto into small balls. Dip each ball into the beaten egg, then roll it in breadcrumbs until fully coated.
- Bake the Bites:
- Preheat the oven to 375°F (190°C). Place the coated risotto balls on a baking sheet lined with parchment paper. Bake for 20-25 minutes or until golden brown and crispy.
- Serve:
- Let the bites cool slightly before serving. Arrange them on a platter and serve with your favorite dipping sauce.
Extra Tips:
For an extra touch of Halloween flair, consider adding a small piece of black olive or a slice of roasted red pepper on top of each risotto bite before baking, giving them an eerie “eye” appearance.
If you prefer a richer flavor, substitute chicken broth for vegetable broth. Confirm the risotto is completely cool before shaping to make handling easier and to help the bites maintain their shape during baking.
Enjoy crafting these Phantom Pumpkin Risotto Bites, turning your Halloween appetizer into a bewitching culinary experience!
Witch’s Brew Cheese Fondue

Indulge in the enchanting flavors of a Witch’s Brew Cheese Fondue, a sophisticated and spooky appetizer perfect for Halloween gatherings. This dish combines a rich blend of cheeses melted into a velvety concoction, seasoned with aromatic spices and a splash of white wine for a smooth finish.
Served with an assortment of dippables, this fondue is certain to cast a spell on your guests and transport them into a world of savory delight. The Witch’s Brew Cheese Fondue is ideal for an adult Halloween party, providing both a visual and culinary treat.
The bubbling cauldron of cheese isn’t only eye-catching but also offers a communal dining experience, encouraging guests to gather around and enjoy together. This recipe serves 4-6 people, making it a perfect centerpiece for a small get-together or a pre-dinner appetizer.
Ingredients (for 4-6 people):
- 1 cup dry white wine
- 1 tablespoon lemon juice
- 2 cups shredded Gruyère cheese
- 2 cups shredded Emmental cheese
- 1 tablespoon cornstarch
- 1 tablespoon Dijon mustard
- 1 clove garlic, halved
- 1/4 teaspoon nutmeg
- Salt and pepper to taste
- Assorted dippers (such as crusty bread cubes, apple slices, steamed vegetables)
Cooking Instructions:
- Prepare the Cheese: In a medium bowl, toss the shredded Gruyère and Emmental cheeses with the cornstarch until evenly coated. This helps to thicken the fondue and prevent the cheese from clumping.
- Infuse the Pot: Rub the inside of a fondue pot or heavy-bottomed saucepan with the halved garlic cloves to impart a subtle garlic flavor. Discard the garlic once finished.
- Heat the Wine: Pour the white wine and lemon juice into the pot and heat over medium heat until the mixture starts to simmer. This step guarantees the fondue will have a smooth texture and a hint of acidity to balance the rich cheese.
- Melt the Cheese: Gradually add the cheese mixture to the simmering wine, stirring continuously with a wooden spoon. Allow each addition to melt completely before adding more cheese. This process should take about 5-7 minutes.
- Season the Fondue: Once the cheese is fully melted and smooth, stir in the Dijon mustard and nutmeg. Season with salt and pepper to taste. Keep the fondue warm over a low flame or heat setting.
- Serve with Dippers: Arrange a platter of assorted dippers around the fondue pot and invite your guests to start dipping and enjoying the Witch’s Brew Cheese Fondue.
Extra Tips:
For the best results, use high-quality cheeses as they melt more smoothly and provide a richer flavor. If the fondue becomes too thick, add a little more wine to reach the desired consistency.
Always keep the fondue warm, but not boiling, to avoid separating the cheese. Experiment with different dippers to personalize the experience; roasted potatoes, pretzel sticks, or even cooked shrimp can add an exciting twist to your fondue party.
Batwing Bacon-Wrapped Jalapeños

Batwing Bacon-Wrapped Jalapeños are a spine-chilling yet tantalizing appetizer perfect for your Halloween gathering. These spicy, smoky, and savory bites are sure to cast a spell over your guests. The combination of jalapeños stuffed with creamy cheese and wrapped in crispy bacon offers an irresistible contrast of flavors and textures that will captivate even the most discerning taste buds. Each bite delivers a delightful burst of heat balanced by the richness of the cheese, making it an ideal dish to kick off a night of Halloween festivities.
This spooky appetizer resembles bat wings, adding an extra touch of Halloween flair to your spread. The dish isn’t only visually appealing but also easy to prepare, allowing you to focus on other aspects of your party. Whether you’re hosting a costume party or an intimate gathering, Batwing Bacon-Wrapped Jalapeños are guaranteed to be a hit. Prepare to be enchanted by how quickly they disappear from the plate!
Ingredients for 4-6 people:
- 12 large jalapeños
- 8 ounces cream cheese, softened
- 1 cup shredded cheddar cheese
- 1 teaspoon garlic powder
- 1 teaspoon onion powder
- 1/2 teaspoon paprika
- Salt and pepper to taste
- 12 slices of bacon
- Toothpicks
Cooking Instructions:
- Preheat the Oven: Start by preheating your oven to 400°F (200°C). This will guarantee that your bacon-wrapped jalapeños cook evenly and become perfectly crispy.
- Prepare the Jalapeños: Slice each jalapeño in half lengthwise and remove the seeds and membranes using a small spoon or a knife. Be cautious while handling the jalapeños, as the seeds can be quite spicy. Consider wearing gloves to avoid any irritation.
- Make the Cheese Filling: In a mixing bowl, combine the softened cream cheese, shredded cheddar cheese, garlic powder, onion powder, paprika, salt, and pepper. Mix thoroughly until all ingredients are well-blended.
- Stuff the Jalapeños: Using a spoon, fill each jalapeño half with the cheese mixture, ensuring an even spread. Be generous with the filling, as it will melt and settle during baking.
- Wrap with Bacon: Take a slice of bacon and wrap it around each stuffed jalapeño half, securing it in place with a toothpick. Make sure the bacon wraps tightly to guarantee it stays in place while baking.
- Bake the Jalapeños: Place the bacon-wrapped jalapeños on a baking sheet lined with parchment paper. Bake in the preheated oven for 20-25 minutes, or until the bacon is crispy and the jalapeños are tender.
- Serve: Allow the jalapeños to cool slightly before serving. Arrange them on a platter for a spooky presentation.
Extra Tips:
For those who prefer a milder version, consider using mini bell peppers instead of jalapeños. You can also experiment with different types of cheese, such as pepper jack or mozzarella, to add a unique twist to the filling.
If you want an extra kick, mix in some chopped cooked sausage or crumbled bacon into the cheese filling. Remember to keep an eye on the jalapeños while baking, as oven temperatures can vary and you want to guarantee the bacon is crispy but not burnt.
Enjoy these ghoulishly delicious jalapeños as part of your Halloween feast!
Mummy Brie With Berry “Blood” Sauce
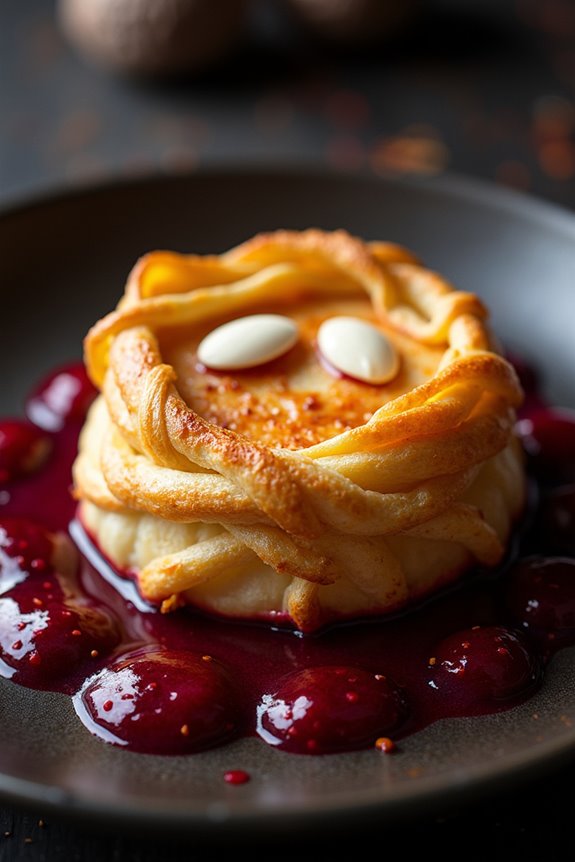
Mummy Brie With Berry “Blood” Sauce is a spooky yet sophisticated appetizer perfect for any adult Halloween gathering. This dish combines the creamy richness of baked Brie with the tart and sweet flavors of a homemade berry sauce. Wrapped in a golden puff pastry resembling a mummy, it’s both a visual treat and a delight for the taste buds. The berry sauce adds a strikingly eerie element, mimicking blood oozing from the mummy’s folds, making it a great conversation starter at your Halloween party.
Not only is this dish visually enticing, but it also offers a complex flavor profile. The buttery, flaky pastry encases the warm, gooey Brie, while the berry sauce adds a fresh and zesty contrast. This appetizer is designed to impress and satisfy your guests, setting the tone for an evening of fun and fright. It’s easy to prepare and can be made ahead of time, allowing you to enjoy the festivities without being stuck in the kitchen.
Ingredients (Serves 4-6):
- 1 wheel of Brie cheese (approximately 8 ounces)
- 1 sheet of puff pastry, thawed
- 1 egg, beaten (for egg wash)
- 1/2 cup mixed berries (such as raspberries, blackberries, and strawberries)
- 1/4 cup sugar
- 1 tablespoon lemon juice
- 1 teaspoon cornstarch
- 2 tablespoons water
- Sliced almonds (for eyes)
Cooking Instructions:
- Preheat the Oven: Start by preheating your oven to 375°F (190°C). This guarantees that it reaches the right temperature while you prepare the dish.
- Prepare the Berry Sauce: In a small saucepan over medium heat, combine the mixed berries, sugar, and lemon juice. Stir occasionally until the berries start to break down. In a small bowl, mix the cornstarch with water until smooth, then add it to the berry mixture. Stir continuously until the sauce thickens. Remove from heat and let it cool.
- Prepare the Puff Pastry: Roll out the thawed puff pastry on a lightly floured surface. Cut it into thin strips, about 1/2 inch wide, which will be used to wrap the Brie.
- Wrap the Brie: Place the Brie wheel in the center of a baking sheet lined with parchment paper. Carefully wrap the Brie with the pastry strips, leaving spaces in between to resemble a mummy. Brush the pastry with the beaten egg to give it a golden finish when baked.
- Bake the Brie: Place the wrapped Brie in the preheated oven and bake for 20-25 minutes or until the pastry is golden brown and crispy.
- Add the Eyes: Remove the Brie from the oven and immediately press two sliced almonds into the top of the pastry to create eyes for the mummy.
- Serve with Berry Sauce: Allow the Brie to cool slightly before serving. Drizzle the berry “blood” sauce over the top or serve it on the side for dipping.
Extra Tips:
For the best results, verify your puff pastry is thoroughly thawed before use, as this will make it easier to handle and wrap around the Brie.
If you prefer a smoother sauce, you can blend the berry mixture before adding the cornstarch. This dish can be prepared in advance and baked just before serving, allowing you to focus on other party preparations.
Remember to let the Brie cool slightly before serving to avoid any potential burns from the molten cheese. Enjoy watching your guests delight in this deliciously spooky treat!
Vampire Garlic Breadsticks

Vampire Garlic Breadsticks are the perfect spooky treat to add a touch of Halloween fun to your adult gatherings. These deliciously eerie breadsticks are infused with a rich garlic flavor that even the most discerning vampires would find irresistible. Their twisted shape and blood-red marinara sauce make them an eye-catching appetizer that will have your guests coming back for more.
Whether you’re hosting a Halloween party or just want to enjoy a festive snack, these breadsticks are bound to be a hit. Crafted with simple ingredients, Vampire Garlic Breadsticks are easy to make and can be prepared in advance, allowing you to enjoy the festivities without spending too much time in the kitchen.
The use of fresh garlic and herbs guarantees a flavorful experience, while the accompanying marinara sauce adds a tangy complement to the soft, warm breadsticks. Perfect for dipping and sharing, these breadsticks are an ideal addition to any Halloween-themed menu.
Ingredients (Serving Size: 4-6 people)
- 1 pound pizza dough
- 4 tablespoons unsalted butter, melted
- 4 cloves garlic, minced
- 2 tablespoons fresh parsley, chopped
- 1 teaspoon salt
- 1/2 teaspoon black pepper
- 1/2 teaspoon red pepper flakes (optional)
- 1 cup marinara sauce
- 1/4 cup grated Parmesan cheese
Cooking Instructions
- Preheat the Oven: Begin by preheating your oven to 375°F (190°C) to verify it reaches the right temperature for baking your breadsticks.
- Prepare the Dough: Roll out the pizza dough on a lightly floured surface until it’s about 1/4 inch thick. Use a pizza cutter or sharp knife to slice the dough into strips approximately 1 inch wide and 6 inches long.
- Shape the Breadsticks: Take each strip and twist it gently to create a spiral shape. This will give your breadsticks their signature vampire look.
- Prepare the Garlic Butter: In a small saucepan, melt the butter over medium heat. Add the minced garlic and let it cook for about 1 minute until fragrant. Remove from heat and stir in the chopped parsley, salt, black pepper, and red pepper flakes.
- Brush with Garlic Butter: Place the twisted dough strips on a baking sheet lined with parchment paper. Using a pastry brush, generously coat each breadstick with the prepared garlic butter mixture.
- Bake the Breadsticks: Bake in the preheated oven for 15-18 minutes, or until golden brown and cooked through. Keep an eye on them to prevent over-baking.
- Prepare the Marinara Sauce: While the breadsticks are baking, warm the marinara sauce in a small saucepan over low heat. Once heated, pour it into a serving bowl.
- Serve and Enjoy: Once the breadsticks are done, remove them from the oven and immediately sprinkle with grated Parmesan cheese. Serve warm with the marinara sauce on the side for dipping.
Extra Tips
For an added depth of flavor, consider using roasted garlic instead of fresh garlic in the butter mixture. This will impart a sweeter, more mellow garlic taste that complements the tanginess of the marinara sauce.
If you’re looking to add a bit more heat, increase the amount of red pepper flakes or include a pinch of cayenne pepper in the garlic butter. Finally, these breadsticks can be made a day in advance; simply prepare and twist the dough, then store them covered in the refrigerator.
When ready to serve, brush with garlic butter and bake as directed.
Black Widow Spider Crostini
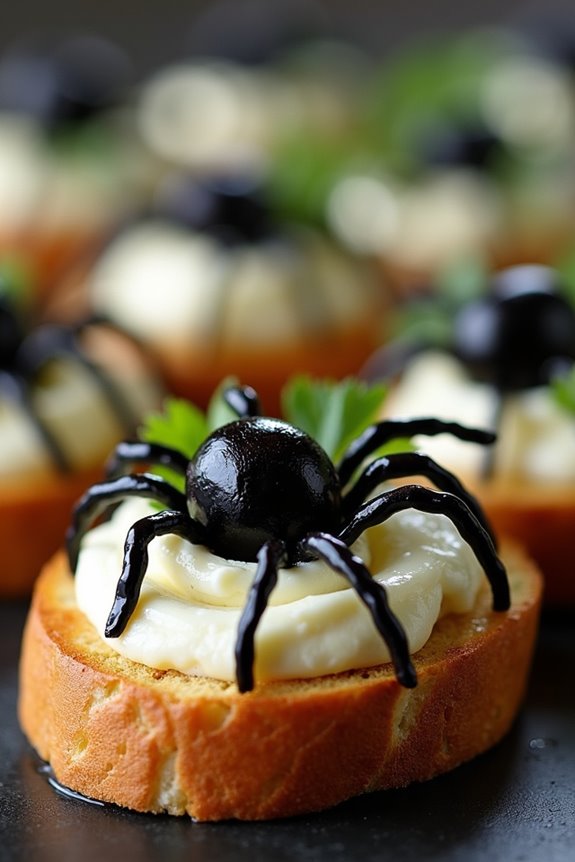
Black Widow Spider Crostini is a spooky and delicious appetizer perfect for setting the eerie mood of an adult Halloween gathering. This dish combines the crunch of toasted crostini with the savory flavors of cream cheese and olives, artfully assembled to resemble a creepy black widow spider. Not only does it look impressive, but the combination of textures and flavors is certain to intrigue and delight your guests.
The preparation of Black Widow Spider Crostini is straightforward, making it an excellent choice for a host looking to impress without spending hours in the kitchen. The use of simple ingredients like black olives, cream cheese, and baguette guarantees that the flavors are harmonious and the presentation is striking. This recipe serves 4-6 people and can easily be multiplied to accommodate larger gatherings.
Ingredients:
- 1 fresh baguette
- 8 oz (225g) cream cheese, softened
- 1 cup black olives, pitted
- 2 tablespoons olive oil
- 1 clove garlic, minced
- Salt and pepper to taste
- Fresh parsley for garnish
Instructions:
- Prepare the Baguette: Preheat your oven to 375°F (190°C). Slice the baguette into 1/2-inch thick slices, aiming to get about 12-16 slices. Arrange the slices on a baking sheet.
- Toast the Bread: Brush each slice with olive oil and sprinkle lightly with salt. Bake in the preheated oven for about 8-10 minutes, or until the bread is golden and crispy. Remove from the oven and set aside to cool.
- Make the Spread: In a medium mixing bowl, combine the softened cream cheese with the minced garlic. Mix well until the garlic is evenly distributed throughout the cream cheese. Season with salt and pepper to taste.
- Assemble the Crostini: Spread a generous amount of the cream cheese mixture on each crostini slice.
- Create the Spider: For each crostini, use a whole black olive as the spider’s body. Cut additional olives into thin slices to form the spider’s legs, arranging them around the olive body to create a spider-like shape.
- Garnish and Serve: Once the spiders are assembled, garnish each crostini with a small sprig of fresh parsley for a pop of color and added flavor. Serve the crostini on a platter for a spooky presentation.
Extra Tips:
When assembling the spider legs, use a small, sharp knife to make precise cuts for more realistic-looking legs. If you’re preparing these in advance, store the toasted crostini and cream cheese mixture separately, then assemble closer to serving time to guarantee the bread remains crisp. Additionally, for an extra touch of Halloween flair, consider adding a tiny dot of red bell pepper to the top of the olive to mimic the black widow’s distinctive red mark.
Gory Gourmet Meatballs

Halloween is the perfect time to embrace the eerie and indulge in some spooky treats. Gory Gourmet Meatballs are a fantastic choice for those looking to add a touch of horror to their adult Halloween party. These meatballs aren’t only delicious but also visually striking, with a bloody appearance that’s sure to captivate your guests. The combination of savory meat, flavorful spices, and a crimson sauce makes them a hit at any gathering.
These meatballs are easy to prepare and serve, making them a great option for hosts who want to spend more time enjoying the party rather than slaving away in the kitchen. The dish offers a perfect balance of taste and presentation, guaranteeing your Halloween spread stands out. Whether you’re hosting a large gathering or a small get-together, this recipe will serve 4-6 people, making it ideal for a cozy yet thrilling evening.
Ingredients:
- 1 pound ground beef
- 1/2 cup breadcrumbs
- 1/4 cup grated Parmesan cheese
- 1 large egg
- 2 cloves garlic, minced
- 1 teaspoon dried oregano
- 1 teaspoon dried basil
- Salt and pepper to taste
- 1 tablespoon olive oil
- 1 cup tomato sauce
- 2 tablespoons tomato paste
- 1 tablespoon Worcestershire sauce
- Red food coloring (optional)
Instructions:
- Prepare the Meatball Mixture: In a large mixing bowl, combine the ground beef, breadcrumbs, Parmesan cheese, egg, garlic, oregano, basil, salt, and pepper. Mix until all ingredients are well incorporated. Be careful not to overmix, as this can make the meatballs tough.
- Shape the Meatballs: Roll the mixture into 1-inch balls, using your hands to make sure they’re evenly shaped. This should yield approximately 16-20 meatballs, depending on size.
- Brown the Meatballs: In a large skillet, heat the olive oil over medium heat. Add the meatballs and cook until they’re browned on all sides, about 5-7 minutes. Make sure to turn them occasionally to guarantee even browning.
- Prepare the Sauce: In a separate saucepan, combine the tomato sauce, tomato paste, and Worcestershire sauce. Add a few drops of red food coloring if you desire a more vibrant “bloody” appearance. Stir well and simmer over low heat for about 5 minutes.
- Simmer the Meatballs: Once the meatballs are browned, transfer them to the saucepan with the sauce. Cover and let them simmer for an additional 10 minutes, allowing the flavors to meld and the meatballs to cook through.
- Serve and Enjoy: Once cooked, transfer the meatballs to a serving platter. Drizzle with additional sauce for a gory effect and serve warm.
Extra Tips:
For an even spookier presentation, consider serving the meatballs with toothpicks or skewers that resemble daggers or bones. If you want to prepare the meatballs ahead of time, you can refrigerate them after browning and then simmer them in the sauce just before serving.
Additionally, feel free to adjust the spices to suit your taste or add a dash of hot sauce for a bit of heat. These meatballs also pair well with a crusty baguette or a simple pasta dish for a more substantial meal.
Creepy Caprese Skewers
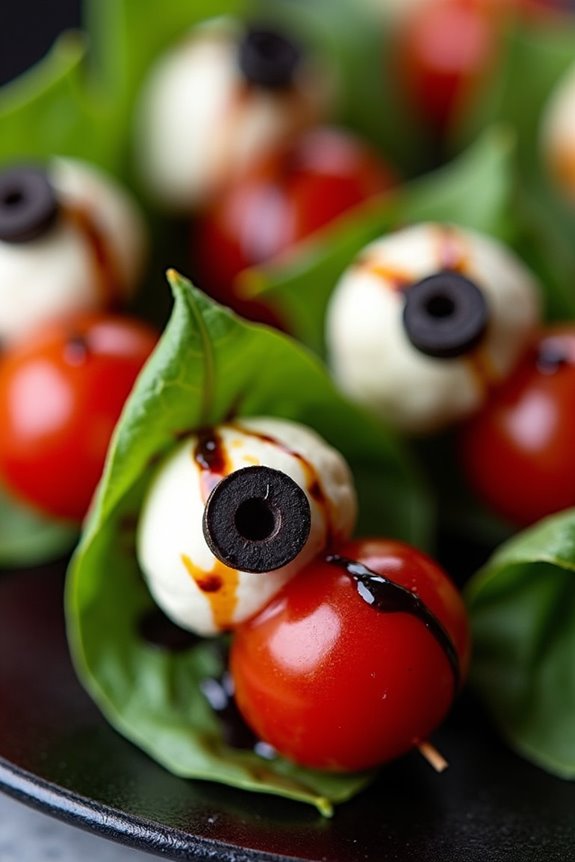
Creepy Caprese Skewers are the perfect appetizer for an adult Halloween gathering. These spooky yet delicious skewers bring a ghoulish twist to the classic Caprese salad. Imagine juicy cherry tomatoes, creamy mozzarella balls, and fresh basil leaves, arranged on skewers to resemble eerie eyeballs. This simple yet creative dish is sure to impress your guests and add a touch of Halloween flair to your party spread.
Not only do these skewers look creepy, but they also deliver on flavor. The combination of sweet tomatoes, rich mozzarella, and aromatic basil creates a revitalizing bite that balances perfectly with a drizzle of balsamic glaze. These skewers aren’t just about appearance; they’re a taste sensation that will have your guests reaching for more. Whether you’re hosting a Halloween bash or a small gathering, Creepy Caprese Skewers are an appetizer that will make your event memorable.
Ingredients for 4-6 servings:
- 24 cherry tomatoes
- 24 bocconcini (small mozzarella balls)
- 24 fresh basil leaves
- 24 black olive slices
- 12 wooden skewers
- Balsamic glaze
- Salt and pepper, to taste
Cooking Instructions:
- Prepare the Ingredients: Begin by washing the cherry tomatoes and basil leaves thoroughly. Pat them dry with a paper towel. Drain the bocconcini and set them aside.
- Assemble the Skewers: Start by threading a cherry tomato onto a wooden skewer. Follow it with a basil leaf, folding it in half if necessary to fit. Next, add a bocconcini. Repeat this sequence until you have four sets per skewer, ending with a cherry tomato.
- Add the Creepy Element: To create the “eyeball” effect, place a black olive slice on each bocconcini, gently pressing it so it adheres. This will give the appearance of a pupil on the mozzarella balls.
- Season and Drizzle: Arrange all the skewers on a serving platter. Lightly season them with salt and pepper. Just before serving, drizzle the skewers with balsamic glaze for added flavor and presentation.
- Chill and Serve: For the best taste, refrigerate the skewers for at least 15 minutes before serving. This allows the flavors to meld and the skewers to be invigorating when eaten.
Extra Tips:
For an added touch of spookiness, consider using a mix of red and green cherry tomatoes to vary the appearance of your skewers. You can also experiment with different types of olives, such as Kalamata, for a more intense flavor.
If you prefer a sweeter glaze, make your own balsamic reduction by simmering balsamic vinegar until it thickens. Finally, if you’re short on time, these skewers can be assembled a few hours in advance and stored in the refrigerator, making them a convenient option for party prep.
Eerie Edible Eyeballs
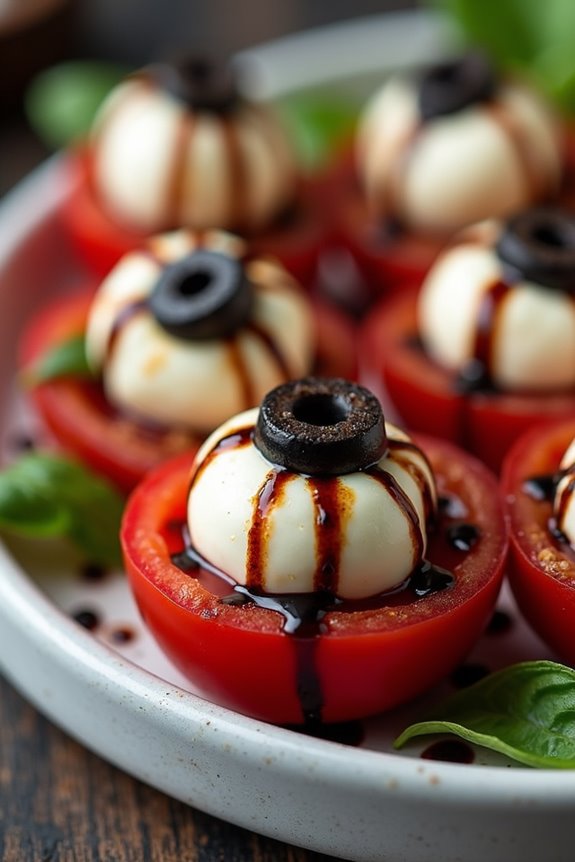
Eerie Edible Eyeballs are a spooky and delicious appetizer perfect for an adult Halloween party. These creepy creations aren’t only visually striking but also incredibly tasty, making them a memorable addition to your festive spread. Made with a combination of mozzarella balls, olives, and cherry tomatoes, these eerie bites are easy to assemble and guaranteed to delight your guests with their ghoulish appearance and savory flavors.
Designed to serve 4-6 people, this appetizer is ideal for a small gathering or as part of a larger feast. The Eerie Edible Eyeballs will add a touch of horror to your Halloween menu while keeping the preparation simple and fun. The combination of fresh ingredients guarantees that each bite is packed with flavor, creating a perfect balance between the creamy mozzarella and the tangy olives and tomatoes.
Ingredients (serving size: 4-6 people):
- 12 fresh mozzarella balls (bocconcini)
- 6 cherry tomatoes
- 12 pitted black olives
- 2 tablespoons balsamic glaze
- 1 tablespoon olive oil
- Salt and pepper to taste
- Fresh basil leaves for garnish
Cooking Instructions:
- Prepare the Cherry Tomatoes: Cut each cherry tomato in half. These will serve as the base for the eyeballs, so make sure they’re stable and can hold the mozzarella balls securely.
- Assemble the Eyeballs: Place a mozzarella ball on top of each cherry tomato half. Press gently to confirm they stay put, forming the main part of the ‘eyeball’.
- Add the Pupil: Slice the black olives into thin rings. Place one olive ring on top of each mozzarella ball to create the ‘pupil’ of the eyeball.
- Season the Eyeballs: Drizzle olive oil over the assembled eyeballs. Season them with a pinch of salt and pepper to enhance the flavor.
- Create the Bloodshot Effect: Use a toothpick to carefully drizzle balsamic glaze over the mozzarella balls, creating a ‘bloodshot’ effect. Be creative with the lines for a spooky and realistic appearance.
- Garnish and Serve: Arrange the Eerie Edible Eyeballs on a serving platter. Decorate with fresh basil leaves for a pop of color and an added touch of freshness.
Extra Tips:
To make the Eerie Edible Eyeballs even more striking, consider using different colored olives or adding a small piece of red bell pepper to the olive ring for a more menacing look.
If you want to prepare these appetizers ahead of time, assemble them without the balsamic glaze and keep them refrigerated. Drizzle the glaze just before serving to maintain the fresh look and taste.
Experiment with various herbs like oregano or thyme for additional flavor and aroma, and enjoy watching your guests’ reactions to these frightfully fun appetizers!