

When planning my Halloween party, I wanted appetizers that not only taste amazing but also look wonderfully festive. So, I crafted a spread featuring 11 creative appetizers that capture the Halloween spirit perfectly. From Mummy Jalapeño Poppers to Witch’s Broomstick Cheese Sticks, each dish adds a touch of whimsy and flavor to the table. The real magic is how these treats come together to create a hauntingly delightful experience. Ready to get inspired for your own spooktacular celebration?
Mummy Jalapeño Poppers
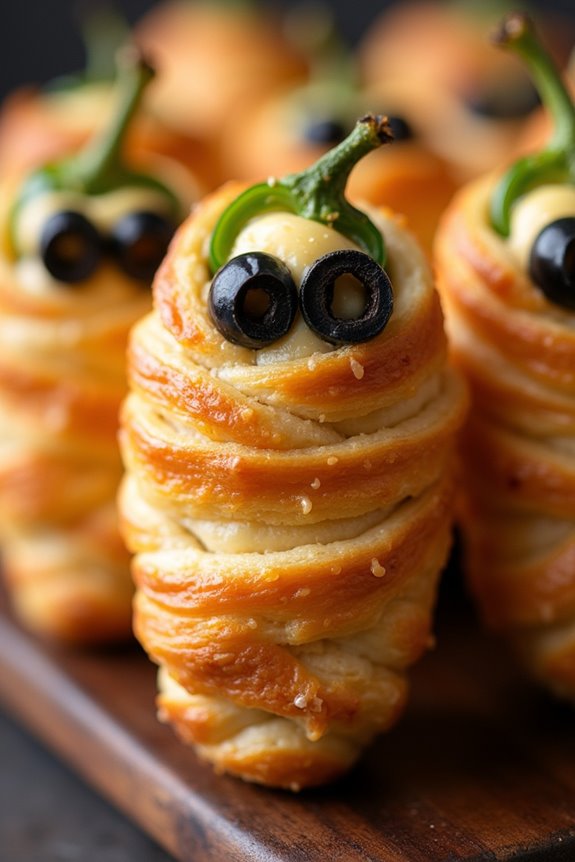
Mummy Jalapeño Poppers are a spooky twist on the classic appetizer that are perfect for your Halloween gathering. These delightful bites combine the spicy kick of jalapeños with a creamy, cheesy filling, all wrapped up in a fun, mummy-like appearance. They’re not only delicious but also a great way to get into the Halloween spirit with their festive look.
To create this ghoulish treat, jalapeños are hollowed out and filled with a rich mixture of cream cheese, cheddar cheese, and spices. The poppers are then wrapped with strips of crescent roll dough to mimic the look of a mummy, complete with olive slice eyes to complete their spooky appearance. These poppers are baked until golden brown and crispy, making them an irresistible addition to your Halloween appetizer spread.
Ingredients for 4-6 servings:
- 12 large jalapeños
- 8 oz cream cheese, softened
- 1 cup shredded cheddar cheese
- 1 teaspoon garlic powder
- 1 teaspoon onion powder
- 1/2 teaspoon smoked paprika
- Salt and pepper to taste
- 1 package crescent roll dough
- 24 small slices of black olives
Cooking Instructions:
- Preheat the Oven: Start by preheating your oven to 375°F (190°C) to guarantee it’s ready for baking the poppers.
- Prepare the Jalapeños: Slice each jalapeño in half lengthwise and carefully remove the seeds and membranes using a small spoon or a paring knife. Be cautious and wear gloves if necessary, as the oils can irritate the skin.
- Make the Filling: In a mixing bowl, combine the softened cream cheese, shredded cheddar cheese, garlic powder, onion powder, smoked paprika, salt, and pepper. Mix until everything is evenly combined and smooth.
- Fill the Jalapeños: Using a spoon or piping bag, fill each jalapeño half with the cream cheese mixture, making sure the filling is level with the edges of the jalapeño.
- Wrap with Crescent Dough: Open the crescent roll dough and cut it into thin strips. Wrap each filled jalapeño with the dough strips to create a mummy effect, leaving a small gap near the top for the eyes.
- Add the Eyes: Place two small olive slices near the top of each jalapeño to resemble eyes peeking through the mummy wrap.
- Bake: Place the wrapped jalapeños on a baking sheet lined with parchment paper. Bake in the preheated oven for 15-20 minutes, or until the dough is golden brown and crispy.
- Cool and Serve: Allow the poppers to cool slightly before serving to guarantee the filling isn’t too hot. Serve them warm for the best flavor.
Extra Tips:
To make the Mummy Jalapeño Poppers even more festive, you can add a drop of red hot sauce or ketchup on the olive eyes to give them a bloodshot appearance.
If you’re sensitive to spice, consider using milder peppers like mini sweet peppers instead of jalapeños.
Additionally, if you’re short on time, pre-made crescent roll dough sheets can be used instead of individual rolls, making the wrapping process quicker and easier.
Enjoy these poppers as a standalone appetizer or pair them with a spooky dipping sauce like a green guacamole or a fiery salsa to enhance the Halloween experience.
Witch’s Broomstick Cheese Sticks
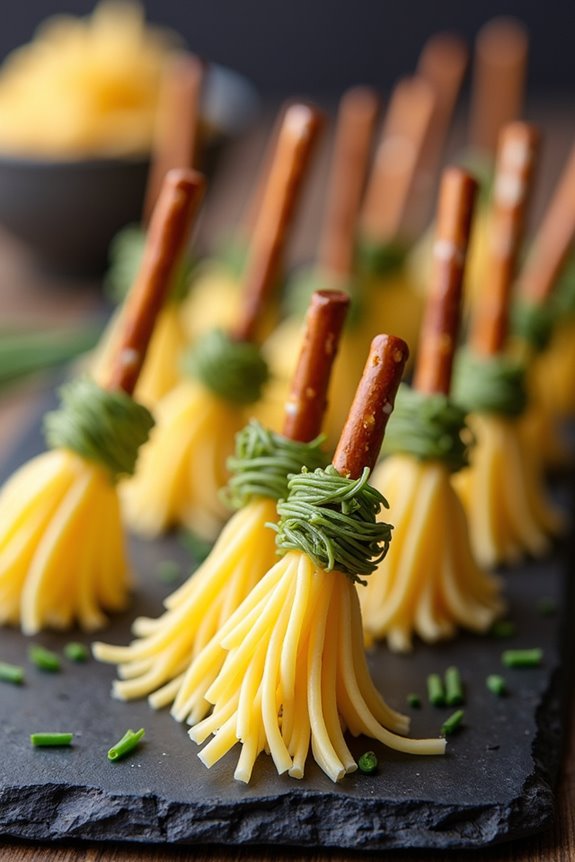
Get ready to enchant your guests with these delightful Witch’s Broomstick Cheese Sticks, a perfect appetizer for your Halloween gathering. These whimsical snacks not only look incredibly festive but are also deliciously savory, combining the classic flavors of cheese and pretzels with a bit of creative flair.
They’re simple to make and can be prepared in advance, making them a convenient choice for party hosts looking to add a spooky touch to their spread. Whether you’re throwing a Halloween bash for kids or adults, these broomsticks are sure to be a hit.
This fun and easy-to-assemble appetizer requires minimal ingredients and effort, yet yields charming and tasty results. The combination of cheese sticks and pretzel rods creates a crunchy and creamy texture that’s bound to impress.
Perfect for a serving size of 4-6 people, these Witch’s Broomstick Cheese Sticks won’t only captivate eyes but also satisfy taste buds, adding a magical element to your Halloween festivities. Follow the simple instructions below to create these bewitching bites.
Ingredients (serving size: 4-6 people):
- 8 string cheese sticks
- 8 pretzel rods
- 16 fresh chives
- 1 tablespoon of melted butter (optional for taste)
Cooking Instructions:
- Prepare the Cheese Sticks: Begin by unwrapping the string cheese and cutting each stick into thirds. These will form the bristles of your broomsticks.
- Create the Broom Bristles: Using a small, sharp knife, carefully make vertical cuts around one end of each cheese piece to create a fringed effect, resembling broom bristles. Be sure not to cut through the entire cheese stick.
- Assemble the Broomsticks: Insert a pretzel rod into the uncut end of each cheese stick, pressing gently to secure it in place. Confirm the fringed end resembles the bristles of a broom.
- Tie the Chives: Take two chives and wrap them around the top of the cheese fringe, just below the pretzel, to mimic the broom bindings. You can tie them in a knot or simply wrap them tightly and tuck the ends under.
- Optional Butter Coating: For a richer flavor, lightly brush the cheese bristles with melted butter before serving. This step is optional but adds a nice touch.
- Serve and Enjoy: Arrange the Witch’s Broomstick Cheese Sticks on a platter and serve them immediately as they’re best enjoyed fresh.
Extra Tips:
To make your Witch’s Broomstick Cheese Sticks even more festive, consider using flavored string cheese, such as jalapeño or garlic, to add an extra kick.
If the chives are difficult to tie, you can briefly blanch them in hot water to make them more pliable. For a more gourmet presentation, serve these broomsticks with a dipping sauce, such as marinara or honey mustard.
To guarantee the cheese sticks remain fresh, prepare them shortly before serving, as the cut edges may dry out if left exposed for too long.
Deviled Egg Eyeballs
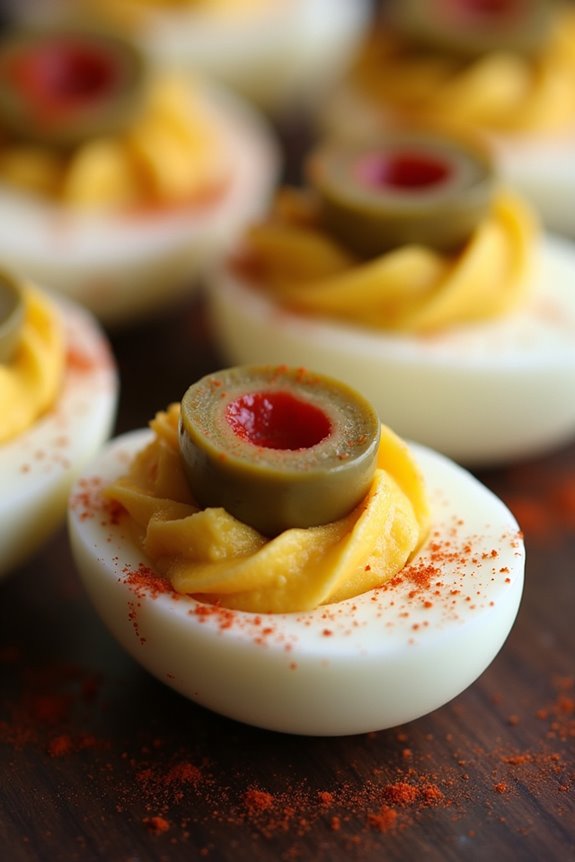
Deviled Egg Eyeballs are the perfect spooky treat to add a bit of ghoulish flair to your Halloween appetizer spread. With their eerie appearance and delicious taste, they’re sure to be a hit at any Halloween gathering. These creepy yet delectable snacks are made by transforming classic deviled eggs into sinister, eyeball-like creations. By adding a few simple ingredients and a dash of creativity, you can easily transform an ordinary dish into something ideal for the season.
The base of Deviled Egg Eyeballs is the classic deviled egg recipe, but with an added twist to give them an eerie appearance. The rich and creamy filling, made from egg yolks, mayonnaise, and a hint of mustard, is contrasted by the eerie look of the eyeball, created using olives and food coloring. These appetizer eyeballs aren’t only fun to make but are also a great way to involve kids in the kitchen, as they can help with assembling the eyeball decorations. This recipe serves 4-6 people, making it perfect for a small Halloween get-together.
Ingredients:
- 6 large eggs
- 3 tablespoons mayonnaise
- 1 teaspoon Dijon mustard
- Salt and pepper to taste
- Red food coloring
- 6 green olives with pimentos
- Paprika for dusting
Instructions:
- Boil the Eggs: Place the eggs in a single layer in a saucepan and cover them with water. Bring the water to a boil over medium-high heat. Once boiling, remove the pan from the heat and cover it. Let the eggs sit for about 10-12 minutes.
- Cool and Peel: Drain the hot water from the saucepan and fill it with cold water. Allow the eggs to cool for a few minutes. Once cool, gently tap the eggs on a hard surface to crack the shell, then peel them carefully.
- Prepare the Filling: Slice the eggs in half lengthwise and remove the yolks, placing them in a small mixing bowl. Add mayonnaise, mustard, salt, and pepper to the yolks, and mash them together until smooth and creamy.
- Color the Filling: Add a few drops of red food coloring to the yolk mixture to give it a slightly red tint. Mix well until the color is evenly distributed.
- Fill the Egg Whites: Spoon or pipe the yolk mixture back into the hollow egg whites, mounding it slightly over the top.
- Create the Eyeballs: Slice the green olives into halves. Place one olive half, cut side down, on top of the yolk mixture in each egg half. This will form the pupil of the eyeball.
- Add Details: Dip a toothpick into the red food coloring and draw squiggly lines from the yolk mixture outward onto the egg white to mimic bloodshot veins.
- Finish and Serve: Lightly dust the Deviled Egg Eyeballs with paprika for an extra touch of flavor and color. Arrange them on a platter and serve immediately or refrigerate until needed.
Extra Tips:
When making Deviled Egg Eyeballs, it’s essential to use fresh eggs, as they’re easier to peel after boiling. If you want the eyeballs to look even more realistic, consider using different colored olives for more variety in the “pupils.”
For added spookiness, you can use black olives instead of green ones to create a darker pupil effect. If you’re planning to make these in advance, store them in an airtight container in the refrigerator, but for best results, add the olive pupils and draw the veins just before serving to keep the colors vibrant and fresh.
Pumpkin Patch Hummus Cups

Pumpkin Patch Hummus Cups are a delightful and festive Halloween appetizer that combines the rich, creamy texture of hummus with the vibrant and seasonal flavors of pumpkin. These cups aren’t only visually appealing, resembling tiny pumpkin patches, but they also provide a healthy and delicious snack option for your Halloween gatherings.
Perfect for both kids and adults, these appetizers are sure to be a hit at any party, adding a touch of whimsy to your table spread.
The base of this dish is a classic hummus, which is then enhanced with pumpkin puree for an autumn twist. The hummus is spooned into individual cups and topped with adorable garnishes to create the appearance of a miniature pumpkin patch.
These Pumpkin Patch Hummus Cups are easy to prepare and can be made in advance, making them a convenient option for any busy host or hostess. Serve them with an array of fresh vegetables and pita chips for dipping, and watch your guests delight in this creative and tasty treat.
Ingredients (Serves 4-6):
- 2 cups canned chickpeas, drained and rinsed
- 1 cup pumpkin puree
- 1/4 cup tahini
- 1/4 cup fresh lemon juice
- 2 cloves garlic, minced
- 1/2 teaspoon ground cumin
- 1/4 teaspoon smoked paprika
- Salt and pepper to taste
- 1/4 cup extra virgin olive oil
- 2 tablespoons pumpkin seeds
- Fresh parsley leaves for garnish
- Mini bell peppers or carrots for decoration
- Assorted vegetables and pita chips for serving
Cooking Instructions:
- Prepare the Hummus Base: In a food processor, combine the drained chickpeas, pumpkin puree, tahini, lemon juice, minced garlic, cumin, smoked paprika, salt, and pepper. Blend until smooth and creamy, scraping down the sides as needed.
- Incorporate Olive Oil: With the food processor running, slowly drizzle in the olive oil until the hummus reaches your desired consistency. Taste and adjust seasoning as necessary, adding more salt, pepper, or lemon juice if desired.
- Assemble the Cups: Divide the pumpkin hummus evenly among small cups or bowls, filling each about halfway to two-thirds full.
- Create the Pumpkin Patch Look: Sprinkle a few pumpkin seeds over the top of each cup to mimic the look of a pumpkin patch. Add small pieces of mini bell peppers or carrot sticks to represent “pumpkins” scattered throughout the patch.
- Garnish and Serve: Finish with a sprinkle of fresh parsley leaves for a pop of color. Arrange the cups on a platter with an assortment of vegetables and pita chips for dipping.
Extra Tips:
For an even more festive presentation, consider using mini hollowed pumpkins or orange bell peppers as serving dishes instead of cups. This will enhance the pumpkin patch theme and add an extra element of fun.
Additionally, you can make the hummus a day in advance and store it in an airtight container in the refrigerator. This allows the flavors to meld together and reduces preparation time on the day of your event.
If serving to a crowd, consider doubling the recipe to assure there’s plenty for everyone to enjoy.
Spooky Spider Cheese Ball
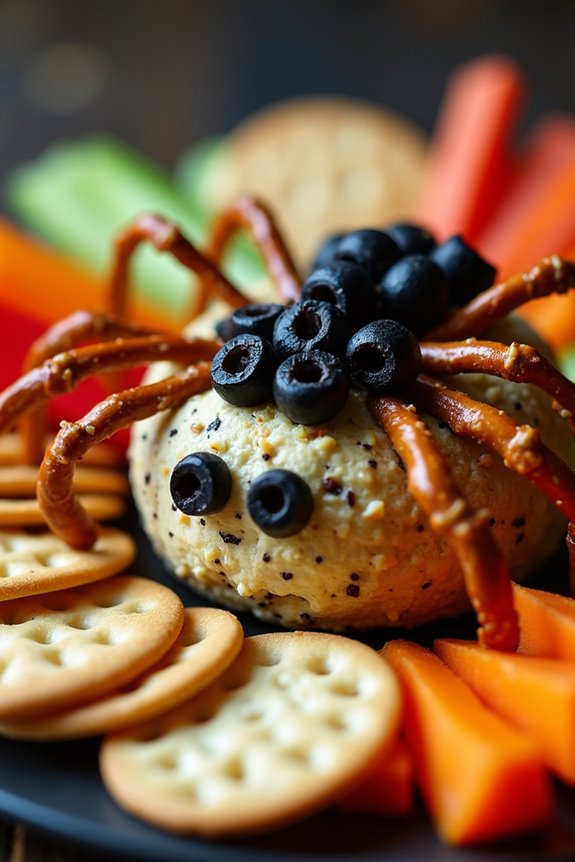
The Spooky Spider Cheese Ball is a festive and delicious appetizer perfect for any Halloween gathering. This creepy yet fun dish isn’t only visually striking, but its rich and creamy flavors make it a crowd-pleaser. Molded into the shape of a spider, this cheese ball is sure to be the highlight of your Halloween spread, adding a touch of spookiness to your table.
It’s a simple yet effective way to get into the Halloween spirit with minimal effort, while still impressing your guests with your culinary creativity.
This cheese ball combines a variety of cheeses with aromatic herbs and spices, creating a flavorful and creamy base that’s hard to resist. The exterior is coated with a layer of black olives, mimicking the dark hue of a spider, while pretzel sticks form the legs, adding a crunchy contrast to the creamy center.
This dish isn’t only fun to make but also allows for creativity in its presentation, ensuring your Halloween party starts off on the right note.
Ingredients (Serving Size: 4-6 people)
- 8 oz cream cheese, softened
- 2 cups shredded cheddar cheese
- 1/4 cup grated Parmesan cheese
- 1 tablespoon Worcestershire sauce
- 1/2 teaspoon garlic powder
- 1/2 teaspoon onion powder
- Salt and pepper to taste
- 1/2 cup chopped black olives
- 1 small can of whole black olives
- 8 pretzel sticks
- Crackers or vegetable sticks for serving
Cooking Instructions
- Prepare the Cheese Mixture: In a large mixing bowl, combine the softened cream cheese, shredded cheddar cheese, grated Parmesan cheese, Worcestershire sauce, garlic powder, onion powder, salt, and pepper. Mix thoroughly until all ingredients are well incorporated and the mixture is smooth.
- Shape the Cheese Ball: Using your hands, form the cheese mixture into a large ball. Place the ball onto a serving platter and gently press it down to flatten the bottom slightly, ensuring it stays in place.
- Coat with Black Olives: Chop half of the whole black olives. Press the chopped olives onto the surface of the cheese ball, covering it entirely to create the appearance of a spider’s body.
- Create the Spider’s Legs: Insert the pretzel sticks into the sides of the cheese ball to form the spider’s legs. Use four pretzel sticks on each side, arranging them evenly for a balanced look.
- Add Finishing Touches: Use two whole black olives to create the spider’s eyes, placing them at the front of the cheese ball. Adjust the position of the pretzel legs if needed to enhance the spider-like appearance.
- Chill Before Serving: Refrigerate the Spooky Spider Cheese Ball for at least one hour before serving. This will help the flavors meld together and allow the cheese ball to firm up.
Extra Tips
To make the Spooky Spider Cheese Ball even more festive, consider adding edible decorations like red pepper strips for a pop of color or using different types of olives for the eyes to create a more vivid expression.
If you prefer a spicier cheese ball, add a pinch of cayenne pepper or a few dashes of hot sauce to the cheese mixture. For easy serving, place an assortment of crackers and vegetable sticks around the spider, encouraging guests to dig into this deliciously spooky centerpiece.
Bloody Mary Shrimp Cocktail
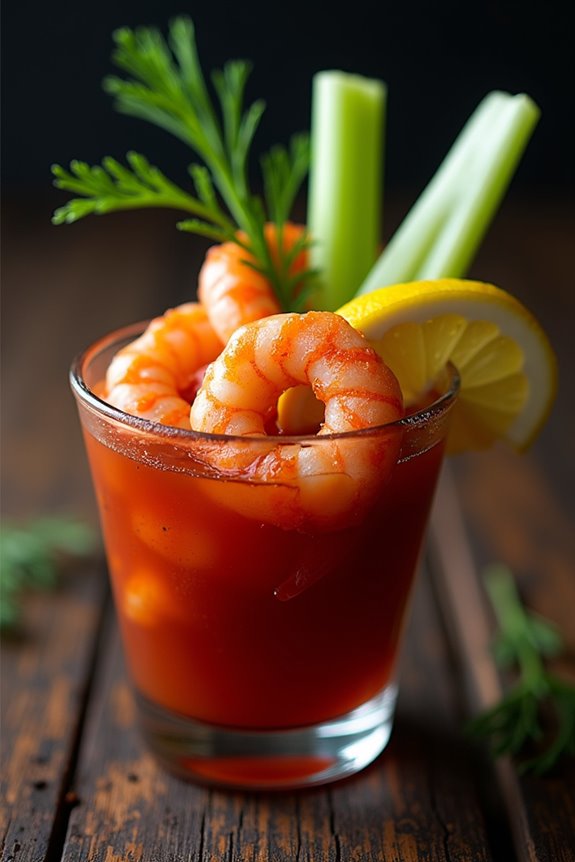
A spine-chilling yet delicious addition to your Halloween appetizer spread, the Bloody Mary Shrimp Cocktail is a creative twist on the classic shrimp cocktail. This dish marries the bold and spicy flavors of a Bloody Mary with the fresh and juicy taste of shrimp. The vibrant red sauce, reminiscent of a Bloody Mary, adds a festive and eerie touch to your Halloween party, making it a perfect starter to get your guests in the spooky spirit.
The Bloody Mary Shrimp Cocktail isn’t only visually appealing but also easy to prepare, making it an ideal choice for entertaining. The key lies in using fresh, succulent shrimp and combining them with a zesty sauce that incorporates classic Bloody Mary ingredients like tomato juice, horseradish, and Worcestershire sauce. This recipe serves 4-6 people, guaranteeing there’s plenty to share or to keep your guests coming back for more.
Ingredients (Serves 4-6):
- 1 pound large shrimp, peeled and deveined
- 2 tablespoons olive oil
- 1 cup tomato juice
- 2 tablespoons horseradish
- 1 tablespoon Worcestershire sauce
- 1 tablespoon lemon juice
- 1 teaspoon hot sauce
- 1/2 teaspoon celery salt
- 1/2 teaspoon black pepper
- 1/4 teaspoon garlic powder
- 1 tablespoon chopped fresh dill
- Lemon wedges, for garnish
- Celery sticks, for garnish
Cooking Instructions:
- Prepare the Shrimp: Preheat your oven to 400°F (200°C). Toss the shrimp with olive oil, a pinch of salt, and pepper. Spread them in a single layer on a baking sheet.
- Roast the Shrimp: Roast the shrimp in the preheated oven for 6-8 minutes or until they’re pink and opaque. Remove from oven and set aside to cool.
- Make the Bloody Mary Sauce: In a medium bowl, whisk together tomato juice, horseradish, Worcestershire sauce, lemon juice, hot sauce, celery salt, black pepper, and garlic powder until well combined.
- Combine Shrimp and Sauce: Once the shrimp have cooled, gently toss them in the Bloody Mary sauce until they’re well coated.
- Chill the Cocktail: Cover the bowl with plastic wrap and refrigerate for at least 30 minutes to allow the flavors to meld.
- Serve: Arrange the shrimp cocktail in small serving glasses or bowls. Garnish with lemon wedges, celery sticks, and a sprinkle of fresh dill before serving.
Extra Tips:
When preparing the Bloody Mary Shrimp Cocktail, opt for fresh shrimp over frozen for the best texture and flavor. If using frozen shrimp, be certain they’re fully thawed before roasting.
Adjust the level of spice in the Bloody Mary sauce by varying the amount of horseradish and hot sauce to suit your taste preference. For an extra touch of Halloween flair, consider serving the cocktail in test tubes or beakers to enhance the spooky theme of your party.
Skeleton Veggie Tray
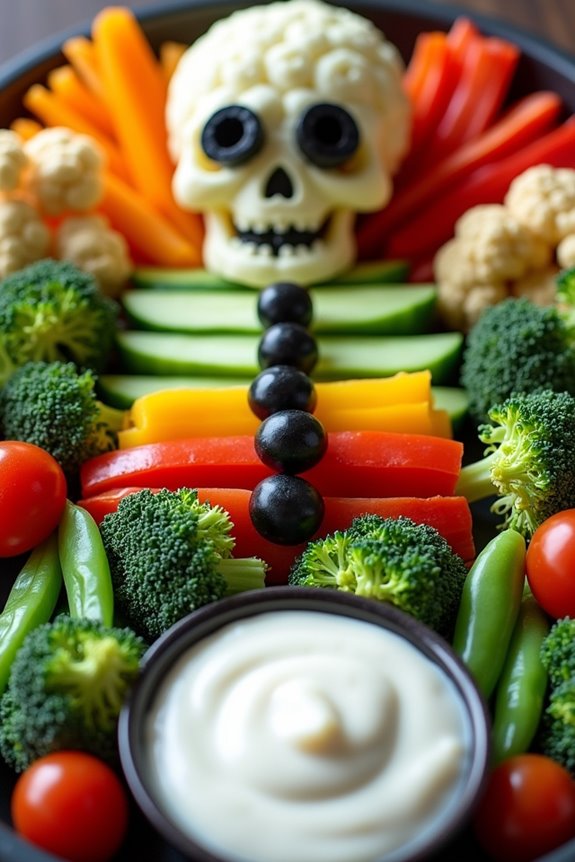
Creating a spooky and delightful Skeleton Veggie Tray is a fantastic way to add some Halloween flair to your appetizer spread. This creative dish not only looks festive but also offers a healthy alternative to the usual candy-laden treats. Perfect for a gathering of 4-6 people, this skeleton-themed veggie platter will surely become the centerpiece of your Halloween party, bringing both fun and nutrition to your celebration.
The key to a successful Skeleton Veggie Tray lies in its presentation. By artfully arranging an assortment of fresh vegetables to resemble a skeleton, you can create an eye-catching and entertaining dish that encourages even the pickiest eaters to enjoy their greens. Pair it with a savory dip to enhance the flavors and make it an irresistible treat for guests of all ages.
Ingredients (Serving Size: 4-6 People)
- 2 cups baby carrots
- 1 cucumber
- 1 red bell pepper
- 1 yellow bell pepper
- 2 cups cherry tomatoes
- 1 small head of cauliflower
- 1 small head of broccoli
- 1 cup sugar snap peas
- 1 cup black olives
- 1 cup ranch dressing or your favorite dip
Instructions
- Prepare the Vegetables: Begin by washing all the vegetables thoroughly. Peel the cucumber and slice it into thin rounds. Cut the red and yellow bell peppers into strips. Separate the cauliflower and broccoli into small florets.
- Assemble the Skeleton Body: On a large platter or tray, start arranging the vegetables to form a skeleton shape. Use the cucumber slices to create the spine. Place the bell pepper strips as ribs radiating out from the cucumber spine.
- Create the Head and Limbs: Use the cauliflower florets to form the skull at the top of the spine. Arrange the broccoli florets as the hips and legs. For the arms, lay out the sugar snap peas extending from the sides.
- Add the Details: Use cherry tomatoes to represent joints at the shoulders, elbows, hips, and knees. Place black olives in the eye sockets of the cauliflower skull to give it character.
- Serve with the Dip: Place a small bowl of ranch dressing or your preferred dip at the bottom of the tray, acting as the skeleton’s “feet.” This will encourage guests to dip the veggies as they enjoy the creative display.
Extra Tips
When creating your Skeleton Veggie Tray, feel free to get creative with the types of vegetables used. For instance, you can swap out some veggies for others based on seasonal availability or personal preference.
If you want to add a little more spookiness, consider using purple cauliflower or heirloom carrots for added color and interest. Make sure to arrange the vegetables shortly before serving to keep them fresh and crisp.
Additionally, you can prepare the veggies in advance and store them in airtight containers in the refrigerator until you’re ready to assemble the tray. This will save time and guarantee that your skeleton remains vibrant and appetizing.
Bat Wings With Spicy Sauce
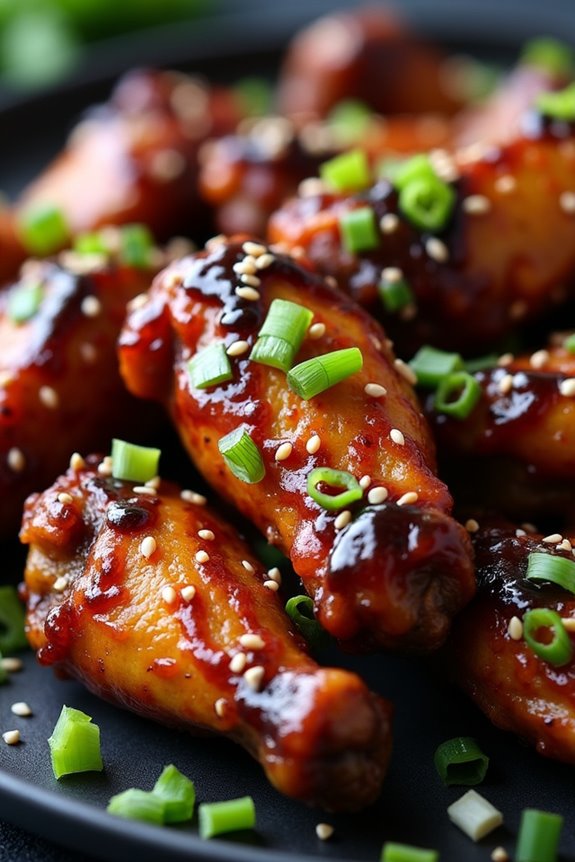
Bat Wings With Spicy Sauce are a fun and flavorful addition to any Halloween party spread. These chicken wings are coated with a dark, savory glaze that gives them a bat-like appearance, perfect for a spooky celebration. The spicy sauce adds an extra kick, making them irresistible to those who enjoy a bit of heat with their appetizers. This dish not only looks thematic but also satisfies the taste buds with a balance of sweet, spicy, and umami flavors.
The preparation of Bat Wings With Spicy Sauce is quite straightforward, making it an excellent choice for both experienced cooks and kitchen novices. The key to achieving the perfect texture is guaranteeing the wings are properly baked until crispy before tossing them in the deliciously spicy sauce. This recipe serves 4-6 people, making it ideal for a small gathering or a fun family night.
Ingredients:
- 2 lbs chicken wings
- 1 tablespoon baking powder
- 1 teaspoon salt
- 1 teaspoon black pepper
- 1 cup soy sauce
- 1/4 cup honey
- 1/4 cup Sriracha or hot sauce of choice
- 2 tablespoons rice vinegar
- 2 tablespoons sesame oil
- 2 cloves garlic, minced
- 1 tablespoon ginger, grated
- Black food coloring (optional)
- Sesame seeds and chopped green onions for garnish
Cooking Instructions:
- Prepare the Wings: Preheat your oven to 400°F (200°C). Pat the chicken wings dry with paper towels to remove excess moisture. In a large bowl, toss the wings with baking powder, salt, and black pepper until evenly coated. This will help the wings become extra crispy when baked.
- Bake the Wings: Arrange the wings on a baking sheet lined with parchment paper or a wire rack. Guarantee they aren’t touching each other for even cooking. Bake in the preheated oven for 45-50 minutes, flipping them halfway through the cooking time, until they’re golden brown and crispy.
- Make the Spicy Sauce: While the wings are baking, prepare the sauce. In a small saucepan over medium heat, combine soy sauce, honey, Sriracha, rice vinegar, sesame oil, minced garlic, and grated ginger. Stir well and bring to a simmer. If using, add a few drops of black food coloring to give the sauce a darker hue.
- Toss the Wings: Once the wings are done baking, remove them from the oven. In a large mixing bowl, toss the hot wings with the prepared spicy sauce until they’re well coated.
- Garnish and Serve: Transfer the wings to a serving platter. Garnish with sesame seeds and chopped green onions for a pop of color and added flavor. Serve immediately while hot.
Extra Tips:
For best results, guarantee the wings are thoroughly dry before coating them with baking powder; this is vital for achieving crispiness. If you prefer a milder sauce, reduce the amount of Sriracha or substitute it with a mild hot sauce.
Feel free to experiment with different hot sauces to find your preferred level of spiciness. If you wish to avoid food coloring, the wings will still be delicious, though they may not have the signature dark bat-like appearance.
Remember to use parchment paper or a wire rack while baking to prevent sticking and promote even cooking.
Creepy Crawly Pretzel Rods
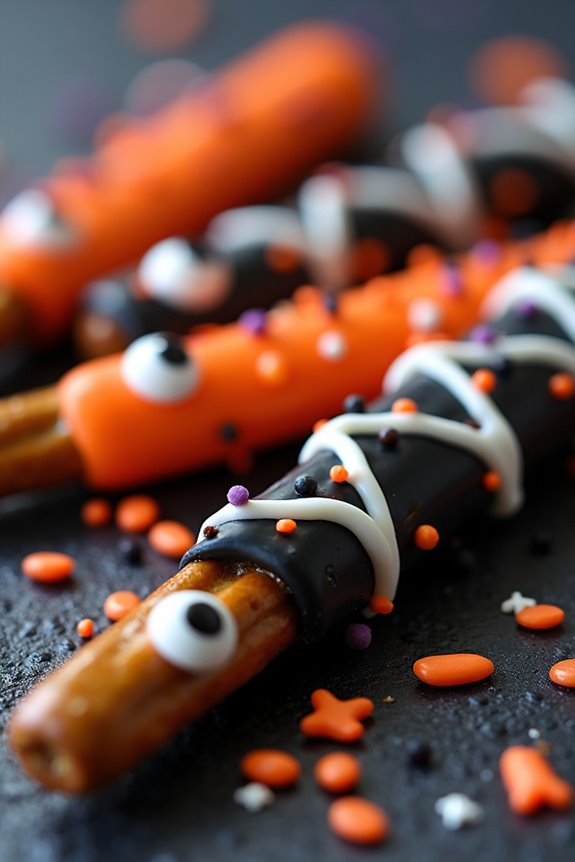
Creepy Crawly Pretzel Rods are the perfect Halloween appetizer to spook and delight your guests. These eerie treats combine the salty crunch of pretzel rods with the sweetness of candy melts, creating a delightful balance of flavors.
Decorated to resemble creepy crawlers, these appetizers are sure to be a hit at any Halloween gathering. The vibrant colors and fun decorations make Creepy Crawly Pretzel Rods not only delicious but also a visual treat that adds a festive touch to your party spread.
This recipe is easy to make and requires minimal ingredients, making it a fantastic option for both experienced cooks and beginners. Whether you’re hosting a Halloween bash or just looking for a fun snack to enjoy with family, Creepy Crawly Pretzel Rods are a must-try.
The following recipe serves 4-6 people, providing enough creepy crawlers to share with your guests or to have as a fun family snack.
Ingredients:
- 12 large pretzel rods
- 1 cup black candy melts
- 1 cup orange candy melts
- 1/2 cup white candy melts
- Edible candy eyes
- Halloween-themed sprinkles
Instructions:
- Prepare Your Station: Begin by lining a baking sheet with parchment paper. This will prevent the pretzels from sticking and make cleanup easier.
- Melt the Candy: In separate microwave-safe bowls, melt the black, orange, and white candy melts. Heat each color in 30-second intervals, stirring in between, until smooth and fully melted.
- Coat the Pretzel Rods: Dip each pretzel rod into the black or orange melted candy, covering about 3/4 of the rod. Let any excess drip back into the bowl.
- Decorate the Pretzels: While the candy coating is still wet, press edible candy eyes onto the coated pretzel rods. Add Halloween-themed sprinkles for extra spooky decoration.
- Add White Webbing: To create a web-like effect, use a fork to drizzle melted white candy over the decorated pretzel rods.
- Cool and Set: Place the decorated pretzel rods onto the prepared baking sheet. Let them sit at room temperature until the candy coating is completely set, approximately 30 minutes.
- Serve and Enjoy: Once set, arrange the Creepy Crawly Pretzel Rods on a platter for serving. Enjoy these spooky snacks with your guests!
Extra Tips:
When making Creepy Crawly Pretzel Rods, you can get creative with your decorations. Use different colors of candy melts or add other edible decorations like crushed cookies or colored sugar for added texture and color.
If you find that the candy melts are too thick, add a teaspoon of vegetable shortening to thin it out for a smoother coating. Additionally, you can make these pretzel rods a day in advance, storing them in an airtight container at room temperature to save time on the day of your event.
Ghostly Mini Pizzas

Celebrate Halloween with a delightful and spooky treat by making Ghostly Mini Pizzas! These fun and easy-to-make appetizers are perfect for a festive gathering or a family dinner leading up to Halloween night.
Shaped like adorable ghosts, these pizzas aren’t only visually appealing but also delicious, combining the classic flavors of pizza with a playful twist. Kids and adults alike will enjoy crafting and devouring these mini culinary ghosts, making them an ideal addition to your Halloween menu.
The base of each Ghostly Mini Pizza is made using simple ingredients that you might already have in your pantry. The pizzas are topped with a flavorful tomato sauce, gooey mozzarella cheese, and olive slices that give your ghostly creations their signature eyes.
With just a few steps, you can create a spooky snack that sets the mood for a night of fun and fright. This recipe yields enough for 4-6 people, making it perfect for a small gathering or a family meal.
Ingredients for 4-6 servings:
- 6 English muffins, split in half
- 1 cup pizza sauce
- 2 cups shredded mozzarella cheese
- 12-18 black olives, sliced
- 1 tablespoon olive oil
- 1 teaspoon garlic powder
- 1 teaspoon dried oregano
- Salt and pepper to taste
Instructions:
1. Prepare the English Muffins:
Preheat your oven to 375°F (190°C). Arrange the split English muffins on a large baking sheet, cut side up. Lightly brush the tops with olive oil to create a crispy base once baked.
2. Add the Sauce:
Spread about a tablespoon of pizza sauce over each English muffin half, guaranteeing you cover the surface evenly. This will be the flavorful base for your mini pizzas.
3. Create the Ghosts:
Sprinkle a generous amount of shredded mozzarella cheese over the pizza sauce on each muffin half. Shape the cheese into a ghostly figure by slightly elongating the cheese towards the bottom, creating the illusion of a ghostly tail.
4. Add the Eyes:
Place two olive slices on each cheese ghost to create the eyes. This gives your mini pizzas their fun and spooky character.
5. Season the Pizzas:
Lightly sprinkle garlic powder, dried oregano, salt, and pepper over the top of each pizza to enhance the flavor profile.
6. Bake the Pizzas:
Place the baking sheet in the preheated oven and bake for about 10-12 minutes, or until the cheese is melted and bubbly, and the edges of the muffins are golden brown.
7. Serve:
Remove the pizzas from the oven and let them cool slightly before serving. Enjoy your Ghostly Mini Pizzas warm for the best taste and texture.
Extra Tips:
To guarantee your Ghostly Mini Pizzas have the best texture, make sure to preheat your oven properly before baking. This helps achieve a crispy base and perfectly melted cheese.
You can also experiment with different toppings to give your ghosts more character, such as using red bell pepper slices for a spooky grin. If you want to make these pizzas in advance, assemble them up to the baking step and refrigerate them; then bake when you’re ready to serve.
Enjoy your Halloween festivities with these delightful and spooky treats!
Monster Mouth Apple Bites
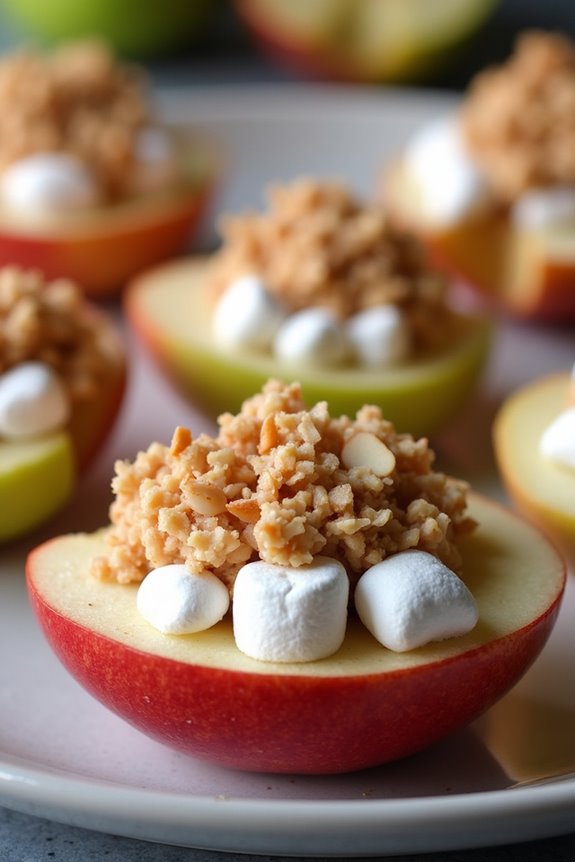
Monster Mouth Apple Bites are the perfect Halloween appetizer to bring a touch of spooky fun to your festive gatherings. These creative snacks aren’t only adorably eerie but also healthy and easy to make.
With crisp apple slices serving as the base for monstrous mouths, peanut butter for a deliciously gooey interior, and marshmallows and slivered almonds for teeth, these treats are sure to delight both kids and adults alike. Whether you’re hosting a Halloween party or simply looking to add some seasonal flair to your meals, Monster Mouth Apple Bites are a must-try.
This recipe is designed to serve 4-6 people, making it ideal for a small gathering or family snack. The combination of sweet and savory flavors, along with the crunchy and creamy textures, makes these apple bites irresistibly tasty. Plus, the assembly process is a fun activity that can involve the whole family, turning it into a delightful pre-Halloween event. Gather your ingredients and let’s create some monstrous munchies!
Ingredients for 4-6 people:
- 2 large apples (any variety you prefer)
- 1/2 cup creamy peanut butter
- 1/4 cup mini marshmallows
- 1/4 cup slivered almonds
- Lemon juice (optional, for preventing apple browning)
Instructions:
- Prepare the Apples: Begin by washing the apples thoroughly. Slice each apple into quarters and remove the core. Then, cut each quarter into two or three thin wedges, depending on the size of the apple, to create the “lips” of the monster mouth.
- Prevent Browning (Optional): If you wish to prevent the apple slices from browning, lightly brush them with lemon juice. This step is optional but recommended if you’re preparing the bites in advance.
- Assemble the Mouths: Take one apple slice and spread a generous layer of peanut butter on one side. Place another apple slice on top, peanut butter side touching, to sandwich the peanut butter between the slices.
- Add the Teeth: Insert a few mini marshmallows along the edge of the peanut butter to resemble teeth. If desired, intersperse some slivered almonds between the marshmallows to create a more jagged, monstrous appearance.
- Serve and Enjoy: Arrange the completed Monster Mouth Apple Bites on a platter and serve immediately, or cover and refrigerate until ready to serve. Enjoy the spooky fun!
Extra Tips:
For an allergy-friendly version, you can substitute the peanut butter with almond butter or sunflower seed butter, making sure to adjust for any specific dietary needs.
If you prefer a different type of “teeth,” you can experiment with other edible items like chocolate chips or raisins. Additionally, for a more vibrant presentation, consider using different colored apples, such as green Granny Smiths for a ghoulish look or red varieties for a blood-red effect.
The key is to have fun and get creative with these Monster Mouth Apple Bites!