

Halloween is just around the corner, and I’m thrilled to share some spooktacular appetizer ideas that your kids will absolutely adore. Picture the joy on their faces as they snack on Monster Eyeball Deviled Eggs and Mummy Mini Hot Dogs. These treats are not only delicious but also a visual delight. Family gatherings will take on a whole new level of fun with these ghoulish goodies. Ready to embark on this fun culinary adventure?
Monster Eyeball Deviled Eggs
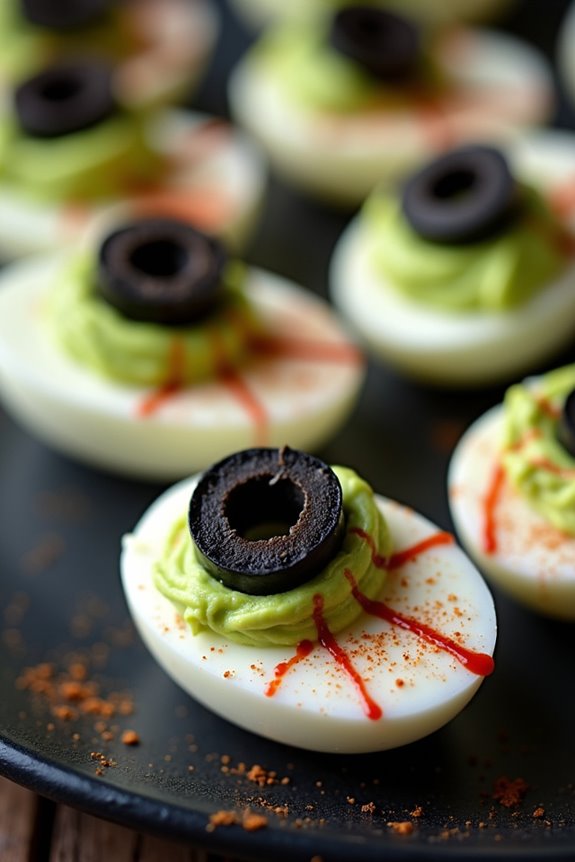
Get ready to spook and delight with Monster Eyeball Deviled Eggs, the perfect Halloween appetizer for kids. These creepy yet delicious treats are sure to be a hit at any Halloween gathering. With a ghoulish twist on the classic deviled eggs, these “eyeballs” aren’t only fun to look at but also easy to make.
Combining simple ingredients with a touch of creativity, you can transform a plain egg into a spooky Halloween snack that will be both entertaining and satisfying for your little monsters.
Creating Monster Eyeball Deviled Eggs is an exciting activity to engage kids in the kitchen. The process is straightforward, allowing for a fun family activity that results in a deliciously eerie platter of appetizers. The recipe uses vibrant food coloring and clever garnishes to mimic the appearance of monster eyes, making them not only delicious but also a visual treat.
This recipe serves 4-6 people, making it ideal for a small Halloween party or family gathering.
Ingredients:
- 6 large eggs
- 3 tablespoons mayonnaise
- 1 teaspoon yellow mustard
- 1/2 teaspoon salt
- 1/4 teaspoon black pepper
- Green food coloring
- Red food coloring
- Black olives, sliced
- Paprika (optional)
Instructions:
- Boil the Eggs: Place the eggs in a single layer in a saucepan and cover them with water. Bring to a boil over medium-high heat. Once boiling, remove from heat, cover, and let sit for 10 minutes. Afterward, transfer the eggs to an ice bath to cool.
- Peel and Halve the Eggs: Once the eggs are cool, gently peel them. Cut each egg in half lengthwise and remove the yolks, placing them in a small mixing bowl.
- Prepare the Filling: Mash the egg yolks with a fork. Add mayonnaise, mustard, salt, and pepper. Mix until smooth. Add a few drops of green food coloring and mix until you reach the desired hue.
- Fill the Egg Whites: Spoon or pipe the green yolk mixture back into the egg white halves, creating a mound in the middle to resemble the iris of an eyeball.
- Create the Eyeballs: Place a black olive slice in the center of each yolk mound to form the pupil of the “eye.”
- Add Bloodshot Effect: Use a toothpick dipped in red food coloring to draw thin lines radiating from the yolk to the outer edge of the egg white, mimicking bloodshot veins.
- Optional Garnish: Lightly sprinkle paprika over the yolk for extra flavor and a more gruesome appearance if desired.
Extra Tips:
To guarantee the eggs peel easily, use slightly older eggs rather than fresh ones. Older eggs tend to have a more acidic environment, which helps separate the shell from the egg white.
Additionally, if you want to enhance the eerie look, consider using a piping bag with a star tip to fill the egg whites, which can give the “iris” a more textured appearance.
When drawing the bloodshot lines, less is more; subtlety can create a more realistic effect. Finally, get creative with your olive placement to give each “eyeball” its own personality!
Creepy-Crawly Cheese Breadsticks

Creepy-Crawly Cheese Breadsticks are the perfect Halloween appetizer to delight and entertain the little ones. These spooky yet delicious breadsticks are shaped to resemble creepy-crawlies, making them a fun addition to any Halloween celebration. Soft, cheesy, and easy to make, they’re certain to be a hit at your party. The combination of melted cheese and buttery breadsticks will have the kids coming back for more, while their eerie appearance will capture their imaginations.
This recipe is designed to serve 4-6 people, making it ideal for small gatherings or a family Halloween night. The preparation is simple enough that kids can join in the fun, helping to shape the dough into creepy-crawly shapes. Whether you’re hosting a Halloween bash or just want to add some festive fun to your dinner table, these Creepy-Crawly Cheese Breadsticks are a must-try.
Ingredients:
- 1 can (13.8 oz) refrigerated pizza dough
- 1 cup shredded mozzarella cheese
- 2 tablespoons melted butter
- 1/2 teaspoon garlic powder
- 1/2 teaspoon dried Italian herbs (optional)
- Black olives for decoration
- Red bell pepper for decoration
Instructions:
- Preheat the Oven: Begin by preheating your oven to 375°F (190°C). This guarantees that the oven is ready to bake the breadsticks once they’re prepared.
- Prepare the Dough: Unroll the refrigerated pizza dough onto a lightly floured surface. Use a rolling pin to flatten it slightly, guaranteeing an even thickness throughout.
- Cut the Dough: Using a sharp knife or pizza cutter, slice the dough into strips about 1 inch wide and 6 inches long. These will form the bodies of your creepy-crawly breadsticks.
- Add Cheese: Sprinkle a generous amount of shredded mozzarella cheese over each strip of dough. Carefully roll each strip into a log, enclosing the cheese within, guaranteeing the edges are sealed to prevent cheese from oozing out during baking.
- Shape the Breadsticks: To make them look like creepy-crawlies, gently twist each roll a couple of times and shape them into squiggly lines on a baking sheet lined with parchment paper.
- Decorate: Slice black olives into thin rounds and red bell pepper into small triangles. Place these on the dough to create eyes and other features for your creepy-crawlies.
- Brush with Butter: In a small bowl, mix melted butter with garlic powder and Italian herbs. Brush this mixture generously over the top of each shaped breadstick.
- Bake: Transfer the baking sheet to the preheated oven and bake for 15-20 minutes, or until the breadsticks are golden brown and the cheese is bubbly.
- Cool and Serve: Allow the breadsticks to cool slightly on the baking sheet. Serve warm for the best taste and texture.
Extra Tips: For an extra spooky touch, you can add food coloring to the dough before shaping to create different colored creepy-crawlies. You can also experiment with different cheeses, like cheddar or pepper jack, for varied flavors. If you want to make the breadsticks ahead of time, prepare them up to the baking step, then refrigerate them until ready to bake. This allows you to enjoy freshly baked breadsticks without the last-minute rush.
Mummy Mini Hot Dogs

Mummy Mini Hot Dogs are a fun and spooky treat perfect for any Halloween gathering, especially when catering to young children. These delicious appetizers are both easy to make and a guaranteed hit with kids who enjoy getting into the Halloween spirit. The combination of savory mini hot dogs wrapped in buttery crescent roll dough creates a delightful snack that resembles mummies, complete with edible eyes for added effect.
These miniature mummies are a great way to get children involved in the kitchen. They can help in wrapping the hot dogs or placing the eyes on the mummies, making it a fun family activity. Not only are they simple to prepare, but they also require minimal ingredients, making them a convenient choice for busy parents planning a Halloween party or a themed lunch. Serve them with a side of ketchup or mustard for dipping, and watch them disappear as quickly as they were made.
Ingredients (serving size: 4-6 people):
- 1 package of mini hot dogs (about 32 pieces)
- 2 cans of refrigerated crescent roll dough
- 1 egg, beaten (for egg wash)
- 1 tablespoon of water
- 1 tablespoon of flour (for dusting the surface)
- 32 edible candy eyes or dots of mustard/ketchup for eyes
- Cooking spray or parchment paper
Cooking Instructions:
- Preheat the Oven: Set your oven to 375°F (190°C) to allow it to heat up while you prepare the mummy mini hot dogs.
- Prepare the Crescent Dough: Lightly dust your working surface with flour to prevent sticking. Unroll the crescent roll dough and separate it into four rectangles. Press the perforations together to seal them.
- Cut the Dough into Strips: Use a knife or pizza cutter to slice each rectangle into thin strips, about 1/4 inch wide. These strips will be used to wrap around the mini hot dogs.
- Wrap the Hot Dogs: Take one mini hot dog and start wrapping it with a strip of dough, leaving a small gap at the top for the eyes. Continue wrapping until the entire hot dog is covered with a few gaps to mimic mummy bandages. Repeat this process for all the mini hot dogs.
- Prepare the Baking Sheet: Line a baking sheet with parchment paper or lightly spray it with cooking spray to prevent sticking.
- Place and Brush with Egg Wash: Arrange the wrapped hot dogs on the prepared baking sheet. In a small bowl, mix the beaten egg with a tablespoon of water. Brush the egg wash over the dough-wrapped hot dogs to give them a golden sheen during baking.
- Bake the Mummies: Place the baking sheet in the preheated oven and bake for 12-15 minutes, or until the dough is golden brown and fully cooked.
- Add the Eyes: Remove the hot dogs from the oven and let them cool slightly. Using candy eyes or dots of mustard/ketchup, place two eyes on each mummy in the uncovered space near the top of the hot dog.
- Serve: Arrange the mummy mini hot dogs on a platter and serve them warm with your choice of dipping sauces.
Extra Tips:
For a more festive presentation, consider serving the mummy mini hot dogs on a platter lined with Halloween-themed napkins or plates. If you’re short on time, you can prepare the mummies in advance and refrigerate them unbaked for a few hours. Just be sure to bake them fresh before serving for the best taste and texture.
Additionally, if you can’t find candy eyes, a small dot of mustard or ketchup will work perfectly fine as a substitute.
Witch’s Broomstick Pretzels
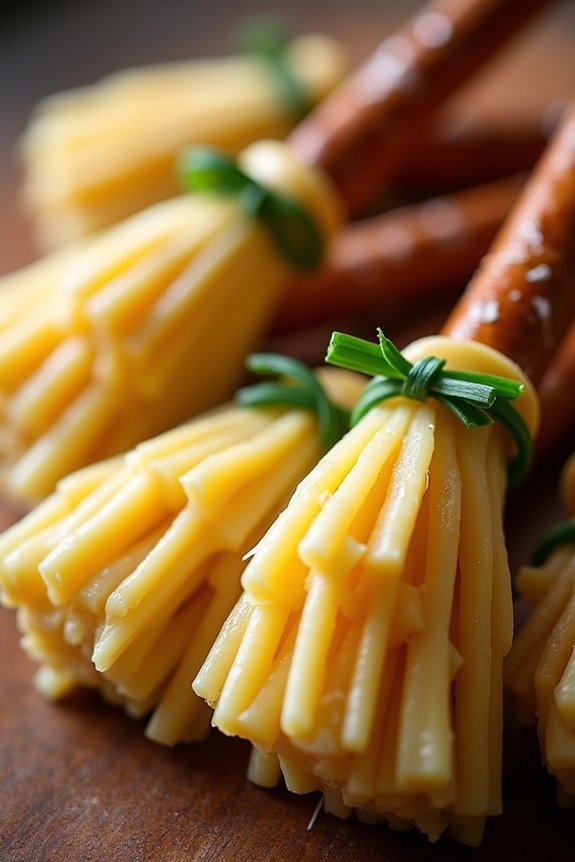
Witch’s Broomstick Pretzels are a delightful and spooky treat perfect for a Halloween gathering with kids. These whimsical appetizers aren’t only fun to make but also enjoyable to eat, bringing a touch of magic to your festive spread. The combination of salty pretzel sticks and savory cheese is sure to be a hit among the young ones, and the playful presentation will enchant both kids and adults alike.
Crafting these Witch’s Broomstick Pretzels is a simple and engaging activity that can involve the little ones, making it an ideal choice for a Halloween party. The recipe requires minimal ingredients and effort, yet delivers maximum impact with its charming appearance. Serve these broomsticks as a standalone snack or pair them with other Halloween-themed treats for a complete festive experience.
Ingredients for 4-6 people:
- 24 pretzel sticks
- 12 string cheese sticks
- Fresh chives (optional, for tying)
- 1/4 cup honey mustard (for dipping, optional)
Cooking Instructions:
- Prepare the Cheese: Begin by cutting each string cheese stick into halves. This will give you a total of 24 pieces – one for each broomstick.
- Create the Bristles: Take each half piece of string cheese and carefully make lengthwise slits around one end, about halfway up, to mimic the bristles of a broom. Confirm you don’t cut all the way through.
- Assemble the Broomsticks: Insert a pretzel stick into the uncut end of each string cheese piece. Gently push it in until it feels secure, forming the handle of the broomstick.
- Secure with Chives (Optional): If desired, cut the fresh chives into small strands and tie one around the top of the cheese, just under the pretzel stick, to give the appearance of a tied broom.
- Serve: Arrange the Witch’s Broomstick Pretzels on a platter. If using, place a small bowl of honey mustard on the side for dipping.
Extra Tips:
To make the assembly process smoother, confirm that the string cheese is cold, as it will be easier to handle and less prone to breaking.
If you find the pretzel sticks are breaking when inserting them, gently twist the pretzel as you push it into the cheese to minimize pressure.
For a gluten-free option, consider using gluten-free pretzel sticks.
Additionally, you can experiment with different dipping sauces to suit your taste preferences, such as ranch or marinara sauce.
Spooky Spiderweb Dip
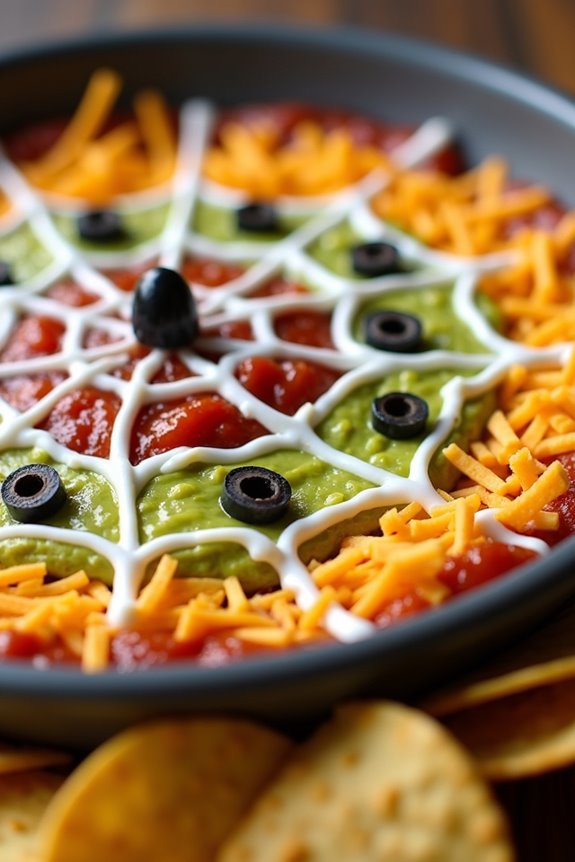
Get ready for a frightfully fun Halloween with this Spooky Spiderweb Dip, a perfect appetizer that will delight kids and adults alike. This dish not only captivates with its ghoulishly good looks but also tantalizes taste buds with a deliciously creamy texture.
Perfect for Halloween parties, this dip is designed to look like a spiderweb, adding a festive touch to your snack table. The combination of savory ingredients makes it a hit for any spooky gathering, and it’s easy to put together, guaranteeing you spend more time enjoying the party rather than worrying about the food.
This Spooky Spiderweb Dip is an excellent way to involve kids in the kitchen, allowing them to get creative with the design. Whether you’re hosting a Halloween party or simply looking for a fun treat to enjoy at home, this dip is a must-try. For a serving size of 4-6 people, this recipe includes ingredients that are both simple and readily available.
Now, let’s plunge into the ingredients you’ll need to create this festive appetizer.
Ingredients:
- 1 can (15 oz) refried beans
- 1 cup sour cream
- 1 cup guacamole
- 1 cup salsa
- 1 cup shredded cheddar cheese
- 1 cup black olives, sliced
- 1 packet taco seasoning
- Tortilla chips for serving
Instructions:
- Prepare the Base Layer: Begin by spreading the refried beans evenly on a large, circular serving platter. This will form the base layer of your dip, providing a solid foundation for all the other tasty layers.
- Add the Taco Seasoning: Mix the sour cream with the taco seasoning in a small bowl until well combined. This step guarantees that the sour cream is flavorful and complements the other layers.
- Layer the Flavors: Carefully spread the guacamole over the refried beans, followed by the seasoned sour cream. Be gentle to maintain distinct layers, which will make the final presentation more appealing.
- Create the Spiderweb Design: Spoon the salsa on top of the sour cream layer, then sprinkle the shredded cheddar cheese over the salsa. For the spiderweb effect, fill a small plastic sandwich bag with sour cream, snip off a tiny corner, and pipe concentric circles over the top layer. Use a toothpick to drag lines from the center to the edges, creating a web-like pattern.
- Finish with Final Touches: Scatter sliced black olives on top for added flavor and decoration. These can represent little spiders crawling on the web.
- Serve: Accompany the Spooky Spiderweb Dip with tortilla chips for dipping and serve immediately. Your guests can dig into this delicious treat and enjoy the Halloween spirit.
Extra Tips:
When creating the spiderweb design, guarantee that the sour cream used for piping is smooth and slightly thinned out for easy application. If you prefer a spicier dip, consider adding jalapeños or using a hot salsa variant.
To keep the guacamole from browning, guarantee it’s well covered by the other layers and consider adding a bit of lime juice for freshness. Remember, the presentation is key to making this dish look spooky, so feel free to get creative with your decorations.
Ghostly Guacamole Cups
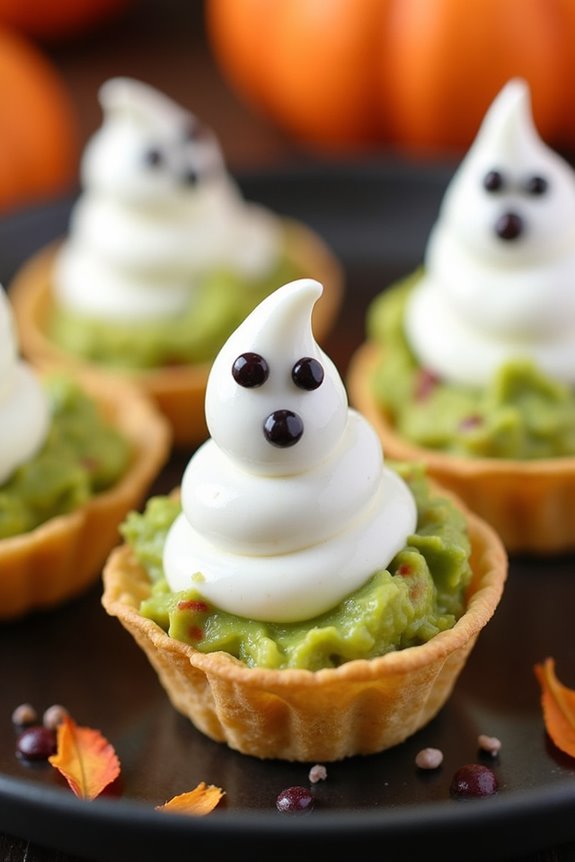
Ghostly Guacamole Cups are a spook-tacular appetizer that’s sure to delight kids and adults alike during Halloween festivities. These eerie yet delicious cups are perfect for setting a creepy theme at any party, combining the creamy goodness of guacamole with a fun and engaging presentation. Not only are they visually appealing, but they’re also packed with healthy ingredients, making them a great choice for a Halloween treat that parents can feel good about serving.
The star of this dish is certainly the guacamole, which is made from ripe avocados mixed with a variety of flavorful ingredients. The ghostly appearance is achieved by using small cups or shot glasses to hold the guacamole, topped with sour cream ghosts that are easy to create using a piping bag. This recipe is designed to serve 4-6 people, making it ideal for small gatherings or as part of a larger spread of Halloween appetizers.
Ingredients (Serves 4-6):
- 3 ripe avocados
- 1 small lime, juiced
- 1/4 cup finely chopped red onion
- 1 small tomato, diced
- 2 tablespoons chopped fresh cilantro
- Salt and pepper to taste
- 1/2 cup sour cream
- 12 mini tortilla cups or shot glasses
- 1 tablespoon black sesame seeds or 12 small edible candy eyes
Cooking Instructions:
- Prepare the Guacamole:
- Cut the avocados in half, remove the pits, and scoop the flesh into a mixing bowl. Use a fork to mash the avocado to your desired consistency.
- Add the lime juice, chopped red onion, diced tomato, cilantro, salt, and pepper. Mix everything together until well combined. Taste and adjust seasoning if necessary.
- Assemble the Cups:
- Divide the guacamole evenly among the mini tortilla cups or shot glasses, filling each about three-quarters full.
- Create the Ghosts:
- Fill a piping bag or a plastic sandwich bag with the sour cream. If using a sandwich bag, snip off a small corner to create a makeshift piping bag.
- Pipe a small ghost shape on top of each cup of guacamole. The ghost should resemble a small, pointed blob.
- Add the Eyes:
- Place two black sesame seeds or edible candy eyes onto each sour cream ghost to create eyes. Press gently to secure them in place.
- Serve and Enjoy:
- Arrange the Ghostly Guacamole Cups on a platter and serve immediately. Encourage guests to enjoy the creamy, spooky treat.
Extra Tips:
For the best flavor, use ripe avocados that give slightly when pressed. If you’re preparing the guacamole in advance, be sure to store it in an airtight container with plastic wrap pressed directly onto the surface to prevent browning.
To add a little more fun, consider using colored tortilla cups or decorating the serving platter with Halloween-themed items like mini pumpkins or toy spiders. Enjoy getting creative with the presentation to wow your guests!
Jack-O’-Lantern Stuffed Peppers
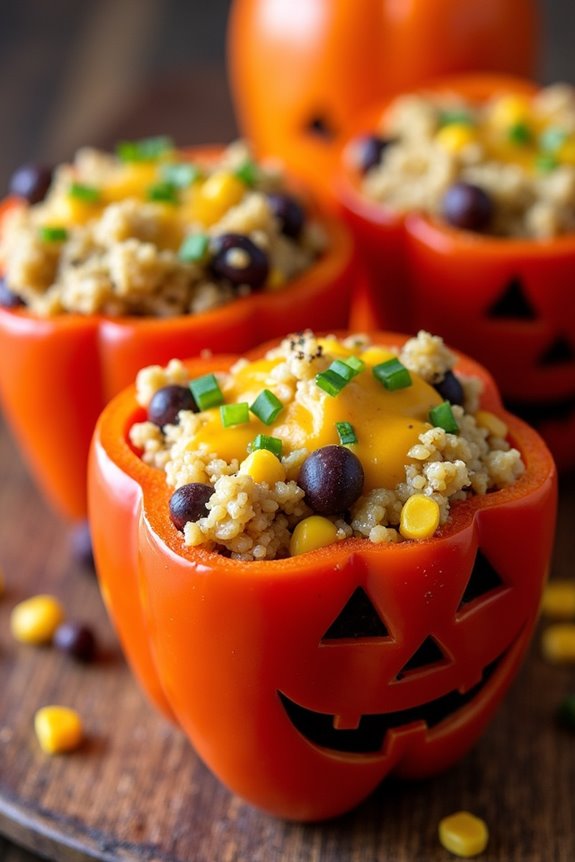
Jack-O’-Lantern Stuffed Peppers are a fun and festive appetizer perfect for a Halloween gathering with kids. These delightful treats combine the whimsy of Halloween with a healthy, delicious snack that’s bound to be a hit. The peppers are carved to resemble charming jack-o’-lanterns, and they’re filled with a savory stuffing that will tantalize young taste buds. Not only are they visually appealing, but they also offer a nutritious option that’s easy to prepare and customize to suit different tastes.
These stuffed peppers aren’t only great for a party but also make for an engaging activity to do with children. Kids can participate in carving the faces on the peppers, making them invested in what they’re eating. The stuffing offers a balanced combination of protein and grains, guaranteeing the dish is filling and satisfying. By using vibrant orange bell peppers, you bring the Halloween theme to life, while the stuffing can be tailored with your family’s favorite ingredients, making this a versatile and enjoyable dish.
Ingredients for 4-6 servings:
- 6 medium-sized orange bell peppers
- 1 cup quinoa
- 2 cups vegetable broth
- 1 tablespoon olive oil
- 1 small onion, diced
- 2 cloves garlic, minced
- 1 cup black beans, drained and rinsed
- 1 cup corn kernels
- 1 teaspoon cumin
- 1 teaspoon paprika
- Salt and pepper to taste
- 1 cup shredded cheddar cheese
Instructions:
- Prepare the Quinoa: Rinse the quinoa under cold water. In a medium saucepan, combine the quinoa and vegetable broth. Bring to a boil, then reduce the heat to low, cover, and simmer for about 15 minutes or until the quinoa is cooked and the liquid is absorbed. Fluff with a fork and set aside.
- Preheat the Oven: Set your oven to 375°F (190°C) to confirm it’s hot and ready for baking the peppers.
- Carve the Peppers: Carefully cut the tops off the bell peppers and remove the seeds and membranes. Using a small paring knife, carve out jack-o’-lantern faces on one side of each pepper. Be gentle to avoid puncturing the peppers.
- Cook the Filling: In a large skillet, heat the olive oil over medium heat. Add the diced onion and minced garlic, sautéing until the onion becomes translucent. Stir in the cooked quinoa, black beans, corn, cumin, paprika, salt, and pepper. Cook for about 5 minutes, stirring occasionally, until everything is well combined and heated through.
- Stuff the Peppers: Spoon the filling mixture into each carved pepper, packing it tightly. Place the stuffed peppers upright in a baking dish. If they don’t stand up well, you can slightly trim the bottom to create a flat base.
- Bake the Peppers: Cover the baking dish with foil and bake in the preheated oven for 25 minutes. Remove the foil, sprinkle the tops with shredded cheddar cheese, and bake for an additional 10 minutes or until the cheese is melted and bubbly.
- Serve: Allow the peppers to cool slightly before serving. They can be enjoyed warm and are a perfect centerpiece for your Halloween table.
Extra Tips:
To make the peppers easier to carve, choose peppers that are firm and have a stable base. If you’re short on time, the quinoa filling can be prepared a day in advance and stored in the refrigerator. For a spicier version, you can add diced jalapeños or a pinch of chili powder to the filling.
These Jack-O’-Lantern Stuffed Peppers can also be adapted for vegetarian or vegan diets by omitting the cheese or using a dairy-free alternative. Enjoy the creativity and flavor of this Halloween treat!
Vampire Bat Wings
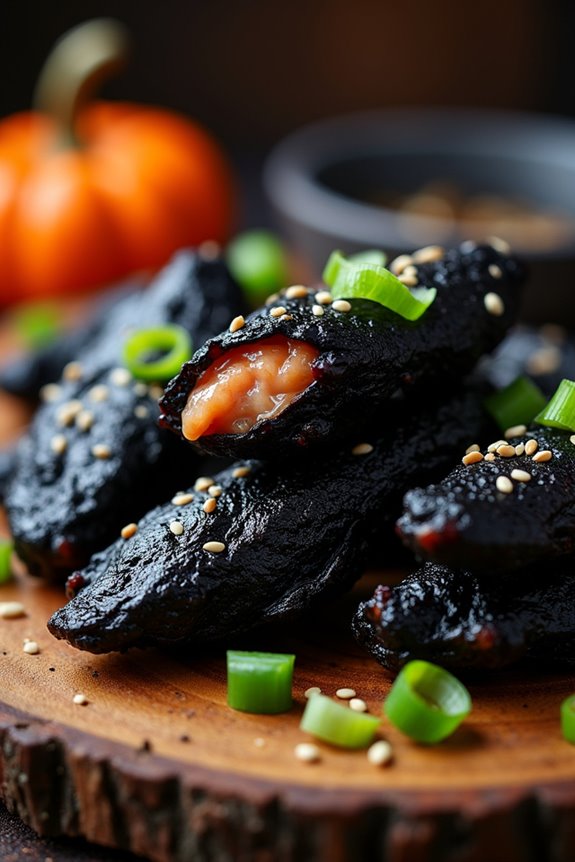
Halloween is the perfect occasion to let your culinary creativity soar, and what better way to do so than with Vampire Bat Wings? This spooky yet delicious appetizer is sure to delight kids and make your Halloween party a hit. The deep, dark color of the wings, achieved through a special marinade, makes them look just like bat wings, while the sweet and spicy flavors will have everyone coming back for more.
Whether you’re hosting a party or just want to bring some Halloween fun to your dinner table, Vampire Bat Wings are a must-try.
The key to this recipe is the marinade, which not only gives the wings their eerie appearance but also infuses them with incredible flavor. A combination of soy sauce, honey, garlic, and a hint of black food coloring does the trick. Once marinated, the wings are baked to perfection, resulting in a crispy exterior and juicy, tender meat. This recipe serves 4-6 people, making it ideal for a small gathering or family celebration.
Ingredients for 4-6 people:
- 2 pounds chicken wings
- 1/2 cup soy sauce
- 1/4 cup honey
- 2 tablespoons olive oil
- 4 cloves garlic, minced
- 1 teaspoon ground ginger
- 1 tablespoon Sriracha or hot sauce (optional)
- Black food coloring (gel or liquid)
- Salt and pepper to taste
- Sesame seeds (for garnish)
- Green onions, chopped (for garnish)
Cooking Instructions:
- Prepare the Marinade: In a large mixing bowl, combine soy sauce, honey, olive oil, minced garlic, ground ginger, and Sriracha. Mix well until all ingredients are fully incorporated. Add a few drops of black food coloring until the marinade reaches your desired darkness.
- Marinate the Wings: Rinse and pat dry the chicken wings. Place them in a resealable plastic bag or a shallow dish. Pour the marinade over the wings, making sure they’re evenly coated. Seal the bag or cover the dish and refrigerate for at least 2 hours, preferably overnight, to allow the flavors to fully develop.
- Preheat the Oven: Preheat your oven to 400°F (200°C). Line a baking sheet with aluminum foil or parchment paper for easy cleanup.
- Bake the Wings: Arrange the marinated wings in a single layer on the prepared baking sheet. Bake in the preheated oven for 25-30 minutes, turning once halfway through, until the wings are crispy and cooked through.
- Garnish and Serve: Remove the wings from the oven and let them rest for a few minutes. Transfer them to a serving platter and sprinkle with sesame seeds and chopped green onions for a touch of color and added flavor.
Extra Tips:
For an even darker appearance, consider using more black food coloring, but be careful not to overdo it, as it might leave an aftertaste.
If you prefer your wings extra crispy, you can broil them for an additional 3-5 minutes after baking. Keep a close eye on them to prevent burning.
Adjust the level of spiciness by increasing or decreasing the amount of Sriracha according to your preference, or omit it entirely for a milder version.
Enjoy these fun and festive Vampire Bat Wings as a spooky treat for your Halloween festivities!
Pumpkin Cheese Ball
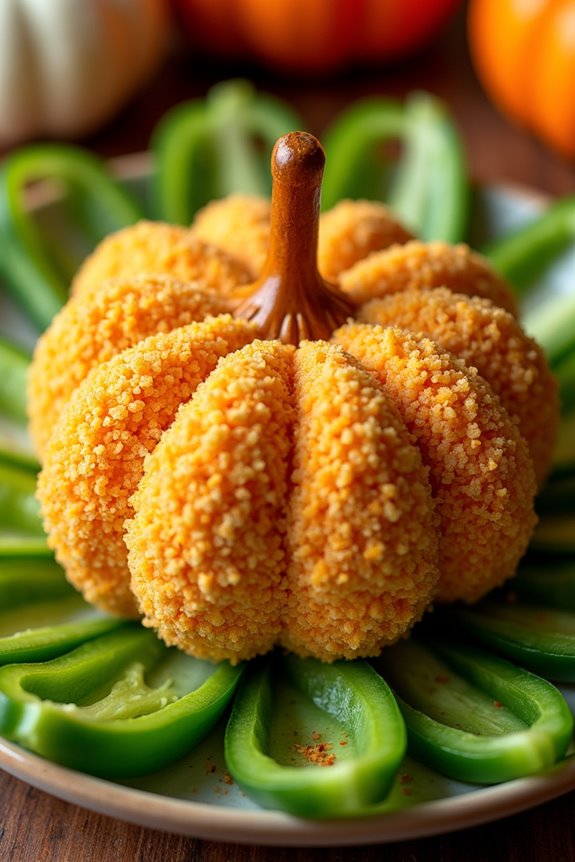
Creating a festive and fun Halloween appetizer for kids can be a delightful experience, and the Pumpkin Cheese Ball is the perfect choice. This savory treat not only captures the essence of Halloween with its pumpkin shape but also serves as a delicious snack that kids will love. Its creamy and cheesy texture, combined with the medley of flavors, makes it an irresistible addition to your Halloween festivities.
The Pumpkin Cheese Ball is both visually appealing and easy to make, requiring only a handful of ingredients. The cheese ball is flavored with a variety of seasonings and shaped into a pumpkin, complete with a stem, to enhance its Halloween theme. Whether served with crackers, pretzels, or vegetable sticks, this dish is sure to be a hit at any Halloween gathering.
Ingredients (Serves 4-6):
- 16 oz cream cheese, softened
- 2 cups shredded cheddar cheese
- 1/4 cup finely chopped green onions
- 1/2 teaspoon garlic powder
- 1/2 teaspoon onion powder
- 1/2 teaspoon smoked paprika
- 1/4 teaspoon salt
- 1/4 teaspoon black pepper
- 1 cup crushed pretzels
- 1 pretzel rod (for the stem)
- Green bell pepper strips (for the leaves)
Cooking Instructions:
- Prepare the Cheese Mixture: In a large bowl, combine the softened cream cheese, shredded cheddar cheese, chopped green onions, garlic powder, onion powder, smoked paprika, salt, and black pepper. Mix thoroughly until all ingredients are well incorporated and the mixture is smooth.
- Shape the Cheese Ball: Once the cheese mixture is ready, use your hands to shape it into a ball. Wrap the cheese ball in plastic wrap, then mold it into a pumpkin shape by gently pressing it. To create the pumpkin ridges, use a rubber band or kitchen twine to wrap around the ball, pressing lightly to form indentations. Chill the cheese ball in the refrigerator for at least 2 hours, or until firm.
- Coat the Cheese Ball: Spread the crushed pretzels evenly on a large plate. Remove the cheese ball from the refrigerator and unwrap it. Roll the cheese ball in the crushed pretzels, making sure it’s fully coated on all sides.
- Add Decorative Elements: Insert the pretzel rod into the top of the cheese ball to mimic the pumpkin’s stem. Arrange green bell pepper strips around the stem to resemble leaves, adding a touch of color and realism.
- Serve and Enjoy: Place the pumpkin cheese ball on a serving platter. Serve with crackers, pretzels, or vegetable sticks, allowing guests to enjoy the creamy and flavorful appetizer.
Extra Tips:
For best results, verify the cream cheese is fully softened before mixing to achieve a smooth consistency. If you prefer a spicier version, consider adding a pinch of cayenne pepper or a few dashes of hot sauce to the cheese mixture.
Additionally, the cheese ball can be made a day in advance and stored in the refrigerator, which can help enhance the flavors. Remember to allow it to sit at room temperature for about 15 minutes before serving to make spreading easier.
Bloody Finger Mozzarella Sticks
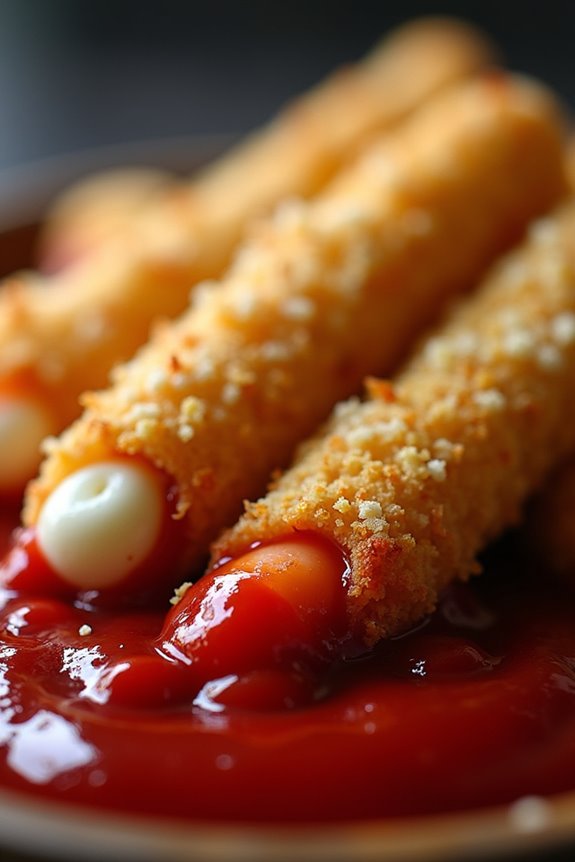
Transform a classic appetizer into a spooky Halloween treat with these Bloody Finger Mozzarella Sticks. Perfect for a Halloween party, these eerie snacks aren’t only fun to make but also deliciously cheesy. Kids will love the gory appearance of these mozzarella sticks, which resemble severed fingers complete with a ketchup “blood” dip.
Whether you’re hosting a party or just want to add some festive flair to your Halloween menu, these mozzarella sticks are sure to be a hit.
This recipe serves 4-6 people and requires minimal ingredients and preparation time. The key to creating the finger-like appearance is in the details: using almonds as fingernails and scoring the mozzarella sticks to mimic knuckle creases. The addition of ketchup or marinara sauce for “blood” completes the look, making these appetizers both creepy and tasty.
Gather your little ghouls and goblins to join in the fun of crafting these spooky snacks.
Ingredients:
- 12 mozzarella string cheese sticks
- 1 cup all-purpose flour
- 2 eggs, beaten
- 1 cup breadcrumbs
- 1/4 cup grated Parmesan cheese
- 12 whole blanched almonds
- 1 teaspoon garlic powder
- 1 teaspoon Italian seasoning
- 1 cup marinara sauce or ketchup
- Salt and pepper to taste
- Vegetable oil for frying
Cooking Instructions:
- Prepare the Mozzarella Sticks: Cut each mozzarella stick in half to make a total of 24 pieces. These will form the “fingers” of your spooky appetizer.
- Set Up the Breading Station: In three separate shallow bowls, place the flour in one, beaten eggs in the second, and a mixture of breadcrumbs, Parmesan cheese, garlic powder, Italian seasoning, salt, and pepper in the third.
- Bread the Mozzarella Sticks: Dredge each mozzarella stick half in flour, making certain it’s fully coated. Dip it into the beaten eggs, and then roll it in the breadcrumb mixture, pressing gently to adhere. Repeat the egg and breadcrumb coating for an extra crispy layer.
- Create the Finger Details: Gently score three small lines onto each mozzarella stick to mimic the appearance of knuckles. At one end of each stick, press an almond into the cheese to create a “fingernail.”
- Chill the Sticks: Place the prepared mozzarella sticks on a baking sheet and refrigerate for at least 30 minutes. This helps the breading set and prevents the cheese from melting too quickly during frying.
- Fry the Mozzarella Sticks: Heat vegetable oil in a large skillet over medium heat. Fry the mozzarella sticks in batches for about 2-3 minutes or until golden brown and crispy. Carefully remove them with a slotted spoon and drain on paper towels.
- Serve with Sauce: Arrange the Bloody Finger Mozzarella Sticks on a platter and serve with a bowl of marinara sauce or ketchup for dipping. This will be the “blood” that completes the spooky effect.
Extra Tips:
For best results, make certain that the mozzarella sticks are thoroughly chilled before frying. This step is vital to prevent the cheese from oozing out during cooking.
If you prefer baking over frying, preheat your oven to 400°F (200°C) and bake the mozzarella sticks on a parchment-lined baking sheet for 8-10 minutes or until golden and crispy. Remember to keep a close eye on them to avoid any cheese leakage.
Adjust the seasoning to taste, and feel free to add a pinch of cayenne pepper for a spicy kick. Enjoy these ghoulish snacks at your next Halloween gathering!
Frankenstein’s Veggie Platter
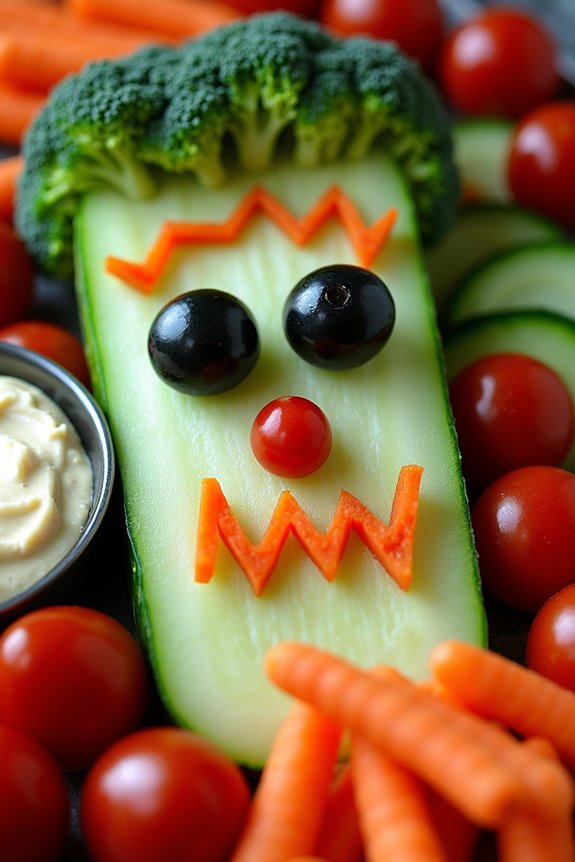
Looking for a spooky yet nutritious Halloween appetizer for kids? The Frankenstein’s Veggie Platter is the perfect choice to add a touch of creativity to your Halloween spread. This fun and colorful dish not only appeals to the eyes but also encourages kids to munch on healthy veggies. It’s a fantastic way to get them excited about eating their greens while celebrating the Halloween spirit.
With just a bit of creativity and some fresh vegetables, you can craft a monster-themed platter that will delight kids and adults alike. The essence of this dish lies in its presentation—transforming ordinary vegetables into a whimsical Frankenstein face. It’s an interactive appetizer that invites kids to recognize and enjoy different vegetables.
The platter can be customized with your choice of veggies, but it’s crucial to use a variety of colors and shapes to capture Frankenstein’s distinctive look. Perfect for serving 4-6 people, this appetizer is simple to assemble and requires no cooking, making it a stress-free addition to your Halloween festivities.
Ingredients for 4-6 people:
- 1 large cucumber
- 1 green bell pepper
- 1 small broccoli head
- 1 small cauliflower head
- 1 cup cherry tomatoes
- 1/2 cup black olives
- 1 medium carrot
- 1/2 cup baby carrots
- 1 cup hummus or ranch dip
Instructions:
- Prepare the Base: Start by slicing the cucumber into thin rounds. Arrange these slices in a rectangular shape on a large platter to form the base of Frankenstein’s face.
- Create the Hair and Eyebrows: Cut the broccoli and cauliflower into small florets. Place the broccoli florets above the cucumber slices to create spiky hair. Use the black olives to form thick eyebrows, positioning them just below the broccoli hairline.
- Make the Eyes: Slice the green bell pepper into thin rings. Use two rings to create the eyes, placing them under the eyebrows. For the pupils, place a slice of black olive in the center of each bell pepper ring.
- Design the Nose and Mouth: Use one of the larger cherry tomatoes as Frankenstein’s nose, placing it centrally between the eyes. For the mouth, lay out a few thin strips of carrot below the nose in a zigzag pattern to mimic stitches.
- Add the Ears and Neck Bolts: Slice two cucumber rounds in half and place one half on each side of the face as ears. Use the remaining cherry tomatoes to represent bolts sticking out of Frankenstein’s neck by placing them on either side of the platter.
- Finish with Details: Scatter baby carrots around the bottom of the platter to add color. Serve the platter with a bowl of hummus or ranch dip in the corner for a delicious way to enjoy the veggies.
Extra Tips:
For the best results, verify the vegetables are fresh and crisp as they hold their shape better. Feel free to get creative with additional veggies based on your preferences or availability.
If you want to add more personality, carve small expressions into the cherry tomatoes or use edible markers to draw on the cucumber rounds. This platter can be prepared a few hours in advance and stored in the fridge, making it easier to assemble when you’re ready to serve.
Haunted Hummus Graveyard
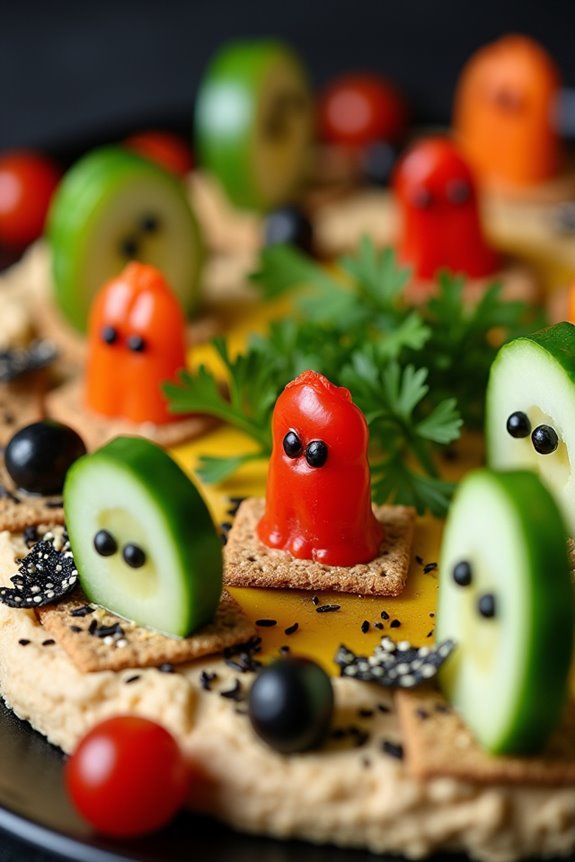
Creating Halloween appetizers that are both fun and delicious is a surefire way to delight kids at any spooky celebration. The Haunted Hummus Graveyard is an imaginative and healthy dish that combines the creamy goodness of hummus with playful, ghostly decorations. This appetizer isn’t only visually appealing but also provides a nutritious option for kids to enjoy amidst the sweet treats typically associated with Halloween.
Transforming a traditional hummus dip into a festive graveyard scene only takes a few simple ingredients and some creative touches. The hummus, which acts as the “dirt” in the graveyard, is topped with an assortment of vegetables and edible decorations that resemble tombstones, ghosts, and other creepy elements. This recipe is designed to serve 4-6 people, making it perfect for a small Halloween party or family gathering.
Ingredients:
- 2 cups of store-bought or homemade hummus
- 1 large cucumber
- 4-5 whole wheat crackers or rectangular tortilla chips
- Black olives
- 1 red bell pepper
- 1 small carrot
- 1/2 cup cherry tomatoes
- 1/4 cup sliced black olives
- 1/4 cup fresh parsley
- 1 tablespoon sesame seeds
Instructions:
- Prepare the Base: Spread the hummus evenly on a large, flat serving platter to create the base of your graveyard. The hummus should cover the platter completely and be about half an inch thick to hold the decorations.
- Create Tombstones: Slice the cucumber into thick rounds, then cut each round in half to create “tombstones.” Push half of a whole wheat cracker or tortilla chip into the hummus behind each cucumber piece to give it a sturdy backing.
- Add Ghosts: Cut the red bell pepper into ghost shapes using a small paring knife. Place these on top of the hummus to appear as if they’re floating above the “ground.”
- Make Trees and Shrubs: Use small sprigs of fresh parsley to create trees and shrubs around the graveyard. These can be placed randomly to add a natural element to the scene.
- Decorate with Olives: Slice black olives in half and scatter them around the graveyard to resemble bats or creepy creatures lurking in the shadows.
- Finish with Vegetables: Cut the carrot into thin sticks and place them on the hummus as creepy crawlers or fence posts. Arrange cherry tomatoes around the edge of the platter for added color and texture.
- Sprinkle Seeds: Finally, sprinkle sesame seeds over the entire platter to mimic the appearance of scattered bones or graveyard soil.
Extra Tips:
For a more interactive experience, let the kids help with decorating the graveyard. They can place the tombstones, ghosts, and other elements to their liking, which adds to the fun and excitement.
If you’re short on time, using store-bought hummus is perfectly fine, but homemade hummus can be customized with spices or herbs to add extra flavor. Additionally, use any leftover vegetables for dipping, making sure to cut them into fun shapes or spooky figures to keep with the Halloween theme.
Candy Corn Fruit Parfaits
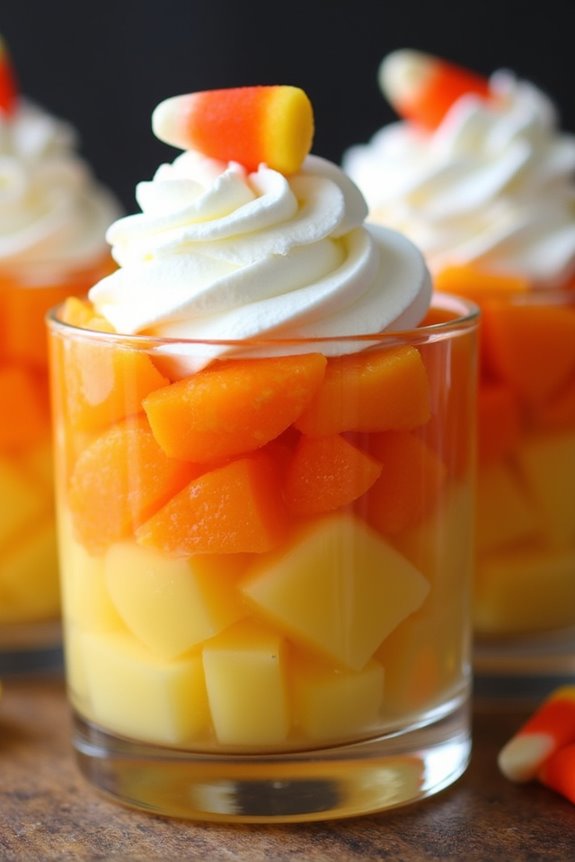
Candy Corn Fruit Parfaits are a delightful and healthy Halloween appetizer that will captivate kids with their vibrant colors and sweet flavors. These parfaits mimic the iconic candy corn with layers of yellow pineapple, orange mandarin slices, and creamy whipped topping, making them not only visually appealing but also a nutritious option.
Perfect for a Halloween party or a festive treat, these parfaits are easy to assemble and offer a revitalizing departure from traditional candy-based snacks. Creating these fun and fruity parfaits involves layering fresh, juicy fruits and topping them with a light, fluffy whipped cream for a sweet finish.
The combination of flavors and textures creates a satisfying treat that kids will love, while parents will appreciate the inclusion of natural, wholesome ingredients. This recipe is designed to serve 4-6 people, making it a convenient choice for small gatherings or family events.
Ingredients:
- 2 cups canned pineapple chunks, drained
- 2 cups canned mandarin orange segments, drained
- 2 cups whipped cream or whipped topping
- Candy corn pieces for garnish (optional)
- Clear cups or parfait glasses for serving
Instructions:
- Prepare the Ingredients: Start by draining the pineapple chunks and mandarin orange segments to prevent any excess liquid from affecting the consistency of the parfaits. If using canned fruits, make sure they’re well-drained before proceeding.
- Assemble the Parfaits: In each clear cup or parfait glass, begin by adding a layer of pineapple chunks at the bottom. This will represent the yellow layer of the candy corn.
- Add the Middle Layer: Next, carefully spoon the mandarin orange segments over the pineapple to form the middle orange layer. Try to distribute the fruit evenly across all glasses for a consistent look.
- Top with Whipped Cream: Finally, add a generous dollop of whipped cream or whipped topping on top of the mandarin oranges. This will complete the candy corn color scheme with the white layer.
- Garnish (Optional): For an added touch, consider placing a few candy corn pieces on top of the whipped cream for decoration. This optional step enhances the theme and adds a small candy treat to each parfait.
- Chill Before Serving: Refrigerate the parfaits for at least 30 minutes before serving to allow the flavors to meld and to keep the whipped topping firm.
Extra Tips:
For a healthier version, consider using fresh fruits instead of canned ones, if available. You can also substitute the whipped cream with Greek yogurt for a tangier and protein-rich topping.
When preparing the parfaits, be gentle when layering to maintain the distinct color separation, which is key to achieving the candy corn effect. If serving these at a party, prepare them in advance and store them in the fridge until ready to serve, guaranteeing they remain fresh and visually appealing.