

Creating a Halloween charcuterie board for kids is an absolute treat. The whimsy of ghost-shaped cheese and crackers, paired with playful monster fruit kabobs, is sure to spark joy. Add a creepy crawly veggie platter to tempt those little hands. A sprinkle of pumpkin patch popcorn mix and a batch of vampire bat cookies add a sweet twist. These snacks turn every nibble into a playful celebration of creativity and fun.
Spooky Ghost Cheese and Crackers
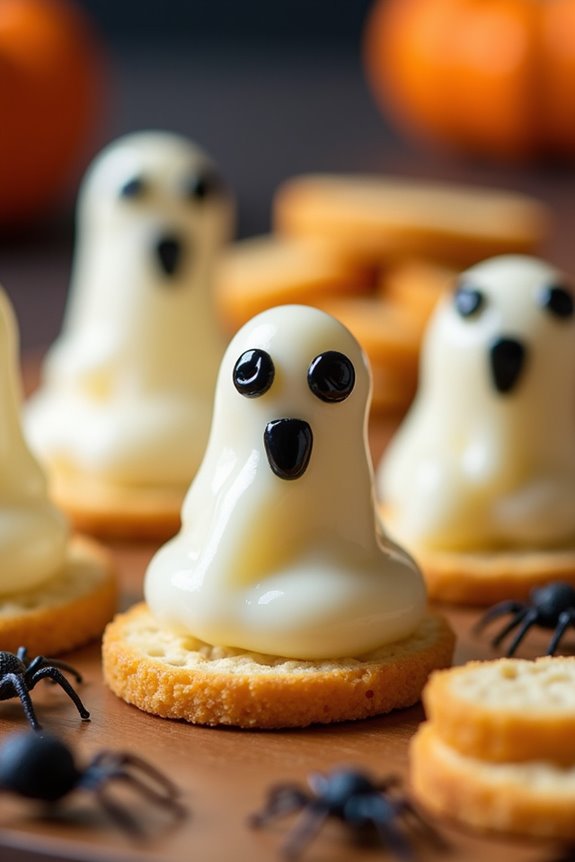
This recipe requires minimal ingredients and no cooking, making it a quick and simple addition to your Halloween festivities.
You’ll be using slices of cheese cut into ghost shapes and adorning them with little eyes to bring your spooky specters to life. The crackers serve as the perfect crunchy base, offering a delightful texture contrast to the creamy cheese.
This dish is designed to serve 4-6 people, ideal for a small gathering or family snack.
Ingredients for Spooky Ghost Cheese and Crackers (serving size: 4-6 people):
- 8 slices of white cheese (like mozzarella or provolone)
- 1 pack of round or oval crackers
- 1 small tube of black food gel or edible marker
- A small ghost-shaped cookie cutter
Cooking Instructions:
- Prepare the Cheese: Start by laying out the slices of cheese on a flat surface. Using the ghost-shaped cookie cutter, press down on each cheese slice to cut out ghost shapes. You can get about two ghost shapes per slice, depending on the size of your cutter.
- Add the Eyes: Take the black food gel or edible marker and carefully dot two small eyes onto each ghost-shaped cheese slice. This will give your ghosts a fun and spooky look.
- Assemble the Snack: Place each ghost-shaped cheese slice onto a cracker. You can either use round or oval crackers depending on your preference. Align them nicely on a platter to create an appealing presentation.
- Serve: Arrange your Spooky Ghost Cheese and Crackers on a serving platter or charcuterie board. Feel free to decorate the surrounding area with Halloween-themed decorations like plastic spiders or mini pumpkins to enhance the spooky atmosphere.
Extra Tips:
To make your Spooky Ghost Cheese and Crackers even more exciting, consider using a variety of cheese flavors or colors to add diversity to your platter.
If you want to add an extra level of detail, use a small piece of olive or a tiny dab of cream cheese for the eyes instead of food gel.
Always verify the cheese is chilled before cutting to maintain its shape, and serve immediately for the freshest taste.
Monster Fruit Kabobs

Halloween is the perfect time to get creative with your snacks, and Monster Fruit Kabobs are a fun and healthy way to celebrate the spooky season with kids.
These colorful and playful skewers aren’t only easy to make but also packed with a variety of fresh fruits that will delight young taste buds. Whether you’re hosting a Halloween party or just looking for a festive snack for your little ones, these kabobs are bound to be a hit.
The great thing about Monster Fruit Kabobs is their versatility. You can use any combination of fruits to create your own unique monster designs. The vibrant colors of the fruits make them visually appealing, and the process of assembling the kabobs can be a fun activity for kids to participate in.
Plus, by using edible candy eyes, you can give each fruit monster its own personality, adding to the fun and excitement of this delicious treat.
Ingredients for 4-6 servings:
- 1 cup green grapes
- 1 cup strawberries, hulled and halved
- 1 cup pineapple chunks
- 1 cup blueberries
- 1 kiwi, peeled and sliced
- 1 banana, sliced
- Edible candy eyes
- Wooden skewers
Instructions:
- Prepare the Fruits: Begin by washing all the fruits thoroughly. Hull and halve the strawberries, peel and slice the kiwi and banana, and cut the pineapple into chunks if not pre-chunked. Verify all fruits are bite-sized for easy skewering.
- Assemble the Kabobs: Take a wooden skewer and start threading the fruits onto it. You can create a pattern or let the kids choose their favorite fruits to assemble their monsters. Leave a little space at the top for the candy eyes.
- Add Personality: Once the fruits are arranged on the skewers, attach the edible candy eyes to some of the fruits to create monster faces. You can use a dab of honey or a small piece of fruit to help the eyes stick if needed.
- Serve and Enjoy: Place the completed Monster Fruit Kabobs on a platter and serve immediately. They can be enjoyed as a snack or as part of a Halloween-themed charcuterie board.
Extra Tips:
For an even more fun twist, consider using a variety of colored skewers or even pretzel sticks for the kabobs.
If you’re preparing these ahead of time, store them in the refrigerator until ready to serve to keep the fruits fresh. Encourage kids to create their own monster designs by offering a variety of fruits and letting them pick how to assemble their kabobs.
Most importantly, have fun and enjoy the process of creating these delightful and healthy Halloween treats!
Creepy Crawly Veggie Platter
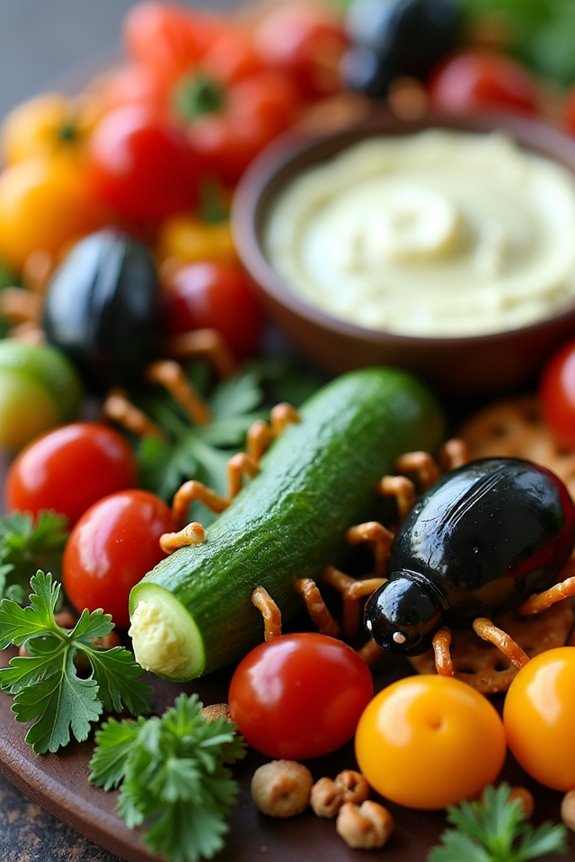
Halloween is the perfect time to get creative with food, especially when you’re catering to kids. A Creepy Crawly Veggie Platter isn’t only healthy but also a fun way to get little ones enthusiastic about eating their greens. This spooky charcuterie board features an assortment of veggies arranged to resemble critters and creepy crawlies. With a little imagination and some basic ingredients, you can transform ordinary vegetables into a Halloween-themed snack that will delight kids and adults alike.
Creating a Creepy Crawly Veggie Platter is as much about presentation as it’s about flavor. By using a mix of colors and textures, you can craft a visually appealing platter that captures the Halloween spirit. Carrots can become centipedes, bell peppers can morph into spiders, and olives can turn into beetles. This platter is perfect for a Halloween party or as a festive snack leading up to the big day. It’s a fantastic way to encourage kids to explore different veggies while enjoying a spooky theme.
Ingredients (for 4-6 servings):
- 1 large cucumber
- 1 red bell pepper
- 1 yellow bell pepper
- 1 cup cherry tomatoes
- 1 cup baby carrots
- 1 cup black olives
- 1 cup green olives
- 1/2 cup hummus or ranch dressing
- 1 handful of pretzel sticks
- 1 small bunch of fresh parsley
- 1 small bunch of green onions
Cooking Instructions:
- Prepare the Vegetables: Wash all the vegetables thoroughly. Slice the cucumber into thin rounds to form the body of centipedes. Cut the red and yellow bell peppers into strips to create legs for spiders. Halve the cherry tomatoes and olives for spider and beetle bodies.
- Assemble the Centipedes: Arrange the cucumber slices in an S-shape on the platter. Use black olive slices for the head and add two tiny dollops of hummus or ranch dressing for eyes. Insert small pieces of parsley or green onion into the sides of the cucumber slices to mimic legs.
- Create the Spiders: Use the bell pepper strips as legs, arranging them around a whole cherry tomato or a halved olive to form the spider’s body. Make small dots with hummus or ranch on the tomato for eyes.
- Form Beetles and Bugs: Use the halved olives to simulate beetles and bugs. You can stack them and use pretzel sticks as antennae. Add small parsley leaves under the olives to resemble wings.
- Finishing Touches: Arrange the baby carrots in clusters to resemble logs or ground elements. Sprinkle additional parsley and sliced green onions around the platter for a forest floor effect.
- Serve with Dip: Place a bowl of hummus or ranch dressing on the side for dipping. Arrange a few pretzel sticks around the bowl to suggest tree branches.
Extra Tips: When assembling the Creepy Crawly Veggie Platter, focus on using contrasting colors to make the critters stand out. You can also use a small cookie cutter to create shapes with the vegetables, adding more variety to the platter. If you want to prepare the platter in advance, cover it with plastic wrap and store it in the refrigerator to keep the veggies fresh. Encourage the kids to help you with the arrangement; it’s a fun activity that can spark their creativity and make them more enthusiastic to try the veggies.
Witch’s Brew Dip and Chips
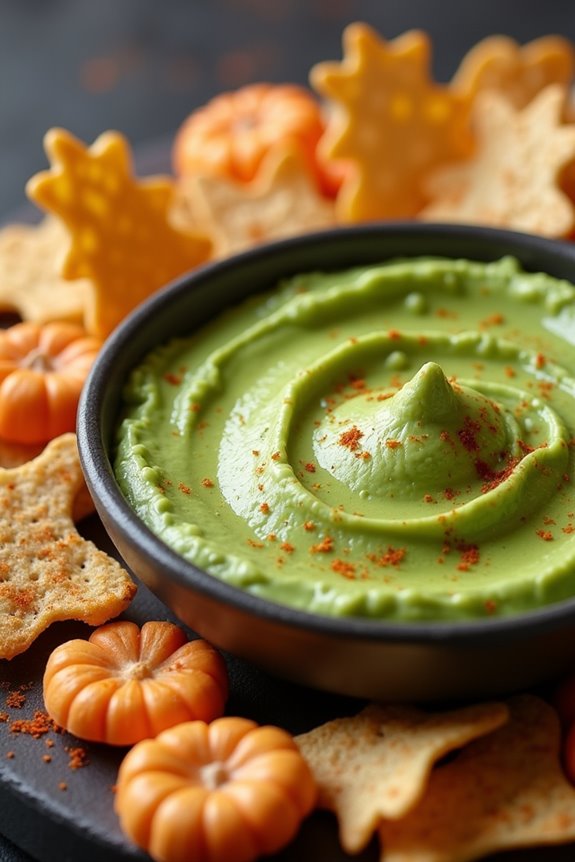
Witch’s Brew Dip and Chips is a fun and festive way to delight children during Halloween. This spooky-themed dish combines a creamy, savory dip with crispy, ghoulishly shaped chips, creating a perfect addition to any Halloween charcuterie board. The vibrant colors and whimsical presentation capture the spirit of Halloween, making it an exciting treat for kids.
By using simple ingredients and a little creativity, you can easily conjure up this magical snack that’s both delicious and visually appealing.
The dip, a mixture of creamy avocado and tangy sour cream, is given a bewitching green hue that mimics a bubbling witch’s cauldron. The chips, cut into Halloween-themed shapes like ghosts, bats, and pumpkins, are baked to a golden crisp, providing the perfect vessel for scooping up the dip.
This dish isn’t only tasty but also provides a fun, interactive element for children, as they can participate in cutting out the shapes and watching their spooky creations come to life in the oven.
Ingredients for Witch’s Brew Dip and Chips (serves 4-6 people)
- 2 ripe avocados
- 1 cup sour cream
- 1 tablespoon lime juice
- 1 teaspoon garlic powder
- Salt and pepper to taste
- 4 large flour tortillas
- 2 tablespoons olive oil
- 1 teaspoon paprika
- Halloween-themed cookie cutters (ghosts, bats, pumpkins)
- Optional: green food coloring for extra vibrancy
Cooking Instructions
- Prepare the Dip:
- In a medium-sized bowl, mash the ripe avocados until smooth. Add in the sour cream, lime juice, and garlic powder. Mix until well combined.
- Season with salt and pepper to taste. If desired, add a few drops of green food coloring to enhance the witchy green appearance. Stir until the color is evenly distributed.
- Cut Out the Chips:
- Preheat your oven to 350°F (175°C). Using Halloween-themed cookie cutters, cut shapes out of the flour tortillas. Try to maximize the number of shapes by placing the cutters close together.
- Bake the Chips:
- Arrange the tortilla shapes on a baking sheet lined with parchment paper. Brush each shape lightly with olive oil on both sides.
- Sprinkle with paprika for flavor and a hint of color. Bake in the preheated oven for about 8-10 minutes, or until the chips are crisp and golden brown. Keep a close eye on them to prevent burning.
- Serve:
- Arrange the freshly baked chips around a bowl of the Witch’s Brew Dip on your Halloween charcuterie board. Encourage kids to use the spooky shapes to scoop up the dip and enjoy their tasty creation.
Extra Tips
For a more interactive experience, involve the kids in the preparation process. Let them mash the avocados or use the cookie cutters to create their chip shapes.
You can also experiment with different spices or herbs to flavor the chips, such as cumin or chili powder, to add a unique twist. If you prefer a healthier alternative, use whole wheat tortillas instead of regular flour tortillas.
Finally, remember to taste the dip as you go, adjusting the seasonings to suit your family’s preferences.
Mummy Pretzel Sticks
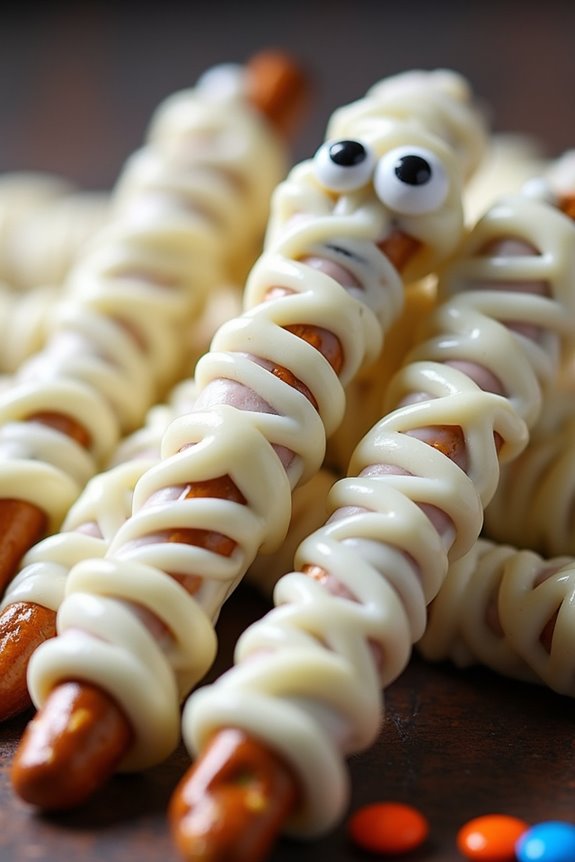
Transform your Halloween charcuterie board into something both delicious and festive with these Mummy Pretzel Sticks. This fun and spooky treat is perfect for kids and adults alike, adding a playful twist to your Halloween spread.
These delightful snack sticks are made using pretzel rods wrapped in sweet white chocolate, decorated to resemble little mummies. Not only are they easy to make, but they also provide a pleasing crunch combined with the creamy sweetness of chocolate, making them a hit among all ages.
The best part about Mummy Pretzel Sticks is their simplicity. With just a few ingredients and minimal preparation time, you can whip up a batch quickly for any Halloween party or gathering.
Whether you’re creating a full Halloween charcuterie board or simply want a fun snack for the kids, these mummy sticks are versatile and can be customized with different toppings or decorations. They also make for a great activity with the kids, allowing them to participate in the decorating process and get creative with their designs.
Ingredients for 4-6 servings:
- 1 pack of pretzel rods (approximately 12-15 rods)
- 1 cup white chocolate chips or candy melts
- 1 tablespoon coconut oil or shortening
- Small candy eyes
- Black decorating gel (optional)
Cooking Instructions:
- Prepare the Pretzels: Lay out a baking sheet and line it with parchment paper to prevent sticking. This will also make it easier to clean up afterward.
- Melt the Chocolate: In a microwave-safe bowl, combine the white chocolate chips with the coconut oil or shortening. Microwave on medium power for 30-second intervals, stirring in between, until the chocolate is fully melted and smooth.
- Dip the Pretzels: Dip each pretzel rod into the melted white chocolate, covering about three-quarters of the rod. Use a spoon to help coat the pretzel evenly, letting any excess chocolate drip off.
- Create the Mummy Wrapping: Gently place the chocolate-covered pretzel rods on the prepared baking sheet. Use a fork to drizzle additional melted chocolate over the coated pretzels in a zig-zag pattern to mimic mummy bandages.
- Add Candy Eyes: While the chocolate is still soft, press two candy eyes onto each pretzel stick. If needed, use a dot of chocolate as ‘glue’ to help them stick better.
- Allow to Set: Let the pretzels sit at room temperature or refrigerate for about 15-20 minutes, or until the chocolate is firm and set.
- Decorate (Optional): For a more detailed mummy look, use black decorating gel to add a mouth or additional features around the eyes.
Extra Tips:
For an even more festive appearance, consider using colored candy melts or adding sprinkles before the chocolate sets to add a pop of color.
If you’re short on time, you can speed up the setting process by placing the pretzels in the refrigerator. Make certain that your workspace is dry, as moisture can cause the chocolate to seize.
If you’re working with kids, encourage them to be creative with their designs, adding personal touches to each mummy pretzel stick.
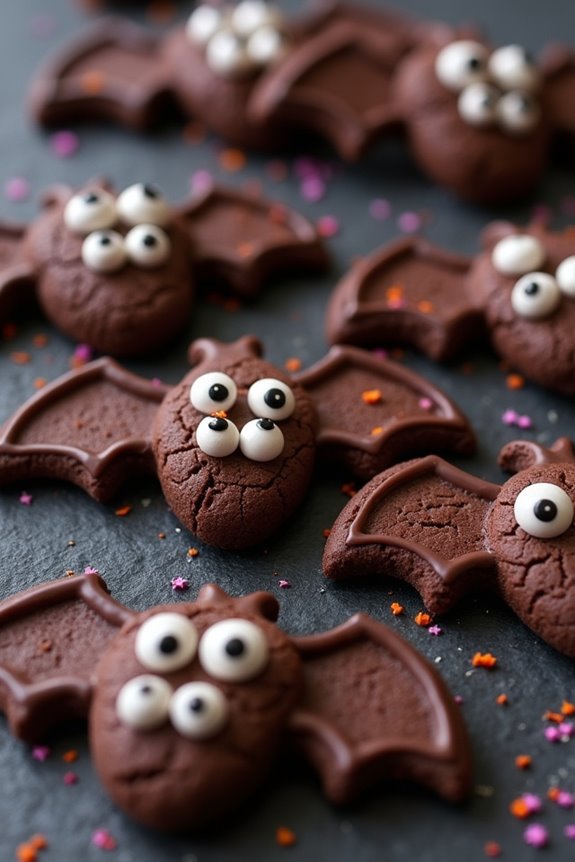
Vampire Bat Cookies
Creating a Halloween charcuterie board for kids isn’t only about the traditional cheeses and meats; it’s also a fantastic opportunity to incorporate some themed treats that will excite and delight young trick-or-treaters.
Vampire Bat Cookies are the perfect addition to your spooky spread, offering a sweet and fun twist. These cookies, shaped like little bats, aren’t only delicious but also add a touch of Halloween whimsy to your board. With their chocolatey goodness and playful design, they’re sure to be a hit among kids and adults alike.
These cookies are relatively simple to make, allowing you to involve the kids in the kitchen for a fun-filled baking activity. The key to creating these adorable bat-shaped cookies is all in the details, from the dark cocoa color to the tiny candy eyes that make them come to life.
With a serving size intended for 4-6 people, you’ll have just enough to share with your little ghouls and goblins. So, gather your ingredients, preheat the oven, and let’s plunge into this spooktacular recipe!
Ingredients for 4-6 people:
- 1 cup unsalted butter, softened
- 1 cup granulated sugar
- 1 large egg
- 1 teaspoon vanilla extract
- 2 cups all-purpose flour
- 1/2 cup unsweetened cocoa powder
- 1/2 teaspoon baking powder
- 1/4 teaspoon salt
- Candy eyes
- Chocolate icing or melted chocolate (for decoration)
Cooking Instructions:
- Preheat and Prep: Preheat your oven to 350°F (175°C) and line two baking sheets with parchment paper or silicone baking mats for easy cleanup.
- Cream the Butter and Sugar: In a large mixing bowl, cream together the softened butter and granulated sugar until the mixture is light and fluffy. This should take about 2-3 minutes.
- Add Wet Ingredients: Beat in the egg and vanilla extract into the butter-sugar mixture until well combined.
- Combine Dry Ingredients: In a separate bowl, whisk together the flour, cocoa powder, baking powder, and salt.
- Form the Dough: Gradually add the dry ingredients to the wet mixture, stirring until a soft dough forms. If the dough is too sticky, you can chill it for 15-20 minutes to make it easier to handle.
- Roll and Cut: On a lightly floured surface, roll out the dough to about 1/4 inch thickness. Use a bat-shaped cookie cutter to cut out the cookies and place them on the prepared baking sheets.
- Bake the Cookies: Bake in the preheated oven for 10-12 minutes, or until the edges are firm. Be careful not to overbake, as the cookies will continue to firm up as they cool.
- Decorate: Allow the cookies to cool on the baking sheets for a few minutes before transferring to a wire rack. Once cooled, use chocolate icing or melted chocolate to attach candy eyes to each bat, giving them a spooky look.
Extra Tips:
When making Vampire Bat Cookies, make certain that your butter is properly softened, as this will help achieve the perfect texture for the dough.
If you don’t have a bat-shaped cookie cutter, you can easily create a template using a piece of cardstock, and carefully cut around it with a knife.
For an added touch, consider sprinkling a little edible glitter or colored sugar for a magical finish.
And remember, these cookies can be stored in an airtight container for up to a week, making them a great make-ahead option for your Halloween festivities.
Jack-o’-Lantern Cheese Balls

Get ready to spook up your Halloween charcuterie board with these adorable Jack-o’-Lantern Cheese Balls! These cheesy delights aren’t only a treat for the eyes but also for the taste buds, perfect for both little ghouls and goblins.
Made with a delicious blend of cheeses, these mini cheese balls are easily shaped into festive pumpkins and decorated to resemble jack-o’-lanterns. They make a great addition to your Halloween snack spread, whether you’re hosting a party or just enjoying some festive fun with the family.
Creating these Jack-o’-Lantern Cheese Balls is a fun and simple activity that the kids can join in on too. With a few basic ingredients and some creativity, you’ll have a platter full of these charming cheese treats that are sure to impress.
The recipe yields enough to serve 4-6 people, making it perfect for a small gathering or family night in. Let’s get started on crafting these cheesy, spooky delights!
Ingredients (serving size: 4-6 people):
- 8 oz cream cheese, softened
- 8 oz sharp cheddar cheese, shredded
- 1 teaspoon garlic powder
- 1 teaspoon onion powder
- 1/2 teaspoon smoked paprika
- 1/4 teaspoon salt
- 1/4 cup finely chopped chives
- 1/2 cup crushed nacho cheese-flavored tortilla chips
- 6 pretzel sticks
- 6 small pieces of celery leaves
Instructions:
- Prepare the Cheese Mixture: In a large mixing bowl, combine the softened cream cheese, shredded cheddar cheese, garlic powder, onion powder, smoked paprika, and salt. Use a hand mixer or wooden spoon to mix until well combined and smooth.
- Shape the Cheese Balls: Once the cheese mixture is well mixed, divide it into 6 equal portions. Roll each portion into a ball using your hands. If the mixture is too sticky, lightly wet your hands with water to make rolling easier.
- Coat the Cheese Balls: Spread the crushed nacho cheese-flavored tortilla chips onto a plate. Roll each cheese ball in the crushed chips until completely coated. This will give the cheese balls a nice orange color, resembling small pumpkins.
- Decorate the Cheese Balls: Insert a pretzel stick into the top of each cheese ball to act as the pumpkin stem. Arrange a small piece of celery leaf next to the pretzel stick to resemble the pumpkin’s leaf.
- Chill Before Serving: Place the decorated cheese balls on a tray and refrigerate for at least 30 minutes before serving. This helps the cheese balls firm up and makes them easier to handle.
Extra Tips:
For an extra fun twist, you can use food-safe markers to draw jack-o’-lantern faces on the cheese balls, adding an extra layer of Halloween spirit.
If you want to vary the flavor, try adding some finely chopped jalapeños to the cheese mixture for a bit of heat. These cheese balls can be made a day in advance and stored in the refrigerator, making them a convenient option for party prep.
Enjoy your spooky, cheesy creations!
Frankenstein’s Monster Sandwiches
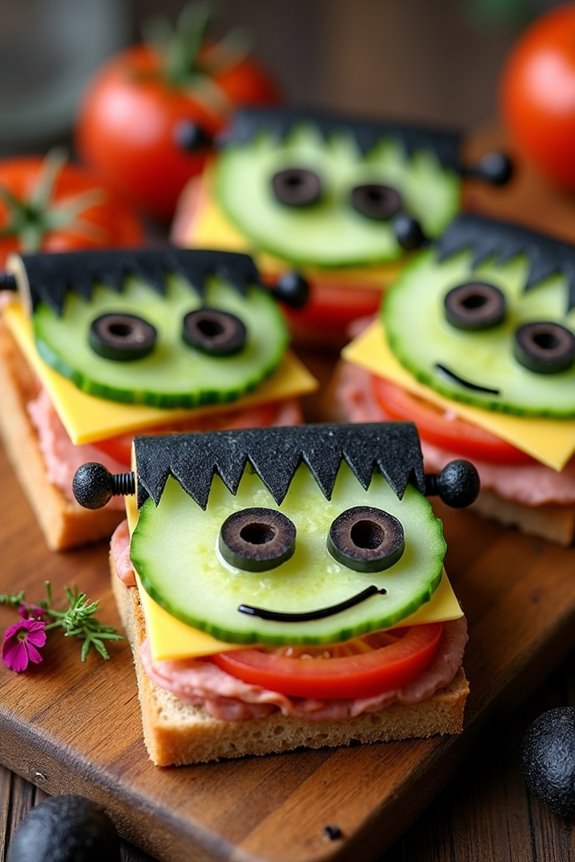
Create a monstrously delightful addition to your Halloween charcuterie board with Frankenstein’s Monster Sandwiches. These spooky yet tasty treats are perfect for kids and can be a fun activity to involve them in the kitchen. With just a few ingredients, you’ll transform ordinary sandwiches into a playful and festive snack that will surely be the centerpiece of your Halloween spread.
These Frankenstein’s Monster Sandwiches aren’t only visually appealing but also versatile, allowing you to customize them with your child’s favorite fillings. The combination of savory ingredients and creative presentation will make these sandwiches a hit at your Halloween gathering. Designed to serve 4-6 people, this recipe guarantees everyone gets a taste of the Halloween fun.
Ingredients:
- 12 slices of whole wheat or white sandwich bread
- 6 slices of cheese (cheddar or American)
- 6 slices of deli turkey or ham
- 12 cherry tomatoes
- 24 small black olives
- 1 cucumber
- 1 red bell pepper
- 2 tablespoons mayonnaise
- 1 tablespoon mustard
- Salt and pepper to taste
Instructions:
- Prepare the Bread: Begin by cutting the crusts off the sandwich bread to create neat squares. This will form the base for Frankenstein’s head.
- Assemble the Sandwiches: Spread a thin layer of mayonnaise and mustard on each slice of bread. Add a slice of cheese and a slice of deli meat to half of the bread slices. Top with the remaining bread to form sandwiches.
- Create Frankenstein’s Face: Slice the cucumber into thin rounds to use as eyes, and the cherry tomatoes in half for the cheeks. Place two cucumber slices on each sandwich for eyes and use a small dab of mayonnaise to attach a half cherry tomato beneath each eye.
- Add Details: Cut small pieces of black olives to form pupils for the eyes and attach them using mayonnaise. Slice the red bell pepper into small strips for the mouth, and arrange them on the sandwich.
- Make the Hair and Bolts: Cut additional strips of cheese to create jagged hair on the top of the sandwich. Slice the remaining olives in half and place them on the sides of the sandwiches to mimic bolts.
- Serve: Arrange the sandwiches on your charcuterie board and add any additional Halloween-themed snacks to complete the presentation.
Extra Tips:
For added fun, consider using cookie cutters to shape the bread into more intricate designs, like Frankenstein’s silhouette.
If you want to make the sandwiches more nutritious, use whole grain bread and add lettuce or spinach for added greens.
To keep the sandwiches fresh and prevent them from drying out, cover them with a damp paper towel if you’re preparing them in advance.
Encourage kids to customize their own Frankenstein faces with different toppings, making it an interactive and enjoyable activity.
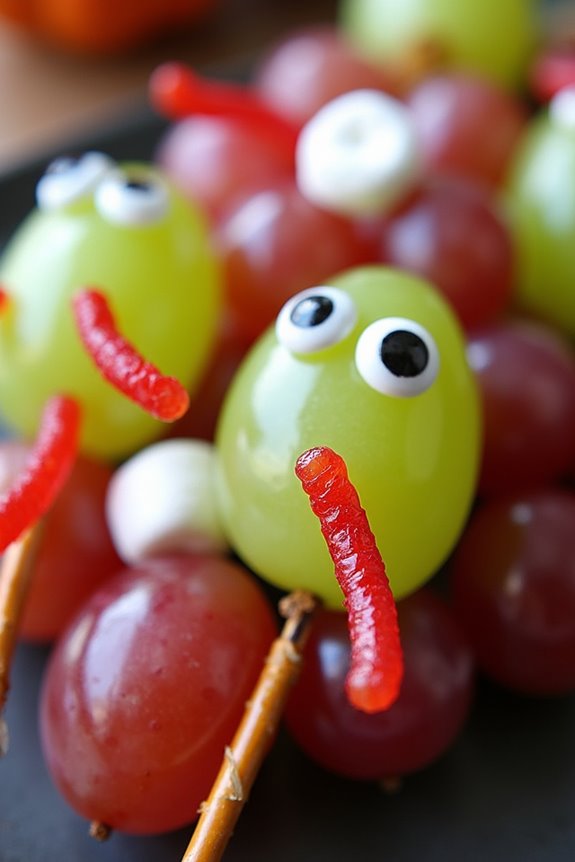
Ghoulish Grape Skewers
Halloween is a time for spooky fun, and what better way to celebrate than with some kid-friendly Ghoulish Grape Skewers? These delightful treats are perfect for a Halloween charcuterie board, adding a burst of freshness and a dash of creepiness to your festive spread. The combination of juicy grapes and eerie decorations makes these skewers a hit among children and adults alike.
Not only are they easy to make, but they’re also a healthy option amidst all the sugary Halloween candies. These Ghoulish Grape Skewers are a great addition to any Halloween party, providing a simple yet effective way to engage kids in the holiday spirit. Each skewer is decorated with googly eyes and spooky elements that are sure to bring a smile to everyone’s face.
Whether you’re hosting a Halloween party or simply looking for a fun activity to do with the kids, these skewers are bound to be a crowd pleaser. Let’s plunge into what you’ll need and how to make these deliciously spooky treats.
Ingredients (Serves 4-6):
- 2 cups of green grapes
- 2 cups of red grapes
- 16-24 wooden skewers
- 32-48 edible candy eyes
- 1 cup of miniature marshmallows
- 1 cup of gummy worms
- 1 cup of pretzel sticks (optional for decoration)
- 1 tablespoon of lemon juice
Instructions:
- Prepare the Grapes: Wash the green and red grapes thoroughly under cold water. Pat them dry with a paper towel to guarantee they aren’t slippery. Place them in a large bowl and sprinkle with lemon juice to keep them fresh and prevent browning.
- Assemble the Skewers: Take a wooden skewer and begin by threading a grape onto it, alternating between green and red grapes to create a colorful pattern. Leave about an inch of space at the top of the skewer for decoration.
- Decorate with Candy Eyes: Use small dollops of edible glue or honey to attach candy eyes onto some of the grapes, making them look like spooky creatures. You can place one or two eyes on each grape depending on your desired level of creepiness.
- Add Spooky Elements: Slide a miniature marshmallow onto the skewer as a spacer between the grapes. You can also add gummy worms by wrapping them around the skewers or inserting them between the grapes for a more ghoulish effect.
- Optional Decorations: For added fun, break pretzel sticks into small pieces and insert them into the marshmallows to create arms or legs for your grape monsters.
- Serve and Enjoy: Arrange the completed Ghoulish Grape Skewers on a platter or charcuterie board. Serve them immediately or refrigerate until ready to enjoy.
Extra Tips:
When making these Ghoulish Grape Skewers, consider using seedless grapes to avoid any unpleasant surprises while eating. If you’re working with younger children, supervise them while handling the skewers to prevent any accidental pokes or injuries.
Feel free to get creative with the decorations by using different types of candy or edible markers to draw on the grapes, adding extra personality to your spooky creations.
Haunted House Hummus Tray

Halloween is the perfect time to get creative with your culinary skills, especially when it comes to entertaining the little ones. A Haunted House Hummus Tray is a fun and nutritious way to bring some spooky vibes to your Halloween celebration. This dish combines the creamy texture of hummus with a variety of healthy vegetables and creative garnishes to create a haunted house scene that will delight kids and adults alike.
Not only is it visually appealing, but it also provides a healthy snacking option amidst the sugary treats typically associated with Halloween.
To build your Haunted House Hummus Tray, you’ll start with a foundation of vibrant hummus, which will serve as the base of your spooky scene. From there, you’ll add an array of colorful veggies and other toppings to create the haunted house and its eerie surroundings. With a little imagination, slices of bell pepper can become rooftops, olives can be ghostly eyes, and pretzel sticks can form a creepy fence. Not only will this be a feast for the eyes, but it will also encourage children to enjoy a variety of vegetables in a fun and festive way.
Ingredients for 4-6 people:
- 2 cups of hummus
- 1 large red bell pepper
- 1 large yellow bell pepper
- 1 cucumber
- 1 cup cherry tomatoes
- 1 small head of broccoli
- 1 small carrot
- 1 cup black olives
- 1 cup green olives
- Pretzel sticks
- 1/2 cup feta cheese crumbles
- 1/4 cup pumpkin seeds
- 1 tablespoon olive oil
- Salt and pepper to taste
Cooking Instructions:
- Prepare the Hummus Base: Spread the hummus evenly across a large platter to form the base of your haunted house scene. Use a spoon to create slight peaks and valleys for added texture and a spooky effect.
- Create the Haunted House Structure: Slice the red and yellow bell peppers into large, flat pieces. Arrange these pieces on the hummus to form the outline of a house, using the bell pepper slices as walls and rooftops.
- Add Vegetables for Detail: Slice the cucumber into rounds and arrange them as windows on the bell pepper house. Use cherry tomatoes cut in half to form a path leading to the house.
- Build the Spooky Surroundings: Cut the broccoli into small florets and place them around the house to resemble trees. Use carrot sticks to create a spooky garden fence.
- Add Ghoulish Garnishes: Slice black and green olives in half and use them to create ghostly eyes peeking out from the house and around the platter. Scatter feta cheese crumbles and pumpkin seeds around the scene for an eerie effect.
- Final Touches: Drizzle olive oil over the hummus for added flavor, and season with salt and pepper to taste. Arrange pretzel sticks around the edges of the platter to frame your haunted house scene.
Extra Tips:
When assembling your Haunted House Hummus Tray, feel free to get creative with the ingredients and presentation. You can use different colored peppers, or add more vegetables based on your preference and availability.
If you want to add more variety, consider including pita bread or crackers on the side for dipping. Also, if you’re serving this to younger children, you might want to cut the vegetables into smaller, easy-to-eat pieces.
This dish is as much about having fun and being creative as it’s about eating, so enjoy the process and let the kids help with the design.
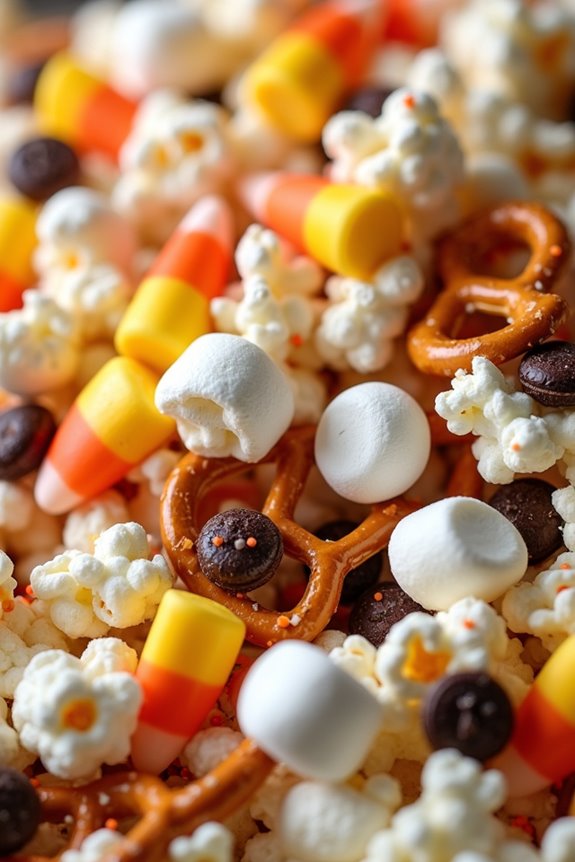
Pumpkin Patch Popcorn Mix
Searching for a fun and festive treat to add to your Halloween charcuterie board? Search no more than this Pumpkin Patch Popcorn Mix! This delightful concoction is a perfect blend of sweet, salty, and colorful Halloween-themed goodies that kids will absolutely love.
It’s easy to prepare and makes for a great snack while the little ones enjoy a spooky movie or get ready for trick-or-treating. The mix not only adds a pop of color to your board but also brings a delightful crunch and burst of flavors that kids will find irresistible.
The Pumpkin Patch Popcorn Mix is designed to be both visually appealing and delicious. With a combination of popcorn, candy corn, pretzels, and mini marshmallows, this mix creates a harmony of textures and flavors that will excite young taste buds.
It’s also a versatile recipe, allowing you to add in your favorite treats or adjust the quantities to your liking. The following recipe serves 4-6 people, making it perfect for a small Halloween gathering or family movie night.
Ingredients:
- 8 cups popped popcorn
- 1 cup candy corn
- 1 cup mini marshmallows
- 1 cup pretzels (mini twists or sticks)
- 1 cup chocolate-covered raisins or chocolate chips
- 1/2 cup pumpkin seeds (optional)
- 1/2 cup orange and black Halloween sprinkles
Instructions:
- Prepare the Popcorn: Start by popping your popcorn. You can use microwave popcorn or stovetop popcorn, whichever you prefer. Once popped, confirm the popcorn is cool and transfer it to a large mixing bowl.
- Add Sweet Elements: Add in the candy corn and mini marshmallows to the popcorn. These sweet elements will provide a delightful chewy texture and are a favorite among kids.
- Mix in Salty & Crunchy Ingredients: Next, add the pretzels and chocolate-covered raisins (or chocolate chips) to the mix. The pretzels add a satisfying crunch and a salty counterpoint to the sweetness, while the chocolate adds a rich, decadent flavor.
- Optional Add-ins: If you like, mix in the pumpkin seeds for an extra layer of nuttiness and nutrition.
- Decorate with Sprinkles: To complete your Pumpkin Patch Popcorn Mix, sprinkle the orange and black Halloween sprinkles throughout the mixture. This not only enhances the visual appeal but also adds an extra touch of festivity to the dish.
- Mix and Serve: Gently toss all the ingredients together in the bowl until well combined. Be careful not to crush the popcorn and pretzels. Serve in a large, decorative bowl or portion out into individual cups for easy snacking.
Extra Tips:
To maintain your Pumpkin Patch Popcorn Mix fresh and crunchy, store any leftovers in an airtight container.
Feel free to customize the mix by adding other Halloween-themed candies or nuts, depending on your kids’ preferences. If you want to create a healthier version, consider using air-popped popcorn and reducing the amount of candy added.
Remember that this mix is versatile, so have fun experimenting with different ingredients to suit your Halloween celebration!
Skeleton Bone Breadsticks

Skeleton Bone Breadsticks are a fun and spooky addition to any Halloween charcuterie board, especially one tailored for kids. These delightful breadsticks are shaped like bones and are sure to add a touch of eerie excitement to your festivities. Not only are they visually appealing, but they’re also delicious and easy to make, guaranteeing both kids and adults will enjoy them.
Perfectly seasoned and baked to golden perfection, these breadsticks are a great way to bring some Halloween spirit to your snacks.
These bone-shaped breadsticks are versatile and can be paired with a variety of dips like marinara, cheese sauce, or even a spooky black bean dip. Whether you’re hosting a Halloween party or looking for a fun and interactive way to involve the kids in the kitchen, these Skeleton Bone Breadsticks are a must-try.
Let’s explore the ingredients and instructions to make this spooky treat for 4-6 people.
Ingredients:
- 1 package of refrigerated pizza dough
- 2 tablespoons butter, melted
- 1 teaspoon garlic powder
- 1 teaspoon Italian seasoning
- 1 tablespoon grated Parmesan cheese
- Salt, to taste
- Marinara sauce, for dipping (optional)
Instructions:
- Preheat the Oven: Start by preheating your oven to 375°F (190°C). This guarantees that your breadsticks will bake evenly and develop a nice golden color.
- Prepare the Dough: Roll out the refrigerated pizza dough on a lightly floured surface to prevent sticking. Aim for a rectangle roughly 12×16 inches. Using a pizza cutter or a sharp knife, cut the dough into strips about 6 inches long and 1 inch wide.
- Shape the Bones: To create the bone shape, take each strip and tie a knot at each end. Adjust the dough as needed to enhance the bone-like appearance, making sure the middle section resembles the shaft of a bone.
- Season the Breadsticks: In a small bowl, combine the melted butter, garlic powder, and Italian seasoning. Use a pastry brush to generously coat each shaped dough strip with the butter mixture. Sprinkle the grated Parmesan cheese and a pinch of salt over the breadsticks for added flavor.
- Bake the Breadsticks: Place the breadsticks on a baking sheet lined with parchment paper, guaranteeing they’re spaced slightly apart. Bake in the preheated oven for 12-15 minutes or until they’re golden brown and cooked through.
- Serve and Enjoy: Allow the breadsticks to cool slightly before serving. Offer them alongside a small bowl of marinara sauce for dipping, if desired, to enhance the spooky theme and flavor.
Extra Tips:
For a more pronounced bone shape, consider gently pinching the dough at the center of each breadstick before baking. This will help create a more distinct bone appearance.
Additionally, if you prefer a crispier texture, bake the breadsticks a little longer, keeping a close eye to prevent burning. Feel free to get creative with the seasonings; adding a pinch of cayenne pepper or smoked paprika could give your breadsticks an extra kick, perfect for those who enjoy a bit of heat.
Eyeball Deviled Eggs
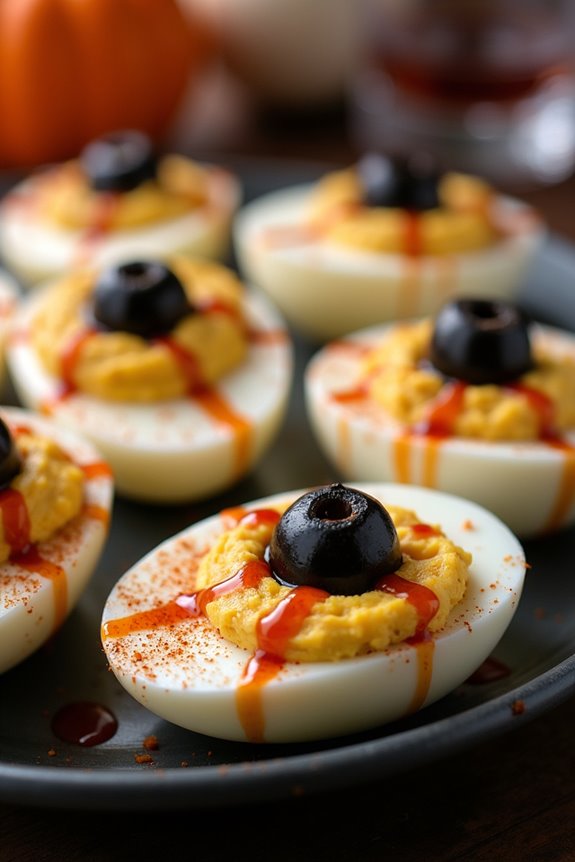
Eyeball Deviled Eggs are a spooky and fun addition to your Halloween-themed charcuterie board, perfect for delighting kids and adults alike. These creepy yet delicious treats are a twist on the classic deviled eggs, featuring a ghoulish “eyeball” look that’s sure to captivate little ones. They’ll love the eerie vibe, and you’ll appreciate how easy they’re to prepare.
With just a few simple ingredients, you can transform ordinary deviled eggs into a Halloween masterpiece that will be a hit at any party or gathering. Not only are these Eyeball Deviled Eggs visually appealing, but they’re also packed with flavor. The creamy yolk mixture is seasoned to perfection, complemented by the addition of an olive “iris” and a ketchup or hot sauce “vein” design that adds an extra layer of taste and authenticity.
This recipe is designed to serve 4-6 people, making it ideal for small gatherings or as a special treat for your family. Follow the steps below to create your own batch of spooky Eyeball Deviled Eggs that will surely impress your guests.
Ingredients (for 4-6 people):
- 6 large eggs
- 1/4 cup mayonnaise
- 1 teaspoon mustard
- Salt and pepper to taste
- 6 black olives, pitted
- Red food coloring or hot sauce
- 1 teaspoon vinegar (optional for boiling)
- Paprika for garnish (optional)
Cooking Instructions:
- Boil the Eggs: Place the eggs in a single layer in a saucepan and add enough cold water to cover them by about an inch. Add a teaspoon of vinegar to the water to help prevent the eggs from cracking. Bring the water to a boil over medium-high heat. Once boiling, remove from heat and cover the saucepan. Let the eggs sit in the hot water for about 10-12 minutes.
- Prepare the Eggs: After boiling, drain the hot water and transfer the eggs to a bowl of ice water to cool for at least 5 minutes. This will make them easier to peel. Once cooled, gently tap each egg to crack the shell and peel under running water.
- Prepare the Filling: Slice each egg in half lengthwise and carefully remove the yolks, placing them in a separate bowl. Arrange the egg whites on a platter. Mash the yolks with a fork and mix in mayonnaise, mustard, salt, and pepper until smooth and creamy.
- Assemble the Eyeballs: Spoon or pipe the yolk mixture back into the hollow of each egg white. Cut each black olive in half and place a half, cut side down, on top of the yolk mixture to resemble an iris.
- Add the Spooky Details: Using a toothpick, draw thin lines from the olive to the edge of the yolk mixture with red food coloring or a small amount of hot sauce, creating the effect of bloodshot veins. Optionally, sprinkle a little paprika on top for added flavor and color.
Extra Tips:
To guarantee the perfect texture for your Eyeball Deviled Eggs, make sure the yolk mixture is thoroughly blended and smooth before filling the egg whites. If you find the mixture too thick, you can add a bit more mayonnaise or a dash of cream for creaminess.
For a more intense spooky look, you can experiment with different colored olives or use a small piece of red pepper as the “pupil” within the olive “iris.” Make sure to prepare these just a little ahead of time and store them in the refrigerator until ready to serve, guaranteeing they remain fresh and delicious.