

Oh, Halloween magic is in the air, and what better way to celebrate than with some adorable cookies for the little ones? These creative and cute Halloween cookies are sure to bring a smile to everyone’s face with their whimsical designs and vibrant colors. From spooky spider cookies with chocolate truffle bodies to ghostly meringue delights that melt in your mouth, each recipe promises a sweet adventure. Ready to sprinkle some festive fun into your kitchen? Let’s explore these enchanting baking projects together!
Spooky Spider Cookies
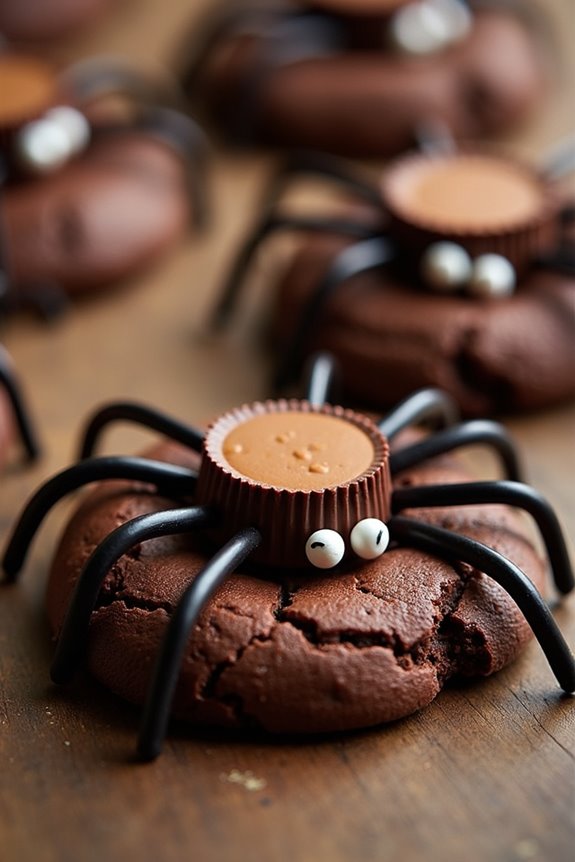
Spooky Spider Cookies are a fun and delicious treat perfect for a Halloween party or a spooky snack for kids. These cookies aren’t only delicious but also visually appealing, bringing a creepy crawly twist to your Halloween celebrations. The combination of rich chocolate and playful decorations makes these cookies a hit among children and adults alike.
Easy to make, they offer a creative way to get kids involved in the kitchen, as they can help with shaping the cookies and decorating them to look like tiny spiders.
The recipe for Spooky Spider Cookies is straightforward and requires common baking ingredients. The cookies themselves are chocolate-based, with a chewy texture and a decadent flavor. The “spider” aspect is achieved by using chocolate truffles or peanut butter cups for the body, and pretzel sticks or licorice for the legs. The final touch is adding candy eyes to each spider, giving them a whimsical and spooky appearance.
This recipe yields approximately 12-18 cookies, making it suitable for serving 4-6 people.
Ingredients:
- 1 cup unsalted butter, softened
- 1 cup granulated sugar
- 1 cup packed brown sugar
- 2 large eggs
- 1 teaspoon vanilla extract
- 2 1/2 cups all-purpose flour
- 1 teaspoon baking soda
- 1/2 teaspoon salt
- 3/4 cup unsweetened cocoa powder
- 24-36 small chocolate truffles or mini peanut butter cups
- 48-72 candy eyes
- Pretzel sticks or black licorice (for legs)
Instructions:
- Preheat and Prepare: Preheat your oven to 350°F (175°C). Line two baking sheets with parchment paper or silicone baking mats.
- Cream Butter and Sugars: In a large mixing bowl, cream together the softened butter, granulated sugar, and brown sugar until the mixture is light and fluffy.
- Add Wet Ingredients: Beat in the eggs, one at a time, followed by the vanilla extract. Mix until well combined.
- Combine Dry Ingredients: In a separate bowl, whisk together the flour, baking soda, salt, and cocoa powder.
- Mix the Dough: Gradually add the dry ingredients to the wet mixture, stirring until just combined. Avoid overmixing to maintain a soft cookie texture.
- Shape the Cookies: Scoop out tablespoon-sized amounts of dough and roll them into balls. Place them on the prepared baking sheets, spaced about 2 inches apart.
- Bake: Bake in the preheated oven for 10-12 minutes, or until the edges are set and the centers are still soft. Remove from oven and let them cool slightly on the baking sheets.
- Decorate: While the cookies are still warm, gently press a chocolate truffle or mini peanut butter cup into the center of each cookie to form the spider’s body. Insert 8 pretzel sticks or pieces of licorice around each truffle to create legs, four on each side. Add candy eyes to each spider body.
- Cool Completely: Allow the cookies to cool completely on a wire rack, letting the chocolate set and the decorations adhere.
Extra Tips:
For an added touch of realism, you can use a toothpick to create small indentations around the spider body for a more textured appearance. If you’re using pretzel sticks for the legs, try dipping them in melted chocolate for a darker look that matches the spider body.
Store the cookies in an airtight container to keep them fresh and chewy. If you’re planning to make these cookies ahead of time, consider decorating them closer to serving time to guarantee the candy eyes and legs remain intact.
Ghostly Meringue Treats
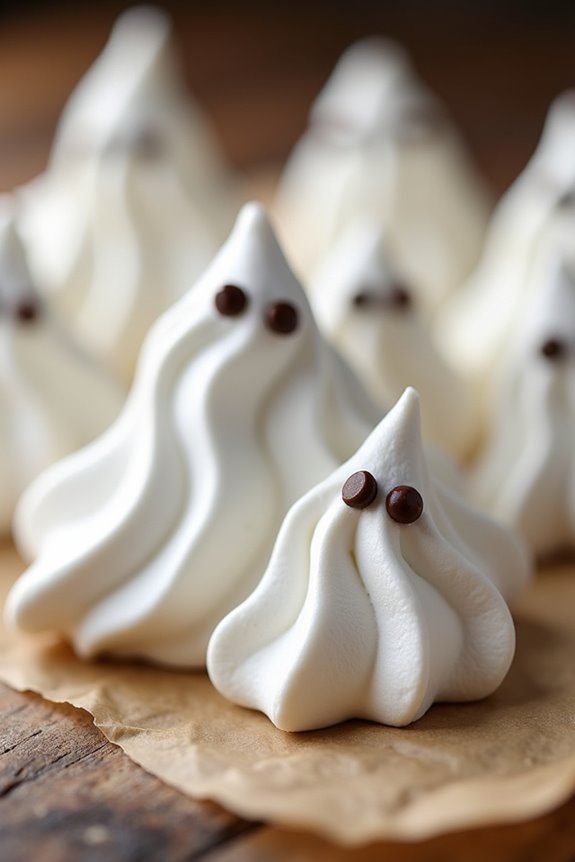
Ghostly Meringue Treats are the perfect Halloween cookies for kids, combining the spooky spirit of the holiday with a light, sweet taste that delights little ones. These treats resemble eerie, floating specters, making them an exciting addition to any Halloween party or gathering.
The meringue ghosts aren’t only visually appealing but also melt in your mouth, offering a fun and delicious experience for children and adults alike. This recipe is simple to follow and involves basic ingredients you likely already have in your pantry.
Creating these Ghostly Meringue Treats is an enjoyable activity that the whole family can participate in, making Halloween preparations even more memorable. Kids will love shaping and decorating their ghostly creations, allowing for creativity and personalization.
Perfect for a serving size of 4-6 people, this recipe guarantees there are plenty of treats to go around without overwhelming your baking tray. So, gather your ingredients and get ready to whip up some spooky, sweet fun in your kitchen.
Ingredients:
- 4 egg whites
- 1 cup granulated sugar
- 1/4 teaspoon cream of tartar
- 1 teaspoon vanilla extract
- Mini chocolate chips for eyes
Cooking Instructions:
- Preheat the Oven: Begin by preheating your oven to 225°F (110°C). Line two baking sheets with parchment paper to guarantee the meringue ghosts don’t stick.
- Whip the Egg Whites: In a clean, dry bowl, use a mixer to beat the egg whites on medium speed until they become frothy. Add the cream of tartar and continue to beat until soft peaks form.
- Add Sugar Gradually: Slowly add the granulated sugar, one tablespoon at a time, while continuing to beat the mixture. Increase the mixer speed to high and beat until the egg whites form stiff, glossy peaks. This should take about 5-7 minutes.
- Incorporate Vanilla: Gently fold in the vanilla extract with a spatula, being careful not to deflate the meringue.
- Shape the Ghosts: Transfer the meringue into a piping bag fitted with a large round nozzle. Pipe ghost shapes onto the prepared baking sheets, about 2 inches high each.
- Add Eyes: Gently press two mini chocolate chips into each ghost to create eyes.
- Bake: Place the baking sheets in the preheated oven and bake for 1.5 hours. After baking, turn off the oven, but leave the meringues inside with the door closed for another hour to allow them to dry out completely.
- Cool and Serve: Once the meringues are fully dried, remove them from the oven and let them cool completely on the baking sheets. Serve your Ghostly Meringue Treats at room temperature.
Extra Tips:
For best results, verify that your mixing bowl and beaters are completely clean and free from any grease, as this can prevent the meringue from reaching stiff peaks.
It’s also important to separate the egg whites from the yolks carefully; even a small amount of yolk in the whites can hinder the beating process. If you don’t have a piping bag, you can use a plastic sandwich bag with a corner snipped off as an alternative.
Enjoy the process with your kids, as they can help with piping and decorating the ghosts to make Halloween even more fun and festive.
Pumpkin Patch Sugar Cookies
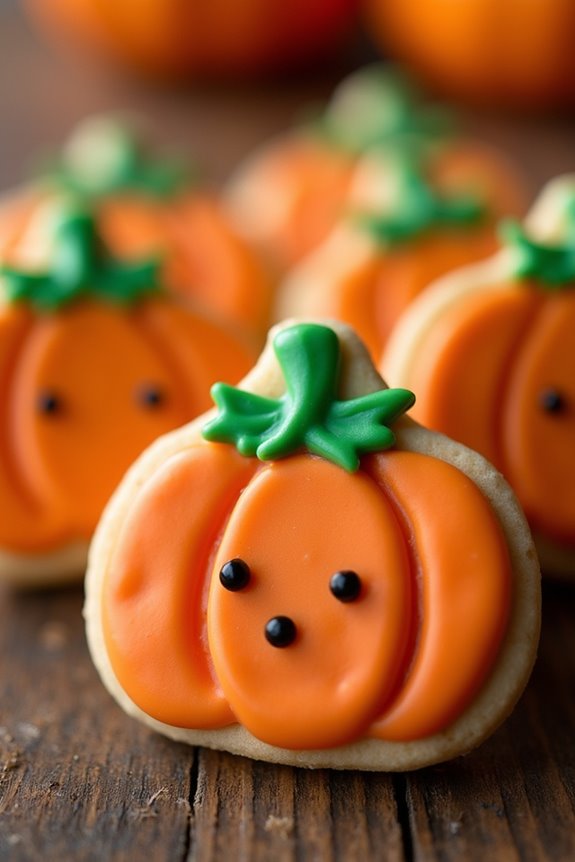
Pumpkin Patch Sugar Cookies are a delightful treat that will bring smiles to kids and adults alike during the Halloween season. These cookies not only taste delicious but also allow for creativity in decoration, making them an engaging activity for children. The sweet, buttery flavor of the sugar cookies is complemented by the vibrant colors of the icing, creating a playful and festive appearance reminiscent of a pumpkin patch.
Start by preparing the cookie dough, which serves as the canvas for your pumpkin patch. The dough is easy to work with, making it perfect for little hands to help with rolling and cutting. Once baked, the cookies serve as the perfect base for colorful icing decorations. With a little imagination, these cookies can be transformed into charming pumpkins and other Halloween-themed shapes that are sure to enchant onlookers.
Ingredients (Serves 4-6 people):
- 2 1/2 cups all-purpose flour
- 1/2 teaspoon baking powder
- 1/4 teaspoon salt
- 3/4 cup unsalted butter, softened
- 1 cup granulated sugar
- 1 large egg
- 1 teaspoon vanilla extract
- 1/2 teaspoon almond extract (optional)
- Orange food coloring
- Green food coloring
- Black decorating gel or icing
- Assorted Halloween-themed cookie cutters
Instructions:
- Prepare the Dough: In a medium bowl, whisk together the flour, baking powder, and salt. In a separate large bowl, beat the softened butter and sugar with an electric mixer on medium speed until light and fluffy, about 3 minutes. Add the egg, vanilla extract, and almond extract (if using) to the butter mixture and beat until well combined.
- Combine and Chill: Gradually add the dry ingredients to the wet ingredients, mixing on low speed until a dough forms. Divide the dough into two equal portions, wrap them in plastic wrap, and refrigerate for at least 1 hour. This chilling process will make the dough easier to roll out and help the cookies maintain their shape during baking.
- Roll and Cut: Preheat your oven to 350°F (175°C). On a lightly floured surface, roll out one portion of the dough to about 1/4-inch thickness. Use Halloween-themed cookie cutters to cut out your desired shapes. Transfer the cookies to a baking sheet lined with parchment paper, spacing them about 1 inch apart.
- Bake: Bake the cookies in the preheated oven for 10-12 minutes, or until the edges are lightly golden. Be careful not to overbake, as you want the cookies to remain soft. Allow the cookies to cool on the baking sheet for 5 minutes before transferring them to a wire rack to cool completely.
- Decorate: Once the cookies are completely cool, prepare the icing by mixing powdered sugar with a small amount of water until you reach the desired consistency. Divide the icing into two bowls and color one with orange food coloring and the other with green. Use a small piping bag or a spoon to decorate the cookies with the icing, creating pumpkin shapes with the orange and adding green stems and leaves. Use black decorating gel or icing to add faces if desired.
Extra Tips:
For the best results, make sure all your ingredients, particularly the butter and egg, are at room temperature before starting. This will help the dough come together smoothly and evenly.
If you find the dough sticking too much during rolling, lightly dust your rolling pin and surface with flour, but be cautious not to over-flour, as this can make the cookies dry.
Additionally, allow your decorated cookies to set for at least an hour before serving to make certain the icing hardens properly. Enjoy the process and let your creativity shine with these festive Pumpkin Patch Sugar Cookies!
Witch Hat Delights
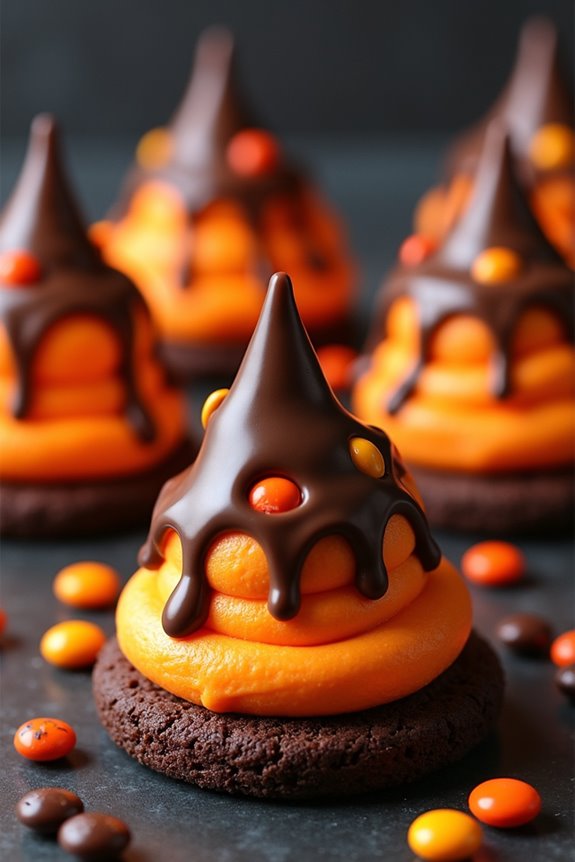
Witch Hat Delights are the perfect Halloween cookies for kids. These whimsical treats aren’t only delicious but also add a festive touch to any Halloween party. Made with colorful candies, chocolate, and a dash of creativity, Witch Hat Delights are bound to enchant little goblins and witches alike.
The best part? They’re easy to make and involve minimal baking, making it a fun and safe kitchen activity for children with adult supervision.
These cookies are a delightful combination of crunchy and creamy textures, with a rich chocolate base and a sweet, colorful top. Whether you’re hosting a Halloween party or simply looking for a fun family activity, Witch Hat Delights will be a hit. They can be prepared in advance and stored until the spooky festivities begin. This recipe makes enough for 4-6 people, guaranteeing everyone gets a taste of the Halloween magic.
Ingredients:
- 12 chocolate wafer cookies
- 12 chocolate kisses
- 1 cup of orange frosting
- 1/2 cup of assorted Halloween candies (such as mini M&Ms or candy corn)
- 1/4 cup of melted chocolate or chocolate chips
Instructions:
- Prepare the Base: Lay out the chocolate wafer cookies on a large baking sheet or tray. Make certain they’re spaced apart so they don’t stick together while decorating.
- Attach the Chocolate Kisses: Place a dollop of orange frosting on the flat bottom of each chocolate kiss. Press the kiss firmly onto the center of each wafer cookie. The frosting will act as glue, securing the kiss to the cookie.
- Decorate the Witch Hats: Using a small spoon or piping bag, pipe a ring of orange frosting around the base of each chocolate kiss where it meets the cookie. This will create the brim of the witch hat.
- Add the Candy Accents: Press a small candy, like a mini M&M or candy corn, into the orange frosting ring of each hat. This adds a pop of color and extra sweetness to your Witch Hat Delights.
- Finish with Chocolate Drizzle: Melt the chocolate chips in a microwave-safe bowl, stirring every 30 seconds until smooth. Drizzle the melted chocolate over the top of each witch hat for an extra touch of magic.
- Chill and Set: Place the tray of Witch Hat Delights in the refrigerator for about 20-30 minutes to allow the frosting and chocolate to set completely.
Extra Tips:
For a more vibrant color, you can use gel food coloring to enhance the orange frosting or choose other Halloween colors like purple or green.
If you’re making these with children, encourage them to get creative with the candy accents and frosting designs. Witch Hat Delights can be stored in an airtight container at room temperature for up to a week, making them an excellent make-ahead option for Halloween festivities.
Enjoy the spooky fun and delicious treats!
Monster Eyeball Cookies
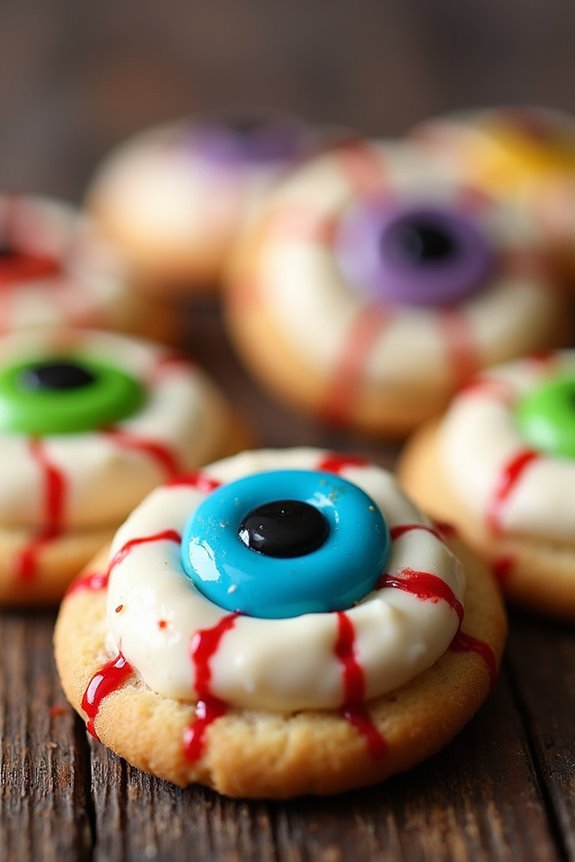
Monster Eyeball Cookies are a fun and spooky treat perfect for Halloween festivities, especially when kids are involved. These cookies are designed to look like creepy monster eyes, with vibrant colors and a delicious taste that will delight children and adults alike.
With a simple sugar cookie base and creative decorations, these cookies are a fantastic way to get into the Halloween spirit and make your Halloween party a memorable event. The recipe yields enough Monster Eyeball Cookies to serve 4-6 people, making it an excellent choice for small gatherings or family treats.
This recipe involves baking sugar cookies and decorating them with candy and colored icing to resemble eerie eyeballs. The process is straightforward and is a great opportunity for kids to get involved in the kitchen, encouraging their creativity and enhancing their holiday experience.
Ingredients:
- 2 ¾ cups all-purpose flour
- 1 teaspoon baking soda
- ½ teaspoon baking powder
- 1 cup unsalted butter, softened
- 1 ½ cups white sugar
- 1 egg
- 1 teaspoon vanilla extract
- Assorted food coloring (green, red, blue, etc.)
- Large candy eyeballs
- Colored icing pens or gel
Instructions:
- Preheat and Prepare: Preheat your oven to 375°F (190°C). Line two baking sheets with parchment paper to prevent the cookies from sticking.
- Mix Dry Ingredients: In a medium bowl, whisk together the flour, baking soda, and baking powder. Set aside.
- Cream Butter and Sugar: In a large bowl, cream together the softened butter and white sugar until smooth. Beat in the egg and vanilla extract until well combined.
- Combine Ingredients: Gradually add the dry ingredients to the wet mixture, mixing until a dough forms. If the dough is too sticky, add a little more flour.
- Color the Dough: Divide the dough into several portions and color each with different food coloring. Knead the color into the dough until it’s evenly distributed.
- Shape Cookies: Roll the dough into 1-inch balls and place them on the prepared baking sheets about 2 inches apart. Press down slightly to flatten.
- Bake: Bake in the preheated oven for 8 to 10 minutes, or until the edges are lightly golden. Remove from the oven and allow to cool on the baking sheets for a few minutes before transferring to wire racks to cool completely.
- Decorate: Once cooled, use the colored icing pens to draw veins or designs on the cookies to give them a monstrous appearance. Place a large candy eyeball in the center of each cookie.
Extra Tips:
When making Monster Eyeball Cookies, verify your butter is softened to room temperature for easy mixing. If you want to add extra flavor, consider adding a teaspoon of almond extract alongside the vanilla.
For a more intense color, use gel food coloring as it doesn’t alter the dough’s consistency like liquid food coloring might. Encourage kids to get creative with the designs, adding more than one eyeball per cookie for an extra monstrous look.
Store cookies in an airtight container to keep them fresh for several days.
Frankenstein’s Monster Bars
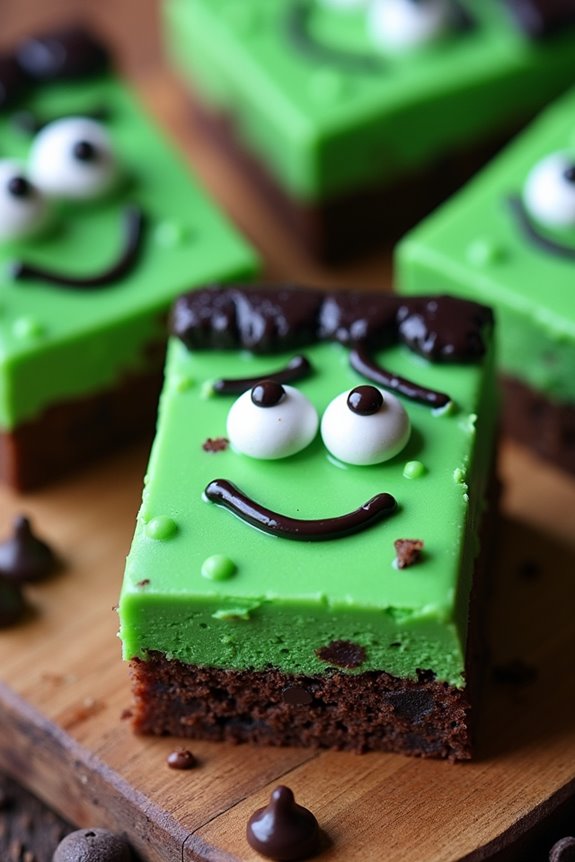
Frankenstein’s Monster Bars are a spooky yet delicious treat perfectly suited for Halloween festivities, especially for kids who enjoy a little fright with their sweets. These bars are inspired by the legendary creature from Mary Shelley’s classic novel, but with a much more delightful and tasty twist.
With a vibrant green hue and playful decorations, these bars won’t only stand out on your Halloween dessert table but will also captivate the hearts (and taste buds) of both children and adults alike.
Creating these Frankenstein’s Monster Bars is a fun and engaging activity that can be enjoyed by the whole family. The recipe combines simple ingredients with a touch of creativity to bring the iconic monster to life in a sweet form.
These bars aren’t only a treat for the eyes but also provide a deliciously chewy texture and rich flavor that kids will love. Perfect for a party or a Halloween-themed afternoon snack, this recipe is sure to be a hit.
Ingredients for 4-6 servings:
- 1 cup unsalted butter, softened
- 1 cup granulated sugar
- 1 cup light brown sugar, packed
- 2 large eggs
- 1 teaspoon vanilla extract
- A few drops of green food coloring
- 2 ½ cups all-purpose flour
- 1 teaspoon baking soda
- ½ teaspoon salt
- 1 cup mini chocolate chips
- ½ cup candy eyes
- Black decorating gel
Cooking Instructions:
- Preheat the Oven: Start by preheating your oven to 350°F (175°C). Line a 9×13-inch baking pan with parchment paper, leaving some overhang on the sides for easy removal later.
- Cream the Butter and Sugars: In a large mixing bowl, beat the softened butter, granulated sugar, and brown sugar together until creamy and well combined. This should take about 2-3 minutes using an electric mixer.
- Add Eggs and Vanilla: Add the eggs one at a time, mixing well after each addition. Stir in the vanilla extract and a few drops of green food coloring, adjusting the amount to achieve your desired shade of green.
- Mix Dry Ingredients: In a separate bowl, whisk together the flour, baking soda, and salt. Gradually add the dry ingredients to the wet ingredients, mixing until just combined.
- Incorporate Chocolate Chips: Fold in the mini chocolate chips evenly throughout the dough. Confirm they’re well distributed for consistent flavor in each bite.
- Spread the Dough: Transfer the dough into the prepared baking pan, spreading it evenly with a spatula.
- Bake the Bars: Place in the preheated oven and bake for 25-30 minutes, or until the edges are golden brown and a toothpick inserted into the center comes out clean. Allow the bars to cool in the pan.
- Decorate the Bars: Once cooled, use the candy eyes and black decorating gel to create Frankenstein faces on each bar. Get creative with their expressions to make them fun and unique.
- Slice and Serve: Carefully lift the bars out of the pan using the parchment paper overhang, slice into squares, and serve.
Extra Tips:
When making Frankenstein’s Monster Bars, it’s important to verify that the butter is softened to room temperature, allowing it to cream smoothly with the sugars. This will result in a better texture for the bars.
If you want to make the bars extra spooky, consider adding some crushed Oreos or chocolate sprinkles to mimic Frankenstein’s stitches or hair. Additionally, if you’re working with children, let them help with the decorating process, which can be a fun and creative part of the preparation.
Finally, store any leftovers in an airtight container to keep them fresh and chewy for several days.
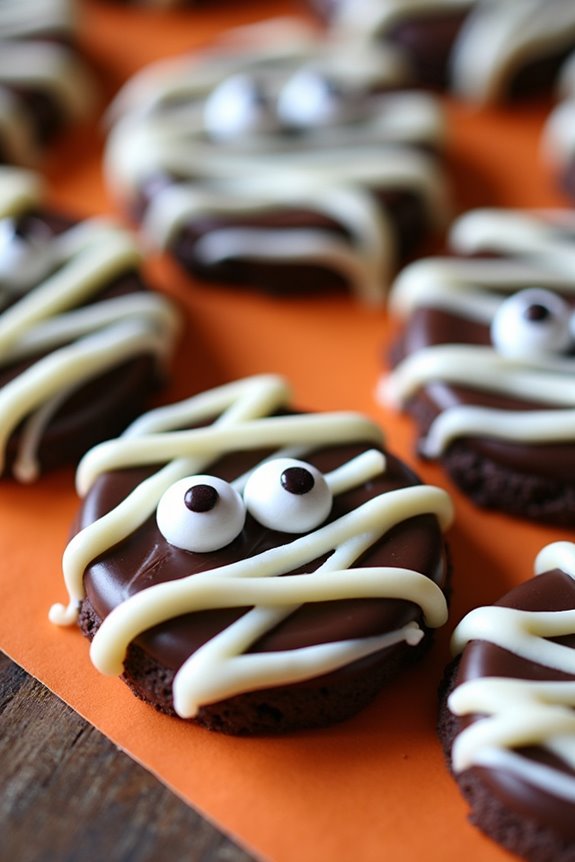
Mummy Chocolate Dips
- 12 sturdy cookies (shortbread or sugar cookies recommended)
- 1 cup white chocolate chips
- 1 cup dark chocolate chips
- 24 candy eyes
- 1 tablespoon coconut oil (optional, for thinning chocolate)
Instructions
- Prepare Your Workspace: Line a baking sheet with parchment paper or a silicone baking mat. This will prevent the cookies from sticking when you dip them in chocolate.
- Melt the Chocolate: In separate microwave-safe bowls, melt the white and dark chocolate chips. Microwave in 20-second intervals, stirring in between, until the chocolate is completely melted and smooth. If the chocolate is too thick, add a little coconut oil to help thin it out.
- Dip the Cookies: Take each cookie and dip it halfway into the melted dark chocolate. Allow any excess chocolate to drip off before placing it on the prepared baking sheet. Repeat with all the cookies.
- Create the Mummy Wraps: Once the dark chocolate has set slightly, use a spoon or a small piping bag to drizzle the melted white chocolate over the dipped part of each cookie, creating a mummy wrap effect. You can be as random or as neat as you like with the drizzles.
- Add Eyes: Before the white chocolate sets, place two candy eyes on each cookie where the mummy’s eyes would be. Press gently to confirm they stick.
- Set the Cookies: Allow the cookies to set completely. You can speed up this process by placing the baking sheet in the refrigerator for about 15-20 minutes until the chocolate hardens.
Extra Tips
To make certain your chocolate melts smoothly, avoid any contact with water, as even a drop can cause the chocolate to seize.
Also, if you want to switch things up a bit, consider adding a few drops of food coloring to the white chocolate to create different colored mummy wraps.
Finally, feel free to experiment with different types of cookies or add a sprinkle of sea salt for an extra flavor dimension.
Enjoy making these Mummy Chocolate Dips with your kids, and have a fun and spooky Halloween!
Candy Corn Sugar Twists
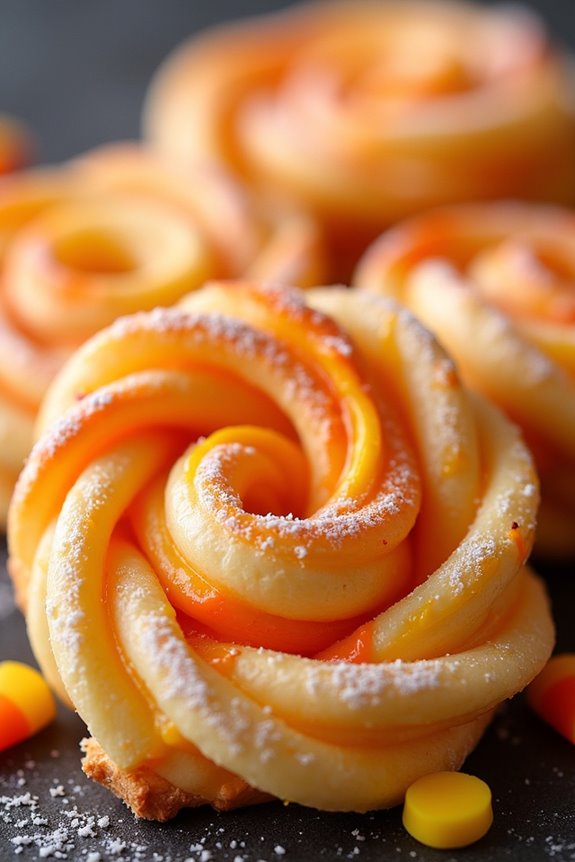
Halloween is a perfect time to let your creativity shine, especially in the kitchen. If you’re looking for a fun and festive treat to delight the little ones, Candy Corn Sugar Twists are a fantastic choice. These delightful pastries combine the classic flavors of candy corn with a buttery, flaky twist, making them a hit at any Halloween gathering. The vibrant colors and sweet taste are bound to catch the eye and excite the taste buds of kids and adults alike.
Ideal for serving 4-6 people, this recipe isn’t only visually appealing but also simple to make. With just a few ingredients and some creativity, these Candy Corn Sugar Twists can be whipped up in no time. Whether you’re hosting a Halloween party or just looking for a fun baking activity with the kids, this recipe is a surefire way to bring some festive flair to your table.
Ingredients (Serving size: 4-6 people)
- 1 sheet of puff pastry, thawed
- 1/4 cup granulated sugar
- 1/4 cup candy corn, finely chopped
- 1 teaspoon ground cinnamon
- 1 egg, beaten
- Orange and yellow food coloring
- Powdered sugar for dusting (optional)
Cooking Instructions
- Prepare the Puff Pastry: Preheat your oven to 400°F (200°C). Unroll the thawed puff pastry sheet on a lightly floured surface. Using a rolling pin, gently roll it out to smooth any creases.
- Mix the Filling: In a small bowl, combine the granulated sugar and ground cinnamon. Evenly sprinkle this mixture over the puff pastry sheet.
- Add Candy Corn: Sprinkle the finely chopped candy corn over the sugar and cinnamon mix, guaranteeing even distribution.
- Color the Twists: Divide the pastry into two equal halves. Use a small brush to lightly paint one half with yellow food coloring and the other half with orange food coloring.
- Cut and Twist the Pastry: Using a sharp knife or a pizza cutter, slice the pastry into 1-inch wide strips. Carefully twist each strip several times to form a spiral.
- Prepare for Baking: Place the twisted strips onto a baking sheet lined with parchment paper, ensuring they’re spaced out to prevent sticking during baking.
- Egg Wash and Bake: Gently brush the beaten egg over each twist to give them a glossy finish. Bake in the preheated oven for 12-15 minutes, or until golden brown and puffed.
- Serve: Allow the Candy Corn Sugar Twists to cool slightly before serving. Dust with powdered sugar if desired for added sweetness.
Extra Tips
For best results, make sure the puff pastry is cold but pliable; if it gets too warm, it can become difficult to handle.
When adding food coloring, use gel colors for more vibrant hues and guarantee even application. If you prefer a less sweet version, adjust the amount of candy corn used.
The twists can be stored in an airtight container for up to 2 days, though they’re best enjoyed fresh. Kids will love helping with the twisting and coloring steps, making it a fun and interactive activity for the whole family.
Jack-O’-Lantern Shortbreads
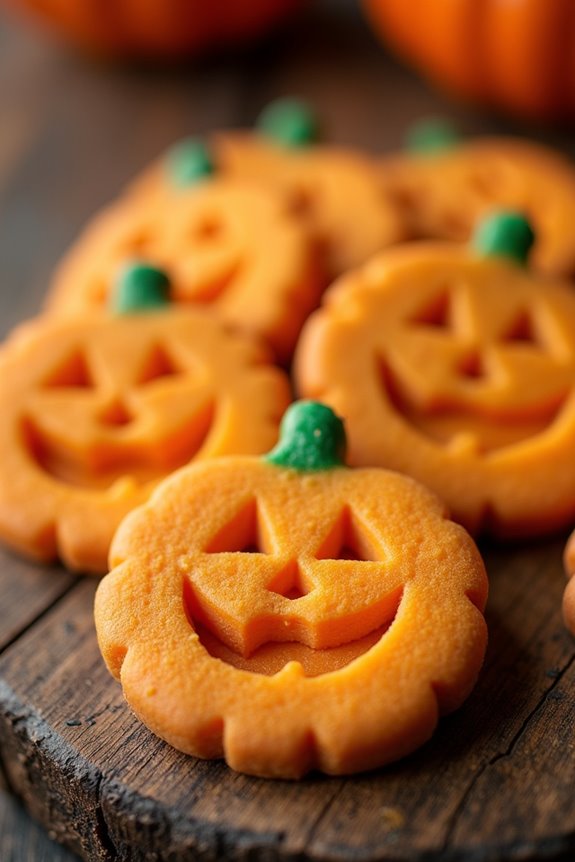
Celebrate Halloween with these delightful Jack-O’-Lantern Shortbreads that aren’t only fun to make but also delicious to eat. These buttery cookies are shaped like the iconic Halloween symbol, the Jack-O’-Lantern, and are perfect for getting the kids involved in the kitchen. The process is simple enough for little hands to help with, and the result is a batch of festive cookies that are certain to be a hit at any Halloween gathering.
This recipe will guide you through making approximately 24-30 cookies, which is ideal for serving about 4-6 people. The recipe includes ingredients like all-purpose flour, butter, and a hint of vanilla, along with food coloring to give these cookies their characteristic orange hue. With just a few steps, you’ll have a tray of cookies that are as delightful to the eyes as they’re to the taste buds.
Ingredients (serves 4-6 people):
- 2 cups all-purpose flour
- 1 cup unsalted butter, softened
- 1/2 cup powdered sugar
- 1 teaspoon vanilla extract
- Orange food coloring
- Green food coloring
- Black food coloring (optional for details)
- A pinch of salt
Cooking Instructions:
- Prepare the Dough: In a large mixing bowl, cream together the softened butter and powdered sugar until the mixture is light and fluffy. Mix in the vanilla extract until well combined.
- Add Flour and Salt: Gradually add the all-purpose flour and a pinch of salt to the butter mixture. Mix until a dough forms. The dough should be soft but not sticky.
- Color the Dough: Divide the dough into two portions. Tint the larger portion with orange food coloring to represent the pumpkin. Knead the dough until the color is evenly distributed. Use the green food coloring to tint the smaller portion for the pumpkin stems.
- Shape the Cookies: Preheat your oven to 350°F (175°C). Line a baking sheet with parchment paper. Roll the orange dough into small balls (about 1 inch in diameter) and flatten them slightly to form the pumpkin body. Roll the green dough into tiny logs and attach them to the top of each orange circle to form the stem.
- Add Details: Use a toothpick or a small knife to carve Jack-O’-Lantern faces into the cookies. If desired, use a small amount of black food coloring to paint on facial features for extra detail.
- Bake: Arrange the cookies on the prepared baking sheet, leaving about an inch between each cookie. Bake in the preheated oven for 10-12 minutes or until the edges are lightly golden.
- Cool and Serve: Remove the cookies from the oven and allow them to cool on the baking sheet for a few minutes before transferring them to a wire rack to cool completely. Serve and enjoy!
Extra Tips:
For an extra festive touch, consider using a variety of carving tools to create different facial expressions on your Jack-O’-Lanterns. If you’re short on time, you can also use Jack-O’-Lantern cookie cutters to shape the dough instead of carving each cookie individually.
To guarantee vibrant colors, use gel food coloring, which requires only a small amount to achieve a rich hue. Finally, make sure the butter is softened to guarantee the dough comes together easily and has a smooth consistency. Enjoy crafting these spooky treats with your little ones!
Batty Black Cocoa Treats
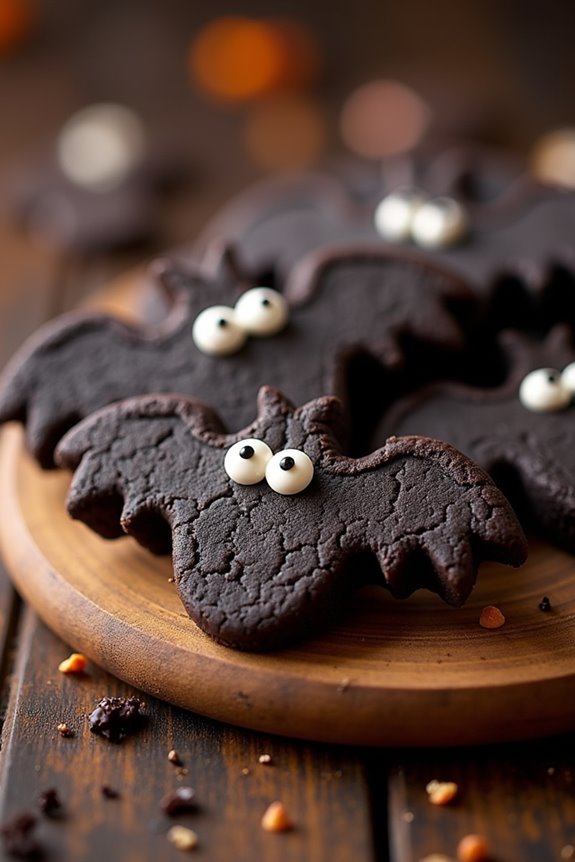
Celebrate Halloween with these spooky and delicious Batty Black Cocoa Treats! Perfect for little ones and adults alike, these cookies are a sweet and festive addition to your Halloween celebrations. The rich, dark color comes from black cocoa powder, which isn’t only visually striking but also lends a deep chocolate flavor that’s certain to delight.
These bat-shaped cookies are as fun to make as they’re to eat, making them a perfect kitchen activity for kids and parents to enjoy together. Each bite of these treats is a magical dance of flavors, with the tender, buttery crumb of the cookie contrasting beautifully with the rich cocoa. The bat shapes make these cookies ideal for Halloween, and you can even add a decorative touch with white icing or candy eyes to give your bats more character.
Gather the family, don your favorite costumes, and get ready to bake up a storm with this delightful recipe for Batty Black Cocoa Treats, designed to serve 4-6 people.
Ingredients:
- 1 cup unsalted butter, softened
- 3/4 cup granulated sugar
- 1 large egg
- 1 teaspoon vanilla extract
- 2 cups all-purpose flour
- 3/4 cup black cocoa powder
- 1/2 teaspoon baking powder
- 1/2 teaspoon salt
- White icing or candy eyes (optional, for decoration)
Cooking Instructions:
- Prepare the Dough: In a large mixing bowl, cream together the softened butter and granulated sugar until light and fluffy. This should take about 2-3 minutes using an electric mixer on medium speed. Add the egg and vanilla extract, and mix until well combined.
- Combine Dry Ingredients: In a separate bowl, whisk together the all-purpose flour, black cocoa powder, baking powder, and salt. Gradually add this dry mixture to the wet ingredients, mixing on low speed until a soft dough forms.
- Chill the Dough: Divide the dough into two halves. Flatten each half into a disk, wrap them in plastic wrap, and refrigerate for at least 1 hour. This chilling process helps the dough firm up, making it easier to roll out.
- Roll and Cut: Preheat your oven to 350°F (175°C). On a lightly floured surface, roll out one disk of dough to about 1/4-inch thickness. Use a bat-shaped cookie cutter to cut out shapes and place them on a parchment-lined baking sheet. Repeat with the second disk of dough.
- Bake the Cookies: Bake in the preheated oven for 10-12 minutes, or until the edges are firm and the center is set. Be careful not to overbake, as the cookies will continue to firm up as they cool.
- Cool and Decorate: Allow the cookies to cool on the baking sheet for 5 minutes, then transfer them to a wire rack to cool completely. Once cool, decorate with white icing or candy eyes as desired to give your batty treats some extra Halloween charm.
Extra Tips:
When working with black cocoa powder, remember it’s more potent than regular cocoa powder, so a little goes a long way in achieving that intense dark color and flavor. If you can’t find black cocoa powder, you can substitute with Dutch-process cocoa, though the color will be lighter.
To guarantee even baking, make sure your cookies are similar in size and thickness. If you’re decorating with icing, let the cookies cool completely to prevent the icing from melting. For added fun, let kids help with the decorating, using their creativity to bring the bats to life!
Vampire Fang Bites
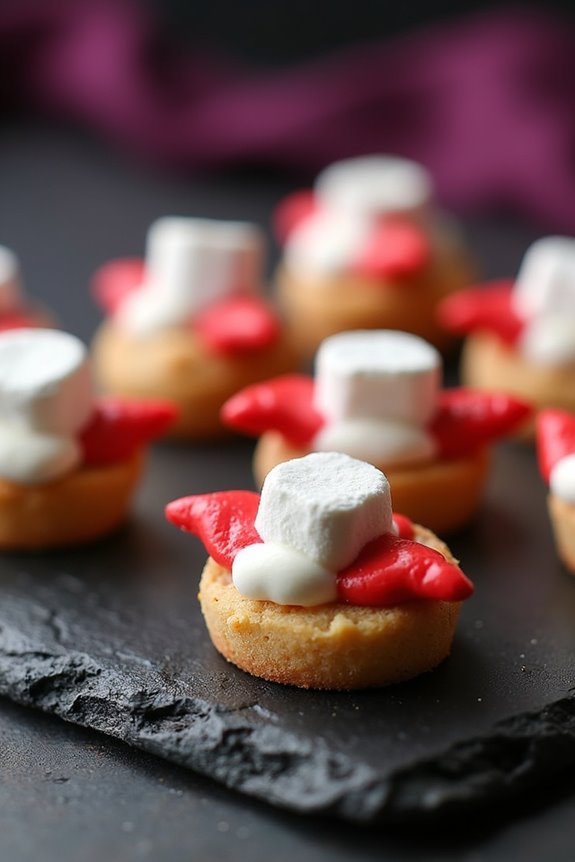
Halloween is the perfect time to let your culinary creativity shine, especially when it comes to treats for kids. Vampire Fang Bites are a spooky yet delicious addition to any Halloween spread, promised to delight both young and old.
These playful cookies aren’t only simple to make but also a fun activity for kids who love to get involved in the kitchen. With their ghoulish appearance and sweet taste, these fang-shaped cookies will surely become a Halloween favorite.
The beauty of Vampire Fang Bites lies in their simplicity and versatility. This recipe uses basic cookie dough as a foundation, which is then transformed into fang shapes with the help of a little imagination and some clever decorating.
Whether you’re hosting a Halloween party or just looking to add some festive flair to your snack table, these cookies are a must-try. The combination of a crisp cookie and sweet icing will have everyone coming back for more, all while adding a touch of spookiness to your Halloween celebrations.
Ingredients (serving size: 4-6 people):
- 2 cups all-purpose flour
- 1/2 teaspoon baking powder
- 1/4 teaspoon salt
- 1/2 cup unsalted butter, softened
- 3/4 cup granulated sugar
- 1 large egg
- 1 teaspoon vanilla extract
- Red food coloring gel
- White icing (store-bought or homemade)
- Mini marshmallows
Cooking Instructions:
- Prepare the Dough: Preheat your oven to 350°F (175°C). In a medium bowl, whisk together the flour, baking powder, and salt. In a separate large bowl, cream the softened butter and sugar together until light and fluffy.
- Beat in the egg and vanilla extract until well combined.
- Combine Ingredients: Gradually add the dry ingredients to the wet mixture, mixing until a dough forms. If the dough is too sticky, add a little more flour until it’s manageable.
- Shape the Cookies: Divide the dough into small, manageable portions. Roll each portion into a ball and then shape it into a crescent or fang shape.
- Place the cookies onto a baking sheet lined with parchment paper, leaving some space between each.
- Bake: Bake the cookies in the preheated oven for 10-12 minutes, or until the edges are lightly golden. Remove from the oven and let them cool on a wire rack.
- Decorate: Once cooled, use a small brush or toothpick to apply red food coloring gel to the pointed ends of the cookies to mimic blood.
- Then, pipe white icing onto the fangs to create the illusion of teeth. Add mini marshmallows on top of the icing to create the effect of gums or additional teeth.
- Serve: Once the icing is set, arrange the Vampire Fang Bites on a festive platter and serve them at your Halloween gathering.
Extra Tips:
To guarantee the best results, make sure the butter is properly softened before starting the recipe, as this will help achieve a smooth dough consistency.
If you’re short on time, you can use pre-made sugar cookie dough as a substitute. For added flavor, consider incorporating a few drops of almond or peppermint extract into the dough.
Additionally, for a more realistic look, you can use edible silver spray on the icing to give the fangs a metallic sheen. Enjoy getting creative with your vampire fangs and have fun making them look as spooky or silly as you like!
Skeleton Bone Crunchers
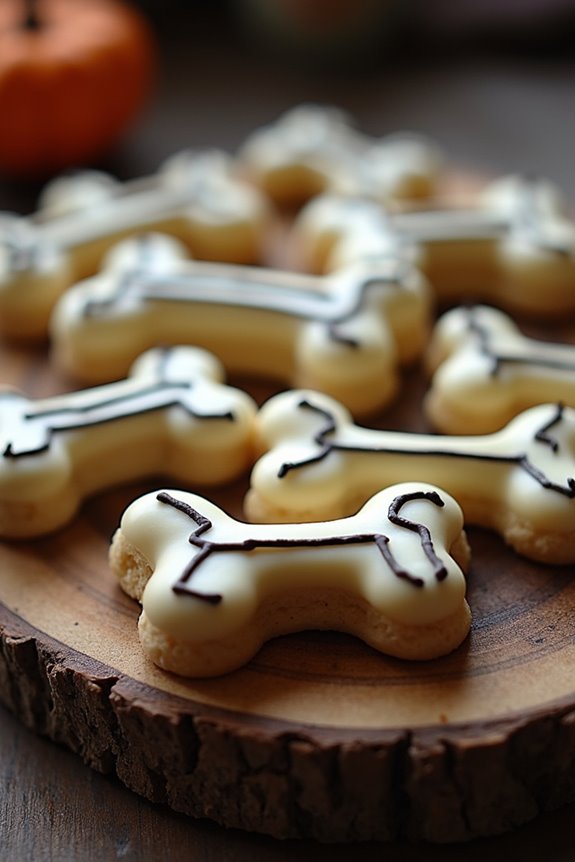
Halloween is the perfect time to get creative in the kitchen, especially when it comes to making festive treats for the little ones. Skeleton Bone Crunchers are a spooky and fun addition to any Halloween celebration, bound to delight kids with their eerie appearance and delicious taste.
These crunchy cookies are shaped like bone fragments, adding a fun and ghoulish touch to your Halloween snack table while providing a sweet treat that everyone will enjoy. The recipe is simple enough for kids to join in on the fun, making it a great family activity.
With just a few ingredients, you can whip up a batch of these delightful cookies in no time. The easy-to-follow instructions guarantee that even novice bakers can achieve bone-chilling results. Let’s get started on making a batch of Skeleton Bone Crunchers that will serve 4-6 people.
Ingredients:
- 2 cups all-purpose flour
- 1 cup unsalted butter, softened
- 1 cup powdered sugar
- 1 teaspoon vanilla extract
- 1/2 teaspoon almond extract
- 1/4 teaspoon salt
- 1 tablespoon milk
- 1/2 cup white chocolate chips (for decoration)
- Black edible food marker or black gel icing (for decoration)
Cooking Instructions:
- Preheat the Oven: Start by preheating your oven to 350°F (175°C). This guarantees that the cookies will bake evenly and develop a nice, crisp texture.
- Prepare the Dough: In a large mixing bowl, cream together the softened butter and powdered sugar until light and fluffy. Add the vanilla extract, almond extract, and milk, mixing until well combined. Gradually add in the flour and salt, mixing just until a soft dough forms.
- Shape the Bones: Divide the dough into small, equal portions. Roll each portion into a log shape, about 3 inches long. Pinch the ends of each log to create a bone-like shape, using your fingers to form indentations that resemble joints.
- Bake the Cookies: Place the shaped dough onto a baking sheet lined with parchment paper, leaving some space between each cookie. Bake in the preheated oven for 12-15 minutes, or until the edges are lightly golden. Remove the cookies from the oven and let them cool on a wire rack.
- Decorate the Bones: Once the cookies are completely cooled, melt the white chocolate chips in a microwave-safe bowl, stirring every 20 seconds until smooth. Dip each cookie into the melted chocolate, allowing any excess to drip off. Place the coated cookies back onto the parchment paper to set.
- Add Details: Use the black edible food marker or black gel icing to draw lines and details on the cookies, enhancing their bone-like appearance. Let the decorations dry completely before serving.
Extra Tips:
For an extra spooky touch, consider adding a few drops of food coloring to the dough to create various shades of bone. You can also experiment with different flavored extracts to add a unique twist to your Skeleton Bone Crunchers.
If you’re making these cookies with kids, encourage them to get creative with the decorations, using additional colored icing or sprinkles to personalize their treats. Remember to store any leftovers in an airtight container to keep them fresh and crunchy for longer.
Haunted House Ginger Snaps
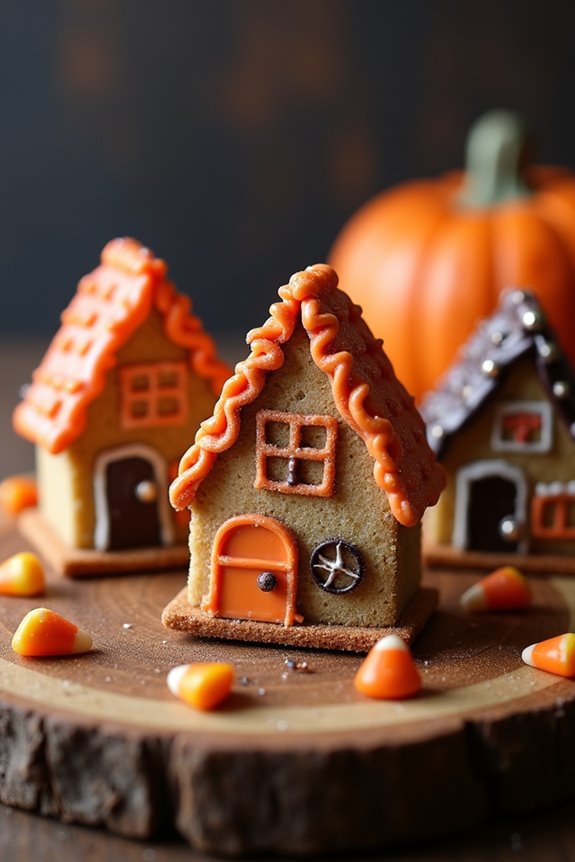
Halloween is the perfect time to get creative in the kitchen, especially when it comes to baking spooky treats for kids. One of the best ways to delight little ones is by making Haunted House Ginger Snaps. These cookies aren’t only delicious with their spicy and sweet ginger flavor, but they’re also fun to decorate, turning each cookie into a mini haunted house. Perfect for a Halloween party or just as a festive treat, these cookies will certainly be a hit with kids and adults alike.
The Haunted House Ginger Snaps are made with a classic ginger snap recipe that’s easy to follow and yields delightful results. The secret to their deliciousness lies in the blend of spices, which includes ginger, cinnamon, and cloves, creating a warm and aromatic flavor. Once baked, the cookies can be decorated with royal icing to form spooky designs like haunted houses, ghosts, or pumpkins. This allows for a fun and interactive activity for kids, who’ll love both making and eating their eerie creations.
Ingredients (serving size: 4-6 people):
- 2 cups all-purpose flour
- 1 teaspoon baking soda
- 1 tablespoon ground ginger
- 1 teaspoon ground cinnamon
- 1/2 teaspoon ground cloves
- 1/4 teaspoon salt
- 3/4 cup unsalted butter, softened
- 1 cup granulated sugar
- 1 large egg
- 1/4 cup molasses
- Royal icing (store-bought or homemade)
- Food coloring (optional, for decorating)
- Sprinkles, candies, or edible decorations (optional)
Cooking Instructions:
- Preheat the Oven: Preheat your oven to 350°F (175°C) to prepare for baking the cookies. Line two baking sheets with parchment paper.
- Mix Dry Ingredients: In a medium bowl, whisk together the flour, baking soda, ginger, cinnamon, cloves, and salt. Set aside.
- Cream Butter and Sugar: In a large mixing bowl, use an electric mixer to cream the softened butter and sugar until light and fluffy, about 3-4 minutes.
- Add Egg and Molasses: Beat in the egg and molasses until well combined, making certain the mixture is smooth.
- Combine Ingredients: Gradually add the dry ingredients to the wet ingredients, mixing on low speed until a dough forms.
- Shape the Cookies: Scoop tablespoon-sized amounts of dough and roll them into balls. Place them onto the prepared baking sheets about 2 inches apart to allow for spreading.
- Bake: Bake in the preheated oven for 10-12 minutes until the edges are firm. The centers will appear slightly soft but will firm up as they cool.
- Cool Down: Allow the cookies to cool on the baking sheet for about 5 minutes before transferring them to a wire rack to cool completely.
- Decorate: Once cooled, use royal icing to decorate the cookies. Divide the icing into small bowls and color with food coloring if desired. Use piping bags to create haunted house designs, or let the kids get creative with their spooky designs.
Extra Tips:
For the best results, make sure that all ingredients are at room temperature before starting to mix, as this helps achieve a smooth dough. If you want to make the cookies ahead of time, the dough can be refrigerated for up to two days before baking.
When it comes to decorating, let the kids have fun with different colors and embellishments, like candy corn or chocolate chips, to personalize their haunted houses. If you find the dough too sticky to handle, a light dusting of flour on your hands can make rolling the dough balls easier.