

Halloween is just around the corner, and what better way to celebrate than with some fun and spooky treats? Cookies with eyes are the perfect blend of whimsy and deliciousness, adding a playful touch to any festive gathering. Think of googly-eyed monster cookies or eerie eyeball macarons that are sure to be the talk of the party. These delightful creations not only please the palate but also spark joy with their imaginative designs. Ready to bring some eye-catching magic to your Halloween festivities?
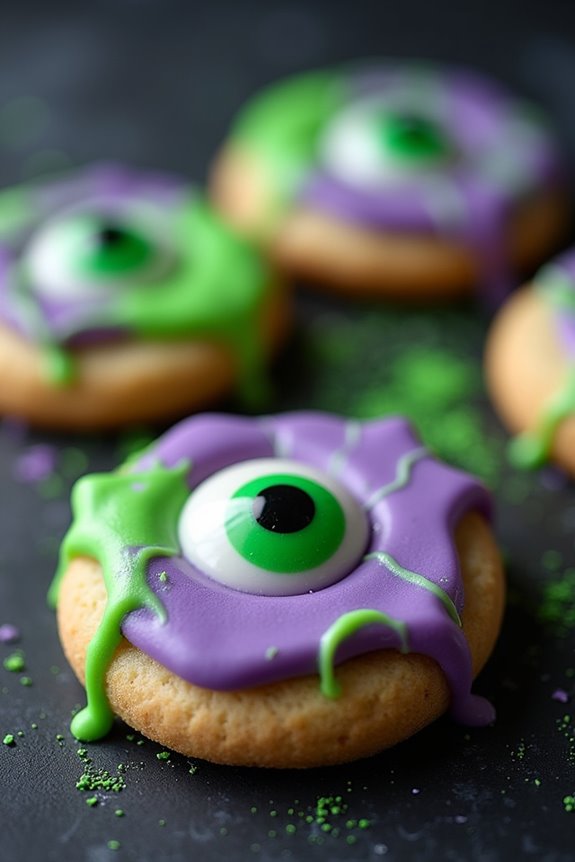
Googly-Eyed Monster Cookies
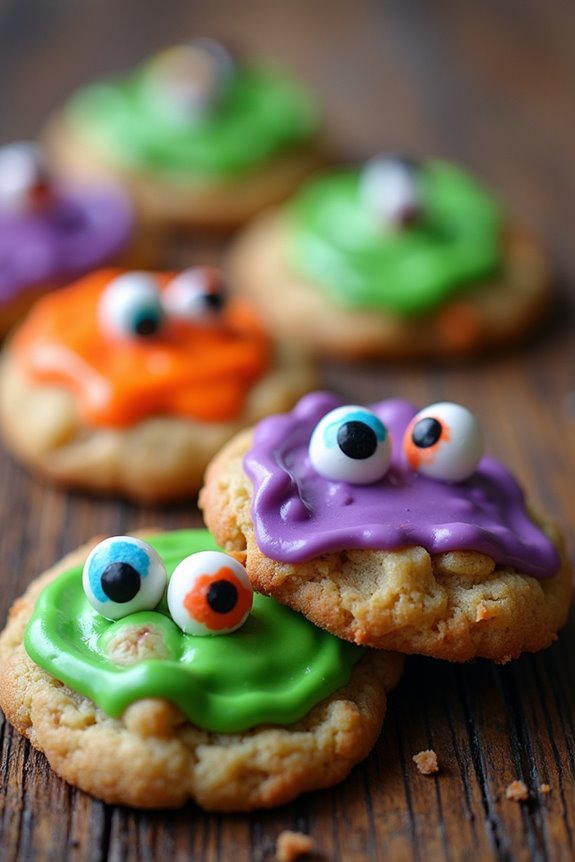
Googly-Eyed Monster Cookies are a delightful and whimsical treat perfect for a Halloween celebration. These cookies aren’t only fun to make but also a great activity to involve kids in the kitchen. The colorful candies and googly eyes give these cookies a playful and monstrous appearance that’s sure to be a hit with both children and adults alike.
With a soft and chewy interior and a slightly crispy exterior, these cookies offer a delicious flavor that complements their spooky design. The recipe for Googly-Eyed Monster Cookies is simple enough for bakers of all levels. Using a basic cookie dough as the base, you can get creative with food coloring, candy eyes, and bright candies to bring your monsters to life.
The dough can be adapted to your liking, allowing you to make each cookie uniquely monstrous. Perfect for a Halloween party or a festive family gathering, these cookies are sure to add a touch of fun and fright to your dessert table.
Ingredients (for 4-6 people):
- 1 cup unsalted butter, softened
- 1 cup granulated sugar
- 1/2 cup packed light brown sugar
- 2 large eggs
- 1 teaspoon vanilla extract
- 2 3/4 cups all-purpose flour
- 1 teaspoon baking soda
- 1/2 teaspoon baking powder
- 1/2 teaspoon salt
- Assorted food coloring (green, purple, orange)
- 1 cup candy-coated chocolates (e.g., M&Ms)
- Candy googly eyes
Instructions:
- Preheat the Oven: Begin by preheating your oven to 350°F (175°C). Line two baking sheets with parchment paper and set them aside.
- Cream the Butter and Sugars: In a large mixing bowl, cream together the softened butter, granulated sugar, and brown sugar until the mixture is light and fluffy. This should take about 3-4 minutes with an electric mixer.
- Add Wet Ingredients: Beat in the eggs one at a time, ensuring each is well incorporated before adding the next. Mix in the vanilla extract until fully combined.
- Mix Dry Ingredients: In a separate bowl, whisk together the flour, baking soda, baking powder, and salt. Gradually add this dry mixture to the wet ingredients, mixing just until combined and a dough forms.
- Divide and Color the Dough: Divide the dough into three equal portions. Add a few drops of food coloring to each portion (green, purple, and orange) and knead until the color is evenly distributed. Adjust the color intensity as desired.
- Shape and Decorate the Cookies: Scoop tablespoon-sized portions of the colored dough and roll them into balls. Place them onto the prepared baking sheets, spacing them about 2 inches apart. Gently press down the dough balls and decorate with candy-coated chocolates and candy googly eyes.
- Bake the Cookies: Bake in the preheated oven for 10-12 minutes or until the edges start to turn golden brown. Avoid overbaking to maintain a soft center.
- Cool the Cookies: Remove the cookies from the oven and allow them to cool on the baking sheets for 5 minutes before transferring them to a wire rack to cool completely.
Extra Tips: For an extra spooky effect, use a toothpick to create tiny cracks and creases on the cookie surface before baking. This adds texture that enhances the monster look.
If you’re short on time, consider using pre-made cookie dough and simply add food coloring and decorations. Store cookies in an airtight container to maintain freshness, and enjoy them within 3-4 days for the best taste and texture.
Spooky Cyclops Sugar Cookies
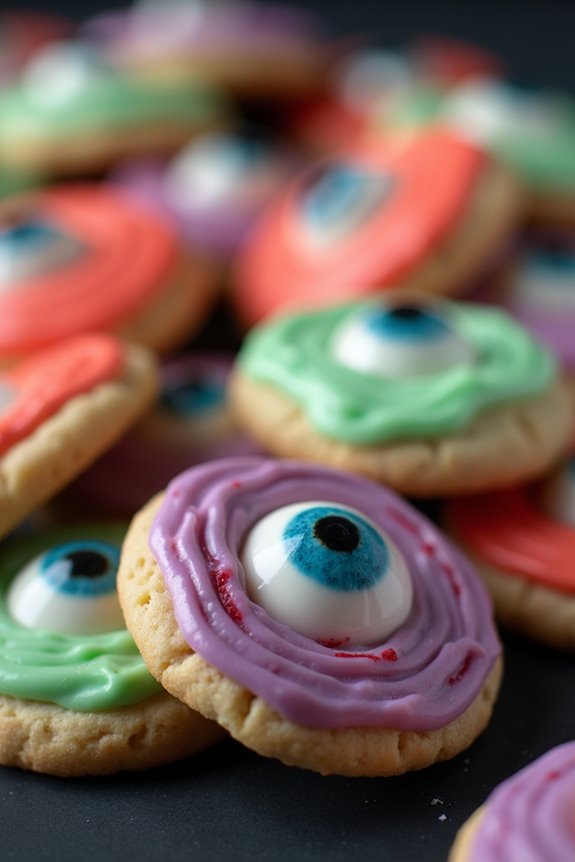
Spooky Cyclops Sugar Cookies are the perfect Halloween treat to delight both kids and adults alike. These eerie yet delicious cookies aren’t only fun to make but also delightful to eat, with their spooky eye-catching design. The combination of a classic sugar cookie base with a ghoulish touch makes them an ideal addition to your Halloween party spread or a spooky-themed family baking session.
The recipe incorporates simple ingredients and steps that allow even novice bakers to create a batch of these hauntingly good cookies. To create the signature “cyclops” look, each cookie is topped with a single candy eye, surrounded by a smooth layer of icing. This recipe yields around 24-30 cookies, making it perfect for serving 4-6 people, depending on how many cookies each person enjoys.
The cookies aren’t only visually appealing but also soft and buttery, with a sweet, melt-in-your-mouth texture that’s sure to make them a hit at any Halloween gathering.
Ingredients for Spooky Cyclops Sugar Cookies (Serves 4-6 people):
- 2 3/4 cups all-purpose flour
- 1 teaspoon baking soda
- 1/2 teaspoon baking powder
- 1 cup unsalted butter, softened
- 1 1/2 cups granulated sugar
- 1 egg
- 1 teaspoon vanilla extract
- 1/2 teaspoon almond extract (optional)
- 1/4 teaspoon salt
- 24-30 candy eyes
- 1 cup confectioners’ sugar
- 2-3 tablespoons milk
- Food coloring (preferably red, green, or purple)
Instructions:
- Preheat the Oven: Begin by preheating your oven to 375°F (190°C). Line two baking sheets with parchment paper or silicone baking mats and set them aside.
- Mix Dry Ingredients: In a medium bowl, whisk together the flour, baking soda, baking powder, and salt. This will guarantee even distribution of the leavening agents throughout the dough.
- Cream Butter and Sugar: In a large mixing bowl, cream together the softened butter and granulated sugar until light and fluffy. This should take about 2-3 minutes using an electric mixer.
- Add Egg and Extracts: Beat in the egg, vanilla extract, and almond extract (if using) into the butter mixture, mixing until well combined.
- Combine Wet and Dry Ingredients: Gradually add the dry ingredients to the wet ingredients, mixing just until the dough comes together. Don’t overmix, as this can result in tough cookies.
- Shape the Cookies: Scoop tablespoons of dough and roll them into balls. Place them on the prepared baking sheets, leaving about 2 inches between each cookie to allow for spreading.
- Bake the Cookies: Bake in the preheated oven for 8-10 minutes, or until the edges are just beginning to turn golden. Remove from the oven and let them cool on the baking sheets for 5 minutes before transferring to a wire rack to cool completely.
- Prepare Icing: In a small bowl, mix the confectioners’ sugar with enough milk to create a smooth, thick glaze. Add a few drops of your chosen food coloring and stir until the color is even.
- Decorate the Cookies: Once the cookies are completely cool, spread a small amount of icing on top of each one. Place a candy eye in the center of the icing, pressing gently to secure it. Allow the icing to set before serving.
Extra Tips:
When preparing the dough, make certain that your butter is properly softened; this makes it easier to cream with sugar, resulting in a smoother dough. If you find your dough is too sticky, refrigerate it for 15-20 minutes before shaping the cookies.
To add an extra touch of spookiness, consider using a toothpick to create subtle lines in the icing radiating from the eye, mimicking bloodshot veins. Enjoy your Spooky Cyclops Sugar Cookies fresh, or store them in an airtight container for up to a week.
Creepy Crawly Spider Cookies
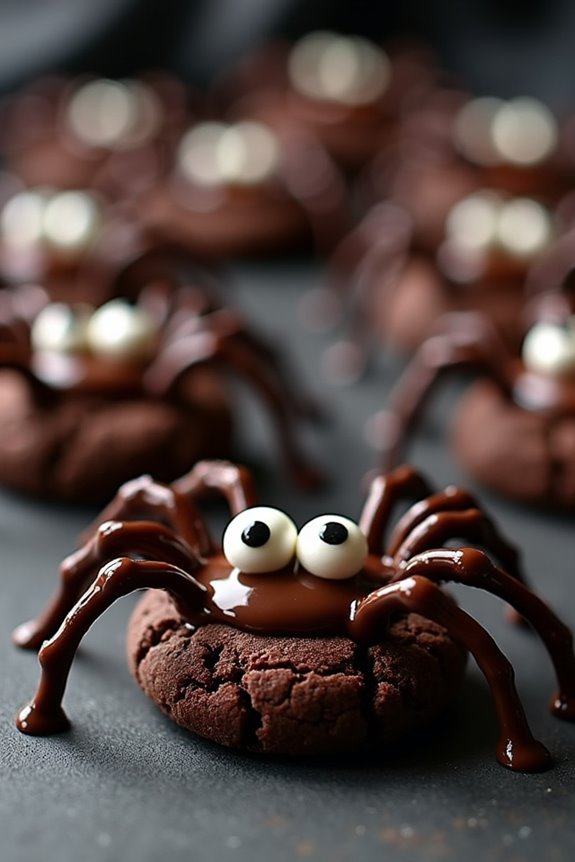
Creepy Crawly Spider Cookies are a delightful and spooky treat perfect for the Halloween season. These cookies not only taste delicious but also add a fun and eerie touch to your Halloween party spread. With a rich chocolate base and detailed spider decorations, these cookies are guaranteed to be a hit with both kids and adults alike.
Whether you’re hosting a party or simply want to enjoy a festive treat, these spider cookies will make your Halloween celebrations even more special.
Making Creepy Crawly Spider Cookies is a fun and creative process that allows you to get crafty with your baking. The recipe involves preparing a simple chocolate cookie dough, which is then baked and transformed into spider-shaped delights with the help of a few artistic touches.
The cookies are decorated with melted chocolate and candy eyes to give them their signature creepy crawly appearance. Serve them up as a centerpiece on your dessert table, and watch as your guests are both impressed and spooked by these hauntingly delicious creations.
Ingredients (Serves 4-6)
- 1 cup unsalted butter, softened
- 1 cup granulated sugar
- 1 cup packed brown sugar
- 2 large eggs
- 1 teaspoon vanilla extract
- 2 3/4 cups all-purpose flour
- 1/2 cup unsweetened cocoa powder
- 1 teaspoon baking soda
- 1/2 teaspoon salt
- 1 cup mini chocolate chips
- 1 cup melted dark chocolate (for decorating)
- Candy eyes
Instructions
- Preheat the Oven: Begin by preheating your oven to 350°F (175°C) and line two baking sheets with parchment paper.
- Cream the Butter and Sugars: In a large mixing bowl, cream together the softened butter, granulated sugar, and brown sugar until the mixture is light and fluffy. This should take about 2-3 minutes with an electric mixer.
- Add Eggs and Vanilla: Beat in the eggs one at a time, making certain each egg is fully incorporated before adding the next. Stir in the vanilla extract.
- Combine Dry Ingredients: In a separate bowl, whisk together the flour, cocoa powder, baking soda, and salt. Gradually add this dry mixture to the wet ingredients, mixing until just combined.
- Fold in Chocolate Chips: Gently fold in the mini chocolate chips until they’re evenly distributed throughout the dough.
- Shape the Cookies: Using a cookie scoop or tablespoon, drop rounded tablespoons of dough onto the prepared baking sheets, leaving about 2 inches of space between each cookie.
- Bake the Cookies: Bake in the preheated oven for 9-11 minutes, or until the edges are set and the centers are soft. Allow the cookies to cool on the baking sheets for about 5 minutes before transferring them to a wire rack to cool completely.
- Decorate the Spiders: Once the cookies are completely cooled, use a spoon or piping bag to drizzle melted dark chocolate over each cookie to create spider legs. Place two candy eyes on each cookie to form the spider’s face.
- Set the Decoration: Allow the decorated cookies to sit at room temperature until the chocolate has set. You can speed up this process by placing them in the fridge for a few minutes.
Extra Tips
When making Creepy Crawly Spider Cookies, make sure your butter is softened to room temperature to guarantee a smooth and creamy texture for the dough. If the dough feels too sticky, you can chill it in the refrigerator for 15-20 minutes before shaping the cookies.
For an added touch of Halloween flair, consider sprinkling a pinch of edible glitter or colored sugar on top of the spider cookies just before the chocolate sets. This will give your cookies a magical and spooky sparkle that will enchant your guests.
Mummy Eyeball Shortbread
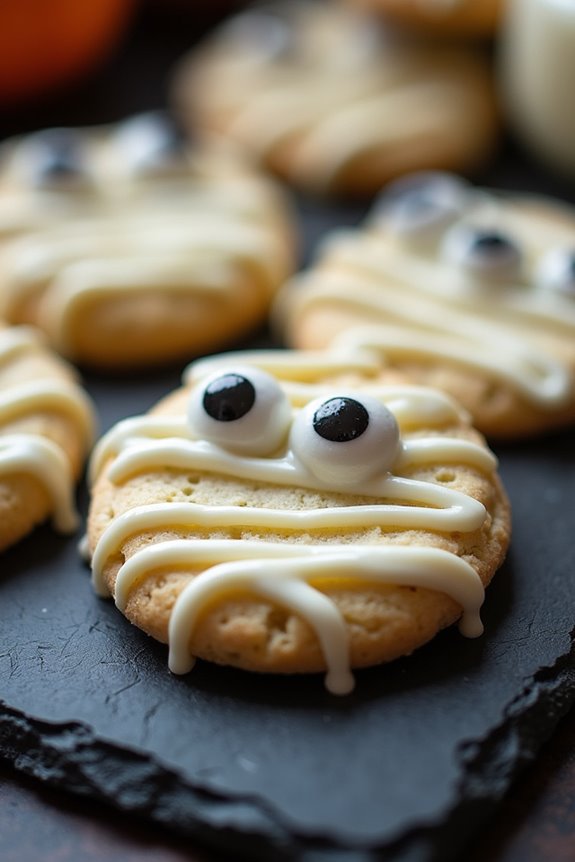
Mummy Eyeball Shortbread is a spooky and fun treat perfect for Halloween festivities. These delightful cookies combine the classic buttery flavor of shortbread with a creepy twist to entertain both kids and adults. The recipe is simple to follow and results in a batch of cookies that look like mummy-wrapped eyeballs, making them a perfect addition to your Halloween party spread or a fun baking activity with the family.
The shortbread dough serves as the perfect base for these cookies, offering a rich and crumbly texture that melts in your mouth. Topped with a sweet icing that forms the mummy bandages and completed with a candy eyeball, these cookies are as delicious as they’re frightfully festive. This recipe yields enough Mummy Eyeball Shortbread for a serving size of 4-6 people, guaranteeing everyone gets a taste of these spooky treats.
Ingredients:
- 1 cup (2 sticks) unsalted butter, softened
- 1/2 cup powdered sugar
- 2 cups all-purpose flour
- 1/4 teaspoon salt
- 1 teaspoon vanilla extract
- 1 cup white chocolate chips
- Candy eyeballs
- Black gel icing
Instructions:
- Prepare the Dough: Begin by creaming the softened butter and powdered sugar together in a large mixing bowl until light and fluffy. This process incorporates air into the mixture, giving the shortbread its characteristic texture.
- Add Dry Ingredients: Sift in the all-purpose flour and salt, then add the vanilla extract. Mix until just combined and the dough comes together. Avoid over-mixing to prevent the cookies from becoming tough.
- Shape the Cookies: Roll the dough into small balls, about 1 inch in diameter, and place them on a baking sheet lined with parchment paper. Lightly flatten each ball to form a disc shape. This will be the base of your mummy eyeball.
- Bake: Preheat your oven to 325°F (165°C). Bake the cookies for 12-15 minutes or until the edges are lightly golden. Be cautious not to overbake, as they should remain pale to maintain the shortbread texture.
- Cool the Cookies: Remove the cookies from the oven and allow them to cool completely on a wire rack. This step is essential for the icing to set properly without melting.
- Melt the Chocolate: While the cookies cool, melt the white chocolate chips in a microwave-safe bowl or using a double boiler until smooth. Stir frequently to avoid burning.
- Decorate: Use a spoon to drizzle the melted white chocolate over each cookie in a zigzag pattern to mimic mummy bandages. Immediately place a candy eyeball in the center before the chocolate sets.
- Add Details: Use the black gel icing to add any additional details or to secure the candy eyeballs more firmly if needed.
Extra Tips:
For even more fun, you can experiment with different colored candy eyeballs or use dark chocolate to create a contrasting bandage effect. If you don’t have candy eyeballs, you can pipe a small circle of white chocolate and add a dot of black gel icing in the center to create your own.
Confirm that your butter is at room temperature before starting, as this will help it cream more effectively with the sugar. Enjoy these cookies fresh, or store them in an airtight container for up to a week.
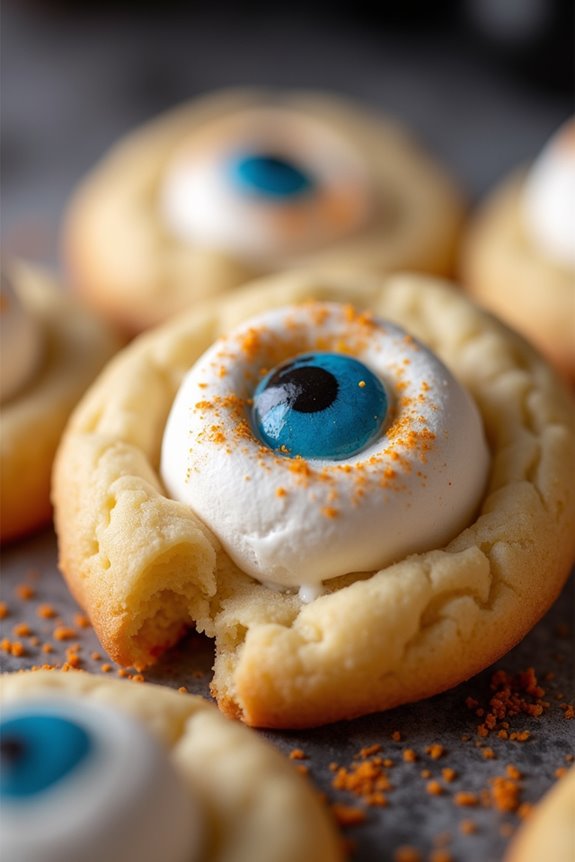
Witch’s Brew Eye Cookies
Witch’s Brew Eye Cookies are a spooky yet delightful treat perfect for your Halloween festivities. These cookies aren’t just visually striking with their eerie eye design, but they’re also deliciously sweet, making them a hit at any Halloween party.
The cookies combine a buttery sugar cookie base with colorful icing and a candy eyeball center, creating a treat that’s both fun to make and eat. Whether you’re hosting a Halloween bash or just want to enjoy some themed baking, Witch’s Brew Eye Cookies are guaranteed to impress.
The preparation of these cookies is a fun activity that can involve kids and adults alike, making it an enjoyable family affair. As you whip up these delightful treats, you’ll get to experiment with vibrant colors and creative designs. The recipe is straightforward, allowing even novice bakers to achieve impressive results.
With their bewitching appearance and scrumptious taste, these cookies are a must-have for your Halloween dessert spread. Here’s how to prepare a batch that serves 4-6 people.
Ingredients:
- 2 ¾ cups all-purpose flour
- 1 teaspoon baking soda
- ½ teaspoon baking powder
- 1 cup unsalted butter, softened
- 1 ½ cups granulated sugar
- 1 egg
- 1 teaspoon vanilla extract
- ½ teaspoon almond extract
- Green and purple gel food coloring
- 24 candy eyeballs
- 1 cup powdered sugar
- 2-3 tablespoons milk
Instructions:
- Preheat the Oven: Start by preheating your oven to 375°F (190°C). Line two baking sheets with parchment paper to prevent the cookies from sticking.
- Mix Dry Ingredients: In a medium-sized bowl, whisk together the flour, baking soda, and baking powder. Set aside.
- Cream Butter and Sugar: In a large bowl, cream the softened butter and granulated sugar until light and fluffy, about 3 to 4 minutes.
- Add Wet Ingredients: Beat in the egg, vanilla extract, and almond extract until well combined.
- Combine Mixtures: Gradually add the dry ingredients to the wet ingredients, mixing until just combined.
- Divide and Color: Divide the dough into two equal parts. Add green gel food coloring to one half and purple to the other, kneading until each is evenly colored.
- Shape the Cookies: Roll tablespoon-sized balls of each colored dough, then slightly flatten them on the prepared baking sheets. Press a candy eyeball into the center of each dough ball.
- Bake: Bake in the preheated oven for 8 to 10 minutes, or until the edges are lightly golden. Let the cookies cool on the baking sheets for a few minutes before transferring them to a wire rack to cool completely.
- Prepare Icing: In a small bowl, mix the powdered sugar with 2-3 tablespoons of milk until you achieve a smooth, drizzle-able consistency. You can add more milk if needed.
- Decorate: Drizzle the icing over the cooled cookies, adding an extra spooky touch. Allow the icing to set before serving.
Extra Tips:
When adding the food coloring, start with a small amount and gradually increase until you reach your desired shade. Gel food coloring is recommended for its vibrant color and minimal impact on dough consistency.
Also, make sure your butter is adequately softened before creaming to achieve a smooth dough. If you prefer a different flavor, you can swap the almond extract for lemon or peppermint extract for a unique twist.
Finally, store the cookies in an airtight container to maintain their freshness and keep the spooky spirit alive throughout the Halloween season.
Goblin Glance Ginger Snaps

Goblin Glance Ginger Snaps are a delightful treat perfect for adding a bit of spooky fun to your Halloween celebrations. These cookies aren’t only deliciously spicy and sweet with a classic ginger snap crunch but also have a whimsical, eerie appearance that makes them a unique addition to any Halloween spread.
The spices in the cookies provide a warming flavor, while the decorative touches give them a playful yet creepy look, capturing the essence of the season.
Ideal for gatherings of 4-6 people, these Goblin Glance Ginger Snaps are sure to be a hit with both kids and adults alike. Whether you’re hosting a Halloween party or just looking to enjoy some festive baking, these cookies are easy to make and certain to bring a smile to everyone’s face.
Follow the recipe below to create your own batch of these spooky sweets.
Ingredients:
- 2 cups all-purpose flour
- 1 teaspoon baking soda
- 1 teaspoon ground ginger
- 1 teaspoon ground cinnamon
- 1/2 teaspoon ground cloves
- 1/4 teaspoon salt
- 3/4 cup unsalted butter, softened
- 1 cup granulated sugar
- 1 large egg
- 1/4 cup molasses
- 1 tablespoon white vinegar
- Green food coloring
- Candy eyes or small candies for decoration
Instructions:
- Preheat and Prepare: Preheat your oven to 350°F (175°C). Line two baking sheets with parchment paper to guarantee the cookies don’t stick and allow for easy cleanup.
- Mix Dry Ingredients: In a medium-sized bowl, whisk together the flour, baking soda, ginger, cinnamon, cloves, and salt. This guarantees that the spices are evenly distributed throughout the dough.
- Cream Butter and Sugar: In a large mixing bowl, cream together the softened butter and granulated sugar until light and fluffy. This should take about 2-3 minutes using an electric mixer on medium speed.
- Add Wet Ingredients: Beat in the egg, molasses, and white vinegar until well combined. The mixture should be smooth and uniform in color.
- Combine Mixtures: Gradually add the dry ingredients into the wet mixture, stirring until just combined. Avoid over-mixing to guarantee tender cookies.
- Add Food Coloring: Mix in a few drops of green food coloring until the dough reaches your desired shade of green. This gives the cookies their goblin-like appearance.
- Shape the Cookies: Use a tablespoon to scoop and roll the dough into balls. Place them onto the prepared baking sheets, leaving about 2 inches between each ball to allow for spreading.
- Decorate: Gently press a candy eye or small candy into the center of each cookie ball. This will create the “goblin glance” effect.
- Bake: Bake the cookies in the preheated oven for 10-12 minutes, or until the edges are firm and the tops are slightly cracked.
- Cool and Serve: Allow the cookies to cool on the baking sheets for 5 minutes before transferring them to a wire rack to cool completely. Serve once cooled.
For extra tips, confirm your butter is sufficiently softened to achieve a smooth and creamy mixture with the sugar.
If your dough is too sticky to handle, refrigerate it for about 30 minutes before shaping the cookies. This will make the dough easier to work with and help the cookies keep their shape during baking.
Finally, feel free to experiment with different candy decorations to give your goblins varied expressions and add an extra touch of Halloween fun!
Vampire Bat Eye Biscuits

Vampire Bat Eye Biscuits are a spooky and delicious addition to any Halloween celebration. These creatively designed cookies resemble eerie bat eyes, making them a perfect treat for both kids and adults. The rich flavors of chocolate and almond combine with the eye-catching design to create a dessert that’s not only fun to look at but also delightful to eat.
Whether you’re hosting a Halloween party or just want to surprise your family with a themed dessert, these cookies are sure to be a hit. To start, create a simple sugar cookie dough, which will serve as the base for your Vampire Bat Eye Biscuits. This dough is easy to work with and bakes into soft, chewy cookies that hold their shape well.
With a little bit of creative decorating using colored icing and candy, you can transform these ordinary cookies into something extraordinary. Get ready to impress your guests with your baking and decorating skills!
Ingredients (Serves 4-6):
- 2 1/2 cups all-purpose flour
- 1/2 teaspoon baking powder
- 1/4 teaspoon salt
- 1 cup unsalted butter, softened
- 1 cup granulated sugar
- 1 large egg
- 1 teaspoon vanilla extract
- 1/2 teaspoon almond extract
- 1 cup powdered sugar
- 2-3 tablespoons milk
- Black food coloring
- Red food coloring
- 12 white candy melts
- 12 mini chocolate chips
Instructions:
- Prepare the Cookie Dough: In a medium bowl, whisk together the flour, baking powder, and salt. In a large bowl, beat the softened butter and granulated sugar until light and fluffy. Add the egg, vanilla extract, and almond extract, mixing until well combined. Gradually add the dry ingredients to the wet ingredients, mixing until a dough forms.
- Chill the Dough: Wrap the dough in plastic wrap and refrigerate for at least 1 hour. This helps the dough firm up and makes it easier to roll out.
- Roll and Cut the Cookies: Preheat your oven to 350°F (175°C). Roll out the chilled dough on a lightly floured surface to about 1/4 inch thickness. Use a round cookie cutter to cut out circles, and place them on a baking sheet lined with parchment paper.
- Bake the Cookies: Bake the cookies in the preheated oven for 8-10 minutes, or until the edges are lightly golden. Allow them to cool completely on a wire rack.
- Make the Icing: In a small bowl, mix the powdered sugar with 2 tablespoons of milk, adding more milk as needed to achieve a smooth, spreadable consistency. Divide the icing into two bowls, tint one with black food coloring and the other with red food coloring.
- Decorate the Cookies: Spread black icing over each cooled cookie. Place a white candy melt in the center of each cookie and press gently. Use a small amount of red icing to create bloodshot lines around the candy melt. Place a mini chocolate chip in the center of each candy melt for the pupil.
- Set the Icing: Allow the decorated cookies to sit for at least an hour to let the icing set completely before serving.
Extra Tips:
For a more intense flavor, you can substitute half of the vanilla extract with additional almond extract. When rolling out the dough, make sure you flour the surface and rolling pin to prevent sticking. If the dough becomes too soft to handle, return it to the refrigerator for a few minutes.
For an extra touch, consider adding a few drops of peppermint extract to the icing for a rejuvenating twist. Keep the cookies stored in an airtight container to maintain their freshness.
Haunted House Eye Pops
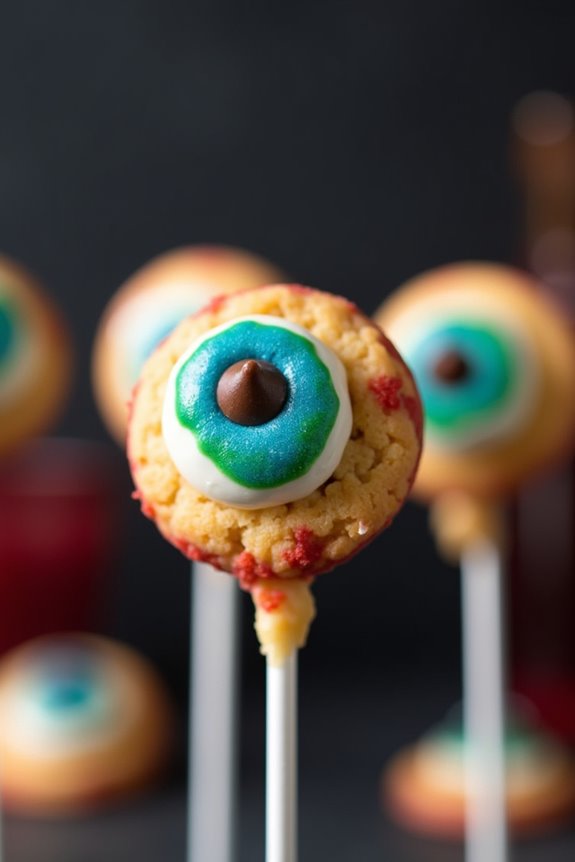
Haunted House Eye Pops are a spooky twist on traditional Halloween cookies that are certain to delight both children and adults at any Halloween gathering. These eerie yet delicious treats combine the classic flavors of vanilla and chocolate with a ghoulish design that will send shivers down your spine. Perfect for a Halloween party or a night of trick-or-treating, these cookies are as fun to make as they’re to eat.
The Haunted House Eye Pops are designed to resemble creepy eyeballs, complete with colorful irises and chocolate pupils. The cookies are crafted on sticks, making them easy to handle and perfect for a festive dessert display. With a few simple ingredients and a dash of creativity, you can whip up a batch of these hauntingly delightful treats that will leave your guests impressed and craving more.
Ingredients (serving size: 4-6 people):
- 1 cup unsalted butter, softened
- 1 cup granulated sugar
- 1 large egg
- 1 teaspoon vanilla extract
- 2 1/2 cups all-purpose flour
- 1/2 teaspoon baking powder
- 1/4 teaspoon salt
- 1 cup white chocolate chips or candy melts
- Assorted food coloring gels (blue, green, red)
- Miniature chocolate chips
- Lollipop sticks
Cooking Instructions:
- Prepare the Cookie Dough:
- In a large mixing bowl, cream together the softened butter and granulated sugar until light and fluffy.
- Add the egg and vanilla extract, and mix until well combined.
- In a separate bowl, whisk together the flour, baking powder, and salt.
- Gradually add the dry ingredients to the wet mixture, mixing until a smooth dough forms.
- Chill and Shape the Dough:
- Wrap the dough in plastic wrap and refrigerate for at least 30 minutes, or until firm.
- Preheat your oven to 350°F (175°C) and line a baking sheet with parchment paper.
- Roll the dough into 1-inch balls, placing them onto the prepared baking sheet 2 inches apart.
- Insert a lollipop stick into each ball, gently flattening them slightly to adhere the stick to the cookie.
- Bake the Cookies:
- Bake the cookies in the preheated oven for 10-12 minutes, or until the edges are lightly golden.
- Allow the cookies to cool completely on the baking sheet before transferring them to a wire rack.
- Decorate the Eye Pops:
- Melt the white chocolate chips or candy melts in a microwave-safe bowl, stirring every 30 seconds until smooth.
- Divide the melted chocolate into separate bowls, adding a few drops of desired food coloring to each bowl to create various iris colors.
- Using a spoon, carefully cover the top of each cookie with colored chocolate, creating the iris of the eye.
- Place a miniature chocolate chip in the center for the pupil.
- Allow the chocolate to set completely before serving.
Extra Tips:
When coloring the white chocolate or candy melts, add the food coloring gradually to achieve the perfect shade for your eyeballs. If the chocolate begins to harden while you’re working, simply reheat it in the microwave for a few seconds until it becomes smooth again.
Be sure to let the cookies cool completely before decorating to guarantee the chocolate adheres properly. Finally, if you’re feeling extra creative, use a toothpick dipped in red food coloring to draw faint red veins across the white chocolate for an even spookier effect.
Zombie Eyeball Oatmeal Cookies
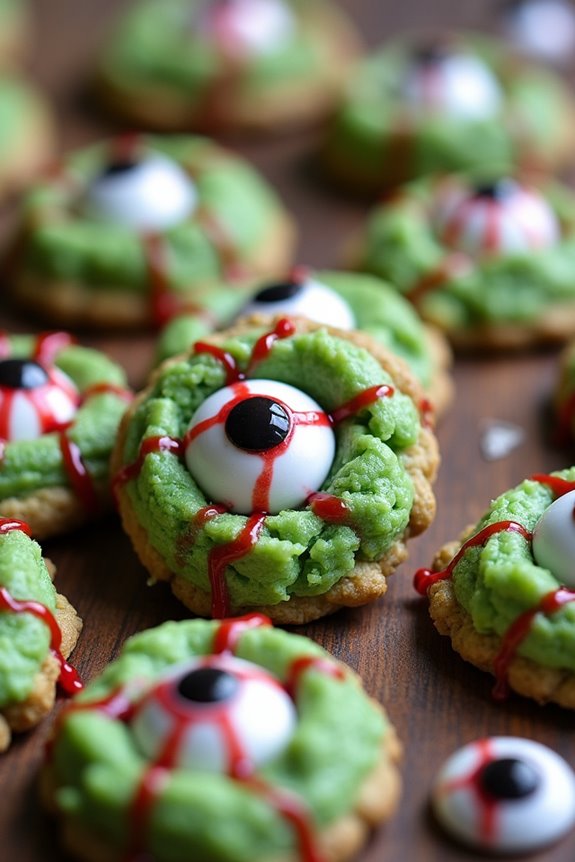
Zombie Eyeball Oatmeal Cookies are a spooky and fun treat to make during the Halloween season. These cookies not only have the chewy goodness of oatmeal cookies but also the eerie appearance of zombie eyeballs, making them a perfect addition to any Halloween party or gathering.
The combination of oats, chocolate chips, and a touch of food coloring creates a deliciously creepy effect that’s sure to delight both kids and adults alike. This recipe yields a batch large enough to serve 4-6 people, making it ideal for a small party or family treat.
The process is simple, involving basic baking techniques and a creative touch for decoration. The cookies aren’t only tasty but also an enjoyable activity for kids to participate in, allowing them to get creative with the design of each “eyeball.”
Ingredients:
- 1 cup all-purpose flour
- 1/2 teaspoon baking soda
- 1/4 teaspoon salt
- 1/2 cup (1 stick) unsalted butter, softened
- 1/2 cup granulated sugar
- 1/2 cup packed brown sugar
- 1 large egg
- 1 teaspoon vanilla extract
- 1 1/2 cups rolled oats
- 1 cup semisweet chocolate chips
- Green food coloring
- Red gel icing
- Candy eyeballs or white chocolate chips for decoration
Cooking Instructions:
- Preheat the Oven: Begin by preheating your oven to 350°F (175°C). Line a baking sheet with parchment paper or a silicone baking mat to prevent sticking.
- Mix Dry Ingredients: In a medium mixing bowl, whisk together the flour, baking soda, and salt. Set this aside for later use.
- Cream Butter and Sugars: In a large bowl, using an electric mixer, cream together the softened butter, granulated sugar, and brown sugar until light and fluffy. This should take about 2-3 minutes.
- Add Egg and Vanilla: Beat in the egg and vanilla extract to the butter mixture, ensuring everything is well combined. Add a few drops of green food coloring and mix until you achieve the desired zombie green shade.
- Combine Ingredients: Gradually add the dry ingredients to the wet mixture, stirring until just combined. Be careful not to overmix. Fold in the oats and chocolate chips, ensuring they’re evenly distributed throughout the dough.
- Shape the Cookies: Scoop tablespoons of dough onto the prepared baking sheet, spacing them about 2 inches apart. Gently press a candy eyeball or white chocolate chip into the center of each cookie to form the “eyeball.”
- Bake the Cookies: Place the baking sheet in the preheated oven and bake for 10-12 minutes, or until the edges are lightly golden. The center should remain slightly soft.
- Decorate: Once out of the oven, allow the cookies to cool on the baking sheet for a few minutes before transferring them to a wire rack. Use red gel icing to create “veins” radiating from the eyeballs for an extra creepy effect.
Extra Tips:
For a more intense zombie effect, consider using a mix of candy eyeballs of different sizes for a varied look. If you can’t find candy eyeballs, white chocolate chips can be used as a substitute with a dot of melted chocolate for the pupil.
When coloring the dough, start with a small amount of food coloring and gradually add more to reach the perfect undead shade. These cookies can be stored in an airtight container for up to a week, but they rarely last that long!
Ghostly Gaze Meringue Cookies

Ghostly Gaze Meringue Cookies are the perfect spooky treat for your Halloween festivities. These light and airy cookies are shaped like little ghosts, with a hauntingly sweet taste that will delight both kids and adults. The meringue’s crisp exterior and marshmallow-like interior create a delightful contrast, making them an irresistible addition to your Halloween spread.
They’re not only delicious but also a fun baking project that can involve the whole family.
To make these Ghostly Gaze Meringue Cookies, you’ll start by whipping up a simple meringue mixture. The key is to achieve stiff peaks, which will help the cookies hold their ghostly shape. Once piped onto a baking sheet, tiny chocolate chips are added to create the eyes of the ghosts, giving them their characteristic spooky gaze. After baking, these meringues will transform into a sweet, ghostly treat that will melt in your mouth.
Ingredients (Serves 4-6):
- 4 large egg whites
- 1 cup granulated sugar
- 1/2 teaspoon cream of tartar
- 1 teaspoon vanilla extract
- Pinch of salt
- Small chocolate chips (for eyes)
Instructions:
- Preheat and Prepare: Preheat your oven to 200°F (93°C). Line two baking sheets with parchment paper to guarantee the meringues don’t stick during baking.
- Whip Egg Whites: In a clean, dry mixing bowl, add the egg whites and a pinch of salt. Begin beating with an electric mixer on medium speed until foamy.
- Add Ingredients: Gradually add the cream of tartar, continuing to beat the mixture, then slowly add the granulated sugar, one tablespoon at a time. Increase the mixer speed to high and beat until the egg whites form stiff, glossy peaks. Make sure the sugar is fully dissolved by rubbing a bit of meringue between your fingers.
- Flavor and Pipe: Gently fold in the vanilla extract. Transfer the meringue mixture into a piping bag fitted with a large round tip. Pipe ghost shapes onto the prepared baking sheets, leaving a bit of space between each ghost.
- Add Eyes: Lightly press two chocolate chips into each ghost to create eyes. Confirm they’re placed symmetrically to maintain a spooky appearance.
- Bake: Place the baking sheets in the preheated oven. Bake the meringues for approximately 1.5 to 2 hours, or until they’re completely dry to the touch but not browned.
- Cool: Turn off the oven and leave the meringues inside to cool completely, about another hour, to guarantee they’re dry and crisp.
Extra Tips:
For the best results, confirm that your mixing bowl and whisk are completely free of any grease, as this can prevent the egg whites from whipping correctly.
It’s also essential to add the sugar slowly to achieve the right meringue texture. If your kitchen is humid, it might be challenging to achieve the perfect crispness, so consider using a dehumidifier or making these on a dry day.
Store the meringues in an airtight container to keep them crisp until serving.
Pumpkin Patch Peepers
Pumpkin Patch Peepers are a delightful and spooky treat perfect for your Halloween celebrations. These cookies are designed to resemble eyes peeking out from a pumpkin patch, making them both fun and festive. Their delicious flavor comes from a blend of pumpkin spice and chocolate, and they’re guaranteed to be a hit at any Halloween party. Not only do they look great, but they also taste amazing, with a soft, chewy texture that will have everyone coming back for more.
To make Pumpkin Patch Peepers, you’ll start with a basic pumpkin cookie dough, which is flavored with cinnamon, nutmeg, and ginger. This will give the cookies a warm, autumnal flavor that pairs perfectly with the chocolate “eyeballs” you’ll add on top. The eyes are made from chocolate candies, and with a little help from some colorful icing, they’ll look just like spooky eyes staring out at you. This recipe yields enough cookies for a serving size of 4-6 people, making it perfect for a small gathering or family treat.
Ingredients:
- 2 cups all-purpose flour
- 1 teaspoon baking soda
- 1/2 teaspoon salt
- 1 teaspoon ground cinnamon
- 1/2 teaspoon ground nutmeg
- 1/4 teaspoon ground ginger
- 1/2 cup unsalted butter, softened
- 1 cup granulated sugar
- 1 large egg
- 1 teaspoon vanilla extract
- 1 cup canned pumpkin puree
- 1 cup chocolate candies (such as M&M’s)
- Black and green icing for decoration
Instructions:
- Preheat the Oven: Begin by preheating your oven to 350°F (175°C). Line a baking sheet with parchment paper to prevent the cookies from sticking.
- Mix Dry Ingredients: In a medium-sized bowl, whisk together the flour, baking soda, salt, cinnamon, nutmeg, and ginger. This will guarantee that your spices are evenly distributed throughout the dough.
- Cream Butter and Sugar: In a large mixing bowl, cream together the softened butter and granulated sugar until light and fluffy, about 2-3 minutes. This can be done using an electric mixer on medium speed.
- Add Wet Ingredients: Beat in the egg and vanilla extract until well combined. Then, mix in the pumpkin puree, taking care not to over-mix.
- Combine: Gradually add the dry ingredients to the wet ingredients, mixing until just combined. The dough should be soft and slightly sticky.
- Shape Cookies: Scoop tablespoon-sized amounts of dough onto the prepared baking sheet, spacing them about 2 inches apart to allow for spreading.
- Bake: Place in the preheated oven and bake for 12-15 minutes, or until the edges are lightly golden and the centers are set.
- Decorate: Once the cookies have cooled, use the black and green icing to adhere the chocolate candies onto the cookies as eyes. Add pupils and any additional spooky details you like.
- Serve: Allow the icing to set before serving to confirm the eyes stay in place.
Extra Tips:
For the best results, make sure your butter is at room temperature before you start. This will help it cream more easily with the sugar, resulting in a smoother dough.
If you want your cookies to have an extra spooky touch, consider using different colored candies for the eyes, or add a drop of food coloring to the icing to make it more vibrant.
Additionally, storing the cookies in an airtight container will help maintain their soft texture for several days. Enjoy your creepy and delicious Pumpkin Patch Peepers!
Eerie Eyeball Macarons
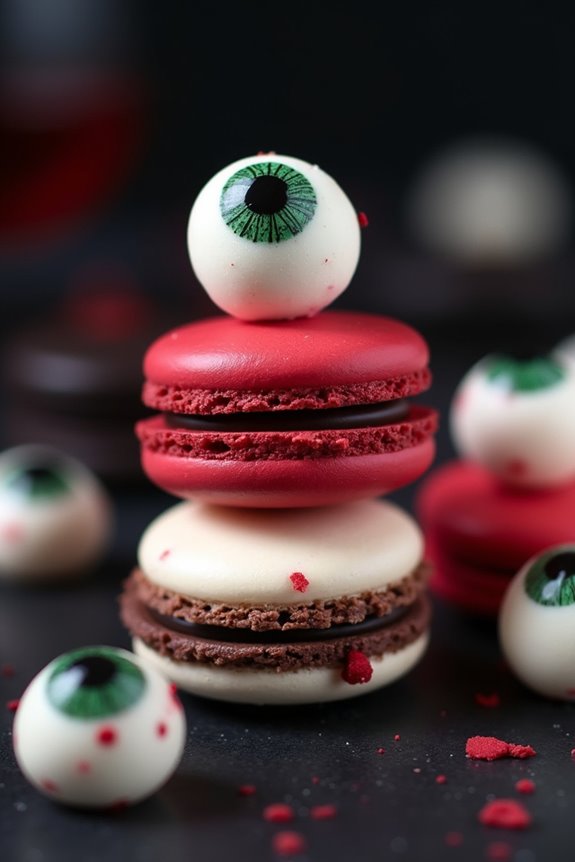
Eerie Eyeball Macarons are the perfect spooky treat to add a touch of Halloween magic to your dessert table. These macarons, with their delicate almond shells and eerie eyeball design, aren’t only visually striking but also deliciously sweet. Filled with a rich buttercream or chocolate ganache, they offer a delightful combination of texture and flavor that will please both children and adults alike at your Halloween gathering.
With a little patience and some artistic flair, you can create these spooky sweets that are as fun to make as they’re to eat. Creating Eerie Eyeball Macarons involves a few steps, but the end result is truly worth the effort. The key to making perfect macarons lies in mastering the meringue and achieving the right consistency of the batter.
Once you have your macaron shells ready, the fun begins as you decorate them to resemble creepy eyeballs. The process requires precision and a steady hand, but with practice, you’ll be able to craft these eerie delights that will be the talk of your Halloween party. Let’s plunge into the recipe suitable for serving 4-6 people.
Ingredients:
- 200g powdered sugar
- 100g almond flour
- 3 large egg whites, at room temperature
- 50g granulated sugar
- 1/4 teaspoon cream of tartar
- Gel food coloring (black, red, and green)
- 100g unsalted butter, softened
- 200g icing sugar
- 1 teaspoon vanilla extract
- 50g dark chocolate, melted
- Edible candy eyeballs
Instructions:
- Prepare the Baking Sheets: Line two baking sheets with parchment paper. Preheat your oven to 300°F (150°C).
- Mix Dry Ingredients: In a bowl, sift together the powdered sugar and almond flour. Set aside.
- Make the Meringue: In a large mixing bowl, whisk the egg whites until foamy. Add the cream of tartar and continue to whisk until soft peaks form. Gradually add the granulated sugar and continue to whisk until stiff peaks form, making sure the meringue is glossy.
- Combine Ingredients: Gently fold the dry mixture into the meringue using a spatula. Mix until the batter falls in a thick ribbon from the spatula.
- Color the Batter: Divide the batter into three portions. Add black food coloring to one portion, red to another, and leave the third portion white. Gently fold the coloring into each portion until evenly distributed.
- Pipe the Macaron Shells: Transfer each colored batter into separate piping bags fitted with a round tip. Pipe small circles (about 1 inch in diameter) onto the prepared baking sheets, spacing them about an inch apart.
- Rest the Macarons: Tap the baking sheets on the counter to release air bubbles. Let the macaron shells sit at room temperature for 30 minutes until they form a skin.
- Bake the Macarons: Bake each sheet for 15-18 minutes, until the shells are firm and can be lifted off the parchment. Allow them to cool completely on the sheets.
- Prepare the Filling: Beat the softened butter until creamy. Gradually add the icing sugar and continue to beat until smooth. Stir in the vanilla extract.
- Assemble the Macarons: Pair the macaron shells by size. Pipe a small amount of buttercream onto the flat side of one shell and sandwich with another shell.
- Decorate the Eyeballs: Use the melted dark chocolate to create the pupils of the eyes on the white macaron shells. Add a dot of red or green food coloring for a bloodshot effect. Attach edible candy eyeballs using a dab of buttercream.
Extra Tips:
When making macarons, it’s important to use room temperature egg whites for better volume. Verify that all your equipment is clean and dry to prevent any oil or moisture from impacting the meringue.
Be patient when folding the dry ingredients into the meringue to avoid deflating it. Allowing the macaron shells to rest before baking is essential, as it helps develop their characteristic feet and prevents cracking. If you’re new to using food coloring, add small amounts gradually until you achieve the desired color.
Monster Mash Marshmallow Eyes
Monster Mash Marshmallow Eyes are a spooky and fun treat perfect for a Halloween party or a themed gathering. These colorful and quirky cookies aren’t only delicious but also a delightful addition to any Halloween dessert table. The base of these cookies is a soft, chewy cookie topped with a gooey marshmallow center and finished with a creepy candy eye, making them a hit with both kids and adults.
What makes Monster Mash Marshmallow Eyes truly special is their whimsical appearance and the combination of textures and flavors. The cookie base provides a sweet and buttery foundation, while the marshmallow adds a fluffy, melt-in-your-mouth experience. The candy eyes not only enhance the spooky aesthetic but also add a slight crunch. This recipe is designed to serve 4-6 people, making it ideal for small gatherings or family celebrations.
Ingredients (Serves 4-6):
- 1 cup unsalted butter, softened
- 1 cup granulated sugar
- 1 cup brown sugar, packed
- 2 large eggs
- 1 tablespoon vanilla extract
- 3 cups all-purpose flour
- 1 teaspoon baking soda
- 1/2 teaspoon salt
- 1 cup mini marshmallows
- Assorted candy eyes
- Gel food coloring (optional for cookie dough)
Cooking Instructions:
- Preheat the Oven: Begin by preheating your oven to 350°F (175°C). This will guarantee that your cookies bake evenly and to perfection.
- Prepare the Cookie Dough: In a large mixing bowl, cream together the softened butter, granulated sugar, and brown sugar until light and fluffy. Add the eggs one at a time, mixing well after each addition. Stir in the vanilla extract.
- Mix the Dry Ingredients: In a separate bowl, whisk together the flour, baking soda, and salt. Gradually add this dry mixture to the wet ingredients, mixing until just combined. If desired, incorporate a few drops of gel food coloring to the dough to enhance the Halloween theme.
- Shape the Cookies: Scoop out tablespoon-sized portions of dough and roll them into balls. Place them on a parchment-lined baking sheet, leaving about 2 inches of space between each cookie.
- Add Marshmallows: Gently press a few mini marshmallows into the center of each dough ball. The marshmallows will melt and create the gooey center characteristic of these cookies.
- Bake the Cookies: Place the baking sheet in the preheated oven and bake for 10-12 minutes, or until the edges are lightly golden and the marshmallows are puffed and gooey.
- Decorate with Candy Eyes: Remove the cookies from the oven and immediately press candy eyes into the warm marshmallow centers. Allow the cookies to cool on the baking sheet for a few minutes before transferring them to a wire rack to cool completely.
Extra Tips:
For the best Monster Mash Marshmallow Eyes, verify your butter is softened to room temperature for easy mixing. If you want to add a bit of color to your cookies, divide the dough into sections and use different gel food coloring for a variety of vibrant hues.
Keep an eye on the cookies while baking; the marshmallows can brown quickly if left too long in the oven. Finally, feel free to experiment with different sizes and colors of candy eyes to create your unique monster faces.
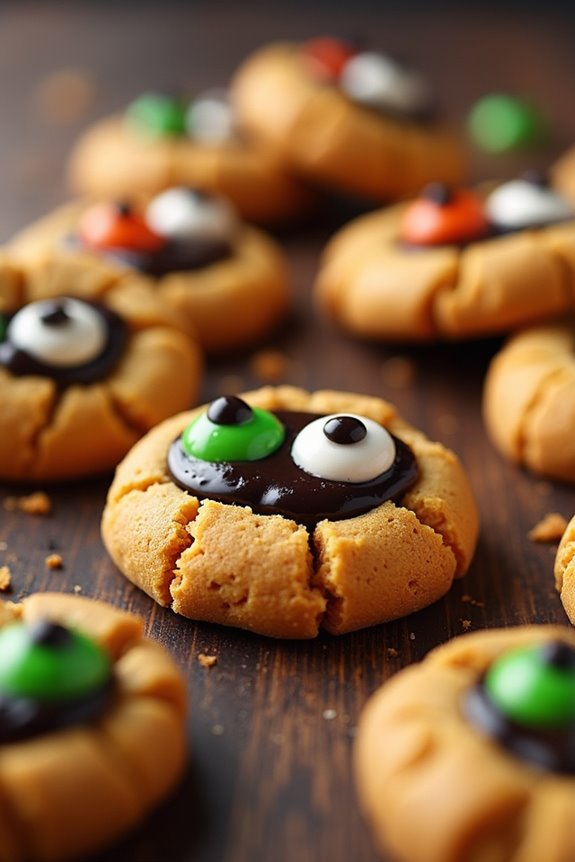
Gory Glare Peanut Butter Cookies
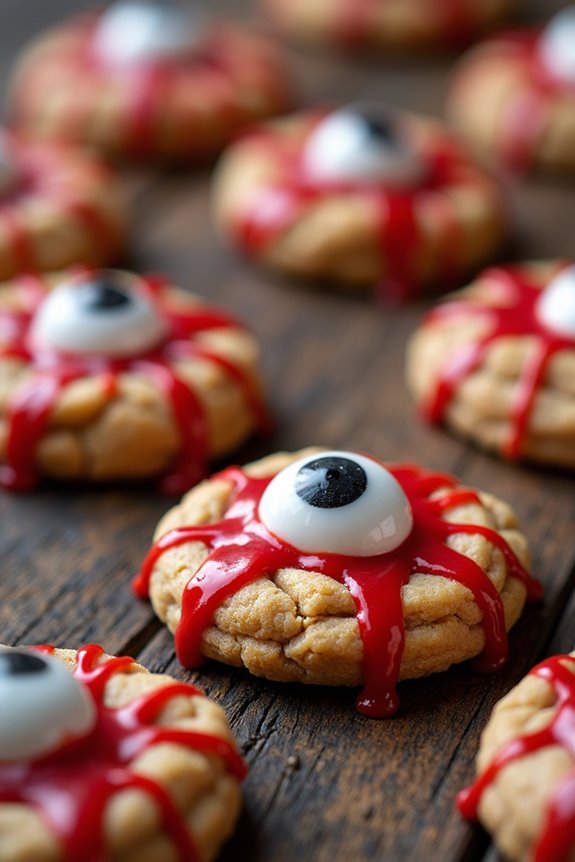
Gory Glare Peanut Butter Cookies are a spooky and delicious way to celebrate Halloween with family and friends. These cookies aren’t only fun to make but also a treat for the taste buds with their rich peanut butter flavor and creepy, gory design that fits perfectly with the Halloween theme.
The eerie appearance of these cookies, reminiscent of bloodshot eyes, adds a fun twist to your Halloween festivities, making them a hit with both kids and adults alike. The recipe is designed to yield around 24 cookies, making it ideal for a small gathering or a family treat.
The gory glare effect is achieved by using red icing and candy eyeballs, giving the cookies an unsettling yet exciting look. The combination of smooth peanut butter, sugar, and flour gives these cookies a soft and chewy texture that’s hard to resist. Perfect for a spooky-themed party or a cozy night in, these cookies are sure to be a memorable addition to your Halloween celebrations.
Ingredients (Serves 4-6 people):
- 1 cup of creamy peanut butter
- 1 cup of granulated sugar
- 1 large egg
- 1 teaspoon of vanilla extract
- Candy eyeballs (24)
- Red decorator gel or icing
Cooking Instructions:
- Preheat the Oven: Begin by preheating your oven to 350°F (175°C). This guarantees the cookies bake evenly and achieve the desired texture.
- Mix Ingredients: In a large mixing bowl, combine 1 cup of creamy peanut butter, 1 cup of granulated sugar, 1 large egg, and 1 teaspoon of vanilla extract. Mix well until the ingredients are fully combined and form a smooth dough.
- Shape the Cookies: Use a tablespoon to scoop out dough portions and roll them into balls. Place them on a baking sheet lined with parchment paper, leaving some space between each ball to allow for spreading.
- Create the Gory Look: Gently press a candy eyeball into the center of each dough ball. This will create the “eye” of your gory glare cookies.
- Bake the Cookies: Place the baking sheet in the preheated oven and bake for about 10-12 minutes or until the edges are lightly golden. The cookies may look slightly underbaked but will firm up as they cool.
- Cool the Cookies: Remove the cookies from the oven and allow them to cool on the baking sheet for about 5 minutes. Then, transfer them to a wire rack to cool completely.
- Add the Gory Effect: Once the cookies are completely cool, use the red decorator gel or icing to draw lines radiating out from the candy eyeballs to create a bloodshot effect.
Extra Tips:
For the best results, use a smooth and creamy peanut butter, as it will help achieve the right consistency for the dough. If you prefer a less sweet cookie, you can reduce the amount of sugar slightly.
When adding the red icing, use a steady hand to create realistic and creepy bloodshot lines. These cookies are best consumed within a few days of baking, but they can also be stored in an airtight container to maintain freshness. Decorate them just before serving to guarantee the icing retains its vivid color and texture.
Bewitching Eyeball Brownie Bites
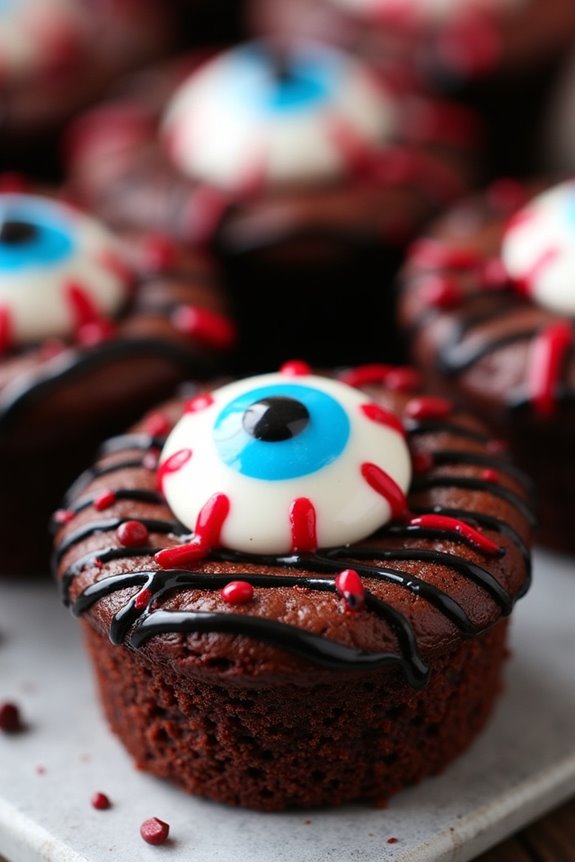
Looking to add a spooky touch to your Halloween dessert table? These Bewitching Eyeball Brownie Bites are the perfect treat for both kids and adults. They combine the rich, fudgy texture of brownies with a fun and creepy eyeball design, making them a hit at any Halloween gathering. Not only are they delicious, but they’re also easy to make, guaranteeing that you spend more time enjoying the party and less time in the kitchen.
These brownie bites are made by preparing a simple brownie batter, baking it into bite-sized pieces, and creatively decorating them to resemble eerie eyeballs. The combination of chocolatey goodness and a bit of artistic flair will have everyone reaching for more. Whether you’re hosting a party or just looking to enjoy the Halloween festivities with family, these treats are sure to delight and spook in equal measure.
Ingredients (Serving Size: 4-6 people)
- 1 cup unsalted butter
- 2 cups granulated sugar
- 4 large eggs
- 1 teaspoon vanilla extract
- 1 cup all-purpose flour
- 1 cup unsweetened cocoa powder
- 1/2 teaspoon salt
- 1/2 teaspoon baking powder
- 1 cup semi-sweet chocolate chips
- 24 candy eyeballs
- 1/2 cup white chocolate chips
- Red food coloring
- Black gel icing
Cooking Instructions
- Preheat the Oven: Start by preheating your oven to 350°F (175°C). This guarantees that the oven reaches the correct temperature while you prepare the brownie batter.
- Prepare the Brownie Batter: In a large mixing bowl, melt the butter. Add the granulated sugar and stir until well combined. Beat in the eggs one at a time, followed by the vanilla extract.
- Combine Dry Ingredients: In a separate bowl, whisk together the flour, cocoa powder, salt, and baking powder. Gradually add this dry mixture to the wet ingredients, stirring until just combined. Avoid overmixing to guarantee the brownies remain fudgy.
- Add Chocolate Chips: Fold in the semi-sweet chocolate chips gently. This adds extra chocolatey goodness to the brownie bites.
- Bake the Brownies: Grease a mini muffin tin or line it with paper liners. Spoon the brownie batter into the tin, filling each cup about 3/4 full. Bake in the preheated oven for 15-18 minutes, or until a toothpick inserted into the center comes out with a few crumbs attached.
- Cool and Decorate: Allow the brownie bites to cool in the pan for about 5 minutes before transferring them to a wire rack to cool completely. Melt the white chocolate chips and add a few drops of red food coloring to create bloodshot lines. Use a piping bag or a toothpick to draw thin red lines on top of each brownie bite. Place a candy eyeball in the center of each one and use black gel icing to add details around the eye.
Extra Tips
When melting the white chocolate chips, do so slowly and carefully to avoid burning. You can use a microwave in short bursts or a double boiler for more control.
If you’re not a fan of red food coloring, you can use jam or jelly to create the bloodshot effect. Additionally, make sure to let the brownies cool completely before decorating to prevent the candy eyes from melting.
Enjoy creating these spooky treats, and don’t hesitate to get creative with your designs!