

Planning the ultimate Halloween party means creating an atmosphere that’s both spooky and sweet. Picture a table filled with spine-chilling spiderweb brownies, ghostly meringue pops, and monster eyeball cookies. Each dessert is a treat for the taste buds and a visual delight, capturing the eerie magic of Halloween. Ready to craft a dessert spread that will leave your guests spellbound? Let’s get those creative juices flowing with these enchanting Halloween dessert ideas.
Spooky Spiderweb Brownies
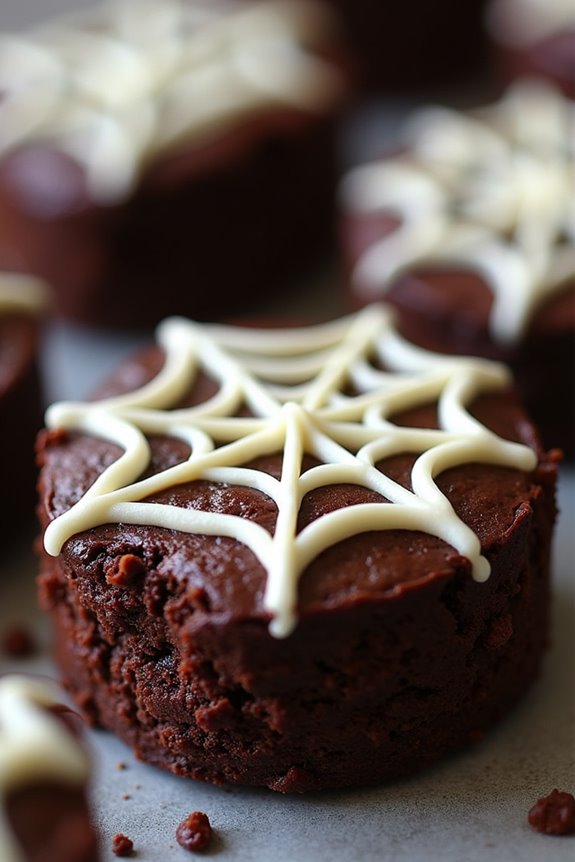
Spooky Spiderweb Brownies are the perfect Halloween dessert to delight and spook your party guests. These rich, fudgy brownies aren’t only delicious but also feature a fun, web-like design that adds a festive touch to your Halloween buffet. The combination of chocolatey goodness and a decorative white chocolate spiderweb will make these brownies a standout treat for both children and adults alike.
The process of creating these Spiderweb Brownies is as enjoyable as the end result. You’ll start by baking a batch of your favorite brownies, then transform them into a spooky masterpiece with an easy-to-make white chocolate spiderweb design. This recipe is designed for 4-6 servings, guaranteeing there’s enough to share at your Halloween gathering.
Let’s plunge into the ingredients list and step-by-step instructions to bring this spooktacular dessert to life.
Ingredients (Serving Size: 4-6 people)
- 1 cup unsalted butter
- 2 cups granulated sugar
- 4 large eggs
- 1 teaspoon vanilla extract
- 1 cup all-purpose flour
- 1/2 cup unsweetened cocoa powder
- 1/2 teaspoon salt
- 1/2 teaspoon baking powder
- 1/2 cup white chocolate chips
- 1 teaspoon vegetable oil
Cooking Instructions
- Preheat and Prepare: Preheat your oven to 350°F (175°C). Line a 9×9 inch baking pan with parchment paper, leaving some overhang on the sides for easy removal.
- Mix the Wet Ingredients: In a large microwave-safe bowl, melt the unsalted butter. Once melted, stir in the granulated sugar until combined. Add the eggs one at a time, mixing well after each addition. Stir in the vanilla extract.
- Combine Dry Ingredients: In a separate bowl, whisk together the all-purpose flour, unsweetened cocoa powder, salt, and baking powder. Gradually add the dry ingredients to the wet ingredients, stirring until just combined. Be careful not to overmix.
- Bake the Brownies: Pour the brownie batter into the prepared baking pan and spread it evenly. Bake in the preheated oven for 25-30 minutes, or until a toothpick inserted into the center comes out with a few moist crumbs. Allow the brownies to cool completely in the pan.
- Prepare the Spiderweb: Once the brownies have cooled, melt the white chocolate chips with the vegetable oil in a microwave-safe bowl. Heat in 20-second intervals, stirring after each, until smooth and fully melted.
- Create the Web Design: Transfer the melted white chocolate to a piping bag or a small zip-top bag with a corner snipped off. Pipe a spiral pattern starting from the center of the brownies to the edges. Drag a toothpick from the center to the edge to create a spiderweb effect.
- Set the Design: Allow the white chocolate to set at room temperature before slicing the brownies into squares for serving.
Extra Tips
For a more intense chocolate flavor, consider adding a handful of dark chocolate chips to the brownie batter.
If you’d like to make the spiderweb design even more realistic, you can also use a small amount of black food coloring gel to create a fake spider in one corner of the web.
To guarantee clean cuts when slicing the brownies, use a sharp knife and wipe it clean between each cut. These extra touches will enhance both the taste and presentation of your Spooky Spiderweb Brownies!
Ghostly Meringue Pops
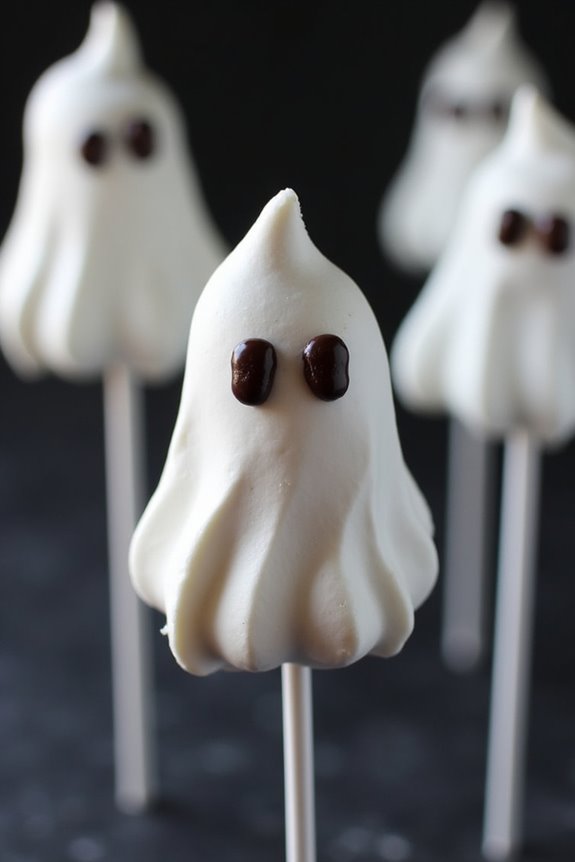
Halloween is the perfect time to get creative in the kitchen, and what better way to impress your party guests than with some spooky yet delicious Ghostly Meringue Pops? These delightful treats are as much fun to look at as they’re to eat. With their light, airy texture and sweet flavor, these ghost-shaped meringue pops are bound to be a hit with both kids and adults.
Not only do they make a great addition to any Halloween dessert table, but they’re also surprisingly simple to make, requiring just a few basic ingredients and a little patience. The key to achieving the perfect meringue lies in properly whipping the egg whites to form stiff peaks, which gives the pops their characteristic lightness.
Once the meringue is piped into ghostly shapes and baked to perfection, you can have fun decorating them with spooky faces using melted chocolate or edible food coloring. Whether you’re hosting a Halloween party or simply looking for a fun baking project, these Ghostly Meringue Pops are a delightful way to celebrate the Halloween spirit.
Ingredients (Serves 4-6):
- 4 large egg whites
- 1 cup granulated sugar
- 1/4 teaspoon cream of tartar
- 1/4 teaspoon vanilla extract
- 1/4 teaspoon almond extract (optional)
- Melted dark chocolate for decoration
- Lollipop sticks
Cooking Instructions:
- Preheat and Prepare: Preheat your oven to 200°F (93°C). Line a baking sheet with parchment paper and set it aside. This will guarantee that the meringue doesn’t stick and can be easily removed once baked.
- Whip Egg Whites: In a clean, dry mixing bowl, combine the egg whites and cream of tartar. Using an electric mixer, beat the egg whites on medium speed until they become frothy. Gradually increase the speed to high and continue beating until soft peaks form.
- Add Sugar: Gradually add the granulated sugar, about one tablespoon at a time, while continuing to beat the egg whites. Make sure each addition is well incorporated before adding the next. This helps in achieving stiff, glossy peaks without deflating the mixture.
- Flavor the Meringue: Once the sugar is fully dissolved and the egg whites are glossy with stiff peaks, gently fold in the vanilla extract and almond extract, if using. Be careful not to deflate the meringue.
- Pipe the Ghosts: Transfer the meringue into a piping bag fitted with a large round tip. Pipe ghost shapes onto the prepared baking sheet, leaving enough space between each one. Insert a lollipop stick into the base of each ghost.
- Bake: Bake the meringues in the preheated oven for about 1.5 to 2 hours, or until the meringues are dry to the touch and easily lift off the parchment paper. Turn off the oven and let them cool inside for an additional hour to make sure they dry completely.
- Decorate: Once the meringues are completely cooled, use a small brush or a toothpick to paint on ghostly faces with the melted dark chocolate. Allow the chocolate to set before serving.
Extra Tips:
To make certain the meringue sets properly, make sure your mixing bowl and beaters are completely clean and free of any grease, as even a small amount can prevent the egg whites from whipping up properly.
If you don’t have a piping bag, you can use a plastic sandwich bag with the corner snipped off to pipe your ghost shapes. Additionally, avoid opening the oven door during baking, as rapid temperature changes can cause the meringues to crack.
For added flavor, consider sprinkling a pinch of cinnamon or nutmeg into the meringue before piping. Enjoy your spooky creations!
Monster Eyeball Cookies
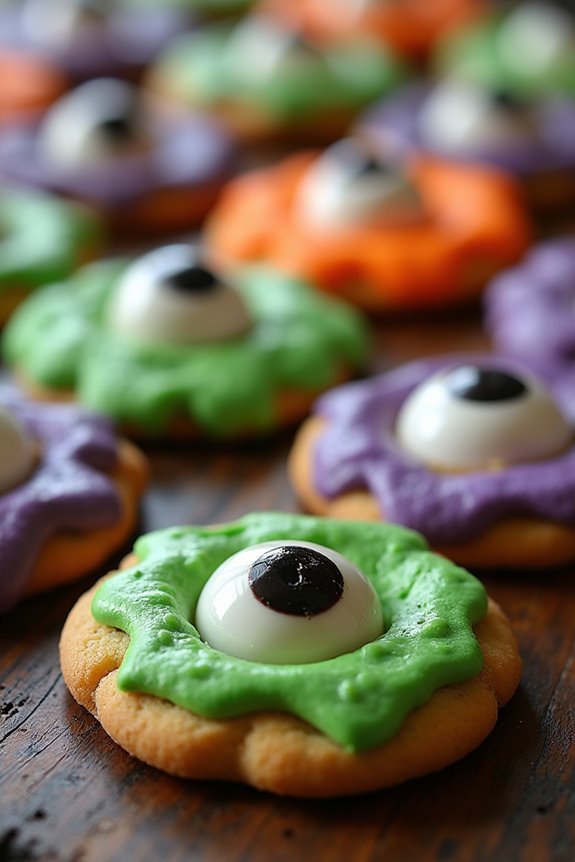
Monster Eyeball Cookies are the ultimate spooky treat for Halloween parties, delighting both kids and adults alike with their creepy-cool appearance and delicious taste.
These cookies are a fun and festive way to add a little fright to your dessert table. With a soft and chewy texture, they’re adorned with candy eyeballs that make them look like they came straight from a mad scientist’s laboratory. Perfect for a party or just to enjoy at home, these cookies are sure to be a hit with anyone who dares to try them.
The recipe is simple enough to make with the whole family, allowing you to spend some quality time together while preparing for your Halloween festivities. The combination of vibrant colors and ghoulish decorations will make these cookies the star of your Halloween spread.
With the right ingredients and a bit of creativity, you can whip up a batch of these Monster Eyeball Cookies to serve 4-6 people. Whether you’re a seasoned baker or just starting out, this recipe is designed to be easy and fun, ensuring that your cookies are both delicious and eye-catching.
Ingredients (serving size: 4-6 people):
- 1 cup unsalted butter, softened
- 1 cup granulated sugar
- 1/2 cup brown sugar, packed
- 2 large eggs
- 1 teaspoon vanilla extract
- 2 1/2 cups all-purpose flour
- 1 teaspoon baking soda
- 1/2 teaspoon baking powder
- 1/2 teaspoon salt
- Food coloring (green, purple, orange)
- Candy eyeballs
Cooking Instructions:
- Preheat the oven: Set your oven to 350°F (175°C) and line two baking sheets with parchment paper, readying them for the cookies.
- Cream the butter and sugars: In a large mixing bowl, beat together the softened butter, granulated sugar, and brown sugar until the mixture is light and fluffy. This should take about 2-3 minutes using an electric mixer.
- Add eggs and vanilla: Crack in the eggs one at a time, mixing well after each addition. Then, add the vanilla extract and continue to beat until everything is fully incorporated.
- Combine dry ingredients: In a separate bowl, whisk together the flour, baking soda, baking powder, and salt. Gradually add this dry mixture to the wet ingredients, mixing until just combined.
- Divide and color the dough: Divide the cookie dough into three equal parts. Tint each portion with a different food coloring (green, purple, and orange), mixing until the color is evenly distributed.
- Shape the cookies: Roll tablespoon-sized amounts of dough into balls and place them on the prepared baking sheets, leaving enough space between each cookie. Press a candy eyeball into the center of each dough ball.
- Bake: Bake in the preheated oven for 10-12 minutes, or until the edges are lightly golden. The cookies should still be soft and puffy.
- Cool the cookies: Allow the cookies to cool on the baking sheet for 5 minutes before transferring them to a wire rack to cool completely.
Extra Tips:
When coloring the dough, remember that the colors will appear more vibrant after baking, so don’t be afraid to use a few extra drops of food coloring to achieve the desired hue.
If you want to add more dimension to your Monster Eyeball Cookies, consider using a mix of large and small candy eyeballs for a more varied and spooky look.
Finally, if you prefer your cookies to be extra soft, slightly underbake them and let them cool on the baking sheet. Happy baking, and have a monstrously fun Halloween!
Witch Hat Cupcakes
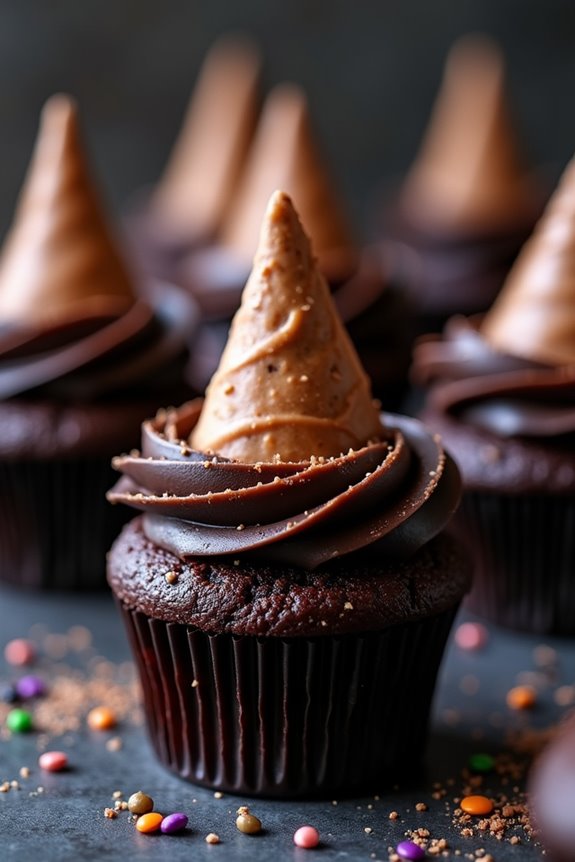
Witch Hat Cupcakes are a fun and festive treat, perfect for adding a touch of magic to your Halloween party dessert table. These whimsical cupcakes aren’t only delicious but also visually striking, making them a hit with party guests of all ages.
With a simple combination of rich chocolate cupcakes, creamy frosting, and a creative candy hat topper, these desserts are both easy to make and delightful to eat.
The charm of Witch Hat Cupcakes lies in their playful design, which mimics the iconic silhouette of a witch’s hat. The cupcakes themselves are moist and chocolaty, providing the perfect base for a swirl of colored frosting.
The crowning glory is a clever assembly of a chocolate-covered wafer cookie and a sugar cone, which forms the hat when placed atop the cupcake. These cupcakes serve about 4-6 people, making them an ideal treat for a small gathering or as part of a larger dessert spread.
Ingredients for Witch Hat Cupcakes (Serving Size: 4-6 people):
- 6 chocolate cupcakes (store-bought or homemade)
- 1 cup of buttercream frosting
- Black food coloring
- 6 chocolate wafer cookies
- 6 sugar cones
- 1/2 cup of chocolate chips
- Assorted sprinkles or edible glitter
Cooking Instructions:
- Prepare the Frosting: Start by coloring the buttercream frosting with black food coloring. Mix until the desired shade of black is achieved. Set aside.
- Melt the Chocolate: In a microwave-safe bowl, melt the chocolate chips in the microwave in 30-second intervals, stirring in between until smooth.
- Create the Witch Hat: Dip the rim of each sugar cone into the melted chocolate, allowing any excess to drip off. Immediately attach the dipped rim of the cone to the center of a chocolate wafer cookie. This forms the base of the witch hat. Allow the chocolate to set for about 10 minutes.
- Frost the Cupcakes: While the hats are setting, pipe the black frosting onto each chocolate cupcake using a piping bag fitted with a star tip. Swirl the frosting in a circular motion to create a peak in the center.
- Assemble the Cupcakes: Once the chocolate hats are set, gently place one on top of each frosted cupcake, pressing down slightly so it adheres to the frosting.
- Decorate the Hats: Optionally, sprinkle some edible glitter or colorful sprinkles around the base of the witch hat for added flair.
Extra Tips:
For an even more dramatic effect, consider using different shades of food coloring in the frosting, such as purple, green, or orange, to match your Halloween theme.
If you want to make the cupcakes from scratch, use a simple chocolate cake recipe, ensuring they’re completely cooled before frosting.
To speed up the setting process of the chocolate, place the hats in the refrigerator.
Finally, feel free to get creative with the decorations, perhaps adding a licorice band around the hat or using a small candy piece as a buckle. This recipe is versatile, allowing you to personalize it for your specific party needs.
Pumpkin Patch Dirt Cups
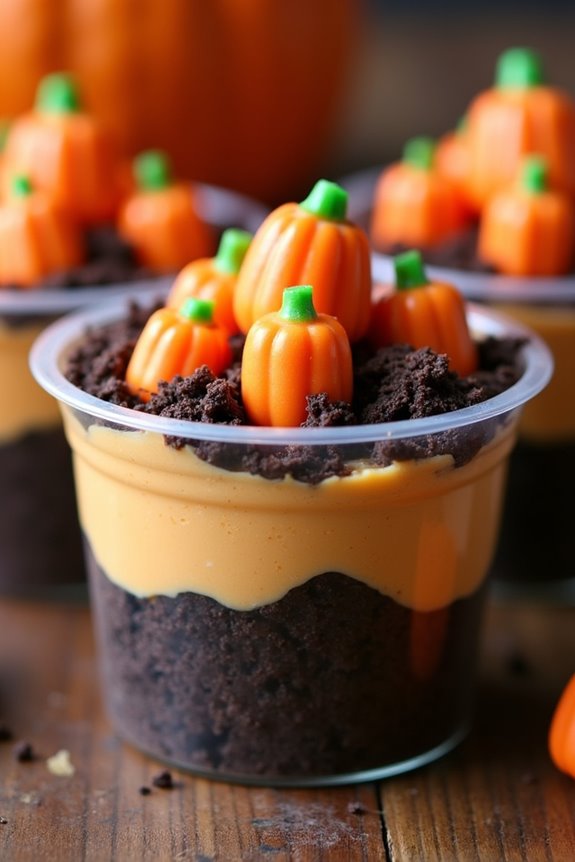
Pumpkin Patch Dirt Cups are a delightful and festive treat perfect for any Halloween party. Combining the earthy richness of chocolate with the seasonal flavors of pumpkin, these dessert cups are a hit among both kids and adults.
The presentation is as enjoyable as the taste, with each cup resembling a miniature pumpkin patch, complete with candy pumpkins and a “dirt” topping made from crushed cookies. These cups aren’t only delicious but also visually appealing, making them a great centerpiece for your Halloween dessert table.
These dirt cups are incredibly easy to assemble, requiring only a handful of ingredients and minimal preparation time. The base is made from a creamy pumpkin pudding layered with cookie crumbs, and topped with adorable candy pumpkins.
You can prepare them in advance, making them a convenient option for party planning. Plus, they offer a fun and interactive way for kids to get involved in the kitchen. With a serving size of 4-6 people, this recipe is perfect for small gatherings or as part of a larger dessert spread.
Ingredients (Serving Size: 4-6 people):
- 1 packet of instant chocolate pudding mix (3.9 oz)
- 2 cups cold milk
- 1 cup canned pumpkin puree
- 1 teaspoon pumpkin pie spice
- 1 cup whipped topping
- 18 chocolate sandwich cookies, crushed
- 12 candy pumpkins
- Clear plastic cups or small glass jars
Cooking Instructions:
- Prepare the Pudding: In a large mixing bowl, combine the instant chocolate pudding mix with 2 cups of cold milk. Whisk the mixture until it’s smooth and begins to thicken, about 2 minutes.
- Mix in Pumpkin: Add the canned pumpkin puree and pumpkin pie spice to the pudding mixture. Stir well until the pumpkin is fully incorporated and the mixture is smooth.
- Fold in Whipped Topping: Gently fold in the whipped topping into the pumpkin pudding mixture. Be careful not to overmix to keep the texture light and fluffy.
- Crush the Cookies: Place the chocolate sandwich cookies in a resealable plastic bag. Use a rolling pin or your hands to crush the cookies into fine crumbs.
- Assemble the Cups: Begin by layering the bottom of each cup with a spoonful of cookie crumbs. Add a layer of the pumpkin pudding mixture on top. Repeat the layers, ending with a layer of cookie crumbs on top.
- Decorate: Place two candy pumpkins on top of each dirt cup. Press them gently into the cookie crumbs to secure them in place.
- Chill: Refrigerate the dirt cups for at least 1 hour before serving, allowing the flavors to meld and the mixture to set.
Extra Tips:
For added crunch, try mixing some toasted pecans or walnuts into the cookie crumbs. If you’re looking for a richer chocolate flavor, consider using chocolate pudding made with whole milk.
You can also customize the candy decorations on top to suit your Halloween theme, using gummy worms or other spooky candies. These dirt cups can be made a day in advance, just be sure to store them in the refrigerator to keep them fresh and delicious for your guests.
Creepy Crawly Jelly Worms
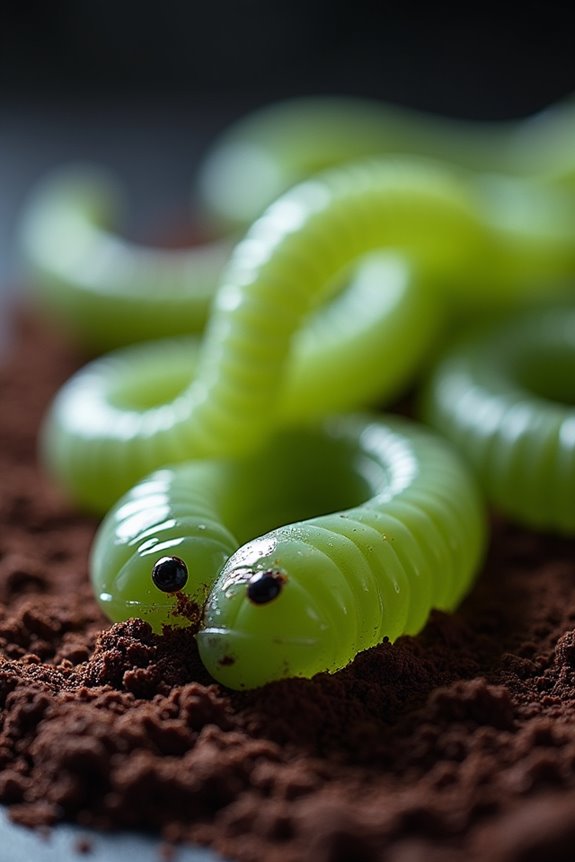
Creepy Crawly Jelly Worms are a fun and eerie addition to any Halloween party. These wiggly, jiggly treats resemble real earthworms and are bound to delight both kids and adults. The key to these delightful desserts is the realistic texture and appearance, achieved by using a combination of flavored gelatin and flexible straws to mold the worms. They’re perfect for serving in a dish of crushed cookie “dirt” or as a spooky garnish for other desserts.
This recipe is designed to yield enough Creepy Crawly Jelly Worms to serve 4-6 people, making it ideal for smaller gatherings or as part of a larger dessert spread. The preparation involves a bit of patience, as the worms need time to set in the refrigerator, but the results are worth the wait. Whether you’re hosting a Halloween party or just looking to surprise your family with a ghoulish treat, these jelly worms are sure to make an impression.
Ingredients (Serving Size: 4-6 People)
- 2 packs (3 oz each) of raspberry or grape flavored gelatin
- 1 envelope (0.25 oz) of unflavored gelatin
- 3 cups boiling water
- 3/4 cup heavy cream
- 1-2 drops green food coloring
- 100 flexible plastic straws
- A tall container or glass
Instructions
- Prepare the Gelatin Mixture: In a large bowl, combine the flavored gelatin and the unflavored gelatin. Pour in 3 cups of boiling water, stirring until all the gelatin is completely dissolved. This guarantees a smooth consistency for the worms.
- Add Cream and Color: Stir in the heavy cream, which gives the worms a more opaque and realistic look. Add 1-2 drops of green food coloring to achieve a slightly earthier tone, mimicking the appearance of real worms.
- Set Up the Straws: Extend the flexible part of each straw to its maximum length. This creates the segmented appearance of the worms. Pack the straws tightly into a tall container or glass, making certain they stand upright and are snug against each other.
- Pour the Gelatin Mixture: Carefully pour the gelatin mixture over the straws, filling them completely. Tap the container gently on the counter to remove any air bubbles trapped in the straws.
- Chill and Set: Place the container in the refrigerator for at least 4 hours, or until the gelatin is fully set. This allows the worms to firm up and hold their shape when removed from the straws.
- Remove and Serve: Once set, remove the straws from the container. To extract the worms, hold the straw from one end and squeeze it gently from the opposite end, allowing the worm to slide out. Arrange the jelly worms on a serving plate, or place them on a bed of crushed chocolate cookies to resemble dirt.
Extra Tips
For an even spookier effect, consider adding a few drops of black food coloring to the mixture for darker, more sinister-looking worms. If you find it difficult to extract the worms from the straws, run the straws under warm water for just a second to loosen the gelatin. Be careful not to melt the worms.
Storing the worms in the refrigerator until ready to serve will keep them firm and delicious. Enjoy your creepy crawly creation!
Bloodshot Eyeball Truffles
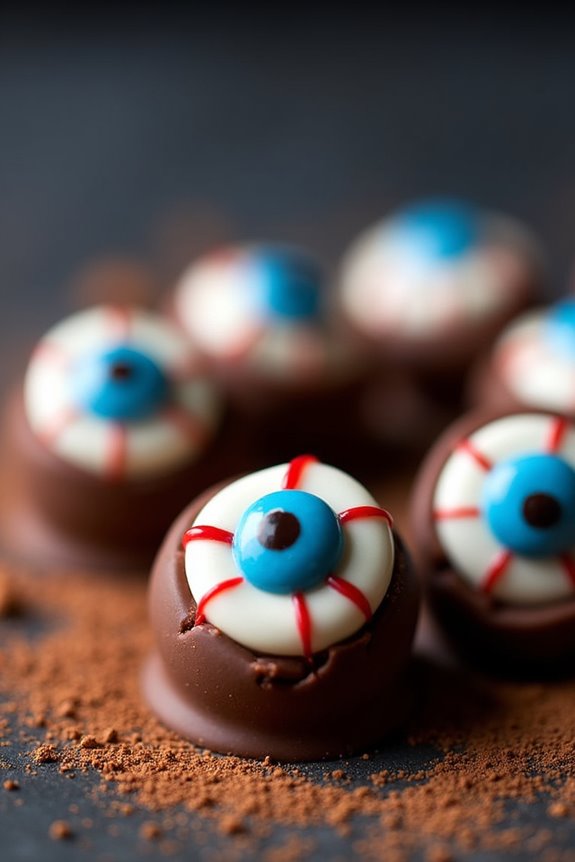
Bloodshot Eyeball Truffles are the perfect spooky treat for any Halloween party. These deliciously eerie desserts are both fun to make and eat, combining creamy chocolate truffles with a gory-looking eyeball design. The truffles are rich and indulgent, making them a delightful surprise amidst other festive treats.
Their realistic appearance will add a chilling effect to your dessert table, enchanting guests with both their taste and visual impact. Creating Bloodshot Eyeball Truffles involves shaping a simple chocolate truffle mixture into spheres, then adding a decorative layer to resemble bloodshot eyeballs.
This recipe guarantees that your creepy creations are as delicious as they’re frightful, perfect for both kids and adults. The combination of flavors and textures will make these truffles a standout offering at your Halloween gathering. The recipe below will guide you through the process of making 24 truffles, ideal for serving 4-6 people.
Ingredients:
- 8 oz (225g) semi-sweet chocolate, chopped
- 1/2 cup (120ml) heavy cream
- 1 tsp vanilla extract
- 1/4 cup (25g) cocoa powder
- 1/2 cup (120g) white chocolate, melted
- Red food coloring
- Blue or green M&M’s (24 pieces)
- Black decorating gel
Instructions:
1. Prepare the Ganache:
Place the chopped semi-sweet chocolate in a heatproof bowl. In a small saucepan, heat the heavy cream over medium heat until it begins to simmer. Pour the hot cream over the chocolate and let it sit for 2-3 minutes. Stir until the chocolate is completely melted and smooth. Stir in the vanilla extract.
2. Chill the Mixture:
Cover the bowl with plastic wrap and refrigerate the chocolate mixture for about 1-2 hours, or until it’s firm enough to scoop.
3. Shape the Truffles:
Once the ganache is firm, use a small cookie scoop or a teaspoon to portion out the mixture. Roll each portion between your palms to create smooth, round truffles. Place them on a baking sheet lined with parchment paper.
4. Coat with Cocoa Powder:
Roll each truffle in cocoa powder to coat them completely. This will give the truffles a nice finish and prevent them from sticking to your hands.
5. Decorate the Eyeballs:
Dip a small brush or toothpick into the melted white chocolate and draw a circular outline on each truffle to resemble the whites of an eye. Place an M&M in the center of each circle, using a dab of white chocolate as glue if necessary.
6. Add the Bloodshot Effect:
Mix a few drops of red food coloring into the remaining melted white chocolate to create a red icing. Use a toothpick or fine-tipped brush to draw thin red lines radiating out from the M&M to mimic blood vessels.
7. Finish with the Pupil:
Use black decorating gel to dot the center of each M&M, completing the eyeball design with a realistic pupil.
Extra Tips:
For a more intense chocolate flavor, consider using dark chocolate instead of semi-sweet. Be sure not to overheat the white chocolate, as it can seize and become unusable.
If any truffles become too soft to handle during decoration, briefly return them to the fridge to firm up. Additionally, feel free to get creative with the colors of the iris by using different colored M&M’s, and experiment with various food coloring combinations for a unique touch.
Haunted Graveyard Pudding Cups
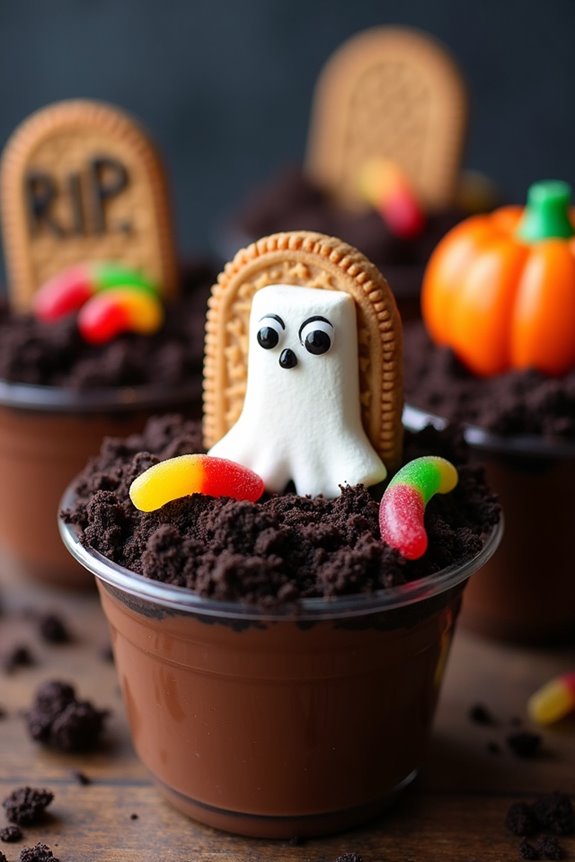
Celebrate Halloween with a spooky and delicious treat by making Haunted Graveyard Pudding Cups. These whimsical desserts are perfect for parties, combining the creamy richness of chocolate pudding with crunchy cookie crumbs and eerie decorations that will delight both kids and adults.
Each cup is a miniature edible graveyard, complete with tombstones, ghosts, and other creepy crawlies that make for a festive centerpiece on your Halloween table.
The beauty of this recipe lies in its simplicity and the opportunity for creativity. Using store-bought ingredients, these pudding cups are quick to assemble and can be customized with various candies and decorations to suit your party theme.
Whether you’re hosting a gathering or just want to surprise your family with a fun dessert, these Haunted Graveyard Pudding Cups are sure to be a hit and are the perfect addition to your Halloween celebrations.
Ingredients (serves 4-6 people):
- 2 cups of chocolate pudding (store-bought or homemade)
- 12 chocolate sandwich cookies
- 6 rectangular chocolate cookies (like Milano cookies)
- Black decorating gel
- 12 mini marshmallows
- Edible candy eyes
- Gummy worms
- Candy pumpkins (optional)
- Clear plastic cups or small serving bowls
Instructions:
- Prepare the Chocolate Pudding:
- If using store-bought pudding, simply open the container. If you prefer homemade, prepare 2 cups of your favorite chocolate pudding recipe and let it cool completely.
- Create the “Dirt” Layer:
- Place the chocolate sandwich cookies in a plastic bag and crush them into fine crumbs using a rolling pin. These will serve as the “dirt” for your graveyard.
- Assemble the Base:
- Spoon an even layer of chocolate pudding into each clear plastic cup or serving bowl, filling each about halfway.
- Add the “Dirt”:
- Sprinkle a generous amount of the crushed cookie crumbs over the pudding layer in each cup. Make sure the “dirt” completely covers the pudding.
- Create the Tombstones:
- Use the black decorating gel to write spooky messages like “RIP” or draw crosses on the rectangular chocolate cookies. Insert one decorated cookie vertically into the “dirt” layer in each cup to resemble a tombstone.
- Decorate with Ghosts and Worms:
- For the ghosts, place a mini marshmallow on top of the “dirt” and use a small dab of black decorating gel to attach edible candy eyes. Arrange gummy worms to look like they’re emerging from the ground.
- Add Final Touches:
- If desired, place a candy pumpkin on top of the “dirt” for an extra festive touch. Feel free to get creative with additional candies or decorations to personalize your graveyard scene.
Extra Tips:
For an added layer of flavor, consider mixing a tablespoon of instant coffee granules into your pudding to create a mocha flavor.
If you want to add a bit more texture, try layering some chopped nuts or chocolate chips between the pudding and cookie crumb layers.
Remember, the decorations don’t have to be perfect – the charm of these desserts lies in their quirky, homemade appearance. Encourage kids to join in the fun of decorating their own graveyard cups, making it a great family activity.
Enjoy your Halloween festivities with this playful and delicious dessert!
Zombie Brain Cupcakes
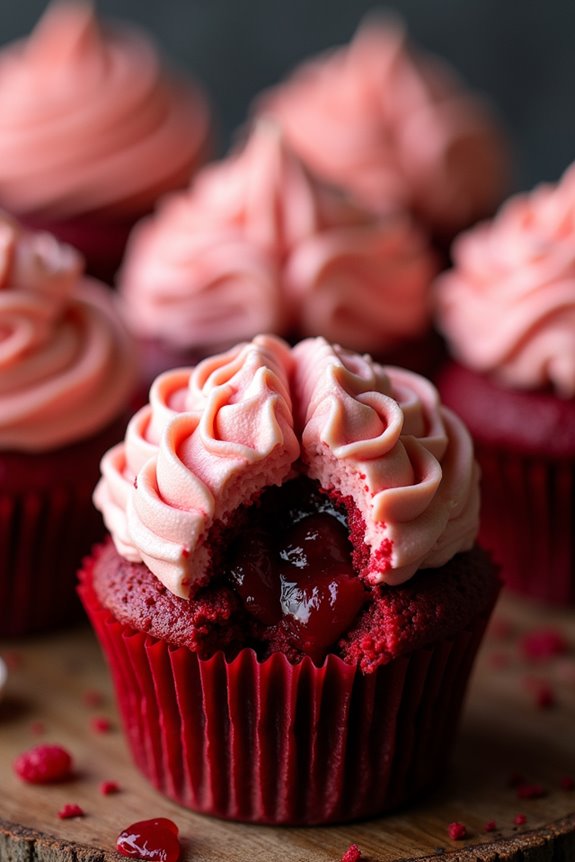
Zombie Brain Cupcakes are a spooktacular treat that will take your Halloween party to the next level. These eerie yet delicious cupcakes are designed to resemble creepy zombie brains, complete with a gory raspberry filling and a shockingly realistic brain-like frosting. Perfect for kids and adults alike, these cupcakes aren’t only visually striking but also delightfully tasty, offering a sweet surprise with every bite.
Whether you’re hosting a haunted house party or just want to impress your guests with a memorable dessert, these Zombie Brain Cupcakes are sure to be a hit!
The key to achieving the brain-like look lies in the clever use of red velvet cupcakes as a base, topped with a rich and creamy buttercream frosting that’s piped into squiggly, brain-like shapes. The raspberry filling adds a tart and juicy contrast to the sweetness of the cupcake, making each bite a delightful experience.
The cupcakes are easy to make and can be prepared ahead of time, allowing you to focus on other aspects of your Halloween celebration. Now, let’s plunge into the ingredients and steps needed to create these ghastly yet delightful treats.
Ingredients (Serving Size: 4-6 people):
- 1 cup all-purpose flour
- 1 tablespoon cocoa powder
- 1/2 teaspoon baking soda
- 1/4 teaspoon salt
- 1/2 cup unsalted butter, softened
- 1 cup granulated sugar
- 2 large eggs
- 1 teaspoon vanilla extract
- 1/2 cup buttermilk
- 1 tablespoon red food coloring
- 1/2 cup raspberry jam
- 2 cups powdered sugar
- 1/2 cup unsalted butter, softened (for frosting)
- 1-2 tablespoons milk
- 1/4 teaspoon vanilla extract (for frosting)
Cooking Instructions:
- Preheat the Oven: Preheat your oven to 350°F (175°C) and line a standard muffin tin with paper liners.
- Mix Dry Ingredients: In a medium bowl, whisk together the flour, cocoa powder, baking soda, and salt. Set aside.
- Cream Butter and Sugar: In a large mixing bowl, cream together the softened butter and granulated sugar until light and fluffy. This should take about 3-4 minutes.
- Add Eggs and Vanilla: Add the eggs one at a time, mixing well after each addition. Then, stir in the vanilla extract.
- Combine Wet and Dry Ingredients: Gradually add the dry ingredients to the wet mixture, alternating with the buttermilk. Mix until just combined. Add the red food coloring to achieve the desired shade.
- Fill Cupcake Liners: Divide the batter evenly among the prepared cupcake liners, filling each about 2/3 full.
- Bake: Bake in the preheated oven for 18-20 minutes or until a toothpick inserted into the center comes out clean. Allow to cool completely.
- Prepare Frosting: In a mixing bowl, beat the softened butter for frosting until creamy. Gradually add powdered sugar, milk, and vanilla extract. Beat until smooth and spreadable.
- Core and Fill Cupcakes: Once the cupcakes are cool, use a small knife or cupcake corer to remove a small section from the center of each cupcake. Fill with raspberry jam.
- Frost Cupcakes: Using a piping bag fitted with a small round tip, pipe the frosting in squiggly “brain” shapes on top of each cupcake.
Extra Tips:
For an even spookier effect, consider adding a few drops of red gel food coloring to the raspberry jam to make it look more like “blood.”
If you don’t have a piping bag, you can use a zip-top bag with the corner snipped off to pipe the frosting. Confirm the cupcakes are completely cooled before frosting, as any residual heat can cause the frosting to melt and lose its shape.
Finally, for a more pronounced brain effect, practice your piping technique on parchment paper before applying it to the cupcakes. Happy Halloween!
Caramel Apple Mummies
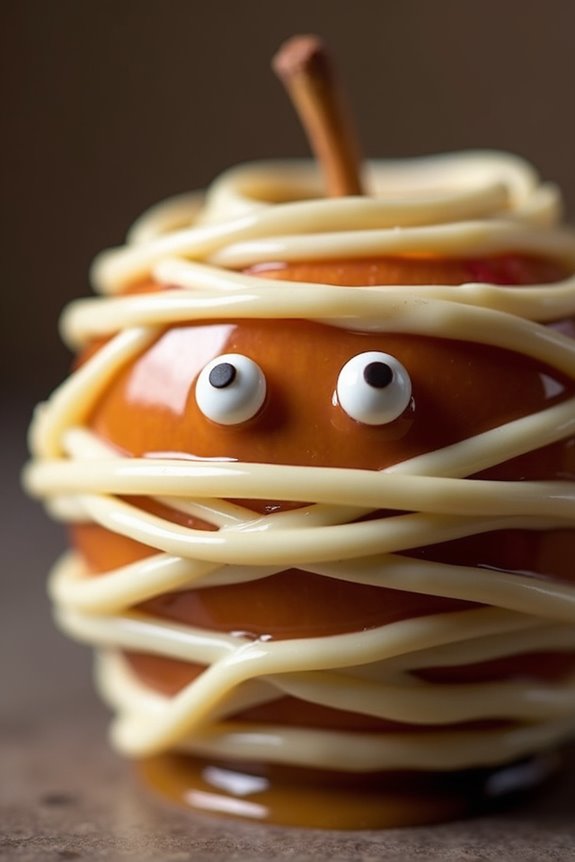
Caramel Apple Mummies are a fun and spooky treat perfect for Halloween parties. These whimsical desserts combine the classic flavors of caramel apples with a playful twist, turning them into mummified delights. With their sweet and chewy caramel coating wrapped in strips of white chocolate to mimic mummy bandages, these treats are certain to be a hit with both kids and adults.
Not only are they visually appealing, but they also offer a delightful combination of textures and flavors. Perfect for serving at gatherings or as a festive treat for your family, Caramel Apple Mummies can be made in advance, making party preparations a breeze. The recipe is simple enough for novice cooks, yet impressive enough to wow your guests.
With just a few ingredients and some creativity, you can transform ordinary apples into a spooky Halloween dessert that everyone will love.
Ingredients (Serves 4-6):
- 4-6 medium-sized apples (Granny Smith or Honeycrisp work well)
- 1 package (14 oz) of caramels
- 2 tablespoons of water
- 1 cup white chocolate chips
- 4-6 lollipop or popsicle sticks
- Small candy eyes
Instructions:
- Prepare the Apples: Wash and thoroughly dry the apples, removing any waxy coating to help the caramel adhere better. Insert a lollipop or popsicle stick into the top of each apple, making sure it’s secure.
- Melt the Caramel: In a medium saucepan, combine the unwrapped caramels and water. Place over low heat, stirring continuously, until the caramels are completely melted and smooth.
- Coat the Apples: Dip each apple into the melted caramel, turning to coat evenly. Allow excess caramel to drip off before placing the apples on a parchment-lined baking sheet. Let them set for about 30 minutes or until the caramel is firm.
- Melt the White Chocolate: In a microwave-safe bowl, melt the white chocolate chips in 30-second intervals, stirring in between, until smooth.
- Create the Mummy Bandages: Transfer the melted white chocolate to a piping bag or a zip-top bag with a small corner snipped off. Drizzle the white chocolate over the caramel-coated apples in a back-and-forth motion to create the appearance of mummy bandages.
- Add the Eyes: Before the white chocolate sets, gently press two candy eyes onto each apple to complete the mummy look. Allow the chocolate to harden completely before serving.
Extra Tips:
To guarantee your Caramel Apple Mummies turn out perfect, make sure the apples are completely dry before dipping them in caramel, as any moisture can prevent the caramel from sticking.
If the caramel begins to harden while you’re coating the apples, gently reheat it on low heat. Additionally, when melting the white chocolate, be careful not to overheat it, as it can seize and become unusable.
For a more dramatic effect, you can use dark chocolate for the bandages instead of white chocolate. Enjoy your spooky, sweet creations!
Vampire Bat Cake Pops
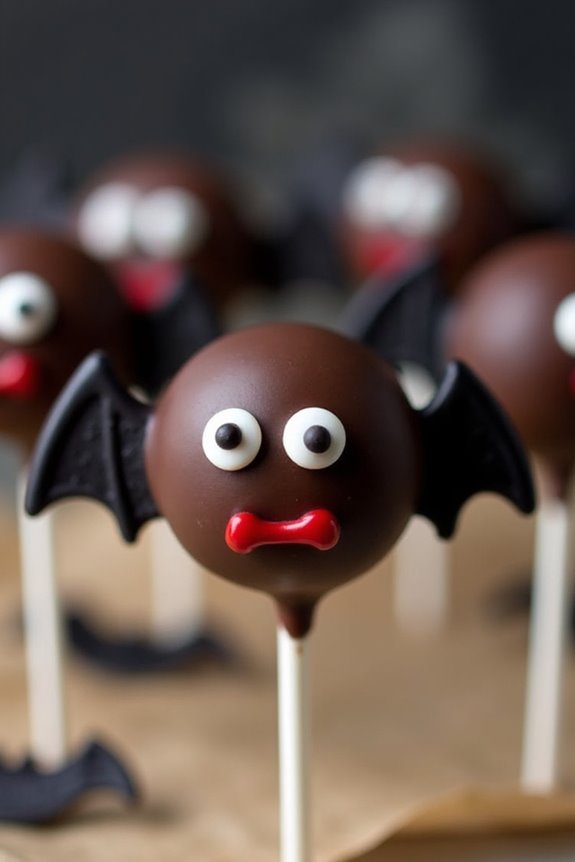
Halloween parties are the perfect time to release your culinary creativity, and what better way to do so than with these spooky and delicious Vampire Bat Cake Pops? These delightful treats aren’t only visually striking but also a hit with both kids and adults. Perfectly moist cake combined with creamy frosting, all encased in a layer of rich chocolate, these cake pops are shaped into adorable bat silhouettes, complete with wings and fangs.
Whether you’re hosting a party or attending one, these cake pops will surely add a fun and eerie touch to your dessert table. Creating Vampire Bat Cake Pops is both an enjoyable and rewarding process. The steps are simple enough for novice bakers to follow while providing enough room for experienced bakers to add their personal touches.
With a serving size that caters to 4-6 people, this recipe is perfect for small gatherings or as part of a larger spread. The key to success is in the details—making sure that each component is perfectly executed, from the cake base to the decorative chocolate wings and edible eyes. Let’s plunge into the ingredients and steps needed to create these ghoulishly good treats.
Ingredients:
- 1 box of chocolate cake mix (plus ingredients required by box instructions)
- 1/2 cup chocolate frosting
- 2 cups dark chocolate chips or melting wafers
- 12 lollipop sticks
- 24 candy eyes
- 6 black licorice ropes (for wings)
- Red gel icing (for fangs)
- Small amount of vegetable oil (optional, for thinning chocolate)
Cooking Instructions:
- Bake the Cake: Begin by preparing the chocolate cake as per the instructions on the box. Once baked, allow the cake to cool completely. This step makes sure that the cake is firm enough to crumble without being too mushy.
- Prepare the Cake Mixture: Crumble the cooled cake into a large bowl, breaking it down into fine crumbs. Add the chocolate frosting to the crumbs, mixing thoroughly until you achieve a dough-like consistency. This mixture will form the base of your cake pops.
- Shape the Cake Pops: Divide the cake mixture into 12 equal portions. Roll each portion into a ball and then flatten slightly to form an oval shape. Insert a lollipop stick into each cake pop, making sure it’s stable. Place them on a baking sheet lined with parchment paper.
- Chill the Cake Pops: Refrigerate the cake pops for at least 30 minutes. This step will help the cake pops hold their shape during the dipping process.
- Melt the Chocolate: In a microwave-safe bowl, melt the dark chocolate chips or melting wafers in 30-second intervals, stirring in between until completely smooth. If the chocolate is too thick, add a small amount of vegetable oil to thin it out for easier coating.
- Dip the Cake Pops: Carefully dip each cake pop into the melted chocolate, making sure it’s completely coated. Gently tap off any excess chocolate and place the cake pops back onto the parchment-lined baking sheet.
- Decorate the Cake Pops: While the chocolate is still wet, attach two candy eyes to each cake pop. Cut the black licorice ropes into small pieces to form wings and insert them into the sides of the cake pops. Use the red gel icing to draw small fangs below the eyes.
- Set the Cake Pops: Allow the decorated cake pops to set and the chocolate to harden completely. You can speed up this process by placing them in the refrigerator.
Extra Tips:
When making Vampire Bat Cake Pops, make sure your cake is baked and cooled thoroughly before crumbling to prevent the mixture from becoming too sticky.
When melting chocolate, keep an eye on it to prevent burning, and use a double boiler if you’re not comfortable with the microwave method. If you’re having trouble with licorice wings staying in place, try making small incisions in the cake pop before inserting the licorice.
Finally, feel free to experiment with different colors and types of candy decorations to personalize your bats!
Skeleton Bone Meringues
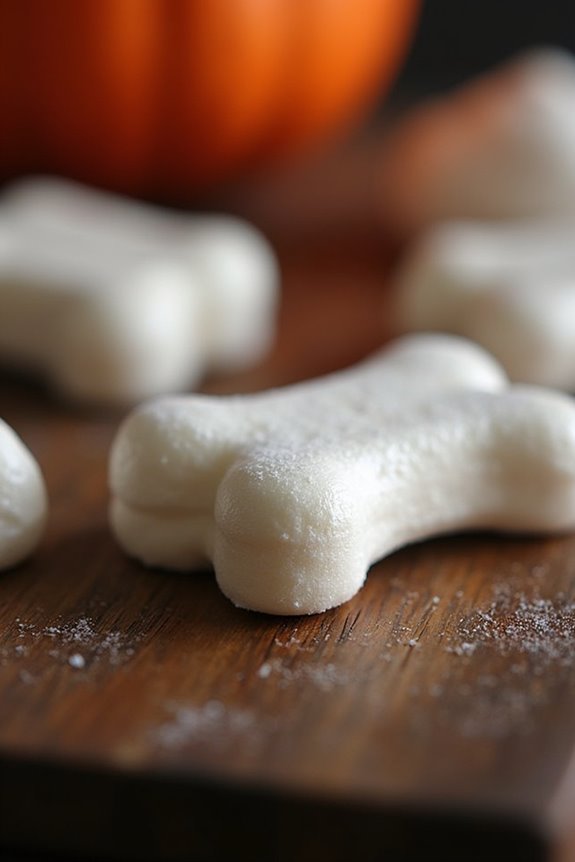
Skeleton Bone Meringues are a fun and spooky treat that will add a touch of Halloween magic to any party spread. These light and airy meringues are shaped to resemble bones, making them a perfectly themed sweet for the occasion. Not only are they visually striking, but they also offer a delightful crunch that will please guests of all ages.
With just a few ingredients, you can whip up a batch of these eerie confections and impress your friends with your culinary creativity. This recipe for Skeleton Bone Meringues yields about 24 bones, making it suitable for a gathering of 4-6 people. The meringues are made by whipping egg whites with sugar until they form stiff peaks, then piping them into bone shapes before baking them to crispy perfection. They can be served as a standalone dessert or used as a decorative element on cakes and cupcakes.
Let’s explore the recipe and transform your kitchen into a Halloween wonderland.
Ingredients (Serving Size: 4-6 people):
- 4 large egg whites
- 1 cup granulated sugar
- 1/4 teaspoon cream of tartar
- 1 teaspoon vanilla extract
- Pinch of salt
Instructions:
- Preheat the Oven: Set your oven to 200°F (93°C) to guarantee a low and slow bake for the meringues, which helps them dry out without browning.
- Prepare the Baking Sheet: Line two large baking sheets with parchment paper. This will prevent the meringues from sticking and make for easy cleanup.
- Whip the Egg Whites: In a clean, dry bowl, begin to beat the egg whites and the pinch of salt using an electric mixer on medium speed until soft peaks form. This should take about 2-3 minutes.
- Add Cream of Tartar: Once soft peaks form, add the cream of tartar to stabilize the egg whites and continue beating.
- Incorporate Sugar Gradually: Increase the mixer speed to high and gradually add the sugar, one tablespoon at a time. Beat until the mixture forms stiff, glossy peaks and the sugar has dissolved completely.
- Add Vanilla Extract: Gently fold in the vanilla extract until evenly distributed throughout the meringue mixture.
- Pipe the Meringues: Transfer the meringue to a piping bag fitted with a large round tip. Pipe bone shapes onto the prepared baking sheets, leaving some space between each bone for expansion.
- Bake the Meringues: Place the baking sheets in the preheated oven and bake for 1.5 to 2 hours. The meringues should be completely dry and easily lift off the parchment paper.
- Cool the Meringues: Once baked, turn off the oven and leave the meringues inside to cool completely, which helps prevent cracking.
Extra Tips: To guarantee perfectly shaped bones, practice piping a few on a separate parchment paper until you get the hang of the bone shape. If the meringue feels sticky or doesn’t come off the parchment easily, they need a bit more time in the oven.
Also, make sure your mixing bowl and beaters are completely free of any grease or egg yolk, as even a small amount can prevent the egg whites from whipping properly. Store baked meringues in an airtight container at room temperature to keep them crisp until serving.
Gory Red Velvet Brain Cake
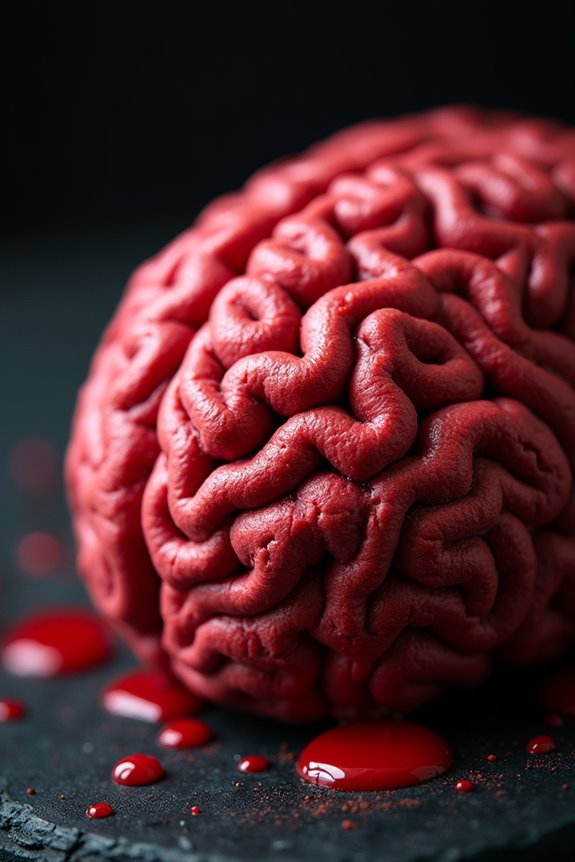
Gory Red Velvet Brain Cake is the ultimate showstopper for your Halloween party, assured to both delight and terrify your guests. This spine-chilling dessert combines the rich, decadent flavors of a classic red velvet cake with a hauntingly realistic brain-like appearance, making it the perfect centerpiece for any spooky celebration.
With its eerie design and delicious taste, this cake not only impresses visually but also tantalizes the taste buds, leaving everyone craving more. This cake serves 4-6 people, making it an ideal option for an intimate gathering or as a part of a larger assortment of Halloween-themed treats.
The recipe involves crafting a moist red velvet cake, shaping it into a brain-like form using a dome mold, and covering it with cream cheese frosting for that signature brain texture. Finally, a layer of raspberry glaze gives it a gory finish, guaranteeing your Halloween table is as creepy as it’s delicious.
Ingredients:
- 1 1/4 cups all-purpose flour
- 1 cup granulated sugar
- 1 tablespoon unsweetened cocoa powder
- 1/2 teaspoon baking soda
- 1/2 teaspoon salt
- 1/2 cup buttermilk
- 1/2 cup vegetable oil
- 1 large egg
- 1 tablespoon red food coloring
- 1/2 teaspoon vanilla extract
- 1/2 teaspoon white vinegar
- 8 ounces cream cheese, softened
- 1/4 cup unsalted butter, softened
- 2 cups powdered sugar
- 1 teaspoon vanilla extract
- 1/2 cup seedless raspberry jam
- Red food coloring (for glaze)
Instructions:
- Preheat the Oven and Prepare the Mold: Preheat your oven to 350°F (175°C). Grease and flour a dome-shaped cake mold to prevent sticking.
- Mix the Dry Ingredients: In a large bowl, sift together the flour, sugar, cocoa powder, baking soda, and salt. Set aside.
- Combine the Wet Ingredients: In a separate bowl, whisk together buttermilk, vegetable oil, egg, red food coloring, vanilla extract, and vinegar until well combined.
- Create the Batter: Gradually add the wet ingredients to the dry ingredients, mixing until just combined. Don’t overmix to guarantee a light, fluffy cake.
- Bake the Cake: Pour the batter into the prepared dome mold and bake for 25-30 minutes or until a toothpick inserted into the center comes out clean. Cool in the mold for 10 minutes, then transfer to a wire rack to cool completely.
- Make the Cream Cheese Frosting: In a medium bowl, beat softened cream cheese and butter until creamy. Gradually add powdered sugar and vanilla extract, beating until smooth and spreadable.
- Assemble the Cake: Once the cake is completely cooled, use a serrated knife to carve fine lines and indentations to mimic the look of a brain. Spread the cream cheese frosting over the cake, ensuring the carved lines remain visible.
- Prepare the Raspberry Glaze: In a small saucepan, heat the raspberry jam over low heat until melted. Add a few drops of red food coloring to enhance the gory look. Allow to cool slightly.
- Finish the Cake: Drizzle the raspberry glaze over the frosted cake, allowing it to drip into the crevices for a realistic effect. Chill the cake for at least an hour before serving to set the glaze.
Extra Tips:
When carving the cake to create a brain-like texture, take your time and use a small, sharp knife for precision. If you’re not confident in your carving skills, practice on a small section of the cake first.
For a more dramatic presentation, consider placing the finished cake on a platter with red-tinted syrup around the base to simulate blood. If you’re serving outside or in a warm environment, keep the cake chilled until just before serving to maintain its shape and texture.
Candy Corn Parfait
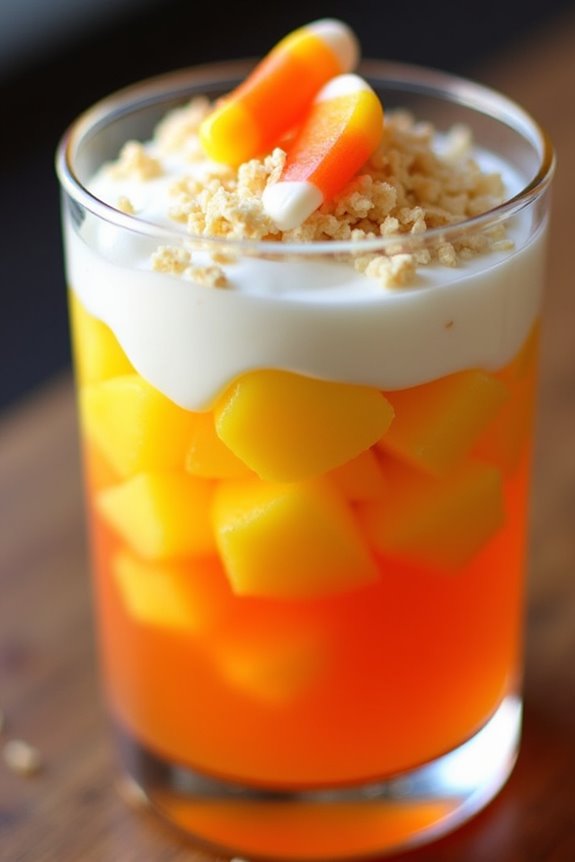
Candy Corn Parfait is a delightful and visually appealing dessert that’s perfect for Halloween parties. This layered treat mimics the classic candy corn colors and is a fun way to celebrate the spooky season. With its vibrant layers of yellow, orange, and white, this parfait not only looks festive but also offers a delicious combination of flavors.
It’s an easy-to-make dessert that can be prepared ahead of time, making it ideal for entertaining guests.
To create the perfect Candy Corn Parfait, you’ll need a combination of ingredients that blend well together while maintaining the distinct candy corn colors. The key is to use ingredients that are easy to layer and hold their shape. This dessert is versatile, allowing for some creativity with the ingredients. You can customize the parfait to suit your taste, whether you prefer a more fruity flavor or a creamy texture.
Follow the recipe below to make a serving size suitable for 4-6 people.
Ingredients:
- 1 cup of crushed pineapple
- 1 package (3 oz) of orange-flavored gelatin
- 1 cup of whipped topping
- 1 cup of vanilla yogurt
- 1/4 cup of candy corn for garnish
- 1/4 cup of granola (optional)
- 1 tablespoon of honey (optional)
Instructions:
1. Prepare the Orange Layer: Start by preparing the orange-flavored gelatin according to the package instructions. Allow it to cool slightly but not set completely. Once cooled, divide the gelatin evenly and spoon it into the bottom of each serving glass.
Place the glasses in the refrigerator to let the gelatin set completely, about 1-2 hours.
2. Add the Yellow Layer: Once the orange gelatin layer is set, evenly distribute the crushed pineapple over the top of the gelatin in each glass. The pineapple represents the yellow layer of the candy corn.
Make sure to drain any excess juice from the pineapple before adding it to prevent the layers from mixing.
3. Create the White Layer: In a mixing bowl, combine the whipped topping with vanilla yogurt. Gently fold the ingredients together until they’re well combined.
Spoon this mixture over the pineapple layer in each glass, creating the white layer on top.
4. Decorate and Serve: For a festive touch, sprinkle candy corn over the top of each parfait. If desired, add a drizzle of honey and a sprinkle of granola for added texture and flavor.
Serve immediately or refrigerate for later.
Extra Tips:
When making Candy Corn Parfait, it’s important to pay attention to the layering process to guarantee each color is distinct.
Use clear glasses or cups to showcase the layers for a more appealing presentation. If you’re making the parfaits in advance, cover them with plastic wrap and store them in the refrigerator until ready to serve. This will keep the whipped topping from deflating and the flavors fresh.
Feel free to experiment with different fruits or yogurt flavors to suit your preferences and add a personal touch to this festive dessert.
Witch’s Brew Marshmallow Pops
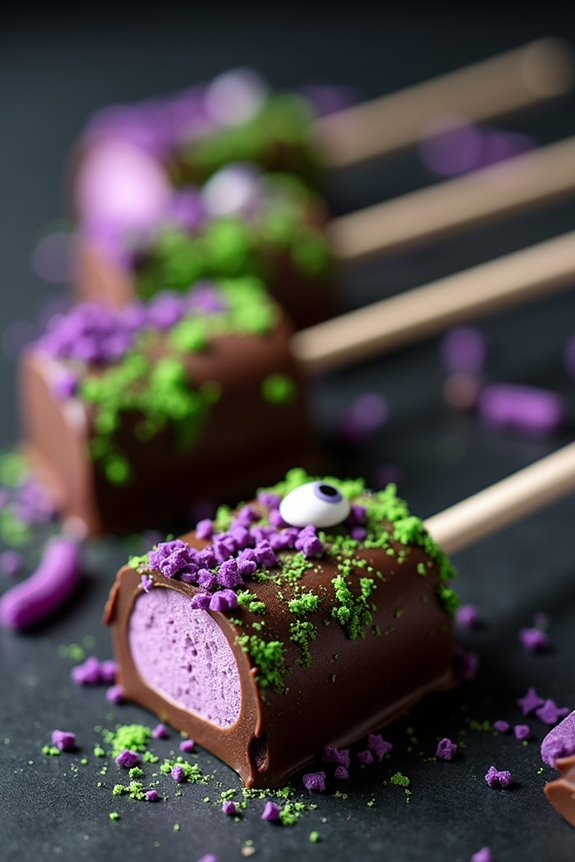
Witch’s Brew Marshmallow Pops are a spooktacular addition to any Halloween party. These delightful treats are easy to make and are sure to be a hit with both children and adults alike. With their fun appearance and delicious taste, they capture the spirit of Halloween perfectly. The combination of gooey marshmallows, crunchy toppings, and smooth chocolate makes for a truly magical experience.
The pops are designed to resemble bubbling witch’s brews, complete with all the colorful and spooky elements one might imagine in a witch’s cauldron. Not only are they visually appealing, but they also allow for creativity as you can customize the toppings to suit your party theme or personal taste. This recipe serves 4-6 people, making it ideal for small gatherings or as a part of a larger dessert spread.
Ingredients:
- 12 large marshmallows
- 1 cup of semi-sweet chocolate chips
- 1 tablespoon of coconut oil
- 1/2 cup of crushed graham crackers
- 1/4 cup of green sanding sugar
- 1/4 cup of purple sprinkles
- 12 lollipop sticks
- Optional: candy eyes, gummy worms, or other spooky candy decorations
Instructions:
- Prepare the Sticks: Insert a lollipop stick into each marshmallow, pushing it about halfway through to guarantee it holds securely. Set them aside on a baking sheet lined with parchment paper.
- Melt the Chocolate: In a microwave-safe bowl, combine the chocolate chips and coconut oil. Microwave in 30-second intervals, stirring in between, until the chocolate is completely melted and smooth.
- Dip the Marshmallows: Hold a marshmallow by the stick and dip it into the melted chocolate, turning it to coat evenly. Allow any excess chocolate to drip off before placing it back on the parchment paper.
- Add Toppings: While the chocolate is still wet, sprinkle each marshmallow with crushed graham crackers, green sanding sugar, and purple sprinkles. Press on any additional decorations like candy eyes or gummy worms as desired.
- Set the Pops: Once all marshmallows are decorated, place the baking sheet in the refrigerator for about 15-20 minutes to allow the chocolate to set completely.
- Serve: Remove the pops from the refrigerator and serve them on a platter or stand for your guests to enjoy.
Extra Tips:
For the best results, verify the chocolate mixture isn’t too hot when dipping the marshmallows, as this can cause the marshmallows to melt. If you find the chocolate is too thick, add a little more coconut oil to thin it out.
Additionally, get creative with your toppings—try different colored sugars or candies to match your Halloween theme. If you’re making these ahead of time, store them in an airtight container in the refrigerator to keep them fresh.