

Hey there, fellow Halloween enthusiasts! 🎃 If you’re anything like me, Halloween is the perfect excuse to get creative in the kitchen. I’m thrilled to share some spooky yet scrumptious dinner ideas that will have your guests spellbound. From Vampire Bat Wings with a tantalizingly crimson sauce to a bubbling Witch’s Cauldron Beef Stew, there’s something here for every ghost and ghoul. Let’s make this Halloween feast one to remember!
Vampire Bat Wings With Blood Red Sauce

Halloween is the perfect time to bring out your inner chef and create some spooktacular dishes that will thrill your guests. One dish that’s sure to be a hit at your Halloween dinner party is Vampire Bat Wings With Blood Red Sauce. This savory treat combines the rich, smoky flavors of baked chicken wings with a tangy and slightly sweet sauce that has a deep red hue reminiscent of a vampire’s favorite beverage.
The dish isn’t only delicious but also visually striking, making it an ideal addition to your Halloween menu. To prepare this dish, you’ll marinate the chicken wings in a flavorful blend of spices before baking them to crispy perfection. The “blood red” sauce, a blend of ingredients like cranberry juice and hot sauce, adds a mesmerizing color and kick to the wings.
Serve these wings as a main dish or an appetizer, and watch your guests marvel at your culinary creativity. Perfect for a group of 4-6 people, these wings are sure to disappear fast, leaving everyone with delightfully messy fingers and satisfied smiles.
Ingredients (Serving Size: 4-6 people)
- 2 pounds chicken wings
- 1 tablespoon olive oil
- 1 tablespoon smoked paprika
- 1 teaspoon garlic powder
- 1 teaspoon onion powder
- 1 teaspoon salt
- 1/2 teaspoon black pepper
- 1/4 teaspoon cayenne pepper
Blood Red Sauce:
- 1 cup cranberry juice
- 1/4 cup ketchup
- 2 tablespoons hot sauce (adjust to taste)
- 2 tablespoons honey
- 1 tablespoon apple cider vinegar
- 1 tablespoon Worcestershire sauce
- 1 teaspoon cornstarch
- 1 tablespoon water
Cooking Instructions:
- Prepare the Wings: Preheat your oven to 400°F (200°C). In a large bowl, combine the olive oil, smoked paprika, garlic powder, onion powder, salt, black pepper, and cayenne pepper. Add the chicken wings to the bowl and toss them in the spice mixture until they’re evenly coated.
- Bake the Wings: Arrange the seasoned wings on a baking sheet lined with parchment paper or a silicone baking mat, making sure they’re in a single layer for even cooking. Bake in the preheated oven for 40-45 minutes, turning them halfway through, until they’re golden brown and crispy.
- Make the Blood Red Sauce: While the wings are baking, prepare the sauce. In a medium saucepan, combine the cranberry juice, ketchup, hot sauce, honey, apple cider vinegar, and Worcestershire sauce. Bring the mixture to a simmer over medium heat.
- Thicken the Sauce: In a small bowl, mix the cornstarch with water to create a slurry. Gradually add the slurry to the simmering sauce, stirring constantly until the sauce thickens to your desired consistency.
- Coat the Wings: Once the wings are cooked, transfer them to a large bowl. Pour the blood red sauce over the wings and toss them until they’re well coated.
- Serve: Arrange the coated wings on a platter and serve hot. For an extra spooky touch, garnish with fresh parsley or edible fake spider decorations.
Extra Tips:
For best results, make certain the wings are as dry as possible before coating them with the spice mixture to help them crisp up in the oven. If you prefer a less spicy sauce, adjust the amount of hot sauce to your liking or omit it altogether.
For a smokier flavor, consider adding a teaspoon of liquid smoke to the sauce. If you want to prepare the wings in advance, you can marinate them overnight for more intense flavors. Enjoy your Vampire Bat Wings With Blood Red Sauce alongside themed cocktails or other Halloween-inspired dishes for a memorable celebration.
Witch’s Cauldron Beef Stew

Immerse yourself in the mystic world of flavors with our Witch’s Cauldron Beef Stew, a perfect addition to your Halloween dinner menu for adults. This spooky-themed dish combines tender beef, aromatic herbs, and hearty vegetables, simmered to perfection in a rich, flavorful broth.
The cauldron-like appearance of the stew, bubbling with savory ingredients, will enchant your guests and leave them spellbound. Ideal for a group of 4-6 people, this beef stew isn’t only a visual treat but also a comforting meal perfect for a chilly Halloween night.
Whether you’re hosting a themed dinner or simply enjoying a cozy evening at home, this dish will surely add a touch of magic to your festivities.
Ingredients:
- 2 pounds of beef chuck, cut into 1-inch cubes
- 2 tablespoons olive oil
- 1 large onion, chopped
- 3 garlic cloves, minced
- 2 carrots, sliced
- 3 potatoes, diced
- 2 stalks celery, chopped
- 1 cup mushrooms, sliced
- 4 cups beef broth
- 1 cup red wine
- 2 tablespoons tomato paste
- 1 teaspoon dried thyme
- 1 teaspoon dried rosemary
- 1 bay leaf
- Salt and pepper to taste
- Fresh parsley, chopped (for garnish)
Cooking Instructions:
- Prepare the Ingredients: Begin by patting the beef cubes dry with a paper towel to guarantee they brown properly. Season them with salt and pepper.
- Brown the Beef: In a large pot or Dutch oven, heat the olive oil over medium-high heat. Add the beef cubes in batches, making sure not to overcrowd the pot. Brown the meat on all sides, then remove and set aside.
- Sauté the Aromatics: In the same pot, add the chopped onions and garlic. Sauté until the onions become translucent and the garlic is fragrant, about 5 minutes.
- Add Vegetables: Stir in the carrots, potatoes, celery, and mushrooms. Cook for another 5 minutes, allowing the vegetables to slightly soften.
- Combine Ingredients: Return the browned beef to the pot. Stir in the tomato paste, making sure it coats the meat and vegetables evenly.
- Deglaze and Simmer: Pour in the red wine, scraping up any browned bits from the bottom of the pot. Add the beef broth, thyme, rosemary, and bay leaf. Bring the mixture to a boil.
- Cook the Stew: Reduce the heat to low, cover the pot, and let the stew simmer for 1.5 to 2 hours. Check occasionally, stirring and adjusting seasoning if necessary, until the beef is tender and the flavors have melded.
- Finishing Touches: Remove the bay leaf and discard. Adjust seasoning with salt and pepper as needed. Serve hot, garnished with fresh parsley.
Extra Tips:
For an even richer flavor, consider preparing the stew a day in advance. The flavors intensify as they meld overnight, making for a more robust and savory dish.
If you’d like to thicken the stew, mix a tablespoon of cornstarch with a little water and stir it into the bubbling pot during the last 10 minutes of cooking. Additionally, using a mix of different mushroom varieties can add an earthy depth to the stew, enhancing its mystical allure.
Mummy Meatloaf With Monster Mashed Potatoes
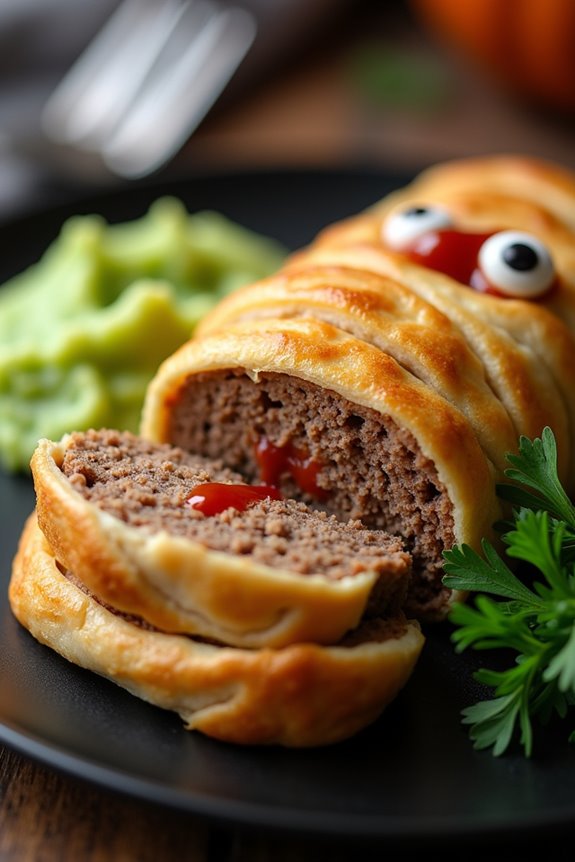
Mummy Meatloaf with Monster Mashed Potatoes is a spooky yet delicious dish perfect for an adult-themed Halloween dinner. This ghoulish feast combines a classic meatloaf wrapped in strips of dough to resemble a mummy, paired with vibrant green mashed potatoes that bring a monstrous flair to your plate. Not only is this dish visually exciting and fun to prepare, but it also offers a comforting and hearty meal that will satisfy your guests’ appetites.
This recipe serves 4-6 people, making it ideal for a small Halloween gathering. The mummy meatloaf is seasoned with a blend of spices and herbs, giving it a rich, savory flavor. The monster mashed potatoes are made with creamy potatoes and a hint of green food coloring to achieve their eerie appearance. Together, these components create a Halloween dinner that’s as delicious as it’s entertaining.
Ingredients:
- 2 lbs ground beef
- 1 cup breadcrumbs
- 1/2 cup milk
- 1 egg
- 1 small onion, finely chopped
- 2 cloves garlic, minced
- 1 tbsp Worcestershire sauce
- 1 tsp salt
- 1/2 tsp black pepper
- 1 package of refrigerated crescent roll dough
- 4 slices of mozzarella cheese
- Ketchup (for decoration)
- 4 large potatoes, peeled and cubed
- 1/2 cup butter
- 1/2 cup milk
- Salt and pepper to taste
- Green food coloring
- 1 sprig of parsley (optional, for garnish)
Cooking Instructions:
- Preheat and Prepare: Preheat your oven to 350°F (175°C). In a large mixing bowl, combine the ground beef, breadcrumbs, milk, egg, onion, garlic, Worcestershire sauce, salt, and pepper. Mix thoroughly until all ingredients are well incorporated.
- Shape the Meatloaf: Transfer the meatloaf mixture onto a lined baking sheet and shape it into a loaf. Make sure it’s compact and evenly shaped to guarantee even cooking.
- Wrap the Mummy: Open the crescent roll dough package and unroll the dough. Cut the dough into thin strips and wrap them around the meatloaf, leaving small gaps to resemble a mummy. Reserve some strips for later use as decoration.
- Add the Cheese: Place the mozzarella cheese slices over the top of the wrapped meatloaf, tucking them under the dough strips slightly to secure them.
- Bake the Mummy Meatloaf: Place the baking sheet in the preheated oven and bake for approximately 50-60 minutes, or until the meatloaf is cooked through and the dough is golden brown.
- Prepare the Monster Mashed Potatoes: While the meatloaf is baking, boil the potatoes in a large pot of salted water until they’re tender, about 15-20 minutes. Drain the potatoes and return them to the pot.
- Mash and Color the Potatoes: Add butter, milk, salt, and pepper to the potatoes and mash until smooth and creamy. Gradually add a few drops of green food coloring until the desired shade of green is achieved. Mix well to confirm even coloring.
- Serve: Once the meatloaf is done, remove it from the oven and let it cool slightly. Use ketchup to add eyes and a mouth to your mummy for a spooky effect. Serve slices of mummy meatloaf alongside a generous scoop of monster mashed potatoes. Garnish with parsley if desired.
Extra Tips:
For best results, try to keep the dough strips evenly spaced and not too thick, allowing the meatloaf to cook evenly and the dough to achieve a crispy texture.
If you prefer a spicier meatloaf, consider adding a pinch of cayenne pepper or red pepper flakes to the meat mixture.
When mashing the potatoes, confirm they’re thoroughly drained to avoid watery mashed potatoes.
If you don’t have crescent roll dough, puff pastry can be used as an alternative for wrapping the mummy.
Ghostly Garlic Shrimp Pasta
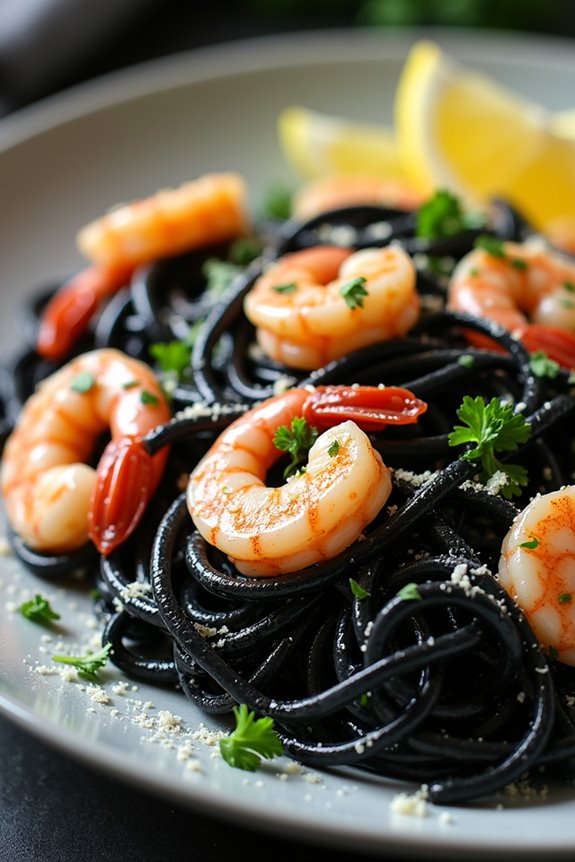
If you’re hosting a Halloween dinner for adults, Ghostly Garlic Shrimp Pasta is an eerie yet delicious dish that will leave your guests spellbound. This dish combines succulent shrimp with a creamy garlic sauce, all tossed with al dente pasta for a meal that’s both spooky and satisfying. The ghostly theme is achieved with a touch of black squid ink pasta, which adds a dramatic flair to your Halloween table setting.
Whether you’re planning a sit-down dinner or a buffet-style gathering, this pasta dish will be a hauntingly good addition to your menu.
Perfect for a serving size of 4-6 people, the Ghostly Garlic Shrimp Pasta is easy to prepare and can be made in under 30 minutes, making it an ideal choice for anyone who wants to enjoy the festivities without spending too much time in the kitchen. The delicate balance of flavors from the garlic and shrimp, combined with a hint of lemon and a sprinkle of parsley, guarantees that this dish is both flavorful and visually striking.
Ingredients:
- 1 pound of black squid ink pasta
- 1 pound of large shrimp, peeled and deveined
- 4 tablespoons of olive oil
- 6 cloves of garlic, minced
- 1 cup of heavy cream
- 1/2 cup of grated Parmesan cheese
- Juice of 1 lemon
- Salt and pepper to taste
- 1/4 cup of fresh parsley, chopped
- Lemon wedges for garnish (optional)
Cooking Instructions:
- Cook the Pasta: Bring a large pot of salted water to a boil. Add the black squid ink pasta and cook until al dente according to package instructions. Drain the pasta and set aside.
- Prepare the Shrimp: In a large skillet, heat 2 tablespoons of olive oil over medium heat. Add the shrimp to the skillet and season with salt and pepper. Cook the shrimp for about 2-3 minutes on each side, or until they turn pink and opaque. Remove the shrimp from the skillet and set aside.
- Make the Garlic Sauce: In the same skillet, add the remaining 2 tablespoons of olive oil and the minced garlic. Sauté the garlic for about 1 minute, or until fragrant. Be careful not to burn the garlic.
- Add Cream and Cheese: Reduce the heat to low and pour in the heavy cream. Stir in the grated Parmesan cheese until the sauce is smooth and creamy. Add the lemon juice and stir well.
- Combine Ingredients: Return the cooked shrimp to the skillet, along with the drained pasta. Toss everything together until the pasta is well-coated with the sauce.
- Season and Serve: Taste and adjust seasoning with salt and pepper if necessary. Sprinkle the chopped parsley over the pasta and toss again. Serve immediately with lemon wedges on the side for an extra burst of flavor.
Extra Tips:
To enhance the ghostly appearance, consider using a mix of black and regular pasta for a more dramatic effect. Confirm that the shrimp aren’t overcooked, as they can become rubbery; they should be just pink and firm to the touch.
If you want to add some heat, include a pinch of red pepper flakes during the garlic sauté step. Finally, always taste the sauce before serving to make any necessary adjustments to the seasoning. Enjoy this hauntingly delicious dish with a glass of white wine for a complete Halloween dining experience.
Pumpkin and Sage Risotto With Spider Web Garnish
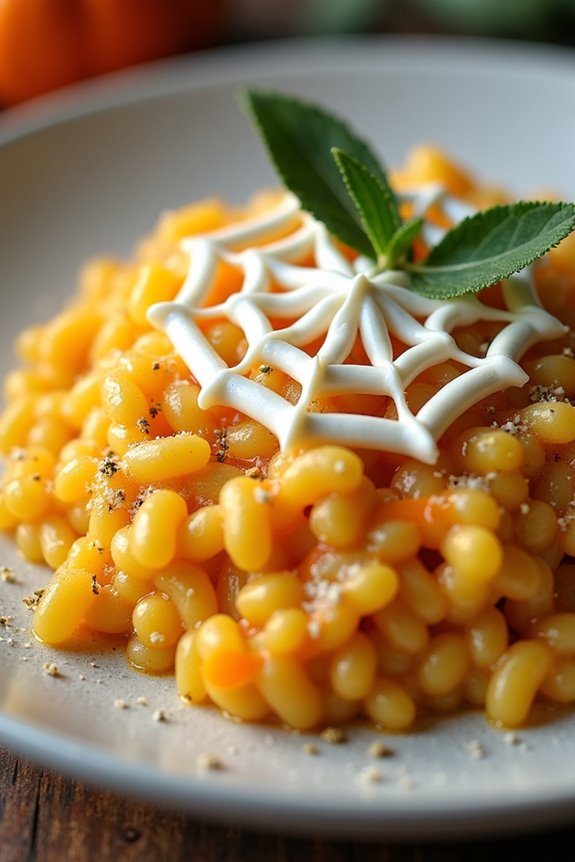
Elevate your Halloween dinner with this sophisticated Pumpkin and Sage Risotto, complete with a whimsical spider web garnish. This dish is perfect for adults looking to enjoy the festive spirit with a touch of elegance. The rich, creamy risotto is infused with the earthy flavors of pumpkin and sage, while the spider web garnish adds a playful twist that will surely impress your guests.
The risotto’s creamy texture is balanced with the nutty undertones of Parmesan cheese and the subtle sweetness of pumpkin puree. The spider web garnish, made from a simple mixture of sour cream and milk, not only enhances the visual appeal but also adds a slight tanginess that complements the risotto beautifully. This recipe serves 4-6 people, making it an ideal choice for an intimate Halloween gathering.
Ingredients (Serves 4-6):
- 2 cups Arborio rice
- 1 tablespoon olive oil
- 1 small onion, finely chopped
- 3 cloves garlic, minced
- 1 cup pumpkin puree
- 1/2 cup dry white wine
- 5 cups vegetable broth, kept warm
- 1/2 cup grated Parmesan cheese
- 2 tablespoons unsalted butter
- 1 teaspoon fresh sage, finely chopped (or 1/2 teaspoon dried sage)
- Salt and pepper to taste
- 1/4 cup sour cream
- 2 tablespoons milk
Cooking Instructions:
- Prepare the Base: In a large, heavy-bottomed saucepan, heat the olive oil over medium heat. Add the chopped onion and garlic, and sauté until the onion becomes translucent, about 3-4 minutes.
- Cook the Rice: Add the Arborio rice to the pan, stirring continuously for about 2 minutes until the rice is lightly toasted and coated with oil.
- Incorporate the Wine: Pour in the white wine, stirring constantly until it has been completely absorbed by the rice.
- Add the Pumpkin: Stir in the pumpkin puree and mix well with the rice, allowing it to incorporate completely.
- Gradually Add Broth: Begin adding the warm vegetable broth, one ladleful at a time, stirring frequently. Wait until each addition is almost completely absorbed before adding the next. Continue this process until the rice is creamy and al dente, about 18-20 minutes.
- Finish with Cheese and Butter: Remove the risotto from the heat and stir in the Parmesan cheese, butter, and chopped sage. Season with salt and pepper to taste.
- Create the Spider Web Garnish: In a small bowl, mix the sour cream and milk until smooth. Transfer this mixture to a squeeze bottle or a small piping bag with a fine tip.
- Decorate: To create the spider web, pipe concentric circles over the surface of the risotto. Use a toothpick to draw lines from the center of the circles outward to create a web effect. Serve immediately.
Extra Tips:
For the best results, make sure that the vegetable broth is kept warm throughout the cooking process to promote even cooking of the rice.
If you prefer a more intense sage flavor, consider frying whole sage leaves in a bit of olive oil and using them as a crispy garnish on top of the risotto.
Additionally, if you don’t have a squeeze bottle or piping bag for the spider web garnish, a small plastic bag with a tiny corner snipped off can work as a substitute.
Bloody Beetroot Soup With Spooky Breadsticks
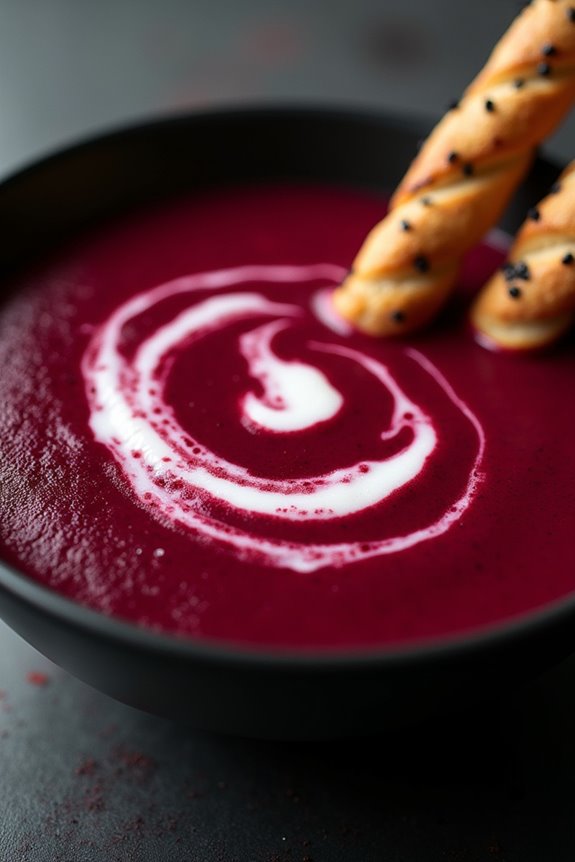
Impress your guests with this spooky yet sophisticated dish that will surely become a Halloween staple. Whether you’re hosting a small gathering or a larger event, this recipe serves 4-6 people, making it ideal for sharing. The combination of flavors and textures will leave your guests enamored and keenly anticipating your next Halloween feast. Let’s get started on creating this hauntingly delicious dish!
Ingredients for Bloody Beetroot Soup With Spooky Breadsticks (Serves 4-6):
- 6 medium-sized beetroots, peeled and diced
- 1 large onion, chopped
- 3 cloves of garlic, minced
- 4 cups vegetable broth
- 1 tablespoon olive oil
- 1 teaspoon thyme
- Salt and pepper to taste
- 1 cup heavy cream
- 1 loaf of French bread
- 2 tablespoons butter, melted
- 1 teaspoon garlic powder
- Black sesame seeds for garnish (optional)
Cooking Instructions:
- Prepare the Beetroots: Begin by peeling and dicing the beetroots into small, even pieces. This will guarantee they cook evenly and quickly.
- Sauté the Aromatics: In a large pot, heat the olive oil over medium heat. Add the chopped onion and minced garlic, sautéing until the onion becomes translucent and fragrant, about 5 minutes.
- Cook the Beetroots: Add the diced beetroots to the pot, stirring to combine with the onions and garlic. Pour in the vegetable broth, making certain all the beetroot pieces are submerged. Add the thyme, salt, and pepper. Bring the mixture to a boil, then reduce the heat to a simmer. Cover and cook until the beetroots are tender, approximately 30 minutes.
- Blend the Soup: Once the beetroots are cooked, use an immersion blender to puree the soup until smooth. If you prefer a thinner consistency, you can add more broth as needed. Stir in the heavy cream and adjust seasoning to taste.
- Prepare the Breadsticks: Preheat your oven to 375°F (190°C). Slice the French bread into thin sticks, about 1 inch wide. Arrange them on a baking sheet. Brush each stick with melted butter and sprinkle with garlic powder and black sesame seeds for a spooky touch.
- Bake the Breadsticks: Place the baking sheet in the preheated oven and bake for 10-12 minutes, or until the breadsticks are golden brown and crispy.
- Serve: Ladle the beetroot soup into bowls and garnish with a swirl of cream if desired. Serve alongside the spooky breadsticks for dipping.
Extra Tips:
To enhance the spooky atmosphere, consider serving the soup in black bowls or using Halloween-themed serving ware.
Roasting the beetroots beforehand can deepen the flavor of the soup, adding a caramelized sweetness.
If you don’t have an immersion blender, a regular blender will work, but be sure to let the soup cool slightly before blending to avoid any hot splashes.
Finally, feel free to get creative with the breadsticks by shaping them into fingers or other eerie shapes before baking to add an extra festive touch!
Monster Eyeball Stuffed Peppers

Monster Eyeball Stuffed Peppers are the perfect way to add a spooky twist to your Halloween dinner party. These deliciously eerie stuffed peppers aren’t only visually striking, but they also offer a flavorful combination of hearty ground meat, rice, and spices. The “eyeball” effect is created with a creative use of mozzarella cheese and olives, making them both fun and creepy for your adult guests. With a balance of protein and veggies, this dish is as satisfying as it’s festive.
These Monster Eyeball Stuffed Peppers are an ideal centerpiece for your Halloween-themed dinner table. The recipe is designed to serve 4-6 people, making it great for entertaining a small group of friends or family. The dish is surprisingly easy to prepare and assemble, allowing you to focus on the presentation and enjoy the fun of the season. Whether you’re throwing a full-blown Halloween bash or just want to add a little fright to your night, these stuffed peppers will surely be a conversation starter.
Ingredients for 4-6 servings:
- 6 large bell peppers (any color)
- 1 pound ground beef or turkey
- 1 cup cooked rice
- 1 medium onion, chopped
- 2 cloves garlic, minced
- 1 can (15 oz) diced tomatoes, drained
- 1 teaspoon Italian seasoning
- Salt and pepper to taste
- 1 cup shredded mozzarella cheese
- 12 black olives, halved
- Olive oil for drizzling
Cooking Instructions:
- Preheat the Oven: Begin by preheating your oven to 375°F (190°C). This guarantees the stuffed peppers cook evenly and thoroughly.
- Prepare the Peppers: Cut the tops off the bell peppers and remove the seeds and membranes. Arrange them in a baking dish, cut side up. Drizzle a little olive oil inside and outside the peppers, and season with a pinch of salt.
- Cook the Filling: In a large skillet over medium heat, add a little olive oil and sauté the chopped onion and minced garlic until they’re translucent, about 3-4 minutes. Add the ground meat, breaking it up with a spoon, and cook until browned. Stir in the cooked rice, drained diced tomatoes, Italian seasoning, and salt and pepper. Cook for an additional 5 minutes, allowing the flavors to meld.
- Stuff the Peppers: Spoon the meat and rice mixture into each pepper, filling them generously. Place the filled peppers back into the baking dish.
- Create the Eyeballs: Sprinkle the top of each stuffed pepper with shredded mozzarella cheese. Place two olive halves, cut side down, on top of the cheese on each pepper to resemble eyes.
- Bake the Peppers: Cover the baking dish with foil and bake in the preheated oven for 25 minutes. Remove the foil and bake for an additional 10-15 minutes, or until the cheese is bubbly and golden.
- Serve and Enjoy: Let the peppers cool slightly before serving. Arrange them on a platter for a striking presentation.
Extra Tips:
When selecting bell peppers, try to choose ones that have a flat bottom so they can stand upright easily. If your peppers aren’t sitting flat, you can trim a small slice off the bottom to level them.
For a vegetarian version, you can substitute the ground meat with a mixture of mushrooms and zucchini. Feel free to adjust the spices to your taste, and for added heat, you can include a pinch of chili flakes.
Enjoy these Monster Eyeball Stuffed Peppers with a side of creepy coleslaw or a haunted house salad for a complete Halloween experience.
Poison Apple Pork Chops
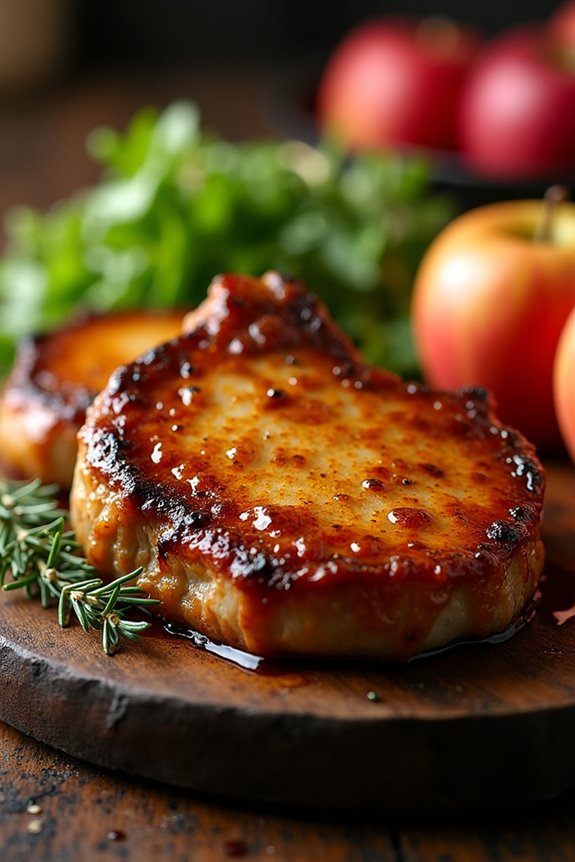
Transform your Halloween dinner into a spooktacular feast with these Poison Apple Pork Chops. This dish is perfect for adults looking to add a touch of mystery and flavor to their evening. The pork chops are glazed with a wickedly delicious apple cider reduction, which gives them a sweet yet tangy taste that pairs perfectly with the savory meat.
The “poison apple” theme adds a fun and festive twist to your Halloween menu, making it a standout dish at any dinner party. The secret to these tantalizing pork chops lies in the combination of fresh herbs and spices, which infuse them with a rich depth of flavor.
As the pork chops cook, the apple cider reduces to a glossy, caramelized glaze that not only looks impressive but tastes even better. Served alongside seasonal vegetables or a crisp autumn salad, these Poison Apple Pork Chops will surely enchant your guests and leave them craving more.
Ingredients (Serves 4-6):
- 4-6 thick-cut bone-in pork chops
- 2 cups apple cider
- 1/2 cup apple cider vinegar
- 1/4 cup brown sugar
- 2 tablespoons olive oil
- 1 tablespoon fresh thyme leaves
- 1 teaspoon ground cinnamon
- 1/2 teaspoon ground cloves
- Salt and pepper to taste
- 2 tablespoons unsalted butter
- 2 cloves garlic, minced
Cooking Instructions:
- Prepare the Pork Chops: Season the pork chops generously with salt and pepper on both sides. Let them sit at room temperature for about 20 minutes to absorb the seasoning.
- Create the Cider Glaze: In a medium saucepan, combine the apple cider, apple cider vinegar, and brown sugar. Bring the mixture to a boil over medium-high heat, stirring occasionally until the sugar dissolves. Reduce the heat and let it simmer until the liquid has reduced by half and thickened to a glaze-like consistency, about 15-20 minutes.
- Sauté the Aromatics: In a large skillet, heat the olive oil over medium heat. Add the minced garlic and fresh thyme, and sauté for 1-2 minutes until fragrant.
- Cook the Pork Chops: Increase the heat to medium-high and add the pork chops to the skillet. Sear each side for about 3-4 minutes until they’re golden brown.
- Add the Glaze: Once the pork chops are seared, pour the apple cider glaze over them. Lower the heat to medium and continue to cook, basting the chops with the glaze, until they’re cooked through (internal temperature should reach 145°F), about 6-8 more minutes depending on thickness.
- Finish with Butter and Spices: Stir in the butter, cinnamon, and ground cloves, allowing the butter to melt and the spices to incorporate into the sauce. This will add a rich, aromatic finish to the dish.
- Rest and Serve: Remove the pork chops from the skillet and let them rest for 5 minutes before serving. This allows the juices to redistribute, guaranteeing tender and juicy meat.
Extra Tips:
To guarantee the pork chops are juicy and flavorful, avoid overcooking them. Use a meat thermometer to check the internal temperature, aiming for precisely 145°F.
If the glaze thickens too much while cooking, add a splash of apple cider to loosen it. For added color and flavor, consider garnishing with thin apple slices or a sprinkle of fresh thyme before serving. This dish pairs beautifully with roasted root vegetables or a fresh green salad for a complete Halloween-inspired meal.
Creepy Crawly Crab Cakes
Creepy Crawly Crab Cakes are the perfect addition to your Halloween dinner menu, offering a spooky twist on a classic seafood dish. These crab cakes aren’t only delicious, but their presentation can be adjusted to add a touch of the macabre, making them a fun and festive choice for adult Halloween gatherings.
The rich flavors of the crab are complemented by a blend of spices and herbs, creating a savory treat that will leave your guests both intrigued and satisfied.
To achieve the eerie aesthetic of Creepy Crawly Crab Cakes, consider using black or colored food-safe garnishes to mimic the appearance of spiders or other creepy crawlies. This can be done easily with olives, edible decorations, or even colored aioli, adding a playful yet sophisticated touch to the dish.
Not only are these crab cakes a feast for the eyes, but their well-balanced texture and flavor make them an instant crowd-pleaser.
Ingredients (serves 4-6):
- 1 pound fresh crab meat, drained and picked over for shells
- 1/2 cup breadcrumbs
- 1/4 cup mayonnaise
- 1 large egg, beaten
- 1 tablespoon Dijon mustard
- 1 tablespoon Worcestershire sauce
- 1 teaspoon Old Bay seasoning
- 1/4 cup green onions, finely chopped
- 2 tablespoons fresh parsley, chopped
- Salt and pepper, to taste
- Olive oil, for frying
- Black olives or food-safe garnishes for decoration
Cooking Instructions:
- Prepare the Crab Mixture: In a large bowl, combine the crab meat, breadcrumbs, mayonnaise, beaten egg, Dijon mustard, Worcestershire sauce, Old Bay seasoning, green onions, and parsley. Mix gently to avoid breaking up the crab meat too much.
- Season the Mixture: Taste the mixture and season with salt and pepper according to your preference. Adjust the seasoning as needed to guarantee the right balance of flavors.
- Form the Crab Cakes: Divide the mixture into 8-12 equal portions, depending on your desired size. Shape each portion into a patty, pressing gently to guarantee they hold together.
- Chill the Crab Cakes: Place the formed crab cakes on a baking sheet lined with parchment paper and refrigerate for at least 30 minutes. This helps them firm up and makes them easier to handle when cooking.
- Cook the Crab Cakes: Heat a thin layer of olive oil in a large skillet over medium heat. Once the oil is hot, carefully add the crab cakes to the skillet. Cook for about 4-5 minutes on each side, or until golden brown and crispy.
- Decorate for Halloween: Once cooked, transfer the crab cakes to a serving platter. Use black olives or other food-safe garnishes to create ‘legs’ and ‘eyes,’ giving the appearance of creepy crawlies emerging from the cakes.
Extra Tips:
For an added Halloween effect, consider serving the Creepy Crawly Crab Cakes with a side of colored aioli or dipping sauce by incorporating food coloring into the sauce. This can enhance the spooky theme and provide additional flavor.
If you prefer a spicier kick, add a pinch of cayenne pepper to the crab mixture. Remember, the key to perfect crab cakes is balancing the moisture and binding ingredients to guarantee they hold together without being too dry.
Enjoy crafting these eerie treats and impress your guests with both taste and creativity.
Graveyard Shepherd’s Pie

In this recipe, we aim to serve 4-6 people, making it ideal for an intimate Halloween dinner party. The balance of flavors and textures, from the creaminess of the mashed potatoes to the umami-rich meat filling, guarantees a satisfying meal.
The addition of spices and herbs elevates the dish, while the creative presentation brings an element of fun and surprise. Get ready to impress your friends and family with this deliciously spooky dish.
Ingredients:
- 2 tablespoons olive oil
- 1 large onion, finely chopped
- 2 cloves garlic, minced
- 1 pound ground beef or lamb
- 1 cup carrots, diced
- 1 cup peas (fresh or frozen)
- 2 tablespoons tomato paste
- 1 cup beef broth
- 1 teaspoon Worcestershire sauce
- Salt and pepper to taste
- 2 pounds potatoes, peeled and cubed
- 4 tablespoons unsalted butter
- 1/2 cup milk
- 1/2 cup grated cheddar cheese
- Fresh parsley for garnish (optional)
Instructions:
- Preheat and Prepare: Preheat your oven to 400°F (200°C). Begin by heating olive oil in a large skillet over medium heat. Add the finely chopped onion and minced garlic, sautéing until the onions are translucent and fragrant.
- Cook the Meat: Add the ground beef or lamb to the skillet. Cook until browned, breaking up any large chunks with a wooden spoon. Confirm the meat is cooked through and no longer pink.
- Add Vegetables: Stir in the diced carrots and peas. Cook for about 5 minutes until the carrots are slightly softened.
- Incorporate Flavor Enhancers: Mix in the tomato paste, and then pour in the beef broth and Worcestershire sauce. Stir well to combine all ingredients, and let simmer for about 10 minutes, allowing the sauce to thicken. Season with salt and pepper to taste.
- Prepare Mashed Potatoes: While the meat mixture simmers, place the cubed potatoes in a pot of salted water. Bring to a boil and cook until tender, about 15-20 minutes. Drain the potatoes and return them to the pot.
- Mash Potatoes: Add butter and milk to the potatoes, mashing until smooth and creamy. Stir in grated cheddar cheese until melted and well combined.
- Assemble the Pie: Transfer the meat mixture to a baking dish, spreading it evenly. Spoon or pipe the mashed potatoes over the top, creating peaks or grave-like shapes with a fork for a spooky effect.
- Bake: Place the dish in the preheated oven and bake for about 25 minutes, or until the top is golden brown and slightly crispy.
- Garnish and Serve: Remove from oven and let it cool for a few minutes. Garnish with fresh parsley if desired, and serve warm.
Extra Tips: For an even more eerie presentation, you can use sliced olives or small pieces of vegetables to create eyes or other creepy features on the mashed potatoes.
If you’re short on time, use store-bought mashed potatoes, but homemade mashed potatoes will provide the best flavor. Adjust the seasoning to your taste, and remember that the filling can be prepared a day in advance, making it a convenient choice for busy hosts. Enjoy your spooky yet comforting Halloween meal!
Black Magic Dark Chocolate Fondue

Indulge your guests this Halloween with a rich and enchanting dessert that’s as bewitching as it’s delicious: Black Magic Dark Chocolate Fondue. This luxurious fondue is perfect for adding a touch of sophistication to your Halloween festivities, offering an irresistible combination of smooth, dark chocolate and a hint of mystery.
Whether you’re hosting a spooky soiree or a quiet gathering, this fondue is sure to captivate adults with its decadent flavor and velvety texture. The deep, dark hue of the chocolate fondue sets a striking contrast to the vibrant colors of the fruits and treats you’ll serve for dipping, creating an eye-catching centerpiece for your dessert table.
Pair it with an assortment of fresh fruits, marshmallows, and various pastries, and you’ll have a Halloween treat that’s both visually stunning and utterly delectable. The following recipe serves 4-6 people, making it ideal for an intimate gathering of friends or family.
Ingredients:
- 12 ounces of high-quality dark chocolate, chopped
- 1 cup of heavy cream
- 2 tablespoons of sugar
- 1 teaspoon of vanilla extract
- 1 tablespoon of espresso powder (optional, for a richer flavor)
- Assorted dippables (e.g., strawberries, banana slices, marshmallows, pound cake cubes, pretzels)
Instructions:
- Prepare the Chocolate: Begin by chopping the dark chocolate into small, even pieces to guarantee it melts smoothly. Place the chopped chocolate in a heatproof bowl.
- Heat the Cream: In a small saucepan, combine the heavy cream and sugar. Heat over medium-low heat, stirring occasionally, until the sugar dissolves and the cream is just about to simmer. Don’t let it boil.
- Combine Ingredients: Pour the hot cream mixture over the chopped chocolate. Let it sit for about 2 minutes to allow the chocolate to soften.
- Stir Until Smooth: After waiting, gently stir the mixture using a whisk or spatula until the chocolate is completely melted and the mixture is smooth. Stir in the vanilla extract and espresso powder (if using) until fully incorporated.
- Transfer to Fondue Pot: Transfer the chocolate mixture to a fondue pot to keep it warm. Use a low heat source, such as a candle or low flame, to prevent the chocolate from burning.
- Prepare Dippables: Arrange your assorted dippables on a platter around the fondue pot. Provide skewers or fondue forks for dipping.
Extra Tips:
To guarantee your Black Magic Dark Chocolate Fondue remains silky smooth, avoid overheating the chocolate as it can cause it to seize. If the fondue begins to thicken, stir in a little more warm cream to maintain its consistency.
Experiment with different types of dark chocolate with varying cocoa percentages to find your preferred intensity. Additionally, if you wish to add a spooky touch, you can sprinkle a pinch of edible gold or silver dust over the fondue for a shimmering effect.
Enjoy this decadent treat while delighting in the eerie ambiance of Halloween night!