

As Halloween approaches, I’ve been brewing up some delightfully spooky dinner ideas that your little ones will love. Think spider pasta and mummy meatballs taking center stage at your table. Each dish is crafted with creativity and a sprinkle of vibrant veggies to captivate young imaginations. These meals are not only fun but also a sneaky way to introduce some healthy ingredients. Are you ready to turn your kitchen into a haunted haven with these unforgettable recipes?
Spooky Spider Pasta
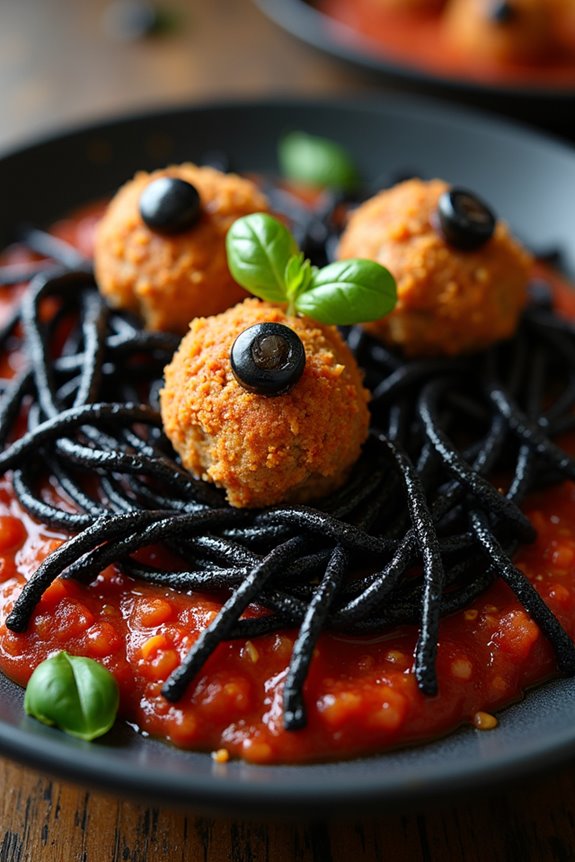
This recipe is easy to prepare and can be made with ingredients that are readily available. The black pasta is often made with squid ink, giving it a unique color and a subtle briny flavor that complements the savory meatballs. The dish is a fantastic way to get children excited about dinner while also indulging in the Halloween spirit.
So gather your ingredients, get the kids involved in the cooking process, and enjoy a fun-filled meal that’s sure to be remembered!
Ingredients (Serves 4-6 people):
- 1 lb black spaghetti or linguine
- 1 lb ground beef or turkey
- 1/2 cup breadcrumbs
- 1/4 cup grated Parmesan cheese
- 1 egg
- 2 cloves garlic, minced
- Salt and pepper to taste
- 24 black olives, pitted
- 1 jar (24 oz) marinara sauce
- Edible candy eyes (optional)
- Olive oil
- Fresh basil leaves for garnish
Cooking Instructions:
- Prepare the Meatballs: In a large mixing bowl, combine the ground beef or turkey, breadcrumbs, Parmesan cheese, egg, minced garlic, salt, and pepper. Mix thoroughly until all ingredients are well incorporated. Roll the mixture into small meatballs, about 1 inch in diameter, and set them aside.
- Cook the Meatballs: In a large skillet, heat a tablespoon of olive oil over medium heat. Add the meatballs to the skillet and cook them until they’re browned on all sides and cooked through, about 10-12 minutes. Make sure to turn them occasionally for even cooking. Once done, remove the meatballs from the skillet and set them aside.
- Cook the Pasta: While the meatballs are cooking, bring a large pot of salted water to a boil. Add the black spaghetti or linguine to the pot and cook according to the package instructions until al dente. Drain the pasta and set it aside, reserving a cup of pasta water.
- Prepare the Sauce: In the same skillet used for the meatballs, add the marinara sauce and bring it to a simmer over medium heat. If the sauce is too thick, add some reserved pasta water to reach your desired consistency. Add the cooked meatballs into the sauce and simmer for an additional 5 minutes.
- Assemble the Dish: Toss the cooked pasta with the marinara sauce and meatballs. Arrange the pasta on a serving platter, creating a nest-like appearance. Place the meatballs on top of the pasta.
- Create the Spiders: Slice the black olives into thin rings and place them around the meatballs to resemble spider legs. For extra spookiness, attach edible candy eyes to each meatball using a dab of the sauce as glue.
- Serve and Garnish: Garnish the dish with fresh basil leaves and serve immediately while warm. Enjoy your spooky culinary creation!
Extra Tips: For an even spookier look, consider using a mix of regular pasta and black pasta for a two-toned effect. If you can’t find black pasta, you can use whole wheat or spinach pasta for a different color variation.
Encourage kids to get involved by letting them place the olive legs and candy eyes on the meatballs. This hands-on participation can make the meal more engaging and enjoyable for them. Adjust the spice level of the marinara sauce to suit your family’s preference, and don’t forget to have fun with the presentation!
Monster Meatball Mummies
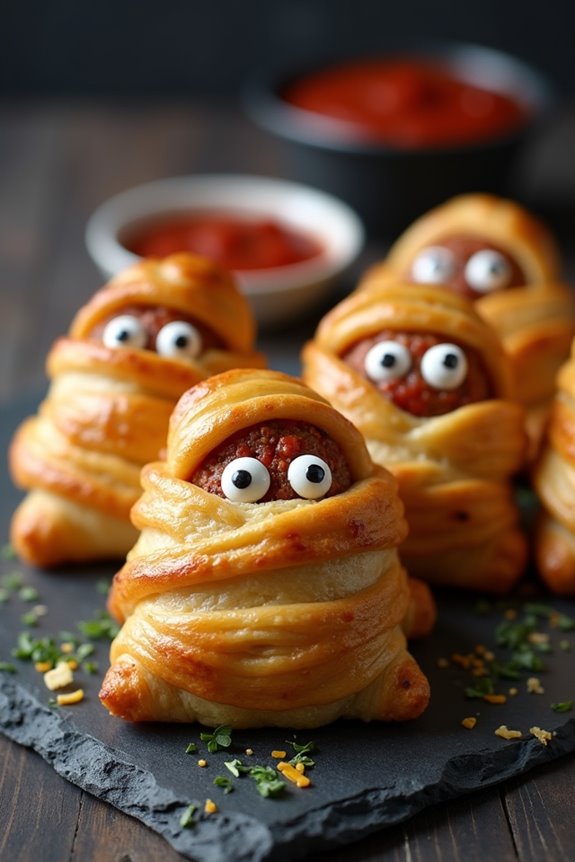
Monster Meatball Mummies are a spooktacular treat that will have your little goblins howling with delight this Halloween. These delightful, savory mummies are made by wrapping juicy meatballs in strips of flaky crescent dough, creating a ghoulishly fun dish that’s both simple to prepare and assured to be a hit at your Halloween dinner table.
Whether served as an appetizer or the main attraction, these Monster Meatball Mummies will add a touch of magic to your Halloween festivities. Perfect for a serving size of 4-6 people, this recipe combines classic flavors with a spooky twist, guaranteeing that both kids and adults will enjoy every bite.
The combination of tender meatballs, gooey cheese, and crispy pastry makes for an irresistible Halloween meal. Serve them with a side of marinara sauce for dipping, and you’ve got a monstrous dish that’s as fun to make as it’s to eat.
Ingredients (serving size: 4-6 people):
- 24 pre-cooked meatballs (beef, turkey, or vegetarian)
- 1 can (8 oz) refrigerated crescent roll dough
- 4 slices of cheddar cheese (cut into strips)
- 24 candy eyes (or substitute with small pieces of black olives)
- 1 cup marinara sauce (for dipping)
Cooking Instructions:
- Preheat the Oven: Begin by preheating your oven to 375°F (190°C) to guarantee it’s hot and ready once the mummies are assembled.
- Prepare the Dough: Unroll the crescent roll dough and separate it into strips. If needed, use a pizza cutter or knife to create more strips, approximately 1/4 inch wide. This will be used to “wrap” the meatballs like mummies.
- Wrap the Meatballs: Take each meatball and wrap 1-2 strips of dough around it, leaving a small gap for the “face” where the eyes will go. Assure the ends of the dough are tucked under the meatball to secure them.
- Add Cheese and Eyes: Place a strip of cheddar cheese under the dough strips as you wrap the meatballs. Once wrapped, gently press two candy eyes into the dough for each meatball so they look like mummies.
- Bake the Mummies: Place the wrapped meatballs on a baking sheet lined with parchment paper. Bake in the preheated oven for 12-15 minutes, or until the dough is golden brown and the cheese is melted.
- Serve and Enjoy: Remove from the oven and let cool slightly. Serve warm with a side of marinara sauce for dipping.
Extra Tips:
To make your Monster Meatball Mummies even more flavorful, consider brushing the crescent dough with a bit of garlic butter or adding a sprinkle of Italian seasoning before baking.
If you’re using candy eyes, remember to remove them before eating, or opt for edible alternatives like small pieces of black olive or dots of cream cheese with a peppercorn center.
For a vegetarian version, use plant-based meatballs and ensure the dough is suitable for vegetarians. These mummies are best enjoyed fresh but can be prepared a few hours in advance and reheated briefly in the oven before serving.
Creepy Crawly Tacos
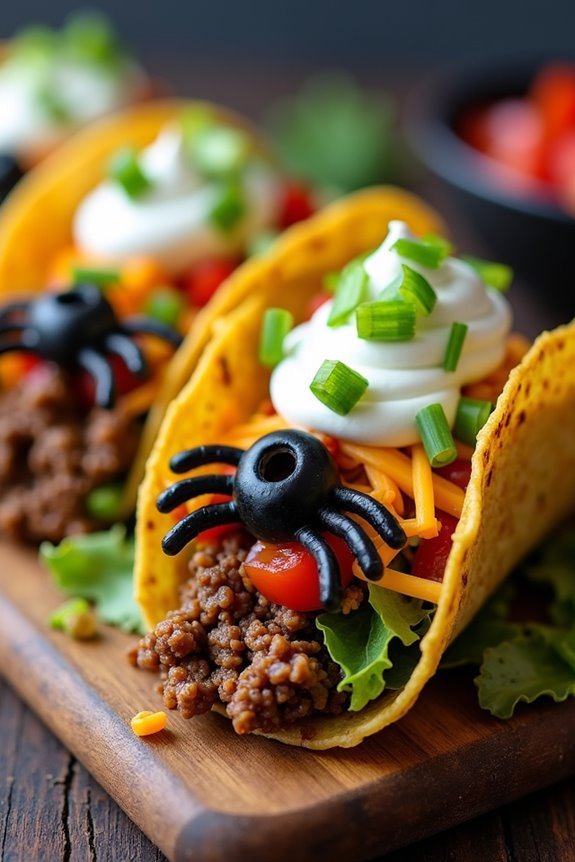
Halloween is the perfect time to have some fun with your meals, and Creepy Crawly Tacos are a fantastic way to do just that. These tacos aren’t only delicious but also add a spooky twist to your Halloween dinner for kids. The idea is to create a taco dish that resembles creepy crawlies, using ingredients that are both tasty and visually playful.
It’s all about engaging the kids with the idea of eating something that looks creepy, but actually tastes fantastic. The Creepy Crawly Tacos are filled with seasoned ground beef, beans, and a variety of toppings that bring the Halloween theme to life. The tacos are then topped with black olives and shredded cheese to give the impression of spiders and other creepy crawlies.
This dish is a great way to get kids excited about dinner, and they can even help in the kitchen to make their own creepy creations. This recipe serves 4-6 people, making it perfect for a family dinner or a small Halloween gathering.
Ingredients:
- 1 lb ground beef
- 1 packet taco seasoning
- 1 cup black beans, drained and rinsed
- 12 small taco shells
- 1 cup shredded lettuce
- 1 cup shredded cheddar cheese
- 1/2 cup sliced black olives
- 1 cup diced tomatoes
- 1/2 cup sour cream
- 1/4 cup sliced green onions
Instructions:
- Prepare the Meat: In a large skillet, cook the ground beef over medium heat until browned and fully cooked. Drain any excess fat. Add the taco seasoning and enough water as per the packet instructions, stir well, and let it simmer for about 5 minutes.
- Add the Beans: Stir in the black beans and continue cooking for another 3 minutes until the beans are heated through. This will give the taco filling a hearty texture and additional flavor.
- Prepare Shells and Toppings: While the meat is cooking, heat the taco shells according to package instructions. Arrange the lettuce, cheese, tomatoes, olives, sour cream, and green onions in small bowls for easy assembly.
- Assemble the Tacos: Fill each taco shell with a generous spoonful of the meat and bean mixture. Top with lettuce, cheese, and tomatoes. Use the sliced black olives to create “spider” eyes or legs by strategically placing them on the tacos.
- Add Final Touches: Add a dollop of sour cream and a sprinkle of green onions on top. The sour cream can be piped to create a web-like pattern for extra spookiness.
Extra Tips:
For an added spooky touch, consider using blue corn taco shells instead of regular ones, as they offer a darker color that’s perfect for Halloween. You can also use cookie cutters to cut the cheese slices into fun shapes like ghosts or bats.
If you want to make it more interactive, set up a taco bar and let the kids assemble their own Creepy Crawly Tacos. This not only makes it fun but also allows them to be creative with their toppings. Remember, the presentation is key to the Halloween theme, so have fun with it!
Witch’s Brew Stew
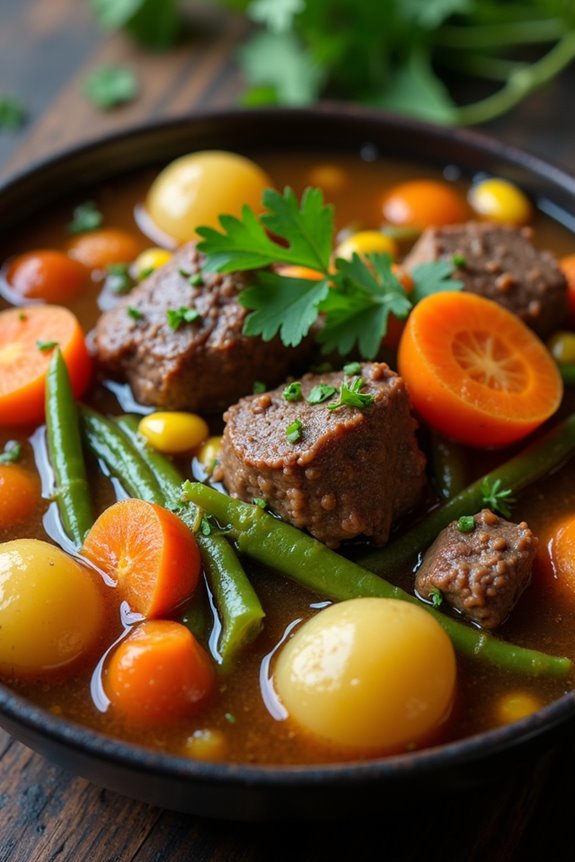
Sure, here’s a recipe for Witch’s Brew Stew, a perfect dish to delight your kids on Halloween night. This whimsical and hearty stew combines a medley of colorful vegetables and tender meat, creating a bubbling cauldron of flavors that will enchant both young witches and wizards.
With its playful presentation and delicious taste, Witch’s Brew Stew is an excellent way to make your Halloween dinner both fun and nutritious.
The key to making this stew truly magical is the vibrant array of ingredients that mimic a witch’s potion. From bright orange carrots to dark leafy greens, each component adds a unique texture and taste to the pot.
The stew is slow-cooked to allow all the flavors to meld together, resulting in a savory dish that’s as delightful to the palate as it’s to the eyes. Perfect for serving 4-6 people, this recipe will guarantee there’s enough for everyone to enjoy a bowl of this spooky delight.
Ingredients (Serves 4-6):
- 2 tablespoons olive oil
- 1 pound beef stew meat, cut into 1-inch cubes
- 1 large onion, chopped
- 2 garlic cloves, minced
- 4 cups beef broth
- 2 carrots, peeled and sliced
- 2 potatoes, peeled and diced
- 1 cup green beans, trimmed and cut into 1-inch pieces
- 1 cup mushrooms, sliced
- 1 cup corn kernels
- 1 teaspoon dried thyme
- 1 teaspoon dried rosemary
- Salt and pepper to taste
- Fresh parsley for garnish
Cooking Instructions:
- Prepare the Ingredients: Begin by chopping all the vegetables and cutting the beef stew meat into 1-inch cubes. This will guarantee that everything cooks evenly.
- Brown the Meat: In a large pot or Dutch oven, heat the olive oil over medium-high heat. Add the beef cubes and cook until browned on all sides. This should take about 5-7 minutes. Remove the meat from the pot and set aside.
- Sauté the Aromatics: In the same pot, add the chopped onion and minced garlic. Sauté for about 3 minutes, or until the onion becomes translucent and fragrant.
- Combine Ingredients: Return the browned meat to the pot. Pour in the beef broth, then add the carrots, potatoes, green beans, mushrooms, and corn. Stir well to combine.
- Season the Stew: Add the dried thyme, rosemary, salt, and pepper to the pot. Bring the mixture to a boil over high heat.
- Simmer: Once boiling, reduce the heat to low and cover the pot. Let the stew simmer gently for 1.5 to 2 hours, or until the meat is tender and the vegetables are cooked through.
- Final Touches: Taste the stew and adjust seasoning if necessary. Serve hot, garnished with fresh parsley for a touch of freshness.
Extra Tips:
For a thicker stew, you can dissolve a tablespoon of cornstarch in a little water and stir it into the pot during the last 15 minutes of cooking.
If you want to make the dish even more festive, consider serving it in small cauldrons or bowls with some crusty bread on the side.
To make it vegetarian, simply omit the meat and use vegetable broth instead. Feel free to get creative with additional vegetables or spices to suit your family’s taste preferences!
Ghostly Grilled Cheese
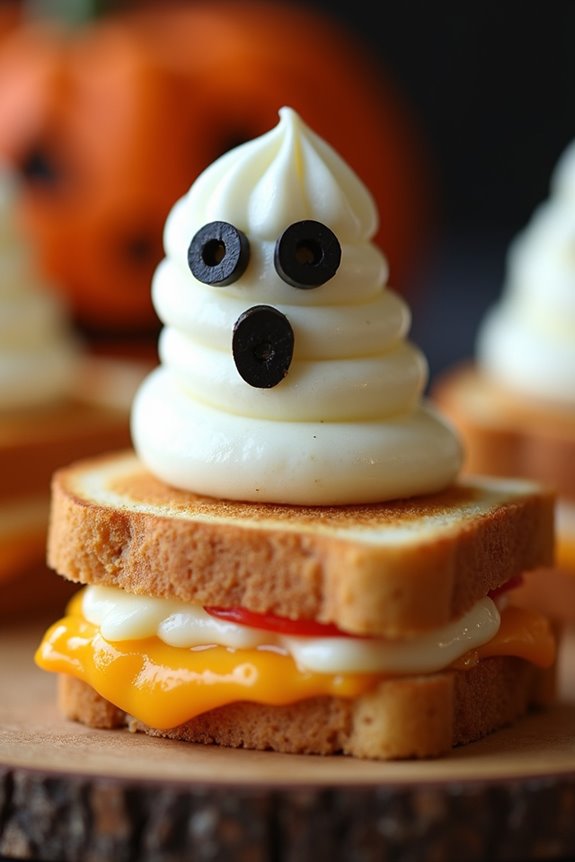
Transform your standard grilled cheese sandwich into a spooky Halloween treat with this Ghostly Grilled Cheese recipe. Perfect for a fun-filled Halloween dinner with kids, these sandwiches are sure to delight with their ghostly appearance and cheesy goodness.
This recipe isn’t only easy to make but also adds a festive touch to your dining table, making meal preparation both entertaining and delicious.
The Ghostly Grilled Cheese is a creative twist on the classic comfort food, where bread slices are transformed into ghost shapes using cookie cutters, and a mixture of cheeses provides a gooey, flavorful filling. This dish is perfect for serving 4-6 people, making it an ideal choice for a family meal or a small Halloween gathering.
Let’s explore the ingredients and instructions to make these delightful sandwiches.
Ingredients (for 4-6 servings):
- 8-12 slices of white or whole wheat bread
- 8-12 slices of cheddar cheese
- 8-12 slices of mozzarella cheese
- 4 tablespoons unsalted butter, softened
- 1/2 teaspoon garlic powder (optional)
- Non-stick cooking spray or a few drops of olive oil
Cooking Instructions:
- Prepare the Bread: Using a ghost-shaped cookie cutter, cut ghost shapes out of each slice of bread. Each sandwich will need two ghost-shaped slices. This should yield about 4-6 sandwiches, depending on the size of your bread and cookie cutter.
- Butter the Bread: In a small bowl, mix the softened butter with garlic powder if using. Spread a thin layer of the butter mixture on one side of each ghost-shaped bread slice. The buttered side will guarantee a golden, crispy exterior.
- Assemble the Sandwich: Place one slice of cheddar cheese and one slice of mozzarella cheese between two slices of ghost-shaped bread, with the buttered sides facing outwards. Confirm the cheese covers as much of the bread as possible for even melting.
- Heat the Pan: Preheat a non-stick skillet over medium heat. Lightly spray the pan with non-stick cooking spray or add a few drops of olive oil to prevent sticking.
- Cook the Sandwiches: Place the assembled sandwiches in the skillet. Cook for approximately 3-4 minutes on each side, or until the bread is golden brown and the cheese is melted. Press down gently with a spatula to help the cheese melt evenly.
- Serve Warm: Once cooked, remove the sandwiches from the skillet and let them cool for a minute before serving. Pair with a warm bowl of tomato soup or serve them with a side of fresh veggies for a complete meal.
Extra Tips:
To make the Ghostly Grilled Cheese even more festive, consider adding small black olive slices or pieces of bell pepper to create eyes and a mouth on the ghost shapes. This not only enhances the ghostly appearance but also adds a bit of extra flavor and nutrition.
If you don’t have a ghost-shaped cookie cutter, you can easily use a knife to cut out ghost shapes freehand. Just make sure to keep the knife steady and the shapes consistent for the best results.
Enjoy this fun and spooky dish with your family and friends for a memorable Halloween dinner!
Pumpkin Patch Pizza

Celebrate Halloween with a delightful twist on a classic dish by making Pumpkin Patch Pizza. This playful and colorful pizza isn’t only a feast for the eyes but also a treat for the taste buds. Perfect for a Halloween dinner with the kids, this pizza features a vibrant orange sauce made from roasted pumpkin and is topped with an assortment of veggies to resemble a patch full of pumpkins. The combination of flavors and the Halloween theme make it an exciting dish for children, encouraging them to enjoy their vegetables in a fun way.
Pumpkin Patch Pizza is designed to serve 4-6 people, making it an ideal choice for family gatherings or small Halloween parties. The recipe involves crafting a homemade pumpkin sauce that acts as the base, followed by an array of toppings that mimic miniature pumpkins and leaves, enhancing the festive spirit. The simplicity of this recipe guarantees that even novice cooks can create a magical Halloween meal that’s both nutritious and entertaining.
Ingredients:
- 1 pre-made pizza crust (12-inch)
- 1 1/2 cups roasted pumpkin puree
- 1 tablespoon olive oil
- 1/2 teaspoon garlic powder
- 1/2 teaspoon onion powder
- Salt and pepper to taste
- 1 cup shredded mozzarella cheese
- 1/2 cup sliced cherry tomatoes
- 1/2 cup sliced bell peppers (orange, yellow, and green)
- 1/4 cup black olives, sliced
- 1/4 cup fresh basil leaves
- 1 teaspoon dried oregano
Instructions:
- Prepare the Pumpkin Sauce: In a bowl, combine the roasted pumpkin puree, olive oil, garlic powder, onion powder, salt, and pepper. Mix well until all ingredients are fully incorporated and the sauce is smooth and creamy.
- Preheat the Oven: Set your oven to 425°F (220°C) to make sure it’s hot enough to adequately cook the pizza and melt the cheese.
- Assemble the Pizza: Place the pre-made pizza crust on a baking sheet or pizza stone. Spread the pumpkin sauce evenly over the crust, leaving a small border around the edges for the crust.
- Add the Cheese and Toppings: Sprinkle the shredded mozzarella cheese over the pumpkin sauce. Arrange the cherry tomatoes and bell peppers on top to resemble mini pumpkins. Add black olive slices to create the eyes and mouths of the pumpkins. Scatter fresh basil leaves around the pizza to represent leaves.
- Season and Bake: Sprinkle dried oregano evenly over the toppings for added flavor. Place the pizza in the preheated oven and bake for 12-15 minutes, or until the cheese is melted and bubbly, and the crust is golden brown.
- Cool and Serve: Once baked, remove the pizza from the oven and let it cool for a few minutes. Slice into wedges and serve warm to enjoy all the flavors at their best.
Extra Tips:
When making Pumpkin Patch Pizza, feel free to get creative with the toppings. You can use different vegetables to create a variety of “pumpkins” and “leaves” to personalize the look of your pizza.
Additionally, if you prefer a homemade pizza crust, you can prepare one ahead of time to enhance the homemade feel of the dish. For an extra touch of spookiness, consider using mini cookie cutters to shape some of the toppings into fun Halloween shapes such as ghosts or bats.
This will make the dish even more appealing to kids and heighten the festive atmosphere.
Fang-Tastic Sliders

Fang-Tastic Sliders are a spooktacular treat perfect for a Halloween dinner with kids. These miniature burgers aren’t only fun to make but also delicious to eat. With their playful vampire theme, they’re sure to be a hit at any Halloween gathering. Shaped to resemble vampire mouths with cheddar cheese fangs and ketchup “blood,” these sliders are both creepy and cute, making them a delightful addition to your Halloween menu.
The key to these Fang-Tastic Sliders is in the presentation. The sliders are made with juicy, seasoned beef patties, nestled in soft mini burger buns. The sharp cheddar cheese slices are cut into fang shapes and strategically placed to give the appearance of a vampire’s mouth. A touch of ketchup adds the finishing touch, simulating dripping blood for a truly festive effect. These sliders are both simple to prepare and fun to assemble, making them an ideal project for little hands excited to join in on the Halloween fun.
Ingredients (Serves 4-6):
- 1 pound ground beef
- 1 teaspoon garlic powder
- 1 teaspoon onion powder
- 1/2 teaspoon salt
- 1/2 teaspoon black pepper
- 6 mini burger buns
- 6 slices of cheddar cheese
- Ketchup
- Lettuce leaves (optional)
- Tomato slices (optional)
- Pickles (optional)
- Mustard (optional)
- Vegetable oil (for cooking)
Instructions:
- Prepare the Meat Mixture: In a large bowl, combine the ground beef, garlic powder, onion powder, salt, and black pepper. Mix well until all ingredients are evenly incorporated.
- Shape the Patties: Divide the meat mixture into 6 equal portions. Shape each portion into a small patty, about the size of your mini burger buns. Make sure the patties are slightly larger than the buns as they’ll shrink when cooked.
- Cook the Patties: Heat a large skillet over medium-high heat and add a little vegetable oil. Once the oil is hot, add the beef patties. Cook for about 3-4 minutes on each side, or until they’re cooked to your desired doneness. Remove the patties from the skillet and let them rest on a plate.
- Create the Vampire Fangs: While the patties are resting, cut each slice of cheddar cheese into small triangles to resemble vampire fangs. You’ll need 2-3 triangular pieces per slider.
- Assemble the Sliders: Place the cooked beef patty on the bottom half of each mini burger bun. Add a few drops of ketchup at the top of the patty to simulate blood. Arrange the cheese triangles along the edge of the patty, with the pointed ends facing outward to mimic fangs. If desired, add lettuce leaves, tomato slices, and pickles to the sliders.
- Finish with the Top Bun: Spread a thin layer of mustard on the inside of the top bun if you like, then place it on top of the slider, pressing down gently to secure the cheese fangs in place.
Extra Tips:
For an extra spooky touch, consider using black sesame seed buns or adding a small edible eyeball on top of each slider. If you want to make the sliders even more festive, use different colored cheeses like white cheddar or gouda for a variety of fang shades.
Additionally, if you’re serving these sliders to a younger crowd, be sure to adjust the seasoning and spice levels to suit their taste preferences. Enjoy crafting these Fang-Tastic Sliders and watch them disappear in the blink of an eye at your Halloween party!
Eyeball Spaghetti
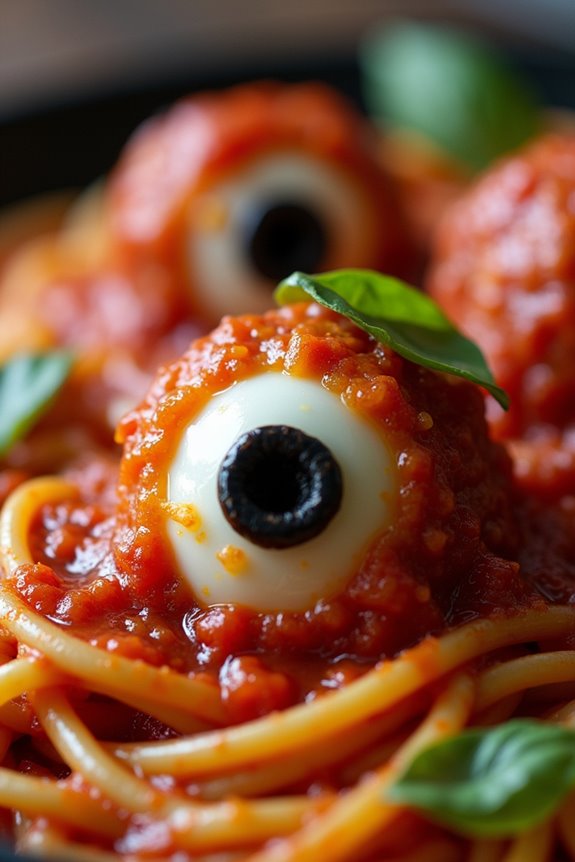
Eyeball Spaghetti is a fun and spooky dish that’s perfect for a Halloween dinner with kids. This creative recipe combines the classic favorite of spaghetti with a creepy twist—meatball “eyeballs” floating in a rich tomato sauce. The eyeballs are made using mozzarella balls and olives to give them an eerily realistic appearance.
This dish not only looks fantastically frightening but also tastes delicious, making it a hit among children and adults alike. Imagine a big pot of steaming spaghetti with savory meatballs staring back at you with cheesy eyes. It’s a perfect centerpiece for a Halloween-themed dinner party, sure to amuse and delight little goblins and ghosts.
The combination of tender spaghetti, flavorful meatballs, and a tangy tomato sauce is sure to satisfy everyone’s taste buds while adding a bit of Halloween magic to your meal.
Ingredients (Serves 4-6):
- 1 pound spaghetti
- 1 pound ground beef
- 1/2 cup breadcrumbs
- 1/4 cup grated Parmesan cheese
- 1 egg
- 1 teaspoon garlic powder
- 1 teaspoon onion powder
- 1 teaspoon Italian seasoning
- Salt and pepper to taste
- 24 small mozzarella balls (bocconcini)
- 12 black olives, halved
- 3 cups marinara sauce
- 2 tablespoons olive oil
- Fresh basil leaves (optional, for garnish)
Instructions:
- Prepare the Meatballs: In a large bowl, combine the ground beef, breadcrumbs, Parmesan cheese, egg, garlic powder, onion powder, Italian seasoning, salt, and pepper. Mix well until all ingredients are fully incorporated.
- Shape the Meatballs: Roll the mixture into 24 small meatballs, roughly the size of a golf ball. Place them on a baking sheet lined with parchment paper.
- Create the Eyeballs: Press a mozzarella ball into each meatball and then press half of a black olive into the mozzarella to form the “pupil” of the eyeball.
- Cook the Meatballs: Heat the olive oil in a large skillet over medium heat. Add the meatballs and cook until browned on all sides, about 8-10 minutes. Verify they’re cooked through.
- Simmer in Sauce: Pour the marinara sauce into the skillet with the meatballs. Simmer on low heat for about 10 minutes to allow the flavors to meld together.
- Cook the Spaghetti: While the meatballs are simmering, cook the spaghetti according to package instructions. Drain and set aside.
- Assemble the Dish: Divide the spaghetti among serving plates. Spoon the meatballs and sauce over the top. Garnish with fresh basil leaves if desired.
Extra Tips:
For an extra creepy presentation, consider adding a few drops of red food coloring to the marinara sauce to deepen the red hue, mimicking a more blood-like appearance.
You can also prepare the meatballs and sauce a day ahead and reheat them before serving to save time. If you prefer, turkey or chicken can be substituted for ground beef to lighten the dish.
Remember to let the kids help with assembling the eyeballs—it’s a fun and engaging activity that they’ll enjoy!
Goblin Nachos

Goblin Nachos are a spooky and delicious treat that’s perfect for a Halloween dinner with kids. These nachos aren’t only fun to make, but they also provide a burst of flavors and textures that will excite any little goblin. Combining traditional nacho ingredients with a creative Halloween twist, Goblin Nachos will become a festive favorite that brings smiles to faces and satisfies hungry tummies.
The charm of Goblin Nachos lies in their presentation and the playful use of ingredients to create a dish that’s both eerie and appetizing. Children will delight in helping to assemble these nachos, allowing them to express their creativity while learning how to prepare a simple and tasty meal. This dish also provides an opportunity to sneak in some nutritious elements amidst the cheesy and crunchy goodness, making it a well-rounded option for a festive dinner menu.
Ingredients for 4-6 servings:
- 1 bag of tortilla chips (about 14 oz)
- 1 lb ground beef or turkey
- 1 packet taco seasoning
- 1 cup shredded cheddar cheese
- 1 cup shredded Monterey Jack cheese
- 1 can black beans, drained and rinsed
- 1 cup salsa
- 1/2 cup black olives, sliced
- 1/2 cup sour cream
- 2 green bell peppers
- 1 bunch green onions
- Optional toppings: jalapeños, guacamole, diced tomatoes
Cooking Instructions:
- Preheat the Oven: Begin by preheating your oven to 350°F (175°C). This will guarantee that it’s at the right temperature when you’re ready to bake the nachos.
- Cook the Meat: In a large skillet over medium heat, cook the ground beef or turkey until browned. Drain any excess fat, then add the taco seasoning and 1/4 cup of water. Stir well and allow the mixture to simmer for about 5 minutes, or until the water has evaporated and the meat is well-seasoned.
- Prepare the Bell Peppers: While the meat is cooking, slice the green bell peppers into rings to resemble goblin eyes. Set them aside for later assembly.
- Layer the Nachos: On a large baking sheet or oven-safe platter, spread half of the tortilla chips in an even layer. Sprinkle half of the cooked meat over the chips, followed by half of the black beans, cheddar cheese, and Monterey Jack cheese. Repeat with the remaining half of the chips, meat, black beans, and cheeses.
- Bake the Nachos: Place the baking sheet in the preheated oven and bake for about 10-15 minutes, or until the cheese is melted and bubbly.
- Add Toppings: Once baked, remove the nachos from the oven. Carefully arrange the bell pepper rings over the nachos to create goblin eyes. Add a slice of black olive in the center of each ring for pupils. Spoon salsa over the nachos and garnish with sliced green onions, additional toppings like jalapeños and diced tomatoes, if desired.
- Serve with Dips: Serve the Goblin Nachos with sour cream and guacamole on the side for dipping.
Extra Tips:
When preparing Goblin Nachos, you can easily customize the toppings based on your children’s preferences. For a vegetarian option, simply omit the meat and double the beans for protein.
To make the nachos extra spooky, consider using “ghost-shaped” tortilla chips or adding a dash of food coloring to the cheese before melting. Remember to keep an eye on the nachos while they’re in the oven to prevent the cheese from burning, as ovens vary in heat distribution.
Enjoy this fun and festive meal that turns dinner into a Halloween adventure!
Vampire Veggie Platter
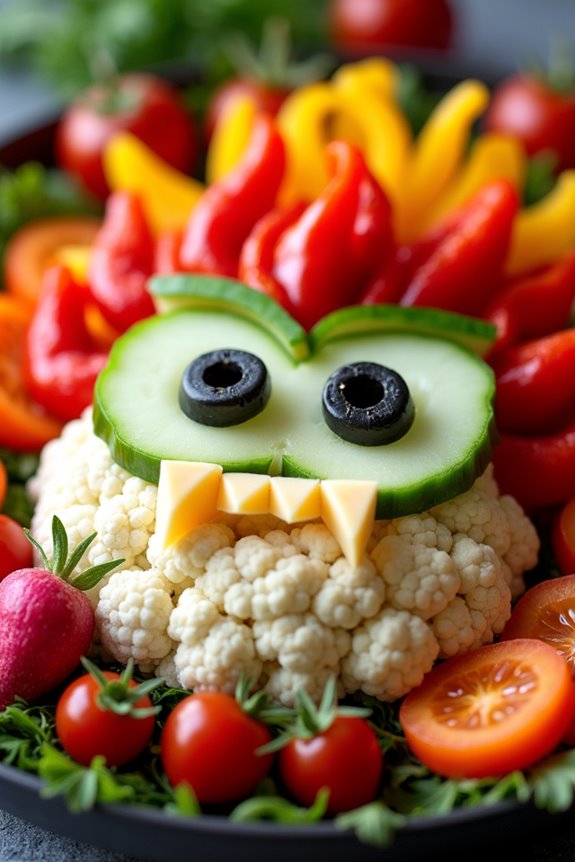
Create a fun and spooky snack for your Halloween dinner with a Vampire Veggie Platter that will delight kids of all ages. This dish isn’t only visually appealing but also healthy, making it a perfect addition to any Halloween celebration.
The platter features an assortment of vibrant vegetables arranged to resemble a vampire face, complete with fangs made from cheese and olives for eyes. It’s a creative way to encourage kids to eat their veggies while getting into the festive spirit.
The Vampire Veggie Platter is easy to assemble and can be customized with your favorite vegetables, making it adaptable to any dietary preferences or restrictions. The key to this platter is to be playful with the arrangement and let your imagination run wild.
Whether you’re hosting a Halloween party or simply serving up a spooky dinner for the family, this veggie platter is sure to be a hit and a conversation starter.
Ingredients (serving size: 4-6 people):
- 1 small head of cauliflower
- 1 red bell pepper
- 1 yellow bell pepper
- 1 cucumber
- 1 small bunch of radishes
- 1 cup cherry tomatoes
- 1 cup baby carrots
- 1 block of cheddar cheese
- 6 black olives
- 1 small bunch of parsley
- 1 cup ranch dressing (or preferred dip)
Instructions:
- Prepare the Vegetables: Begin by washing all the vegetables thoroughly. Cut the cauliflower into bite-sized florets. Slice the red and yellow bell peppers into strips. Slice the cucumber into rounds. Trim and halve the radishes.
- Cheese and Olive Fangs: Cut the cheddar cheese into thin, triangular shapes to resemble fangs. Slice the black olives in half to create eyes.
- Assemble the Face: On a large platter, start arranging the cauliflower florets to form the shape of a face. Use the bell pepper strips to outline the hair and the cucumber slices to create a mouth.
- Add Eyes and Fangs: Place the olive halves above the mouth to create eyes, and position the cheese triangles to look like fangs emerging from the mouth.
- Add Other Features: Use radishes to form the cheeks and position cherry tomatoes around the platter as blood droplets. Scatter baby carrots around the edge for added color and texture.
- Finishing Touches: Garnish the platter with sprigs of parsley to add a touch of green and serve the ranch dressing in a small bowl at the side of the platter for dipping.
Extra Tips:
To make the platter even more festive, consider adding some spooky props like plastic spiders or Halloween-themed toothpicks to the arrangement.
For a more interactive experience, invite the kids to help with the assembly, allowing them to design their own vampire faces. If you want to make the platter more substantial, you can add other items like sliced meats or nuts.
Remember to keep the platter refrigerated until serving to guarantee the veggies stay fresh and crisp.
Zombie Fingers Hot Dogs

Get ready for a spooky Halloween dinner that your kids will love with these Zombie Fingers Hot Dogs! This fun and eerie dish is perfect for getting into the Halloween spirit, combining the classic taste of hot dogs with a creative, creepy twist.
These zombie fingers will surely be a hit with the little ones, sparking their imagination and satisfying their taste buds. They’re easy to make and perfect for a Halloween party or dinner.
Zombie Fingers Hot Dogs aren’t only delicious but also a fantastic way to bring some Halloween-themed fun to the table. Made with simple ingredients, these hot dogs are designed to look like creepy fingers, complete with “fingernails” and “knuckles.”
With just a little bit of creativity and minimal preparation, you can transform ordinary hot dogs into something extraordinary. Serve them with a side of ketchup for a “bloody” effect, and watch your kids’ eyes light up with delight!
Ingredients (Serves 4-6 people):
- 8 hot dogs
- 8 hot dog buns
- 1 tablespoon ketchup
- 8 small slivers of onion (or small pieces of cheese) for nails
- 1 tablespoon mustard (optional)
- 1 tablespoon mayonnaise (optional)
- 1 tablespoon butter (optional)
- 1 tablespoon relish (optional)
Cooking Instructions:
- Prepare the Hot Dogs: Start by taking each hot dog and slicing off a small, thin piece at the end to create a flat surface for the “fingernail.” Use a paring knife to carve out three small, shallow lines in the middle of each hot dog to create the appearance of knuckles.
- Create the Nails: Take the small slivers of onion or cheese and stick them onto the flat end of each hot dog to mimic fingernails. You can use a little bit of ketchup to help them stick if needed.
- Cook the Hot Dogs: Boil, grill, or pan-fry the hot dogs until they’re heated through and slightly browned. Cooking them on a grill or frying pan will give a more realistic look with a slight char, resembling old, zombie-like fingers.
- Prepare the Buns: If desired, lightly butter and toast the hot dog buns. This step is optional but adds extra flavor and texture to your dish.
- Assemble the Zombie Fingers: Place each hot dog into a bun. Drizzle some ketchup at the base of the hot dog for a “bloody” effect. You can also add mustard, mayonnaise, or relish according to your preference.
- Serve: Arrange the Zombie Fingers Hot Dogs on a spooky platter and serve them immediately to your excited little goblins!
Extra Tips:
For an even spookier presentation, serve the hot dogs on a black or Halloween-themed platter. You can also enhance the creepy atmosphere by using a little food coloring to make the ketchup look darker and more sinister.
If you’re expecting a larger crowd, simply double the ingredients to accommodate more guests. Get creative with the “fingernails” by using different ingredients like sliced olives or almonds. Most importantly, have fun and enjoy the festive spirit of Halloween!
Haunted Harvest Chili

Halloween is a time for thrills, chills, and deliciously spooky meals that bring the family together. Haunted Harvest Chili is the perfect dish to serve up for a fun and festive Halloween dinner. This hearty chili is packed with seasonal flavors and is sure to be a hit with both kids and adults alike. With a mix of beans, veggies, and spices, it’s not only tasty but also a nutritious option to keep the little goblins fueled for a night of trick-or-treating.
Picture a bubbling cauldron of rich, savory chili filled with colorful ingredients that mimic the vibrant hues of autumn. The beauty of this dish lies in its simplicity and the way it captures the essence of a fall harvest. The combination of beans, bell peppers, and pumpkin puree makes it a well-rounded meal that’s both comforting and festive.
Ready to whip up a batch of Haunted Harvest Chili? Here’s how you can prepare this delightful dish for 4-6 people.
Ingredients:
- 1 tablespoon olive oil
- 1 large onion, chopped
- 2 cloves garlic, minced
- 1 pound ground turkey or beef
- 1 red bell pepper, chopped
- 1 green bell pepper, chopped
- 1 (15-ounce) can kidney beans, drained and rinsed
- 1 (15-ounce) can black beans, drained and rinsed
- 1 (15-ounce) can pumpkin puree
- 2 cups chicken or vegetable broth
- 1 (14.5-ounce) can diced tomatoes
- 2 tablespoons chili powder
- 1 teaspoon ground cumin
- 1 teaspoon smoked paprika
- Salt and pepper to taste
- Optional toppings: shredded cheese, sour cream, chopped cilantro, sliced green onions
Cooking Instructions:
- Sauté the Aromatics: Heat the olive oil in a large pot over medium heat. Add the chopped onion and minced garlic, cooking until the onion becomes translucent and the garlic is fragrant, about 3-4 minutes.
- Cook the Meat: Add the ground turkey or beef to the pot. Cook until the meat is browned and cooked through, breaking it apart with a spatula as it cooks, approximately 5-7 minutes.
- Add Vegetables: Stir in the chopped red and green bell peppers. Cook for another 3-4 minutes until the peppers begin to soften.
- Combine Remaining Ingredients: Add the kidney beans, black beans, pumpkin puree, chicken or vegetable broth, diced tomatoes, chili powder, ground cumin, smoked paprika, salt, and pepper. Stir well to combine all ingredients.
- Simmer the Chili: Bring the mixture to a boil, then reduce the heat to low. Cover the pot and let the chili simmer for at least 30 minutes to allow the flavors to meld together, stirring occasionally.
- Adjust for Taste: After simmering, taste the chili and adjust seasoning if necessary. Add more salt, pepper, or spices to suit your preference.
- Serve and Garnish: Ladle the Haunted Harvest Chili into bowls and top with your choice of shredded cheese, sour cream, chopped cilantro, or sliced green onions for extra flavor and color.
Extra Tips:
For a vegetarian version, simply omit the meat and double the amount of beans for added protein. If your kids are sensitive to spice, you can reduce the chili powder and replace it with a pinch of cinnamon for a sweet, warming touch.
This chili can also be made in advance and reheated, making it an excellent option for busy Halloween evenings. Serve it with crusty bread or cornbread on the side for a complete meal that will leave everyone spellbound!
Bat Wings Buffalo Chicken

Looking for a spooky and delicious treat for your Halloween dinner with the kids? Bat Wings Buffalo Chicken is the perfect dish to add some fun and flavor to your table. This creative twist on the classic buffalo wings involves using dark-colored chicken wings, giving them the eerie appearance of bat wings. Coated in a tangy buffalo sauce, these wings are sure to be a hit among the little goblins and ghosts at your gathering. Not only are they fun to look at, but they also pack a punch of flavor that even the adults will enjoy.
To obtain the dark, eerie look of bat wings, the recipe uses a combination of soy sauce, balsamic vinegar, and a hint of food coloring to give the wings their unique shade. The chicken is first marinated to soak up all the savory goodness before being baked to crispy perfection. Once cooked, the buffalo sauce is generously applied, creating a perfect blend of spicy and savory that will have everyone reaching for seconds. Serve these wings with a side of celery sticks and a creamy ranch or blue cheese dressing for dipping.
Ingredients (serving size: 4-6 people):
- 3 pounds of chicken wings
- 1/2 cup soy sauce
- 1/4 cup balsamic vinegar
- 1/4 teaspoon black food coloring
- 1/4 cup unsalted butter
- 1/2 cup hot sauce (such as Frank’s RedHot)
- 1 tablespoon apple cider vinegar
- 1 teaspoon garlic powder
- 1 teaspoon onion powder
- Salt and pepper to taste
- Celery sticks (optional)
- Ranch or blue cheese dressing (optional)
Cooking Instructions:
- Prepare the Chicken Wings: Cut the chicken wings into three parts – drumette, wingette, and tip. Discard the tips or save them for stock. Rinse the wings and pat them dry with paper towels.
- Marinate the Wings: In a large bowl, combine the soy sauce, balsamic vinegar, and black food coloring. Add the chicken wings to the bowl and toss them until they’re evenly coated. Cover the bowl with plastic wrap and let the wings marinate in the refrigerator for at least 1 hour, or overnight for best results.
- Preheat the Oven: Preheat your oven to 400°F (200°C). Line a baking sheet with aluminum foil and place a wire rack on top.
- Bake the Wings: Remove the wings from the marinade and arrange them in a single layer on the prepared wire rack. Bake in the preheated oven for 40-45 minutes, turning halfway through, until the wings are crispy and fully cooked.
- Prepare the Buffalo Sauce: In a small saucepan over medium heat, melt the butter. Stir in the hot sauce, apple cider vinegar, garlic powder, and onion powder. Mix until well combined and season with salt and pepper to taste.
- Coat the Wings: Once the wings are done baking, place them in a large bowl. Pour the prepared buffalo sauce over the wings and toss them until they’re fully coated.
- Serve: Transfer the Bat Wings Buffalo Chicken to a serving platter. Serve hot with celery sticks and your choice of ranch or blue cheese dressing for dipping.
Extra Tips:
To guarantee the wings are extra crispy, make sure they’re completely dry before marinating, and avoid crowding them on the baking rack. This allows for even air circulation.
If you prefer a milder version, you can adjust the amount of hot sauce in the buffalo mixture. For added fun, you could serve the wings in a dimly lit area with Halloween-themed decorations to enhance the spooky dining experience. Enjoy your hauntingly delicious feast!
Skeleton Bone Breadsticks

Skeleton Bone Breadsticks are a spooktacular addition to any Halloween dinner table, especially when catering to children. These whimsically shaped breadsticks aren’t only fun to look at but also delicious to munch on. Shaped like bones, they add a playful touch to your meal and can be paired with a variety of dips or served alongside a hearty Halloween-themed soup or pasta dish. The texture is crispy on the outside with a soft, chewy center, making them an appealing treat for both kids and adults.
Making Skeleton Bone Breadsticks is easier than you might think, and it’s a great way to get the little ones involved in the kitchen. This recipe uses pre-made pizza dough, which cuts down on preparation time and guarantees that the breadsticks turn out perfectly every time. With just a few simple ingredients and some creative shaping, you can bring these bony delights to life in no time. Plus, the aroma of freshly baked breadsticks wafting through your home will surely set the scene for a festive Halloween evening.
Ingredients (Serves 4-6):
- 1 pound of pre-made pizza dough
- 2 tablespoons of olive oil
- 1 teaspoon of garlic powder
- 1 teaspoon of dried oregano
- 1 teaspoon of dried thyme
- Salt to taste
- 1/4 cup of grated Parmesan cheese (optional)
- Marinara sauce or any preferred dipping sauce
Cooking Instructions:
- Preheat the Oven: Begin by preheating your oven to 375°F (190°C). Prepare two baking sheets by lining them with parchment paper to prevent sticking.
- Prepare the Dough: On a lightly floured surface, roll out the pizza dough to about 1/4 inch thickness. Using a knife or pizza cutter, slice the dough into strips approximately 6 inches long and 1 inch wide.
- Shape the Breadsticks: To create the bone shape, gently tie a knot at each end of the dough strips, leaving a bit of space in the middle to form the bone’s shaft. Adjust the knots to make the ends look like bone joints.
- Season the Breadsticks: In a small bowl, mix the olive oil, garlic powder, oregano, thyme, and salt. Brush this mixture generously over the shaped dough strips. If using Parmesan cheese, sprinkle it over the top at this stage.
- Bake the Breadsticks: Place the prepared breadsticks on the lined baking sheets, ensuring they’ve enough space to expand. Bake them in the preheated oven for about 15-20 minutes, or until they’re golden brown and crisp.
- Serve: Once baked, remove the breadsticks from the oven and let them cool slightly. Serve warm with a side of marinara sauce or your favorite dipping sauce.
Extra Tips: When shaping the breadsticks, don’t worry if they look slightly imperfect, as this adds to the spooky appeal of the dish. If you prefer a more buttery flavor, you can substitute melted butter for olive oil in the seasoning mixture. For added flavor, feel free to experiment with other herbs and spices based on your family’s taste preferences.
Finally, if you’re making these breadsticks ahead of time, simply reheat them in a warm oven for a few minutes before serving to bring back their fresh-from-the-oven taste and texture.
Mummy Wrapped Corn Dogs

Mummy Wrapped Corn Dogs are a fun and spooky dish perfect for Halloween dinner with kids. Not only do they make a delightful centerpiece for your Halloween spread, but they’re also easy to prepare and enjoy. The combination of a classic corn dog with a mummy-like twist using crescent roll dough is sure to be a hit with children. The playful appearance and delicious taste make this dish a great choice for a festive Halloween meal.
To create these Mummy Wrapped Corn Dogs, you’ll wrap each corn dog in strips of crescent roll dough, leaving a small space for the “eyes” to peer out. Once baked to golden perfection, these tasty treats will resemble tiny mummies, making them an exciting addition to your Halloween celebration. Whether you’re planning a party or just a fun family dinner, Mummy Wrapped Corn Dogs are an easy way to add a bit of spooky flair to your evening.
Ingredients (Serves 4-6):
- 8 corn dogs
- 1 can of refrigerated crescent roll dough
- 16 small candy eyes
- Mustard or ketchup (for dipping)
Cooking Instructions:
- Preheat the Oven: Start by preheating your oven to 375°F (190°C). This guarantees that the crescent roll dough will bake evenly and achieve a golden-brown color.
- Prepare the Crescent Dough: Open the can of crescent roll dough and unroll it onto a clean surface. Use a pizza cutter or a sharp knife to cut the dough into long, thin strips, about 1/4 inch wide. These strips will be used to wrap around the corn dogs.
- Wrap the Corn Dogs: Take one corn dog and begin wrapping it with the strips of dough, starting from the bottom and working your way up. Leave a small gap near the top to place the “eyes” once baked. Repeat this process with the remaining corn dogs.
- Place on Baking Sheet: Arrange the wrapped corn dogs on a baking sheet lined with parchment paper. Make sure they’re spaced adequately apart to guarantee even cooking.
- Bake: Place the baking sheet in the preheated oven and bake for about 15-18 minutes, or until the dough is golden brown and cooked through.
- Add the Eyes: Once the corn dogs are done baking, remove them from the oven and allow them to cool slightly. Place two candy eyes in the gap left unwrapped near the top of each corn dog.
- Serve: Serve the Mummy Wrapped Corn Dogs warm with mustard or ketchup for dipping.
Extra Tips:
For added flavor, consider brushing the crescent dough with melted butter before baking. This will give the dough a richer taste and a beautiful sheen.
If you’re looking to add a bit of spice, try incorporating some shredded cheese or a thin spread of Dijon mustard on the dough before wrapping.
Additionally, if you don’t have candy eyes, you can use small dots of mustard or ketchup to create the eyes after baking. These small details can make a big difference in the presentation and enjoyment of the dish.