

I was so excited to plan my Halloween soirée and wanted to wow my friends with finger foods that feel chic but still have that spooky vibe we all love. Truffle deviled eggs topped with black caviar and mini beef Wellington bites were just the beginning. These aren’t your usual snacks; they’re little gourmet treats that promise to delight. Want to know what else is on the menu? Keep reading to discover more.
Truffle Deviled Eggs With Black Caviar

Truffle Deviled Eggs With Black Caviar are the perfect sophisticated finger food for an adult Halloween party. These elegant bites bring a luxurious twist to the classic deviled eggs, combining the rich aroma of truffle oil with the exquisite taste of black caviar. They aren’t only visually appealing but also tantalize the taste buds with their decadent flavors, making them a standout dish at any gathering.
Whether you’re hosting a spooky soirée or an upscale Halloween dinner, these deviled eggs add a touch of class and indulgence to the menu.
Suitable for serving 4-6 people, these Truffle Deviled Eggs With Black Caviar are easy to prepare and can be made ahead of time, allowing you to focus on other aspects of your party. The creamy yolk filling, infused with truffle oil and topped with a dollop of caviar, provides a delightful contrast to the smooth egg whites.
The addition of fresh herbs enhances the flavor profile, making them not just a treat for the eyes but also a memorable culinary experience.
Ingredients:
- 6 large eggs
- 3 tablespoons mayonnaise
- 1 teaspoon Dijon mustard
- 1 teaspoon truffle oil
- Salt and freshly ground black pepper, to taste
- 1 tablespoon chopped fresh chives
- 2 ounces black caviar
- Paprika for garnish (optional)
Cooking Instructions:
- Boil the Eggs: Place the eggs in a medium-sized saucepan and cover them with cold water. Bring the water to a boil over medium-high heat. Once boiling, remove from heat and cover the pot. Let the eggs sit in the hot water for about 10-12 minutes.
- Cool and Peel: After the eggs have cooked, transfer them to a bowl of ice water to cool for at least 5 minutes. Once cooled, gently peel the eggs under running water to remove the shells without damaging the whites.
- Prepare the Filling: Slice each egg in half lengthwise and carefully remove the yolks, placing them in a mixing bowl. Arrange the egg whites on a serving platter. Mash the yolks with a fork until smooth, then add the mayonnaise, Dijon mustard, truffle oil, salt, and pepper. Mix until well combined and creamy.
- Fill the Egg Whites: Using a spoon or a piping bag, fill each egg white half with the yolk mixture. Make sure to fill them generously for the best flavor.
- Add Garnishes: Top each filled egg with a small dollop of black caviar. Sprinkle chopped chives over the top for added color and flavor. If desired, lightly dust with paprika for a touch of color and spice.
Extra Tips:
To guarantee the perfect texture, make sure the yolk mixture is smooth and lump-free before filling the egg whites. If you prefer a silkier consistency, you can pass the yolk mixture through a fine sieve.
For an extra touch of luxury, consider using a high-quality truffle oil, as it greatly influences the overall flavor. Remember to keep the filled eggs cool until serving to maintain the freshness of the caviar.
If you want to prepare them ahead of time, store the egg whites and yolk mixture separately, assembling just before serving for best texture and taste.
Spicy Shrimp and Avocado Bites
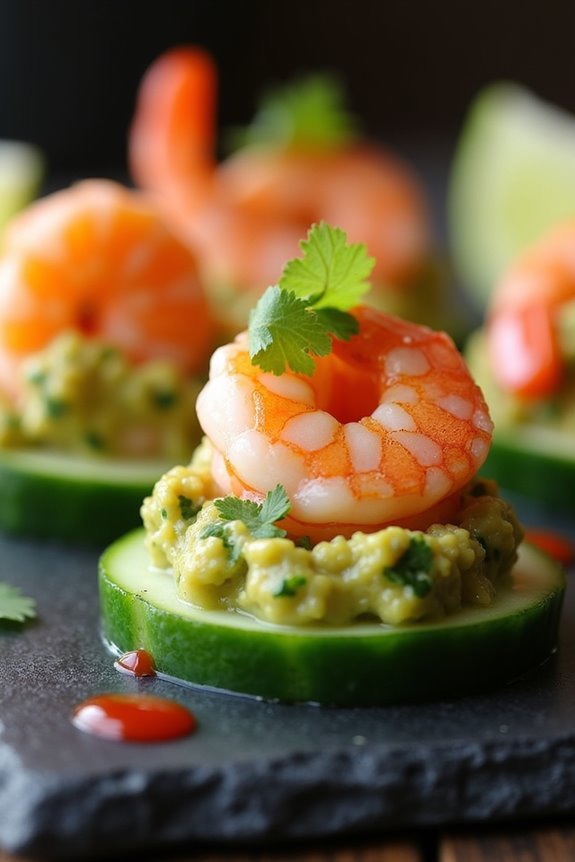
Spicy Shrimp and Avocado Bites are the perfect addition to any Halloween party spread, offering a tantalizing combination of flavors and textures that your guests will love. This dish combines succulent shrimp with creamy avocado and a hint of spice, all served on a crisp cucumber slice for a revitalizing bite-sized treat.
It’s an easy-to-make appetizer that not only looks sophisticated but also delivers a satisfying flavor punch. Whether you’re hosting a spooky soiree or a casual get-together, these spicy shrimp and avocado bites will surely be a hit.
The great thing about this recipe is its versatility and simplicity. The shrimp can be prepared in advance, allowing you to focus on the other components as your guests arrive. The coolness of the avocado balances the heat from the shrimp, while the cucumber provides a revitalizing crunch.
Each bite is a perfect harmony of spicy, creamy, and crisp textures, making these bites a standout on any Halloween finger food menu. Plus, they’re naturally gluten-free and can be easily adapted to suit various dietary preferences.
Ingredients (serving size: 4-6 people):
- 1 pound large shrimp, peeled and deveined
- 2 tablespoons olive oil
- 1 teaspoon smoked paprika
- 1/2 teaspoon cayenne pepper
- Salt and black pepper to taste
- 2 ripe avocados
- 1 tablespoon lime juice
- 2 tablespoons fresh cilantro, chopped
- 1 English cucumber, sliced into 1/4-inch rounds
- Optional: hot sauce for extra heat
- Lime wedges for garnish
Cooking Instructions:
- Prepare the Shrimp: In a bowl, toss the shrimp with olive oil, smoked paprika, cayenne pepper, salt, and black pepper until well-coated. Allow them to marinate for at least 10 minutes to let flavors meld.
- Cook the Shrimp: Heat a large skillet over medium-high heat. Add the shrimp and cook for 2-3 minutes on each side, or until they’re pink and opaque. Remove from heat and set aside to cool slightly.
- Prepare the Avocado Mixture: In a separate bowl, mash the avocados with lime juice, cilantro, and a pinch of salt until smooth but still slightly chunky.
- Assemble the Bites: Take each cucumber slice and spread a generous teaspoon of the avocado mixture on top. Place one cooked shrimp on each cucumber slice.
- Add Finishing Touches: If desired, add a drop of hot sauce on each shrimp for an extra kick. Arrange the bites on a serving platter and garnish with lime wedges for squeezing over the top.
Extra Tips:
For an extra layer of flavor, consider grilling the shrimp instead of pan-searing them. This will add a smoky depth that complements the spiciness beautifully.
Make sure the avocados are ripe for a smooth and creamy texture; if they’re too hard, you might end up with a less desirable consistency. Also, these bites are best served immediately once assembled to maintain the freshness and crunch of the cucumber.
If you need to prepare them in advance, keep the components separate and assemble them just before serving.
Prosciutto-Wrapped Asparagus Spears

Halloween isn’t just about candy and sweets; it’s also a great opportunity to serve up some fabulous finger foods that adults will love. Prosciutto-Wrapped Asparagus Spears are an elegant and savory addition to any Halloween party spread. These delightful bites bring together the crisp freshness of asparagus with the rich, salty flavor of prosciutto, making them a perfect appetizer for a sophisticated yet spooky gathering.
The combination of textures and flavors is bound to impress your guests, and their simple preparation means you can spend more time enjoying the festivities. This dish isn’t only visually appealing but also incredibly easy to prepare. The asparagus spears are lightly blanched to retain their vibrant green color and subtle crunch, while the prosciutto crisps up beautifully in the oven, adding a touch of decadence.
Whether you’re hosting a Halloween cocktail party or looking for a sophisticated snack to accompany your horror movie marathon, these Prosciutto-Wrapped Asparagus Spears are sure to be a hit. Let’s get started on this delicious dish for a serving size of 4-6 people!
Ingredients:
- 1 pound of asparagus spears, trimmed
- 8 ounces of prosciutto, thinly sliced
- 2 tablespoons olive oil
- 1 teaspoon black pepper, freshly ground
- 1 teaspoon garlic powder
- 1 lemon, cut into wedges, for serving
Instructions:
1. Preparation: Preheat your oven to 400°F (200°C). Begin by washing the asparagus spears thoroughly and trimming the woody ends. This guarantees that the asparagus is tender and easy to eat.
2. Blanching: Fill a large pot with salted water and bring it to a boil. Add the asparagus spears to the boiling water and blanch them for about 2-3 minutes. This will help maintain their vibrant green color and crunch.
Immediately transfer the blanched asparagus to a bowl of ice water to stop the cooking process. Drain and pat dry with paper towels.
3. Wrapping: Lay out a slice of prosciutto on a cutting board. Place one asparagus spear at one end of the prosciutto slice and roll it up tightly, allowing the prosciutto to overlap as you go.
Repeat this process until all the asparagus spears are wrapped.
4. Seasoning: Place the wrapped asparagus spears on a baking sheet lined with parchment paper. Drizzle them with olive oil, and sprinkle with freshly ground black pepper and garlic powder to taste.
5. Baking: Bake in the preheated oven for about 12-15 minutes, or until the prosciutto is crispy and the asparagus is tender.
6. Serving: Once done, remove from the oven and let cool slightly. Serve warm with lemon wedges on the side for a burst of freshness.
Extra Tips:
- For added flavor, you can sprinkle some grated Parmesan cheese over the top before baking.
- Be cautious not to over-blanch the asparagus to ensure they remain crisp.
- If you prefer, you can substitute prosciutto with bacon, but adjust the cooking time as bacon may take longer to crisp up.
- These can be assembled ahead of time and baked just before serving, making them a convenient option for party planning.
Smoky Gouda and Fig Crostini
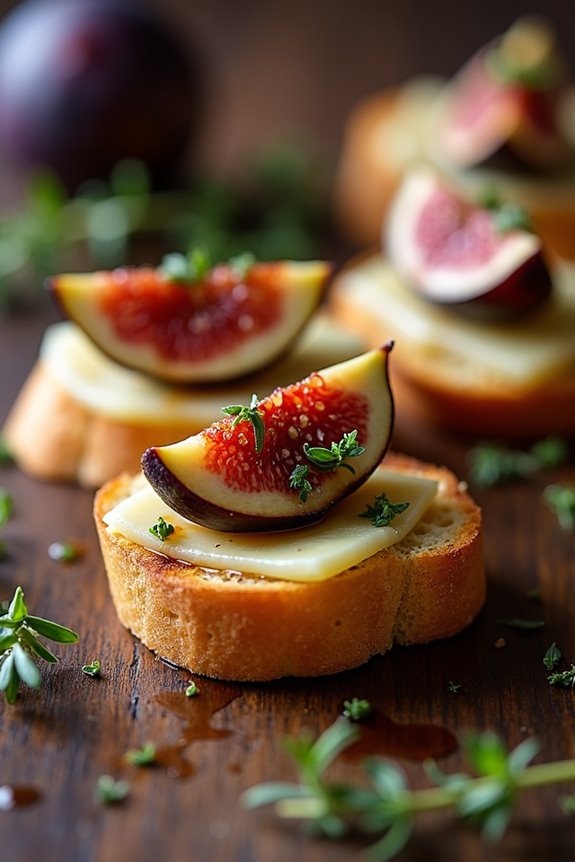
Smoky Gouda and Fig Crostini is the perfect Halloween finger food for adults, offering a delightful blend of smoky, sweet, and savory flavors. This elegant appetizer is bound to impress your guests with its sophisticated taste and presentation. The smooth, smoky Gouda pairs wonderfully with the rich sweetness of figs, while the crisp crostini provides the ideal crunchy base.
As the spooky season calls for gatherings and celebrations, this dish is easy to prepare and makes for a great addition to any Halloween party platter. Crafting these crostini is a breeze and involves minimal ingredients, making it an ideal choice for any host looking for a quick yet gourmet option.
The combination of textures and flavors in this dish will tantalize your taste buds, making it a memorable experience. The slight smokiness of the Gouda, combined with the natural sweetness of figs and a drizzle of balsamic glaze, creates a harmony of flavors that dance on the palate. Perfectly sized for easy handling, these crostini are as convenient to eat as they’re pleasing to the eye, adding a touch of sophistication to your Halloween festivities.
Ingredients (Serves 4-6):
- 1 French baguette
- 8 oz smoked Gouda cheese
- 6-8 fresh figs
- Olive oil
- Salt and pepper
- Balsamic glaze
- Fresh thyme leaves
Cooking Instructions:
- Prepare the Baguette: Preheat your oven to 375°F (190°C). Slice the French baguette into 1/2 inch thick slices, yielding about 12-18 pieces, and arrange them on a baking sheet.
- Toast the Crostini: Lightly brush each slice with olive oil and season with a pinch of salt and pepper. Place the baking sheet in the preheated oven and toast the bread slices for about 8-10 minutes, or until they’re golden brown and crispy. Remove from the oven and let them cool slightly.
- Prepare the Cheese and Figs: While the crostini cool, slice the smoked Gouda cheese into thin slices. Wash and slice the fresh figs into quarters.
- Assemble the Crostini: Place a slice of smoked Gouda on each toasted baguette slice. Top with a fig quarter, gently pressing down to secure it in place.
- Finish with Garnish: Drizzle a small amount of balsamic glaze over each crostini. Scatter fresh thyme leaves on top for an aromatic finish and an added layer of flavor.
- Serve: Arrange the smoky Gouda and fig crostini on a serving platter, ready for your guests to enjoy.
Extra Tips:
To enhance the flavors, consider using a high-quality extra virgin olive oil and a balsamic glaze with a rich, syrupy consistency. If fresh figs aren’t in season, dried figs can be rehydrated in warm water for a few minutes before using them in the recipe.
Additionally, for an extra hint of smokiness, lightly grill the figs before placing them on the crostini. This dish is best served fresh, but the crostini can be toasted in advance and assembled just before serving to save time.
Charcoal Black Cheese and Crackers
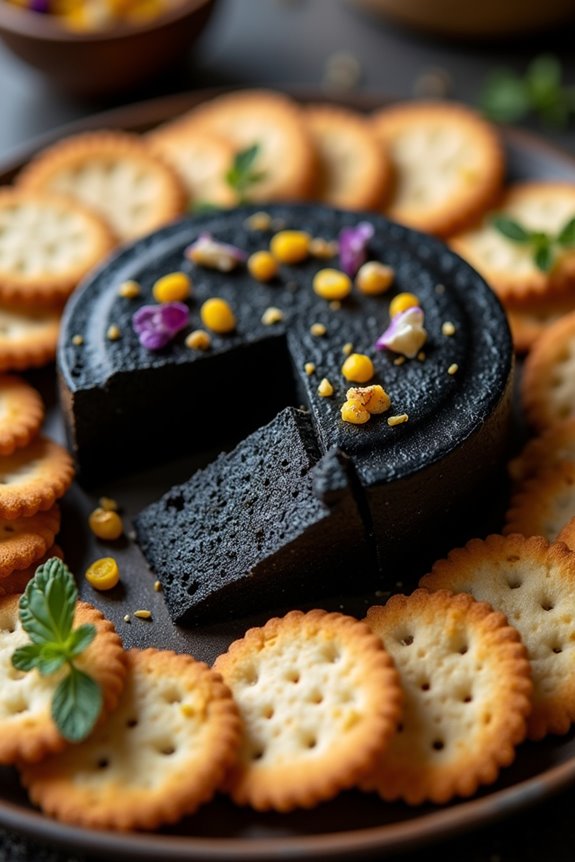
If you’re looking to add a touch of mystery to your Halloween party, Charcoal Black Cheese and Crackers are the perfect addition to the menu. This eerie yet delicious appetizer is sure to fascinate and delight your guests. The striking contrast between the deep black cheese and the crisp, golden crackers creates a visually stunning presentation that’s ideal for this spooky occasion. Not only does the cheese look unique, but it also boasts a rich and creamy flavor profile that pairs beautifully with a variety of crackers, adding an element of sophistication to your Halloween spread.
To achieve the characteristic black color, this recipe incorporates activated charcoal powder into the cheese mixture. Activated charcoal, made from coconut shells or other natural sources, is safe to consume in small quantities and lends an intriguing depth to both the appearance and taste of your cheese. Serve these crackers alongside a selection of olives, nuts, and perhaps a tangy chutney or jam to create a well-rounded and visually engaging platter that your guests will remember long after the party is over.
Ingredients (Serves 4-6):
- 8 ounces of cream cheese, softened
- 4 ounces of goat cheese
- 1 tablespoon of activated charcoal powder
- 1 teaspoon of fresh lemon juice
- 1 teaspoon of garlic powder
- Salt and pepper, to taste
- Assorted crackers (approximately 20-30 crackers)
- Optional toppings: chopped herbs, nuts, or edible flowers
Cooking Instructions:
- Prepare the Cheese Mixture: In a medium-sized mixing bowl, combine the softened cream cheese and goat cheese. Use a hand mixer on medium speed to blend the cheeses until smooth and creamy.
- Incorporate the Charcoal: Gradually add the activated charcoal powder to the cheese mixture. Mix thoroughly until the charcoal is evenly distributed, and the cheese takes on a uniform black color.
- Add Flavor: Stir in the lemon juice and garlic powder. Season the mixture with salt and pepper to taste. Confirm all ingredients are well combined to maintain a consistent flavor throughout.
- Shape the Cheese: Scoop the cheese mixture onto a piece of plastic wrap or parchment paper. Use your hands to form it into a log or a ball, as preferred. Wrap the cheese tightly and refrigerate for at least 1 hour to allow it to firm up.
- Prepare the Crackers: While the cheese is chilling, arrange your selection of crackers on a serving platter. For added flair, consider using crackers of varying shapes and sizes.
- Final Touches: Once the cheese is firm, unwrap it and place it on the platter with the crackers. If desired, garnish with optional toppings like chopped herbs, nuts, or edible flowers to enhance the presentation.
- Serve: Allow the cheese to sit at room temperature for about 10-15 minutes before serving to make sure it spreads easily onto the crackers.
Extra Tips:
When working with activated charcoal, be mindful of staining; it can leave marks on countertops and utensils, so clean up spills promptly.
Also, consider experimenting with different types of crackers to complement the cheese’s flavor—options like whole grain, sesame, or rosemary crackers can add an extra layer of taste.
For those who enjoy a bit of a kick, a sprinkle of red pepper flakes can be mixed into the cheese for a spicy twist.
Pumpkin Sage Risotto Balls

Pumpkin Sage Risotto Balls are a delightful twist on traditional risotto, perfect for an adult Halloween gathering. These savory morsels are rich with the earthy flavor of sage and the subtle sweetness of pumpkin, offering a sophisticated touch to any spooky soirée. The crispy exterior of the risotto balls contrasts beautifully with the creamy, flavorful interior, making each bite a tantalizing treat. Not only are they delicious, but they also embody the essence of fall, making them an ideal finger food for celebrating the season.
Creating these risotto balls involves preparing a luscious pumpkin and sage-infused risotto, which is then formed into balls, coated, and fried to perfection. While the process requires a bit of patience and attention to detail, the end result is well worth the effort. Serve these Pumpkin Sage Risotto Balls at your Halloween party, and watch them disappear as guests savor the delightful combination of flavors and textures. It’s a dish that promises to impress and satisfy, leaving everyone asking for the recipe.
Ingredients for 4-6 people:
- 1 cup Arborio rice
- 4 cups chicken or vegetable broth
- 1 cup canned pumpkin puree
- 1 small onion, finely chopped
- 2 cloves garlic, minced
- 1/2 cup grated Parmesan cheese
- 1/4 cup fresh sage, finely chopped
- 1/4 teaspoon nutmeg
- Salt and pepper to taste
- 1/2 cup all-purpose flour
- 2 eggs, beaten
- 1 cup breadcrumbs
- Vegetable oil for frying
Cooking Instructions:
- Prepare the Risotto: In a medium-sized saucepan, bring the chicken or vegetable broth to a simmer over low heat. Keep it warm as you prepare the risotto.
- Cook the Aromatics: In a large pan, heat a tablespoon of oil over medium heat. Add the chopped onion and garlic, cooking until the onion becomes translucent and fragrant, about 3-4 minutes.
- Add the Rice: Stir in the Arborio rice, cooking for about 1-2 minutes until the edges of the rice become translucent. This helps toasting the rice, which adds depth of flavor.
- Incorporate the Broth Gradually: Begin adding the warm broth, one ladleful at a time, stirring frequently. Allow the rice to absorb most of the broth before adding more. Continue this process until the rice is creamy and cooked to al dente, approximately 18-20 minutes.
- Mix in Pumpkin and Sage: Stir in the pumpkin puree, Parmesan cheese, chopped sage, nutmeg, salt, and pepper. Mix well until everything is evenly combined. Remove the mixture from heat and let it cool slightly.
- Form the Balls: Once the risotto is cool enough to handle, take a small portion and roll it into a ball, about the size of a golf ball. Repeat with the remaining risotto.
- Coat the Balls: Set up a breading station with three shallow dishes: one with flour, one with beaten eggs, and one with breadcrumbs. Dredge each risotto ball first in flour, then in egg, and finally coat with breadcrumbs. Confirm each ball is evenly coated.
- Fry the Balls: In a deep frying pan, heat vegetable oil over medium-high heat. Once hot, carefully fry the risotto balls in batches, turning occasionally, until they’re golden brown and crispy on all sides, about 3-4 minutes per batch. Transfer to a paper towel-lined plate to drain excess oil.
Extra Tips:
When making Pumpkin Sage Risotto Balls, it’s important not to rush the risotto-making process. Allowing the rice to gradually absorb the broth guarantees a creamy texture, which is essential for forming cohesive balls.
If the mixture seems too soft to hold its shape, you can refrigerate it for about 15 minutes before forming the balls. Additionally, make sure your oil is at the right temperature before frying to achieve a perfectly crispy exterior without absorbing excess oil. These little details can make a big difference in the final result.
Vampire-Themed Caprese Skewers
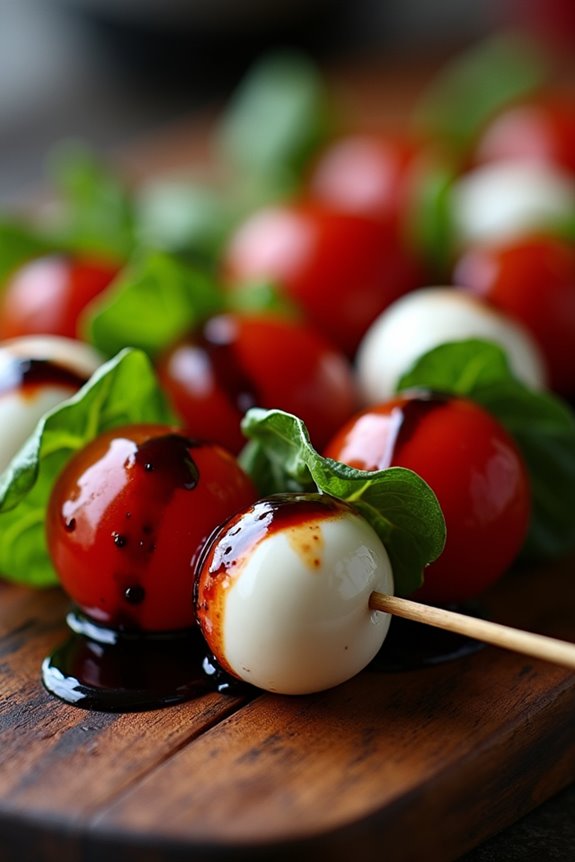
Vampire-Themed Caprese Skewers are a spooky yet sophisticated addition to your Halloween party spread. These delicious skewers combine the classic flavors of a Caprese salad with a playful twist to intrigue and delight your adult guests. By incorporating elements that evoke a vampire theme, such as blood-red cherry tomatoes and dark balsamic glaze, these skewers not only taste delightful but also add an eerie elegance to your Halloween festivities.
This dish is simple to prepare, making it perfect for hosts who want to impress without spending hours in the kitchen. You can assemble these skewers ahead of time and drizzle them with the balsamic glaze just before serving. For a serving size of 4-6 people, this recipe is ideal for a small gathering or as part of a larger buffet. Impress your guests with these fang-tastic treats that are as visually appealing as they’re delicious.
Ingredients:
- 16 cherry tomatoes
- 16 fresh mozzarella balls (bocconcini or ciliegine)
- 16 fresh basil leaves
- 1/4 cup balsamic glaze
- 2 tablespoons extra virgin olive oil
- Salt and pepper to taste
- 8 wooden skewers (4-6 inches long)
Cooking Instructions:
- Prepare the Ingredients: Rinse the cherry tomatoes and basil leaves under cold water and pat them dry with a paper towel. Drain the mozzarella balls from their liquid and set aside.
- Assemble the Skewers: Take a wooden skewer and thread a cherry tomato onto it, followed by a basil leaf folded in half, and then a mozzarella ball. Repeat this pattern once more for a total of two sets per skewer. Continue this process until all skewers are assembled.
- Season the Skewers: Arrange the skewers on a serving platter. Drizzle the extra virgin olive oil over the skewers, ensuring each one gets a light coating. Sprinkle lightly with salt and pepper to enhance the flavors.
- Add the Vampire Touch: Right before serving, drizzle the balsamic glaze over the skewers in an erratic pattern to mimic the look of dripping blood, giving them their vampire-themed appearance.
- Serve: Arrange the skewers artfully on a platter and serve immediately to your guests, ensuring the balsamic glaze retains its dramatic effect.
Extra Tips:
When selecting your ingredients, choose the freshest basil for the best flavor and aroma. If you can’t find balsamic glaze, you can make your own by reducing balsamic vinegar over low heat until it thickens. Be careful not to over-reduce, as it can become too sticky.
Additionally, you can experiment with flavored balsamic glazes, such as fig or raspberry, to add a unique twist to the dish. Finally, if you prefer a bite-sized version, use shorter skewers, and thread only one of each ingredient per skewer for a mini version of these spooky delights.
Mini Beef Wellington Bites

Mini Beef Wellington Bites are a sophisticated and delightful twist on the classic dish, perfect for an elegant Halloween gathering. These bite-sized morsels feature tender beef wrapped in layers of savory mushroom duxelles and flaky puff pastry, creating a deliciously indulgent appetizer. Each bite delivers a burst of flavor that will impress your guests and elevate your Halloween finger food spread to new heights.
The beauty of Mini Beef Wellington Bites lies in their simplicity and ability to be prepared ahead of time, allowing you to enjoy the festivities without being stuck in the kitchen. They’re the perfect combination of rich, savory flavors and crisp, buttery pastry, making them an irresistible treat for adults. This recipe serves 4-6 people, ideal for a small gathering or as part of a larger selection of appetizers.
Ingredients:
- 1 lb beef tenderloin, cut into 1-inch cubes
- Salt and pepper, to taste
- 2 tablespoons olive oil
- 2 tablespoons unsalted butter
- 1 shallot, finely chopped
- 2 cloves garlic, minced
- 8 oz cremini mushrooms, finely chopped
- 2 tablespoons fresh thyme leaves, chopped
- 2 tablespoons Dijon mustard
- 1 sheet puff pastry, thawed
- 1 egg, beaten
- All-purpose flour, for dusting
Cooking Instructions:
- Prepare the Beef: Season the beef tenderloin cubes with salt and pepper. Heat the olive oil in a large pan over medium-high heat. Sear the beef cubes on all sides until browned, about 2-3 minutes total. Remove from the pan and set aside to cool.
- Make the Mushroom Duxelles: In the same pan, melt the butter over medium heat. Add the shallot and garlic, sautéing until soft and fragrant. Stir in the chopped mushrooms and thyme, cooking until the mixture is dry and the mushrooms are golden brown, about 10 minutes. Season with salt and pepper to taste, then remove from heat and let cool.
- Assemble the Bites: Preheat your oven to 400°F (200°C). On a lightly floured surface, roll out the puff pastry to smooth out any creases. Cut the pastry into 3-inch squares. Spread a thin layer of Dijon mustard over each square. Place a spoonful of the mushroom duxelles in the center, followed by a cube of seared beef.
- Wrap the Bites: Fold the corners of the pastry over the beef and mushroom mixture, pinching the edges to seal. Place the bites seam-side down on a baking sheet lined with parchment paper.
- Bake: Brush the tops with beaten egg for a golden finish. Bake in the preheated oven for 15-20 minutes, or until the pastry is puffed and golden brown. Allow them to cool slightly before serving.
Extra Tips:
For the best flavor, use high-quality beef tenderloin and fresh mushrooms. If you’re preparing these in advance, you can assemble the bites and freeze them before baking. When ready to serve, bake from frozen, adding a few extra minutes to the baking time. Be sure to keep an eye on them to prevent over-browning.
Serve these delightful bites with a dipping sauce like horseradish cream or a reduced balsamic glaze for an added touch of elegance.
Dark Chocolate and Sea Salt Popcorn Clusters

Dark Chocolate and Sea Salt Popcorn Clusters are a perfect treat for a Halloween gathering with adults. These delightful clusters offer a blend of sweet and salty flavors with a hint of bitterness from the dark chocolate, making them an enticing snack that’s both sophisticated and fun.
The popcorn provides a light and airy texture, while the dark chocolate adds a luxurious richness, and the sea salt enhances the flavors, creating a treat that’s hard to resist.
Whether you’re hosting a spooky soirée or simply enjoying a cozy night in, these popcorn clusters are bound to be a hit. They’re easy to make and can be prepared in advance, allowing you to focus on other aspects of your Halloween festivities.
The contrast between the dark chocolate and the sea salt is simply delightful, and the clusters are so moreish that your guests will keep coming back for more. This recipe serves 4-6 people, making it ideal for small gatherings or as part of a larger spread of Halloween-themed finger foods.
Ingredients:
- 10 cups popped popcorn
- 12 ounces dark chocolate, chopped
- 2 tablespoons unsalted butter
- 1/2 teaspoon vanilla extract
- 1/2 teaspoon sea salt, plus more for sprinkling
- 1/4 cup chopped nuts (optional)
- 1/4 cup dried cranberries (optional)
Instructions:
- Prepare the Popcorn: Begin by popping your popcorn if you haven’t already. You can use stovetop, air-popped, or microwave popcorn, but make sure it’s unsalted and unbuttered. Once popped, spread the popcorn evenly on a large baking sheet lined with parchment paper.
- Melt the Chocolate: In a microwave-safe bowl, combine the chopped dark chocolate and unsalted butter. Microwave in 30-second intervals, stirring after each, until completely melted and smooth. Be careful not to overheat the chocolate.
- Mix in Flavorings: Stir the vanilla extract and 1/2 teaspoon of sea salt into the melted chocolate until well combined. This will enhance the overall flavor profile of the clusters.
- Combine Ingredients: Drizzle the melted chocolate mixture over the popcorn. Use a spatula or your hands to gently toss the popcorn until it’s evenly coated with chocolate. If using, sprinkle the chopped nuts and dried cranberries over the top and mix gently to incorporate.
- Form Clusters: Working quickly, use a spoon or your hands to form the popcorn into clusters of your desired size. Place them back on the parchment-lined baking sheet, ensuring they don’t touch each other.
- Chill: Sprinkle additional sea salt over the clusters if desired, and place the baking sheet in the refrigerator for about 30 minutes, or until the chocolate has hardened completely.
- Serve: Once the clusters are set, remove them from the refrigerator and serve them as a delicious Halloween treat.
Extra Tips:
For an added touch of elegance, consider using a variety of dark chocolates, such as 70% cocoa or higher, to add depth to the flavor.
If you prefer your clusters to be more visually striking, white chocolate can be drizzled over the top after the dark chocolate has set.
Make sure to store any leftovers in an airtight container at room temperature for up to three days to maintain freshness. If you’re making these ahead of time, they can be stored in the refrigerator to keep them firm and crunchy.
Bloody Mary Shrimp Cocktail Shooters
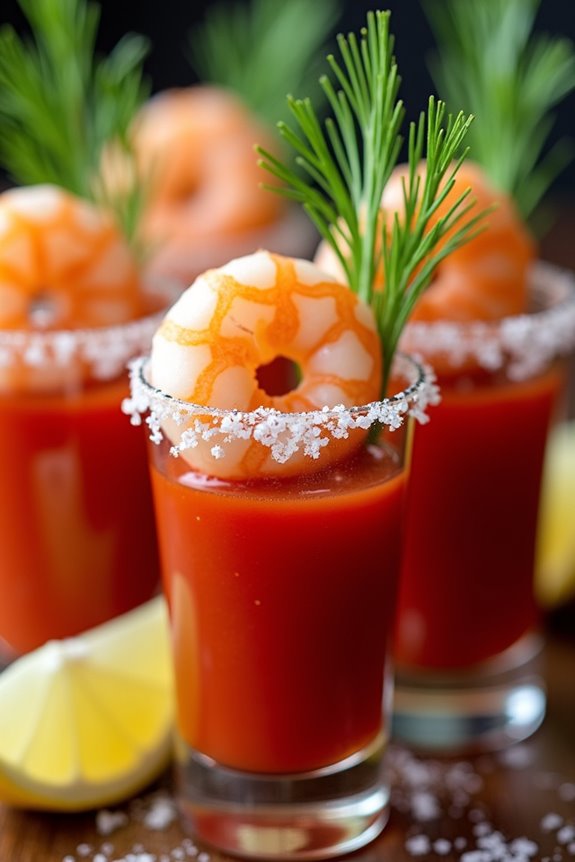
If you’re looking to impress your Halloween party guests with a sophisticated yet spooky appetizer, the Bloody Mary Shrimp Cocktail Shooters are the perfect choice. This dish combines the classic flavors of a Bloody Mary cocktail with succulent shrimp, creating a flavorful and visually striking dish.
The shooters are an ideal finger food for adults, offering a blend of tangy, spicy, and savory notes that will tantalize the taste buds. These shooters aren’t only appetizing but also fun to serve, fitting perfectly into any Halloween-themed gathering.
The vibrant red cocktail sauce, reminiscent of blood, adds to the festive theme, while the shrimp offers a delightful texture contrast. The dish is easy to prepare and can be made ahead of time, allowing you to focus on enjoying the party rather than being stuck in the kitchen.
Serve these Bloody Mary Shrimp Cocktail Shooters for 4-6 people and watch them disappear in no time.
Ingredients:
- 1 pound large shrimp, peeled and deveined
- 1 tablespoon olive oil
- Salt and pepper to taste
- 1 cup tomato juice
- 2 tablespoons vodka
- 1 tablespoon lemon juice
- 1 teaspoon Worcestershire sauce
- 1 teaspoon hot sauce (adjust to taste)
- 1 teaspoon horseradish
- Celery salt, for rim
- Lemon wedges, for garnish
- Fresh dill, for garnish
Instructions:
- Prepare the Shrimp:
- Preheat the oven to 400°F (200°C). Toss the shrimp with olive oil, salt, and pepper. Spread them in a single layer on a baking sheet.
- Bake for 6-8 minutes or until the shrimp are pink and opaque. Remove from the oven and let them cool.
- Prepare the Bloody Mary Mix:
- In a bowl, combine tomato juice, vodka, lemon juice, Worcestershire sauce, hot sauce, and horseradish. Stir well to verify all ingredients are fully incorporated.
- Rim the Shooter Glasses:
- Moisten the rim of each shooter glass with a lemon wedge. Dip the rim into a plate of celery salt, coating it evenly.
- Assemble the Shooters:
- Pour the Bloody Mary mix into each glass, filling them about halfway. Skewer a shrimp on a cocktail pick and place it across the top of each glass.
- Garnish each shooter with a small sprig of fresh dill and a lemon wedge on the side.
- Serve:
- Serve immediately or refrigerate for up to 1 hour before serving to allow the flavors to meld. Enjoy your spooky Bloody Mary Shrimp Cocktail Shooters!
Extra Tips:
For an extra touch of flavor, consider marinating the shrimp in a bit of lemon juice and garlic before cooking. This can enhance the shrimp’s natural sweetness and add depth to the overall dish.
When choosing vodka, opt for a high-quality brand to guarantee the cleanest flavor. Adjust the level of hot sauce based on your guests’ spice tolerance – you can even offer extra on the side for those who enjoy a fiery kick.
Finally, if you prefer a non-alcoholic version, simply omit the vodka and add a splash more tomato juice or a non-alcoholic spirit substitute.
Brie and Cranberry Phyllo Cups
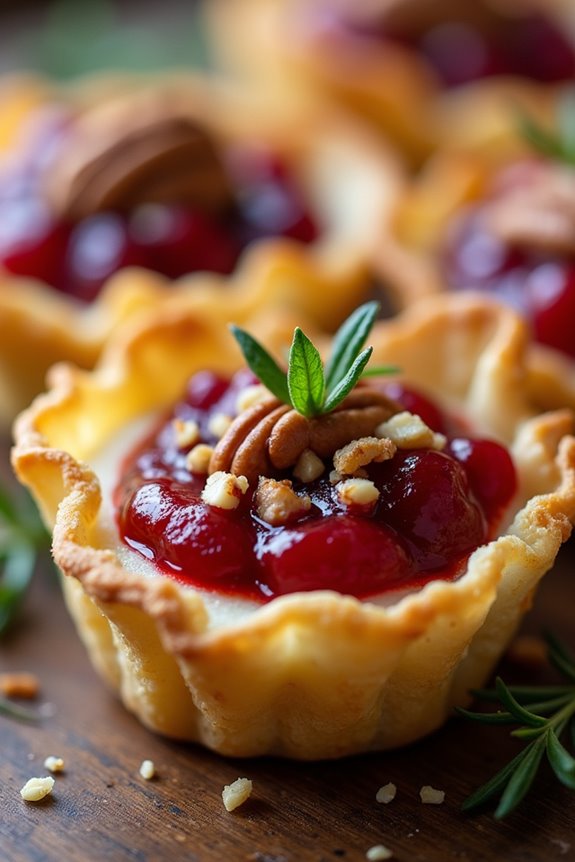
Brie and Cranberry Phyllo Cups are an elegant and delicious finger food perfect for a sophisticated Halloween gathering. These bite-sized treats combine the creamy richness of Brie cheese with the tart sweetness of cranberry sauce, all wrapped in delicate, crispy phyllo pastry. They make for a delightful appetizer that’s both easy to prepare and visually appealing, making them an ideal choice for entertaining adults who appreciate gourmet flavors.
The delightful contrast between the buttery, flaky phyllo cups and the gooey melted cheese topped with a burst of cranberry flavor will have your guests reaching for more. Not only do these phyllo cups taste amazing, but they also look impressive with minimal effort. The combination of ingredients in this recipe makes it a perfect balance of savory and sweet, ideal for a Halloween party where you want to offer something a little more refined than the usual fare.
Ingredients for 4-6 servings:
- 12 sheets of phyllo dough
- 6 tablespoons unsalted butter, melted
- 8 ounces Brie cheese, rind removed
- 1/2 cup whole berry cranberry sauce
- 1/4 cup chopped pecans
- Fresh thyme leaves (optional)
Cooking Instructions:
- Prepare the Phyllo Sheets: Start by preheating your oven to 350°F (175°C). Thaw the phyllo dough according to the package instructions. Once thawed, lay out one sheet of phyllo dough on a clean, dry surface and brush it lightly with melted butter. Place another sheet on top and repeat the process until you have a stack of four sheets. Keep the remaining sheets covered with a damp cloth to prevent drying out.
- Cut and Shape the Cups: Using a sharp knife or a pizza cutter, cut the stacked phyllo sheets into 3-inch squares. Carefully press each square into the cups of a mini muffin tin, letting the edges of the dough extend over the top to form rustic edges.
- Fill the Cups: Cut the Brie cheese into small cubes and place a cube into each phyllo cup. Top each with a teaspoon of cranberry sauce and a sprinkle of chopped pecans.
- Bake: Place the muffin tin in the preheated oven and bake for about 12-15 minutes or until the phyllo is golden brown and crisp, and the Brie is melted.
- Garnish and Serve: Once baked, remove the phyllo cups from the oven and let them cool slightly. Garnish with fresh thyme leaves if desired for an aromatic touch. Serve warm and enjoy!
Extra Tips:
To guarantee the phyllo dough remains easy to work with, always keep it covered with a damp cloth while you’re assembling the cups to prevent it from drying out. For added flavor, try using a variety of Brie that has a slight hint of herbs or pepper.
If you’re preparing these ahead of time, they can be baked and then reheated in the oven for a few minutes just before serving to retain their crispiness. Additionally, feel free to experiment with different toppings; for instance, swapping pecans for walnuts or adding a drizzle of honey can offer a delightful twist.