

As Halloween creeps closer, I’ve been bubbling with excitement to share some delightfully spooky finger foods that will captivate both kids and adults. Picture yourself enjoying Monster Eyeball Tacos or unraveling Mummy Hot Dogs. With Witch’s Broomstick Snacks and Ghostly Cheese Sticks ready to be served, the kitchen will become a playground of tasty tricks and treats. Curious about crafting these festive bites? Trust me, the magic is just beginning.
Monster Eyeball Tacos
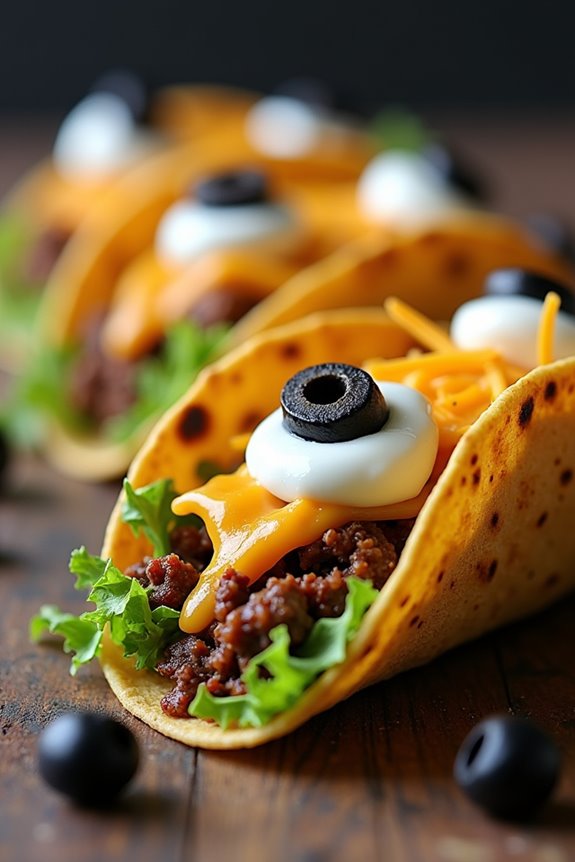
Halloween is a fantastic opportunity to engage kids in fun and creative cooking activities, and what better way to do so than with Monster Eyeball Tacos? These spooky yet delicious tacos are sure to be a hit at any Halloween event and will certainly capture the imagination of little ones.
With their quirky design resembling monster eyes, they aren’t only a treat for the taste buds but also a feast for the eyes. This dish combines the classic flavors of tacos with a playful twist, making it an excellent finger food option for kids during the Halloween season.
To make Monster Eyeball Tacos, we’ll be using soft tortillas as the base, filling them with a savory mixture of ground beef and spices. Each taco is then topped with a dollop of sour cream and an olive slice to create the eerie eyeball effect. The combination of savory beef, creamy sour cream, and a hint of olive provides a delicious flavor that kids will love.
Designed to serve 4-6 people, this recipe is easy to prepare, ensuring you spend more time enjoying the party and less time in the kitchen.
Ingredients (Serving Size: 4-6 people):
- 6 soft tortillas
- 1 pound ground beef
- 1 packet taco seasoning
- 1 cup shredded lettuce
- 1 cup shredded cheddar cheese
- 1/2 cup sour cream
- 12 black olive slices
- 1 tablespoon olive oil
- Salt and pepper to taste
Cooking Instructions:
- Prepare the Beef: In a skillet over medium heat, add the olive oil and allow it to heat up. Add the ground beef and cook until fully browned, breaking it up with a wooden spoon as it cooks. Drain any excess fat.
- Season the Beef: Once the beef is cooked through, stir in the taco seasoning and a splash of water (about 1/4 cup). Mix well and let it simmer for 3-5 minutes, allowing the flavors to meld. Season with salt and pepper to taste.
- Prepare the Tortillas: While the beef is simmering, warm the tortillas in a separate pan over low heat or wrap them in foil and place them in a preheated oven (350°F) for about 5 minutes until soft and pliable.
- Assemble the Tacos: Lay each tortilla flat and start with a layer of shredded lettuce in the center. Add a generous scoop of the seasoned beef mixture, and top with shredded cheddar cheese.
- Create the Monster Eyeballs: Add a dollop of sour cream on top of each taco. Place a black olive slice in the center of the sour cream to create the appearance of an eyeball.
- Serve and Enjoy: Arrange the Monster Eyeball Tacos on a platter and serve immediately. Watch as the kids delight in the spooky presentation!
Extra Tips:
To enhance the spooky theme, you can add a few drops of green or red food coloring to the sour cream before placing the olive slice for a more monstrous appearance.
If you want to add a bit more nutrition, consider incorporating finely chopped vegetables, such as tomatoes or bell peppers, into the beef mixture.
Finally, if you prefer a vegetarian option, substitute the ground beef with cooked lentils or black beans seasoned with the same taco spices.
Mummy Hot Dogs
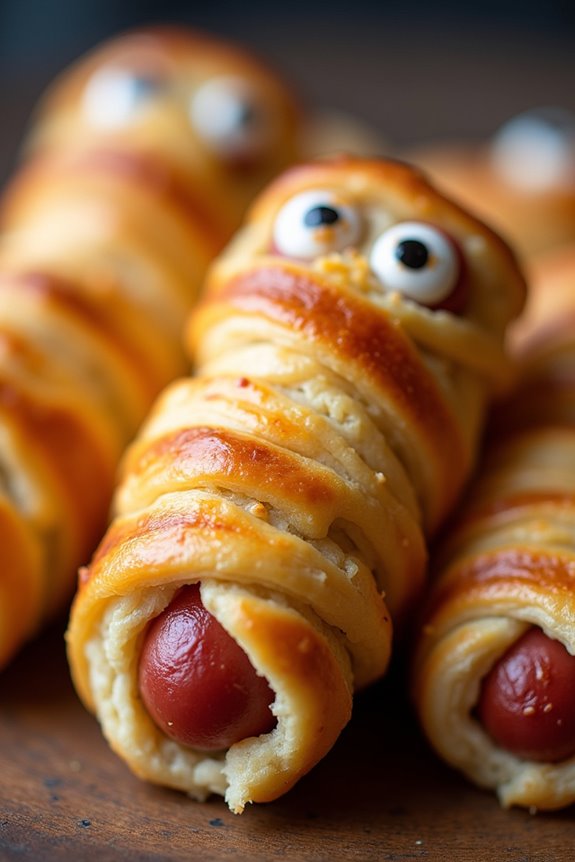
Mummy Hot Dogs are a fun and spooky treat that are perfect for Halloween gatherings, especially for kids. These delightful snacks aren’t only easy to prepare but also add a creative twist to the classic hot dog. The hot dogs are wrapped in strips of crescent roll dough to resemble mummies, making them a playful addition to any Halloween party menu.
Ideal for little hands, Mummy Hot Dogs are sure to be a hit with children and adults alike. Perfect for a serving size of 4-6 people, this recipe combines simplicity with a touch of Halloween spirit, making it an ideal choice for busy parents who want to serve something festive without spending hours in the kitchen.
With just a few ingredients and minimal prep time, you can create an eye-catching and delicious snack that will delight your little ghouls and goblins. Let’s explore the recipe and see how you can whip up these Mummy Hot Dogs in no time!
Ingredients for 4-6 servings:
- 8 hot dogs
- 1 can of crescent roll dough
- 2 tablespoons of mustard or ketchup (for decorating)
- Cooking spray or parchment paper
Cooking Instructions:
- Preheat the Oven: Start by preheating your oven to 375°F (190°C). This will guarantee that the crescent roll dough cooks evenly and becomes golden brown.
- Prepare the Baking Sheet: Line a baking sheet with parchment paper or lightly spray it with cooking spray to prevent the Mummy Hot Dogs from sticking.
- Cut the Dough: Unroll the crescent roll dough and use a knife or pizza cutter to slice it into thin strips, approximately 1/4 inch wide. This will serve as the mummy’s bandages.
- Wrap the Hot Dogs: Take each hot dog and wrap it with the dough strips, leaving a small space at one end to create the mummy’s face. Overlap the dough as you wrap to give a bandaged effect, and make sure to leave some gaps for the mummy “look.”
- Bake: Place the wrapped hot dogs on the prepared baking sheet. Bake in the preheated oven for about 12-15 minutes, or until the dough is golden brown and cooked through.
- Decorate: Once baked, remove the Mummy Hot Dogs from the oven and let them cool slightly. Use mustard or ketchup to dot on eyes at the exposed face area of each mummy.
- Serve: Arrange the Mummy Hot Dogs on a platter and serve them warm with extra mustard or ketchup for dipping.
Extra Tips:
To make your Mummy Hot Dogs even more fun, consider using edible googly eyes instead of mustard or ketchup for the eyes; these can be found at most grocery stores or online.
If you want a healthier option, turkey or chicken hot dogs can be substituted for traditional beef or pork. You can also add a slice of cheese under the dough for an extra layer of flavor.
Keep an eye on the baking time, as ovens can vary; the goal is to have golden brown, not overly browned, dough. Enjoy your spooky and delicious creation!
Witch’s Broomstick Snacks
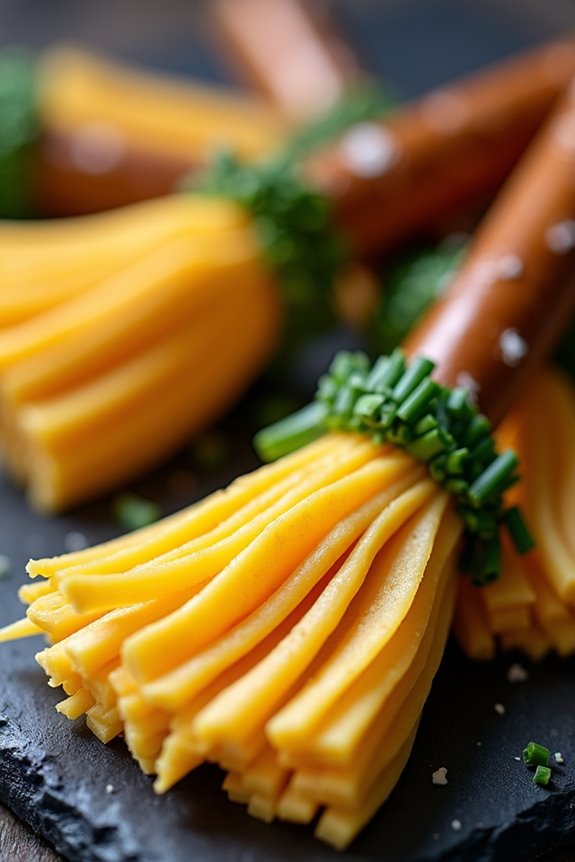
Witch’s Broomstick Snacks are a delightful and spooky addition to any Halloween party, especially for kids. These whimsical treats aren’t only visually appealing but also incredibly simple to make. They’re perfect for little hands and will add a touch of magical fun to your Halloween festivities.
Made with wholesome ingredients, these snacks are a healthier alternative to the usual candy overload, ensuring that both kids and parents are happy. The combination of pretzel sticks, cheese, and chives creates a savory and satisfying treat that’s both fun and nutritious.
The pretzels form the handle of the broomstick, while the cheese is shaped to resemble the broom’s bristles. The fresh chives add a touch of greenery, enhancing the overall appearance of the broomsticks. This recipe serves 4-6 people, making it perfect for a small gathering or as a classroom treat.
Ingredients (Serves 4-6):
- 12 pretzel sticks
- 6 slices of cheese (cheddar or mozzarella work well)
- 6 fresh chives
Instructions:
- Prepare the Cheese: Take your slices of cheese and cut each slice in half lengthwise. This will give you 12 pieces of cheese, perfect for creating the broom bristles.
- Shape the Broom Bristles: Use a pair of clean kitchen scissors to create fringe-like cuts along one long side of each cheese piece. Make sure to leave about 1/4 of the cheese uncut at the top, as this will be where the cheese is attached to the pretzel stick.
- Assemble the Broomsticks: Take a pretzel stick and wrap the uncut end of a cheese piece around the bottom of the stick. Gently press the cheese to secure it in place around the pretzel.
- Secure with Chives: Wrap a fresh chive around the top of the cheese where it meets the pretzel stick to help hold the cheese in place. Tie the chive gently and trim any excess with scissors if necessary.
- Repeat and Serve: Repeat the process with the remaining ingredients until all 12 broomsticks are assembled. Arrange them on a platter, and serve immediately for best texture and taste.
Extra Tips:
To make your Witch’s Broomstick Snacks even more enticing, you can use flavored pretzel sticks or experiment with different types of cheese. For a firmer cheese, you might want to use a paring knife instead of scissors to create the fringe.
If the cheese is too soft to hold its shape, consider chilling it in the refrigerator for a few minutes before cutting. This dish is best served fresh to maintain the crunch of the pretzels and the firmness of the cheese.
Spooky Spider Pizza Bites
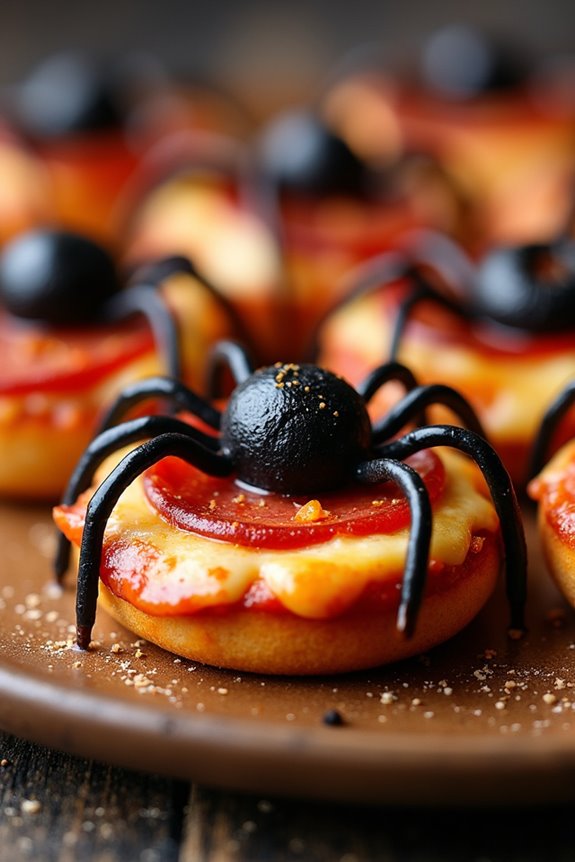
Halloween is the perfect time to release your creativity in the kitchen, especially with fun and festive finger foods that kids will love. Spooky Spider Pizza Bites are an ideal choice for any Halloween gathering, combining the classic taste of pizza with a creepy-crawly twist.
These bite-sized treats aren’t only delicious, but they also add a festive touch to your Halloween spread. The spider design on each pizza bite will surely capture the attention and imagination of young trick-or-treaters, making it a surefire hit at your Halloween party.
These Spooky Spider Pizza Bites are easy to make and customize, allowing you to use your favorite pizza toppings. The base of these bites can be made from mini bagels or English muffins, providing a perfect canvas for the eerie spider design.
With just a few simple ingredients and a little creativity, you can whip up these tasty and spooky treats in no time. They’re perfect for serving 4-6 people, making them a great addition to any Halloween celebration.
Ingredients for 4-6 servings:
- 6 mini bagels or English muffins, halved
- 1 cup pizza sauce
- 2 cups shredded mozzarella cheese
- 1 package of pepperoni slices
- 1 can of black olives
- 2 tablespoons olive oil
- 1 teaspoon dried oregano
- 1 teaspoon garlic powder
Cooking Instructions:
- Preheat the Oven: Start by preheating your oven to 375°F (190°C). This guarantees that your pizza bites will cook evenly and come out perfectly crispy.
- Prepare the Base: Lay the halved mini bagels or English muffins on a baking sheet. Brush each half with a light coating of olive oil to give them a nice golden finish when baked.
- Add Sauce and Cheese: Spread about a tablespoon of pizza sauce on each bagel or muffin half. Sprinkle a generous amount of shredded mozzarella cheese over the sauce, making sure to cover the entire surface.
- Create the Spider Design: For each pizza bite, place a pepperoni slice in the center. Slice the black olives in half for the spider bodies and slice some olives into thin strips for the legs. Arrange the olive halves on top of the pepperoni to form the spider body and use the strips around the body to create legs.
- Season: Sprinkle a small pinch of dried oregano and garlic powder on each pizza bite for added flavor.
- Bake: Place the baking sheet in the preheated oven and bake for 10-12 minutes, or until the cheese is melted and bubbling, and the edges are golden brown.
- Serve: Once baked, remove from the oven and let them cool for a few minutes before serving. Enjoy your spooky creations!
Extra Tips:
For an extra crispy texture, you can toast the bagels or English muffins lightly before adding the toppings. Feel free to experiment with different cheeses or add vegetables like bell peppers or mushrooms for more variety.
If you want to make these pizza bites ahead of time, assemble them and store them in the refrigerator until you’re ready to bake. This recipe is versatile, so have fun with the decorations and let your kids help create their own spider designs!
Ghostly Cheese Sticks
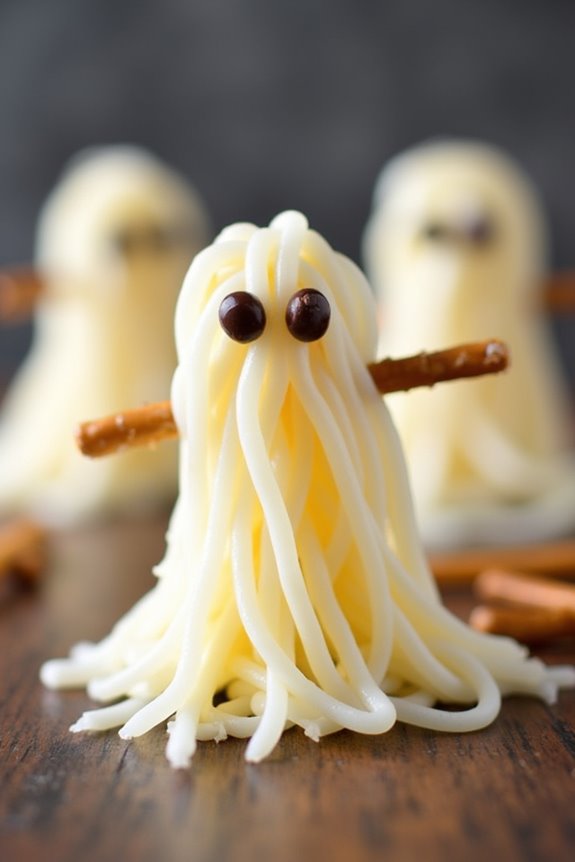
Ghostly Cheese Sticks are a fun and spooky treat perfect for any Halloween celebration, especially when catering to kids. These delightful snacks aren’t only easy to make but also deliciously cheesy, capturing the Halloween spirit with their ghostly appearance.
The simplicity of the ingredients makes this a quick and creative option for parties or a fun family activity, guaranteeing that your little ones are both entertained and well-fed.
Perfectly portioned for 4-6 people, these Ghostly Cheese Sticks add a whimsical touch to any Halloween spread. Featuring string cheese as the main ingredient, they’re transformed into ghostly figures with just a few clever cuts and decorations.
This recipe strikes a balance between creativity and taste, making it an ideal choice for those who wish to impress without spending hours in the kitchen.
Ingredients (Serves 4-6):
- 6 pieces of string cheese
- 12 mini chocolate chips (for eyes)
- 12 pretzel sticks
Instructions:
- Prepare the Cheese Sticks: Start by unwrapping the string cheese sticks and laying them flat on a clean surface. Each stick will serve as the base for your ghostly creation.
- Create the Ghostly Shape: Using a small, sharp knife, gently slice the bottom half of each string cheese into thin strips. This will form the “tail” of the ghost, giving it a wispy, spectral look. Make sure to leave the top half intact.
- Add the Eyes: Press two mini chocolate chips into the top section of each cheese stick to create the ghost’s eyes. Place them a little apart to give the ghost a friendly appearance. Make sure they’re securely embedded, but not too deep.
- Assemble the Ghosts: Insert a pretzel stick into the top of each string cheese to act as a handle. This won’t only make the cheese sticks easier to eat but also add an extra crunch to your snack.
- Arrange and Serve: Once all the ghostly cheese sticks are assembled, arrange them on a platter for serving. They can be served immediately or chilled for later use.
Extra Tips:
For an added touch of creativity, consider using edible markers to draw cute faces or additional details on the cheese sticks.
If you want to prepare these in advance, you can store the completed ghost sticks in the refrigerator, covered, for up to a day. Just be sure to add the pretzel sticks just before serving to guarantee they remain crunchy.
Additionally, if mini chocolate chips are unavailable, raisins or small pieces of olives can serve as alternative ghost eyes.
Frankenstein Rice Krispie Treats
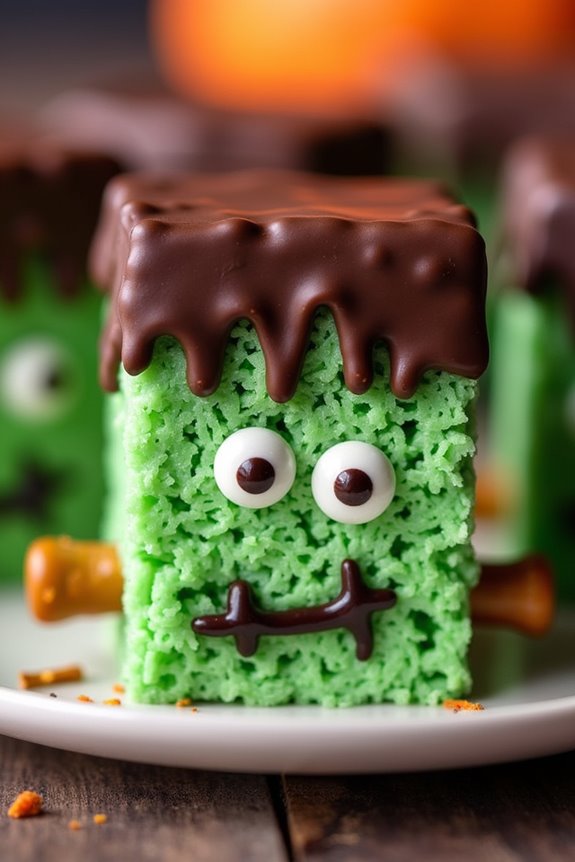
Frankenstein Rice Krispie Treats are a fun and spooky addition to your Halloween festivities, especially when designed for little hands to enjoy. These delightful treats combine the classic, gooey texture of Rice Krispie squares with a playful Frankenstein monster design that’s sure to captivate the imaginations of young ones. Perfect for a Halloween party or a thematic snack, these treats are as enjoyable to make as they’re to eat, providing a wonderful opportunity for kids to participate in the kitchen.
The process of crafting Frankenstein Rice Krispie Treats involves shaping the traditional marshmallow and cereal mixture into rectangles and adorning them with a green hue to mimic the iconic monster’s complexion. With a few additional ingredients and a little creativity, you can transform these simple treats into a memorable and delicious Halloween snack. The recipe below will guide you in preparing 4-6 servings, making it suitable for a small gathering or a fun family activity.
Ingredients (serves 4-6 people):
- 3 tablespoons unsalted butter
- 1 package (10 ounces) marshmallows
- 6 cups Rice Krispies cereal
- Green food coloring
- 1 cup chocolate chips
- Black icing gel
- Candy eyes
- Pretzel sticks
Instructions:
- Prepare the Pan: Begin by lining a 9×13-inch baking dish with parchment paper or lightly grease it with non-stick spray. This will prevent the treats from sticking to the dish.
- Melt the Butter and Marshmallows: In a large saucepan, melt 3 tablespoons of unsalted butter over low heat. Add the marshmallows to the melted butter and stir continuously until they’re completely melted and smooth.
- Add Green Coloring: Once the marshmallows are melted, remove the saucepan from the heat. Add a few drops of green food coloring and stir until the mixture is evenly colored to your desired Frankenstein green.
- Mix in the Cereal: Quickly add the 6 cups of Rice Krispies cereal to the marshmallow mixture. Stir until all the cereal is well-coated with the green marshmallow mixture.
- Shape the Treats: Pour the mixture into the prepared baking dish. Use a spatula greased with a little butter to press the mixture evenly into the dish. Allow it to cool for a few minutes before cutting.
- Cut and Decorate: Once cooled, cut the treats into rectangles to form Frankenstein’s head. Melt the chocolate chips in a microwave-safe bowl in 30-second increments until smooth. Dip the top of each rectangle into the melted chocolate to create Frankenstein’s hair. Attach candy eyes using a small dab of black icing gel, and draw a mouth and stitches with the gel. Insert a small piece of pretzel stick into each side of the rectangle to resemble bolts.
Extra Tips: When melting the marshmallows, be sure to keep the heat low and stir constantly to prevent burning, as this can affect both the color and flavor of your treats. For a more vibrant green, add more food coloring as needed, but do this slowly to avoid over-coloring.
If you want a more detailed Frankenstein face, consider using additional candies or edible decorations. These treats can be prepared a day in advance and stored in an airtight container to maintain their freshness for your Halloween celebration.
Dracula’s Bloody Popcorn
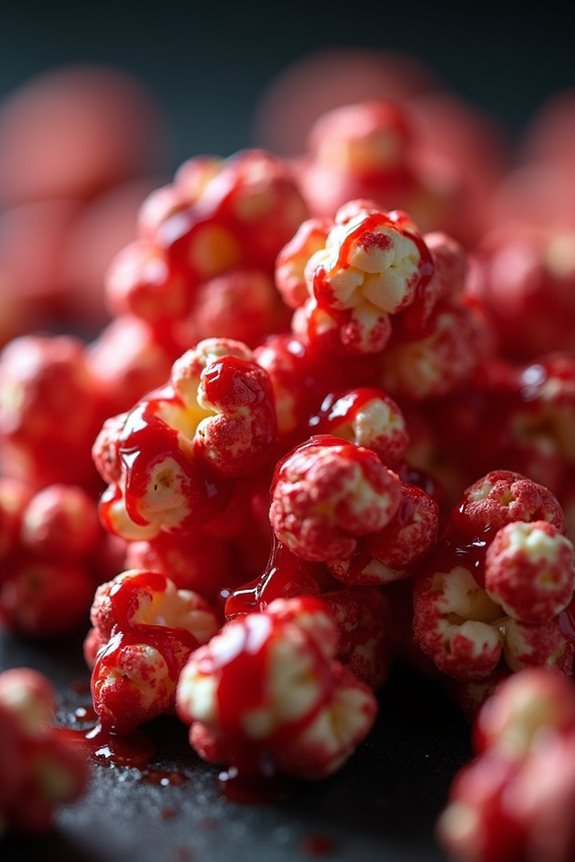
Dracula’s Bloody Popcorn is a delightfully gory treat that’s perfect for your Halloween festivities and bound to be a hit with the kids. This spooky snack combines the classic taste of buttery popcorn with a sweet and shocking twist, making it both delicious and visually thrilling. The vibrant red color and sticky sweetness will have your little vampires coming back for more, while the novelty of the dish will guarantee that even the pickiest eaters are enticed to give it a try.
Perfect for a Halloween party or a fun family movie night, Dracula’s Bloody Popcorn is easy to prepare and guarantees a memorable experience for 4-6 people. With a few simple ingredients and some creative flair, you can craft a frighteningly fun snack that will set the mood for any Halloween gathering. Whether enjoyed on its own or paired with other spooky treats, this recipe will quickly become a seasonal favorite.
Ingredients for 4-6 servings:
- 1/2 cup unpopped popcorn kernels
- 1/4 cup butter
- 1/2 cup light corn syrup
- 1 cup granulated sugar
- 1 (3 oz) package of cherry or strawberry-flavored gelatin mix
- Red food coloring (optional)
- 1/2 teaspoon salt
- Cooking spray or additional butter for greasing
Cooking Instructions:
- Pop the Popcorn: Begin by popping the popcorn kernels. You can use an air popper or stovetop method, guaranteeing you have about 12 cups of popped popcorn. Spread the popped popcorn on a large, greased baking sheet, removing any unpopped kernels.
- Prepare the Sauce: In a medium saucepan over medium heat, melt the butter. Once melted, add the corn syrup, sugar, and salt, stirring until the sugar is completely dissolved.
- Add the Gelatin: Stir in the cherry or strawberry gelatin mix into the butter-sugar mixture until fully dissolved for a consistent flavor and color. If you want a more vibrant red, you can add a few drops of red food coloring.
- Boil the Mixture: Bring the mixture to a boil, stirring constantly. Once it reaches a boil, stop stirring and let it boil for about 5 minutes or until it reaches a temperature of 250°F on a candy thermometer.
- Coat the Popcorn: Carefully pour the hot mixture over the popcorn on the baking sheet. Use a spatula to gently stir and coat all the popcorn evenly with the sauce.
- Bake the Popcorn: Preheat your oven to 250°F. Place the baking sheet in the oven and bake for 45 minutes, stirring every 15 minutes to guarantee even coating and prevent burning.
- Cool and Serve: Remove from the oven and allow the popcorn to cool completely. Once cooled, break it apart into clusters and serve in a large bowl.
Extra Tips:
When making Dracula’s Bloody Popcorn, be cautious when handling the hot sugar mixture, as it can cause burns. Using a candy thermometer helps achieve the perfect consistency for the candy coating.
If you’re making this treat in advance, store it in an airtight container to keep it fresh and crisp. For a more festive presentation, consider serving the popcorn in themed bowls or pairing it with other Halloween decorations. Enjoy creating a spooky atmosphere with this fun and tasty snack!
Skeleton Bone Breadsticks

Skeleton Bone Breadsticks are a spooktacular addition to any Halloween party, especially for kids. These bone-shaped breadsticks not only look eerie but also taste delicious, making them a hit with little goblins and ghouls. With a crispy exterior and soft interior, these breadsticks are fun to make and even more fun to eat. They’re perfect for dipping into marinara sauce or enjoying on their own.
The process of making Skeleton Bone Breadsticks is simple and involves shaping the dough into bone-like structures. This hands-on activity is great for kids who can help with rolling and shaping the breadsticks. The recipe uses basic ingredients that are likely already in your pantry, so you can easily whip them up for a last-minute Halloween gathering. The following recipe serves 4-6 people, making it perfect for a small party.
Ingredients (serves 4-6):
- 2 cups all-purpose flour
- 1 packet (2 1/4 teaspoons) active dry yeast
- 3/4 cup warm water
- 1 tablespoon olive oil
- 1 teaspoon salt
- 1 tablespoon sugar
- 1/2 cup grated Parmesan cheese
- 1 tablespoon garlic powder
- 1 tablespoon dried Italian herbs (such as oregano and basil)
- 1 egg, beaten (for egg wash)
Instructions:
- Prepare the Dough: In a large bowl, combine the warm water, sugar, and yeast. Let this mixture sit for about 5 minutes until it becomes frothy. This indicates that the yeast is active.
- Mix Ingredients: Add the flour, salt, and olive oil to the yeast mixture. Stir until a dough begins to form. Transfer the dough to a floured surface and knead for about 5-7 minutes until it’s smooth and elastic.
- First Rise: Place the kneaded dough in a greased bowl, cover it with a damp cloth, and let it rise in a warm place for about 1 hour or until it has doubled in size.
- Shape the Breadsticks: Preheat your oven to 400°F (200°C). Punch down the risen dough and divide it into 12 equal pieces. Roll each piece into a log about 6-8 inches long. To create the bone shape, make slits at both ends of each log and slightly spread them apart to resemble a bone.
- Season the Breadsticks: Arrange the shaped dough on a baking sheet lined with parchment paper. Brush each breadstick with the beaten egg and sprinkle with Parmesan cheese, garlic powder, and Italian herbs.
- Bake: Bake the breadsticks in the preheated oven for 15-20 minutes or until they’re golden brown and crispy.
- Cool and Serve: Allow the breadsticks to cool slightly on a wire rack before serving them with your choice of dipping sauce.
Extra Tips: For an extra spooky touch, you can use food coloring to dye the dough a ghoulish green or a ghostly white before baking. If you’re short on time, you can use pre-made pizza dough from the store. Just roll it out and shape it as directed.
Additionally, to guarantee even baking, make sure your breadsticks are of uniform size and thickness. For a softer breadstick, cover them with a clean towel as they cool to retain moisture.
Goblin Green Guacamole Cups

Goblin Green Guacamole Cups are a fun and spooky treat perfect for Halloween gatherings with kids. These delightful finger foods aren’t only visually appealing but also a healthy option, loaded with the goodness of avocados. The vibrant green color, reminiscent of goblins, adds to the Halloween theme, making it an exciting dish for children to enjoy. The creamy texture of the guacamole paired with the crunchy base creates a delightful contrast that’s sure to please little ones and adults alike.
Perfect for a serving size of 4-6 people, Goblin Green Guacamole Cups are an easy-to-make appetizer or snack that can be prepared in no time. They’re a versatile treat, suitable for Halloween parties or casual get-togethers, and can be customized with various toppings to suit different tastes. The combination of fresh ingredients guarantees that these cups are both nutritious and delicious, making them a hit with kids and parents looking for healthier Halloween options.
Ingredients:
- 3 ripe avocados
- 1 lime, juiced
- 1 small red onion, finely chopped
- 1-2 cloves garlic, minced
- 1 small jalapeño, seeded and minced
- Salt and pepper, to taste
- 12 mini bell peppers, halved and seeded
- 1/4 cup fresh cilantro, chopped
- Optional toppings: black olives, cherry tomatoes, or shredded cheese
Instructions:
- Prepare the Avocados: Cut the avocados in half, remove the pits, and scoop the flesh into a mixing bowl. Mash the avocados with a fork until you reach your desired consistency—smooth or slightly chunky.
- Mix in Flavors: Add the lime juice, finely chopped red onion, minced garlic, and minced jalapeño to the mashed avocados. Stir well to combine. Season with salt and pepper to taste, and mix in the chopped cilantro.
- Prepare the Pepper Cups: Take the halved mini bell peppers and arrange them on a serving platter. These will serve as the edible cups for the guacamole.
- Fill the Cups: Using a spoon, fill each mini bell pepper half with the prepared guacamole. Be generous to guarantee each cup holds a good amount of the mixture.
- Add Optional Toppings: If desired, garnish each guacamole cup with optional toppings like sliced black olives, cherry tomato halves, or a sprinkle of shredded cheese for additional flavor and decoration.
- Serve: Arrange the filled Goblin Green Guacamole Cups on a platter and serve immediately. Enjoy them fresh for the best taste and texture.
Extra Tips:
To enhance the flavor of your Goblin Green Guacamole Cups, allow the guacamole to chill in the refrigerator for about 30 minutes before filling the pepper cups. This resting period helps the flavors meld together beautifully.
When selecting avocados, make sure they’re ripe but not overripe for the perfect creamy texture. If you prefer a milder guacamole, you can omit the jalapeño or adjust the amount to suit your taste.
These cups are best consumed fresh, but if you need to store leftovers, cover them tightly with plastic wrap to prevent browning of the guacamole.
Vampire Fang Cookies
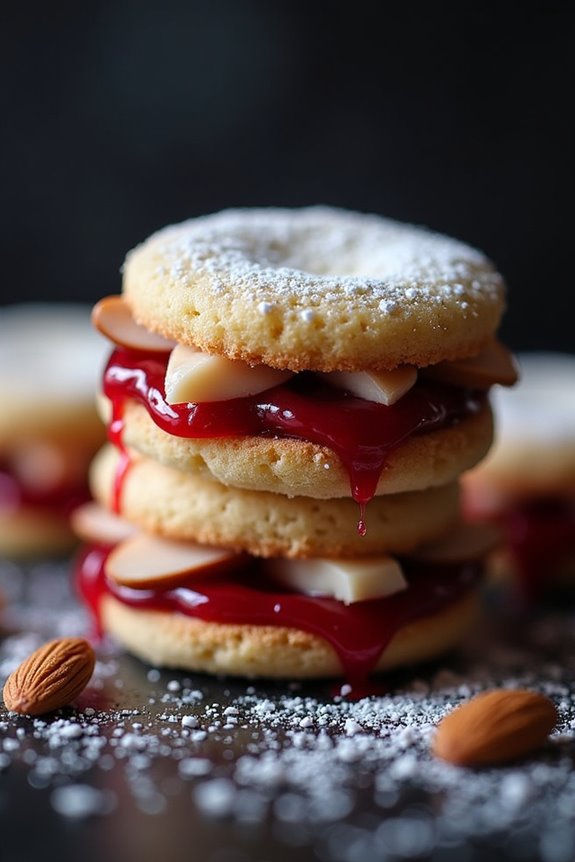
Halloween is the perfect time to get creative in the kitchen, especially when it comes to making spooky treats that your kids will love. Vampire Fang Cookies are a fun and simple way to add a bit of fright to your Halloween party spread. These delicious cookies are shaped to resemble vampire fangs, complete with a blood-red filling and sharp, almond slivers that mimic teeth. Not only are they a blast to make, but they’re also a treat that kids and adults alike will enjoy biting into during your Halloween festivities.
Creating Vampire Fang Cookies is a great way to involve your children in the kitchen. They’ll have a blast helping to shape the cookies, and decorating them can be an exciting activity that doubles as a crafty arts-and-crafts session. Plus, these cookies are made with easy-to-find ingredients and require minimal baking skills, making them an ideal choice for busy parents looking to whip up something spooky yet delicious. So gather your little ghouls and goblins and get started on these delightful Halloween treats.
Ingredients (serving size: 4-6 people):
- 1 package of refrigerated sugar cookie dough (16 oz)
- 1/4 cup all-purpose flour (for dusting)
- 1/2 cup strawberry or raspberry jam
- 1/2 cup slivered almonds
- 1/4 teaspoon red food coloring
- 1/2 teaspoon vanilla extract
- 1 tablespoon powdered sugar (optional, for dusting)
Cooking Instructions:
- Preheat the Oven: Start by preheating your oven to 350°F (175°C). This will guarantee your cookies bake evenly and have a perfect texture.
- Prepare the Dough: On a lightly floured surface, roll out the sugar cookie dough to about 1/4-inch thickness. Use a knife or cookie cutter to cut the dough into crescent or fang shapes, approximately 3 inches long.
- Shape the Fangs: Use your fingers to slightly taper the ends of each crescent to resemble fangs. Press a few slivered almonds into the dough, angled to mimic sharp teeth. This will give the cookies their signature “vampire” appearance.
- Bake the Cookies: Place the shaped cookies on a baking sheet lined with parchment paper. Bake in the preheated oven for 8-10 minutes, or until the edges are lightly golden. Remove from the oven and allow them to cool on a wire rack.
- Make the “Blood” Filling: While the cookies are cooling, mix the strawberry or raspberry jam with red food coloring and vanilla extract in a small bowl. Stir until well combined and the jam has a vibrant red color.
- Assemble the Cookies: Once the cookies are completely cool, spread a small amount of the jam mixture on the underside of one cookie. Press a second cookie on top, creating a sandwich with the jam oozing slightly around the edges like blood.
- Finishing Touches: Dust the tops of the cookies lightly with powdered sugar for an extra touch of sweetness, if desired.
Extra Tips:
For a more dramatic effect, consider adding a small amount of black food coloring to a portion of the jam to create darker “blood” streaks. If you’re short on time, you can use store-bought jam without additional coloring, though the extra tint adds a spooky visual appeal.
Additionally, make sure the cookies are completely cooled before assembling to prevent the jam from becoming too runny. These cookies store well in an airtight container for a few days, so feel free to make them ahead of time for your Halloween celebration!
Creepy Crawly Deviled Eggs
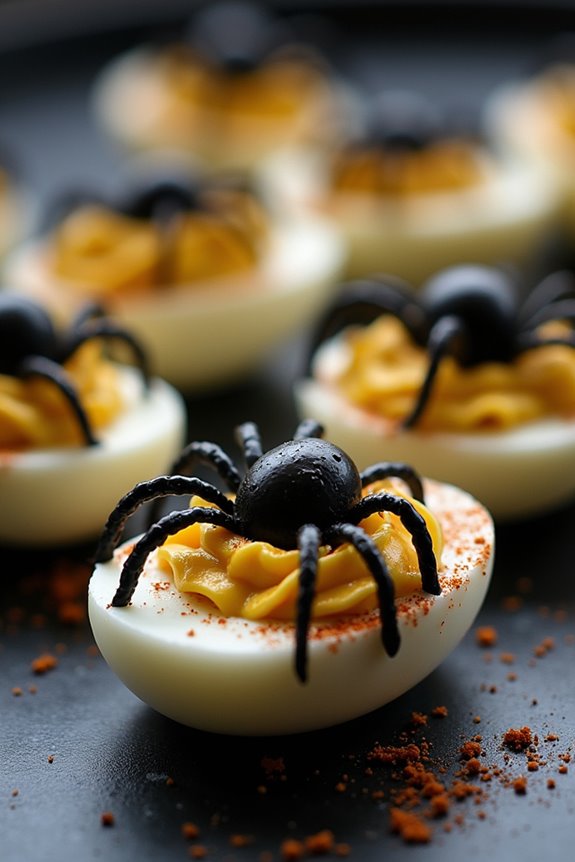
Creepy Crawly Deviled Eggs are a spooky and delicious addition to any Halloween party, especially one catered for children. These deviled eggs aren’t only fun to make but also provide a nutritious snack that kids will love. The combination of creamy yolk filling and the eerie appearance of “spider” toppings makes them an instant hit among little ghouls and goblins.
Perfect for a party setting, these eggs are easy to prepare and can be made ahead of time, allowing you to focus on other aspects of your Halloween celebration.
The key to making Creepy Crawly Deviled Eggs lies in the decoration. Using black olives cleverly cut and arranged, you can create the illusion of spiders crawling over the eggs. This playful twist on the classic deviled egg will capture the imagination of children and add a touch of fright to your festive spread.
With the following recipe, you can prepare a serving size suitable for 4-6 people, ensuring everyone gets a taste of this frightful delight.
Ingredients:
- 6 large eggs
- 3 tablespoons mayonnaise
- 1 teaspoon yellow mustard
- 1/2 teaspoon white vinegar
- Salt and pepper to taste
- Paprika for garnish
- 12 black olives
Cooking Instructions:
- Boil the Eggs: Place the eggs in a saucepan and cover them with water. Bring the water to a rolling boil over medium-high heat. Once boiling, turn off the heat and cover the pan. Let the eggs sit in the hot water for 10-12 minutes.
- Cool and Peel the Eggs: After the eggs have cooked, transfer them to a bowl of ice water to cool for about 5 minutes. Once cool, gently crack and peel the shells off the eggs.
- Prepare the Egg Halves: Slice each egg in half lengthwise. Carefully remove the yolks and place them in a small mixing bowl. Arrange the egg whites on a serving platter.
- Make the Filling: Mash the yolks with a fork until crumbly. Add mayonnaise, mustard, vinegar, salt, and pepper. Mix until smooth and creamy.
- Fill the Eggs: Using a spoon or a piping bag, fill the egg white halves with the yolk mixture, mounding it slightly.
- Create the Spiders: Cut the olives in half; use one half as the spider body and cut the other half into thin strips to form legs. Place one olive half on top of each deviled egg and arrange the strips around it to resemble spider legs.
- Garnish and Serve: Lightly sprinkle paprika over the deviled eggs for added flavor and color. Serve immediately or refrigerate until ready to serve.
To make your Creepy Crawly Deviled Eggs even more appealing, consider using different types of olives or adding food coloring to the yolk mixture for a more dramatic effect.
If you’re preparing these eggs in advance, make sure to keep them covered and refrigerated to maintain freshness. Encourage children to help with the olive spider assembly; it’s a great way to involve them in the kitchen and spark their creativity.
The combination of fun and fright, along with the delicious taste, will make these deviled eggs the highlight of your Halloween finger foods.
Eyeball Pretzel Bites
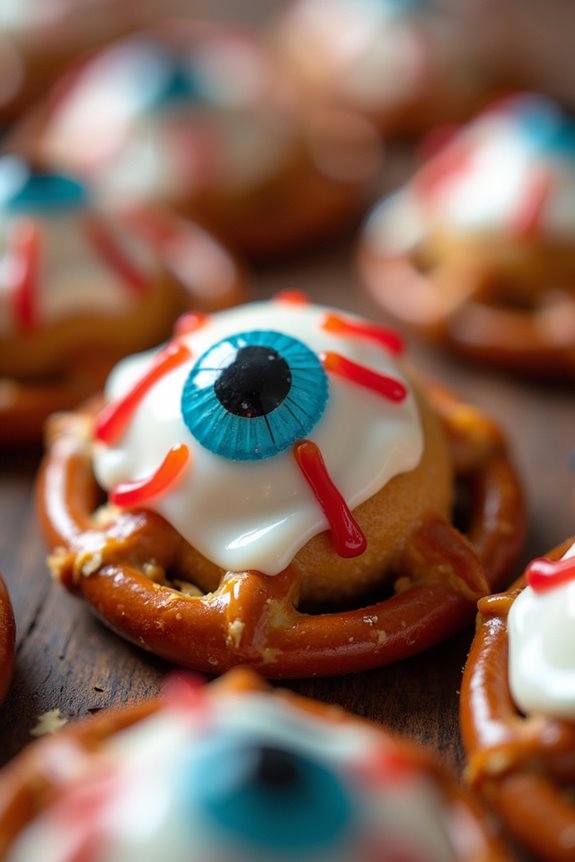
Halloween is a time for spooky fun, and what better way to treat your little monsters than with Eyeball Pretzel Bites? These eerie yet delightful treats are perfect for a Halloween party or a fun family snack. With their creepy eyeball appearance, they’re sure to catch the attention of kids and adults alike.
Plus, they’re incredibly easy to make and involve just a few simple ingredients that come together in a flash.
These Eyeball Pretzel Bites aren’t only a visual treat but also a delicious combination of sweet and salty flavors. The base of the snack is a classic pretzel, topped with a creamy white chocolate disk and finished with a candy eyeball to complete the spooky look. Kids will love helping out with this recipe, as it’s a fun and creative way to get involved in the kitchen.
So gather your ingredients and let’s get started on these bewitching bites!
Ingredients (Serving size: 4-6 people):
- 24 mini pretzel twists
- 24 white chocolate melting wafers
- 24 candy eyeballs
- Optional: red gel icing for added bloodshot effect
Cooking Instructions:
- Preheat the Oven: Begin by preheating your oven to 200°F (93°C). This low temperature is perfect for just melting the chocolate without burning it.
- Prepare the Pretzels: On a baking sheet lined with parchment paper, arrange the mini pretzel twists in a single layer. Make sure there’s a little space between each pretzel to prevent them from sticking together.
- Add the Chocolate Wafers: Place one white chocolate melting wafer on top of each pretzel twist. The wafer should fit nicely within the pretzel’s shape and will eventually melt over it.
- Melt the Chocolate: Place the baking sheet in the preheated oven for about 3-5 minutes, or until the chocolate wafers have softened but not completely melted. Keep a close eye on them to guarantee they don’t overheat.
- Attach the Candy Eyeballs: Once the chocolate wafers have softened, carefully remove the baking sheet from the oven. Immediately press a candy eyeball onto the center of each softened chocolate wafer. The chocolate will act as glue and hold the candy eyeball in place.
- Cool and Set: Allow the pretzel bites to cool at room temperature until the chocolate hardens again. For quicker results, you can place the baking sheet in the refrigerator for about 10 minutes.
- Optional Decoration: For an extra spooky effect, use red gel icing to draw bloodshot lines radiating outward from the candy eyeballs for a more realistic look.
Extra Tips:
For a nut-free version, verify that the white chocolate wafers and candy eyeballs you purchase are certified nut-free.
You can also experiment with different types of pretzels, such as pretzel sticks or squares, to see which shape you prefer. If you want to add a pop of color, consider using colored candy melts instead of white chocolate for a more vibrant and festive touch.
Remember to store any leftover Eyeball Pretzel Bites in an airtight container to keep them fresh and ready for your Halloween festivities!
Haunted Marshmallow Pops
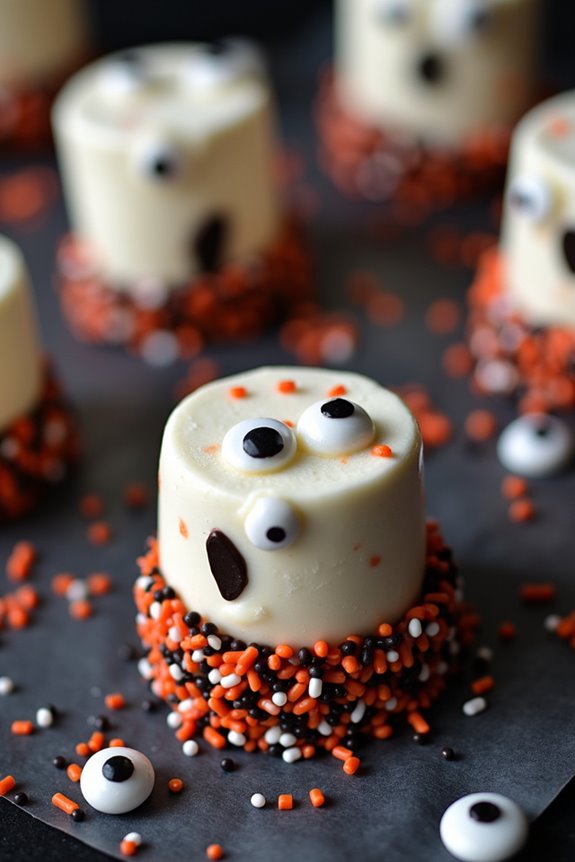
Marshmallow pops are a versatile snack that can be customized with different coatings and decorations to fit any Halloween theme. This recipe is designed for 4-6 people, making it ideal for a small party or a family gathering. The simplicity of the ingredients and the ease of preparation make it a great activity for kids to help with, encouraging creativity and hands-on participation in the kitchen.
Ingredients (Serves 4-6):
- 12 large marshmallows
- 12 lollipop sticks or paper straws
- 1 cup semi-sweet chocolate chips
- 1 cup white chocolate chips
- 1 tablespoon vegetable oil
- Assorted sprinkles, edible eyes, and colored icing for decoration
Cooking Instructions:
1. Prepare the Marshmallows: Insert a lollipop stick or paper straw into each marshmallow, ensuring it’s firmly in place. Set them aside on a baking sheet lined with parchment paper.
2. Melt the Chocolate: In a microwave-safe bowl, combine the semi-sweet chocolate chips with half a tablespoon of vegetable oil. Microwave in 30-second intervals, stirring in between, until smooth and fully melted.
Repeat the process with the white chocolate chips and the remaining oil in a separate bowl.
3. Dip the Marshmallows: Carefully dip each marshmallow into the melted chocolate, ensuring it’s completely coated. Allow any excess chocolate to drip off before placing the marshmallow back onto the parchment-lined baking sheet.
4. Decorate: While the chocolate is still wet, use assorted sprinkles, edible eyes, and colored icing to decorate the marshmallows, creating fun and spooky Halloween designs. Let the kids get creative with their haunted designs.
5. Set the Pops: Place the decorated marshmallow pops in the refrigerator for about 15-20 minutes to allow the chocolate to set completely.
Extra Tips:
For a more vibrant design, consider using colored candy melts instead of chocolate chips. Candy melts come in a variety of hues and can add an extra pop of color to your haunted designs.
Additionally, if you’re planning on serving these at a party, consider setting up a “decoration station” where guests can customize their own marshmallow pops with different toppings and decorations. This not only makes the activity more interactive but also allows for a range of spooky and creative designs.