

Halloween is one of my absolute favorite times of the year, especially when it means crafting a spine-tingling dinner party for fellow thrill-seekers.
Picture yourself sinking your teeth into a Wickedly Delicious Spider Bread Bowl or twirling Hauntingly Good Black Pasta on your fork.
These eerie dishes are just the beginning of a night brimming with chills and flavors.
Curious about how to create this bewitching feast?
Let’s uncover more of these devilishly delightful creations together.
Wickedly Delicious Spider Bread Bowl

Celebrate Halloween with a delectably eerie twist by making a Wickedly Delicious Spider Bread Bowl. This creative and festive dish isn’t only visually striking but also a delightful treat for your taste buds. Perfect for adult Halloween gatherings, this bread bowl is shaped like a spooky spider, holding a creamy and savory dip inside its “body.”
It’s a fun and interactive centerpiece that adds a touch of horror to your holiday spread while offering a scrumptious bite for your guests. The Spider Bread Bowl combines the best of both worlds: a soft, homemade bread exterior with a rich, cheesy filling. As you tear off pieces of the spider’s “legs,” you can scoop up the delicious dip, making it a communal dish that encourages sharing and laughter.
This recipe is designed to serve 4-6 people, making it an ideal addition to your Halloween party menu. Whether you’re hosting a costume party or enjoying a quiet evening with friends, this dish is sure to impress and delight.
Ingredients for 4-6 People:
- 3 1/2 cups all-purpose flour
- 1 packet (2 1/4 teaspoons) active dry yeast
- 2 tablespoons sugar
- 1 teaspoon salt
- 1 cup warm water (110°F)
- 1/4 cup olive oil
- 1 egg (beaten, for egg wash)
- 2 cups shredded cheddar cheese
- 1/2 cup cream cheese (softened)
- 1/2 cup sour cream
- 1/4 cup mayonnaise
- 1/2 cup cooked and crumbled bacon
- 2 tablespoons chopped chives
- 1/2 teaspoon garlic powder
- Black olives or peppercorns (for eyes)
Cooking Instructions:
- Prepare the Dough: In a large mixing bowl, combine warm water, sugar, and yeast. Let it sit for about 5 minutes until foamy. Add in the olive oil, salt, and flour gradually, mixing until a dough forms. Knead the dough on a lightly floured surface for about 8-10 minutes until smooth and elastic.
- First Rise: Place the dough in a greased bowl, cover it with a damp cloth, and let it rise in a warm area for about 1 hour or until doubled in size.
- Shape the Spider: Preheat your oven to 375°F (190°C). Punch down the dough and divide it into one large piece for the body and eight smaller pieces for legs. Shape the large piece into a round ball and the smaller pieces into logs, attaching them to the body to form legs. Place on a baking sheet lined with parchment paper.
- Add Eyes: Use small pieces of black olives or peppercorns to create eyes on the spider’s “head.”
- Second Rise: Cover the shaped bread with a cloth and let it rise for another 20 minutes.
- Bake the Spider: Brush the spider bread with the beaten egg to give it a glossy finish. Bake in the preheated oven for about 25-30 minutes or until golden brown and hollow-sounding when tapped.
- Prepare the Filling: While the bread is baking, mix the cheddar cheese, cream cheese, sour cream, mayonnaise, bacon, chives, and garlic powder in a bowl until well combined.
- Assemble: Once the bread is baked and cooled slightly, cut open the top of the spider’s “body” and hollow out a bit of the bread to create a bowl. Fill it with the prepared cheese dip.
Extra Tips:
When shaping the spider, make sure the legs are securely attached to the body to prevent them from detaching while baking. If the dough is sticky, add a little more flour while kneading.
For an extra spooky presentation, consider using food coloring to tint the dough black or orange. Remember, the dip can be adjusted to your preference—feel free to add more chili flakes for a spicier kick or swap out ingredients to suit dietary needs.
Hauntingly Good Black Pasta
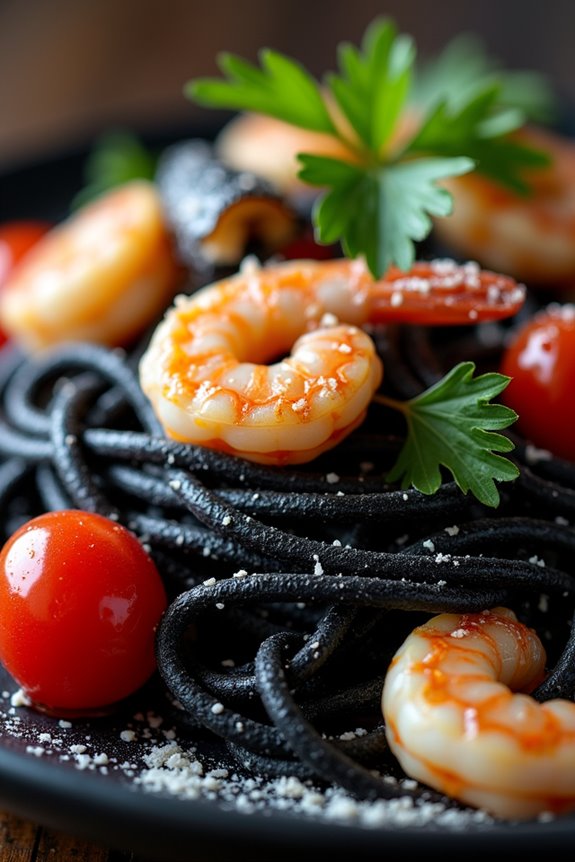
If you’re searching to create a spooky and sophisticated dish for your Halloween gathering, seek no further than Hauntingly Good Black Pasta. This eerie yet elegant dish combines the striking visual of jet-black squid ink pasta with the rich flavors of garlic, cherry tomatoes, and seafood. The result is a mouthwatering meal that’s sure to impress your adult guests as they enjoy a night of Halloween festivities.
The dark color of the pasta sets the perfect mood for the holiday, while the fresh ingredients and delicate flavors make it a dish everyone will remember. Not only does this dish fit the part for a Halloween celebration, but it also boasts a delightful array of flavors and textures. The savory taste of the seafood paired with the slight sweetness of cherry tomatoes and the zest of garlic creates a harmonious symphony on the palate.
The squid ink pasta, with its unique color, is the star of the show, providing a bold backdrop that elevates the entire dish. Whether you’re hosting a dinner party or simply want to indulge in a themed meal, this Hauntingly Good Black Pasta is a must-try.
Ingredients (serves 4-6):
- 500g squid ink pasta
- 3 tablespoons olive oil
- 4 cloves garlic, minced
- 200g cherry tomatoes, halved
- 300g mixed seafood (such as shrimp, squid, and mussels)
- 1/2 cup white wine
- Salt and pepper to taste
- 1 tablespoon lemon juice
- Fresh parsley, chopped, for garnish
- Parmesan cheese, grated, for serving
Cooking Instructions:
- Cook the Pasta: Begin by bringing a large pot of salted water to a boil. Add the squid ink pasta and cook according to the package instructions until al dente. Once cooked, drain the pasta and set aside, reserving a cup of the pasta water.
- Prepare the Base: In a large skillet, heat the olive oil over medium heat. Add the minced garlic and sauté for about 1 minute until it becomes fragrant but not browned.
- Add Tomatoes and Seafood: Add the halved cherry tomatoes to the skillet and cook for about 2-3 minutes until they begin to soften. Then, add the mixed seafood, stirring occasionally until the seafood is cooked through, approximately 5-7 minutes.
- Deglaze and Season: Pour in the white wine and let it simmer until it reduces by half. Season the mixture with salt, pepper, and lemon juice, adjusting to taste.
- Combine and Serve: Add the cooked pasta to the skillet, tossing it with the seafood and tomato mixture. If the sauce is too dry, add a bit of the reserved pasta water to reach the desired consistency. Once everything is well combined, remove from heat.
- Garnish and Enjoy: Transfer the pasta to a serving platter. Garnish with freshly chopped parsley and a generous amount of grated Parmesan cheese. Serve immediately for the best flavor.
Extra Tips:
When cooking Hauntingly Good Black Pasta, timing is key to guarantee the seafood is perfectly cooked and tender. Be cautious not to overcook the seafood as it can become rubbery.
Additionally, if you can’t find squid ink pasta, you can make your own by adding squid ink to regular pasta dough. Be sure to adjust the seasoning and acidity according to your preference, and feel free to experiment with different types of seafood to tailor the dish to your liking.
Enjoy this hauntingly delicious dish as part of your Halloween celebration!
Mummified Sausage Wraps

Mummified Sausage Wraps are a fun and spooky dish perfect for your adult Halloween gathering. These tasty treats resemble mummies with their flaky pastry bandages and are certain to be a hit with your guests. With a savory sausage center wrapped in golden-brown puff pastry, they deliver a delightful combination of flavors and textures that pair well with a variety of dipping sauces. Not only are they delicious, but they also add a whimsical touch to your Halloween spread, making them a great conversation starter.
This recipe is designed for a serving size of 4-6 people, making it perfect for a small gathering or as part of a larger buffet. The preparation is simple, and with just a few ingredients, you can create these charming appetizers in no time. Whether you’re hosting a costume party or a cozy night in with friends, these Mummified Sausage Wraps are certain to impress with their playful appearance and delectable taste.
Ingredients (serving size: 4-6 people):
- 1 package of puff pastry sheets (thawed)
- 12 cocktail sausages
- 1 egg (beaten)
- Mustard or ketchup (for decoration)
Cooking Instructions:
- Preheat the Oven: Begin by preheating your oven to 400°F (200°C). This guarantees that the pastry will cook evenly and develop a golden-brown color.
- Prepare the Puff Pastry: On a lightly floured surface, unroll one sheet of puff pastry. Using a sharp knife or a pizza cutter, cut the pastry into thin strips, approximately 1/4 inch wide. These strips will serve as the “bandages” for your mummies.
- Wrap the Sausages: Take one cocktail sausage and start wrapping it with the pastry strips, leaving a small gap for the “face”. Overlap the strips slightly to create a bandage effect. Repeat this process for all 12 sausages.
- Brush with Egg Wash: Place the wrapped sausages on a baking sheet lined with parchment paper. Brush each mummy with the beaten egg. This step is important as it gives the pastry a nice sheen and helps it brown in the oven.
- Bake the Mummies: Place the baking sheet in the preheated oven and bake for 15-20 minutes, or until the pastry is puffed up and golden brown. Keep an eye on them to avoid overbaking.
- Add the Eyes: Once the mummies are baked and slightly cooled, use a small amount of mustard or ketchup to add eyes to each mummy. Use a toothpick to apply small dots for eyes in the gap left while wrapping.
Extra Tips:
For an added layer of flavor, consider using flavored sausages, such as smoked or spicy varieties, to give your mummies a unique twist.
If you’re short on time, crescent roll dough can be a quick substitute for puff pastry. Be sure to fully thaw the pastry before use to avoid cracks while wrapping.
When cutting the pastry strips, try to make them as even as possible for consistent cooking.
Finally, these wraps are versatile with dips; serve them with mustard, spicy ketchup, or even a cheese sauce for dipping options that cater to different palates.
Blood Red Beet Risotto
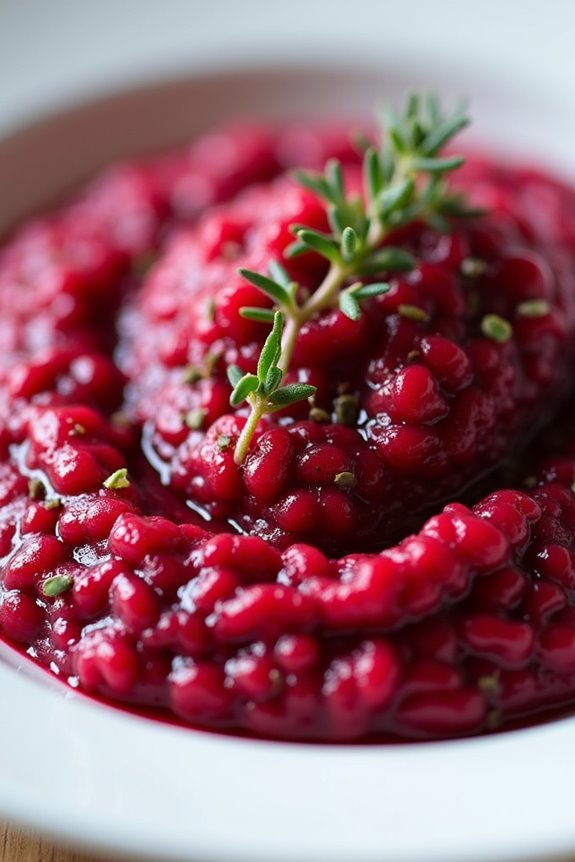
Get ready to add a spooky twist to your Halloween dinner menu with this Blood Red Beet Risotto. This striking dish not only catches the eye with its deep, blood-red hue but also delivers a rich, earthy flavor that will impress your guests. The creamy texture of the arborio rice pairs beautifully with the sweet and slightly tangy taste of beets, creating a dish that’s as delicious as it’s visually enchanting.
Perfect for an adult Halloween gathering, this risotto is sure to be a conversation starter. The secret to this risotto’s vibrant color is the beet puree, which is easily made by roasting beets until tender and then blending them until smooth. Combined with the traditional risotto ingredients like Parmesan cheese and a splash of white wine, the beet puree not only transforms the dish’s appearance but also enhances its flavor profile.
This Blood Red Beet Risotto is an ideal centerpiece for a Halloween-themed dinner, offering a sophisticated yet fun culinary experience.
Ingredients (serving size: 4-6 people):
- 2 medium beets
- 2 tablespoons olive oil
- 1 small onion, finely chopped
- 2 cloves garlic, minced
- 1 1/2 cups arborio rice
- 1/2 cup dry white wine
- 4 cups vegetable broth
- 1/2 cup grated Parmesan cheese
- Salt and pepper to taste
- Fresh thyme leaves for garnish (optional)
Cooking Instructions:
- Prepare the Beets: Preheat your oven to 400°F (200°C). Wrap the beets in aluminum foil and place them on a baking sheet. Roast in the oven for about 45 minutes to 1 hour, or until they’re fork-tender. Allow the beets to cool slightly, then peel and cut them into chunks. Blend the chunks in a food processor until smooth to create a beet puree.
- Sauté the Aromatics: In a large saucepan, heat the olive oil over medium heat. Add the chopped onion and garlic, sautéing until the onion becomes translucent and the garlic is fragrant, about 3-4 minutes.
- Add the Rice: Stir in the arborio rice, ensuring that each grain is coated in the oil. Cook for about 2 minutes until the rice becomes lightly toasted.
- Deglaze with Wine: Pour in the white wine and stir continuously until it’s mostly absorbed by the rice, which should take about 2-3 minutes.
- Incorporate the Broth: Begin adding the vegetable broth, one cup at a time, stirring frequently and allowing each addition to be absorbed before adding the next. This process should take about 18-20 minutes, during which the rice will become creamy and al dente.
- Stir in Beet Puree and Cheese: Once the rice is cooked, reduce the heat to low and stir in the beet puree and grated Parmesan cheese. Mix until fully combined and the risotto is a uniform blood-red color. Season with salt and pepper to taste.
- Serve and Garnish: Serve the risotto hot, garnished with fresh thyme leaves if desired, to add a touch of green contrast.
Extra Tips:
When preparing the beets, wearing kitchen gloves can prevent your hands from staining. If you prefer a creamier texture, you can add a bit more broth or stir in a tablespoon of butter at the end.
For an extra depth of flavor, consider using a homemade vegetable broth. Remember to stir the risotto consistently to prevent it from sticking to the bottom of the pan, and keep in mind: patience is key to achieving the perfect creamy consistency! Enjoy this dish as a unique addition to your Halloween festivities.
Ghostly White Pizza

Celebrate the spooky season with a delicious and hauntingly delightful Ghostly White Pizza. This cheesy, white-sauced pizza is perfect for adult Halloween gatherings. With its creamy garlic-infused base, a blend of cheeses, and ghost-shaped mozzarella pieces, this pizza adds a festive yet sophisticated touch to any Halloween party. The simplicity of the white pizza is balanced by the richness of flavors, making it a crowd-pleaser that’s both fun and gourmet.
Ghostly White Pizza isn’t only visually appealing but also a breeze to make. It combines a smooth white sauce with a crispy crust, topped off with your choice of gourmet toppings like mushrooms, spinach, or artichokes. The ghost shapes are created from mozzarella cheese, lending a playful element that complements the holiday’s theme. This recipe serves 4-6 people, ensuring you have enough to feed a small gathering or family dinner.
Ingredients:
- 1 pizza dough, store-bought or homemade
- 1 cup ricotta cheese
- 1/2 cup heavy cream
- 2 cloves garlic, minced
- 1 tablespoon olive oil
- 1 cup shredded mozzarella cheese
- 1/2 cup grated Parmesan cheese
- 1/2 cup fresh spinach leaves
- 1/2 cup sliced mushrooms
- 1/4 cup sliced artichoke hearts (optional)
- 1 ball of fresh mozzarella, sliced into ghost shapes
- Salt and pepper to taste
- Cornmeal or flour for dusting
Cooking Instructions:
- Prepare the Oven and Dough: Preheat your oven to 475°F (245°C). If you have a pizza stone, place it in the oven to heat. Lightly dust a pizza peel or baking sheet with cornmeal or flour to prevent sticking, and stretch out the pizza dough to your desired thickness.
- Make the White Sauce: In a saucepan over medium heat, combine the ricotta cheese, heavy cream, and minced garlic. Stir continuously until the mixture is smooth and begins to bubble slightly. Season with salt and pepper to taste.
- Assemble the Pizza: Brush the stretched dough with olive oil. Spread the white sauce evenly over the dough, leaving a small border for the crust. Sprinkle the shredded mozzarella and Parmesan cheeses over the sauce.
- Add Toppings: Evenly distribute the fresh spinach leaves, sliced mushrooms, and artichoke hearts over the cheese layer. Place the mozzarella ghost shapes on top, ensuring they’re visible and evenly spaced.
- Bake the Pizza: Transfer the pizza to the preheated oven (or onto the hot pizza stone, if using) and bake for 10-15 minutes or until the crust is golden and crispy, and the cheese is bubbly and slightly browned.
- Serve: Remove the pizza from the oven and let it cool for a few minutes before slicing. Serve hot and enjoy the spooky yet delicious creation.
Extra Tips:
To make your ghost shapes stand out even more, consider using a cookie cutter to create uniform ghost silhouettes from the mozzarella slices. If fresh mozzarella isn’t available, you can use pre-sliced mozzarella cheese, though the fresh variety provides a creamier texture.
Feel free to customize the toppings based on your preferences or what’s in season. Remember, the key to a perfect pizza lies in balancing the toppings and not overloading it, allowing the flavors of the white sauce and cheeses to shine through.
Zombie Brain Guacamole
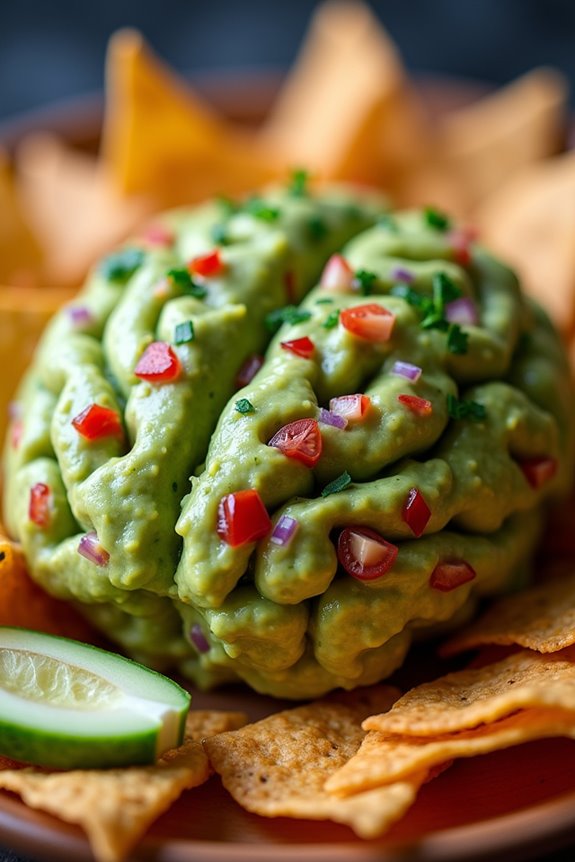
Zombie Brain Guacamole is a spooky yet delicious addition to any Halloween gathering for adults. This eerie appetizer combines the creamy texture of avocados with a burst of flavors from fresh ingredients, creating a dish that isn’t only visually striking but also irresistible to the taste buds. The guacamole is shaped into a brain-like form, making it a perfect centerpiece for your Halloween party table.
With the right combination of spices and a touch of creativity, you can serve a dish that will leave your guests both impressed and slightly spooked.
To create the Zombie Brain Guacamole, you’ll want to focus on achieving the right consistency and flavor balance. The secret lies in using ripe avocados that yield a smooth texture, complemented by the tang of lime juice and the heat of jalapeños. This recipe guarantees that the “brain” is both delicious and visually intriguing, with a perfect balance of creaminess, acidity, and spice.
Serve it with a side of tortilla chips or vegetable sticks, and watch as your guests dig into this Halloween-themed treat with delight.
Ingredients (Serves 4-6)
- 4 ripe avocados
- 1 small red onion, finely chopped
- 2 tomatoes, deseeded and diced
- 1-2 jalapeños, finely chopped (adjust to taste)
- 2 cloves garlic, minced
- Juice of 2 limes
- Salt to taste
- Freshly ground black pepper to taste
- Handful of fresh cilantro, chopped
- 1 tablespoon olive oil
- Red food coloring (optional, for a more “bloody” effect)
Instructions
- Prepare the Avocados: Cut the avocados in half, remove the pits, and scoop the flesh into a large mixing bowl. Use a fork or potato masher to mash the avocados until you achieve a smooth but slightly chunky consistency.
- Mix in Vegetables: Add the finely chopped red onion, diced tomatoes, and jalapeños to the mashed avocados. Stir gently to combine, making sure the vegetables are evenly distributed throughout the mixture.
- Add Flavor: Stir in the minced garlic, lime juice, olive oil, and chopped cilantro. Season the guacamole with salt and freshly ground black pepper. Mix thoroughly to make sure all the flavors are well incorporated.
- Shape the “Brain”: Transfer the guacamole onto a serving platter. Use your hands or a spatula to shape it into a brain-like form. For added effect, you can use a knife to carve shallow grooves on the surface to mimic brain folds.
- Optional – Add Blood Effect: If desired, place a few drops of red food coloring on the surface of the guacamole. Use a toothpick to gently swirl the color into the grooves, creating a “bloody” appearance.
- Serve: Accompany the Zombie Brain Guacamole with a selection of tortilla chips or vegetable sticks for dipping. Serve immediately to maintain its fresh flavor and vibrant appearance.
Extra Tips
When making Zombie Brain Guacamole, it’s essential to use ripe avocados for the best texture and flavor. If you’re preparing the dish ahead of time, press a piece of plastic wrap directly onto the surface of the guacamole to prevent browning.
Additionally, adjusting the amount of jalapeños will allow you to control the heat level to match your guests’ preferences. Finally, while the red food coloring adds a dramatic touch, it’s entirely optional and can be omitted if you prefer a purely natural look.
Monster Eyeball Caprese Skewers
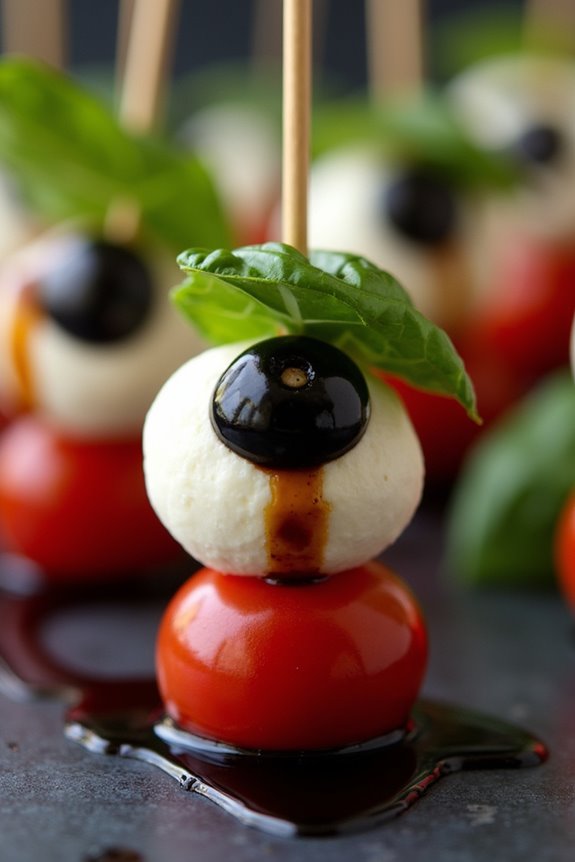
Monster Eyeball Caprese Skewers are a perfect blend of spooky and delicious, making them an excellent choice for your Halloween party. This creative twist on the classic caprese salad not only serves as a tasty appetizer but also adds a festive touch to your party spread. The dish combines fresh mozzarella, cherry tomatoes, and basil leaves on skewers, with the added Halloween flair of transforming them into “eyeballs” using black olives and balsamic glaze. The result is a visually striking and flavorful dish that will surely be a hit among your guests.
These skewers are quick to assemble, making them an ideal last-minute addition to your party menu. The balance of fresh ingredients guarantees a revitalizing taste, while the presentation brings an element of fun and surprise. Whether you’re hosting a large gathering or an intimate dinner, Monster Eyeball Caprese Skewers can easily be scaled up or down to fit your serving needs. Designed to serve 4-6 people, this recipe is a crowd-pleaser that combines ease of preparation with a striking Halloween theme.
Ingredients (Serves 4-6):
- 24 cherry tomatoes
- 24 small fresh mozzarella balls (bocconcini)
- 12 basil leaves
- 12 black olives, pitted
- 1/4 cup balsamic glaze
- 24 appetizer skewers or toothpicks
Instructions:
- Prepare Ingredients: Begin by washing the cherry tomatoes and basil leaves thoroughly. Pat them dry with a paper towel to remove any excess moisture. Set aside.
- Assemble the Skewers: Take an appetizer skewer and start by threading a cherry tomato, followed by a mozzarella ball. Fold a basil leaf and add it next, then finish with another mozzarella ball. Repeat this process for each skewer.
- Create the Eyeballs: Slice each black olive in half, then place one half on top of each mozzarella ball to create the “pupil” of the eyeball. Press gently to guarantee it stays in place.
- Add the Finishing Touches: Once all skewers are assembled, arrange them on a serving platter. Drizzle the balsamic glaze over the skewers to add depth of flavor and enhance the spooky presentation.
- Serve and Enjoy: Serve immediately to enjoy the fresh flavors at their peak. These skewers can also be prepared a few hours in advance and stored in the refrigerator until ready to serve.
Extra Tips: To guarantee the best presentation, select uniformly sized cherry tomatoes and mozzarella balls, as this consistency will enhance the appearance of the “eyeballs.” If you prefer a stronger basil flavor, consider layering more basil leaves between the cheese and tomatoes.
Additionally, you can use a small piping bag or a squeeze bottle to drizzle the balsamic glaze in a more controlled manner, creating a neater presentation. If you want to add a bit more spookiness, consider using food-safe markers to draw veins on the mozzarella balls for an extra eerie effect.
Spooky Smoky Cauldron Chili

Get ready to brew up a cauldron of spooky smoky chili that will bewitch your taste buds and cast a spell of warmth during your Halloween gathering. This chili is perfect for adults looking to enjoy a hearty meal with a touch of Halloween magic. The dish combines a medley of smoky, spicy, and savory flavors, making it a perfect centerpiece for a Halloween feast.
Imagine serving this delicious chili in a black cauldron, embellished with dry ice for that eerie, misty effect, creating an unforgettable Halloween ambiance.
Our Spooky Smoky Cauldron Chili is packed with flavorful ground beef, beans, and a blend of spices that will tantalize your senses. The addition of smoked paprika and chipotle peppers provides a subtle smoky undertone that complements the rich tomato base. This recipe is designed to serve 4-6 people, making it ideal for a small gathering or a family dinner. Prepare to be enchanted by how easy it’s to create this delightful dish that will have your guests coming back for more.
Ingredients (Serves 4-6):
- 2 tablespoons olive oil
- 1 large onion, diced
- 3 cloves garlic, minced
- 1 lb ground beef
- 2 tablespoons tomato paste
- 1 can (15 oz) diced tomatoes
- 1 can (15 oz) black beans, drained and rinsed
- 1 can (15 oz) kidney beans, drained and rinsed
- 2 chipotle peppers in adobo sauce, chopped
- 1 tablespoon smoked paprika
- 2 teaspoons ground cumin
- 1 teaspoon chili powder
- Salt and pepper to taste
- 2 cups beef broth
- 1 cup corn kernels (fresh or frozen)
- 1 tablespoon Worcestershire sauce
- Optional toppings: sour cream, shredded cheese, chopped cilantro, and sliced jalapeños
Cooking Instructions:
- Heat the Oil: In a large pot or Dutch oven, heat the olive oil over medium heat. Add the diced onion and sauté for about 5 minutes until it becomes translucent. Stir in the minced garlic and cook for another minute until fragrant.
- Brown the Beef: Add the ground beef to the pot and cook until it’s browned, breaking it up with a spoon as it cooks. Drain excess fat if necessary.
- Incorporate Tomato Paste: Stir in the tomato paste, allowing it to cook for 2 minutes to enhance the flavors.
- Add Tomatoes and Beans: Pour in the diced tomatoes, black beans, and kidney beans. Stir well to combine all the ingredients.
- Spice It Up: Add the chopped chipotle peppers, smoked paprika, cumin, chili powder, salt, and pepper. Mix everything thoroughly to guarantee the spices are evenly distributed.
- Simmer: Pour in the beef broth, bring the mixture to a boil, then reduce the heat and let it simmer for about 30 minutes. Stir occasionally to prevent sticking.
- Add Corn and Worcestershire Sauce: Stir in the corn and Worcestershire sauce during the last 10 minutes of simmering. Taste and adjust seasoning if needed.
- Serve: Once the chili is thick and flavorsome, serve it hot in bowls, garnished with your choice of toppings such as sour cream, shredded cheese, cilantro, or jalapeños.
Extra Tips:
For a vegetarian version, you can substitute the ground beef with extra beans or a plant-based meat alternative. If you want to add more smokiness, consider using smoked salt or adding a touch of liquid smoke.
This chili can be made a day in advance, allowing the flavors to meld beautifully overnight. If you’re aiming for a spooky presentation, serve the chili in small cauldrons or black bowls and use dry ice to create a misty effect, but make sure the dry ice doesn’t come into contact with the food. Enjoy your hauntingly delicious chili!
Vampire Bite Bloody Mary

The Vampire Bite Bloody Mary is a spookily delicious twist on the classic cocktail, perfect for adding a touch of frightful fun to your Halloween festivities. This drink brings together the familiar tangy flavors of tomato juice and vodka with a blood-red twist that makes it look as if it’s been bitten by a vampire. Ideal for an adult Halloween gathering, this cocktail is as much a treat for the eyes as it’s for the taste buds.
Imagine a glass rimmed with black salt, filled with a deep red concoction, and garnished with eerie elements like spider olives or ghostly mozzarella balls. Whether you’re hosting a haunted house party or simply enjoying a quiet evening with a few friends, the Vampire Bite Bloody Mary is sure to set the mood.
Not only does it look spectacular, but it’s also packed with bold flavors that will satisfy the palate of any cocktail enthusiast. The addition of spicy hot sauce and tangy Worcestershire sauce gives it a thrilling kick, while the garnishes allow for creativity and fun. This recipe serves 4-6 people, making it an ideal choice for small gatherings or as a starter for a larger Halloween-themed meal.
Ingredients for 4-6 servings:
- 2 cups of tomato juice
- 1 ½ cups of vodka
- ¼ cup of fresh lemon juice
- 2 tablespoons of Worcestershire sauce
- 1 tablespoon of hot sauce (adjust to taste)
- 1 teaspoon of celery salt
- 1 teaspoon of freshly ground black pepper
- Black salt for rimming
- Ice cubes
- Garnishes: Cherry tomatoes, mozzarella balls, olives, celery sticks, and lime wedges
Cooking Instructions:
- Prepare the Glasses: Start by rimming your glasses with black salt. To do this, run a lime wedge around the rim of each glass, then dip the rim into a plate of black salt. This adds an eerie touch and a salty contrast to the cocktail.
- Mix the Base: In a large pitcher, combine the tomato juice, vodka, fresh lemon juice, Worcestershire sauce, hot sauce, celery salt, and black pepper. Stir well until all the ingredients are thoroughly mixed.
- Chill the Mix: Add ice cubes to the pitcher and stir again. This will help to chill the mixture rapidly, ensuring the drink is cold and invigorating when served.
- Garnish Preparation: Skewer a combination of cherry tomatoes, mozzarella balls, and olives onto cocktail sticks. Prepare celery sticks and lime wedges as additional garnishes.
- Serve the Drink: Fill each prepared glass with the Bloody Mary mixture, leaving some space at the top for garnishes. Add a skewer of your spooky garnishes and a celery stick to each glass. Finish with a lime wedge on the rim.
Extra Tips:
When making the Vampire Bite Bloody Mary, be sure to adjust the level of hot sauce according to your guests’ taste preferences; you can always serve extra on the side for those who like an extra kick.
It’s a good idea to chill your tomato juice and vodka in advance, so the cocktail remains cold for longer. If you can’t find black salt, you can use regular salt and add a drop of black food coloring to achieve a similar effect.
Finally, get creative with your garnishes for a truly spooky presentation – think outside the box with Halloween-themed picks or edible eyes!
Sinister Dark Chocolate Tart

Sinister Dark Chocolate Tart is the perfect indulgence for your Halloween festivities, offering a rich, decadent dessert that captivates with its deep, dark allure. This tart combines the richness of dark chocolate with the subtlety of a buttery crust, creating a truly luxurious treat.
The smooth and velvety chocolate filling is enhanced with a hint of espresso, accentuating its intense flavor profile. Its mysterious, shadowy appearance is sure to intrigue and delight your guests, making it an ideal dessert for adults seeking a sophisticated Halloween experience.
This recipe is designed to serve 4-6 people, guaranteeing that everyone can savor a slice of this irresistible tart. The process involves a few detailed steps to achieve the perfect balance of flavors and textures. From crafting the crust to achieving the perfect ganache consistency, each element of the Sinister Dark Chocolate Tart is meticulously crafted to deliver a dessert that’s both visually striking and utterly delicious.
Whether you’re hosting a Halloween dinner or simply want to enjoy a special treat, this tart is sure to be a hit.
Ingredients:
- 1 1/4 cups all-purpose flour
- 1/4 cup unsweetened cocoa powder
- 1/2 cup powdered sugar
- 1/2 teaspoon salt
- 1/2 cup unsalted butter, chilled and cubed
- 1 large egg yolk
- 1 teaspoon vanilla extract
- 8 ounces dark chocolate, chopped
- 1 cup heavy cream
- 1 tablespoon espresso powder
- 2 tablespoons granulated sugar
- 1 teaspoon vanilla extract
- Pinch of sea salt
- Optional: whipped cream or fresh berries for garnish
Cooking Instructions:
- Prepare the crust: Preheat your oven to 350°F (175°C). In a mixing bowl, combine the flour, cocoa powder, powdered sugar, and salt. Add the cubed butter and mix until the mixture resembles coarse crumbs. Add the egg yolk and vanilla extract, mixing until the dough comes together.
- Chill and bake the crust: Press the dough into the bottom and sides of a 9-inch tart pan with a removable bottom. Prick the bottom with a fork to prevent puffing. Chill in the refrigerator for 30 minutes. Once chilled, bake for 15-20 minutes or until the crust is firm. Allow to cool completely.
- Make the chocolate filling: In a saucepan over medium heat, combine the heavy cream, espresso powder, and granulated sugar. Heat until the sugar is dissolved and the mixture is just about to boil. Remove from heat.
- Combine chocolate and cream: Place the chopped dark chocolate in a heatproof bowl. Pour the hot cream mixture over the chocolate and let it sit for 3-5 minutes. Stir until smooth and glossy. Add the vanilla extract and a pinch of sea salt, stirring to combine.
- Assemble the tart: Pour the chocolate ganache into the cooled tart shell, spreading evenly with a spatula. Let it set at room temperature for about 2 hours or refrigerate for 1 hour until firm.
- Serve: Once set, remove the tart from the pan. Garnish with whipped cream or fresh berries if desired. Slice and serve to your guests.
Extra Tips: When making the crust, confirm that the butter is thoroughly chilled for the best texture. If the dough feels too sticky, a light dusting of flour can help.
For the ganache, use high-quality dark chocolate for a richer flavor. If you prefer a slightly sweeter tart, you can increase the sugar in the ganache to taste. Finally, if time permits, allowing the tart to chill overnight will enhance its flavor and make slicing easier. Enjoy your Sinister Dark Chocolate Tart as the perfect conclusion to your Halloween celebration!
Creepy Crawly Caramel Apples
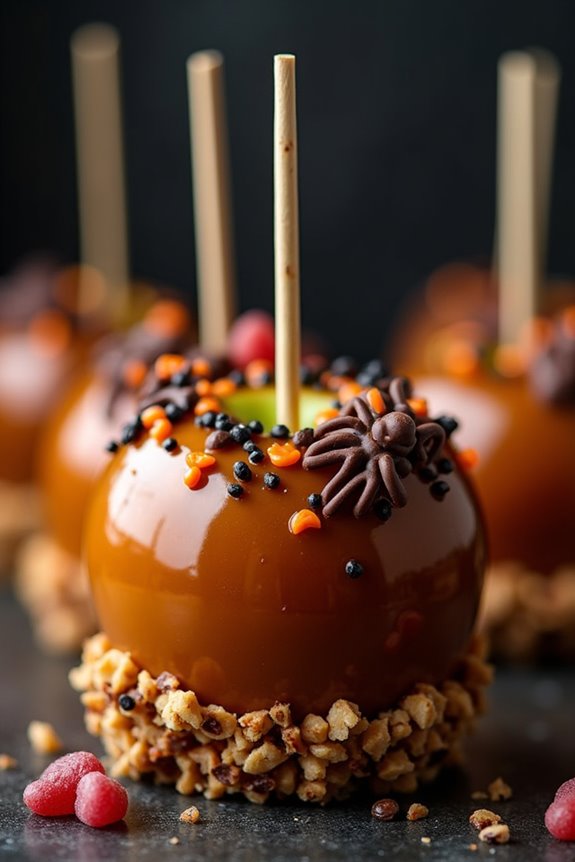
Creepy Crawly Caramel Apples are a perfect treat for adults looking to add a spooky yet delicious twist to their Halloween festivities. These caramel apples aren’t only a fun and creative way to celebrate the holiday, but they also offer a blend of sweet, tart, and nutty flavors that appeal to mature palates.
Dressed up with edible “crawly” embellishments, these apples are sure to be a hit at any Halloween gathering. The process of making Creepy Crawly Caramel Apples involves coating crisp apples with rich, homemade caramel and decorating them with a variety of eerie toppings. The result is a visually striking dessert that’s both creepy and delightful.
Whether you’re hosting a Halloween party or just want to surprise friends and family with a unique treat, these caramel apples are bound to impress.
Ingredients (Serving Size: 4-6 people):
- 6 medium-sized apples (Granny Smith or Honeycrisp)
- 6 wooden sticks
- 1 cup heavy cream
- 1 cup granulated sugar
- 1/2 cup light corn syrup
- 1/4 cup unsalted butter
- 1 teaspoon vanilla extract
- 1/2 teaspoon salt
- 1 cup assorted nuts (chopped)
- 1/2 cup edible chocolate spiders or gummy worms
- 1/2 cup black and orange sprinkles
Instructions:
- Prepare the Apples: Wash and thoroughly dry the apples to remove any waxy coating. Insert a wooden stick into the top of each apple. Set aside on a parchment-lined baking sheet.
- Make the Caramel: In a medium saucepan over medium heat, combine the heavy cream, granulated sugar, corn syrup, butter, vanilla extract, and salt. Stir continuously until the mixture reaches a boil.
- Cook the Caramel: Reduce the heat and let the mixture simmer without stirring. Use a candy thermometer to monitor the temperature. Allow the caramel to reach 245°F (firm ball stage), then remove it from the heat.
- Coat the Apples: Carefully dip each apple into the hot caramel, guaranteeing an even coating. Allow excess caramel to drip off, then place the apples back on the parchment-lined baking sheet to cool slightly.
- Decorate the Apples: While the caramel is still tacky, roll each apple in chopped nuts, then press on the edible chocolate spiders or gummy worms. Finish by sprinkling black and orange sprinkles over the top for a creepy effect.
- Set the Apples: Allow the decorated apples to cool completely at room temperature until the caramel is fully set. Store them in a cool, dry place until ready to serve.
Extra Tips:
When making Creepy Crawly Caramel Apples, it’s important to verify the apples are completely dry before dipping them in caramel to guarantee the coating adheres properly.
If you don’t have a candy thermometer, you can test the caramel by dropping a small amount into a glass of cold water; it should form a firm but pliable ball.
Be creative with the decorations, using any edible embellishments that suit your Halloween theme. If you’re preparing these ahead of time, keep them cool but not refrigerated, as moisture can cause the caramel to become sticky.