

As I was planning this year’s Halloween gathering, I found myself wanting to sprinkle in some fun and healthy options. That’s when I discovered a treasure trove of delightful fruit snacks that are perfect for the occasion. Ghostly Banana Pops and Spooky Apple Bites are just a taste of the festive charm you can add to your table. These treats are more than just delicious; they’re about crafting precious memories with a sprinkle of Halloween magic. Ready to explore the rest of the list?
Ghostly Banana Pops
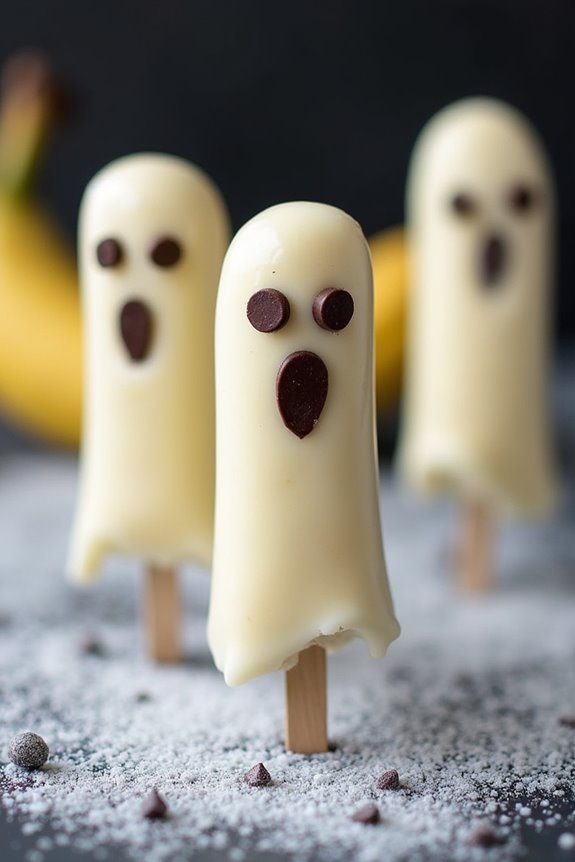
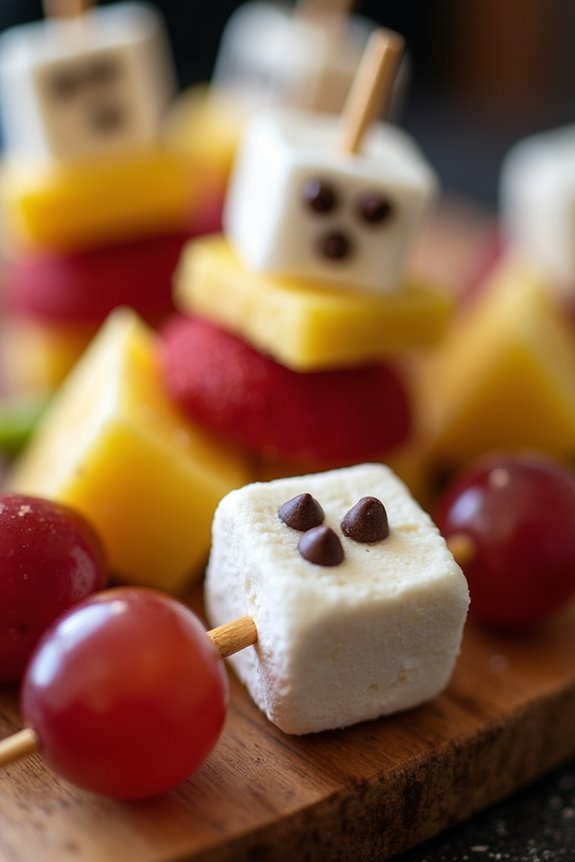
Transforming ordinary bananas into a spooky yet nutritious treat, Ghostly Banana Pops are the perfect addition to your Halloween fruit snack lineup. These delightful snacks aren’t only fun to make but also provide a healthier alternative to traditional Halloween candies.
Whether you’re hosting a Halloween party or simply looking to surprise your family with a festive treat, these banana pops are both visually appealing and deliciously satisfying.
The preparation process is simple and requires just a few ingredients, making it a great activity to involve children in. Kids will love the opportunity to create their own edible ghostly figures, and parents will appreciate the ease of preparation and the nutritious benefits. Packed with potassium and fiber from the bananas, these pops are covered in a yogurt or white chocolate coating and decorated with mini chocolate chips to create the ghostly faces.
Ingredients (for 4-6 servings):
- 4-6 ripe bananas
- 1 cup of white chocolate chips or vanilla yogurt
- 1 tablespoon of coconut oil (if using white chocolate)
- 24-36 mini chocolate chips
- 8-12 popsicle sticks
Cooking Instructions:
- Prepare the Bananas: Peel the bananas and cut them in half crosswise. Insert a popsicle stick into the flat end of each banana half to create the base of the pops.
- Create the Coating: If using white chocolate, melt the white chocolate chips with the coconut oil in a microwave-safe bowl, heating in 30-second intervals and stirring in between until smooth. If using yogurt, simply stir it to verify it’s smooth and ready for dipping.
- Dip the Bananas: Dip each banana half into the melted white chocolate or yogurt, making sure that it’s fully coated. Allow any excess to drip off.
- Decorate the Ghosts: While the coating is still wet, press two mini chocolate chips onto each banana half to create the eyes and another one for the mouth, giving your bananas a ghostly face.
- Freeze the Pops: Place the decorated banana pops on a baking sheet lined with parchment paper. Put them in the freezer for at least 1-2 hours, or until the coating is set and the bananas are firm.
Extra Tips:
For a fun twist, try using dark chocolate chips for a more striking contrast against the white coating. You can also experiment with different decorations, such as using small candies or icing to add more features to your ghostly faces.
If you’re using yogurt as the coating, consider adding a bit of honey or vanilla extract to enhance the flavor. Remember, if you’re planning to store the pops for later, keep them in an airtight container in the freezer to maintain their freshness and prevent freezer burn.
Enjoy your Ghostly Banana Pops as a chilling and charming Halloween treat!
Spooky Apple Bites
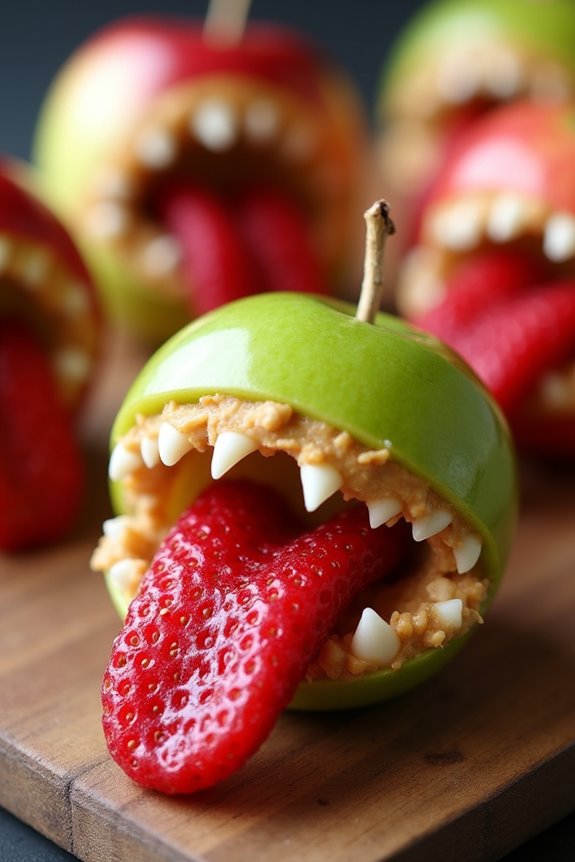
Spooky Apple Bites are a fun and healthy Halloween treat that’s sure to delight both kids and adults. These snacks are simple to make, combining fresh apples with a few creative ingredients to transform them into ghoulishly delicious bites. With their spooky appearance and sweet, crunchy taste, they’re perfect for Halloween parties, school treats, or any festive gathering.
These apple bites aren’t only visually appealing but also packed with nutrients, making them a great choice for those looking to enjoy Halloween without overindulging in sugary candies.
The key to these Spooky Apple Bites lies in their clever design, which resembles tiny monster mouths. By using apple slices as the base and adding elements like nut butter, seeds, and berries, you can create a variety of eerie expressions. This recipe is versatile, allowing for various substitutions to accommodate dietary preferences and allergies.
Whether you’re an experienced cook or a beginner, this simple recipe is easy to follow and customize. Let’s explore the ingredients and steps needed to craft these delightful Halloween fruit snacks.
Ingredients (Serves 4-6 people):
- 2 large apples (any variety)
- 1/4 cup of nut butter (peanut, almond, or sunflower)
- 1/4 cup of sunflower seeds or slivered almonds
- 1/4 cup of strawberries or raspberries
- 1 tablespoon of lemon juice (to prevent browning)
- 1 tablespoon of mini chocolate chips (optional)
Cooking Instructions:
- Prepare the Apples: Begin by washing the apples thoroughly. Cut each apple into quarters, removing the core and seeds. Then, slice each quarter into two or three thinner wedges. To prevent browning, brush each apple slice with a little lemon juice.
- Apply the Nut Butter: Spread a thin layer of nut butter on one side of each apple slice. This will act as the adhesive to hold the other ingredients in place.
- Create the Mouth: Place another apple slice on top of the nut butter side of the first apple slice, creating a mouth shape. Press gently to confirm they stick together.
- Add the Teeth: Insert sunflower seeds or slivered almonds along the edge of the apple slices to resemble sharp teeth. For a more whimsical look, alternate between seeds and almonds.
- Make the Tongue: Slice the strawberries or raspberries thinly and place a slice in the center of the mouth to mimic a tongue.
- Decorate (Optional): For added spookiness, use mini chocolate chips to create eyes by sticking them onto the apple surface with a dab of nut butter.
Extra Tips:
To keep the Spooky Apple Bites fresh, serve them shortly after preparation. If you need to make them in advance, keep them refrigerated in an airtight container to maintain their crunchiness and prevent browning.
Feel free to experiment with different types of nut butter or seeds to suit dietary needs or taste preferences. For a nut-free version, sunflower seed butter is an excellent alternative. Additionally, you can use other fruits like pears for a different texture.
Enjoy making these creative snacks, and have a hauntingly good Halloween!
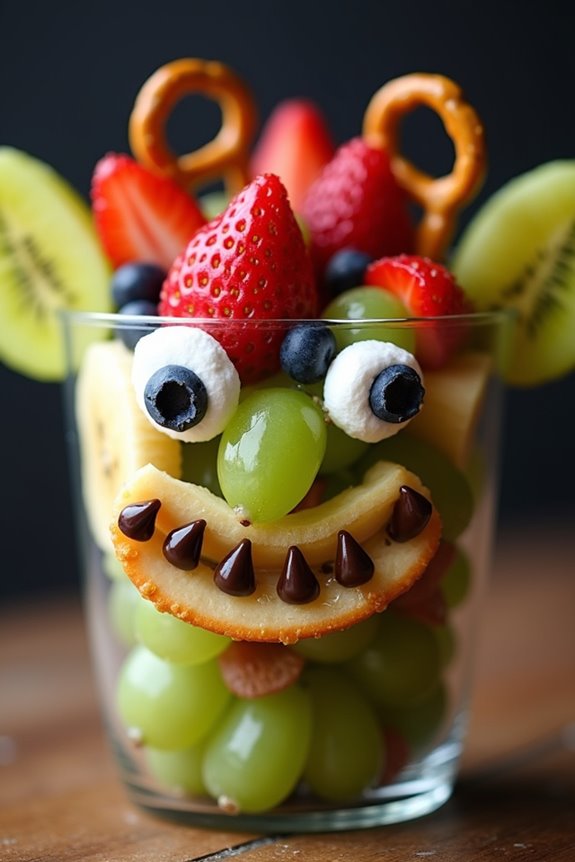
Monster Fruit Kabobs
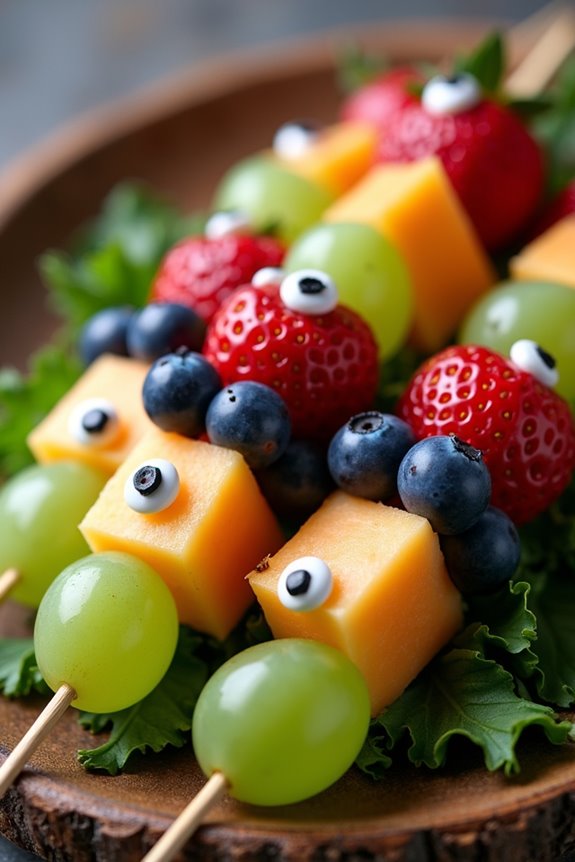
Monster Fruit Kabobs are a fun and healthy treat perfect for Halloween parties or gatherings. These delightful snacks aren’t only colorful and vibrant but also loaded with fresh fruits, making them a nutritious choice that kids and adults will love. The monster theme adds a playful twist to the presentation, capturing the spooky spirit of Halloween while enticing those with a sweet tooth.
Easy to prepare and customizable with your favorite fruits, Monster Fruit Kabobs are a great way to engage little ones in the kitchen and guarantee everyone gets a dose of vitamins amidst the candy frenzy.
The key to creating these whimsical Monster Fruit Kabobs lies in the selection and arrangement of fruits that mimic the colors and textures of classic Halloween monsters. By using a variety of fruits such as grapes, melons, and berries, you can craft an array of kabobs that are both eye-catching and delicious.
The addition of edible eyes and other simple decorations turns ordinary fruit skewers into enchanting creatures that will be the talk of the party. Perfect for serving 4-6 people, this recipe is sure to bring smiles and giggles to your Halloween celebration.
Ingredients for Monster Fruit Kabobs (Serves 4-6):
- 1 cup green grapes
- 1 cup red grapes
- 1 cup cantaloupe, cubed
- 1 cup honeydew melon, cubed
- 1 cup strawberries, hulled and halved
- 1/2 cup blueberries
- 12 wooden skewers
- Edible candy eyes
- Small tube of edible gel or icing (for attaching eyes)
Instructions:
1. Prepare the Fruits:
Begin by washing all the fruits thoroughly under running water. Make certain they’re dry before using. Hull and halve the strawberries. Cut the cantaloupe and honeydew melon into bite-sized cubes. This step helps guarantee that the fruits are clean and ready to be skewered.
2. Assemble the Kabobs:
Start by threading the fruits onto the wooden skewers. Alternate between different fruits to create a vibrant mix of colors. For example, you can start with a green grape, followed by a piece of cantaloupe, a strawberry half, a red grape, a honeydew cube, and finish with a blueberry. Continue this pattern until all skewers are filled, guaranteeing a balanced mix of fruits on each.
3. Add Monster Features:
Once the skewers are assembled, use the edible gel or icing to attach candy eyes onto some of the larger fruit pieces like strawberries or melon cubes. This will create the “monster” look. Be creative with the placement to give each kabob a unique personality.
4. Chill Before Serving:
Place the completed Monster Fruit Kabobs in the refrigerator for at least 30 minutes before serving. Chilling helps the fruit hold its shape and enhances the invigorating taste.
Extra Tips:
When assembling your Monster Fruit Kabobs, consider using a mix of fresh and dried fruits for added texture and flavor. Dried apricots or banana chips can be fun additions.
To make the skewers more festive, you can use Halloween-themed picks or decorate the ends with small ribbons. If you’re serving these kabobs at a party, consider arranging them on a platter with a bed of kale or lettuce for a spooky effect.
Jack-o’-Lantern Oranges
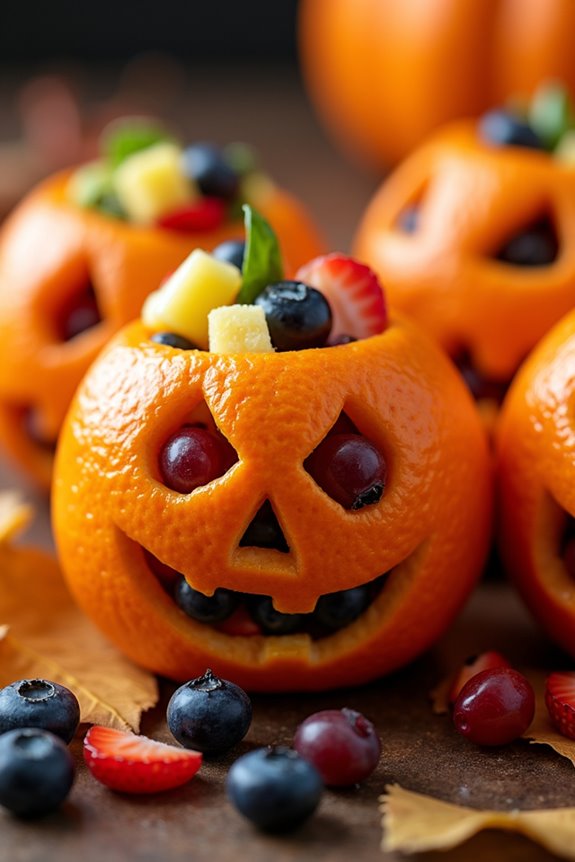
Jack-o’-Lantern Oranges are a fun and healthy Halloween treat that combines creativity with nutrition. This recipe involves transforming ordinary oranges into delightful mini jack-o’-lanterns, filled with a medley of fresh fruits. Perfect for parties or a festive snack, these fruit-filled oranges aren’t only visually appealing but also a great way to encourage kids and adults alike to enjoy their fruits. The combination of vibrant colors and natural sweetness makes this dish a hit among all age groups.
Preparing Jack-o’-Lantern Oranges is an engaging activity that can be enjoyed by the whole family. The process involves hollowing out oranges and carving spooky or funny faces on them, just like you’d a traditional pumpkin jack-o’-lantern.
Once the oranges are prepped, they’re filled with a mix of diced fruits, creating a deliciously invigorating snack. This recipe serves 4-6 people, guaranteeing there’s plenty to go around your Halloween gathering.
Ingredients:
- 6 medium-sized oranges
- 1 cup diced strawberries
- 1 cup diced pineapple
- 1 cup diced kiwi
- 1 cup blueberries
- 1 cup seedless grapes, halved
Instructions:
- Prepare the Oranges: Begin by slicing off the top of each orange to create a lid, just like you’d a pumpkin. Carefully scoop out the inside of the orange using a spoon, being careful not to pierce the skin. Set the orange flesh aside in a bowl for later use.
- Carve the Faces: Using a small paring knife, carefully carve jack-o’-lantern faces into one side of each hollowed-out orange. Get creative with your designs, making each orange unique.
- Prepare the Fruit Filling: In a large mixing bowl, combine the diced strawberries, pineapple, kiwi, blueberries, and halved grapes. Mix well to guarantee an even distribution of fruit.
- Fill the Oranges: Spoon the mixed fruit into each carved orange, packing it tightly to ensure a generous serving. Place the “lid” back on top of each orange once filled.
- Serve and Enjoy: Arrange your Jack-o’-Lantern Oranges on a festive platter and serve immediately. These can be enjoyed as a standalone snack or as part of a larger Halloween spread.
Extra Tips:
When creating the jack-o’-lantern faces, use a knife with a fine point for more intricate designs. You can also use the leftover orange flesh in smoothies or fruit salads to minimize waste.
If preparing these in advance, keep the filled oranges in the refrigerator to maintain vigor. For added flair, consider using a mix of citrus fruits like mandarins or tangerines for different sizes and colors of “lanterns.”
Witch’s Broomstick Snacks
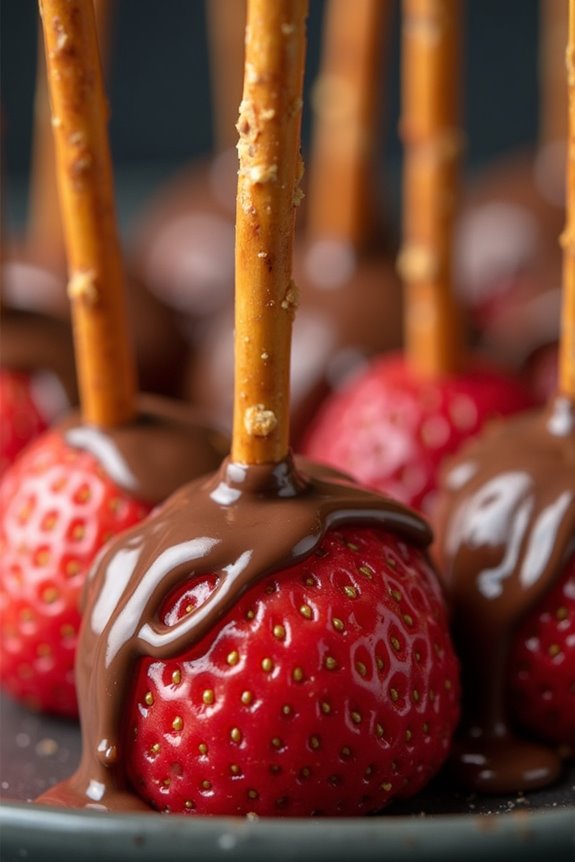
Witch’s Broomstick Snacks are a fun and festive treat perfect for Halloween gatherings. These delightful snacks aren’t only visually appealing but also healthy, combining fresh fruit with a dash of creativity. Designed to resemble witch’s broomsticks, they’re sure to be a hit with both kids and adults.
These snacks are easy to prepare and require minimal ingredients, making them an ideal choice for a quick and nutritious Halloween treat. The great thing about Witch’s Broomstick Snacks is their versatility. You can use a variety of fruits to create different flavors and colors, allowing you to customize them to suit your taste or dietary preferences.
This recipe is crafted to serve 4-6 people, making it an excellent option for a small gathering or party. The sweet and tangy flavors of the fruits combined with the playful presentation will make these snacks the star of your Halloween spread.
Ingredients:
- 3 medium-sized bananas
- 6 large strawberries
- 12 pretzel sticks
- 1 tablespoon lemon juice (to prevent browning)
- 1/4 cup chocolate chips (optional, for decoration)
Instructions:
- Prepare the Bananas: Peel the bananas and slice each one into two halves lengthwise. Then, cut each half into three equal pieces. You should end up with twelve banana pieces in total. Brush each piece with a little lemon juice to prevent browning.
- Prepare the Strawberries: Wash the strawberries thoroughly and remove the stems. Cut each strawberry into two halves. These will form the bristles of the broomstick.
- Assemble the Broomsticks: Take a pretzel stick and carefully push one end through the center of a strawberry half, making sure it comes out the other side without breaking the strawberry. Then, take a piece of banana and gently push it onto the other end of the pretzel stick. Repeat this process for all the pretzel sticks.
- Decorate (Optional): If desired, melt the chocolate chips in a microwave-safe bowl by heating them in 20-second intervals until smooth. Drizzle the melted chocolate over the banana pieces using a spoon or a piping bag for added decoration and flavor.
- Serve: Arrange the Witch’s Broomstick Snacks on a platter and serve immediately, or refrigerate them until ready to serve.
Extra Tips: When selecting bananas, opt for firm ones as they hold their shape better when skewered. If you plan to make these snacks ahead of time, store them in an airtight container in the refrigerator to keep them fresh.
You can also experiment with different fruits, such as apple slices or kiwi, to add variety. If using chocolate, verify it’s cooled slightly before drizzling to avoid melting the fruit. Enjoy these spooky yet nutritious treats as part of your Halloween festivities!
Creepy Crawly Grapes
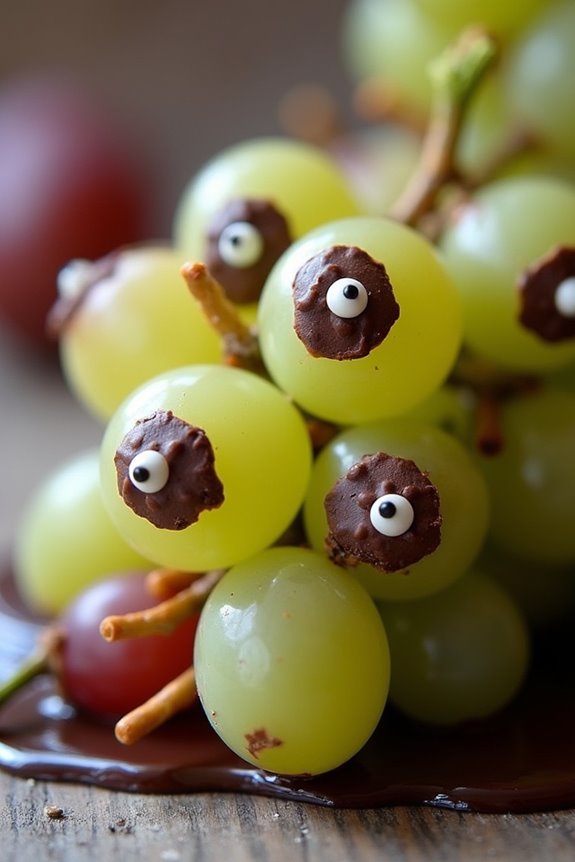
Halloween is the perfect time to get creative with your snacks, and Creepy Crawly Grapes are a fun, healthy, and spooky addition to any Halloween spread. These little treats aren’t only delicious but also incredibly simple to prepare, making them a fantastic option for a Halloween party or just a festive snack for your family.
The combination of juicy grapes and edible decorating options creates a visually striking snack that both kids and adults will love. The key to making Creepy Crawly Grapes is in the presentation. By using a few simple ingredients and a bit of imagination, you can transform ordinary grapes into a delightful and eerie treat that resembles little creepy crawlies.
These snacks aren’t just fun to look at; they’re also a great way to include a healthy option amidst all the candy and sweets typically found during Halloween.
Ingredients for 4-6 servings:
- 2 cups green or red grapes
- 1/2 cup mini chocolate chips or edible candy eyes
- 1/4 cup melted dark chocolate or chocolate syrup
- Toothpicks or small skewers
- Optional: licorice strings or pretzel sticks for legs
Cooking Instructions:
- Wash and Dry the Grapes: Start by thoroughly washing the grapes under cold water to remove any dirt or residue. Pat them dry with a clean kitchen towel or paper towels to guarantee they’re completely dry, as any moisture can prevent the chocolate from sticking properly.
- Prepare the Workspace: Line a baking sheet with parchment paper or a silicone baking mat. This will prevent the grapes from sticking and make cleanup easier.
- Insert the Toothpicks: Carefully insert a toothpick or small skewer through the center of each grape. This not only makes them easier to handle but also adds to the “creepy crawly” effect.
- Attach the Eyes: Dip the tip of a toothpick into the melted chocolate or chocolate syrup, then use it to attach the mini chocolate chips or candy eyes onto each grape. Place the eyes close together at one end of the grape to resemble a face.
- Add the Legs (Optional): If desired, cut licorice strings or pretzel sticks into small pieces to create legs. Insert them into the sides of the grapes to enhance the creepy crawly appearance.
- Chill the Grapes: Place the prepared grapes on the lined baking sheet and refrigerate them for at least 15 minutes. This helps the chocolate to set and guarantees the decorations stay in place.
- Serve and Enjoy: Once the chocolate has set, remove the grapes from the refrigerator and serve them chilled. Arrange them on a platter to create a spooky display.
Extra Tips:
For an extra spooky effect, try using a mix of green and red grapes to create variety and add visual interest. If you’re preparing these treats for a party, consider making a few batches in advance and storing them in the refrigerator until you’re ready to serve.
Experiment with different edible decorations, like colored icing or powdered sugar, to customize your creepy crawlies to your liking. Remember to supervise children if they’re helping with the preparation, especially when using toothpicks and melted chocolate.
Mummy Berry Wraps
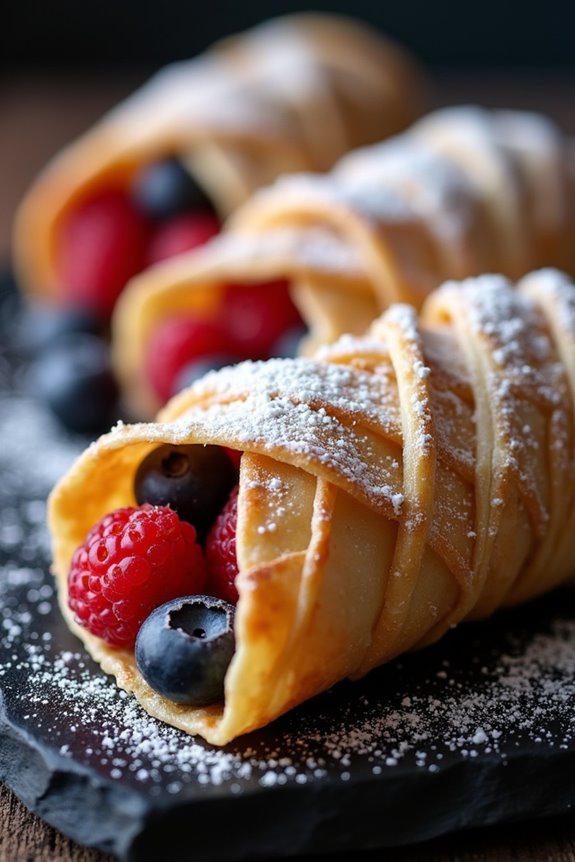
Halloween is the perfect time to get creative with your snacks, and Mummy Berry Wraps are a fun and healthy treat that both kids and adults will love. These wraps are made using fresh fruit and a few simple ingredients to create a spooky yet delicious snack that resembles a mummy.
They’re perfect for Halloween parties, school events, or just a fun treat at home. The best part about these Mummy Berry Wraps is that they’re quick to assemble and provide a healthy alternative to traditional Halloween candy.
This recipe combines the sweetness of berries with the buttery, flaky texture of phyllo dough, wrapped together to create a delightful snack. Each bite reveals a juicy burst of berry flavor, complemented by a light dusting of powdered sugar that adds just the right amount of sweetness.
With minimal ingredients and simple steps, this recipe is ideal for serving 4-6 people, making it a great choice for small gatherings or family dinners during the Halloween season.
Ingredients for Mummy Berry Wraps:
- 1 cup fresh strawberries, hulled and halved
- 1 cup fresh blueberries
- 1 cup fresh raspberries
- 8 sheets of phyllo dough
- 1/4 cup melted butter
- 2 tablespoons powdered sugar
- 1/4 cup cream cheese, softened
- 1 tablespoon honey
Cooking Instructions:
1. Prepare the Phyllo Dough: Preheat your oven to 375°F (190°C). Lay out one sheet of phyllo dough on a clean, dry surface. Using a pastry brush, lightly brush the sheet with melted butter. Place another sheet on top and repeat the process until you have a stack of 4 sheets of phyllo dough.
Repeat with the remaining 4 sheets to create a second stack.
2. Cut the Dough: Using a sharp knife or pizza cutter, cut each phyllo dough stack into 6 equal rectangles. You should end up with a total of 12 rectangles.
3. Prepare the Filling: In a small bowl, mix the softened cream cheese with honey until smooth. Spread a small amount of the cream cheese mixture onto each phyllo rectangle, leaving a small border around the edges.
4. Add the Berries: Place a few pieces of each type of berry (strawberries, blueberries, raspberries) onto the cream cheese spread on each rectangle.
5. Wrap the Mummies: Fold the sides of the phyllo rectangle over the berries and then roll them up into a tight wrap. The berries should be mostly covered, resembling a mummy wrap.
6. Bake the Mummies: Place the wrapped mummies seam side down on a baking sheet lined with parchment paper. Bake in the preheated oven for 12-15 minutes or until golden brown and crispy.
7. Finish with Sugar: Remove the mummies from the oven and allow them to cool slightly. Dust with powdered sugar before serving to give them a spooky finish.
Extra Tips:
For an extra festive touch, you can use small edible candy eyes to decorate your Mummy Berry Wraps. Simply place the eyes on top of the wraps after dusting them with powdered sugar.
If you want to add a bit more sweetness to the dish, consider drizzling a small amount of melted chocolate over the wraps before serving. Make sure to handle the phyllo dough gently and work quickly, as it can dry out easily.
Keep unused sheets covered with a damp cloth to prevent them from drying out during preparation. Enjoy these delightful Mummy Berry Wraps as a healthier yet fun Halloween treat!
Vampire Fang Apples
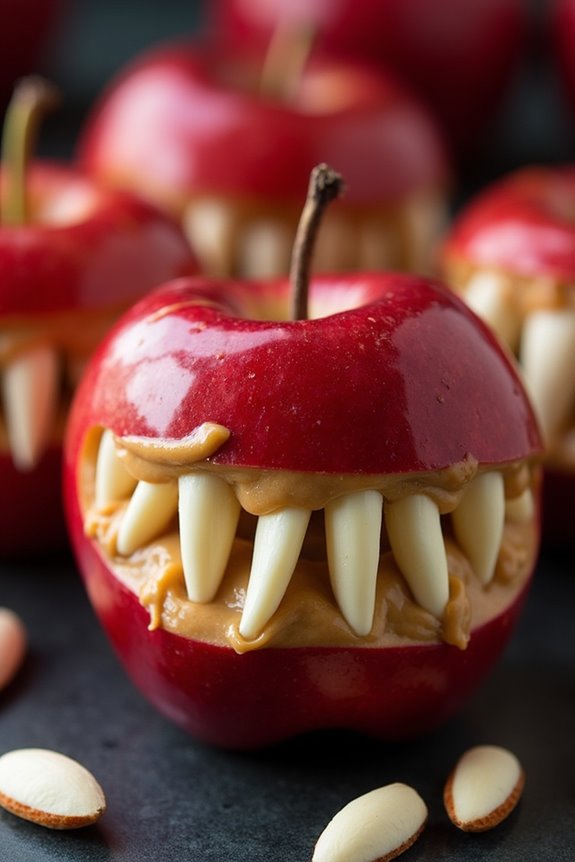
Creating Vampire Fang Apples is a simple and engaging process that involves minimal ingredients and preparation time. This recipe is ideal for a serving size of 4-6 people, making it perfect for small gatherings or family celebrations. With just a few steps, you can transform ordinary apples into a spine-chilling Halloween delicacy that will add a touch of frightful fun to your holiday spread.
Ingredients (for 4-6 people):
- 3 medium-sized red apples
- 1/2 cup creamy peanut butter
- 1/2 cup slivered almonds
- 1 tablespoon lemon juice
Instructions:
- Prepare the Apples: Begin by washing the apples thoroughly under running water. Once clean, use a sharp knife to cut each apple into quarters and remove the core and seeds. Slice each quarter into two wedges to create a total of 8 wedges per apple.
- Avoid Browning: To keep the apple slices fresh and prevent browning, brush each slice with a small amount of lemon juice. This step will maintain the vibrant color of the apples while adding a subtle zing to the flavor.
- Assemble the Fangs: Take one apple wedge and spread a thin layer of peanut butter on one side of it. Repeat this process for half of the apple wedges, as these will form the base of the fangs.
- Add the Almond Teeth: Gently press slivered almonds into the peanut butter side of the apple wedge to resemble sharp teeth. Space the almond slivers evenly to give each apple wedge a realistic fang-like appearance.
- Complete the Fangs: Take the remaining plain apple wedges and press them onto the peanut-butter-covered wedges. This will create a sandwich-like shape with the almonds sticking out as the fangs.
- Serve: Arrange the completed Vampire Fang Apples on a serving platter. These snacks are best served immediately to guarantee the apples remain crisp and the peanut butter holds the almonds securely in place.
Extra Tips:
For an added twist, consider using different types of nut butter, such as almond or cashew butter, to cater to dietary preferences or allergies. You can also experiment with different apple varieties, like Granny Smith or Honeycrisp, for a distinct flavor profile.
If you’re preparing these ahead of time, store them in an airtight container in the refrigerator to keep them fresh. Finally, encourage kids to participate in assembling the fangs, as it can be a fun and creative activity for everyone involved.
Franken-Kiwi Slices
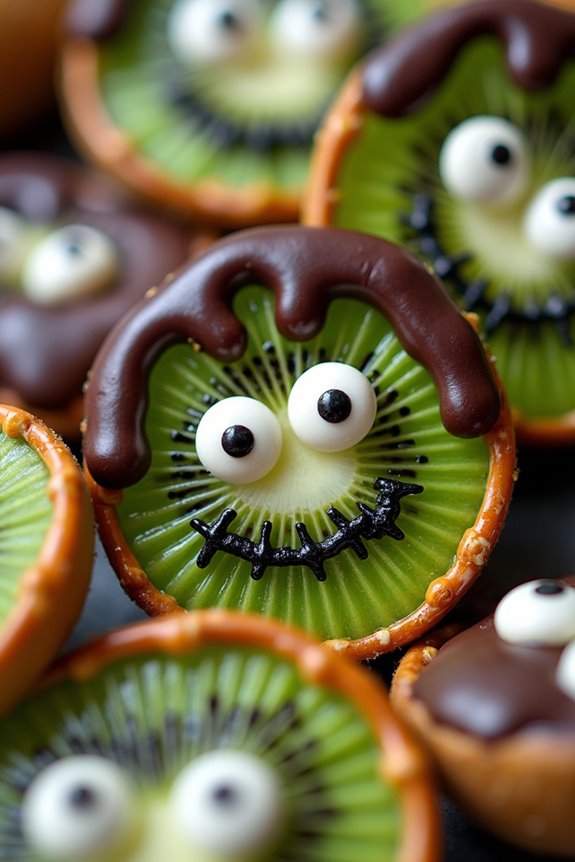
Franken-Kiwi Slices are a fun and spooky addition to your Halloween fruit snacks collection. These adorable treats aren’t only easy to make but also healthy, providing a sweet and tangy delight that both kids and adults will enjoy. The vibrant green kiwi slices are transformed into Frankenstein’s monster with a few simple decorative touches, making them a perfect fit for any Halloween gathering.
Crafting these Franken-Kiwi Slices is an enjoyable activity that you can do with your family or friends. With minimal ingredients and effort, you can create a snack that’s both visually appealing and delicious. The combination of fresh kiwi, chocolate, and pretzel pieces adds a delightful mixture of flavors and textures, setting the stage for a memorable Halloween snack experience.
Ingredients (Serving Size: 4-6 people):
- 4 ripe kiwis
- 1/2 cup dark chocolate chips
- Pretzel sticks
- Black decorating gel (or edible ink pen)
- Candy eyes
Cooking Instructions:
- Prepare the Kiwis: Peel the kiwis and slice them into thick rounds, about 1/4 inch thick. Aim for uniform slices to guarantee each piece looks consistent when decorated.
- Melt the Chocolate: Place the dark chocolate chips in a microwave-safe bowl. Microwave them in 20-second intervals, stirring between each, until the chocolate is completely melted and smooth.
- Create the Hair: Dip the top edge of each kiwi slice into the melted chocolate, allowing it to drip down slightly to create a “hair” effect. Place each slice on a parchment-lined tray and let the chocolate set slightly before proceeding to the next step.
- Add the Candy Eyes: While the chocolate is still slightly soft, press two candy eyes onto each kiwi slice just below the chocolate-dipped section. These will form the monster’s eyes.
- Draw the Mouth and Scars: Using the black decorating gel or an edible ink pen, draw a zigzag mouth and a few stitches or scars below the eyes to complete Frankenstein’s face.
- Attach the Bolts: Break the pretzel sticks into small pieces and insert one on each side of the kiwi slice to represent the bolts on Frankenstein’s neck.
- Set and Serve: Allow the chocolate to fully harden before serving. You can speed up this process by placing the tray in the refrigerator for a few minutes.
Extra Tips:
To make the process faster, prepare all your decorative elements before beginning the assembly. This includes having the candy eyes and pretzel pieces ready.
If you’re short on time, you can use store-bought black icing instead of decorating gel to draw the features.
Also, verify that the kiwis are ripe but firm to maintain their shape during the decorating process.
For added flavor, you can experiment with different types of chocolate or add a pinch of sea salt to the melted chocolate for a sweet-salty combination.
Eerie Eyeball Melons
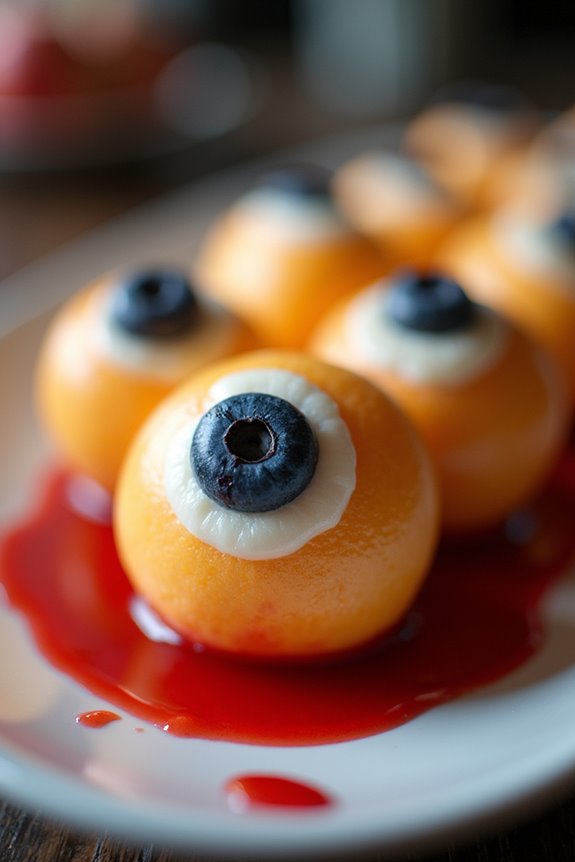
Get ready to spook your guests this Halloween with Eerie Eyeball Melons, a fun and healthy treat perfect for any spooky gathering. This dish combines the natural sweetness of melons with the eerie appearance of eyeballs, making it an ideal snack for both kids and adults. The combination of juicy melon balls and imaginative detailing will leave everyone impressed and satisfied.
Crafting these Eerie Eyeball Melons is both simple and rewarding, requiring only a few ingredients and a bit of creativity. The result is a revitalizing and eye-catching snack that will add a touch of Halloween magic to your party spread. This recipe serves 4-6 people, making it perfect for small gatherings or as part of a larger assortment of Halloween treats.
Ingredients:
- 1 medium-sized watermelon
- 1 cantaloupe
- 1 honeydew melon
- 1 pint of blueberries
- 1 cup of strawberries
- 1 small lemon (for juice)
- 1 tablespoon of honey (optional)
Cooking Instructions:
- Prepare the Melons: Begin by cutting the watermelon, cantaloupe, and honeydew melon in half. Use a melon baller to scoop out round balls from each melon. Aim for about 10-15 melon balls per type of melon, depending on their size.
- Create the Eyeballs: For each melon ball, make a small indentation with the back of a melon baller or a small spoon. Insert a blueberry into each indentation to create the “pupil” of the eyeball.
- Prepare the Strawberry “Blood”: Hull and slice the strawberries. Place them in a blender with the juice of one lemon and blend until smooth. Add honey for additional sweetness if desired.
- Assemble the Dish: Arrange the melon eyeballs on a serving platter. Drizzle the strawberry mixture over the melon balls to create a “bloody” effect.
- Chill and Serve: Refrigerate the dish for at least 30 minutes before serving to guarantee the melons are cold and revitalizing. Serve chilled and enjoy the eerie delight.
Extra Tips:
When preparing Eerie Eyeball Melons, feel free to experiment with different fruits for the “pupil” and “blood” elements to customize the dish to your liking. If blueberries aren’t available, black grapes make a great alternative for the pupils.
For an extra touch of spookiness, consider adding a few drops of food coloring to the strawberry mixture to enhance its vibrant red hue. Additionally, using a variety of melon types adds a colorful contrast, making the dish even more visually appealing.
Enjoy creating and sharing this frightfully fun Halloween snack!
Goblin Fruit Cups
Goblin Fruit Cups are a delightful and spooky treat perfect for your Halloween festivities. These delicious fruit cups aren’t only fun to make but also a healthy alternative to sugary Halloween candies. Featuring a mix of vibrant fruits, these cups are designed to resemble little goblins, with creative touches that make them both a feast for the eyes and the taste buds.
Whether you’re hosting a Halloween party or just want to surprise your family with a themed snack, these fruit cups are sure to be a hit.
Creating Goblin Fruit Cups is a simple process that allows you to use a variety of fruits, making them adaptable to different preferences and dietary needs. The key is to select colorful fruits that can be easily molded and arranged to form goblin faces. The recipe is suitable for 4-6 people, making it a perfect choice for a small gathering or family treat.
Let’s plunge into the ingredients and steps to create this Halloween-themed snack.
Ingredients (Serves 4-6):
- 2 kiwis
- 1 cup of blueberries
- 1 cup of strawberries
- 2 bananas
- 1 apple
- 1/2 cup of seedless grapes
- 1/4 cup of mini marshmallows
- 1/4 cup of pretzel sticks
- 1/4 cup of chocolate chips
- 1 tablespoon of lemon juice
Cooking Instructions:
- Prepare the Fruits:
- Peel the kiwis and slice them into thin rounds.
- Wash the blueberries and set them aside.
- Hull and slice the strawberries into halves.
- Peel and slice the bananas into rounds, then lightly coat them with lemon juice to prevent browning.
- Core and slice the apple into thin wedges. Toss the apple slices in lemon juice as well.
- Assemble the Goblin Faces:
- Start by placing a few kiwi slices at the bottom of each cup or bowl.
- Arrange banana slices on top of the kiwis to form the base of the goblin face.
- Use blueberries to create eyes by placing two at the top center of the banana slices.
- Add Facial Features:
- Use strawberry halves for the goblin’s mouth, placing them below the blueberries.
- Add grapes around the edges as hair or ears, using your creativity to shape the goblin’s features.
- Insert mini marshmallows on the blueberries for pupils, securing them with a dab of chocolate chips.
- Break pretzel sticks into small pieces and use them to create eyebrows or scars for added character.
- Finishing Touches:
- Arrange any remaining fruits around the goblin face for decoration.
- Refrigerate the cups for about 15-20 minutes to allow the fruits to chill and flavors to meld together.
Extra Tips:
When preparing Goblin Fruit Cups, feel free to get creative with the design and use additional fruits or edible decorations as desired.
It’s important to use fresh, ripe fruits to guarantee the best taste and visual appeal. If you’re preparing them ahead of time, keep the fruit cups covered in the fridge to maintain freshness.
For an extra spooky touch, consider using edible black ink pens to draw features on marshmallows or to add details to your goblin faces.
Haunted Berry Ghosts
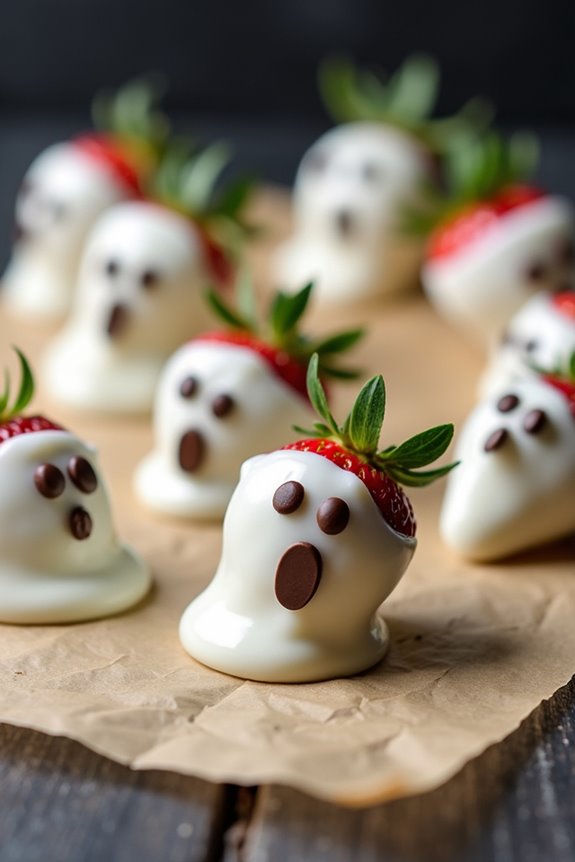
Halloween is a time for spooky fun and delicious treats, and what better way to celebrate than with a healthy twist on the traditional sugary snacks? Haunted Berry Ghosts are a delightful and easy-to-make fruit snack that combines the natural sweetness of strawberries with the creamy texture of white chocolate.
These adorable ghostly figures aren’t only a hit with kids but also a guilt-free indulgence for adults. Perfect for a Halloween party or a fun afternoon treat, these Haunted Berry Ghosts are sure to bring a smile to everyone’s face.
This recipe is designed to serve 4-6 people and is perfect for a small gathering. The process is simple and requires minimal ingredients, making it an ideal choice for those who want to whip up something festive without spending hours in the kitchen.
Let’s explore the ingredients and discover how to create these charming and spooky snacks that are as delightful to look at as they’re to eat.
Ingredients (serving size: 4-6 people):
- 18 fresh strawberries
- 1 cup white chocolate chips
- 1 teaspoon coconut oil
- Mini chocolate chips (for eyes and mouth)
Cooking Instructions:
- Prepare the Strawberries: Wash the strawberries thoroughly under cold water and pat them dry with a paper towel. Confirm that the strawberries are completely dry before proceeding to the next step, as any moisture can affect the chocolate coating.
- Melt the White Chocolate: In a microwave-safe bowl, combine the white chocolate chips and coconut oil. Microwave in 30-second intervals, stirring between each interval, until the chocolate is fully melted and smooth. This should take about 1-2 minutes total. Be careful not to overheat the chocolate as it can become clumpy.
- Dip the Strawberries: Hold each strawberry by the stem and dip it into the melted white chocolate, confirming that the strawberry is fully coated. Gently shake off any excess chocolate and place the strawberry on a parchment paper-lined baking sheet.
- Create the Ghost Faces: Before the chocolate hardens, press two mini chocolate chips into each strawberry to create the eyes. For the mouth, you can either use another mini chocolate chip or create a small oval shape by dragging a toothpick dipped in melted chocolate onto the strawberry.
- Set the Chocolate: Allow the chocolate to set by placing the strawberries in the refrigerator for at least 15 minutes. This will help the chocolate to harden and keep the ghostly shapes intact.
- Serve and Enjoy: Once the chocolate has set, arrange the Haunted Berry Ghosts on a serving platter. Enjoy these spooky treats immediately or store them in the refrigerator until ready to serve.
Extra Tips:
To confirm the best results, use fresh and firm strawberries as they hold up better when coated with chocolate. If you prefer, you can substitute dark chocolate for the eyes and mouth, offering a nice contrast against the white chocolate coating.
For an added touch, you can also drizzle some dark chocolate over the ghosts to create a more elaborate design. If you’re hosting a larger gathering, simply double the ingredients to accommodate more guests.
Enjoy these Haunted Berry Ghosts as a healthier alternative to the usual Halloween sweets, and watch them disappear faster than a ghost in the night!
Skeleton Fruit Skewers
Skeleton Fruit Skewers are a fun and healthy Halloween treat that are perfect for parties or family gatherings. These spooky skewers aren’t only visually appealing but also packed with vitamins and nutrients, making them a guilt-free indulgence. The combination of fresh fruits arranged in a playful skeleton pattern adds a festive touch to your Halloween spread while catering to both kids and adults alike.
The key to creating these delightful Skeleton Fruit Skewers is choosing a variety of colorful fruits that complement each other in taste and texture. By using a mix of different fruits, you can guarantee a balanced flavor profile and an eye-catching presentation. These skewers are easy to assemble and can be customized according to your preferences or dietary needs, allowing you to get creative with your Halloween fruit snacks.
Ingredients for 4-6 People:
- 1 cup seedless green grapes
- 1 cup seedless red grapes
- 2 bananas
- 1 apple
- 1 pear
- 1 cup pineapple chunks
- 1/2 cup blueberries
- 12 wooden skewers
- 12 small marshmallows
- 12 mini chocolate chips
Cooking Instructions:
- Prepare the Fruit: Wash all the fruits thoroughly under running water. Peel the bananas and cut them into thick slices. Core the apple and pear, then cut them into bite-sized chunks. You may want to dip the apple and pear pieces in lemon juice to prevent browning.
- Assemble the Skewers: Start by threading a green grape onto the skewer to serve as the skeleton’s “head.” Follow with a small marshmallow, which will be the skeleton’s “neck.” Place two mini chocolate chips on the marshmallow to create “eyes.”
- Build the Body: Continue threading the skewer with alternating pieces of banana, apple, pear, and red grape. Add a few pineapple chunks for a juicy tropical twist. Alternate the fruits to create a colorful pattern that resembles a skeleton’s body.
- Finish with Feet: End each skewer with a blueberry to serve as the skeleton’s “feet.” The contrasting colors and shapes will create a whimsical skeleton effect.
- Serve and Enjoy: Arrange the completed skewers on a platter or serving tray. For an added Halloween touch, consider placing the skewers on a bed of green cabbage or kale to mimic grass or a spooky forest floor.
Extra Tips:
When making Skeleton Fruit Skewers, consider using a mix of seasonal fruits to take advantage of the freshest produce available. Feel free to substitute or add fruits like kiwi, strawberries, or melon balls for more variety.
If you’re preparing the skewers ahead of time, keep them refrigerated until serving to maintain their freshness. Finally, engaging children in the assembly process can be a fun activity that encourages them to eat more fruits while enjoying the holiday spirit.
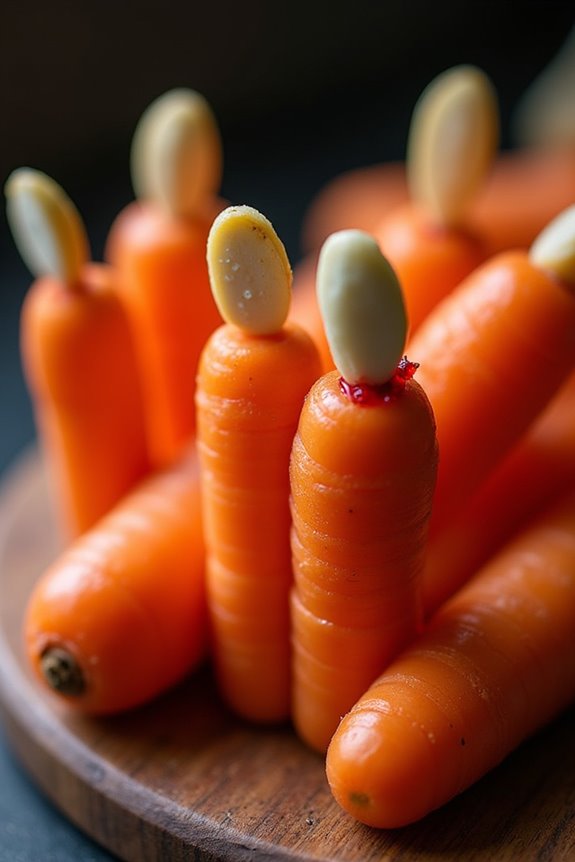
Zombie Finger Carrots
Halloween Fruit Snacks are a fun and healthy way to celebrate the spooky season with family and friends. These snacks combine the festive spirit of Halloween with nutritious ingredients that appeal to both kids and adults. One of the highlights of these treats is the Zombie Finger Carrots, which are sure to be a hit at any Halloween gathering.
These carrot sticks are cleverly crafted to resemble creepy fingers, complete with a nail made from an almond slice. They’re simple to prepare and make for a perfect addition to your Halloween party spread.
Zombie Finger Carrots aren’t only visually appealing but also packed with vitamins and minerals, making them a guilt-free snack option. They’re incredibly easy to make, requiring just a few ingredients and minimal preparation time.
These spooky snacks can be paired with a variety of dips, such as hummus or guacamole, which not only enhance their flavor but also add to the fun, gory theme of the dish. Whether you’re hosting a party or simply looking for a creative way to encourage kids to eat their vegetables, these Zombie Finger Carrots are sure to be a crowd-pleaser.
Ingredients (Serving Size: 4-6 people):
- 12 large carrots
- 12 almond slices
- 1 tablespoon of cream cheese
- 1 teaspoon of red food coloring
Cooking Instructions:
- Prepare the Carrots: Begin by washing and peeling the carrots. Cut each carrot into halves or thirds, depending on their length, to create finger-sized sticks.
- Shape the Fingers: Using a small paring knife, carve out small, shallow indentations along each carrot to resemble knuckles. Be sure to space them evenly for a realistic finger look.
- Prepare the Almond Nails: Take the almond slices and use a small amount of cream cheese to stick each almond slice on the top end of the carrot, simulating a fingernail.
- Add the Bloody Effect: Dab a little red food coloring around the base of the almond slice to give the appearance of blood. You can use a small paintbrush or a toothpick for precision.
- Chill and Serve: Place the finished Zombie Finger Carrots in the refrigerator for 30 minutes to an hour so the cream cheese can set and the flavors meld. Serve chilled with your choice of dip.
Extra Tips:
When crafting your Zombie Finger Carrots, choose carrots that are relatively straight and uniform in size for the best results. If you prefer a plant-based alternative to cream cheese, you can use hummus or vegan cream cheese to attach the almond slices.
Additionally, if you’re concerned about food coloring, consider using a beet juice concentrate as a natural alternative. These Zombie Finger Carrots can also be made a day in advance and stored in an airtight container in the refrigerator, making them a convenient option for busy hosts.
Spidery Blackberries
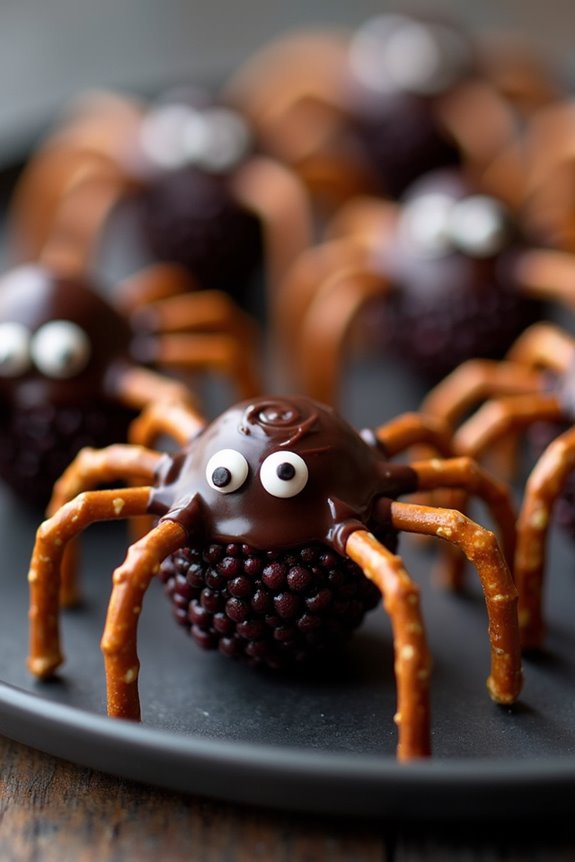
Elevate your Halloween snack game with these creepy, crawly Spidery Blackberries. This fun and delicious recipe combines the sweet and tart flavors of blackberries with the spooky appeal of edible spider decorations. Perfect for a Halloween party or a spooky-themed dinner, these snacks are sure to captivate both kids and adults alike.
Easy to prepare and requiring minimal ingredients, Spidery Blackberries are a delightful addition to your Halloween festivities. Whether you’re hosting a gathering or simply looking for a fun treat to enjoy at home, these Spidery Blackberries will add a touch of whimsy to your Halloween spread.
The combination of fresh blackberries and creative decorating makes this dish both visually appealing and tasty. With just a handful of ingredients and a few simple steps, you’ll have a platter of Spidery Blackberries ready to impress your guests.
Ingredients (Serves 4-6):
- 2 cups fresh blackberries
- 1/2 cup dark chocolate chips
- 1 tablespoon coconut oil
- 24 pretzel sticks (cut into smaller sections for spider legs)
- 24 small candy eyes
- 1 tablespoon honey (for sticking candy eyes)
Cooking Instructions:
- Prepare the Blackberries: Begin by washing the blackberries thoroughly under cold water. Pat them dry with a paper towel to remove any excess moisture, which will help the chocolate adhere better.
- Melt the Chocolate: In a microwave-safe bowl, combine the dark chocolate chips and coconut oil. Microwave in 30-second intervals, stirring in between, until the chocolate is completely melted and smooth.
- Assemble the Spiders: Dip one side of each blackberry into the melted chocolate, ensuring the bottom is fully coated. Place the chocolate-dipped blackberries onto a wax paper-lined tray with the chocolate side down. This will serve as the body of the spider.
- Add the Legs: While the chocolate is still soft, insert three pretzel stick sections on each side of the blackberry to create the spider legs. You may need to gently press them into the chocolate to secure them.
- Attach the Eyes: Using a small dab of honey, affix two candy eyes onto the top of each blackberry. The honey will act as a glue to hold the eyes in place.
- Chill the Spiders: Once all the blackberries are decorated, place the tray in the refrigerator for about 15-20 minutes, or until the chocolate has hardened and the spider legs are securely attached.
Extra Tips:
For a more intense flavor, consider using high-quality dark chocolate with a higher cocoa content, which pairs beautifully with the tartness of the blackberries.
If you’re having trouble finding small candy eyes, you can also use small dots of white chocolate as an alternative. Be sure to handle the pretzel legs gently to avoid breaking them, and if possible, prepare these snacks a few hours before serving to allow the chocolate to set firmly.
Enjoy your spooky creation with a side of fun and fright!