

When it comes to hosting a Halloween bash that’s both chic and chilling, I’m bubbling over with ideas that will make your party the talk of the town. Picture a charcuterie board adorned with ghost-shaped cheeses and eyeball olives, alongside witch’s brew cocktails that are sure to enchant. Your guests will be spellbound by black magic deviled eggs and sinister stuffed bell peppers. Ready to transform your gathering into a hauntingly delicious affair? Let’s stir up some spine-tingling treats that everyone will be raving about!
Spooky Charcuterie Board
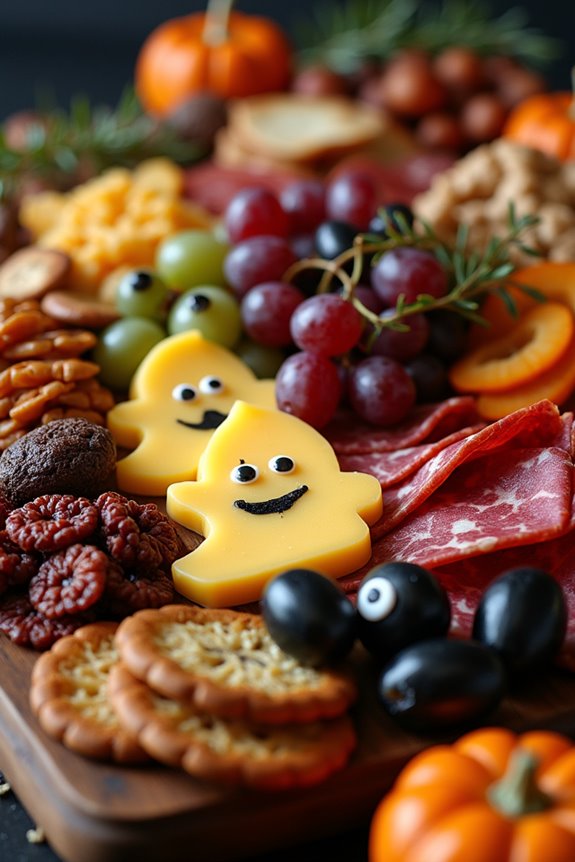
For your Halloween party, impress your guests with a Spooky Charcuterie Board that combines the elegance of fine cheeses and cured meats with the eerie flair of the season. This board is artfully arranged to incorporate spooky elements such as edible eyeballs, ghost-shaped cheeses, and creepy crawly crackers. The key to a successful charcuterie board is a balance of flavors and textures, and this version is no exception. With a variety of cheeses, meats, fruits, nuts, and thematic decorations, this board will be a hit for adults looking to indulge in the Halloween spirit.
Creating a Spooky Charcuterie Board is more about the presentation than cooking, making it a perfect dish for hosts who want to offer something impressive without spending hours in the kitchen. The combination of a wide range of flavors—from salty to sweet to savory—guarantees that there’s something for everyone. Plus, the addition of Halloween-themed elements will delight your guests’ eyes as much as their taste buds.
Let’s plunge into crafting this treat that serves 4-6 people.
Ingredients:
- 3 types of cheese (e.g., aged cheddar, brie, gouda)
- 3 types of cured meats (e.g., salami, prosciutto, chorizo)
- 1 cup black olives
- 1 cup green olives
- 1 cup mixed nuts (e.g., almonds, walnuts)
- 1 cup dried fruit (e.g., apricots, figs)
- 1 cup fresh fruit (e.g., grapes, apple slices)
- 1 package of assorted crackers
- 1 small container of hummus or dip
- Edible googly eyes
- Halloween-themed cookie cutters
- Fresh herbs (e.g., rosemary, thyme) for garnish
- 1-2 small pumpkins or gourds for decoration
Instructions:
- Prepare the Board: Start with a large wooden or slate charcuterie board. Arrange small bowls or ramekins on the board for olives and dips. This structure will help in creating sections for different types of food.
- Cut and Shape Cheeses: Use Halloween-themed cookie cutters to cut cheese into fun shapes like ghosts and pumpkins. Arrange these on the board, making sure they’re spread out for visual interest.
- Arrange Meats: Fold and fan out the cured meats around the cheese. You can create rosettes with the meats by folding them in half and then rolling them into a cone shape.
- Add Fruits and Nuts: Place the fresh and dried fruits in clusters around the board. Fill in gaps with mixed nuts, ensuring a mix of colors and textures.
- Incorporate Spooky Elements: Add edible googly eyes on top of the cheese shapes or olives for a spooky effect. Use fresh herbs to mimic creepy vines or foliage.
- Place Crackers and Dips: Arrange crackers in stacks or fanned-out designs. Place the hummus or any dip in one of the ramekins, and consider adding a sprinkle of paprika or a drizzle of olive oil for extra flair.
- Decorate with Pumpkins: Add small pumpkins or gourds to the board for decoration. These should be placed strategically to add height and interest to the arrangement.
- Final Touches: Before serving, double-check the board to confirm there are no large gaps and that the arrangement is visually appealing. Add any final garnishes.
Extra Tips:
When crafting a Spooky Charcuterie Board, consider the dietary preferences of your guests; include vegetarian options or gluten-free crackers if necessary. Experiment with different cheeses and meats that suit your palate.
Witch’s Brew Cocktails
Witch’s Brew Cocktails are a perfect addition to any Halloween party for adults, adding a touch of mystique and enchantment to the festivities.
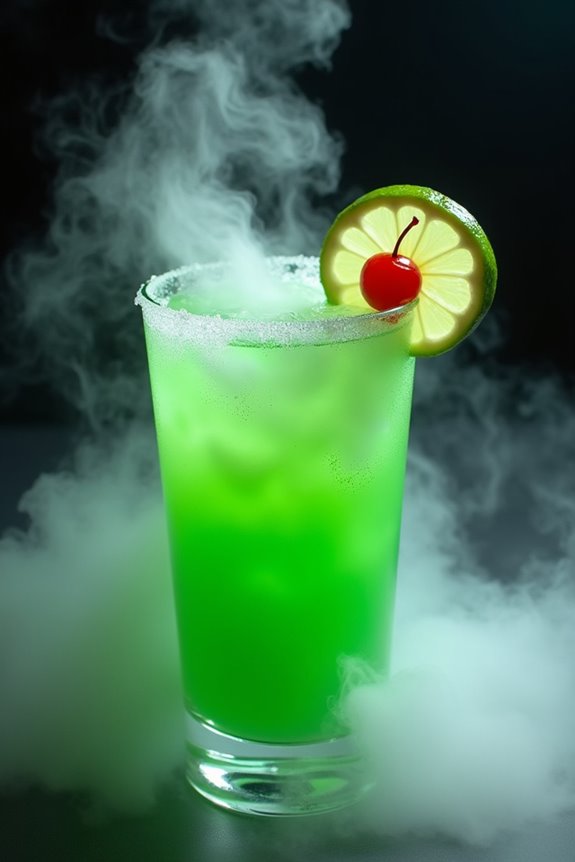
These cocktails aren’t just visually engaging with their eerie, vibrant green hue, but they also pack a punch of delicious flavors that will have your guests coming back for more. The combination of fruity notes and a hint of citrus makes these drinks irresistibly invigorating, while the spooky presentation adds that extra Halloween charm.
Imagine serving your guests a bubbling cauldron of this magical brew, with dry ice fog swirling around the glasses, creating a mysterious and enchanting atmosphere.
The Witch’s Brew Cocktails aren’t only a treat for the taste buds but also a feast for the eyes, making them a standout feature at any Halloween gathering. Perfect for a crowd, this recipe is designed to serve 4-6 people, guaranteeing that everyone gets a taste of this magical concoction.
Ingredients (Serves 4-6):
- 1 cup vodka
- 1 cup sour apple schnapps
- 2 cups lemon-lime soda
- 1 cup pineapple juice
- 1/2 cup fresh lime juice
- Green food coloring (optional, for extra effect)
- Ice cubes
- Lime slices and maraschino cherries for garnish
- Dry ice (optional, for presentation)
Instructions:
- Prepare the Base: In a large pitcher or punch bowl, combine the vodka, sour apple schnapps, lemon-lime soda, pineapple juice, and lime juice. Stir the mixture well until all ingredients are thoroughly mixed.
- Add Color (Optional): If you desire a more vibrant green color, add a few drops of green food coloring to the mixture and stir until the desired color is achieved.
- Chill the Mixture: Add ice cubes to the pitcher or punch bowl to make sure the cocktail is well chilled. Alternatively, you can refrigerate the mixture for about an hour before serving.
- Prepare the Glasses: Fill each serving glass with a few ice cubes. If you’re using dry ice for effect, be cautious while handling it. Use tongs to place a small piece of dry ice at the bottom of each glass (do not touch or ingest the dry ice directly).
- Serve the Cocktails: Pour the chilled cocktail mixture into each glass over the ice, allowing the drink to bubble over the dry ice for a spooky, foggy effect.
- Garnish: Finish by garnishing each glass with a slice of lime and a maraschino cherry for a pop of color and added flavor.
Extra Tips:
When using dry ice, remember that it should never be ingested, so make sure it has completely dissipated before drinking the cocktail.
Always handle dry ice with tongs or gloves to prevent skin burns. For a non-alcoholic version of this Witch’s Brew, simply omit the vodka and sour apple schnapps, and replace them with more lemon-lime soda or a non-alcoholic apple-flavored drink.
This way, everyone can enjoy the mystical experience of these spooky cocktails.
Black Magic Deviled Eggs
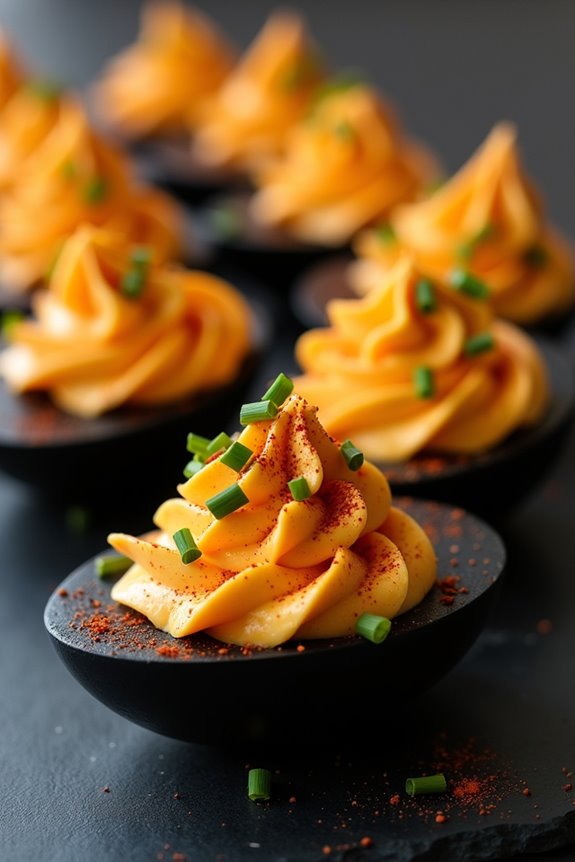
Black Magic Deviled Eggs are a spooky twist on the classic appetizer, perfect for an adult Halloween party. These eggs aren’t only delicious but also visually striking, thanks to their eerie black and orange coloring. The dark hue is achieved by soaking the hard-boiled eggs in a mixture that includes black food coloring, giving them a mysterious, otherworldly appearance. The filling remains creamy and flavorful, incorporating classic deviled egg ingredients with a hint of heat to elevate the taste.
The preparation of these Black Magic Deviled Eggs is straightforward, yet they make a stunning addition to any Halloween spread. With a little creativity and some simple ingredients, you can transform ordinary deviled eggs into a centerpiece that will captivate your guests. This recipe serves 4-6 people, providing a delightful and spooky treat for your Halloween festivities.
Ingredients:
- 6 large eggs
- 1 teaspoon black food coloring
- 2 tablespoons mayonnaise
- 1 teaspoon Dijon mustard
- 1/2 teaspoon white vinegar
- 1/4 teaspoon salt
- 1/4 teaspoon black pepper
- 1/4 teaspoon cayenne pepper
- Paprika for garnish
- Chopped chives for garnish (optional)
Cooking Instructions:
- Boil the Eggs: Place the eggs in a medium-sized pot and cover them with water. Bring the water to a boil over medium-high heat. Once boiling, cover the pot and remove it from the heat. Let the eggs sit in the hot water for about 12 minutes.
- Prepare the Ice Bath: While the eggs are sitting, prepare an ice bath by filling a large bowl with ice and water. After the eggs have cooked, transfer them immediately to the ice bath to stop the cooking process. Let them cool for at least 5 minutes.
- Peel and Dye the Eggs: Gently crack the eggshells and peel them under cold running water. In a medium bowl, mix 1 teaspoon of black food coloring with enough water to cover the peeled eggs. Submerge the eggs in the colored water and let them soak for at least 1 hour, or until they reach your desired shade of black.
- Prepare the Filling: Cut the dyed eggs in half lengthwise and carefully remove the yolks, placing them in a separate bowl. Add mayonnaise, Dijon mustard, white vinegar, salt, black pepper, and cayenne pepper to the yolks. Mix until smooth and creamy.
- Fill the Eggs: Using a spoon or a piping bag, fill the hollowed-out egg whites with the yolk mixture. Confirm each egg half is generously filled.
- Garnish and Serve: Sprinkle the tops with a little paprika for a pop of color, and add chopped chives if desired. Serve immediately or refrigerate until ready to serve.
Extra Tips:
For a more intense black color, you can let the eggs soak overnight in the dye mixture. If you prefer a less spicy filling, reduce or omit the cayenne pepper.
When peeling the eggs, be gentle to avoid tearing the egg whites, as they can be delicate after boiling. If you want to add an extra touch of flair, consider using a star-tipped piping bag to fill the eggs for a more decorative presentation.
Poison Apple Sangria
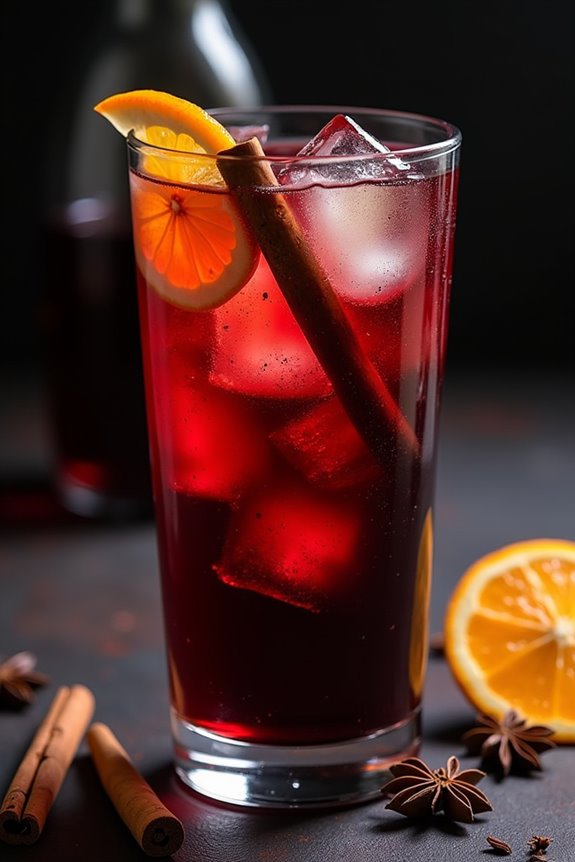
Poison Apple Sangria is a enchanting cocktail perfect for any Halloween gathering with adults. This dark and mysterious drink combines the deep flavors of apple and wine with a hint of spice, creating a sensory experience that’s both delicious and visually enthralling.
The rich, ruby color of the sangria, enhanced by floating apple slices, makes it an ideal centerpiece for your Halloween table. Not only is it easy to prepare, but it also allows you to infuse a touch of creativity and fun into your party’s drink menu.
This intoxicating elixir is crafted by blending red wine with apple cider, brandy, and a splash of pomegranate juice to add depth and sweetness. The addition of cinnamon sticks and star anise introduces a warm, spicy undertone that complements the sweetness of the apples.
To create the “poison” effect, a few drops of black food coloring are mixed in, giving the sangria its dark and eerie appearance. This recipe serves 4-6 people, making it a perfect choice for a small gathering or as part of a larger array of Halloween-themed beverages.
Ingredients (Serves 4-6):
- 1 bottle (750ml) red wine
- 2 cups apple cider
- 1/2 cup brandy
- 1/4 cup pomegranate juice
- 2 apples, thinly sliced
- 1 orange, thinly sliced
- 2 cinnamon sticks
- 2 star anise
- 2-3 drops black food coloring
- Ice cubes
Instructions:
- Prepare the Base: In a large pitcher, combine the red wine, apple cider, brandy, and pomegranate juice. Stir well to guarantee all the ingredients are thoroughly mixed.
- Add the Fruits and Spices: Add the sliced apples and orange to the liquid mixture. Drop in the cinnamon sticks and star anise to infuse the sangria with a warm, spicy aroma.
- Create the Poison Effect: Carefully add 2-3 drops of black food coloring to the mixture. Stir gently until the color is evenly distributed, giving the sangria its signature dark and eerie appearance.
- Chill: Cover the pitcher with plastic wrap or a lid and place it in the refrigerator. Allow the sangria to chill for at least 2 hours to let the flavors meld together.
- Serve: Fill glasses with ice cubes, pour the sangria over the ice, and garnish each glass with a few slices of apple and orange. Serve immediately and enjoy!
Extra Tips:
For an added theatrical touch, consider serving the Poison Apple Sangria in a cauldron-like punch bowl to enhance the Halloween theme.
If you prefer a sweeter drink, you can add a tablespoon of honey or agave syrup to the mixture. Adjust the number of food coloring drops to achieve your desired shade of darkness, but be cautious as too many drops can overpower the flavor.
For a non-alcoholic version, substitute the wine and brandy with sparkling grape juice and apple juice, maintaining the enchanting essence without the alcohol.
Dracula’s Bloody Mary Bar

Hosting a Halloween party for adults calls for a spooky twist on a classic cocktail. Enter Dracula’s Bloody Mary Bar, a perfect blend of bold flavors and ghoulish presentation. This interactive drink station allows guests to customize their own Bloody Marys with an array of toppings and garnishes that are as frightful as they’re delicious.
Whether you prefer it spicy or mild, this setup will guarantee your Halloween gathering is both festive and flavorful.
Creating Dracula’s Bloody Mary Bar involves setting up a table with all the necessary ingredients and garnishes for your guests to mix their own concoctions. Start with a base of high-quality tomato juice and vodka, and let your guests add various spices, sauces, and a haunting selection of garnishes like pickles, olives, and even a creepy eyeball made from mozzarella and olives.
This recipe serves 4-6 people, making it ideal for an intimate gathering or as part of a larger party spread.
Ingredients for 4-6 servings:
- 1 liter of high-quality tomato juice
- 12 ounces of vodka
- 1 tablespoon Worcestershire sauce
- 1 tablespoon hot sauce (adjust to taste)
- 1 teaspoon celery salt
- 1 teaspoon black pepper
- 1 teaspoon smoked paprika
- 1 tablespoon lemon juice
- Ice cubes
- Celery stalks (for garnish)
- Pickles (for garnish)
- Green olives (for garnish)
- Cooked bacon strips (for garnish)
- Cherry tomatoes (for garnish)
- Mozzarella balls (for garnish)
- Pimento-stuffed green olives (for garnish)
Cooking Instructions:
1. Prepare the Base: In a large pitcher, combine the tomato juice, vodka, Worcestershire sauce, hot sauce, celery salt, black pepper, smoked paprika, and lemon juice. Stir until all ingredients are well blended. Chill in the refrigerator for at least 30 minutes to allow the flavors to meld.
2. Set Up the Bar: Arrange the pitcher of Bloody Mary mix on a table. Set out glasses for each guest and fill them halfway with ice cubes. Place small bowls or plates with garnishes like celery stalks, pickles, olives, and bacon strips alongside the glasses.
For a spooky touch, create “eyeballs” by placing pimento-stuffed olives into mozzarella balls and add them to the garnish selection.
3. Serve and Enjoy: Invite your guests to mix their own Bloody Marys by pouring the chilled mix over ice in their glasses and adding their choice of garnishes and additional hot sauce if desired. Encourage them to experiment with different combinations to suit their tastes.
4. Garnish Creatively: Suggest that guests thread their garnishes onto cocktail skewers for easy mixing and a visually appealing presentation.
Extra Tips:
For an added twist, consider providing flavored vodka options such as pepper-infused or herb-infused varieties to give your guests more customization choices.
If you have non-drinkers at your party, offer a non-alcoholic version by omitting the vodka and adding a splash of club soda instead.
To save time on the day of the party, prepare all garnishes in advance and store them in airtight containers in the refrigerator until ready to serve.
Ghoulish Guacamole and Bat Chips
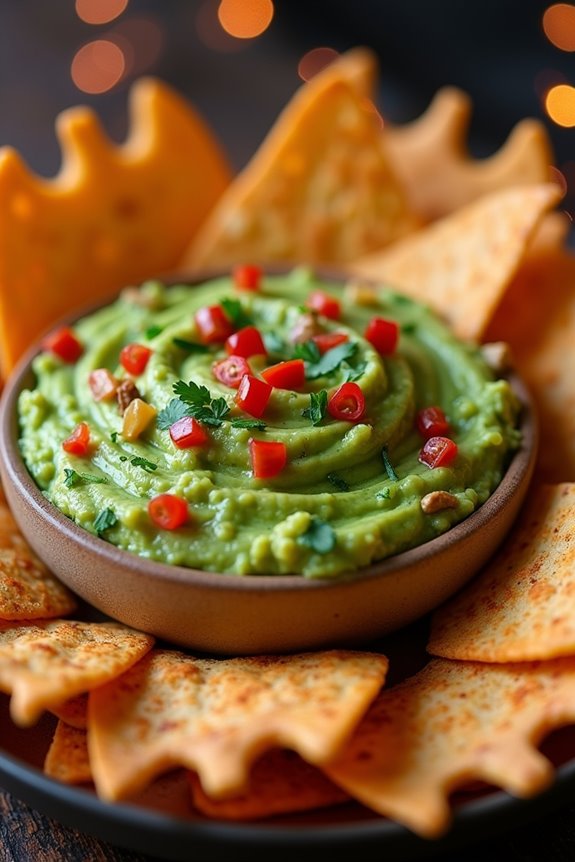
Transform your Halloween party into a thrilling experience with this spooky yet delicious recipe for Ghoulish Guacamole and Bat Chips. This dish combines the creamy texture of guacamole with creatively shaped tortilla chips that resemble bats, making it a perfect appetizer for adults looking to indulge in a bit of festive fun.
The vibrant green guacamole, contrasted with the dark, crispy bat-shaped chips, offers a delightful blend of flavors and textures that’s sure to captivate your guests. As you prepare this dish, you’ll enjoy the simplicity and creativity involved in crafting both the guacamole and the bat chips.
The guacamole is rich, flavorful, and easy to make, while the bat chips add a unique touch, offering a crispy complement to the creamy dip. This recipe serves 4-6 people, ensuring there’s enough to go around for a small gathering or as part of a larger spread of Halloween treats.
Ingredients for Ghoulish Guacamole:
- 3 ripe avocados
- 1 lime, juiced
- 1 teaspoon salt
- 1/2 cup diced onion
- 3 tablespoons chopped fresh cilantro
- 2 roma tomatoes, diced
- 1 teaspoon minced garlic
- 1 pinch ground cayenne pepper
Ingredients for Bat Chips:
- 10 large flour tortillas
- 3 tablespoons olive oil
- 1 teaspoon salt
- 1 teaspoon smoked paprika
- 1 teaspoon black pepper
Cooking Instructions:
- Prepare the Guacamole:
- Cut the avocados in half, remove the pits, and scoop the flesh into a mixing bowl. Mash the avocados using a fork or potato masher until you achieve your desired consistency.
- Add the lime juice and salt to the mashed avocados, mixing well to combine. This helps to keep the guacamole fresh and vibrant.
- Stir in the diced onion, chopped cilantro, diced tomatoes, minced garlic, and cayenne pepper. Mix all the ingredients together until evenly distributed. Taste and adjust seasoning if necessary.
- Make the Bat Chips:
- Preheat your oven to 350°F (175°C).
- Using a bat-shaped cookie cutter, cut out bat shapes from the flour tortillas. Alternatively, use a knife to carefully cut out bat shapes.
- Arrange the bat-shaped tortillas on a baking sheet lined with parchment paper. Brush each tortilla with olive oil on both sides.
- In a small bowl, combine the salt, smoked paprika, and black pepper, and sprinkle this mixture evenly over the oiled tortilla bats.
- Bake the bat chips in the preheated oven for 8-10 minutes, or until they’re golden brown and crispy. Keep a close eye on them to prevent burning.
- Remove from the oven and allow them to cool slightly before serving.
- Serve:
- Place the ghoulish guacamole in a serving bowl and arrange the bat chips around it for a festive presentation. Serve immediately to enjoy the freshness of the guacamole and the warmth of the chips.
Extra Tips:
To prevent the guacamole from browning, keep the avocado pits submerged in the dip until ready to serve. Additionally, if you’re preparing the bat chips in advance, store them in an airtight container to maintain their crispness.
If you prefer a spicier kick, consider adding jalapeño peppers to the guacamole. Finally, using a mix of colored tortillas (such as blue corn) can add an extra eerie element to your bat chips, enhancing the festive Halloween atmosphere.
Pumpkin Spice Cheesecake Bites
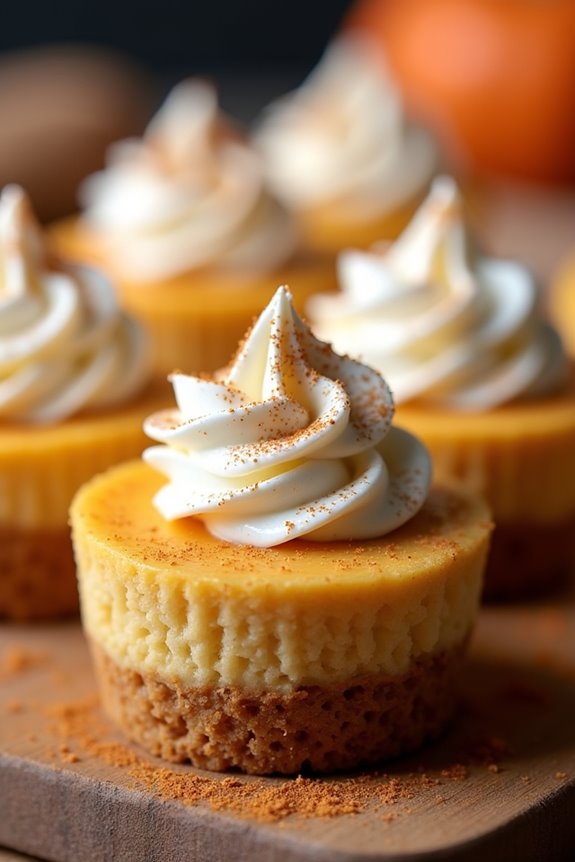
These Pumpkin Spice Cheesecake Bites are the perfect sweet treat for an adult Halloween party. Their rich, creamy texture combined with the warm flavors of pumpkin and spices make them a crowd favorite.
These bite-sized delights are easy to make, serve, and eat, ensuring that your guests can enjoy them without the need for utensils. They capture the essence of autumn in a single bite, making them an ideal dessert for your spooky festivities.
Not only are these cheesecake bites delicious, but they’re also visually appealing, adding a festive touch to your Halloween spread. They can be made ahead of time, allowing you to focus on other party preparations.
Whether you’re a seasoned baker or a novice, this recipe is straightforward and guaranteed to impress your guests. Serve them chilled for the best flavor experience.
Ingredients (serving size: 4-6 people):
- 1 cup graham cracker crumbs
- 2 tablespoons granulated sugar
- 4 tablespoons unsalted butter, melted
- 8 oz cream cheese, softened
- 1/2 cup canned pumpkin puree
- 1/4 cup brown sugar
- 1 teaspoon vanilla extract
- 1 teaspoon pumpkin pie spice
- 1/4 teaspoon ground cinnamon
- A pinch of salt
- 1 large egg
- Whipped cream, for topping (optional)
- Ground cinnamon or additional pumpkin pie spice, for garnish (optional)
Instructions:
- Prepare the Crust: Preheat your oven to 325°F (163°C). In a medium bowl, combine the graham cracker crumbs, granulated sugar, and melted butter. Mix well until the crumbs are evenly coated with butter and have a sandy texture.
- Form the Crust: Line a mini muffin tin with paper liners. Spoon about 1 tablespoon of the graham cracker mixture into each liner and press down firmly to form a compact crust at the bottom. Set aside.
- Make the Cheesecake Filling: In a large mixing bowl, beat the softened cream cheese until smooth and creamy. Add the pumpkin puree, brown sugar, vanilla extract, pumpkin pie spice, ground cinnamon, and salt. Mix until fully combined.
- Add the Egg: Add the egg to the mixture and beat on low speed until just combined. Avoid overmixing to prevent air bubbles, which can cause cracks in your cheesecake.
- Fill the Muffin Tins: Spoon the cheesecake filling over the prepared crusts in the muffin tins, filling each cup almost to the top.
- Bake: Place the muffin tin in the preheated oven and bake for about 15-18 minutes, or until the center is set and no longer jiggles when gently shaken.
- Cool and Chill: Remove the tin from the oven and let the cheesecake bites cool in the pan for about 10 minutes. Then transfer them to a wire rack to cool completely. Once cooled, refrigerate for at least 2 hours or until firm.
- Serve: Just before serving, top each cheesecake bite with a dollop of whipped cream and a light sprinkle of ground cinnamon or pumpkin pie spice, if desired.
Extra Tips:
For a smooth and creamy texture, make sure your cream cheese is at room temperature before mixing. This helps prevent lumps in the cheesecake filling.
You can make these cheesecake bites a day in advance and store them in the refrigerator, which also allows the flavors to meld beautifully. If you want to add a little crunch, consider sprinkling some crushed pecans on top of the whipped cream before serving.
Enjoy these Pumpkin Spice Cheesecake Bites chilled for the best flavor profile.
Monster Meatball Eyeballs
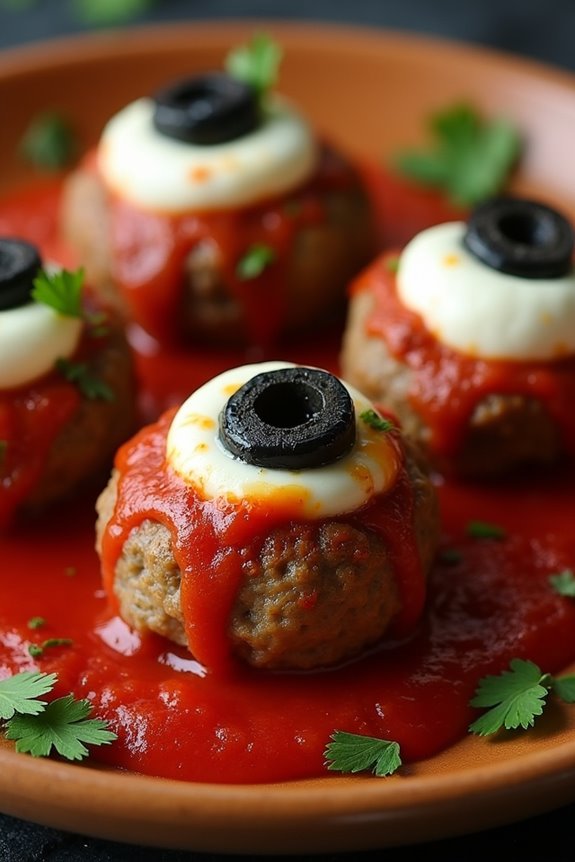
Looking to add a spooky twist to your Halloween party menu? Monster Meatball Eyeballs are the perfect blend of eerie aesthetics and delectable taste, certain to be a hit at your adults-only gathering.
These creepy yet delicious treats are made with savory meatballs and a creepy eye effect using mozzarella balls and olives. Not only are they fun to make, but they also bring a touch of gruesome glamour to your festive spread, making them an ideal centerpiece for your Halloween-themed table.
The combination of succulent meatballs topped with gooey, melted cheese and a hint of olive brine makes for an unforgettable flavor experience. The visual appeal of these gory-looking eyeballs draws guests in, while the rich flavors keep them coming back for more. Perfectly suited for a serving size of 4-6 people, this dish is both a conversation starter and a crowd-pleaser.
Whether you’re hosting a large gathering or a more intimate get-together, Monster Meatball Eyeballs are bound to impress.
Ingredients for Monster Meatball Eyeballs (Serves 4-6):
- 1 pound ground beef
- 1/2 cup breadcrumbs
- 1/4 cup grated Parmesan cheese
- 1 egg
- 2 cloves garlic, minced
- 1 teaspoon dried oregano
- 1 teaspoon salt
- 1/2 teaspoon black pepper
- 1 cup marinara sauce
- 12 small mozzarella balls
- 6 large black olives
- 1 tablespoon olive oil
- Fresh parsley for garnish (optional)
Cooking Instructions:
- Prepare the Meatballs:
- Preheat your oven to 375°F (190°C). In a large mixing bowl, combine the ground beef, breadcrumbs, Parmesan cheese, egg, minced garlic, dried oregano, salt, and black pepper. Mix until all ingredients are evenly incorporated.
- Shape and Bake:
- Roll the mixture into 12 evenly sized meatballs. Place them on a baking sheet lightly greased with olive oil. Bake in the preheated oven for 20-25 minutes, or until the meatballs are cooked through and browned on the outside.
- Make the Eyeballs:
- While the meatballs are baking, slice the black olives in half, lengthwise. Once the meatballs are done, remove them from the oven and set them aside to cool slightly.
- Assemble the Eyeballs:
- Pour the marinara sauce into a large skillet over medium heat. Add the baked meatballs to the sauce, allowing them to simmer for about 5 minutes. Top each meatball with a mozzarella ball and press half an olive into the center of each mozzarella ball to create the “eyeball.”
- Melt the Cheese:
- Cover the skillet with a lid and allow the mozzarella to melt slightly, about 2-3 minutes. This will help the “eyeballs” adhere to the meatballs.
- Serve:
- Transfer the Monster Meatball Eyeballs to a serving platter. Garnish with fresh parsley for a pop of color, if desired. Serve warm and enjoy the spooky delight!
Extra Tips:
- For an even spookier presentation, consider serving the meatballs on a bed of black pasta or inside a carved-out pumpkin.
- If you prefer a spicier kick, add a pinch of red pepper flakes to the meatball mixture.
- To guarantee the mozzarella balls stay in place, use a toothpick to secure them to the meatballs during the melting process, removing them before serving.
- Make-ahead tip: Prepare the meatballs and refrigerate them a day in advance. This allows the flavors to meld and can save you time on the day of the party.
Vampire Bat Wings
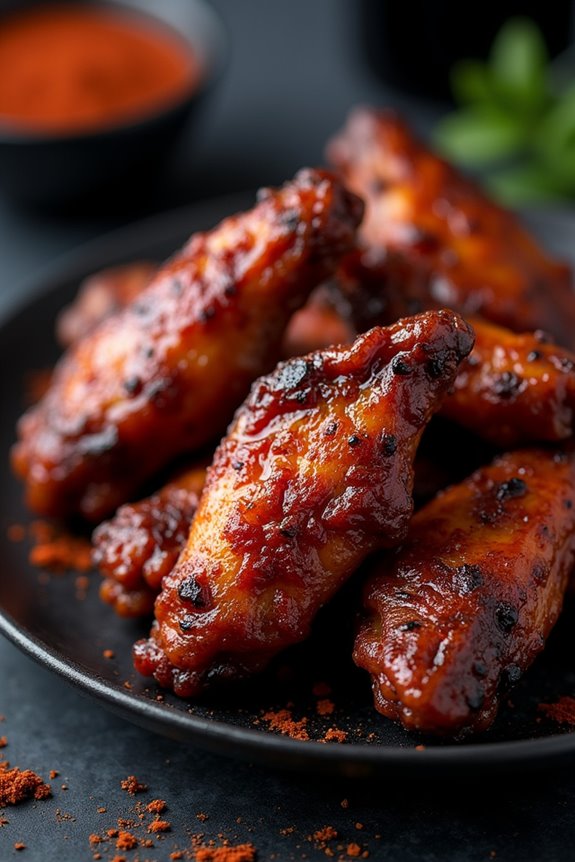
Transform your Halloween party into a night of spooky delights with these delicious Vampire Bat Wings. Perfectly crispy on the outside and tender on the inside, these wings are marinated in a tantalizing blend of spices and sauces that give them a deep, dark hue reminiscent of a vampire’s wings.
The secret to their vibrant color is a rich marinade made with a mix of soy sauce, balsamic vinegar, and a touch of red food coloring, guaranteeing they not only taste amazing but also look the part.
These Vampire Bat Wings are sure to be a hit among guests, offering a savory and slightly sweet flavor profile with a hint of smokiness. The preparation is straightforward, making it easy to whip up a batch for a crowd.
Serve them as a standout appetizer or as part of your Halloween spread. Pair with a spicy dipping sauce or a creamy blue cheese dip for an extra layer of flavor that will leave your guests craving more.
Ingredients (serving size: 4-6 people):
- 2 pounds of chicken wings
- 1/2 cup soy sauce
- 1/4 cup balsamic vinegar
- 1/4 cup honey
- 1 tablespoon olive oil
- 1 tablespoon smoked paprika
- 1 teaspoon garlic powder
- 1 teaspoon onion powder
- 1/2 teaspoon black pepper
- 1/2 teaspoon salt
- 1/2 teaspoon cayenne pepper (optional, for heat)
- 1/4 teaspoon red food coloring (optional, for color)
Instructions:
- Prepare the Marinade: In a large mixing bowl, combine soy sauce, balsamic vinegar, honey, olive oil, smoked paprika, garlic powder, onion powder, black pepper, salt, cayenne pepper, and red food coloring. Mix well to guarantee all ingredients are fully combined.
- Marinate the Wings: Add the chicken wings to the marinade. Toss and turn the wings to guarantee each piece is fully coated with the marinade. Cover the bowl with plastic wrap or transfer the wings and marinade into a large resealable plastic bag. Refrigerate for at least 2 hours, or overnight for more intense flavor.
- Preheat the Oven: When ready to cook, preheat your oven to 400°F (200°C). Line a baking sheet with aluminum foil and place a wire rack on top. This will help the wings cook evenly and develop a crispy exterior.
- Bake the Wings: Arrange the marinated wings on the wire rack, making sure they aren’t touching. Bake in the preheated oven for about 40-45 minutes, turning them halfway through to guarantee even cooking. They should be crispy and have a dark, rich color when done.
- Serve: Once cooked, remove the wings from the oven and let them rest for a few minutes. Serve hot with your choice of dipping sauce.
Extra Tips:
For an even spookier look, you can garnish the serving platter with some edible fake cobwebs or place the wings on a dark, gothic-themed plate.
If you’re looking to add more heat, increase the cayenne pepper amount or serve with a side of hot sauce. To make them extra crispy, consider broiling the wings for an additional 2-3 minutes right at the end of the baking process.
Mummy Jalapeño Poppers
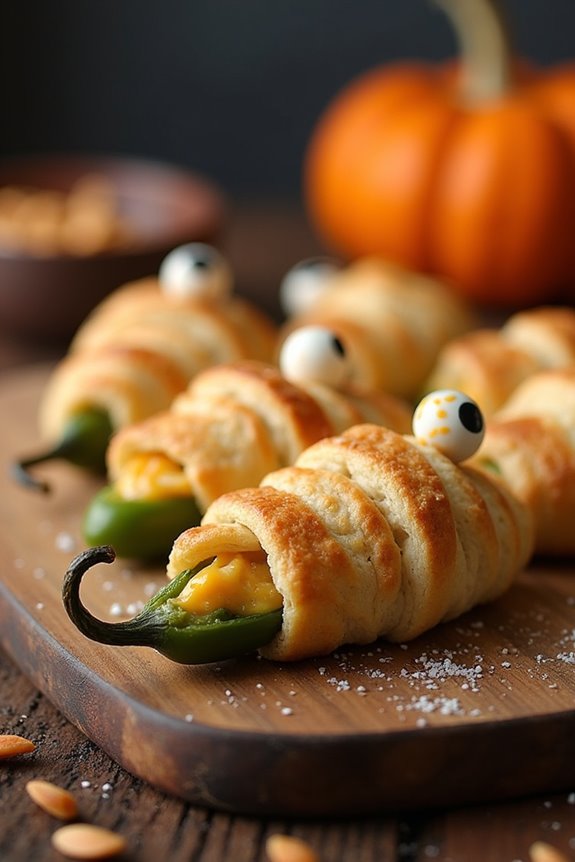
Perfect for a spooky Halloween gathering, Mummy Jalapeño Poppers are a delightful blend of spicy, creamy, and flaky goodness. These appetizers are certain to be a hit among adults, with their playful presentation and irresistible flavors. The jalapeños provide a fiery kick, while the creamy cheese filling balances out the heat. Wrapped in flaky crescent dough to resemble little mummies, these poppers are both fun to make and delicious to eat.
Whether you’re hosting a Halloween party or just want to bring some festive flair to your table, Mummy Jalapeño Poppers are an ideal choice. Not only do they look fantastic, but they’re also simple to prepare. With just a few ingredients, you can whip up a batch in no time. Plus, they can be made ahead of time and baked just before serving, making them a convenient option for entertaining.
Ingredients (Serves 4-6):
- 12 large jalapeño peppers
- 8 oz cream cheese, softened
- 1 cup shredded cheddar cheese
- 1/2 teaspoon garlic powder
- 1/2 teaspoon onion powder
- 1/4 teaspoon salt
- 1 roll of refrigerated crescent dough
- 24 small candy eyeballs
Cooking Instructions:
- Preheat the Oven: Begin by preheating your oven to 375°F (190°C). This guarantees that it’s ready to bake the poppers once they’re assembled.
- Prepare the Jalapeños: Slice each jalapeño in half lengthwise and remove the seeds and membranes. This reduces the heat level and creates space for the filling.
- Make the Filling: In a medium bowl, combine the softened cream cheese, shredded cheddar cheese, garlic powder, onion powder, and salt. Mix until smooth and well combined.
- Stuff the Jalapeños: Spoon the cheese mixture into each jalapeño half, filling them generously.
- Wrap with Dough: Unroll the crescent dough and cut it into thin strips. Wrap each stuffed jalapeño with dough strips, leaving small gaps to mimic a mummy’s bandages.
- Add the Eyes: Gently press two candy eyeballs into the dough near the top of each jalapeño to create the mummy’s eyes.
- Bake the Poppers: Place the wrapped jalapeños on a baking sheet lined with parchment paper. Bake in the preheated oven for 12-15 minutes, or until the dough is golden brown and the cheese is bubbly.
- Cool and Serve: Allow the poppers to cool slightly before serving. Enjoy them warm for the best flavor and texture.
Extra Tips:
When preparing Mummy Jalapeño Poppers, wear gloves to protect your hands from the jalapeños’ oils, which can cause irritation. If you prefer a milder dish, consider using mini sweet peppers instead of jalapeños.
For an extra touch of flavor, incorporate cooked bacon bits into the cheese filling. These poppers can also be frozen before baking; simply wrap them tightly and store them in an airtight container.
When you’re ready to serve, bake them directly from frozen, adding a few extra minutes to the baking time.
Ghostly Brie En Croute
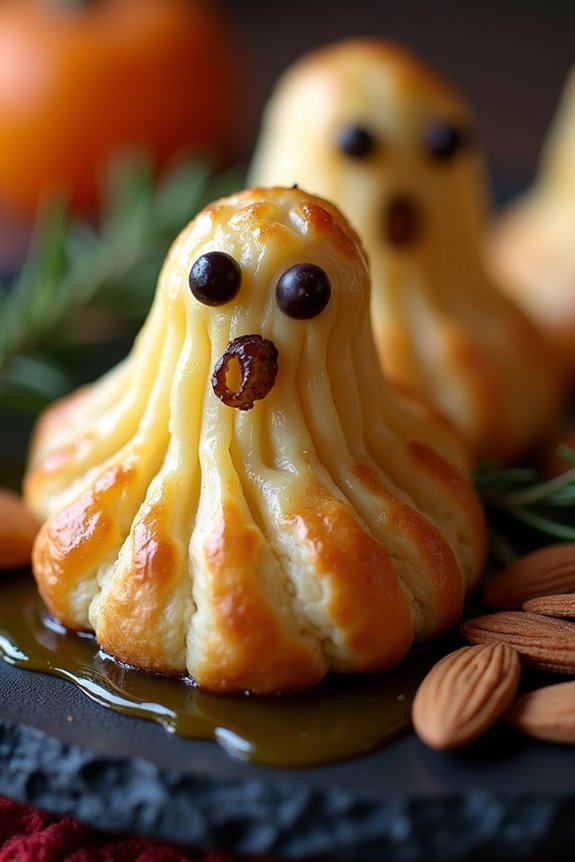
Hosting a Halloween party for adults calls for sophisticated yet spooky treats, and Ghostly Brie En Croute perfectly fits the bill. This delightful dish combines the rich, creamy texture of brie cheese with the buttery, flaky goodness of puff pastry. As it bakes, the pastry becomes golden and crisp, while the cheese inside melts into a delectable pool of indulgence. To add a Halloween twist, the pastry is shaped to resemble a ghost, providing a charming and eerie focal point for your party spread.
Ghostly Brie En Croute is an appetizer that not only tastes divine but also adds a touch of elegance to your Halloween celebration. It’s versatile enough to pair with a variety of accompaniments, like spiced nuts, fruit preserves, or a selection of crackers. This dish serves 4-6 people, making it perfect for an intimate gathering. With a few simple ingredients and a bit of creativity, you’ll have an enthralling centerpiece that’s sure to impress your guests.
Ingredients:
- 1 sheet of puff pastry, thawed
- 1 wheel of brie cheese (about 8 oz)
- 1 egg, beaten
- 1 tablespoon of flour (for dusting)
- 2 tablespoons of sliced almonds
- 2 tablespoons of apricot preserves
- Raisins or small olives (for ghost eyes)
Cooking Instructions:
- Preheat the Oven: Start by preheating your oven to 375°F (190°C) to guarantee it’s hot enough for baking the pastry evenly.
- Prepare the Puff Pastry: Lightly dust a clean surface with flour and unroll the thawed puff pastry. Use a rolling pin to gently smooth out any creases without thinning it out too much.
- Shape the Ghost: With a sharp knife or pastry cutter, trim the pastry into a ghost shape. Make sure the shape is large enough to fully encase the brie wheel. Save the scraps for decoration.
- Add the Filling: Place the brie wheel in the center of the ghost-shaped pastry. Spread apricot preserves over the top of the brie and sprinkle with sliced almonds.
- Wrap the Brie: Fold the pastry over the brie, ensuring it’s completely covered. Press the edges to seal. Use the pastry scraps to create additional ghost features, like arms or a tail.
- Decorate the Ghost: Use raisins or small olives to create eyes for the ghost. Secure them into the pastry gently.
- Apply Egg Wash: Brush the entire surface of the wrapped brie with beaten egg. This will give the pastry a beautiful golden color as it bakes.
- Bake: Transfer the pastry-wrapped brie to a baking sheet lined with parchment paper. Bake in the preheated oven for 20-25 minutes, or until the pastry is golden brown and crispy.
- Cool and Serve: Allow the Ghostly Brie En Croute to cool for a few minutes before serving. This helps the cheese set slightly, making it easier to slice.
Extra Tips:
When shaping the ghost, feel free to get creative with the design—simple shapes work best, and you can use the pastry scraps to add extra features. The brie should be at room temperature to guarantee even melting, so take it out of the fridge at least 30 minutes before wrapping.
If you prefer a different flavor profile, substitute the apricot preserves with another preserve or jam of your choice, such as fig or cranberry. Finally, to make your Ghostly Brie En Croute even spookier, consider serving it on a dark platter with a few sprigs of rosemary or thyme to create the illusion of a haunted forest.
Graveyard Chocolate Mousse Cups
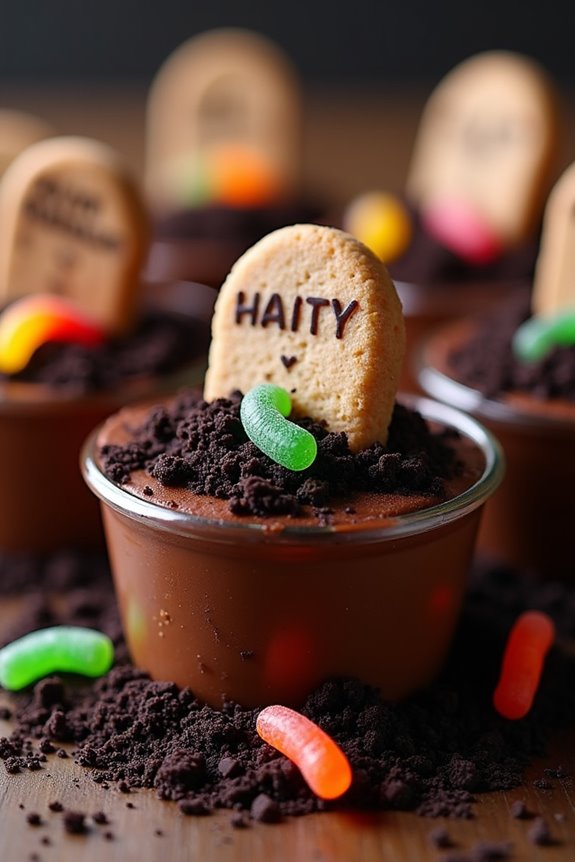
Graveyard Chocolate Mousse Cups are the perfect spooky treat for a Halloween party, combining rich, creamy chocolate mousse with fun, edible decorations to create a dessert that both looks and tastes spectacular.
These delightful cups resemble mini graveyards, complete with tombstones and edible dirt, making them an interactive and thematic choice for your Halloween celebration. Whether you’re hosting a party or attending a potluck, these graveyard chocolate mousse cups are sure to be a hit among adults who appreciate a whimsical touch to their dessert table.
The process begins with preparing a velvety chocolate mousse, which serves as the base of the graveyard. The mousse is then topped with crushed chocolate cookies to resemble dirt, and decorated with cookie tombstones and other spooky elements like gummy worms. The result is a visually appealing and delicious dessert that adds a festive touch to your Halloween table.
The recipe is designed to serve 4-6 people, making it ideal for small gatherings or as part of a larger buffet.
Ingredients:
- 1 cup heavy cream
- 2 large egg yolks
- 2 tablespoons granulated sugar
- 4 ounces dark chocolate, chopped
- 1 teaspoon vanilla extract
- 1/2 cup crushed chocolate cookies (e.g., Oreos)
- 6 rectangular cookies (e.g., Milano) for tombstones
- Edible writing gel or icing
- Gummy worms or other candies for decoration
Cooking Instructions:
- Prepare the Chocolate Mousse: In a medium saucepan, heat the heavy cream over medium heat until hot but not boiling. In a separate bowl, whisk together the egg yolks and granulated sugar until smooth.
- Slowly pour about half of the hot cream into the egg mixture, whisking constantly to temper the eggs. Then, pour the mixture back into the saucepan with the remaining cream.
- Melt the Chocolate: Add the chopped dark chocolate to the saucepan and stir continuously until the chocolate is completely melted and the mixture is smooth. Remove from heat and stir in the vanilla extract. Allow the mixture to cool slightly.
- Chill the Mousse: Pour the chocolate mixture into individual serving cups or ramekins. Cover with plastic wrap and refrigerate for at least 2 hours, or until the mousse is set and firm.
- Create the Graveyard Scene: Once the mousse is set, sprinkle a layer of crushed chocolate cookies over each cup to resemble dirt. Use the edible writing gel or icing to write spooky messages on the rectangular cookies to create tombstones.
- Insert the tombstones into the mousse and add gummy worms or other candy decorations to enhance the graveyard effect.
- Serve and Enjoy: Serve chilled and enjoy the eerie yet delicious dessert with your guests.
Extra Tips:
When making the chocolate mousse, be sure to whisk continuously when adding the hot cream to the egg yolks to prevent the eggs from scrambling.
If you’re short on time, you can prepare the mousse a day in advance and add the decorations just before serving. For a more festive touch, consider adding a drop of green food coloring to the cookie crumbs to simulate moss or grass.
Feel free to get creative with the decorations, using items like candy bones or ghost-shaped marshmallows to personalize your graveyard chocolate mousse cups.
Sinister Stuffed Bell Peppers
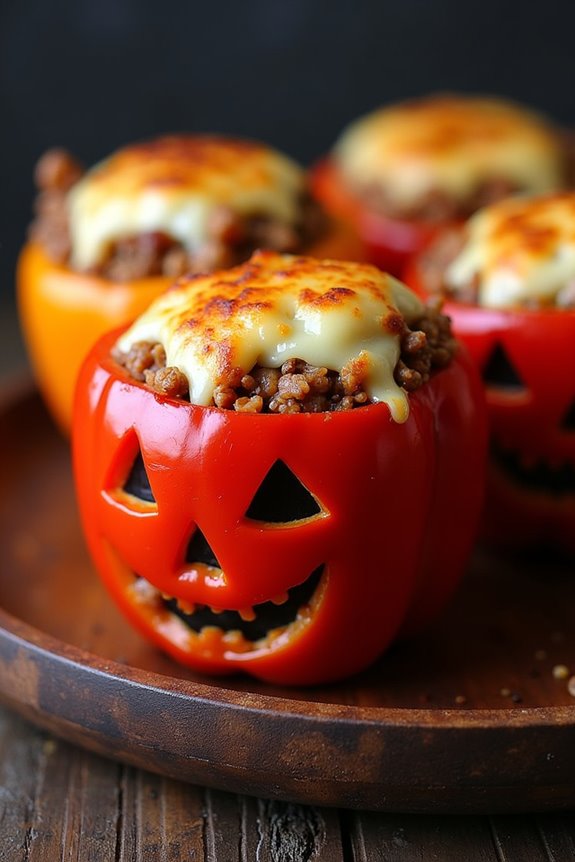
Sinister Stuffed Bell Peppers are a perfect addition to your Halloween party menu, offering a spooky twist on a classic dish. These colorful bell peppers are carved with eerie faces and filled with a savory mixture, making them not only delicious but also a centerpiece presentation. The delightful combination of flavors includes seasoned ground beef, rice, and vegetables, providing a hearty and satisfying meal that will keep your guests coming back for more.
To prepare Sinister Stuffed Bell Peppers, you’ll need to carve each pepper into a jack-o’-lantern style, giving them a festive and slightly creepy appearance. The filling, a blend of protein and grains, guarantees a balanced and nutritious dish that caters to adult palates. This recipe serves 4-6 people, making it ideal for a small gathering or as part of a larger buffet. With a little bit of creativity and some basic cooking skills, you can easily whip up this Halloween treat that will delight and impress your guests.
Ingredients (Serves 4-6):
- 6 medium-sized bell peppers (any color)
- 1 pound ground beef
- 1 cup cooked rice
- 1 can (14.5 ounces) diced tomatoes, drained
- 1 small onion, diced
- 2 cloves garlic, minced
- 1 cup shredded mozzarella cheese
- 1 tablespoon Worcestershire sauce
- 1 teaspoon dried oregano
- 1 teaspoon dried basil
- Salt and pepper to taste
- 2 tablespoons olive oil
Instructions:
- Prepare the Bell Peppers: Preheat your oven to 375°F (190°C). Wash the bell peppers and slice off the tops. Remove the seeds and membranes from inside the peppers. Using a small knife, carve spooky faces into one side of each pepper, mimicking a jack-o’-lantern.
- Cook the Filling: In a large skillet over medium heat, add the olive oil and sauté the diced onion and minced garlic until soft and translucent. Add the ground beef, breaking it up with a spoon, and cook until browned. Drain any excess fat from the skillet.
- Mix the Ingredients: Stir in the drained diced tomatoes, cooked rice, Worcestershire sauce, dried oregano, dried basil, salt, and pepper. Mix well to combine all ingredients thoroughly. Allow the mixture to simmer for about 5 minutes so the flavors meld together.
- Stuff the Peppers: Place the carved bell peppers in a baking dish. Carefully stuff each pepper with the beef and rice mixture, pressing down to fill all the crevices. Top each stuffed pepper with a generous amount of shredded mozzarella cheese.
- Bake: Cover the baking dish with aluminum foil and bake in the preheated oven for 25 minutes. Remove the foil and bake for an additional 10-15 minutes, or until the peppers are tender and the cheese is melted and bubbly.
- Serve: Allow the Sinister Stuffed Bell Peppers to cool slightly before serving. Arrange them on a platter for a spooky presentation.
Extra Tips: When choosing bell peppers, try to select those that can stand upright on their own, as this will make stuffing and baking easier. If you want to add more depth of flavor, consider adding a pinch of smoked paprika or cayenne pepper to the filling mixture. For a vegetarian version, replace the ground beef with black beans or lentils. To make the carving easier, use a small paring knife or a pumpkin carving tool for precision.
Creepy Crawly Pasta Salad
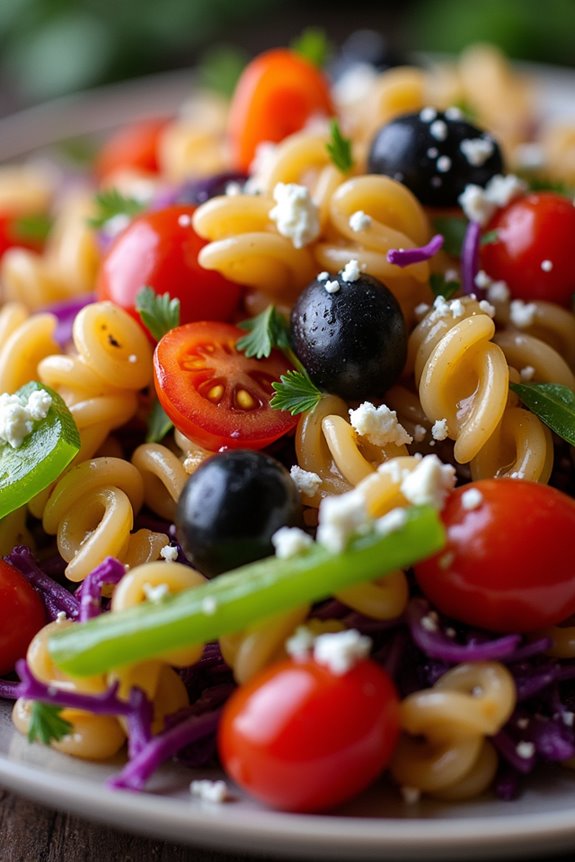
Creepy Crawly Pasta Salad is the perfect dish to bring a touch of spookiness to your Halloween party for adults. This dish combines the classic flavors of pasta salad with a ghoulish twist, making it an ideal choice for those who want to impress their guests with a festive and delicious recipe. The pasta is shaped like tiny critters, and paired with a medley of colorful vegetables, it creates an eerie yet appetizing presentation.
The addition of a tangy dressing ties everything together, making it a crowd-pleaser at any Halloween gathering. This Creepy Crawly Pasta Salad isn’t only visually appealing but also packed with flavors that will leave your guests craving for more. With a serving size that caters to 4-6 people, this dish is perfect for smaller gatherings or can be easily doubled for larger parties.
Whether you’re hosting a haunted house party or a sophisticated Halloween dinner, this pasta salad will surely be a hit. It’s easy to prepare ahead of time, allowing you to focus on other party preparations while still serving a dish that captures the Halloween spirit.
Ingredients (Serves 4-6):
- 12 oz bug-shaped pasta (or any small pasta)
- 1 cup cherry tomatoes, halved
- 1 cup black olives, pitted and sliced
- 1 cup green bell pepper, diced
- 1 cup purple cabbage, shredded
- 1/2 cup red onion, finely chopped
- 1/2 cup feta cheese, crumbled
- 1/4 cup fresh parsley, chopped
- 1/2 cup Italian dressing
- Salt and pepper to taste
Instructions:
- Cook the Pasta: Begin by bringing a large pot of salted water to a boil. Add the bug-shaped pasta and cook according to package instructions until al dente. Drain the pasta and rinse under cold water to stop the cooking process. This will also help prevent the pasta from sticking together.
- Prepare the Vegetables: While the pasta is cooking, prepare the vegetables. Halve the cherry tomatoes, slice the black olives, dice the green bell pepper, shred the purple cabbage, and finely chop the red onion. Set these aside.
- Combine Ingredients: In a large mixing bowl, combine the cooked pasta, cherry tomatoes, black olives, green bell pepper, purple cabbage, red onion, and feta cheese. Add the chopped parsley for a hint of freshness.
- Add the Dressing: Pour the Italian dressing over the pasta and vegetables. Gently toss everything together until well coated. Confirm all the ingredients are evenly distributed for the best flavor.
- Season and Chill: Season the pasta salad with salt and pepper to taste. Cover the bowl with plastic wrap and refrigerate for at least 1 hour before serving. This allows the flavors to meld together.
Extra Tips:
For an extra spooky touch, consider using black food coloring in the pasta cooking water to give the pasta a darker hue. If you’re unable to find bug-shaped pasta, small shell or rotini pasta can be a great substitute.
Feel free to experiment with additional vegetables or different types of cheese to suit your taste preferences. This salad can be made a day ahead, saving you time on the day of the party. Just give it a quick stir before serving to redistribute the dressing.
Bewitching Black Velvet Cake
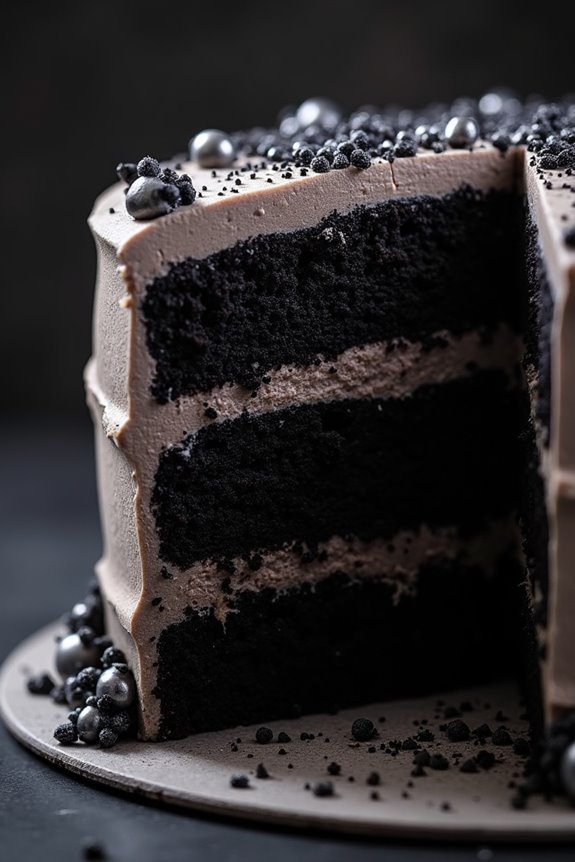
For a truly spooktacular Halloween party, a Bewitching Black Velvet Cake is the ultimate showstopper. This decadent dessert combines the rich, moist texture of classic velvet cake with a mysterious black hue that’s perfect for the eerie season. The cake is layered with a creamy, dark cocoa-infused frosting that adds a luxurious finish to each slice.
Whether you’re hosting an adult-only gathering or simply want to impress your friends, this cake is bound to enchant with its dramatic look and sinfully delightful taste.
The secret to achieving the cake’s striking black color lies in the use of black cocoa powder, which gives it an intense chocolate flavor while maintaining the velvet cake’s signature softness. Paired with a luscious cream cheese frosting that’s tinged with a hint of black food coloring, the cake’s look is undeniably bewitching.
Serve this cake at your Halloween party, and watch as your guests are mesmerized by its appearance and flavor, making it a centerpiece to remember.
Ingredients (Serves 4-6 people):
- 2 cups all-purpose flour
- 1 ½ cups granulated sugar
- 1 teaspoon baking soda
- 1 teaspoon salt
- 1 teaspoon black cocoa powder
- 1 cup buttermilk
- ½ cup vegetable oil
- 2 large eggs
- 1 teaspoon vanilla extract
- 1 tablespoon white vinegar
- 1 tablespoon black food coloring
- ½ cup unsalted butter, softened
- 8 oz cream cheese, softened
- 3 cups powdered sugar
- 1 teaspoon vanilla extract
- 1 tablespoon black cocoa powder (for frosting)
- 1 teaspoon black food coloring (for frosting)
Cooking Instructions:
- Preheat the Oven: Begin by preheating your oven to 350°F (175°C). Grease and flour two 9-inch round cake pans and set them aside.
- Mix Dry Ingredients: In a large mixing bowl, combine the flour, sugar, baking soda, salt, and black cocoa powder. Whisk them together until well mixed.
- Combine Wet Ingredients: In another bowl, whisk together the buttermilk, vegetable oil, eggs, vanilla extract, and white vinegar. Add the black food coloring and mix until the color is evenly distributed.
- Combine Ingredients: Gradually add the wet ingredients to the dry ingredients, mixing on low speed until just combined. Be careful not to overmix, as this can result in a dense cake.
- Bake the Cake Layers: Divide the batter evenly between the prepared cake pans. Bake for 25-30 minutes, or until a toothpick inserted into the center comes out clean. Allow the cakes to cool in the pans for 10 minutes before transferring them to wire racks to cool completely.
- Prepare the Frosting: In a large bowl, beat the softened butter and cream cheese until creamy and smooth. Gradually add the powdered sugar, vanilla extract, black cocoa powder, and black food coloring. Beat until the frosting is smooth and fluffy.
- Assemble the Cake: Once the cake layers are completely cool, spread a generous layer of frosting on top of one cake layer. Place the second layer on top and cover the entire cake with the remaining frosting. Smooth the frosting with a spatula for a sleek finish.
- Serve and Enjoy: Slice the cake and serve it to your guests. Watch as they marvel at the cake’s dark, velvety appearance and delicious taste.
Extra Tips:
- When using black food coloring, a little goes a long way. Start with a small amount and add more until the desired color is achieved.
- Confirm the cake layers are completely cooled before frosting to prevent the frosting from melting.
- For an extra Halloween touch, decorate the cake with edible silver pearls, black sprinkles, or even a few plastic spiders for a spooky effect.
- If black cocoa powder is unavailable, a mix of regular cocoa powder and extra black food coloring can also work, though the flavor might vary slightly.