

Looking to bring extra fun to your Halloween potluck? I’ve got a cauldron full of enchanting ideas that will make your party a hit with the little ones. From Spooky Spider Deviled Eggs to Witch’s Hat Cupcakes, each treat is as delightful to look at as it is to eat. But that’s just the tip of the pumpkin. Ready to transform your potluck into a whimsical wonderland? Let’s brew up some magic together!
Spooky Spider Deviled Eggs
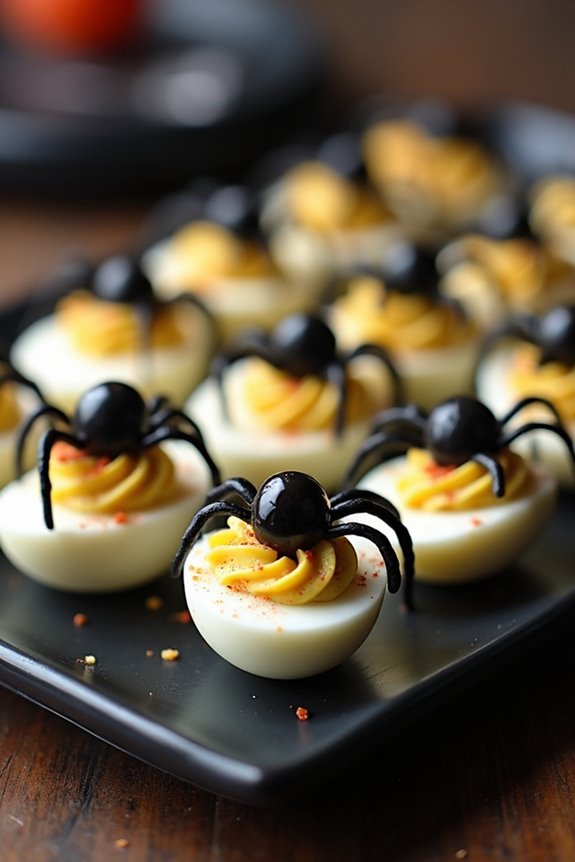
Creating these Spooky Spider Deviled Eggs is both simple and enjoyable, making it an excellent opportunity to involve children in the kitchen. The recipe incorporates basic ingredients that are easy to find, and the assembly process is a fun and creative activity.
With a little bit of imagination and a steady hand, you can craft a platter of edible arachnids that will make your Halloween potluck memorable.
Ingredients for 4-6 People:
- 6 large eggs
- 2 tablespoons mayonnaise
- 1 teaspoon mustard
- 1/2 teaspoon vinegar
- Salt and pepper to taste
- 12 black olives
- Paprika (optional, for garnish)
Cooking Instructions:
- Boil the Eggs: Place the eggs in a single layer in a saucepan and cover them with water by about an inch. Bring the water to a rolling boil over medium-high heat. Once boiling, turn off the heat, cover the saucepan with a lid, and let the eggs sit for 10-12 minutes.
- Cool and Peel: After the eggs have cooked, drain the hot water and transfer the eggs to a bowl of ice water. Let them cool for about 5 minutes, then gently crack and peel the shells off the eggs.
- Prepare the Filling: Cut each egg in half lengthwise and carefully scoop out the yolks into a bowl. Mash the yolks with a fork and mix them with mayonnaise, mustard, vinegar, salt, and pepper until smooth and creamy.
- Fill the Egg Whites: Spoon or pipe the yolk mixture back into the hollowed-out egg whites, filling each cavity generously.
- Create Spider Toppings: Slice the black olives in half. Use one half as the spider body and cut the other half into thin strips to form the spider legs. Arrange one half-olive on top of each filled egg, and position the cut strips around it to resemble spider legs.
- Garnish and Serve: Optionally, sprinkle a little paprika over the filled eggs for added color. Arrange the Spooky Spider Deviled Eggs on a serving platter and watch the kids delight in their creepy-crawly appearance.
Extra Tips:
When making Spooky Spider Deviled Eggs, verify the eggs aren’t overcooked to avoid a rubbery texture. Fresh eggs can be harder to peel, so if possible, use eggs that are a few days old.
If you don’t have a piping bag for the filling, a small plastic bag with a corner snipped off works perfectly. Finally, get creative with your spider designs—experiment with different olive placements to give each spider a unique look!
Mummy Pizza Bites

Mummy Pizza Bites are a fun and spooky treat perfect for a Halloween potluck with kids. These bite-sized delights transform regular pizza into a festive dish, resembling miniature mummies with cheesy bandages. Not only are they delicious, but they also add a playful element to your Halloween spread. Kids will love the creative presentation, and adults will appreciate the quick and easy preparation.
These Mummy Pizza Bites are ideal for a serving size of 4-6 people, making them a great option for small gatherings. They’re made with simple ingredients that come together to create a visually appealing and tasty snack. Whether you’re hosting a Halloween party or attending one, these pizza bites are sure to be a hit with guests of all ages.
Ingredients:
- 1 can of refrigerated pizza dough
- 1/2 cup of pizza sauce
- 1 cup of shredded mozzarella cheese
- 24 slices of pepperoni
- 24 black olive slices
- 1 egg (for egg wash)
- All-purpose flour (for dusting)
Instructions:
- Preheat and Prepare: Begin by preheating your oven to 375°F (190°C). Lightly flour a clean surface and roll out the refrigerated pizza dough to about 1/4-inch thickness.
- Cut the Dough: Use a round cookie cutter or a glass to cut out circles from the dough. These will serve as the base for your mummy faces.
- Add the Sauce and Toppings: Place the dough circles on a lined baking sheet. Spread a small spoonful of pizza sauce on each circle, leaving a small border around the edges.
- Create the Mummy Look: Lay the pepperoni slices over the sauce. Then, cut the mozzarella cheese into thin strips and arrange them over the pepperoni to resemble mummy bandages. Leave small gaps for the eyes.
- Add the Eyes: Place two olive slices on each pizza bite to create the mummy’s eyes.
- Egg Wash and Bake: Beat the egg in a small bowl and brush the edges of the dough with the egg wash. This will help the edges turn golden brown when baked. Bake in the preheated oven for 10-12 minutes or until the cheese is melted and bubbly and the dough is cooked through.
- Cool and Serve: Allow the Mummy Pizza Bites to cool slightly before serving. This guarantees the cheese has time to set and won’t slide off when handled.
Extra Tips: When cutting the pizza dough, try to make the circles as even as possible for consistent baking. If you want to add a bit more flavor, consider sprinkling some Italian seasoning over the cheese before baking. For a vegetarian option, you can skip the pepperoni and use sliced mushrooms or bell peppers instead. Finally, if you’re making these ahead of time, reheat them in the oven for a few minutes to crisp up the edges before serving.
Ghostly Popcorn Balls
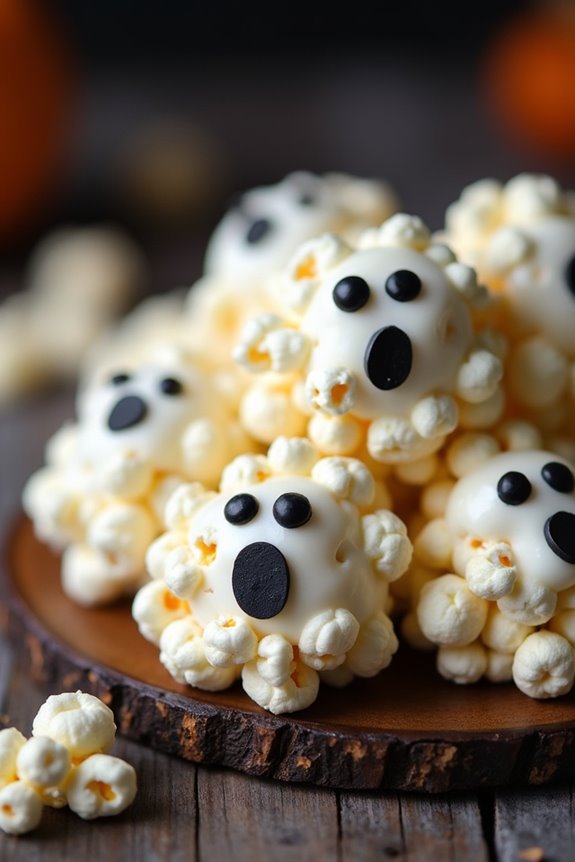
Ghostly Popcorn Balls are a spooktacular treat perfect for any Halloween potluck, especially for kids. These sweet and sticky snacks aren’t only delicious but also a fun and creative way to add a touch of ghostly charm to your party spread. The combination of popcorn, marshmallows, and a hint of vanilla creates a delightful blend that will have both kids and adults coming back for more.
Decorate them with spooky faces or leave them plain white for a ghostly effect—the choice is yours! This recipe is designed to serve 4-6 people, making it ideal for small gatherings or as a special treat for a Halloween party. The ingredients are simple and easy to find, and the process is straightforward, guaranteeing that even novice cooks can whip up a batch without a hitch.
Plus, it’s a great opportunity to involve children in the kitchen, letting them decorate their own ghostly creations. Get ready to enjoy a frightfully fun snack that’s sure to be a hit with the young and the young at heart!
Ingredients (Serves 4-6):
- 8 cups popped popcorn
- 1/4 cup unsalted butter
- 1 package (10 oz) miniature marshmallows
- 1 teaspoon vanilla extract
- Black decorating gel or edible markers for decoration
- Cooking spray or butter for greasing hands
Cooking Instructions:
- Pop the Popcorn: Start by popping 8 cups of popcorn. You can use pre-popped popcorn or make your own using an air popper or stovetop method. Ascertain that all unpopped kernels are removed to avoid any unpleasant surprises.
- Prepare the Marshmallow Mixture: In a large saucepan over medium heat, melt 1/4 cup of unsalted butter. Once melted, add the miniature marshmallows and stir continuously until they’re completely melted and smooth. Remove from heat and stir in the vanilla extract.
- Combine Popcorn and Marshmallow Mixture: In a large bowl, pour the melted marshmallow mixture over the popped popcorn. Use a spatula to gently fold and mix until the popcorn is evenly coated with the marshmallow mixture.
- Shape the Popcorn Balls: Lightly grease your hands with cooking spray or butter to prevent sticking. Taking small handfuls of the coated popcorn, form them into balls about the size of a tennis ball. Place them on a sheet of wax paper to cool and set.
- Decorate the Ghosts: Once the popcorn balls have set and cooled, use black decorating gel or edible markers to draw ghostly faces on each popcorn ball. Get creative with your designs, making each ghost unique.
Extra Tips:
When working with the marshmallow mixture, be sure to act quickly as it tends to harden once it starts to cool. If you find the mixture too sticky to handle, applying a bit of cooking spray or butter to your hands will make shaping the popcorn balls easier.
Additionally, if you’re planning to store these treats, place them in an airtight container to maintain their freshness. If you’re decorating with edible markers, ascertain the popcorn balls are fully cooled to avoid smudging. Enjoy your Ghostly Popcorn Balls and have a boo-tiful Halloween!
Witch’s Hat Cupcakes

Witch’s Hat Cupcakes are a delightful and spooky treat that will definitely enchant kids and adults alike at your Halloween potluck. These cupcakes combine the classic flavors of chocolate and vanilla with a creative twist that transforms them into whimsical witch hats. Perfect for a serving size of 4-6 people, these cupcakes aren’t only delicious but also fun to make with children, allowing their imaginations to run wild as they decorate their own edible witch hats.
The base of the Witch’s Hat Cupcakes is a rich chocolate cupcake, topped with a swirl of vanilla buttercream frosting to mimic the brim of the hat. A chocolate cone, adorned with colorful sprinkles and an edible ribbon, completes the witch’s hat look. These cupcakes are a delightful blend of flavor and fun, making them an ideal choice for a Halloween gathering.
Ingredients (Serving Size: 4-6 people):
- 1 cup all-purpose flour
- 1/2 cup cocoa powder
- 1 cup granulated sugar
- 1 teaspoon baking powder
- 1/2 teaspoon baking soda
- 1/4 teaspoon salt
- 1/2 cup unsalted butter, melted
- 2 large eggs
- 1 teaspoon vanilla extract
- 1/2 cup buttermilk
- 1 cup unsalted butter, softened (for frosting)
- 4 cups powdered sugar (for frosting)
- 2 teaspoons vanilla extract (for frosting)
- 2-4 tablespoons milk (for frosting)
- 6 chocolate sugar cones
- Sprinkles for decoration
- Edible ribbon or candy strips for decoration
Cooking Instructions:
- Preheat and Prep: Preheat your oven to 350°F (175°C) and line a muffin tin with cupcake liners.
- Mix Dry Ingredients: In a large bowl, whisk together the flour, cocoa powder, sugar, baking powder, baking soda, and salt until well combined.
- Combine Wet Ingredients: In another bowl, mix the melted butter, eggs, vanilla extract, and buttermilk until smooth.
- Combine Mixtures: Gradually add the wet ingredients to the dry mixture, stirring until just combined. Be careful not to overmix to guarantee your cupcakes remain fluffy.
- Fill and Bake: Divide the batter evenly among the cupcake liners, filling each about 2/3 full. Bake in the preheated oven for 18-20 minutes or until a toothpick inserted into the center comes out clean. Allow them to cool completely before frosting.
- Prepare Frosting: In a large bowl, beat the softened butter until creamy. Gradually add the powdered sugar, mixing well after each addition. Stir in the vanilla extract and add milk as needed to achieve a smooth, spreadable consistency.
- Assemble the Witch’s Hat: Once the cupcakes have cooled, pipe or spread a generous layer of frosting on each cupcake to create the hat brim. Decorate the chocolate sugar cones with sprinkles and wrap an edible ribbon around the base of each cone. Place a cone on top of each frosted cupcake.
Extra Tips:
For an even more magical touch, consider tinting some of the frosting with food coloring to add a pop of color beneath the hats. If you want to make the cupcakes in advance, bake them a day ahead and store them in an airtight container. Frost and assemble the witch’s hats just before serving to keep them fresh and vibrant.
Encourage kids to help with decorating; it’s a fun activity that lets them express their creativity while getting into the Halloween spirit!
Pumpkin Patch Dirt Cups
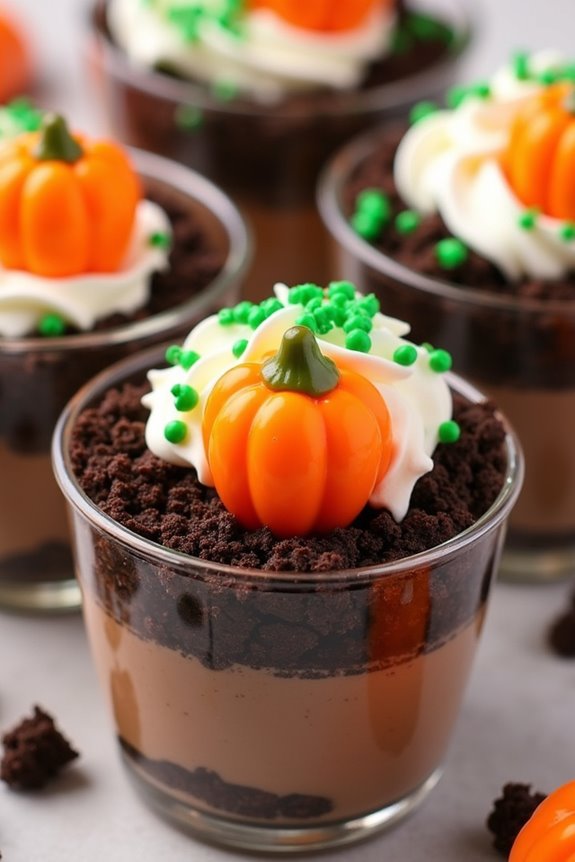
These dirt cups are quick to prepare and don’t require any baking, making them an ideal choice for busy parents and caregivers. The visual appeal of the candy pumpkins against the dark “dirt” layer will captivate the children, and the sweet taste will keep them coming back for more. With a serving size accommodating 4-6 people, this recipe guarantees there’s plenty to go around at your Halloween gathering.
Ingredients (Serving size: 4-6 people):
- 2 cups chocolate pudding
- 20 chocolate sandwich cookies
- 12 candy pumpkins
- 1 cup whipped cream
- 1 teaspoon vanilla extract
- Green sprinkles (optional)
- Clear plastic cups or small glass cups
Cooking Instructions:
- Prepare the Pudding: Start by preparing the chocolate pudding according to package instructions if you’re using instant pudding mix. If you prefer homemade pudding, confirm it’s cooled to room temperature before proceeding.
- Crush the Cookies: Place the chocolate sandwich cookies in a ziplock bag. Use a rolling pin to crush them into fine crumbs. These crumbs will serve as the “dirt” in your cups.
- Prepare the Whipped Cream: Mix the whipped cream with vanilla extract in a bowl until well combined. This adds an extra layer of flavor to your dirt cups.
- Assemble the Cups: Take your clear plastic or glass cups and spoon a layer of chocolate pudding into the bottom of each cup. Next, add a layer of crushed cookies to create the dirt layer.
- Add Whipped Cream: Spoon a layer of vanilla-flavored whipped cream over the cookie crumbs. This layer will act as a “fertilizer” for your pumpkin patch.
- Repeat Layers: Repeat the layers of pudding and crushed cookies until the cups are almost full, finishing with a generous cookie crumb layer on top.
- Decorate with Candy Pumpkins: Place 2-3 candy pumpkins on top of each cup, pressing them lightly into the cookie crumbs so they resemble a pumpkin patch. If desired, sprinkle some green sprinkles around the pumpkins to mimic grass.
- Serve or Chill: These dirt cups can be served immediately or chilled in the refrigerator for about 30 minutes to enhance the flavors.
Extra Tips:
For added variety, consider using different types of candy to decorate your dirt cups. Gummy worms can add an extra spooky touch, crawling out of the “dirt.”
You can also layer in other ingredients, such as crushed nuts or candy corn, for additional texture and flavor. If you want to make this dessert ahead of time, prepare all the layers separately and assemble just before serving to keep the cookie crumbs crunchy.
Monster Eye Cookies

Monster Eye Cookies are a delightful and spooky treat perfect for a Halloween potluck with kids. These cookies aren’t only fun to make but also provide a creative and festive way to indulge in the holiday spirit. With their vibrant colors and eerie candy eyes, they’re sure to be a hit among little ghouls and goblins. The combination of a soft cookie base and sweet candy decorations makes them an irresistible addition to any Halloween spread.
Creating Monster Eye Cookies is a fun activity that can involve the whole family. Kids will love helping to decorate the cookies with colorful icing and monster eyes, making each cookie unique and full of character. These cookies are easy to make and require simple ingredients, making them a perfect last-minute addition to any Halloween event. The recipe below is designed to serve 4-6 people, guaranteeing everyone gets a taste of these creepy yet cute treats.
Ingredients:
- 1 cup unsalted butter, softened
- 1 cup granulated sugar
- 1 large egg
- 1 teaspoon vanilla extract
- 2 ½ cups all-purpose flour
- 1 teaspoon baking powder
- ½ teaspoon salt
- Food coloring (green, purple, orange)
- Candy eyeballs
Instructions:
- Preheat and Prepare Dough: Preheat your oven to 350°F (175°C). In a large mixing bowl, cream together the softened butter and granulated sugar until light and fluffy. This process should take about 2-3 minutes using an electric mixer.
- Add Wet Ingredients: Beat in the egg and vanilla extract until well combined. This step guarantees that all the wet ingredients are fully incorporated, providing a smooth base for the cookie dough.
- Combine Dry Ingredients: In a separate bowl, whisk together the all-purpose flour, baking powder, and salt. Gradually add the dry ingredients to the wet mixture, mixing until a dough forms.
- Color the Dough: Divide the dough into three equal parts. Add a few drops of food coloring to each portion to create different colored doughs (green, purple, and orange). Knead the food coloring into the dough until the color is evenly distributed.
- Shape and Bake: Roll tablespoon-sized amounts of dough into balls and place them on a baking sheet lined with parchment paper, leaving space between each ball. Lightly flatten each ball with your palm. Bake in the preheated oven for 10-12 minutes or until the edges are lightly golden.
- Decorate: Remove the cookies from the oven and immediately press candy eyeballs into each cookie while they’re still warm. Allow them to cool on the baking sheet for a few minutes before transferring to a wire rack to cool completely.
Extra Tips:
For an extra spooky effect, consider using different sizes of candy eyeballs to create a more monster-like appearance. Confirm the cookies aren’t overbaked; they should be soft with slightly crisp edges. If working with younger children, pre-color the dough to minimize mess and let them focus on decorating. These cookies can be stored in an airtight container for up to a week, making them a convenient make-ahead treat for any Halloween celebration.
Frankenstein Rice Krispies Treats
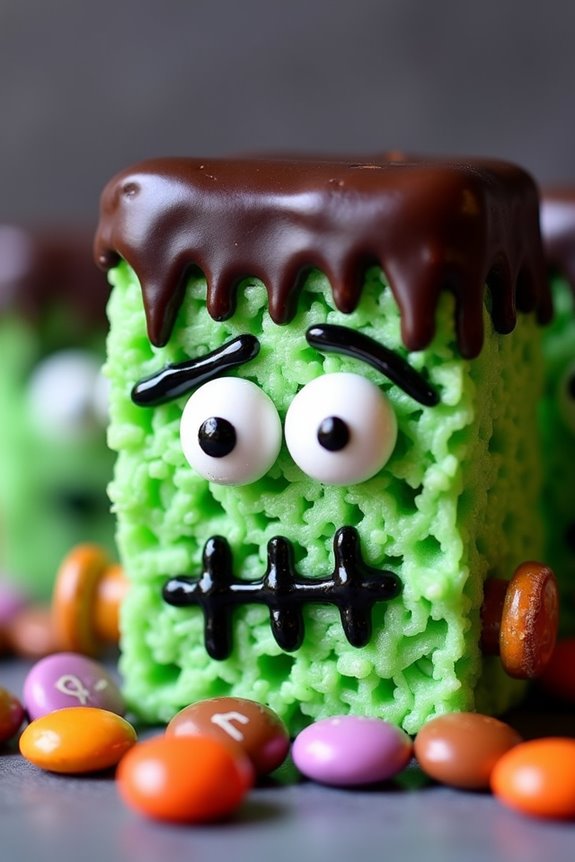
Frankenstein Rice Krispies Treats are a fun and spooky addition to any Halloween potluck, especially for kids. These treats aren’t only delightful to look at but also incredibly easy to make, allowing even young chefs to get involved in the kitchen. The classic Rice Krispies Treats are transformed into cute little Frankenstein heads with just a few additional ingredients and some creativity.
Using green food coloring, chocolate, and a variety of candies for decoration, these treats are guaranteed to be a hit among the little monsters at your Halloween gathering.
The key to making successful Frankenstein Rice Krispies Treats is to guarantee they’ve the right consistency—gooey yet firm enough to hold their shape. Start by preparing a basic Rice Krispies Treat, then mold them into rectangles to represent Frankenstein’s head. Once cooled, the decorating fun begins, allowing kids to personalize their creations with chocolate bolts and sweet facial features. Letting your imagination run wild with different candy options will make each Frankenstein unique and memorable.
Ingredients for 4-6 servings:
- 6 cups Rice Krispies cereal
- 3 tablespoons unsalted butter
- 4 cups mini marshmallows
- Green food coloring
- 1 cup semi-sweet chocolate chips
- 12 small pretzel sticks
- Candy eyeballs
- Tube of black gel icing
- Assorted candies (e.g., M&M’s, licorice strings)
Instructions:
- Prepare the Base: Start by melting the butter in a large saucepan over low heat. Once melted, add the mini marshmallows and stir until completely melted and smooth. Add a few drops of green food coloring and mix thoroughly to achieve the desired shade of Frankenstein green.
- Mix and Mold: Remove the saucepan from the heat and add the Rice Krispies cereal, stirring quickly until the cereal is fully coated with the green marshmallow mixture. Pour the mixture into a greased 9×13-inch pan and press down evenly with a spatula. Allow the mixture to cool for about 30 minutes.
- Cut into Shapes: Once the mixture is cool and firm, cut the treats into rectangles that will form the base of Frankenstein’s head.
- Melt the Chocolate: In a microwave-safe bowl, melt the chocolate chips in 30-second intervals, stirring in between, until the chocolate is smooth.
- Decorate: Dip the top of each rectangle into the melted chocolate to create Frankenstein’s hair. Break the pretzel sticks in half and insert them into the sides of each rectangle to act as bolts. Use candy eyeballs for the eyes, and black gel icing to draw stitches and a mouth.
- Add Details: Use assorted candies to add additional features like a nose or scars, customizing each Frankenstein with your choice of candy.
Extra Tips:
For best results, work quickly when mixing the Rice Krispies cereal into the marshmallow mixture to guarantee even coverage. If the mixture becomes difficult to handle, lightly grease your hands with butter or non-stick spray to prevent sticking while shaping the treats.
Additionally, let the melted chocolate cool slightly before dipping to prevent it from dripping excessively. Feel free to experiment with different candies for unique facial expressions, and have fun letting the kids create their own spooky designs!
Batty Brownie Bites
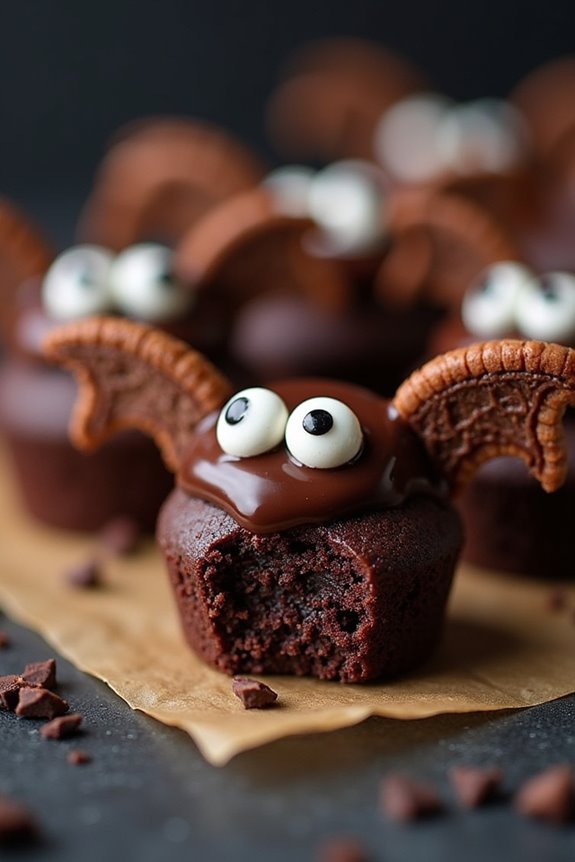
Batty Brownie Bites are the perfect sweet treat for a Halloween potluck, certain to delight kids and adults alike with their spooky yet delicious presentation. These bite-sized brownies are transformed into adorable bats with just a few extra ingredients and a touch of creativity. Not only are they fun to make, but they also offer a rich, chocolatey flavor that everyone will love.
Perfect for a serving size of 4-6 people, these Batty Brownie Bites are an easy and festive addition to any Halloween gathering.
The process begins with baking a batch of brownies, which are then cut into bite-sized pieces. Each brownie bite is decorated with edible candy eyes and wings made from chocolate sandwich cookies. The combination of textures—from the fudgy brownie to the crisp cookie wings—makes these treats irresistible. Plus, they’re simple enough for kids to help with the decorating, making this an enjoyable activity to do together as a family.
Ingredients (Serves 4-6):
- 1 box of brownie mix (plus ingredients required on the box)
- 8 chocolate sandwich cookies
- 1/2 cup of chocolate chips
- 1 tablespoon of vegetable oil
- 1 package of edible candy eyes
Instructions:
- Prepare the Brownie Mix: Preheat your oven to the temperature indicated on the brownie mix box. Prepare the brownie batter according to the instructions on the box. Pour the batter into a greased baking pan and bake as directed. Once baked, allow the brownies to cool completely.
- Cut the Brownies: Once cooled, carefully cut the brownies into bite-sized squares. Aim for pieces that are approximately 2 inches by 2 inches for easy handling.
- Make the Bat Wings: Twist apart 8 chocolate sandwich cookies and remove the filling. Cut each cookie half into two equal pieces to form the bat wings.
- Melt the Chocolate: In a microwave-safe bowl, combine the chocolate chips and vegetable oil. Microwave in 30-second intervals, stirring between each, until the chocolate is completely melted and smooth.
- Assemble the Batty Brownie Bites: Dip the edge of each cookie piece into the melted chocolate and press two of them into the sides of each brownie square to create wings. Hold in place for a few seconds to confirm they stick.
- Add the Eyes: Dab a small amount of melted chocolate onto the back of each candy eye and place two on each brownie to complete the bat face. Allow the chocolate to set completely before serving.
Extra Tips:
For an extra touch, consider adding a sprinkle of powdered sugar or edible glitter for a spooky effect. If you’re making these with kids, let them get creative with the decorations—adding fangs or different colored eyes can make each bat unique.
Make sure to allow the brownies to cool completely before cutting them to prevent crumbling. Additionally, if you’re short on time, you can use pre-made brownie bites from the store and simply add the decorations for a quick and easy solution.
Creepy Crawler Jello Cups
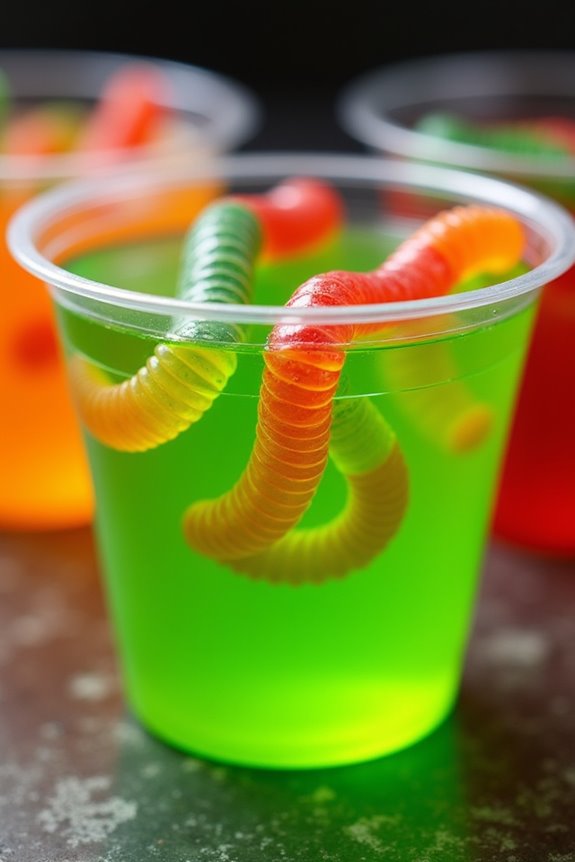
Halloween is the perfect time to let creativity run wild in the kitchen, and these Creepy Crawler Jello Cups are a fantastic way to add a touch of spooky fun to your Halloween potluck. The creepy crawlers nestled in vibrant jello make for a delightfully eerie presentation that kids will love. Not only do these jello cups look great, but they’re also easy to make and require just a few simple ingredients.
Whether you’re hosting a party or attending one, these jello cups are sure to be a hit with the little ones. This recipe is designed to serve 4-6 people, making it ideal for a small group of trick-or-treaters. The key to success with this dish is to plan ahead, as it requires some chilling time to set the jello properly.
By incorporating gummy worms into the jello, you’ll create a creepy crawler effect that’s both visually and texturally exciting. Follow the instructions carefully to guarantee that your jello sets perfectly and your gummy worms remain suspended within the jello layers, creating a chilling effect that will delight all who dare to try it.
Ingredients:
- 2 packages (3 oz each) of lime or orange flavored gelatin
- 4 cups boiling water
- 2 cups cold water
- 1 package (10 oz) gummy worms
- 6 clear plastic cups (8 oz each)
Instructions:
- Prepare the Gelatin: In a large mixing bowl, dissolve the 2 packages of flavored gelatin in 4 cups of boiling water. Stir continuously until the gelatin powder is completely dissolved.
- Add Cold Water: Once the gelatin is fully dissolved, add 2 cups of cold water to the mixture. Stir well to combine.
- Pour into Cups: Carefully pour the gelatin mixture into the 6 clear plastic cups, filling each about halfway. This will allow space for the gummy worms and additional gelatin.
- Chill Partially: Place the cups in the refrigerator and chill them for about 1 hour, or until the gelatin begins to set but is still slightly sticky.
- Add Gummy Worms: Remove the cups from the refrigerator and gently push 3-4 gummy worms into each cup, positioning them so they hang over the edges of the cups or appear to be crawling out.
- Fill with Remaining Gelatin: Pour the remaining gelatin mixture over the gummy worms in each cup, filling them to the top.
- Final Chill: Return the cups to the refrigerator and chill for another 2-3 hours, or until the gelatin is completely set.
- Serve: Once set, serve the Creepy Crawler Jello Cups chilled. Enjoy the expressions of delight and surprise as kids discover the gummy worms within!
Extra Tips:
For an extra spooky effect, consider using a combination of different colored gummy worms to create a more vibrant look. You can also use a toothpick to adjust the position of the gummy worms within the gelatin, ensuring they remain visible and don’t sink to the bottom.
If you’re short on time, you can speed up the chilling process by placing the cups in the freezer for a short period, but be careful not to let the gelatin freeze. Finally, using clear plastic cups allows the colors and creepy crawlers to be visible from all angles, enhancing the Halloween theme!
Vampire Veggie Tray
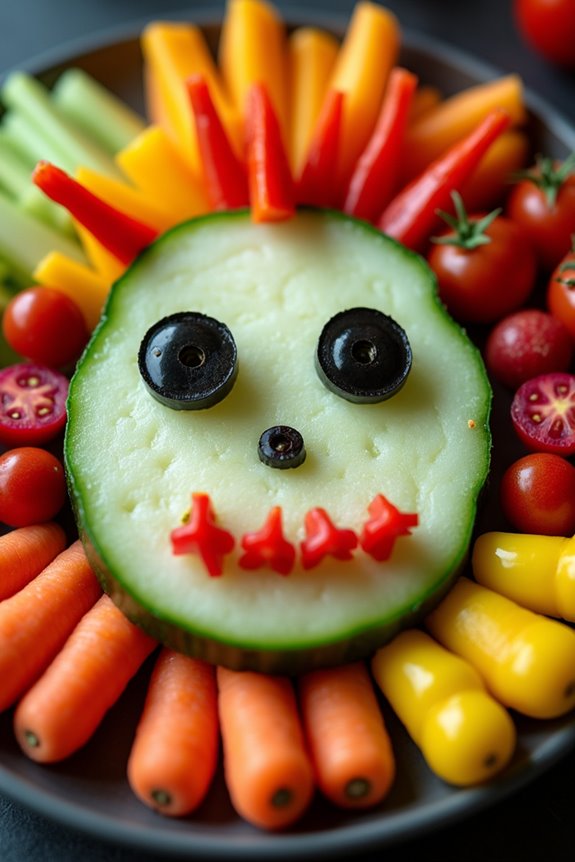
Creating a Vampire Veggie Tray is a fun and healthy way to celebrate Halloween with kids. This festive dish not only adds a spooky touch to your holiday potluck but also encourages children to eat their vegetables. The idea is to arrange a variety of colorful veggies in a creative design that resembles a vampire’s face, complete with fangs and blood-red eyes. The presentation is key, as it captivates the imagination and draws kids closer with its eerie allure.
This recipe is perfect for serving 4-6 people and is a great way to get creative in the kitchen. You can tailor the selection of vegetables to suit your taste preferences or dietary needs, but the goal is to play with colors and shapes to achieve the desired vampire-like appearance. The setup is simple and requires no cooking, making it an ideal activity for children to participate in. Let’s explore the ingredients and steps needed to bring this spooky snack to life.
Ingredients for Vampire Veggie Tray (serves 4-6):
- 1 large cucumber
- 1 red bell pepper
- 1 yellow bell pepper
- 1 small bunch of celery
- 1 pint cherry tomatoes
- 1 small bunch of red radishes
- 1 cup baby carrots
- 1 small jicama
- 1/2 cup black olives
- 1 cup hummus or ranch dressing (for dipping)
Instructions:
- Prepare the Vegetables: Wash all vegetables thoroughly. Peel the cucumber and jicama, then slice them into thin rounds. Cut the cherry tomatoes in half. Slice the red and yellow bell peppers into strips, and chop the celery into sticks. Trim the radishes and cut them into halves.
- Create the Vampire Face: On a large platter, start by arranging the cucumber rounds in an oval shape to form the outline of the vampire’s face. Use the jicama slices to fill in the face, creating a pale complexion.
- Add Eyes and Mouth: Place two cherry tomato halves for the eyes. Use the black olives to create the pupils by placing them in the center of the tomato halves. For the mouth, arrange red bell pepper strips to form a wide, eerie grin.
- Form the Vampire Hair: Use the yellow bell pepper strips to create spiky hair above the face. You can also add a few slices of radish for variation.
- Create the Fangs: Slice the remaining cucumber into thin, long strips to form sharp vampire fangs. Position these under the red bell pepper mouth.
- Arrange the Background: Use the celery sticks, remaining cherry tomatoes, baby carrots, and radish halves to decorate around the vampire face, creating a spooky vegetable garden.
- Serve with Dip: Place a small bowl of hummus or ranch dressing at the side of the platter for dipping. You can also use the dip to accentuate features on the vampire face if desired.
Extra Tips:
When making the Vampire Veggie Tray, feel free to experiment with different vegetables for more vibrant colors and textures. You can substitute any veggies based on availability or personal preference.
To save time, prepare all veggies beforehand and store them in the refrigerator until you’re ready to assemble the dish. Engaging the kids in the process can be a fun family activity and a great opportunity to teach them about healthy eating.
Jack-o’-Lantern Stuffed Peppers
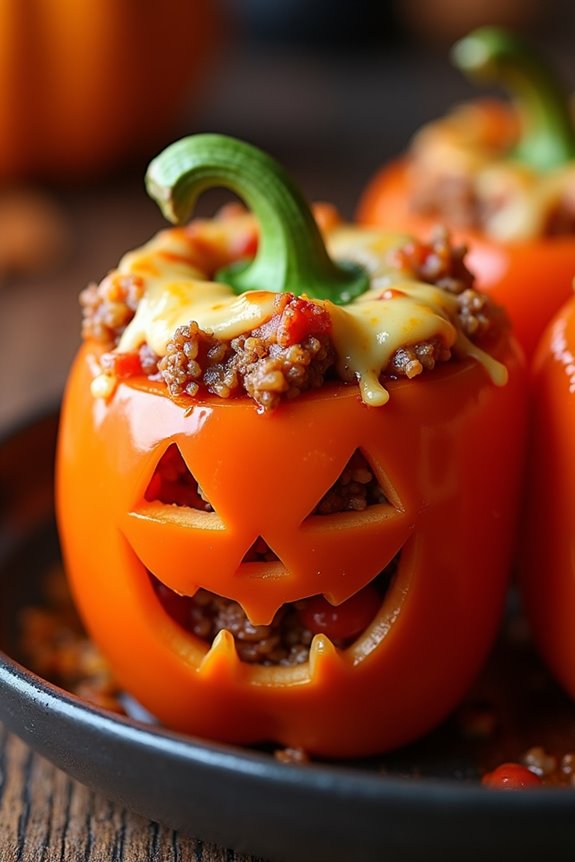
Transforming ordinary bell peppers into festive Jack-o’-Lanterns is a fun and creative way to serve a healthy and delicious meal this Halloween. These Jack-o’-Lantern Stuffed Peppers aren’t only a treat for the eyes but also pack a punch of flavors with their savory stuffing. Perfect for a Halloween potluck, this dish will delight kids and adults alike with its playful presentation and satisfying taste.
The beauty of this dish lies in its versatility; you can customize the stuffing according to your taste preferences or dietary needs. Whether you opt for a classic ground beef filling, a vegetarian quinoa mixture, or even a spicy Mexican-inspired stuffing, these peppers can be tailored to suit your Halloween party theme.
Plus, they’re nutritious and easy to make, ensuring you have more time to enjoy the spooky festivities with your guests.
Ingredients (Serving Size: 4-6 people):
- 6 medium orange bell peppers
- 1 pound ground beef (or substitute with ground turkey or tofu for a vegetarian option)
- 1 cup cooked rice
- 1 can (14.5 oz) diced tomatoes, drained
- 1 cup shredded cheese (cheddar or mozzarella)
- 1 small onion, diced
- 2 cloves garlic, minced
- 1 teaspoon Italian seasoning
- Salt and pepper to taste
- 2 tablespoons olive oil
- 1 tablespoon Worcestershire sauce (optional)
Cooking Instructions:
- Prepare the Peppers: Preheat your oven to 375°F (190°C). Cut the tops off the bell peppers and remove the seeds and membranes. With a small sharp knife, carve out Jack-o’-Lantern faces on one side of each pepper. Lightly brush the outsides with olive oil and place them in a baking dish.
- Cook the Filling: In a large skillet over medium heat, add the remaining olive oil and sauté the onions and garlic until softened. Add the ground beef and cook until browned. Drain any excess fat, then stir in the diced tomatoes, cooked rice, Worcestershire sauce (if using), Italian seasoning, salt, and pepper. Cook for an additional 5 minutes, allowing the flavors to meld.
- Stuff the Peppers: Spoon the beef and rice mixture into each prepared bell pepper, packing it in tightly. Sprinkle shredded cheese over the top of each filled pepper.
- Bake: Cover the baking dish with aluminum foil and bake in the preheated oven for 30 minutes. Remove the foil and bake for an additional 15 minutes, or until the peppers are tender and the cheese is bubbly and golden.
- Serve: Allow the peppers to cool slightly before serving. Arrange them on a platter for a festive Halloween display.
Extra Tips:
When choosing bell peppers, look for ones that can stand upright on their own for the best presentation. If your peppers are tipping over, you can trim the bottom slightly to create a flat base.
To save time, prepare the stuffing the day before and store it in the refrigerator; simply stuff the peppers and bake them on the day of the event. For an extra spooky touch, place a small battery-operated tealight inside each pepper before serving, but be sure to remove them before eating. Enjoy your Halloween feast!
Haunted Pretzel Rods
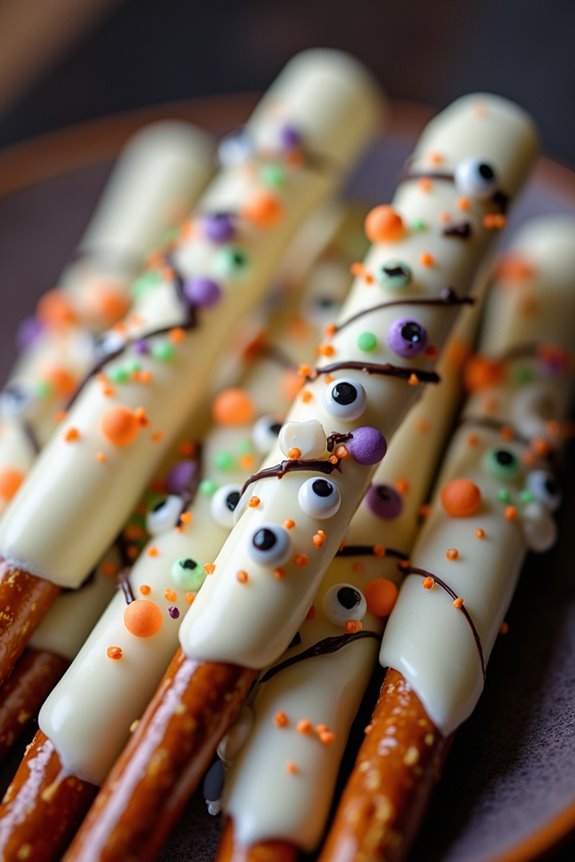
Halloween is a time of spooky fun, and what better way to celebrate than with some deliciously eerie treats? Haunted Pretzel Rods are the perfect addition to any Halloween potluck, especially for kids. These crunchy, chocolate-dipped snacks aren’t only easy to make but also customizable, allowing you to get creative with scary decorations.
Whether you’re hosting a party or just want to surprise your family with a festive treat, these Haunted Pretzel Rods will surely be a hit. The magic of Haunted Pretzel Rods lies in their simplicity and the opportunity for creativity. The base of this treat is a pretzel rod, which is then coated in luscious melted chocolate and decorated with spooky toppings.
Kids will love helping out in the kitchen, choosing their favorite decorations to bring their haunted visions to life. With a serving size of 4-6 people, you’ll have enough to share, making these a perfect option for any Halloween gathering.
Ingredients (for 4-6 people):
- 12 pretzel rods
- 2 cups white chocolate chips or candy melts
- 1 tablespoon coconut oil
- Assorted Halloween-themed sprinkles
- Edible eyes
- Food coloring (optional, for different colors)
- Wax paper
Cooking Instructions:
- Prepare the Workspace: Line a baking sheet with wax paper. This will be where you place your pretzel rods to dry after dipping them in chocolate.
- Melt the Chocolate: In a microwave-safe bowl, combine the white chocolate chips and coconut oil. Microwave in 30-second increments, stirring in between, until fully melted and smooth. If you wish to add color, divide the melted chocolate into separate bowls and add a few drops of food coloring to each, stirring well to combine.
- Dip the Pretzel Rods: Hold a pretzel rod by one end and dip it into the melted chocolate, covering about two-thirds of the rod. Gently tap the rod on the edge of the bowl to remove excess chocolate.
- Decorate: Place the dipped pretzel rod onto the prepared baking sheet. Immediately sprinkle with Halloween-themed sprinkles and add edible eyes to create spooky faces or monsters. You can also use a toothpick to draw designs or add more details with different colored chocolate.
- Set the Chocolate: Allow the decorated pretzel rods to sit at room temperature or place them in the refrigerator for about 10-15 minutes until the chocolate is set and firm.
- Serve and Enjoy: Once the chocolate is fully set, arrange the Haunted Pretzel Rods on a platter and serve them at your Halloween potluck or party.
Extra Tips:
When making Haunted Pretzel Rods, feel free to experiment with different types of chocolate, such as milk or dark chocolate, for a variety of flavors. You can also try using different types of sprinkles or candy pieces to create unique designs.
If you want to add an extra layer of flavor, consider drizzling some caramel over the chocolate before adding decorations. Make sure to have fun with the process and encourage kids to get involved, as their creativity can lead to some truly spooky and delightful treats!
Skeleton Cheese Platter
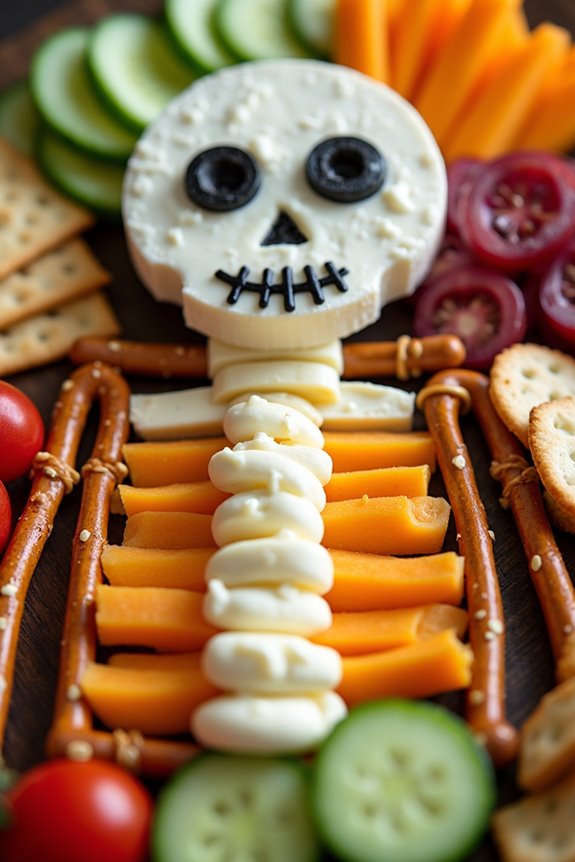
A Skeleton Cheese Platter is a fun and creative way to delight kids at a Halloween potluck. This platter is designed to resemble a skeleton, using a variety of cheeses, crackers, and vegetables to form the bones, skull, and other features. Not only is it visually appealing, but it also offers a healthy and tasty snack option for children. The combination of different textures and flavors makes it a hit among kids, while the spooky presentation keeps it festive for the holiday.
Creating a Skeleton Cheese Platter is both simple and enjoyable, making it a perfect project to involve children in the preparation process. This dish caters to a serving size of 4-6 people, allowing each child to have their own portion of the scare. Be sure to include a variety of cheeses and vegetables to accommodate different tastes and dietary preferences. The key is to have fun with the arrangement and bring the skeleton to life on the platter.
Ingredients for 4-6 people:
- 8 oz cheddar cheese, sliced
- 8 oz mozzarella cheese, sliced
- 1 small round brie cheese
- 1 cup cherry tomatoes, halved
- 1 cucumber, sliced into rounds
- 1 pack of pretzel sticks
- 1 pack of assorted crackers
- 1 black olive, sliced
Instructions:
- Prepare the Base: Begin by laying out a large serving platter or a cutting board as the base for your skeleton. Verify it’s cleaned and dried thoroughly.
- Create the Head: Place the round brie cheese at the top of the platter to form the skeleton’s skull. Use slices of black olive to create eyes and a mouth on the brie.
- Form the Spine and Ribs: Arrange the mozzarella slices in a vertical line below the skull to represent the spine. On either side, lay out the cheddar slices to mimic ribs, slightly overlapping them for a bony effect.
- Assemble the Arms and Legs: Use pretzel sticks to form the arms and legs of the skeleton. Position them to extend from the ribs, with additional pretzel sticks for the hands and feet.
- Add the Pelvis and Hips: Use cucumber slices to construct the pelvis area, placing them below the ribs. Layer them in a semicircle for a natural look.
- Decorate with Vegetables: Scatter the cherry tomato halves around the skeleton to add color and mimic joints or other decorative elements.
- Complete with Crackers: Place assorted crackers around the skeleton for easy grabbing and additional texture to the platter.
Extra Tips:
To guarantee the Skeleton Cheese Platter remains fresh and appealing, assemble it just before serving. If you need to prepare it in advance, cover it tightly with plastic wrap and refrigerate it until ready to serve.
For added fun, consider using a small cup or dish filled with a dip, such as hummus or ranch, to serve as the skeleton’s “brain” or “guts.” This encourages dipping and adds another layer of flavor to the platter.
Finally, remember that the design doesn’t have to be perfect; the goal is to have fun and enjoy the creativity of the dish.