

Hey there, lovely readers! 🎃
If you’re on the hunt for some adorable yet spooky Halloween Rice Krispie Treats that will leave everyone at your party in awe, you’re in the right place.
From ghostly ghouls to charming witch’s hats, these treats aren’t just about taste—they’re about making memories.
With a pinch of creativity and a sprinkle of fun, you’ll create not just desserts but delightful experiences.
Gather your loved ones and get ready to transform your kitchen into a magical Halloween wonderland!
Ghostly Ghouls
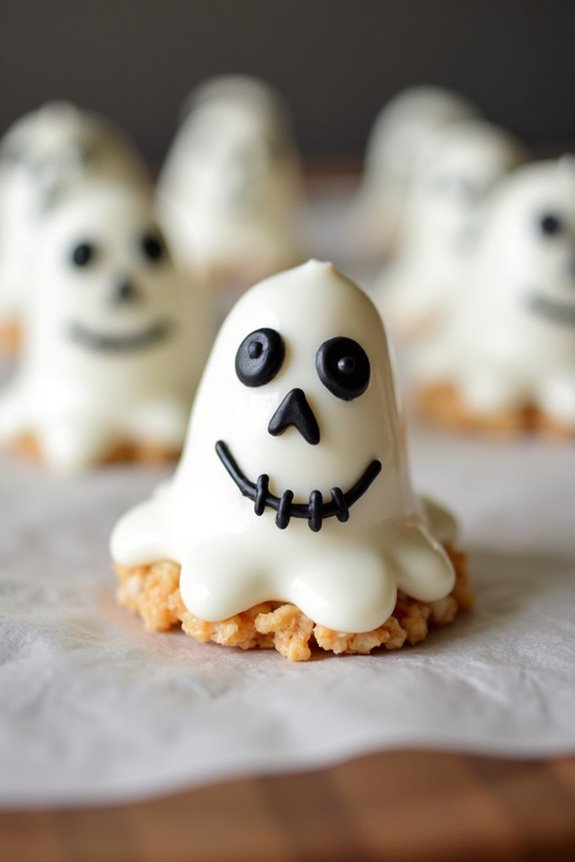
Ghostly Ghouls Halloween Rice Krispie Treats are a delightful and spooky addition to any Halloween celebration. These treats combine the classic, gooey texture of Rice Krispie treats with a festive, ghostly twist that will thrill both kids and adults alike.
Shaped into ghostly figures and adorned with eerie icing faces, they make for a fun and creative activity in the kitchen, while also serving as a delicious snack. Perfect for parties or just a cozy night in with some scary movies, these treats are sure to be a hit during the Halloween season.
The process is simple and enjoyable, making it a great opportunity to involve the whole family in the kitchen. Using just a few basic ingredients and some creativity, you can transform ordinary Rice Krispie treats into spooky specters that are as much fun to look at as they’re to eat.
Whether you’re a seasoned pro in the kitchen or a complete novice, you’ll find that these Ghostly Ghouls are easy to make and even easier to enjoy. Let’s plunge into the recipe and see how you can bring these chilling treats to life.
Ingredients for 4-6 servings:
- 6 cups Rice Krispies cereal
- 4 cups mini marshmallows
- 3 tablespoons unsalted butter
- 1/2 teaspoon vanilla extract
- White candy melts (or white chocolate chips)
- Black decorating gel or melted chocolate for faces
Cooking Instructions:
- Prepare the Pan: Start by lining a 9×13-inch baking dish with parchment paper or lightly grease it with butter to prevent sticking. Set this aside for later.
- Melt the Butter and Marshmallows: In a large saucepan, melt the butter over low heat. Once melted, add the mini marshmallows and stir continuously until they’re completely melted and smooth. Remove the saucepan from the heat and stir in the vanilla extract.
- Combine with Cereal: Add the Rice Krispies cereal to the marshmallow mixture. Stir quickly and thoroughly until the cereal is completely coated with the marshmallow mixture.
- Shape the Ghosts: Once mixed, transfer the cereal mixture into the prepared baking dish. Using buttered hands or a spatula, gently press the mixture into an even layer. Allow it to cool slightly, then use a ghost-shaped cookie cutter to cut out ghost shapes.
- Coat with Candy Melts: Melt the white candy melts or white chocolate chips according to the package instructions. Dip each ghost cut-out into the melted candy, ensuring they’re completely coated. Place the coated ghosts on a parchment-lined tray to set.
- Decorate with Faces: Once the candy coating has set, use black decorating gel or melted chocolate to draw spooky faces on each ghost. Allow the decorations to set before serving.
Extra Tips:
For added fun, you can use different colors of candy melts to give your ghosts a unique look or add sprinkles before the candy coating sets for extra texture.
If you don’t have a ghost-shaped cookie cutter, you can use a knife to carefully carve out ghost shapes. It’s best to work quickly when shaping the treats, as the mixture can harden as it cools.
Store any leftovers in an airtight container to keep them fresh and chewy. Enjoy your ghostly creations with family and friends!
Eerie Eyeballs
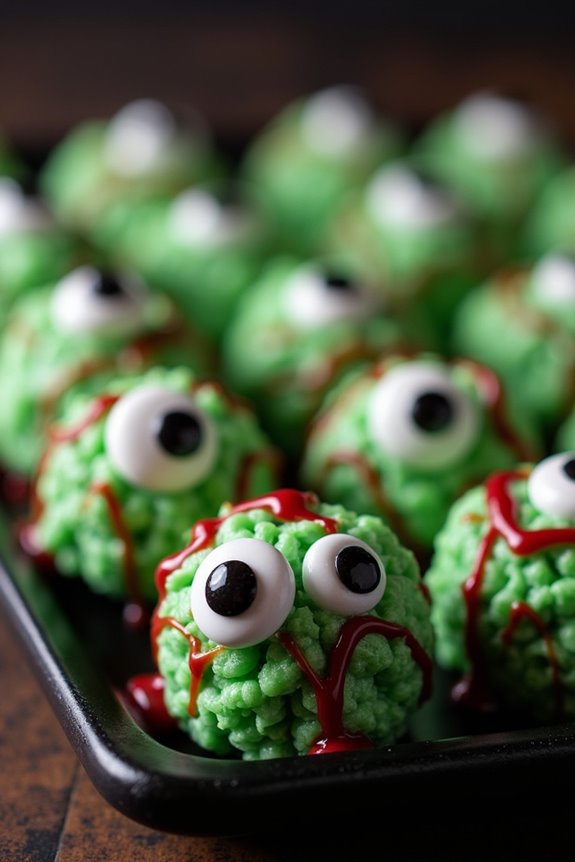
Halloween is the perfect time to get creative in the kitchen, and these Eerie Eyeballs are a fun and spooky twist on the classic Rice Krispie Treats. Perfect for parties or a festive snack, these treats are as delicious as they’re creepy. The gooey marshmallow base combined with the crunch of Rice Krispies creates a delightful texture, while the eerie edible eyes add a touch of Halloween magic.
This recipe is simple enough for kids to help with, making it an excellent family activity. The recipe yields enough creepy eyeballs to serve 4-6 people, making it ideal for a small gathering or family night. The key to making these treats extra special lies in the details – using food coloring to achieve the perfect ghoulish hue and adding edible decorations to create the spooky eyeball effect. With just a few ingredients and a little imagination, you’ll have a batch of Eerie Eyeballs that are certain to be a hit this Halloween.
Ingredients (serving size: 4-6 people):
- 3 tablespoons unsalted butter
- 1 package (10 oz) mini marshmallows
- 6 cups Rice Krispies cereal
- Green food coloring
- Red gel icing or decorating gel
- 1 package candy eyeballs
Cooking Instructions:
- Prepare the Base: In a large saucepan, melt the unsalted butter over low heat until fully melted. Add the mini marshmallows and stir continuously until they’re completely melted and smooth. Be sure to keep the heat low to prevent the marshmallows from burning.
- Color the Mixture: Once the marshmallows are melted, add a few drops of green food coloring to the mixture. Stir until the color is evenly distributed throughout the marshmallow mixture, adding more food coloring if needed to achieve the desired eerie green hue.
- Combine with Cereal: Remove the saucepan from the heat and gradually add the Rice Krispies cereal. Mix well until all the cereal is coated with the green marshmallow mixture. Confirm the cereal is thoroughly mixed to avoid any uncoated patches.
- Shape the Eyeballs: Allow the mixture to cool slightly, so it’s easier to handle. Lightly grease your hands with butter or cooking spray, then take small portions of the mixture and roll them into balls about the size of a golf ball. Place each ball on a sheet of wax paper or a greased tray.
- Decorate the Eyeballs: Using the red gel icing, draw blood vessels on each marshmallow ball to mimic the look of bloodshot eyes. Gently press a candy eyeball into the center of each Rice Krispie ball to complete the spooky look.
- Set and Serve: Allow the Eerie Eyeballs to cool and set completely, which should take about 20 minutes. Once set, they’re ready to be served as a creepy Halloween treat!
Extra Tips:
To make the shaping process easier, be sure to work quickly while the marshmallow mixture is still warm and pliable. If the mixture begins to harden, reheat it slightly in the microwave to soften.
For an extra creepy twist, experiment with different food coloring combinations to make a variety of eye colors. You can also use different sizes of candy eyeballs to create a more varied and realistic effect. Store any leftover Eerie Eyeballs in an airtight container to keep them fresh and chewy.
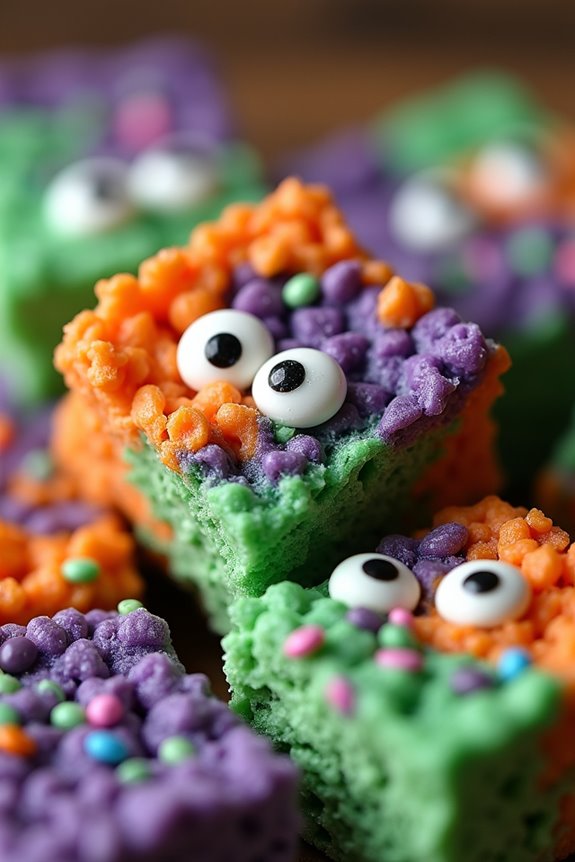
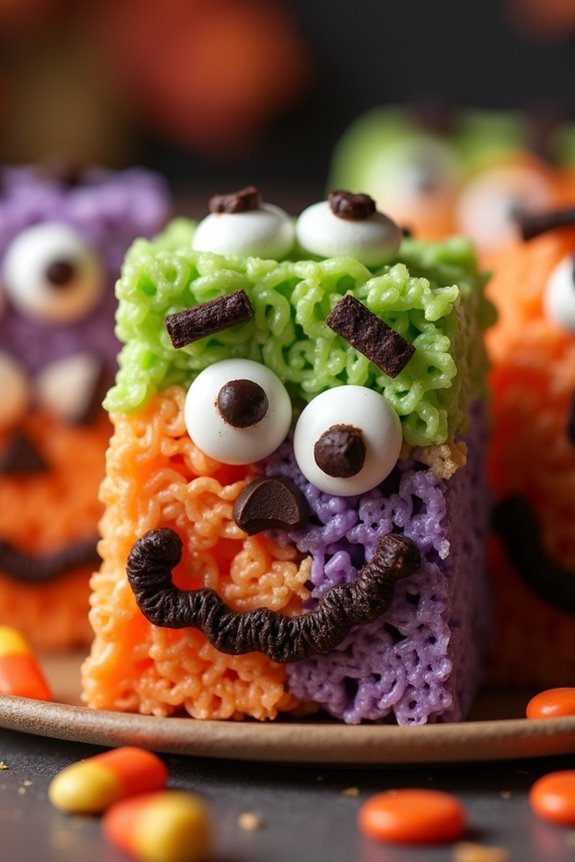
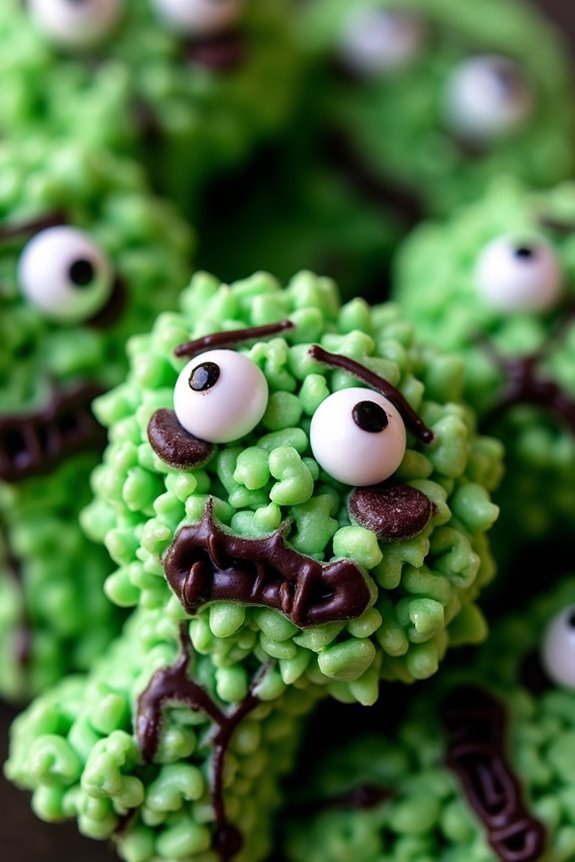
Monster Mash
Halloween is the perfect time to get creative in the kitchen, and what better way to celebrate than with a fun and spooky treat like Monster Mash Halloween Rice Krispie Treats?
These colorful and delicious treats are a spin on the classic Rice Krispie Treats, adding a festive touch with candy eyes and vibrant colors. Perfect for parties or a fun family activity, these treats are certain to be a hit with both kids and adults.
The Monster Mash Halloween Rice Krispie Treats are easy to make and require only a few ingredients, most of which you may already have in your pantry. The recipe is designed to serve 4-6 people, making it ideal for small gatherings or as a fun snack to share with friends and family.
Whether you’re a seasoned baker or a novice in the kitchen, this recipe is simple and enjoyable to put together, allowing you to focus on creativity and fun.
Ingredients (serving size: 4-6 people):
- 6 cups Rice Krispies cereal
- 4 cups mini marshmallows
- 3 tablespoons butter
- Green, purple, and orange food coloring
- Candy eyes
- Various Halloween-themed sprinkles
Cooking Instructions:
- Prepare the Ingredients: Gather all your ingredients and set them out on the counter. Have your baking dish ready by lining it with parchment paper to prevent sticking.
- Melt the Butter and Marshmallows: In a large saucepan over medium heat, melt the butter. Once the butter is melted, add the mini marshmallows and stir continuously until they’re completely melted and smooth.
- Add Food Coloring: Divide the melted marshmallow mixture into three different bowls. Add a few drops of green, purple, and orange food coloring to each bowl and stir until you achieve your desired color.
- Mix with Rice Krispies: Divide the Rice Krispies cereal evenly into the three separate bowls, one for each color. Stir each mixture until the cereal is thoroughly coated with the colored marshmallow mixture.
- Combine and Shape: Layer the colored Rice Krispies mixtures into the prepared baking dish, pressing down gently with a spatula to create an even surface. You can layer them in any order you like or even swirl them together for a marbled effect.
- Decorate: While the treats are still slightly warm, press candy eyes and Halloween-themed sprinkles into the top layer. This guarantees they stick properly.
- Cool and Cut: Allow the treats to cool completely at room temperature. Once set, lift them out of the baking dish using the parchment paper and cut into squares or fun monster shapes.
Extra Tips:
For a more intense color, feel free to add more drops of food coloring as needed.
Be sure to press the Rice Krispies mixture firmly into the pan to confirm the layers stick together well. If you find the mixture sticking to your spatula, lightly coat it with cooking spray.
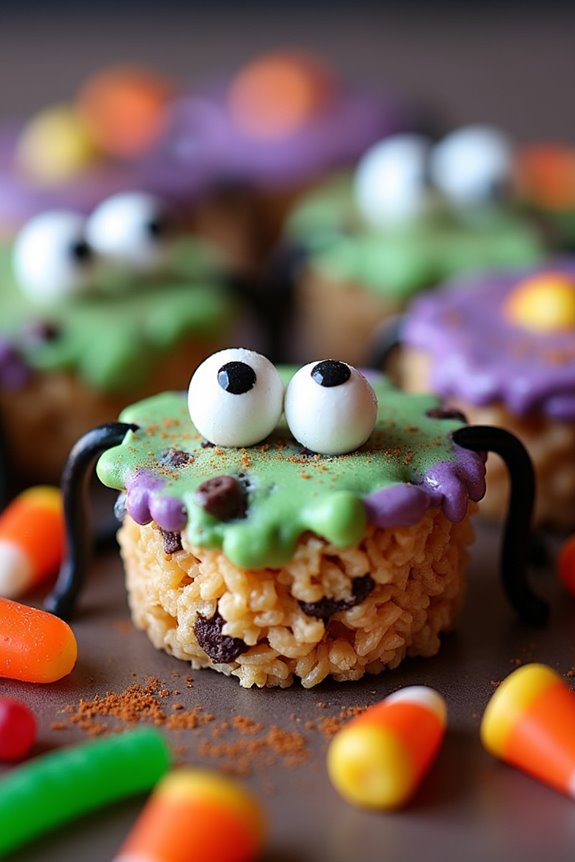
Creepy Crawlers
Halloween is the perfect time to get creative in the kitchen, and what better way to celebrate the spooky season than with some Creepy Crawlers Rice Krispie Treats?
These festive and fun treats aren’t only delicious but also a great interactive activity for the whole family. Perfectly crunchy and gooey, these Creepy Crawlers will bring a delightful scare to your Halloween party spread, making them a hit with both kids and adults alike.
With a few simple ingredients and a dash of imagination, you can easily whip up these treats and add a touch of Halloween magic to your dessert table.
Our Creepy Crawlers Rice Krispie Treats combine the classic taste of Rice Krispies with a Halloween twist. By using food coloring and candies, you can create spooky critters that look as good as they taste.
The recipe is straightforward and doesn’t require any baking, making it an ideal choice for a quick and easy Halloween treat. Whether you’re hosting a party or simply want to enjoy a themed snack with your family, these Creepy Crawlers are sure to impress.
Let’s plunge into the ingredients and steps needed to make these delightful treats for 4-6 people.
Ingredients:
- 6 cups Rice Krispies cereal
- 4 cups mini marshmallows
- 3 tablespoons unsalted butter
- Green and purple food coloring
- 1 cup chocolate chips
- Candy eyes
- Licorice strings
- Assorted Halloween candies (gummy worms, candy corn)
Instructions:
- Prepare the Mixture: In a large saucepan, melt the unsalted butter over low heat. Once melted, add the mini marshmallows and stir continuously until they’re completely melted and smooth.
- Add Colors: Divide the melted marshmallow mixture into two separate bowls. Add a few drops of green food coloring to one bowl and purple food coloring to the other. Stir each until the color is evenly distributed.
- Mix with Cereal: Pour 3 cups of Rice Krispies cereal into each bowl of colored marshmallow mixture. Stir until the cereal is fully coated with the colored mixture.
- Shape the Creepy Crawlers: On wax paper, shape the colored Rice Krispies mixture into small logs or mounds resembling worms or other creepy crawlers.
- Decorate: While the shapes are still slightly warm and sticky, press candy eyes into the treats. Use licorice strings to create legs or antennae. Press chocolate chips and assorted Halloween candies onto the shapes for additional decoration.
- Cool and Set: Allow the Creepy Crawlers to cool completely at room temperature until they’re firm and set. This should take about 30 minutes.
Extra Tips:
For an extra spooky effect, consider using glow-in-the-dark candies or edible glitter to give your Creepy Crawlers an eerie sparkle.
If you want to add an extra layer of flavor, you can include a teaspoon of vanilla extract into the melted marshmallow mixture.
Remember, the key to successful shaping is to work quickly while the mixture is still warm and pliable. If the mixture starts to harden, you can warm it slightly in the microwave for a few seconds to make it easier to handle.
Finally, have fun with it! Encourage kids to get involved in the decoration process for a fun family activity.
Witch’s Cauldron
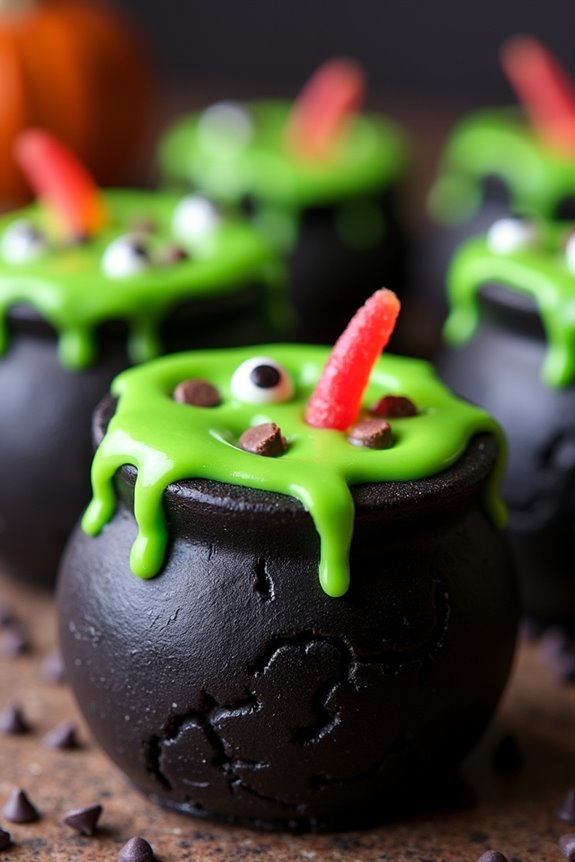
Witch’s Cauldron Halloween Rice Krispie Treats are a creepy and delightful twist on the classic marshmallow treat, perfect for spooking up your Halloween festivities. These treats are shaped like bubbling cauldrons filled with ghoulishly green goo, making them a hit among kids and adults alike.
Using simple ingredients, you can create a colorful and festive dessert that adds a whimsical touch to your Halloween spread. The combination of crispy rice cereal, marshmallows, and vibrant colors guarantees that these treats aren’t only visually appealing but also deliciously sweet and satisfying.
Creating these Witch’s Cauldron treats involves a few creative steps, but the process is easy and fun. The cauldrons are shaped by hand and filled with a gooey green mixture to mimic a witch’s brew. You can also add candy eyeballs or gummy worms to enhance the spooky effect.
Whether you’re hosting a Halloween party or just looking for a fun project to do with the family, these treats are sure to be a memorable addition to your celebration. They serve 4-6 people, making them perfect for small gatherings or as part of a larger dessert table.
Ingredients for 4-6 servings:
- 6 cups Rice Krispies cereal
- 4 cups mini marshmallows
- 3 tablespoons unsalted butter
- Green food coloring
- Black food coloring
- 1/2 cup mini chocolate chips
- 1/2 cup green candy melts
- Candy eyeballs (optional)
- Gummy worms (optional)
Instructions:
- Melt the Butter and Marshmallows: In a large saucepan, melt 3 tablespoons of unsalted butter over low heat. Add 4 cups of mini marshmallows and stir continuously until completely melted and smooth.
- Add Food Coloring: Divide the melted marshmallow mixture into two separate bowls. Add black food coloring to one and green food coloring to the other, stirring each until the desired colors are achieved.
- Mix with Rice Krispies: In a large mixing bowl, add 3 cups of Rice Krispies cereal to each colored marshmallow mixture, stirring gently until the cereal is evenly coated.
- Shape the Cauldrons: For each cauldron, take a handful of the black Rice Krispies mixture and shape it into a small ball. Use your thumb to press into the center, creating a hollow area for the “brew.”
- Create the Brew: Melt 1/2 cup of green candy melts according to package instructions. Pour a small amount into the hollow of each cauldron, allowing it to spill over the edges slightly.
- Decorate: While the green candy melt is still soft, sprinkle mini chocolate chips over it to create a bubbling effect. Add candy eyeballs or gummy worms as desired for added spookiness.
- Set and Serve: Allow the cauldrons to set for 30 minutes at room temperature before serving. Arrange them on a platter for a spooky display.
Extra Tips:
When shaping the cauldrons, keep your hands slightly damp to prevent the sticky marshmallow mixture from adhering to your skin. If the mixture becomes too hard to shape, briefly warm it in the microwave for a few seconds to soften.
For a more pronounced bubbling effect, you can use a piping bag to drizzle additional green candy melts around the cauldron edges. Have fun experimenting with different decorations and colors to customize your Witch’s Cauldron treats!
Spooky Spiders
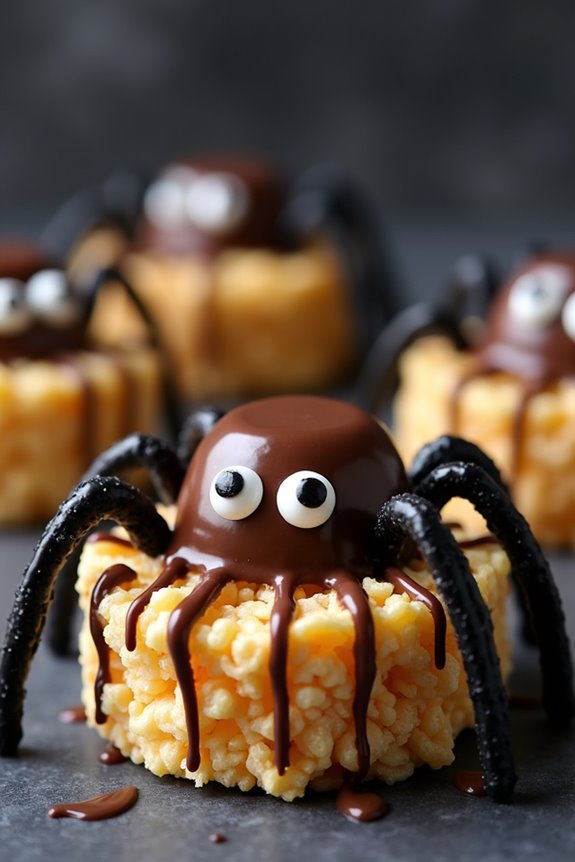
Get ready to add a touch of frightful fun to your Halloween celebrations with these delightful Spooky Spiders made from Rice Krispie Treats. Perfect for a Halloween party or a family gathering, these creepy-crawly treats aren’t only visually striking but also deliciously sweet.
With a combination of gooey marshmallows, crispy rice cereal, and a hint of chocolate, these Spooky Spiders will be a hit with kids and adults alike. The recipe is simple enough to involve the whole family, making it a fun activity to do together.
These Spooky Spiders are made by shaping the classic Rice Krispie Treats into spider bodies and decorating them with candy eyes and licorice legs. The result is a batch of adorable yet eerie treats that capture the spirit of Halloween without being too scary for little ones.
Perfect for a serving size of 4-6 people, this recipe guarantees that everyone at the party gets a spooky spider to munch on. So gather your ingredients, roll up your sleeves, and let’s create some edible arachnids that are sure to be the talk of your Halloween festivities!
Ingredients:
- 3 tablespoons unsalted butter
- 4 cups mini marshmallows
- 6 cups Rice Krispies cereal
- 1/2 cup chocolate chips, melted
- Candy eyes (approximately 24)
- Black string licorice (for legs)
- Cooking spray or butter (for hands)
Instructions:
- Prepare the Base: Begin by melting the butter in a large saucepan over low heat. Once the butter is fully melted, add the mini marshmallows to the pan. Stir continuously until the marshmallows are completely melted and the mixture is smooth.
- Mix in the Cereal: Remove the saucepan from heat and immediately add the Rice Krispies cereal to the melted marshmallows. Stir well until all the cereal is evenly coated with the marshmallow mixture. Allow the mixture to cool slightly until it’s comfortable to handle.
- Shape the Spiders: Lightly coat your hands with cooking spray or butter to prevent sticking. Take a handful of the mixture and shape it into a ball to form the body of the spider. Place the formed spider bodies on a baking sheet lined with parchment paper.
- Add Legs and Eyes: Cut the black string licorice into short pieces to serve as spider legs. Press four licorice pieces into each side of the spider body to create eight legs. Dab a small amount of melted chocolate onto each candy eye and attach them to the front of the spider body.
- Finish with Chocolate: Drizzle the remaining melted chocolate over the spider bodies to create a web-like effect. Allow the spiders to set and cool completely before serving.
Extra Tips:
When making Spooky Spiders, it’s important to work quickly with the marshmallow mixture, as it can set up rapidly and become difficult to shape. If the mixture starts to harden before you’re done shaping all the spiders, you can warm it slightly in the microwave for a few seconds to make it pliable again.
Additionally, for a more vibrant look, consider using colored candy melts or edible glitter to decorate your spiders. This will add an extra pop of Halloween spirit to your creations. Enjoy crafting these spooky treats, and have a terrifyingly tasty Halloween!
Mummy Madness
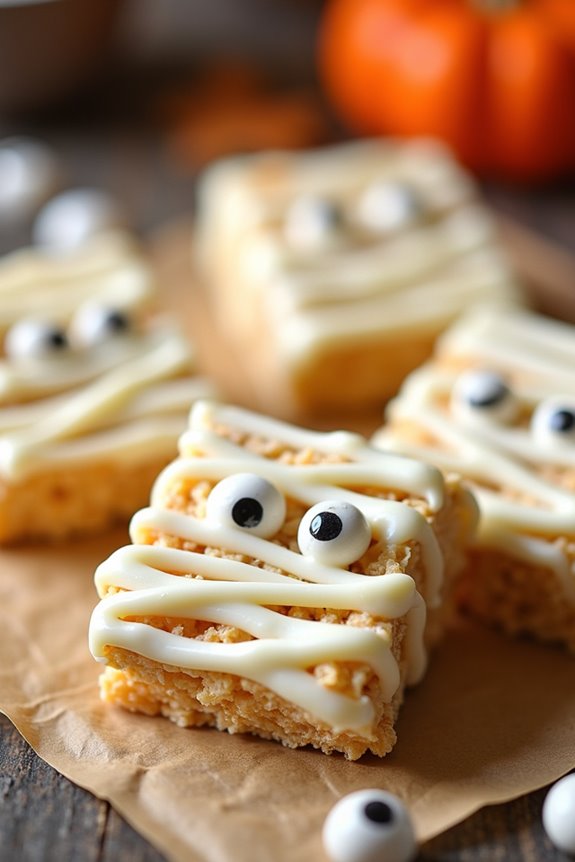
Halloween is the perfect time for fun and spooky treats, and these Mummy Madness Rice Krispie Treats are sure to delight both kids and adults alike. With their cute, mummy-like appearance, these treats add a touch of whimsy to any Halloween gathering.
Combining the classic flavors of buttery marshmallow and crispy rice cereal, these treats are as delicious as they’re fun to make. They’re a great activity to do with kids, and they can be customized with various decorations to suit your Halloween theme.
Not only are these treats easy to make, but they also require minimal ingredients and time, making them a convenient option for busy parents or eleventh-hour party planners. The process involves creating the basic Rice Krispie Treats, then transforming them into spooky mummies using white chocolate and candy eyes.
The result is a batch of delightful and festive sweets that are sure to be a hit at your Halloween celebration.
Ingredients (Serves 4-6)
- 6 cups Rice Krispies cereal
- 3 tablespoons unsalted butter
- 1 package (10 oz) mini marshmallows
- 1 teaspoon vanilla extract
- 1 cup white chocolate chips
- Candy eyeballs
Cooking Instructions
- Prepare the Base: In a large saucepan, melt the butter over low heat. Once the butter is melted, add the mini marshmallows and stir continuously until they’re completely melted and smooth. Remove the saucepan from the heat and stir in the vanilla extract.
- Mix with Cereal: Add the Rice Krispies cereal to the marshmallow mixture. Gently fold the cereal into the mixture until it’s evenly coated and well combined.
- Shape the Treats: Pour the mixture into a greased 9×13 inch pan. Use a greased spatula or wax paper to press the mixture evenly into the pan. Allow the treats to cool and set for about 30 minutes.
- Cut into Mummies: Once cooled, cut the Rice Krispie treats into rectangles to form the shape of mummies, approximately 3×2 inches for each piece.
- Melt the Chocolate: In a microwave-safe bowl, melt the white chocolate chips in 30-second intervals, stirring in between until smooth. Be careful not to overheat the chocolate.
- Decorate as Mummies: Using a spoon or piping bag, drizzle the melted white chocolate over each treat in a back-and-forth motion to create the appearance of mummy bandages. Place two candy eyeballs on each treat while the chocolate is still soft, so they adhere properly.
- Set and Serve: Allow the chocolate to set at room temperature or in the refrigerator until firm. Serve these mummy delicacies on a festive platter and enjoy the spooky fun!
Extra Tips
For a mess-free experience, coat your hands or spatula lightly with cooking spray when pressing the Rice Krispies mixture into the pan.
If you don’t have a piping bag for the white chocolate, you can use a small zip-top plastic bag by snipping a corner to create a makeshift piping bag.
Make sure your treats are completely cooled before cutting and decorating to confirm they hold their shape well.
Finally, feel free to get creative with your mummies by adding different colored candies or edible glitter for a unique touch.
Pumpkins Galore
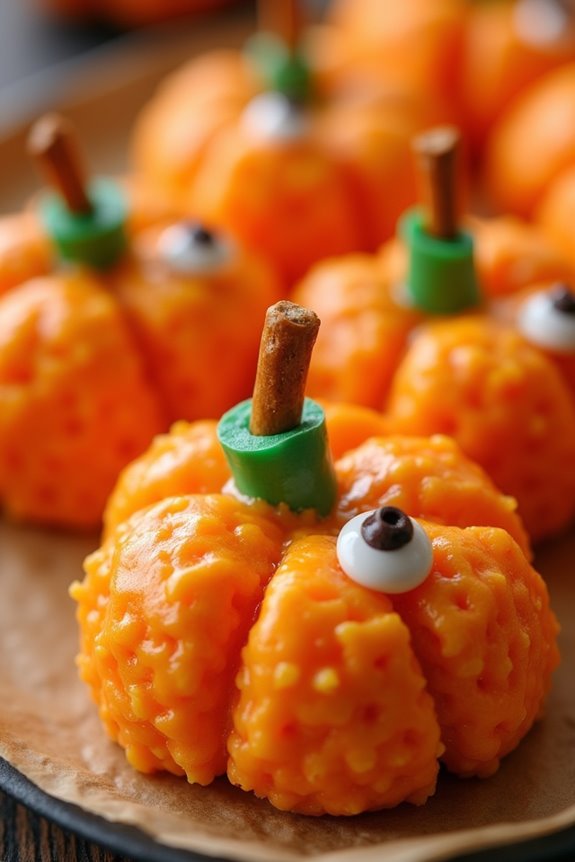
Get ready to delight your family and friends with these festive and delicious Halloween Rice Krispie Treats, featuring the adorable “Pumpkins Galore.” These tasty treats are perfect for any Halloween gathering or party, offering a fun and whimsical twist on the classic rice krispie treat.
Shaped like mini pumpkins, these treats aren’t only eye-catching but also incredibly easy to make, requiring minimal ingredients and time. Whether you’re a seasoned baker or a novice in the kitchen, you’ll find this recipe simple and enjoyable to follow.
These Halloween Rice Krispie Treats are designed to serve 4-6 people, making them perfect for a small get-together or as a special treat for your family. The pumpkin shapes are achieved using marshmallows, food coloring, and a little bit of creativity.
The result is a delightful combination of chewy rice krispie goodness with a festive pumpkin appearance that will have everyone coming back for more. Get your ingredients ready and let’s plunge into the spooky fun of creating these delightful Pumpkin Rice Krispie Treats.
Ingredients:
- 3 tablespoons unsalted butter
- 1 package (10 oz) mini marshmallows
- 6 cups Rice Krispies cereal
- Red and yellow food coloring
- Mini chocolate chips or candy eyes (for decoration)
- Pretzel sticks (for pumpkin stems)
- Green fruit roll-ups or green icing (for leaves)
Instructions:
- Prepare Your Workspace: Begin by setting up your workspace. Line a large baking sheet with parchment paper to prevent sticking and make cleanup easier.
- Melt the Butter: In a large saucepan, melt the unsalted butter over low heat. Stir the butter continuously to prevent it from burning.
- Add Marshmallows: Once the butter is melted, add the mini marshmallows to the saucepan. Stir constantly until the marshmallows are completely melted and smooth.
- Color the Mixture: To achieve the pumpkin color, add a few drops of red and yellow food coloring to the melted marshmallow mixture. Stir until you reach the desired shade of orange.
- Combine with Cereal: Remove the saucepan from heat and add the Rice Krispies cereal to the mixture. Stir quickly and thoroughly until the cereal is evenly coated with the marshmallow mixture.
- Shape into Pumpkins: Allow the mixture to cool slightly so it’s easier to handle. Grease your hands with a little butter or cooking spray and form the mixture into small, round pumpkin shapes. Place them on the prepared baking sheet.
- Add Stems and Leaves: Insert a pretzel stick into the top of each pumpkin to create a stem. Use green fruit roll-ups or green icing to fashion small leaves and attach them near the stem.
- Decorate: Add mini chocolate chips or candy eyes to the pumpkins for added detail and personality. Press them gently to make sure they stick.
- Set and Serve: Allow the pumpkin treats to set at room temperature for at least 30 minutes before serving. This will help them hold their shape.
Extra Tips:
When making these Halloween Rice Krispie Treats, work quickly when shaping the pumpkins as the marshmallow mixture can harden as it cools, making it more difficult to mold.
If needed, you can reheat the mixture slightly to make it more malleable. Be sure to grease your hands well to prevent sticking, and encourage kids to join in the fun of shaping and decorating the pumpkins.
For an extra spooky touch, you can use different colors of candy or icing to create jack-o’-lantern faces on the pumpkins. Enjoy the process and have a frightfully fun Halloween!
Frightful Faces
Get ready to delight and spook your guests with these Halloween Rice Krispie Treats: Frightful Faces. These deliciously gooey and crunchy treats aren’t only fun to make but also make for a fantastic party snack that both kids and adults will love.
Transform ordinary Rice Krispie treats into a Halloween sensation by adding some creative flair to their appearance. Whether you’re hosting a Halloween party or simply want to add some festive spirit to your snack lineup, these frightful faces will definitely do the trick (or treat!).
The best part about these Halloween Rice Krispie Treats is their versatility. You can customize the decorations to reflect your favorite Halloween characters or let your imagination run wild. Use various candies, food coloring, and even edible markers to give each treat its own unique personality.
With minimal ingredients and simple steps, you’ll have a blast creating these spooky snacks. Perfect for a serving size of 4-6 people, this recipe guarantees there’s plenty of fun and flavor to go around.
Ingredients:
- 6 cups Rice Krispies cereal
- 1 package (10 oz) mini marshmallows
- 3 tablespoons butter
- Assorted food coloring (orange, green, purple, etc.)
- Chocolate chips or candy melts
- Assorted candies (for decorating faces)
- Edible black marker
- Cooking spray or butter for greasing
Instructions:
- Prepare the Pan: Lightly grease a 9×13 inch baking dish with cooking spray or butter to prevent sticking.
- Melt the Marshmallows: In a large saucepan, melt the butter over low heat. Once melted, add the mini marshmallows and stir continuously until completely melted and smooth.
- Color the Mixture: Divide the melted marshmallow mixture into separate bowls, one for each color you plan to use. Add a few drops of food coloring to each bowl and stir until the desired color is achieved.
- Mix with Cereal: In a large mixing bowl, add the Rice Krispies cereal. Pour the colored marshmallow mixture over the cereal and gently fold until all pieces are evenly coated.
- Shape the Treats: Quickly transfer the mixture into the prepared baking dish, pressing down with a greased spatula to guarantee an even layer. Let it cool slightly before cutting.
- Cut and Shape: Once the mixture has set, cut it into squares or use cookie cutters to make different shapes.
- Decorate the Faces: Melt the chocolate chips or candy melts in the microwave or over a double boiler until smooth. Use this as glue to attach various candies to create eyes, mouths, and other facial features on each treat. Use the edible black marker to add details like eyebrows or scars.
- Set the Decorations: Allow the decorations to set by leaving the treats at room temperature or placing them in the fridge briefly.
Extra Tips:
When crafting your Frightful Faces, feel free to get creative with your candy choices. Gummy worms, candy corn, and licorice strings can add extra flair to your designs.
If you’re using candy melts for decoration, be sure to work quickly, as they can harden fast. To make the process more enjoyable, involve friends or family members and turn it into a fun group activity.
Batty Bites
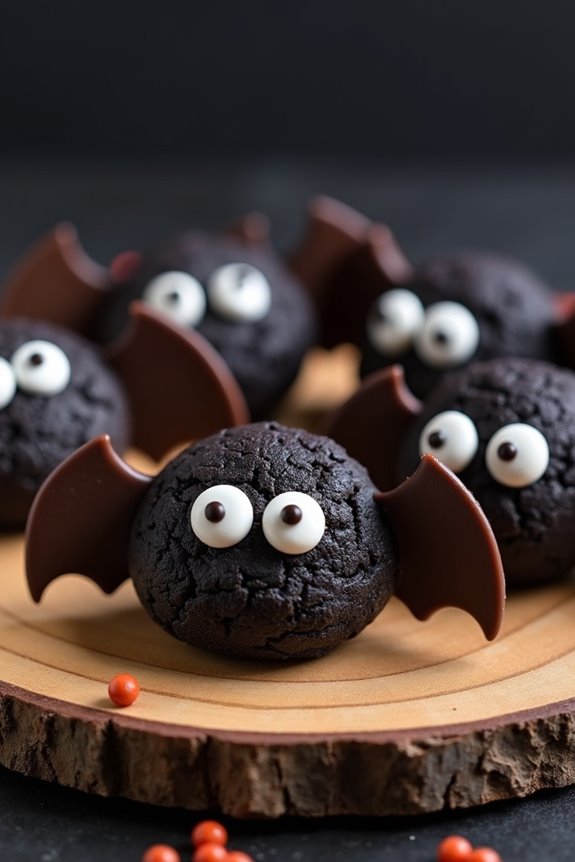
Halloween is a time for fun, creativity, and, of course, delicious treats. One spooky and delightful option that will surely be a hit at any gathering is Batty Bites. These Halloween Rice Krispie Treats aren’t only simple to make but also satisfyingly sweet with a touch of whimsical charm. Shaped like bats, they add an eerie yet adorable touch to your Halloween spread.
Whether you’re hosting a party or just looking for a festive project with the kids, Batty Bites are a perfect choice. The beauty of these treats lies in their simplicity and the nostalgia they evoke. The classic taste of Rice Krispie Treats is combined with the playful shapes of Halloween bats, making them both a delightful snack and a conversation starter.
These treats are made with just a few basic ingredients, most of which you might already have in your pantry. With some creativity and a little bit of patience, you can whip up a batch of these delightful Batty Bites to share with friends and family, offering a perfect blend of crunch and sweetness that everyone will love.
Ingredients (Serves 4-6):
- 6 cups Rice Krispies cereal
- 1 package (10 oz) mini marshmallows
- 3 tablespoons unsalted butter
- Black food coloring
- 1/2 cup chocolate chips, melted
- Candy eyes
Cooking Instructions:
- Prepare the Mixture: In a large saucepan, melt the butter over low heat. Once melted, add the mini marshmallows and stir continuously until they’re fully melted and smooth. Add a few drops of black food coloring to the mixture, stirring until you achieve the desired shade of black for your bats.
- Combine with Cereal: Remove the saucepan from heat and quickly add the Rice Krispies cereal. Stir the mixture until the cereal is evenly coated with the marshmallow mix. Make sure to work quickly as the mixture can harden fast.
- Shape the Bats: Once the mixture is cool enough to handle but still pliable, scoop out portions and shape them into bat forms. You can use a bat-shaped cookie cutter for precision or mold them by hand for a more rustic look. Place them on a lined baking sheet.
- Decorate: Melt the chocolate chips in a microwave-safe bowl, in 30-second intervals, stirring in between until smooth. Use the melted chocolate to add bat details such as wings and ears. Attach candy eyes to each bat using a dab of melted chocolate to secure them.
- Set and Serve: Allow the Batty Bites to set completely at room temperature or speed up the process by placing them in the refrigerator for about 15 minutes. Once set, they’re ready to serve and enjoy.
Extra Tips:
When making Batty Bites, it’s important to work quickly once the marshmallow mixture is ready, as it begins to set as it cools. If you’re using a cookie cutter, coat it with a little bit of non-stick spray to prevent sticking.
For a more vibrant color, you can add more food coloring, but be cautious not to overpower the flavor. If you find the treats are hardening too quickly, simply warm the mixture slightly to make it more pliable again.
Finally, get creative with decorations—try using different colors of candy or sprinkles to give each bat its own personality!
Hauntingly Sweet Skulls
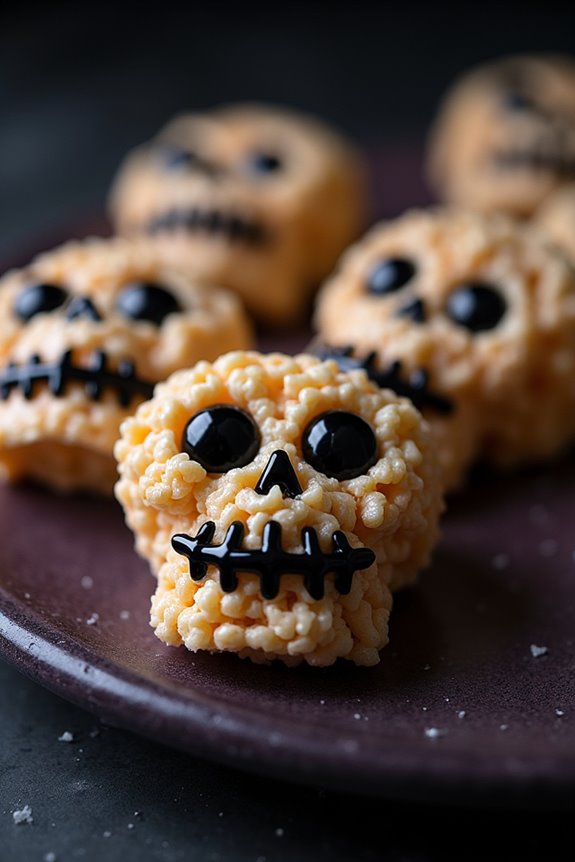
These Halloween Rice Krispie Treats are perfect for spooky festivities, capturing the essence of the occasion with hauntingly sweet skull shapes. Combining the classic crunch of Rice Krispies with a gooey marshmallow mixture, these treats become eerily delightful when molded into skull shapes. Perfect for parties, these treats are sure to be a hit among both children and adults, embracing the spirit of Halloween with every bite.
Creating these Hauntingly Sweet Skulls is as fun as it’s simple, making them an ideal activity for the whole family. With just a few ingredients and a bit of creativity, you can transform ordinary Rice Krispie treats into a spooky, delicious treat that’s as playful as it’s tasty. This recipe yields enough for 4-6 people, guaranteeing that everyone at your gathering will get a chance to indulge in some Halloween magic.
Ingredients (Serving Size: 4-6 People):
- 4 cups of Rice Krispies cereal
- 10 oz (about 40) regular-sized marshmallows
- 3 tablespoons unsalted butter
- 1 teaspoon vanilla extract
- Skull-shaped silicone mold
- Black decorating gel or icing for detailing
Cooking Instructions:
- Prepare the Mold: Lightly grease the skull-shaped silicone mold with non-stick spray or butter to guarantee easy removal of the treats later.
- Melt the Butter and Marshmallows: In a large saucepan over medium heat, melt the butter. Add the marshmallows and stir continuously until completely melted and smooth. Remove the saucepan from heat.
- Add Vanilla Extract: Stir in the vanilla extract to the melted marshmallow mixture, ensuring it’s well incorporated.
- Mix in Rice Krispies: Gradually add the Rice Krispies cereal to the marshmallow mixture, stirring well until all the cereal is evenly coated.
- Shape the Skulls: Quickly spoon the Rice Krispie mixture into the prepared skull-shaped mold. Use a spatula or buttered hands to press the mixture firmly into each mold to guarantee it takes on the skull shape.
- Cool and Set: Allow the treats to cool and set for about 30 minutes. You can speed up this process by placing the mold in the refrigerator.
- Decorate the Skulls: Once set, gently remove each skull from the mold. Use black decorating gel or icing to add spooky details like eyes and mouths to each skull.
Extra Tips:
When making these Hauntingly Sweet Skulls, be sure to work quickly when transferring the marshmallow-coated Rice Krispies into the molds, as the mixture sets fairly fast. If you find the mixture sticking to your hands, lightly butter your fingers to make handling easier.
Additionally, feel free to get creative with the decorations—use colored gels or sprinkles to add extra flair to your spooky treats. Enjoy them fresh, as they’re best consumed within a day or two of preparation to maintain their delightful crunch.
Wicked Witches’ Hats
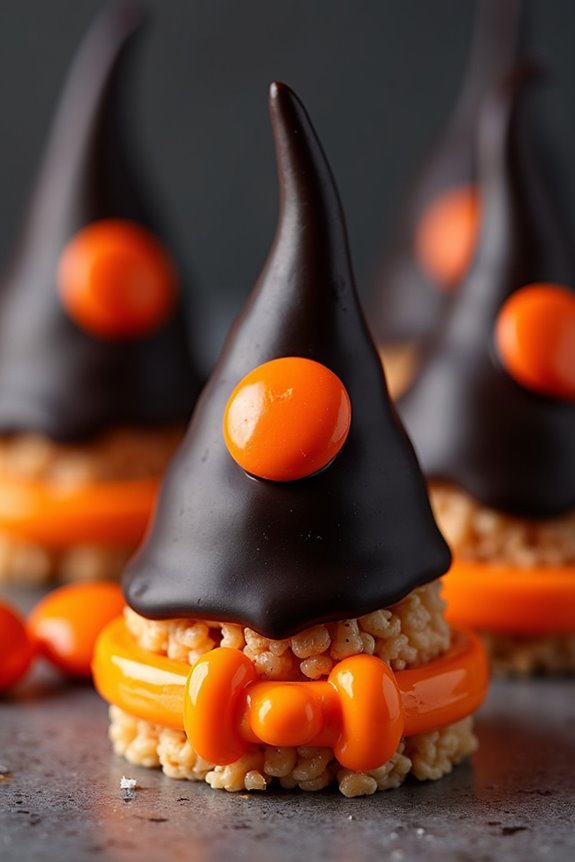
Halloween is a time for creativity and fun, not just in costumes but also in the treats we share. Wicked Witches’ Hats are an enchanting twist on traditional Rice Krispie Treats, perfect for adding a spooky touch to your Halloween spread.
These delightful desserts combine the classic crunch of Rice Krispie Treats with a hint of chocolate, creating a sweet and whimsical treat that resembles the iconic hat of a wicked witch.
Whether you’re hosting a Halloween party or looking for a fun cooking activity with the kids, these Wicked Witches’ Hats are sure to be a hit. They aren’t only easy to make but also allow for some creative decoration, letting you personalize each hat with your own flair.
Let’s plunge into the ingredients and steps needed to whip up a batch for 4-6 people.
Ingredients:
- 6 cups Rice Krispie cereal
- 4 tablespoons unsalted butter
- 1 package (10 oz) marshmallows
- 1/2 cup semi-sweet chocolate chips
- 1 teaspoon vanilla extract
- Black food coloring
- 12 chocolate sugar cones
- 1 cup black icing
- 1/2 cup orange candy melts
- 12 orange M&M’s or candy-coated chocolates
Instructions:
1. Prepare the Rice Krispie Mixture:
In a large saucepan, melt the butter over low heat. Add the marshmallows and stir until completely melted. Remove from heat and stir in the vanilla extract and black food coloring until the mixture is fully colored.
2. Combine with Cereal:
Gradually add the Rice Krispie cereal to the marshmallow mixture, stirring until well coated.
3. Form the Hats’ Bases:
Scoop the mixture onto a lined baking sheet, forming 12 small discs approximately 3 inches in diameter. These will serve as the base of the witches’ hats.
4. Melt the Chocolate:
In a microwave-safe bowl, melt the chocolate chips in 30-second intervals, stirring in between until completely melted.
5. Attach the Cones:
Dip the open edge of each chocolate sugar cone into the melted chocolate, then place it onto the center of each Rice Krispie disc. This forms the pointed part of the hat.
6. Decorate the Hats:
Use black icing to cover the base and the cone, guaranteeing a seamless look. Melt the orange candy melts according to package instructions, and use them to pipe a band around the base of the cone. Attach one orange M&M to each band as a buckle.
7. Set and Serve:
Allow the hats to set at room temperature until the chocolate and icing are firm. Serve as a festive centerpiece or delicious treat.
Extra Tips:
When making Wicked Witches’ Hats, verify the marshmallow mixture is warm but not hot when adding the food coloring to achieve an even color distribution.
If you find the mixture too sticky to handle, lightly grease your hands with butter or cooking spray. For more creative decoration, consider using edible glitter or different colored icing to customize your witches’ hats.
Enjoy crafting these spooky treats, and don’t forget to have fun with the decorating process!
Zombie Zone
Halloween is a time for spooky fun and delicious treats, and what better way to embrace the spirit of the season than with Zombie Zone Rice Krispie Treats? These ghoulishly delightful snacks are perfect for parties or just a fun kitchen activity with family and friends.
With a combination of gooey marshmallows, crispy rice cereal, and some creative decorations, these treats will definitely be the highlight of your Halloween festivities. The Zombie Zone Rice Krispie Treats are easy to make and require minimal ingredients, making them an ideal dessert for busy hosts or anyone looking to add a touch of Halloween flair to their menu.
The treats are shaped into creepy zombie hands, complete with candy eyes and green-tinted marshmallows for an eerie effect. The balance of sweetness and crunch makes these treats a hit with both kids and adults alike.
Ingredients (serves 4-6 people):
- 6 cups Rice Krispies cereal
- 4 cups mini marshmallows
- 3 tablespoons unsalted butter
- Green food coloring
- Candy eyeballs
- Black decorating gel
- 1 teaspoon vanilla extract
Cooking Instructions:
- Prepare Your Workspace: Begin by lining a baking sheet with parchment paper. This will prevent the treats from sticking and make cleanup much easier.
- Melt the Butter and Marshmallows: In a large saucepan, melt the butter over low heat. Add the mini marshmallows and stir continuously until they’re completely melted and smooth. This will form the sticky base for your treats.
- Add Food Coloring and Vanilla: Once the marshmallows are melted, remove the saucepan from heat. Stir in a few drops of green food coloring and the vanilla extract until you achieve a consistent, ghoulish green color.
- Mix in the Cereal: Gradually add the Rice Krispies cereal to the marshmallow mixture. Stir until the cereal is evenly coated with the green marshmallow mixture.
- Shape the Zombie Hands: With buttered hands, scoop portions of the mixture and shape them into hand-like forms on the prepared baking sheet. Allow your creativity to shine—zombie hands can be as gnarled and twisted as you like!
- Decorate with Candy Eyeballs: Press candy eyeballs into each hand to create a spooky effect. Use black decorating gel to add additional details like scars or stitches.
- Cool and Set: Let the Zombie Zone Rice Krispie Treats cool completely at room temperature. This will allow them to firm up and hold their shape.
Extra Tips:
When making Zombie Zone Rice Krispie Treats, keep a bowl of water nearby to lightly dampen your hands. This will prevent the marshmallow mixture from sticking to your fingers as you shape the treats.
For an extra eerie touch, consider adding a drop or two of black food coloring to create a marbled effect in the green marshmallow. Confirm the treats are stored in an airtight container if not serving immediately, as this will help maintain their freshness and crunch.
Enjoy crafting these spooky snacks and delight your guests with your creative Halloween treats!
Black Cat Crunch
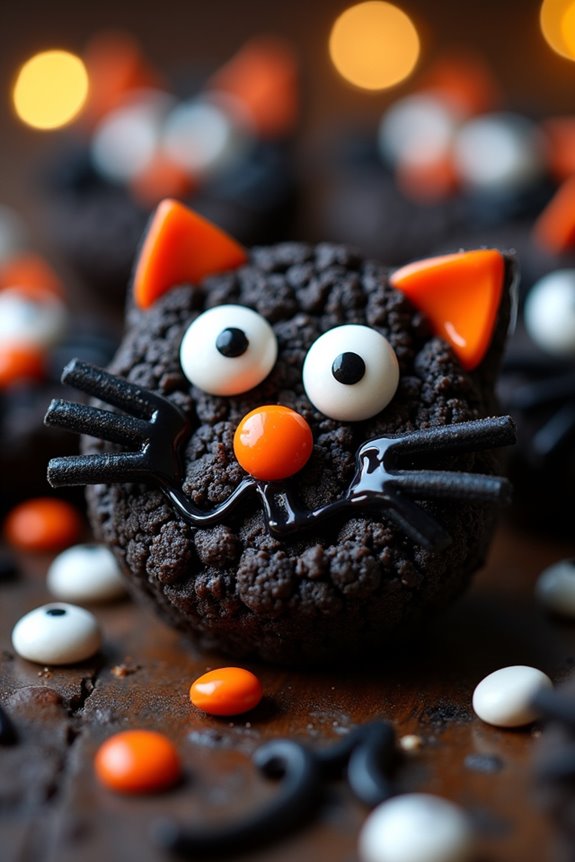
Black Cat Crunch is an adorable and spooky twist on the classic Rice Krispie Treats, perfect for a Halloween celebration. These treats aren’t only fun to make but also delicious, combining the familiar gooey, crunchy texture of traditional Rice Krispie Treats with a festive and eerie appearance.
The addition of black food coloring transforms them into a striking black hue, and carefully placed chocolate candies and licorice pieces bring the black cat design to life. Perfect for kids and adults alike, these treats are sure to be a hit at your Halloween party.
In this recipe, you’ll learn how to make Black Cat Crunch for a serving size of 4-6 people. This version uses classic ingredients with a few creative additions to make the treats both visually appealing and delicious.
Once you’ve prepared the treats, you’ll have the perfect centerpiece for your spooky holiday festivities. Follow the steps below to create these delightful and easy-to-make Halloween treats.
Ingredients:
- 4 cups Rice Krispie cereal
- 1/4 cup unsalted butter
- 4 cups mini marshmallows
- Black food coloring
- 1 teaspoon vanilla extract
- 1 cup chocolate candies (such as M&M’s)
- Black licorice (for whiskers and tails)
- Candy eyes or additional chocolate candies
Instructions:
- Prepare the Pan: Lightly grease a 9×13-inch baking pan with butter or non-stick spray. This will prevent the treats from sticking to the pan.
- Melt the Butter: In a large saucepan, melt the butter over low heat, stirring constantly to prevent it from burning.
- Add Marshmallows: Add the mini marshmallows to the melted butter and stir continuously until they’re completely melted and smooth.
- Color the Mixture: Once the marshmallows are melted, add black food coloring a few drops at a time until you achieve the desired shade of black. Stir well to guarantee even coloring.
- Add Vanilla Extract: Stir in the vanilla extract for additional flavor.
- Combine with Cereal: Remove the saucepan from heat and quickly add the Rice Krispie cereal. Stir until the cereal is completely coated with the marshmallow mixture.
- Press into Pan: Pour the mixture into the prepared 9×13-inch pan. Use a buttered spatula or wax paper to gently press and evenly distribute the mixture into the pan.
- Decorate: Before the mixture cools completely, place chocolate candies to form the cat’s eyes and nose, and use candy eyes for a more playful look if desired. Cut pieces of black licorice and position them to form whiskers and tails.
- Cool and Set: Allow the treats to cool at room temperature until they’re firm enough to cut into squares or desired shapes.
- Serve: Once set, cut the treats into squares or cat shapes and serve to your Halloween guests.
Extra Tips:
When making Black Cat Crunch, verify all decorations are added before the marshmallow mixture cools completely, as this will help them adhere better.
If you can’t find candy eyes, use small chocolate candies for a similar effect. Be cautious with the amount of black food coloring to avoid staining hands or surfaces, and consider using gel food coloring for more vibrant results.
Finally, if you find the mixture too sticky, lightly coat your hands or utensils with butter or cooking spray to make handling easier. Enjoy your spooky and delicious Black Cat Crunch treats!
Vampire Bites
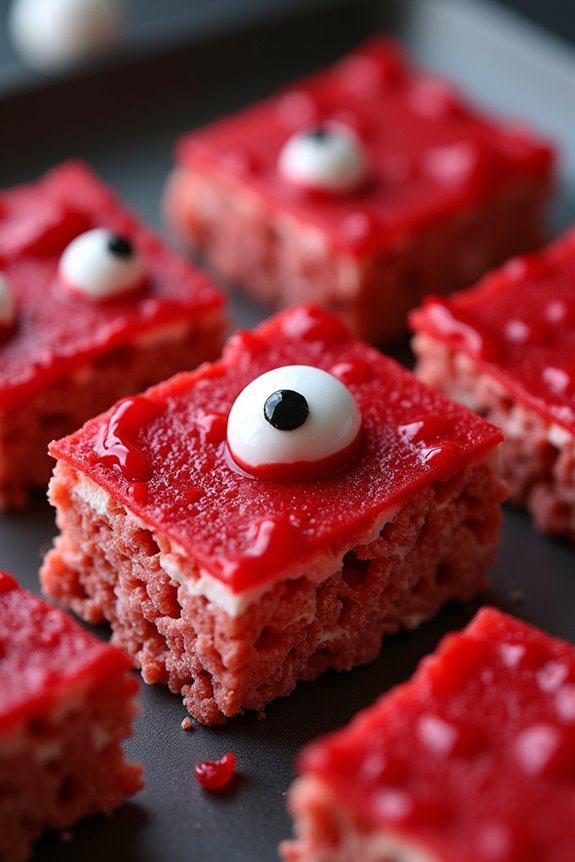
Celebrate Halloween with a spooky twist on a classic treat by making Vampire Bites! These delectable Halloween Rice Krispie Treats are perfect for parties, trick-or-treaters, or simply to satisfy your sweet tooth with a bit of frightful fun.
Vampire Bites aren’t only easy to make, but they also offer a delightful combination of crispy rice cereal, gooey marshmallows, and a touch of red food coloring for a gory, blood-like effect. With just a few ingredients and simple steps, you’ll have a festive and delicious treat that will impress both the young and the young at heart.
The Vampire Bites are sure to be a hit with their eerie appearance and irresistible taste. Whether you’re hosting a Halloween gathering or looking for a creative treat to enjoy with family and friends, these Rice Krispie treats are a must-try.
The addition of candy vampire fangs adds a playful and spooky element, making them the perfect centerpiece for any Halloween dessert table. Gather your ingredients, roll up your sleeves, and get ready to jump into this fun and festive recipe!
Ingredients (serving size: 4-6 people):
- 6 cups rice cereal
- 10 oz marshmallows
- 3 tbsp unsalted butter
- 1 tsp vanilla extract
- Red food coloring
- Candy vampire fangs
- Non-stick cooking spray
Instructions:
- Prepare Your Workspace: Start by lining a 9×13-inch baking dish with parchment paper or lightly spray it with non-stick cooking spray. This will guarantee easy removal of the treats once they’re set.
- Melt the Butter and Marshmallows: In a large saucepan, melt 3 tablespoons of unsalted butter over low heat. Once the butter is melted, add 10 ounces of marshmallows. Stir continuously until the marshmallows are completely melted and smooth.
- Add Vanilla and Food Coloring: Remove the saucepan from heat and stir in 1 teaspoon of vanilla extract. Add a few drops of red food coloring to achieve the desired blood-red hue. Mix well until the color is evenly distributed.
- Combine with Rice Cereal: Pour the marshmallow mixture over 6 cups of rice cereal in a large mixing bowl. Stir gently but thoroughly until all the cereal is evenly coated with the marshmallow mixture.
- Shape the Treats: Transfer the mixture into the prepared baking dish. Using a lightly greased spatula or your hands, press the mixture evenly into the dish, ensuring it reaches all corners.
- Add the Vampire Fangs: Before the mixture cools and sets completely, gently press candy vampire fangs into the surface of the Rice Krispie layer at regular intervals. This will create the appearance of “bite marks.”
- Cool and Serve: Allow the Vampire Bites to cool at room temperature for about 30 minutes or until they’re firm. Once set, lift the treats out of the pan using the parchment paper and cut them into squares or rectangles around the candy fangs.
Extra Tips:
For an extra spooky effect, consider using black or dark purple food coloring instead of red for a different take on Vampire Bites.
If you prefer a less sweet version, reduce the amount of marshmallows slightly. To prevent the mixture from sticking to your hands, dampen them with a little water or butter before pressing the cereal mixture into the pan.
Feel free to get creative with additional Halloween-themed decorations, such as candy eyeballs or edible glitter, to enhance the spooky presentation. Enjoy these treats with a glass of milk, or serve them alongside other Halloween goodies for a festive spread.