

Halloween is almost here, and I can’t wait to share some spooky and fun snack ideas that your little ones will adore. Picture the joy on their faces as they put together Pretzel and Marshmallow Skeletons or get creative decorating Mummy Hot Dogs. These snacks are not just tasty treats; they’re engaging activities that spark creativity and create cherished memories. Ready to make your Halloween celebrations unforgettable? Let’s explore these delightful ideas together!
Spider Web Pizza Bites
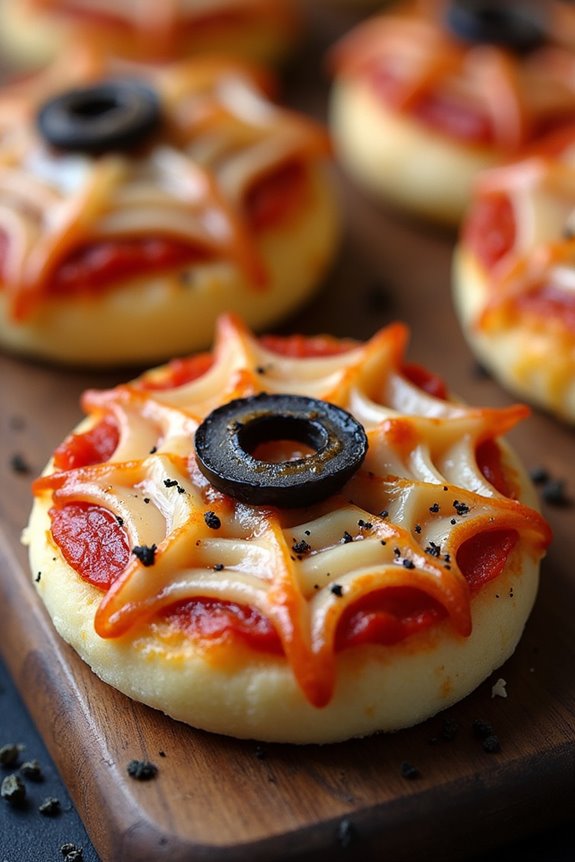
Spider Web Pizza Bites are the perfect Halloween snack for kids, combining the fun of spooky themes with the deliciousness of pizza. These bite-sized treats aren’t only easy to make but also provide a great opportunity to involve the little ones in the kitchen.
With a simple twist on traditional pizza, these Spider Web Pizza Bites will be a hit at any Halloween party or as a festive family snack. To make these, you’ll need basic pizza ingredients with a creative flair to turn them into spooky treats. The recipe involves creating mini pizzas and then adding a “web” of cheese to give them that Halloween touch. This dish serves 4-6 people, making it ideal for small gatherings or family dinners.
Ingredients:
- 1 package of refrigerated pizza dough
- 1 cup pizza sauce
- 2 cups shredded mozzarella cheese
- 1/4 cup sliced black olives
- 1 small package of pepperoni slices
- 1 tablespoon olive oil
- 1 teaspoon dried oregano
Cooking Instructions:
- Preheat the Oven: Start by preheating your oven to 425°F (220°C) to guarantee it’s hot and ready for baking the pizza bites.
- Prepare the Dough: Roll out the refrigerated pizza dough on a lightly floured surface until it’s about 1/4 inch thick. Use a round cookie cutter or glass to cut out circles from the dough approximately 3 inches in diameter.
- Arrange on Baking Sheet: Place the dough circles on a baking sheet lined with parchment paper. Brush each circle lightly with olive oil to guarantee a crisp crust.
- Add the Sauce: Spoon about a tablespoon of pizza sauce onto each dough circle, spreading it out evenly but leaving a small border around the edge.
- Create the Web: Sprinkle a generous amount of mozzarella cheese over the sauce, then use the sliced olives to create a spider web pattern on each mini pizza. Arrange the olives in circles or lines to mimic a web.
- Garnish with Pepperoni: Add a pepperoni slice at the center of each pizza bite to represent the “spider.”
- Sprinkle with Oregano: Finish with a light sprinkling of dried oregano over the top for extra flavor.
- Bake the Pizza Bites: Place the baking sheet in the preheated oven and bake for about 10-12 minutes, or until the cheese is melted and bubbly, and the edges of the dough are golden brown.
- Serve: Once baked, remove from the oven and let them cool slightly before serving. Enjoy these bites warm for the best taste experience.
Extra Tips:
For a more authentic spider appearance, use black olives to create small spiders by slicing them thinly and arranging them creatively on the pepperoni.
You can also try different cheese blends or add a sprinkle of red pepper flakes for a bit of heat. If you want to make this recipe gluten-free, simply substitute the pizza dough with a gluten-free version.
These mini pizza bites are versatile and can be customized with various toppings to suit your child’s preferences, guaranteeing a fun and delicious Halloween treat.
Monster Apple Mouths
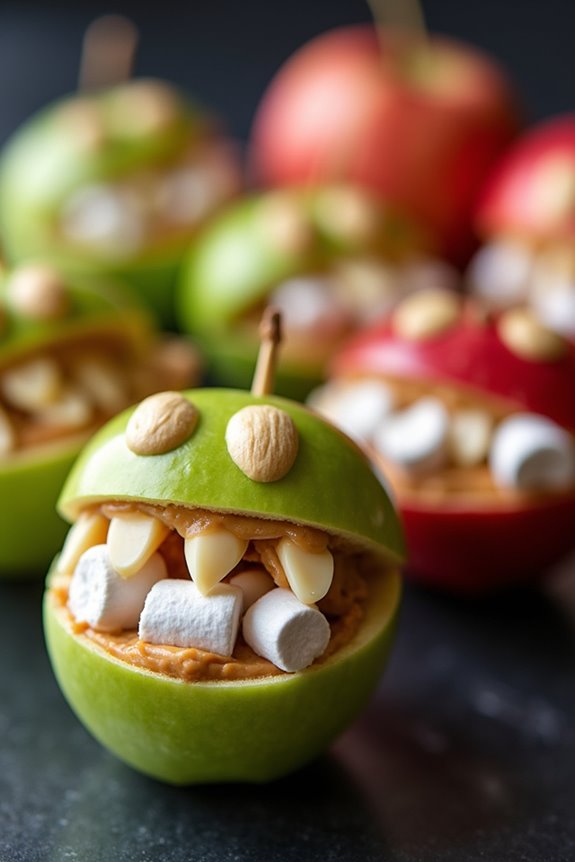
Monster Apple Mouths are a fun, healthy, and spooky snack that will delight kids during Halloween. These little treats are easy to make and serve as a creative way to encourage children to eat fruit. With apple slices, peanut butter, and a few extra ingredients, you can create a ghoulishly good snack that resembles monster mouths, complete with teeth and a wicked tongue.
They’re perfect for Halloween parties, lunchboxes, or as an after-school treat that will keep the festive spirit alive. This recipe isn’t only visually appealing but also nutritious. Apples provide a good source of fiber and vitamin C, while peanut butter adds protein and healthy fats. The use of nuts and seeds for teeth adds both texture and additional nutrients.
With only a few minutes of preparation, you can assemble these Monster Apple Mouths and bring a touch of Halloween fun to your kitchen. This recipe serves approximately 4-6 people.
Ingredients:
- 3 medium apples (Granny Smith or Red Delicious for contrast)
- 1/2 cup peanut butter (or almond butter for allergies)
- 1/4 cup mini marshmallows
- 1/4 cup slivered almonds
- 1 tablespoon lemon juice (optional for apple preservation)
- 1 tablespoon honey (optional for additional sweetness)
Instructions:
- Prepare the Apples: Wash the apples thoroughly. Slice each apple into quarters and then again into thinner wedges. You should have about 16-24 wedges in total. If desired, lightly brush the apple slices with lemon juice to prevent browning.
- Spread the Peanut Butter: Take one apple slice and spread a generous amount of peanut butter on one side. This will form the base of the monster mouth.
- Create the Monster Mouth: Place another apple slice on top of the peanut butter, positioning it at an angle to create an open mouth effect. The peanut butter will act as glue to hold the apples together.
- Add the Teeth: Insert slivered almonds or mini marshmallows between the apple slices, sticking them into the peanut butter to resemble jagged teeth. You can mix and match different sized marshmallows and almonds for variety in your monster’s grin.
- Final Touches: If you prefer a sweeter taste, drizzle a small amount of honey over the teeth for a shiny effect. Arrange the Monster Apple Mouths on a platter for serving.
Extra Tips:
To make Monster Apple Mouths even more exciting, consider using different nut butters like cashew or sunflower seed butter if there are allergy concerns. For a chocolatey twist, try adding a few mini chocolate chips for eyes.
If you’re serving these at a party, prepare them just before serving to keep the apples fresh and crisp. Storing them in an airtight container in the refrigerator will also help maintain their freshness. Remember to get creative and have fun with the designs – after all, Halloween is all about spooky fun!
Pretzel and Marshmallow Skeletons
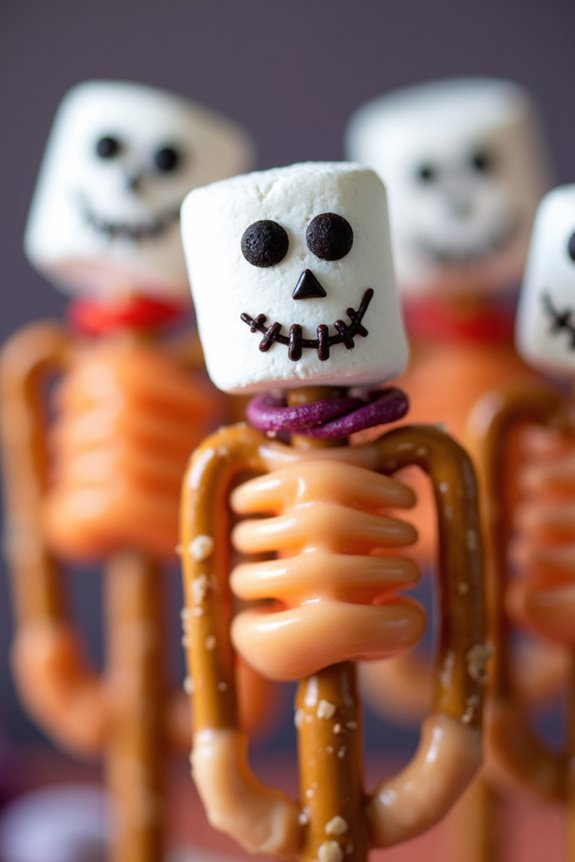
Halloween is a time for fun, creativity, and delightful treats that both kids and adults can enjoy. One of the most entertaining snacks you can make this Halloween is Pretzel and Marshmallow Skeletons. These whimsical treats aren’t only easy to assemble but also a hit with children due to their playful appearance and sweet-savory flavor combination.
Whether you’re hosting a Halloween party or just looking to enjoy a festive treat with your family, these skeletons are sure to be a spook-tacular hit!
The Pretzel and Marshmallow Skeletons are a wonderful blend of crunchy pretzels and fluffy marshmallows, held together by sweet candy melts. This no-bake recipe is straightforward, making it a perfect activity for kids to join in on the Halloween fun. Plus, the recipe allows room for creativity, as you can customize the skeletons with additional decorations like candy eyes or sprinkles.
Here’s how you can create these delicious skeletons for a serving size of 4-6 people.
Ingredients:
- 18 large marshmallows
- 24 mini marshmallows
- 24 pretzel sticks
- 12 candy eyes
- 1/2 cup white candy melts
- 12 small licorice ropes or thin candy strips
Instructions:
- Prepare the Candy Melts: Start by melting the white candy melts according to the package instructions. You can do this in a microwave-safe bowl, heating in 30-second intervals and stirring in between until fully melted and smooth.
- Build the Skeletons: Take two pretzel sticks and slide one large marshmallow onto each, positioning it at the top for the skeleton’s head. Use the melted candy melts as glue to attach two candy eyes to each head.
- Create the Body: Slide three more large marshmallows onto each pretzel stick below the head, leaving a small space between each marshmallow to resemble the skeleton’s spine.
- Form the Arms and Legs: Break the remaining pretzel sticks in half. Dip the ends into the candy melts, then attach two halves on each side of the middle marshmallow (the second from the top) for arms. Attach two more halves at the bottom marshmallow for legs.
- Add the Feet: Use the mini marshmallows as feet by dipping them into the candy melts and attaching them to the bottom of each leg.
- Decorate: If desired, use small licorice ropes or thin candy strips to create a bow tie or a scarf around the neck or the waist of your skeleton for added flair.
- Cool and Serve: Allow the assembled skeletons to set for about 10 minutes or until the candy melt hardens. Serve them on a platter and enjoy your spooky creation!
Extra Tips:
When making Pretzel and Marshmallow Skeletons, it’s helpful to have all your ingredients and supplies ready to streamline the process.
Make sure to work on a flat surface to prevent the skeletons from tipping over as they set. If you find that the candy melts harden too quickly, you can reheat them slightly to regain a smooth consistency.
Additionally, feel free to experiment by adding other edible decorations like colored sugar or edible glitter to personalize your skeletons. This recipe is all about having fun and letting your creative juices flow!
Witch Hat Cookies

Looking to add some spooky fun to your Halloween celebrations? Witch Hat Cookies are the perfect treat for kids and adults alike. These delightful confections aren’t only easy to make but also incredibly fun to assemble.
Combining the classic flavors of chocolate and vanilla, these cookies provide a whimsical twist that will have everyone reaching for more. Whether you’re hosting a Halloween party or simply indulging in some seasonal baking, Witch Hat Cookies are sure to be a hit.
The best part about these cookies is that they require minimal ingredients and effort, making them an ideal project for little hands to help with. With a few simple steps, you can transform ordinary ingredients into magical, edible witch hats.
Gather your family and friends, and enjoy a fun, creative baking session that results in a deliciously spooky treat. Here’s how to make Witch Hat Cookies for a serving size of 4-6 people:
Ingredients:
- 24 round chocolate wafer cookies
- 24 chocolate kisses
- 1/2 cup vanilla frosting
- Orange food coloring
- 1/4 cup chocolate chips (optional, for additional decoration)
Instructions:
- Prepare the Frosting: Start by taking the vanilla frosting and adding a few drops of orange food coloring. Stir until the frosting is evenly colored and vibrant. This will serve as the “glue” to attach the chocolate kisses to the cookies and create the witch hat band.
- Set Up the Cookies: Place all 24 chocolate wafer cookies on a flat surface, such as a baking sheet or a large plate. Make sure they’re evenly spaced out for easy assembly.
- Attach the Chocolate Kisses: Using a small spatula or a butter knife, spread a small amount of the orange-tinted frosting on the bottom of each chocolate kiss. Gently press each kiss onto the center of a chocolate wafer cookie, ensuring that the frosting acts as an adhesive to secure them together.
- Create the Witch Hat Band: Once all the kisses are attached, use the remaining orange frosting to create a band around the base of each chocolate kiss. You can pipe the frosting using a piping bag or simply use a small spoon to carefully apply the frosting.
- Add Extra Decorations: If desired, melt the chocolate chips in a microwave-safe bowl, stirring every 15 seconds until smooth. Use a toothpick to draw additional designs or patterns on the witch hat, such as stars or dots.
- Let the Cookies Set: Allow the cookies to sit at room temperature for about 30 minutes to an hour, so the frosting can set and the hats become stable. Once set, your Witch Hat Cookies are ready to be served and enjoyed!
Extra Tips: For an even more festive touch, consider adding edible glitter or small candy decorations to your Witch Hat Cookies. You can also experiment with different frosting colors to create a variety of witch hats.
If you’re planning to make these cookies ahead of time, store them in an airtight container to keep them fresh and delicious. Remember, the more creative you get with the decorations, the more enchanting your witch hats will be!
Mummy Hot Dogs
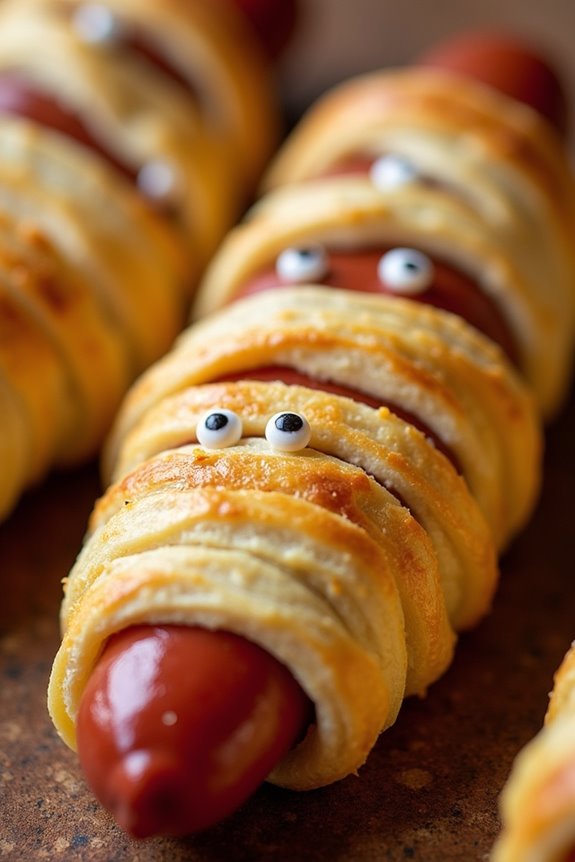
Mummy Hot Dogs are a fun and spooky treat perfect for Halloween parties or a festive family dinner. These adorable and delicious snacks are a creative twist on the classic pigs in a blanket. By simply wrapping hot dogs in crescent roll dough to resemble mummies and adding tiny eyes, you can transform a popular snack into a Halloween delight that kids will love.
The beauty of Mummy Hot Dogs lies in their simplicity and the limited number of ingredients required, making them a go-to recipe for busy parents. With a preparation time of just 10 minutes and a baking time of about 15 minutes, these snacks aren’t only quick to make but also provide a fun activity for the kids to participate in.
Let’s explore the ingredients and steps needed to create these spooky snacks for a serving size of 4-6 people.
Ingredients:
- 1 (8 oz) can of refrigerated crescent roll dough
- 1 package of hot dogs (8 hot dogs)
- 1 tablespoon of Dijon or yellow mustard
- Small edible candy eyes or black sesame seeds for eyes (optional)
Cooking Instructions:
- Preheat the Oven: Begin by preheating your oven to 375°F (190°C) to guarantee it’s ready for baking.
- Prepare the Dough: Open the can of crescent roll dough and unroll it. Separate the dough into four rectangles. Pinch the perforations together to seal them so that they don’t split apart when baking.
- Cut the Dough: Using a knife or a pizza cutter, cut each rectangle into thin strips about 1/4 inch wide. These will be used to wrap the hot dogs like mummy bandages.
- Wrap the Hot Dogs: Take one hot dog and start wrapping it with the dough strips, leaving a small space at the top for the face. Overlap the strips slightly as you wrap to create the mummy effect. Repeat for each hot dog.
- Add the Eyes: Place the wrapped hot dogs onto a baking sheet lined with parchment paper. Use a small amount of mustard to attach candy eyes or press black sesame seeds into the dough for eyes.
- Bake: Place the baking sheet in the preheated oven and bake for about 12-15 minutes or until the dough is golden brown and the hot dogs are heated through.
- Serve: Allow to cool slightly before serving. Serve with mustard or ketchup for dipping.
Extra Tips:
For an extra spooky touch, try using different types of sausages or cheese-filled hot dogs. If you don’t have candy eyes, you can make eyes by dotting mustard or ketchup onto the hot dogs after baking.
To prevent the dough from unraveling, make sure the dough strips are tightly wrapped around the hot dogs. If you’re preparing these snacks in advance, you can assemble the mummies a few hours ahead of time and refrigerate them until it’s time to bake.
Enjoy the fun and frightful experience of making and munching on these Mummy Hot Dogs!
Ghostly Popcorn Balls
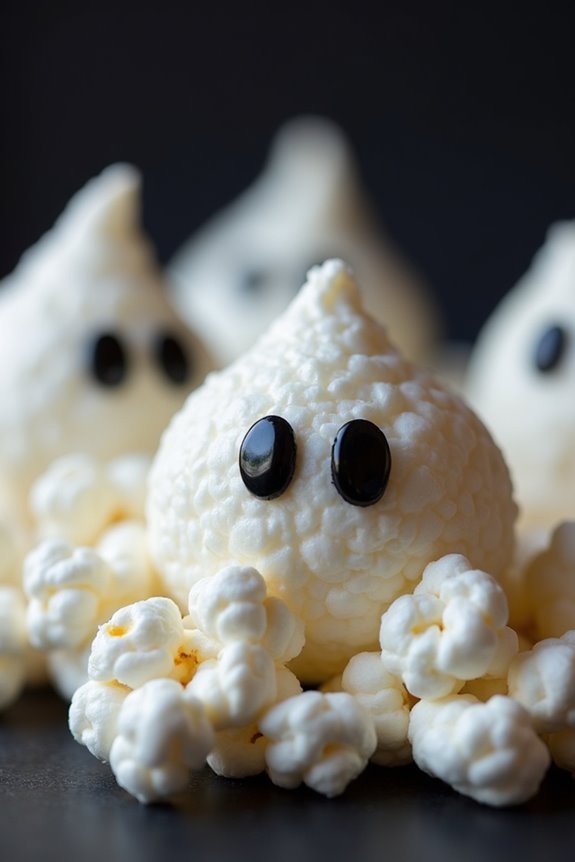
Ghostly Popcorn Balls are a spooktacular treat perfect for adding a little fright to your Halloween festivities. These eerie snacks aren’t only delicious but also fun to make with the kids. With their ghostly white appearance and hauntingly good taste, they’re sure to be a hit at your Halloween party.
Whether you’re hosting a gathering or just looking for a fun activity to do with the family, Ghostly Popcorn Balls are a simple yet delightful addition to your Halloween snack lineup.
The recipe is designed to serve 4-6 people, ideal for a small get-together or family snack time. The combination of sweet and salty flavors, along with a hint of marshmallow gooeyness, makes these popcorn balls irresistible.
Plus, the recipe is versatile, allowing you to get creative with decorations to give each popcorn ball its own spooky personality. Gather your ingredients and let’s get ready to make this hauntingly fun treat!
Ingredients:
- 10 cups of popped popcorn
- 1/4 cup (half stick) of unsalted butter
- 3 cups mini marshmallows
- 1/2 teaspoon vanilla extract
- 1/4 teaspoon salt
- Black food coloring gel or candy eyes for decoration
Cooking Instructions:
- Prepare the Popcorn: Start by popping your popcorn. You can use store-bought plain popcorn or make your own using an air popper. Confirm there are no unpopped kernels in the mix and place the popped popcorn into a large mixing bowl.
- Melt the Butter and Marshmallows: In a medium saucepan over low heat, melt the butter. Once melted, add the mini marshmallows and stir continuously until they’re completely melted and the mixture is smooth. This will form the sticky base that holds your popcorn balls together.
- Add Flavoring: Remove the saucepan from heat and stir in the vanilla extract and salt. Mix well to confirm the flavors are evenly distributed throughout the marshmallow mixture.
- Combine Popcorn and Marshmallow Mixture: Pour the marshmallow mixture over the popcorn. Using a wooden spoon or spatula, gently stir until all the popcorn is evenly coated. Be careful not to crush the popcorn.
- Form the Popcorn Balls: Once the popcorn is coated, let it cool slightly but not completely. Lightly grease your hands with butter or spray them with non-stick cooking spray. Form the popcorn into balls by pressing together small handfuls of the mixture. Be sure to press firmly so the balls hold their shape.
- Decorate the Ghosts: After forming the balls, use the black food coloring gel to draw ghostly faces, or attach candy eyes to give them a spooky look. Let them set for about 10 minutes to firm up.
Extra Tips: While forming the popcorn balls, it might help to have a little butter on your hands to prevent sticking. If you’re preparing these treats ahead of time, store them in an airtight container to keep them fresh and chewy.
Feel free to get creative with decorations; you can use various colors of food coloring or candies to add unique expressions to your ghostly creations. Enjoy the process, and don’t be afraid to let the kids get involved in decorating their own ghostly popcorn ball!
Frankenstein Rice Krispie Treats
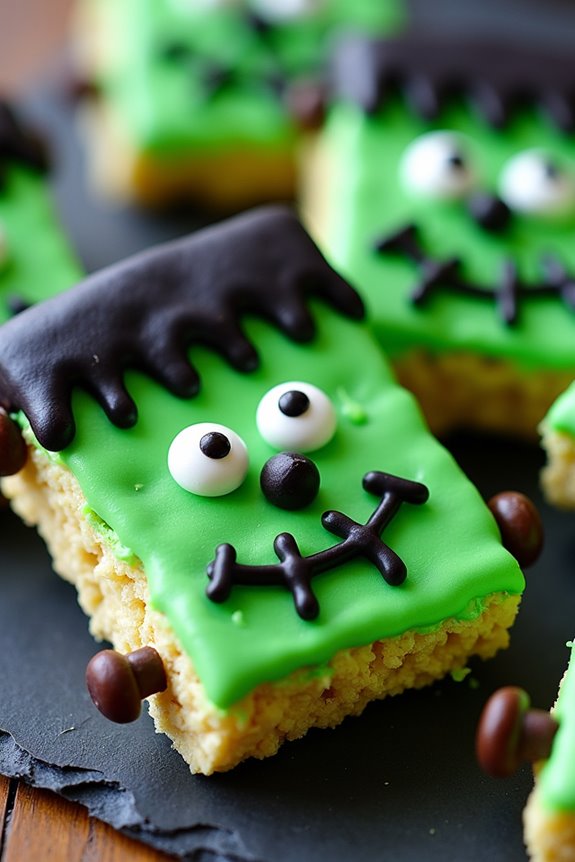
Frankenstein Rice Krispie Treats are a fun and spooky twist on the traditional Rice Krispie treats, perfect for Halloween celebrations with kids. These treats not only look adorable but are also easy to make and delicious to eat. With their bright green color and playful Frankenstein monster faces, they’re sure to be a hit at any Halloween party.
Whether you’re looking to add a festive touch to a classroom party or just want to have some kitchen fun with your kids, these treats make for a fantastic Halloween snack. This recipe combines the classic gooey, crispy texture of Rice Krispie treats with a creative and decorative twist. The process involves using simple pantry ingredients and a bit of creativity in the decoration department.
With a serving size of 4-6 people, these Frankenstein Rice Krispie Treats are perfect for sharing. You’ll be surprised at how quickly these treats come together and how much fun decorating them can be.
Ingredients:
- 6 cups Rice Krispies cereal
- 3 tablespoons butter
- 1 package (10 oz) mini marshmallows
- Green food coloring
- Black icing gel or edible black marker
- Candy eyes
- Chocolate chips or chocolate candy melts
Instructions:
- Prepare the Pan: Line a 9×13 inch baking pan with parchment paper or lightly grease the pan with butter to prevent sticking.
- Melt Butter and Marshmallows: In a large saucepan, melt the butter over low heat. Once melted, add the mini marshmallows and stir continuously until they’re completely melted and smooth.
- Add Color: Remove the saucepan from heat and add a few drops of green food coloring to the melted marshmallow mixture. Stir until the color is evenly distributed. Adjust the amount of food coloring until you achieve your desired shade of green.
- Mix with Cereal: Add the Rice Krispies cereal to the green marshmallow mixture. Stir until all the cereal is well coated with the mixture.
- Transfer to Pan: Pour the mixture into the prepared baking pan. Using a buttered spatula or wax paper, press the mixture evenly into the pan.
- Cool and Cut: Allow the Rice Krispie mixture to cool completely in the pan. Once cooled, remove from the pan and cut into rectangular pieces.
- Decorate: Use the black icing gel or edible marker to draw hair, a mouth, and stitches on each rectangle to mimic Frankenstein’s face. Attach candy eyes using a small dab of melted chocolate or icing.
- Add Bolts: Press a chocolate chip or a small piece of a chocolate candy melt into each side of the rectangles to represent Frankenstein’s neck bolts.
Extra Tips:
For best results, use high-quality marshmallows and fresh cereal to guarantee your treats remain soft and crispy. If you want to make the decoration process easier, consider using pre-made candy eyes and pre-packaged decorating gels.
You can also store these treats in an airtight container for up to three days, making them a convenient option to prepare in advance of your Halloween festivities. Adjust the green food coloring intensity to suit the level of spookiness you desire!
Candy Corn Fruit Parfait
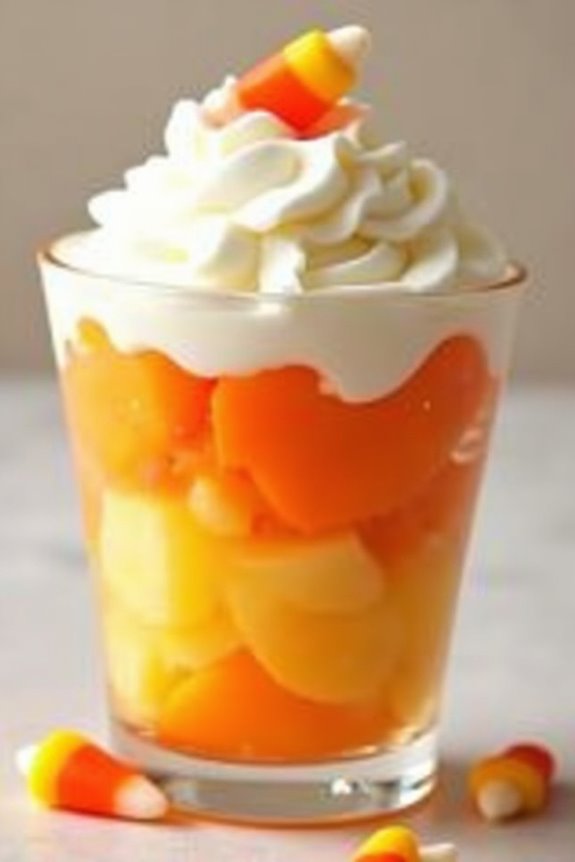
Candy Corn Fruit Parfait is a delightful and festive treat perfect for the Halloween season. This easy-to-make snack isn’t only visually appealing with its vibrant layers of colors, resembling the well-loved candy corn, but it’s also a healthier alternative to traditional Halloween candies. Kids will enjoy the fun presentation and the sweet, invigorating taste of this parfait, making it an excellent addition to any Halloween party or family gathering.
This parfait combines layers of juicy pineapple, bright mandarin oranges, and creamy whipped topping to create a deliciously sweet and tangy dessert. The combination of fresh fruit and cream makes it a nutritious option that parents can feel good about serving. It’s a simple recipe that requires minimal preparation and is perfect for involving kids in the kitchen, allowing them to help layer the ingredients and create their own spooky, edible masterpiece.
Ingredients for 4-6 servings:
- 2 cups fresh pineapple chunks
- 2 cups canned mandarin oranges, drained
- 2 cups whipped topping
- 1/4 cup candy corn (optional for garnish)
- 6 clear cups or glasses
Instructions:
- Prepare the Ingredients: Begin by gathering all your ingredients and verifying that the mandarin oranges are properly drained. If using fresh pineapple, cut it into small, bite-sized chunks.
- Layer the Pineapple: Start by dividing the pineapple chunks evenly among the 6 clear cups or glasses, creating the bottom layer of the parfait. This yellow layer will mimic the base color of candy corn.
- Add the Mandarin Oranges: Next, add a layer of mandarin oranges on top of the pineapple. Confirm the oranges are spread evenly across all cups to create the middle orange layer of your parfait.
- Top with Whipped Topping: Spoon the whipped topping over the mandarin oranges, creating a fluffy white top layer reminiscent of the tip of candy corn. You can use a piping bag or simply spoon it gently for a neat finish.
- Garnish with Candy Corn: For an extra festive touch, add a few pieces of candy corn on top of the whipped topping as a garnish. This step is optional but adds a fun element to the presentation.
- Serve Immediately: Once assembled, serve the Candy Corn Fruit Parfaits immediately to confirm the whipped topping maintains its texture and the fruit is fresh.
Extra Tips:
For an extra burst of flavor, consider using flavored whipped topping, such as vanilla or coconut, to complement the fruit layers. If you want to make this dish even healthier, substitute the whipped topping with Greek yogurt or a light cream cheese mixture.
Additionally, involve the kids by letting them choose their favorite fruits to layer, allowing for a personalized touch. Remember to adjust the serving size based on the number of guests or the size of your glasses to confirm everyone has a satisfying portion.
Batty Brownie Bites
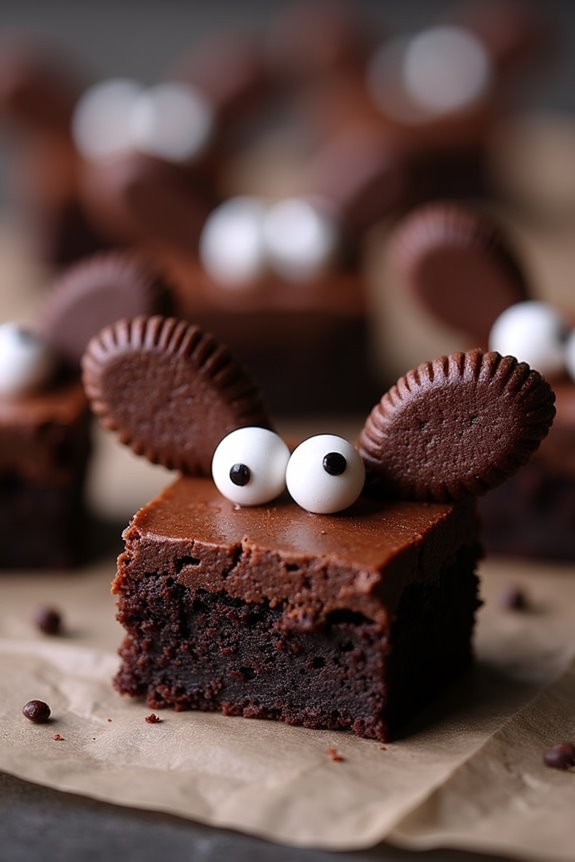
Halloween is a time for spooky fun, and what better way to celebrate than with some deliciously eerie treats? Batty Brownie Bites are the perfect snack for kids, combining the rich chocolatey goodness of brownies with a whimsical bat design. These treats aren’t only delightful to eat but also fun to make, allowing kids to get involved in the kitchen and express their creativity.
Whether you’re hosting a Halloween party or just looking to surprise your little ghouls at home, these Batty Brownie Bites will surely be a hit.
Creating these bites involves a mix of baking and crafting, making the process enjoyable and interactive. The base is a classic brownie, which can be homemade or store-bought, and the bat design is achieved with simple decorations like candy eyes and chocolate wings. This recipe will serve 4-6 people, perfect for a small gathering or family snack time.
Just gather your ingredients, follow the steps, and watch these charming batty treats come to life!
Ingredients:
- 1 box of brownie mix (for 8×8 inch pan) or homemade brownie batter equivalent
- 2 large eggs
- 1/4 cup water
- 1/2 cup vegetable oil
- 1/3 cup chocolate chips
- 12 chocolate sandwich cookies (like Oreos)
- 24 candy eyes
- 1/4 cup chocolate frosting
Instructions:
- Preheat and Prepare: Preheat your oven to 350°F (175°C) and grease an 8×8 inch baking pan. Line it with parchment paper for easier removal.
- Make the Brownie Batter: In a large mixing bowl, combine the brownie mix, eggs, water, and vegetable oil. Stir until well blended. If you’re using a homemade brownie recipe, prepare the batter according to your recipe instructions.
- Add Chocolate Chips: Gently fold in the chocolate chips to the batter for an extra chocolatey surprise in each bite.
- Bake the Brownies: Pour the batter into the prepared baking pan, spreading it evenly. Bake in the preheated oven for 25-30 minutes or until a toothpick inserted into the center comes out clean. Let the brownies cool completely in the pan.
- Cut and Decorate: Once cooled, remove the brownies from the pan and cut them into 12 squares. For each square, twist apart a chocolate sandwich cookie and use the half with the cream as the bat’s wings. Place two candy eyes on each brownie square using a small dab of chocolate frosting to adhere them.
- Attach the Wings: Use a bit more frosting to attach the cookie halves to the sides of the brownie squares, creating the bat wings.
Extra Tips:
To make the Batty Brownie Bites even more festive, consider using dark chocolate chips for a richer flavor. If you want to get creative, you can also use colored frosting to add additional details like fangs or little smiles on each bat.
Store any leftover Batty Brownie Bites in an airtight container at room temperature for up to three days, ensuring they’re as fresh as when they were first made. If you’re making these with kids, let them personalize each bat with their own unique decorations. This not only makes the treats more special but also adds to the Halloween fun!
Jack-o’-Lantern Stuffed Peppers

Get ready to spook up your Halloween feast with these delightful Jack-o’-Lantern Stuffed Peppers. Perfect for kids and adults alike, these edible lanterns aren’t only festive but also nutritious. They bring a playful twist to your Halloween spread, combining the fun of carving with a delicious, hearty filling that everyone will love.
With a savory blend of ground meat, rice, and vegetables, these stuffed peppers make for a well-rounded meal that’s as healthy as it’s entertaining. The best part about making Jack-o’-Lantern Stuffed Peppers is that they can be customized to suit your family’s taste preferences.
Whether you prefer beef, turkey, or a vegetarian filling, there’s plenty of flexibility to make this dish your own. Plus, the carving process is a fun activity to share with the kids, allowing them to release their creativity while contributing to the meal preparation.
Let’s explore the recipe and bring some spooky delight to your dining table!
Ingredients for 4-6 servings:
- 4-6 large orange bell peppers
- 1 pound ground beef or turkey
- 1 cup cooked rice
- 1 small onion, chopped
- 2 cloves garlic, minced
- 1 cup canned diced tomatoes
- 1 cup shredded cheese (cheddar or mozzarella works well)
- 1 teaspoon salt
- 1/2 teaspoon black pepper
- 1 teaspoon Italian seasoning
- 2 tablespoons olive oil
- 1/4 cup chopped parsley (optional, for garnish)
Cooking Instructions:
1. Preheat the Oven: Begin by preheating your oven to 375°F (190°C). This guarantees the peppers cook evenly and become tender.
2. Prepare the Peppers: Carefully slice the tops off the bell peppers and remove the seeds and membranes inside. Using a small knife, carve Jack-o’-Lantern faces into one side of each pepper. Be creative with your designs!
3. Cook the Filling: In a large skillet, heat the olive oil over medium heat. Add the chopped onion and garlic, sautéing until they become fragrant and translucent.
Add the ground beef or turkey, cooking until browned and fully cooked. Stir in the diced tomatoes, cooked rice, salt, pepper, and Italian seasoning. Mix well to combine all the ingredients.
4. Stuff the Peppers: Spoon the meat and rice mixture into each carved pepper, pressing down gently to pack the filling. Place the stuffed peppers upright in a baking dish.
5. Bake the Peppers: Cover the dish with aluminum foil and bake in the preheated oven for about 30 minutes. Remove the foil, sprinkle the tops with shredded cheese, and bake for an additional 10-15 minutes, or until the cheese is melted and bubbly.
6. Serve and Garnish: Once baked, remove the peppers from the oven and let them cool slightly. Garnish with chopped parsley if desired, and serve these delightful Jack-o’-Lanterns warm.
Extra Tips:
When carving your Jack-o’-Lantern faces, guarantee the cuts aren’t too large, as this might cause the peppers to collapse during baking. For added flavor, consider adding a splash of Worcestershire sauce or a handful of chopped mushrooms to the filling.
If you want to make the dish vegetarian, substitute the meat with more vegetables or a plant-based protein. Enjoy the process and have fun with the creativity that comes with making these festive treats!
Eyeball Cake Pops
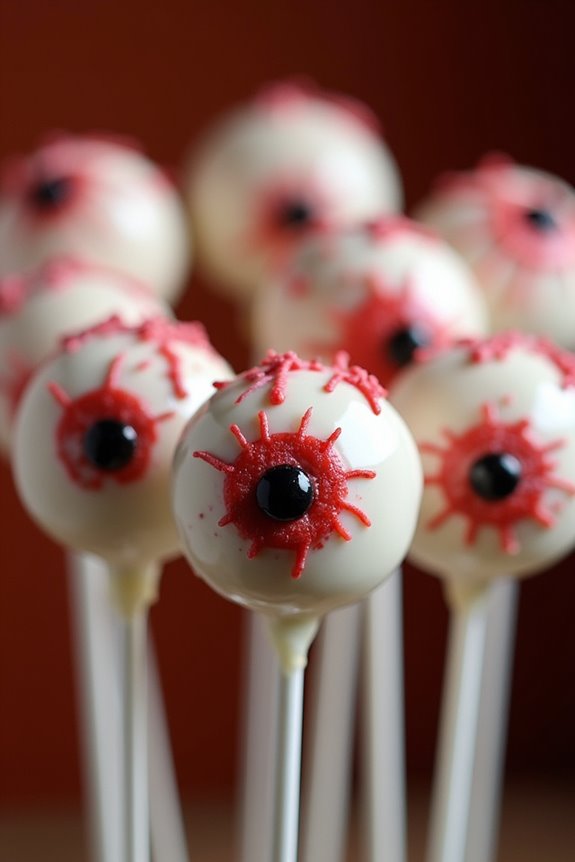
Halloween is the perfect time to get creative in the kitchen, and Eyeball Cake Pops are a spooky yet delicious treat that kids will love. These creepy cake pops aren’t only fun to make but also a great way to involve the little ones in Halloween preparations. The combination of moist cake, sweet frosting, and a candy coating makes for a delightful treat that’s as tasty as it’s visually intriguing.
Plus, these eyeball cake pops are portable and easy to eat, making them an ideal addition to any Halloween party.
Creating Eyeball Cake Pops is a simple process that requires minimal ingredients and effort. The core of the recipe involves crumbling cake and mixing it with frosting to form a dough-like consistency, which is then shaped into balls. These cake balls are then dipped in melted candy coating and decorated to resemble spooky eyeballs, complete with candy decorations for a realistic effect.
Perfect for serving 4-6 people, this recipe is sure to be a hit with kids and adults alike.
Ingredients:
- 1 box of cake mix (any flavor)
- Ingredients needed to prepare the cake mix (usually eggs, oil, and water)
- 1 cup frosting (store-bought or homemade)
- 12 oz white candy melts
- Red and black gel food coloring
- 24-30 lollipop sticks
- Small candy for pupils (e.g., chocolate chips or candy eyeballs)
Instructions:
- Prepare the Cake: Follow the instructions on the cake mix box to bake the cake. Allow it to cool completely once baked.
- Crumble the Cake: Once the cake is cool, crumble it into a large bowl until it resembles fine crumbs.
- Mix with Frosting: Add the frosting to the crumbled cake and mix thoroughly until you achieve a dough-like consistency that holds together when pressed.
- Shape the Cake Balls: Roll the mixture into small balls, roughly the size of a golf ball. Place them on a baking sheet lined with parchment paper.
- Chill the Cake Balls: Refrigerate the cake balls for about 30 minutes to firm them up.
- Melt the Candy Coating: Melt the white candy melts according to the package instructions, making certain it’s smooth and lump-free.
- Dip the Sticks: Dip the tip of each lollipop stick into the melted candy and insert it halfway into a cake ball. This helps secure the stick to the cake ball.
- Coat with Candy: Fully dip each cake ball into the melted candy coating, allowing any excess to drip off. Stand them upright in a styrofoam block or a similar structure to dry.
- Decorate the Eyeballs: Once the coating has set, use red and black gel food coloring to draw veins and a pupil on each cake pop, adding small candy for the pupil if desired. Allow the decorations to set.
Extra Tips:
To guarantee your Eyeball Cake Pops turn out perfectly, make sure the cake balls are firm before dipping them in the candy coating.
If the coating is too thick, thin it out with a little vegetable shortening or coconut oil. Be patient when decorating; using a toothpick can help with detailed designs.
If you’re short on time, you can use pre-made cake and frosting to speed up the process. Finally, store the cake pops in an airtight container to keep them fresh until serving. Happy Halloween!