

As Halloween creeps closer, my kitchen is bubbling with excitement over a cauldron of festive dinner ideas. Picture serving up Spooky Spaghetti and Eyeball Meatballs that are sure to enchant the whole family. Witch’s Brew Stew will bubble away with rich flavors, while Jack-o’-Lantern Stuffed Peppers bring a delightful surprise to the table. Each dish is crafted to transform your dinner into a frightful feast. There’s so much more magic ready to be unveiled for your Halloween celebration!
Spooky Spaghetti and Eyeball Meatballs

Get ready to spook and delight your family and friends this Halloween with a dish that’s as fun to look at as it’s to eat: Spooky Spaghetti and Eyeball Meatballs. This eerie entree combines the timeless comfort of spaghetti and meatballs with a creep-tastic twist. The meatballs, adorned with mozzarella “eyeballs” and sliced black olive “pupils,” float atop a bed of blood-red marinara sauce, creating a deliciously frightful presentation.
Whether you’re hosting a Halloween party or just want to surprise your loved ones with a festive dinner, this dish is sure to be a hit. This recipe isn’t only about the spooky aesthetics; it also offers a rich and savory flavor profile that will leave everyone at the table wanting more. The meatballs are seasoned to perfection with garlic, herbs, and parmesan, while the spaghetti is cooked to al dente perfection and tossed in a tangy marinara sauce.
Easy to prepare and visually impressive, Spooky Spaghetti and Eyeball Meatballs is a creative way to celebrate the Halloween season with a memorable and mouth-watering meal.
Ingredients (serves 4-6 people):
- 1 pound of spaghetti
- 1 ½ pounds of ground beef or turkey
- 1/2 cup breadcrumbs
- 1/4 cup grated parmesan cheese
- 1 large egg
- 2 cloves garlic, minced
- 1 teaspoon dried oregano
- 1 teaspoon dried basil
- Salt and pepper to taste
- 24 small mozzarella balls (bocconcini)
- 12 black olives, sliced
- 4 cups marinara sauce
- Fresh parsley for garnish
Instructions:
- Prepare the Meatballs: In a large bowl, combine the ground meat, breadcrumbs, parmesan cheese, egg, minced garlic, oregano, basil, salt, and pepper. Mix well with your hands or a spatula until all the ingredients are thoroughly incorporated.
- Shape the Meatballs: Roll the meat mixture into 24 small balls, approximately 1 inch in diameter. Place them on a baking sheet lined with parchment paper.
- Add the “Eyeballs”: Press a mozzarella ball into the top of each meatball, then place a slice of black olive on top to create the “pupil.” Ascertain the mozzarella and olive are secure.
- Cook the Meatballs: Preheat your oven to 375°F (190°C). Bake the meatballs for 20-25 minutes or until they’re cooked through and the cheese is slightly melted.
- Cook the Spaghetti: While the meatballs are baking, cook the spaghetti according to package instructions until al dente. Drain and set aside.
- Heat the Marinara Sauce: In a large saucepan, heat the marinara sauce over medium heat until it bubbles gently.
- Assemble the Dish: Toss the cooked spaghetti with the marinara sauce until well coated. Transfer the spaghetti to a large serving platter or individual plates.
- Top with Meatballs: Arrange the eyeball meatballs on top of the spaghetti, ensuring each serving gets 4-6 meatballs. Garnish with fresh parsley if desired.
Extra Tips:
For the best results, use fresh mozzarella balls, as they’ve the perfect size and texture for the “eyeballs.” If you want to add more flavor to your marinara sauce, consider incorporating some red pepper flakes for a spicy kick or a splash of red wine for depth.
Feel free to use whole wheat or gluten-free spaghetti to cater to dietary preferences. Ultimately, if you’re pressed for time, prepare the meatballs in advance and store them in the refrigerator until you’re ready to bake, saving you precious minutes on the day of your spooky celebration.
Mummy Hot Dogs

Add some spooky fun to your Halloween festivities with these delightful Mummy Hot Dogs. This frightfully delicious dish is perfect for both kids and adults, making it an excellent choice for a festive dinner or Halloween party snack. Wrapped in buttery crescent dough, these hot dogs are transformed into adorable little mummies that are as fun to make as they’re to eat.
The best part about Mummy Hot Dogs is how simple they’re to prepare. With just a few ingredients and a little creativity, you can whip up a batch of these ghoulish treats in no time. Not only are they easy to make, but they’re also a crowd-pleaser that will have everyone asking for more. Serve them with a side of ketchup or mustard for dipping, and watch them disappear from the plate!
Ingredients for 4-6 People:
- 8 hot dogs
- 1 tube of refrigerated crescent roll dough
- 1 egg, beaten
- 1 tablespoon of water
- Ketchup or mustard for dipping
- Optional: small edible eyes or mustard/ketchup for eyes
Cooking Instructions:
- Preheat the Oven: Start by preheating your oven to 375°F (190°C) to guarantee it’s hot enough to bake the dough to a golden brown.
- Prepare the Crescent Dough: Open the tube of crescent roll dough and unroll it on a flat surface. Separate the dough into four rectangles, pressing the seams together if necessary. Use a pizza cutter or knife to cut each rectangle into thin strips, approximately 1/4 inch wide.
- Wrap the Hot Dogs: Take each hot dog and wrap the dough strips around it, leaving a small gap near one end for the mummy’s face. Overlap the strips slightly to create the appearance of a mummy’s bandages. Repeat this process for all the hot dogs.
- Prepare the Egg Wash: In a small bowl, whisk together the beaten egg and a tablespoon of water. Brush this egg wash over each wrapped hot dog to give them a nice golden color once baked.
- Bake the Mummy Hot Dogs: Place the wrapped hot dogs on a baking sheet lined with parchment paper. Bake in the preheated oven for 12-15 minutes, or until the dough is golden brown and cooked through.
- Decorate the Mummies: Once baked, let the mummy hot dogs cool slightly before adding the eyes. You can use small edible eyes or dab small dots of mustard or ketchup to create eyes on the exposed part of the hot dog.
- Serve and Enjoy: Serve the Mummy Hot Dogs warm, with a side of ketchup or mustard for dipping. Enjoy this spooky treat with family and friends!
Extra Tips:
For added flavor, consider using different types of hot dogs, such as chicken, turkey, or even veggie dogs to suit your dietary preferences.
If you want to get creative, you can use a small piece of cheese under the dough strips to add an extra cheesy layer.
Also, if you’re making these for a party, you can prepare them ahead of time, wrap them in plastic wrap, and store them in the refrigerator until you’re ready to bake. This makes them an easy and efficient option for busy hosts.
Witch’s Brew Stew
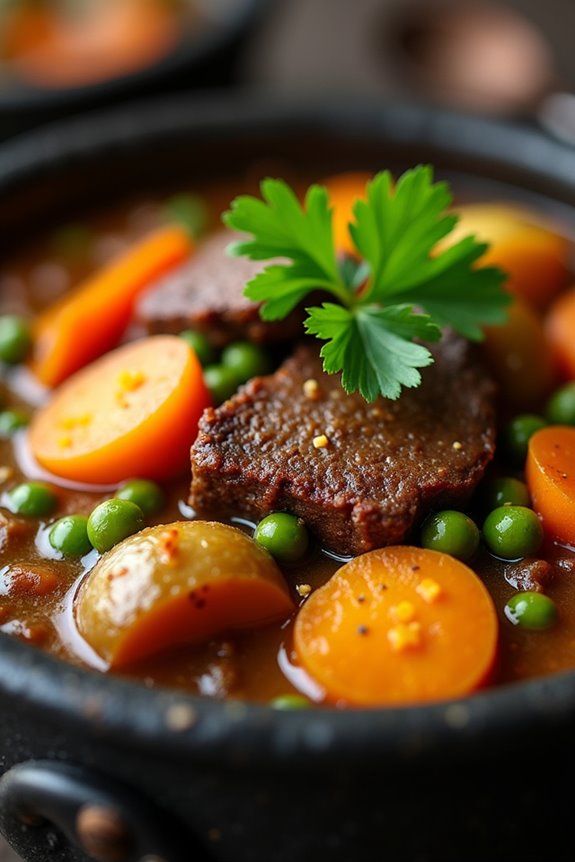
A perfect Halloween dinner concoction, Witch’s Brew Stew is a delightful and hearty dish that brings a sense of mystique and fun to your table. This stew combines a medley of seasonal vegetables, tender chunks of beef, and a blend of aromatic herbs and spices, simmered to perfection to create a rich and flavorful experience. The vibrant colors and robust flavors make it an ideal main course for your spooky celebrations, ensuring that your guests are both impressed and satisfied.
The beauty of Witch’s Brew Stew lies in its adaptability to accommodate various tastes and dietary preferences. You can easily customize this recipe by incorporating your favorite vegetables or substituting beef with a plant-based protein for a vegetarian option. The slow-cooking process allows the flavors to meld together, creating a deeply satisfying and soul-warming dish. Serve it in a cauldron for added effect, and watch as your guests delight in this magical Halloween feast.
Ingredients for a serving size of 4-6 people:
- 2 pounds beef stew meat, cut into 1-inch cubes
- 2 tablespoons olive oil
- 1 large onion, chopped
- 4 cloves garlic, minced
- 3 carrots, peeled and sliced
- 3 celery stalks, sliced
- 2 potatoes, peeled and cubed
- 1 cup butternut squash, cubed
- 4 cups beef broth
- 1 cup red wine
- 2 tablespoons tomato paste
- 1 teaspoon dried thyme
- 1 teaspoon dried rosemary
- 2 bay leaves
- Salt and pepper to taste
- 1 cup frozen peas
- Fresh parsley, chopped, for garnish
Cooking Instructions:
- Prepare the Beef: Start by patting the beef stew meat dry with paper towels. Season it with salt and pepper to taste. This helps the meat to brown properly during cooking, enhancing the flavor of the stew.
- Brown the Beef: In a large pot or Dutch oven, heat the olive oil over medium-high heat. Add the beef cubes in batches, making sure not to overcrowd the pot. Brown the beef on all sides until it develops a nice crust. Remove the beef and set it aside.
- Sauté the Aromatics: In the same pot, add the chopped onion and minced garlic. Sauté for about 2-3 minutes until the onion becomes translucent and fragrant.
- Add Vegetables: Stir in the carrots, celery, potatoes, and butternut squash. Cook for another 5 minutes, allowing the vegetables to begin to soften.
- Deglaze the Pot: Pour in the red wine, scraping the bottom of the pot with a wooden spoon to release any browned bits. This step enhances the flavor of the stew.
- Combine Ingredients: Return the browned beef to the pot. Add the beef broth, tomato paste, thyme, rosemary, and bay leaves. Stir well to combine all ingredients.
- Simmer the Stew: Bring the mixture to a boil, then reduce the heat to low. Cover the pot and let it simmer for about 1.5 to 2 hours, or until the beef is tender and the flavors have melded together.
- Add Final Touches: About 10 minutes before serving, stir in the frozen peas and adjust seasoning with more salt and pepper if needed. Remove the bay leaves before serving.
- Serve and Garnish: Ladle the stew into bowls, garnish with fresh parsley, and serve hot.
Extra Tips:
For the best results, cook the stew a day in advance. Refrigerating overnight allows the flavors to deepen and meld together, resulting in a richer taste when reheated. If you prefer a thicker stew, you can mash some of the potatoes in the pot or add a slurry of cornstarch and water towards the end of cooking.
Jack-o’-Lantern Stuffed Peppers
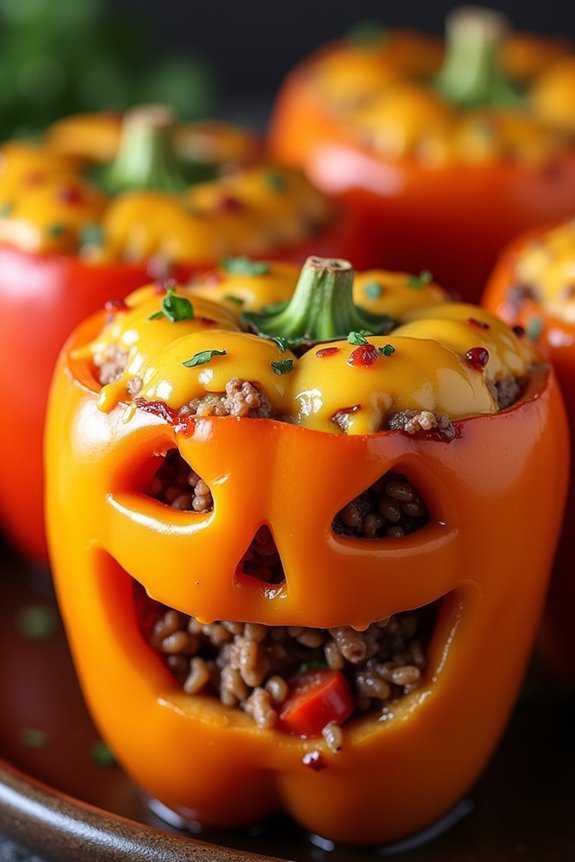
As Halloween approaches, it’s the perfect time to bring a little spooky fun to your dinner table with Jack-o’-Lantern Stuffed Peppers. These delightful treats not only capture the festive spirit but also offer a healthy and satisfying meal. By carving the faces of jack-o’-lanterns into bell peppers, you create an edible art piece that kids and adults alike will enjoy. Stuffed with a flavorful mixture of ground beef, rice, and vegetables, these peppers are as delicious as they’re adorable.
This dish is a fantastic way to use fresh bell peppers and incorporate a variety of ingredients into a single, cohesive meal. The filling can be customized with different proteins, grains, or spices to suit your taste preferences. Whether you’re hosting a Halloween party or simply looking for a fun family dinner idea, these Jack-o’-Lantern Stuffed Peppers will surely impress your guests with their festive appearance and hearty flavors.
Ingredients (Serving Size: 4-6 people):
- 6 large orange bell peppers
- 1 pound ground beef
- 1 cup cooked rice
- 1 medium onion, chopped
- 2 cloves garlic, minced
- 1 can (14.5 ounces) diced tomatoes, drained
- 1 cup shredded cheddar cheese
- 1 tablespoon olive oil
- 1 teaspoon salt
- 1/2 teaspoon black pepper
- 1 teaspoon paprika
- 1 teaspoon dried oregano
- 1/2 teaspoon chili powder
- 1/4 cup fresh parsley, chopped (optional for garnish)
Cooking Instructions:
- Prepare the Peppers: Preheat your oven to 375°F (190°C). Cut the tops off the bell peppers and remove the seeds and membranes. Using a small paring knife, carefully carve jack-o’-lantern faces into the sides of each pepper. Be sure to make the carvings big enough so they’re visible but not so large that they compromise the structural integrity of the peppers.
- Cook the Filling: In a large skillet, heat olive oil over medium heat. Add the chopped onion and minced garlic, cooking until the onion is translucent (about 5 minutes). Add the ground beef, breaking it up with a spoon, and cook until browned. Drain any excess fat from the skillet.
- Add Ingredients to the Filling: Stir in the diced tomatoes, cooked rice, salt, black pepper, paprika, oregano, and chili powder. Mix well and let the mixture simmer for about 5 minutes to allow the flavors to meld together.
- Stuff the Peppers: Spoon the beef and rice mixture into each carved pepper, filling them generously. Place the stuffed peppers upright in a baking dish. If necessary, trim the bottoms slightly to help them stand.
- Bake the Peppers: Cover the baking dish with aluminum foil and bake in the preheated oven for 25 minutes. Remove the foil, sprinkle the tops with shredded cheddar cheese, and bake for an additional 10 minutes, or until the cheese is melted and bubbly.
- Serve and Garnish: Once baked, remove the peppers from the oven and let them cool slightly. Garnish with fresh parsley if desired and serve warm.
Extra Tips:
When selecting bell peppers, try to choose ones that are uniform in size and can stand upright on their own, which will make stuffing and baking easier. If you prefer a vegetarian version, you can substitute the ground beef with mushrooms or black beans for a similar texture and flavor.
Additionally, feel free to adjust the spices and seasonings to your liking—adding a bit of cumin or cayenne can give your filling an extra kick. Finally, if you have little ones helping out, let them carve their own jack-o’-lantern faces on the peppers for an engaging family activity.
Ghostly Chicken Alfredo
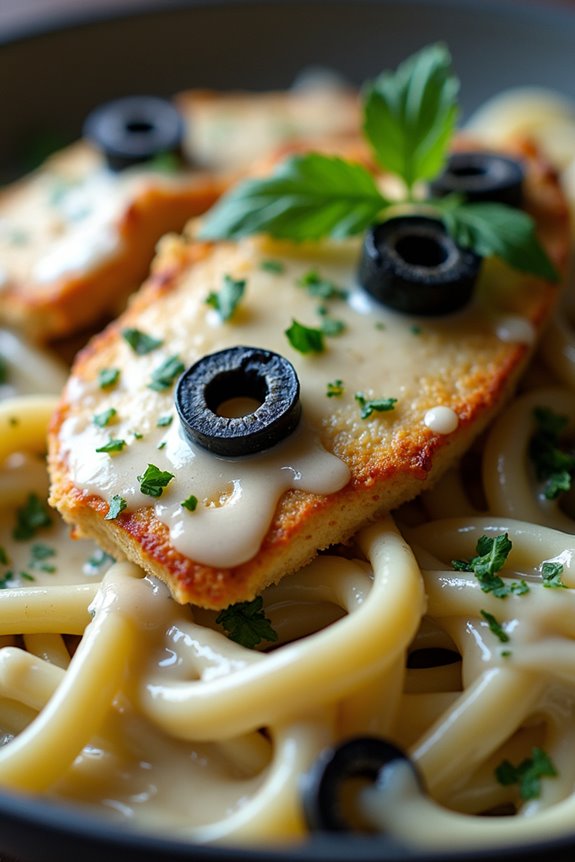
Ghostly Chicken Alfredo is a spooktacular twist on the classic Italian favorite, perfect for setting the eerie mood at your Halloween dinner table. This dish combines tender pieces of chicken in a creamy Alfredo sauce with a hauntingly delightful presentation. The key to this dish lies in the ghostly appearance of the Alfredo sauce, achieved by adding a hint of black squid ink pasta or strategically placed black olives for a striking contrast.
As guests dig in, they’ll be mesmerized not only by the deliciously rich flavors but also by the spooky visual appeal that this dish brings to the table. Ideal for a serving size of 4-6 people, Ghostly Chicken Alfredo is a family-friendly meal that’s both easy to prepare and sure to impress.
Whether you’re hosting a Halloween party or just want to surprise your loved ones with a themed dinner, this recipe promises to be a hit. The balance of creamy sauce, savory chicken, and that eerie touch will have everyone howling for more. So, put on your chef’s hat and prepare to create a meal that embodies the spirit of Halloween with every bite.
Ingredients:
- 1 pound of chicken breast, cut into thin strips
- 12 ounces of fettuccine pasta (preferably squid ink pasta for a spooky effect)
- 2 tablespoons of olive oil
- 4 cloves of garlic, minced
- 1 cup of heavy cream
- 1 cup of grated Parmesan cheese
- Salt and pepper to taste
- 1/2 cup of black olives, sliced (optional for garnish)
- Fresh parsley, chopped (optional for garnish)
Cooking Instructions:
- Cook the Pasta: Begin by cooking the fettuccine pasta according to the package instructions. If you’re using squid ink pasta, it will give a darker, more ghostly appearance. Once cooked, drain and set aside.
- Prepare the Chicken: In a large skillet, heat the olive oil over medium-high heat. Add the chicken strips and cook until they’re browned and cooked through, about 5-7 minutes. Remove the chicken from the skillet and set aside.
- Make the Alfredo Sauce: In the same skillet, reduce the heat to medium and add the minced garlic. Sauté for about 1 minute until fragrant. Slowly pour in the heavy cream, stirring constantly. Allow the cream to heat for about 2 minutes.
- Incorporate the Cheese: Reduce the heat to low and gradually add the Parmesan cheese, stirring continuously until the cheese has melted and the sauce is smooth. Season with salt and pepper to your liking.
- Combine and Serve: Return the cooked chicken to the skillet and stir to coat it in the Alfredo sauce. Add the cooked pasta and toss everything together until well combined. If desired, garnish with sliced black olives and chopped parsley for an extra touch of spookiness.
Extra Tips:
For a more intense ghostly theme, consider using edible black food coloring to enhance the darkness of the sauce if squid ink pasta is unavailable. Be sure to taste the sauce before serving and adjust the seasoning as needed; a pinch of nutmeg can add a subtle depth to the flavor.
If you prefer a thicker sauce, allow it to simmer for a few extra minutes to reach your desired consistency. Finally, to keep the pasta from sticking together, drizzle a small amount of olive oil on it after draining. Enjoy your Ghostly Chicken Alfredo as a centerpiece of your Halloween feast!
Monster Mac and Cheese
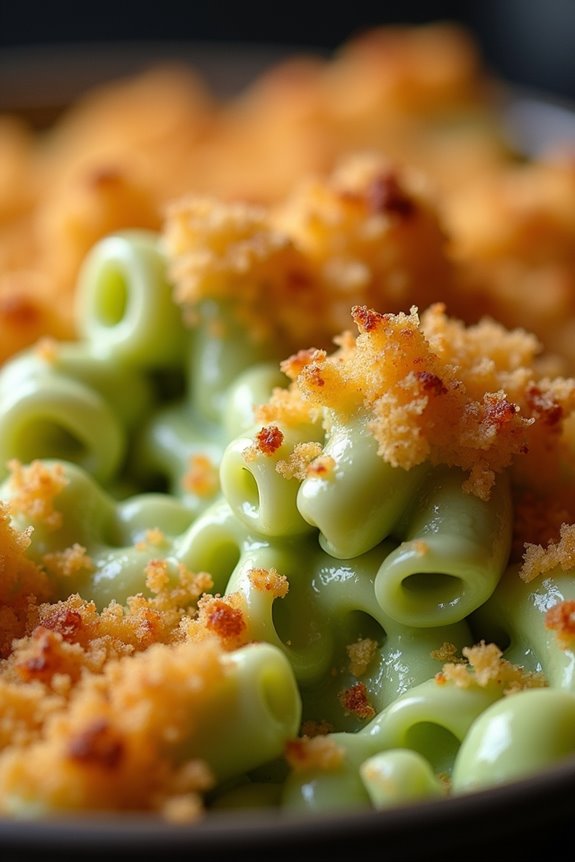
Celebrate Halloween with a monstrously delicious twist on a classic comfort food: Monster Mac and Cheese. This recipe adds a spooky touch to the traditional macaroni and cheese by incorporating vibrant green food coloring and a crispy topping that evokes the essence of a bubbling witch’s cauldron. Perfect for a Halloween-themed dinner or party, this dish isn’t only visually enticing but also packed with cheesy goodness that both kids and adults will love.
The Monster Mac and Cheese combines creamy cheddar and mozzarella cheeses with a hint of garlic and onion powder for depth of flavor. The pasta is dyed a ghoulish green before being baked to perfection with a breadcrumb topping that adds a delightful crunch. This recipe serves 4-6 people, making it ideal for a small gathering or a family dinner on All Hallows’ Eve.
Ingredients for 4-6 servings:
- 1 pound elbow macaroni
- 2 cups shredded cheddar cheese
- 1 cup shredded mozzarella cheese
- 2 cups milk
- 4 tablespoons unsalted butter
- 4 tablespoons all-purpose flour
- 1 teaspoon garlic powder
- 1 teaspoon onion powder
- 1/2 teaspoon salt
- 1/2 teaspoon black pepper
- 1 cup breadcrumbs
- Green food coloring
Cooking Instructions:
- Preheat and Cook Pasta: Preheat your oven to 350°F (175°C). Cook the elbow macaroni according to package instructions until al dente. Drain and return to the pot.
- Make the Cheese Sauce: In a large saucepan, melt the butter over medium heat. Stir in the flour, garlic powder, onion powder, salt, and pepper. Cook for about 1-2 minutes until the mixture is smooth and bubbly.
- Add Milk and Cheese: Gradually whisk in the milk, stirring constantly until the sauce thickens, about 3-5 minutes. Remove from heat and stir in the cheddar and mozzarella cheeses until fully melted and smooth.
- Color the Pasta: Add a few drops of green food coloring to the cooked pasta, stirring until the desired shade of green is achieved. This is the fun part, so feel free to experiment with the intensity of the color.
- Combine and Transfer: Pour the cheese sauce over the green pasta, stirring until well combined. Transfer the mixture to a greased 9×13-inch baking dish.
- Prepare Topping: In a small bowl, mix the breadcrumbs with a tablespoon of melted butter. Sprinkle evenly over the pasta mixture.
- Bake: Bake in the preheated oven for 20-25 minutes or until the top is golden brown and crispy.
Extra Tips:
To achieve the perfect shade of green, start with a few drops of food coloring and gradually add more until you reach the desired color. You can also experiment with different types of cheese for a unique flavor profile; try adding some gouda or parmesan for an extra cheesy kick.
If you’re preparing this dish ahead of time, assemble it without the breadcrumb topping and store it in the refrigerator. When ready to bake, add the topping and increase the baking time by 5-10 minutes. Enjoy your Monster Mac and Cheese with a side of roasted vegetables or a fresh salad for a complete Halloween feast.
Creepy Crawly Tacos

Add a spine-chilling twist to your Halloween menu with Creepy Crawly Tacos, a delightfully eerie dish that will be a hit with both kids and adults alike.
These tacos feature a mix of textures and flavors, with a little bit of visual trickery to give them a spooky vibe. Imagine serving tacos filled with “spider legs” and “wormy” toppings that are actually delicious ingredients in disguise. The key here is to use creativity in presentation while guaranteeing the tacos taste delectable.
These tacos are perfect for a Halloween dinner party or as a clever way to get picky eaters excited about their meal. The Creepy Crawly Tacos will have your guests marveling at your creativity.
The “spider legs” are actually crispy strips of black olives and the “worms” are thinly sliced red bell peppers. You can add ground beef or turkey seasoned with taco spices, and top it off with shredded cheese and lettuce to maintain the taco’s classic appeal.
These eerie tacos are both fun to make and eat, offering a perfect balance between fright and delight. Follow this recipe to create a serving size for 4-6 people.
Ingredients:
- 1 pound ground beef or turkey
- 1 packet taco seasoning mix
- 12 taco shells (hard or soft)
- 1 cup black olives, sliced into thin strips
- 1 large red bell pepper, cut into thin strips
- 1 cup shredded lettuce
- 1 cup shredded cheddar cheese
- 1 cup salsa
- 1/2 cup sour cream
- 1/2 cup chopped tomatoes
- 1 tablespoon olive oil
Instructions:
- Prepare the Meat: Heat the olive oil in a skillet over medium heat. Add the ground beef or turkey and cook until browned, breaking it apart with a spoon as it cooks.
- Season the Meat: Once the meat is fully cooked, drain any excess fat. Add the taco seasoning mix and 2/3 cup of water to the skillet. Stir to combine, and let it simmer for about 5 minutes until the sauce thickens.
- Prepare the Veggie “Creepy Crawlies”: While the meat is cooking, prepare your creepy crawly toppings. Slice the black olives into thin strips to resemble spider legs, and cut the red bell pepper into thin worm-like strips.
- Warm the Taco Shells: Preheat your oven to 350°F (175°C). Arrange the taco shells on a baking sheet and warm them in the oven for about 5 minutes.
- Assemble the Tacos: Take a warmed taco shell and fill it with a generous scoop of the seasoned meat. Add a layer of shredded lettuce and top with shredded cheddar cheese.
- Add the Spooky Toppings: Place the “spider leg” olive strips and “wormy” bell pepper strips on top of each taco for a creepy effect. Add a spoonful of salsa and a dollop of sour cream.
- Finish with Fresh Ingredients: Sprinkle chopped tomatoes over the top of each taco for added freshness and color.
Extra Tips:
For a vegetarian version, substitute the ground beef or turkey with black beans or a meatless crumble alternative.
For an even spookier presentation, consider using blue corn taco shells to add a dark, mysterious hue to your dish. If you want to enhance the “creepy” vibe, you can add edible googly eyes to the top of each taco using small rounds of cream cheese topped with sliced black olive pieces.
Vampire Bite Burgers

Vampire Bite Burgers are a spooky and delicious addition to your Halloween-themed dinner table. These burgers are designed to resemble a vampire’s bite, with a surprise filling of red ketchup oozing out with every bite. They aren’t only visually appealing but also pack a delectable punch that’s sure to satisfy both kids and adults alike. The combination of juicy beef patties stuffed with cheese and ketchup, all tucked into a fresh bun, makes for a gory yet delightful meal perfect for a Halloween gathering.
Preparing Vampire Bite Burgers is a fun activity that can involve the whole family. The secret lies in the careful construction of the patties, ensuring that each one contains a cheesy, ketchup-filled center that mimics the dripping blood of a vampire’s bite. These burgers aren’t only a perfect conversation starter but also a straightforward dish that requires minimal cooking time. With a little creativity and these simple ingredients, you can bring a touch of Halloween horror to your dinner table.
Ingredients for 4-6 servings:
- 2 pounds ground beef
- 1 cup shredded cheddar cheese
- 1/2 cup ketchup
- 6 hamburger buns
- 6 slices of tomato
- Lettuce leaves
- 1 teaspoon garlic powder
- 1 teaspoon onion powder
- Salt and pepper to taste
- 1 tablespoon olive oil
Instructions:
- Prepare the Filling: In a small bowl, mix the shredded cheddar cheese with the ketchup until well combined. This will be the gooey center that creates the “vampire bite” effect.
- Season the Beef: In a large mixing bowl, combine the ground beef with garlic powder, onion powder, salt, and pepper. Mix until the seasoning is evenly distributed throughout the meat.
- Form the Patties: Divide the seasoned beef into 6 equal portions. Take each portion and flatten it slightly in your hand. Place about 1 1/2 tablespoons of the cheese-ketchup mixture in the center of each patty. Carefully fold the beef around the filling, ensuring it’s completely sealed to prevent leakage while cooking.
- Shape the Burgers: Once the filling is secure, shape each portion into a round patty, making sure the edges are well sealed. Repeat the process for all 6 patties.
- Cook the Patties: Heat olive oil in a large skillet over medium-high heat. Once hot, add the patties and cook for about 4-5 minutes on each side, or until they’re cooked through and have a nice golden crust.
- Assemble the Burgers: Toast the hamburger buns lightly if desired. Place a lettuce leaf on the bottom half of each bun, followed by a slice of tomato. Place the cooked patty on top, then close the burger with the top half of the bun.
- Serve: Arrange the Vampire Bite Burgers on a platter and serve immediately while the cheese inside is still hot and gooey.
Extra Tips:
For an added touch of spookiness, you can use a knife to make small punctures on the top bun to resemble a vampire’s bite marks, with a little extra ketchup smeared on top to emphasize the effect.
It’s essential to properly seal the beef around the filling to prevent it from leaking during the cooking process. You can also customize the flavor by adding other spices or herbs to the beef mixture. If you prefer a smoky flavor, consider using smoked cheddar cheese instead of regular cheddar. Enjoy your spooky meal!
Frankenstein’s Monster Pizza

Frankenstein’s Monster Pizza is a spooky and delicious way to celebrate Halloween with family and friends. This themed pizza combines a variety of flavorful ingredients and creative presentation to bring the iconic monster to life right on your dinner table. Perfect for a gathering of 4-6 people, this recipe not only delights the taste buds but also adds a festive touch to your Halloween celebrations. With its ghoulish appearance and delectable taste, this pizza is sure to be a hit among both kids and adults.
This Frankenstein’s Monster Pizza is made with a homemade or store-bought pizza dough base, topped with a savory tomato sauce, a blend of cheeses, and a selection of vegetables that bring out the details of Frankenstein’s monster. The key to this recipe is in the artistic arrangement of ingredients to create a scary yet fun face on the pizza. Whether you’re hosting a Halloween party or just want to enjoy a themed dinner with your family, this pizza is a creative and tasty choice.
Ingredients (serving size: 4-6 people):
- 1 lb pizza dough
- 1 cup tomato sauce
- 2 cups shredded mozzarella cheese
- 1/2 cup sliced black olives
- 1/2 cup sliced green bell peppers
- 1/4 cup sliced red onions
- 8 slices pepperoni
- 1/4 cup grated Parmesan cheese
- Olive oil
- Cornmeal (for dusting)
Cooking Instructions:
- Prepare the Dough: Preheat your oven to 475°F (245°C). If using a pizza stone, place it in the oven to heat up. Roll out the pizza dough on a lightly floured surface to your desired thickness, around 12 inches in diameter. Transfer the dough to a pizza peel lightly dusted with cornmeal to prevent sticking.
- Add the Sauce and Cheese: Spread the tomato sauce evenly over the surface of the dough, leaving a small border for the crust. Sprinkle the shredded mozzarella cheese evenly over the sauce.
- Create Frankenstein’s Face: Arrange the sliced black olives to form the monster’s eyes and mouth. Use the green bell peppers to create hair and bolts on the side of the head. Position the pepperoni slices as scars or additional facial features. Finally, place the red onions as eyebrows or additional facial details.
- Bake the Pizza: Carefully slide the pizza onto the preheated pizza stone or a baking sheet. Bake in the preheated oven for 10-12 minutes, or until the crust is golden brown and the cheese is bubbly and melted.
- Final Touches: Once baked, remove the pizza from the oven and sprinkle with grated Parmesan cheese for extra flavor. Drizzle a little olive oil over the top, if desired.
- Serve: Allow the pizza to cool for a few minutes before slicing. Serve warm and enjoy the spooky creation with your guests.
Extra Tips: For the best results, make sure that the dough is at room temperature before rolling it out, as this will make it more pliable and easier to shape. You can also experiment with different toppings to customize the monster’s face according to your preference. If you want to add more flavor, consider adding herbs like oregano or basil to the tomato sauce before spreading it on the dough. To save time, store-bought pizza dough can be a convenient alternative to homemade dough.
Bat Wings With Bloody Sauce

Embrace the spooky spirit of Halloween with a tantalizing dish that combines creativity with flavor: Bat Wings with Bloody Sauce. This ghoulishly delightful recipe is perfect for a Halloween-themed dinner or party, offering a fun and flavorful twist on classic chicken wings. The rich, savory wings are complemented by a vibrant, tangy sauce that adds a splash of horror to your Halloween feast.
With its dramatic presentation and delectable taste, this dish is sure to be a hit among guests of all ages. The “bat wings” are actually chicken wings that are marinated and baked to perfection, while the “bloody sauce” is a devilishly delicious concoction made with ingredients like honey, sriracha, and soy sauce. This recipe serves 4-6 people, making it an ideal choice for a small gathering or family dinner.
Whether you’re hosting a haunted house party or simply want a festive meal, these Bat Wings with Bloody Sauce will add a frightful flair to your Halloween celebration.
Ingredients:
- 2 lbs chicken wings
- 1 tablespoon olive oil
- 1 teaspoon garlic powder
- 1 teaspoon onion powder
- 1 teaspoon smoked paprika
- Salt and pepper to taste
- 1/4 cup honey
- 1/4 cup sriracha sauce
- 2 tablespoons soy sauce
- 1 tablespoon apple cider vinegar
- 1 tablespoon tomato paste
- 1 tablespoon butter
- Fresh parsley, chopped (for garnish)
Cooking Instructions:
- Prepare the Wings: Preheat your oven to 400°F (200°C). Pat the chicken wings dry with paper towels, which will help them crisp up in the oven. Place them in a large bowl.
- Season the Wings: Drizzle the olive oil over the wings and sprinkle them with garlic powder, onion powder, smoked paprika, salt, and pepper. Toss the wings until they’re evenly coated with the oil and spices.
- Bake the Wings: Arrange the wings on a baking sheet lined with parchment paper or a baking rack. Confirm they’re spread out in a single layer for even cooking. Bake in the preheated oven for 25-30 minutes, flipping halfway through, until they’re golden brown and cooked through.
- Make the Bloody Sauce: While the wings are baking, prepare the sauce. In a medium saucepan over medium heat, combine the honey, sriracha sauce, soy sauce, apple cider vinegar, tomato paste, and butter. Stir the mixture until the butter is melted and the ingredients are well combined. Bring to a simmer and cook for about 5 minutes until slightly thickened.
- Coat the Wings: Once the wings are done, remove them from the oven and let them cool slightly. Place them in a large bowl and pour the bloody sauce over them, tossing to guarantee each wing is coated thoroughly.
- Garnish and Serve: Transfer the wings to a serving platter and sprinkle with chopped parsley for a pop of color. Serve immediately for the best flavor and texture.
Extra Tips:
For an extra crispy texture, try broiling the wings for an additional 2-3 minutes after baking. Keep an eye on them to prevent burning.
If you prefer a milder version of the bloody sauce, reduce the amount of sriracha or replace it with ketchup for a sweeter flavor. Additionally, you can prepare the sauce a day in advance to save time and allow the flavors to meld together, resulting in a more robust sauce.
Enjoy your Bat Wings with Bloody Sauce as a thrilling addition to your Halloween menu!
Skeleton Ribs
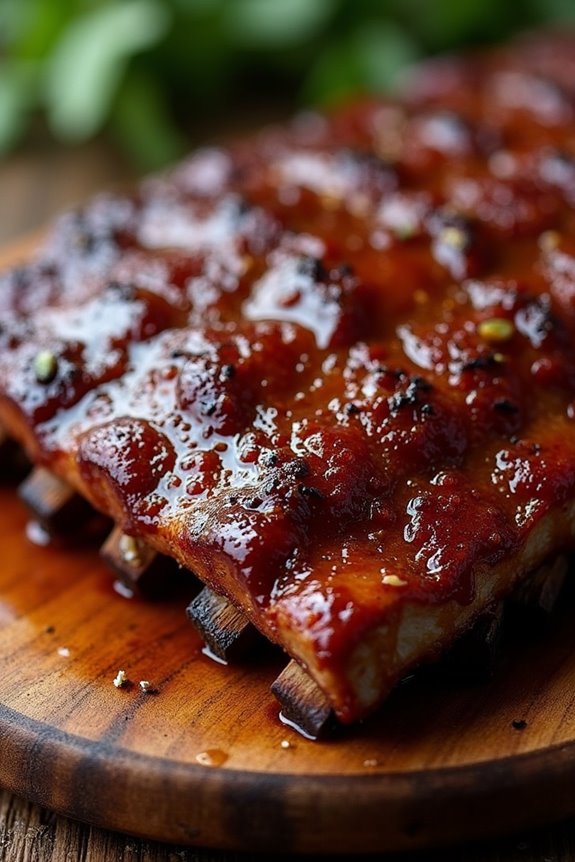
Get ready to spook up your Halloween dinner with a serving of Skeleton Ribs! This eerie yet delicious dish is perfect for setting the mood at any Halloween-themed gathering. Tender and flavorful pork ribs are transformed into a ghoulish spectacle that will have your guests both intrigued and hungry. The rich, smoky flavors combined with a tangy and spicy barbecue sauce make these ribs irresistible. Ideal for an outdoor grill or an oven-baked alternative, these Skeleton Ribs are sure to be a haunting hit.
Skeleton Ribs are more than just a tasty treat; they’re a visual masterpiece that brings the Halloween spirit to your dining table. The process involves marinating the ribs in a special blend of spices and sauces, slow cooking them until they fall off the bone, and then adding a final touch with a tantalizing glaze. Whether you’re hosting a Halloween party or just want to enjoy a spooky meal with family, these ribs will deliver both taste and entertainment.
Ingredients (Serves 4-6)
- 4 lbs pork ribs
- 1 cup apple cider vinegar
- 1/2 cup brown sugar
- 1/4 cup paprika
- 2 tablespoons garlic powder
- 2 tablespoons onion powder
- 1 teaspoon cayenne pepper
- 2 teaspoons salt
- 1 teaspoon black pepper
- 1 cup barbecue sauce (preferably smoky and spicy)
- 1/4 cup honey
- 2 tablespoons Worcestershire sauce
- 1 tablespoon Dijon mustard
- 1/4 cup apple juice
Cooking Instructions
- Prepare the Ribs: Start by removing the membrane from the back of the ribs for tender results. Rinse the ribs under cold water and pat them dry with paper towels.
- Marinate: In a large bowl, mix together the apple cider vinegar, brown sugar, paprika, garlic powder, onion powder, cayenne pepper, salt, and black pepper. Coat the ribs thoroughly with this mixture, cover, and refrigerate for at least 2 hours, preferably overnight for maximum flavor.
- Preheat the Oven or Grill: If using an oven, preheat to 300°F (150°C). If grilling, set your grill to medium-low heat, ensuring one side has indirect heat.
- Cook the Ribs: Place the ribs on a baking sheet lined with foil, or directly on the grill grate. Cover with foil if baking and cook for 2.5 to 3 hours, or until the ribs are tender and the meat is pulling away from the bone.
- Prepare the Glaze: While the ribs are cooking, combine the barbecue sauce, honey, Worcestershire sauce, Dijon mustard, and apple juice in a saucepan. Simmer over medium heat for about 10 minutes until the glaze thickens slightly.
- Glaze the Ribs: Once the ribs are cooked, remove them from the oven or grill. Brush generously with the glaze and return to the oven or direct heat on the grill. Cook for an additional 10-15 minutes until the glaze is caramelized and sticky.
- Serve: Remove the ribs from the heat and let them rest for a few minutes. Cut into individual bones and arrange them in a skeleton-like fashion on a platter for a spooky presentation. Serve immediately.
Extra Tips
For the best results, marinate the ribs overnight to allow the flavors to penetrate deeply into the meat. When glazing, make sure to apply a thick layer of sauce to achieve a rich, caramelized coating.
If grilling, keep an eye on the ribs to prevent burning, and adjust the temperature as needed. For an even more dramatic presentation, use a small brush to paint “bone” details with a mixture of mayonnaise and a small amount of dijon mustard on the ribs after glazing. Enjoy your spooky Skeleton Ribs!
Zombie Meatloaf
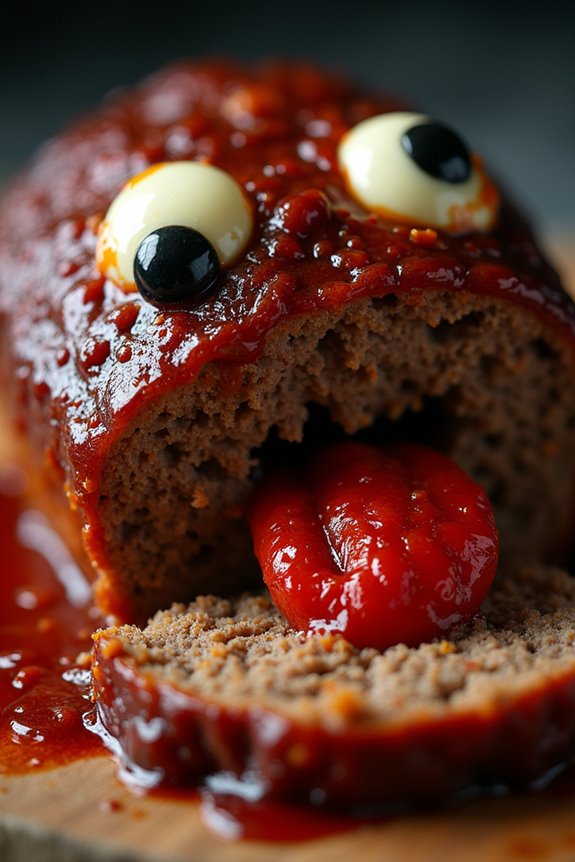
This Halloween, transform your dinner table into a spooky affair with a ghoulishly delightful Zombie Meatloaf. This dish not only brings a fun and eerie touch to your Halloween-themed dinner but also promises a delicious and hearty meal that will satisfy your guests.
With its creepy appearance and savory flavor, the Zombie Meatloaf is the perfect centerpiece for your festive gathering. The combination of ground beef, breadcrumbs, and spices creates a moist and flavorful loaf, while the creative decoration turns it into a haunting masterpiece.
The Zombie Meatloaf isn’t only fun to make but also easy to prepare, making it an ideal choice for a busy Halloween evening. Designed to serve 4-6 people, this recipe includes simple ingredients that come together to form a dish that’s both visually striking and delicious.
The meatloaf is shaped with care and adorned with creepy accents to achieve a truly spine-chilling effect. Whether you’re hosting a Halloween party or enjoying a themed family dinner, this Zombie Meatloaf is sure to impress and delight.
Ingredients (serving size: 4-6 people):
- 2 pounds ground beef
- 1 cup breadcrumbs
- 1 cup milk
- 2 large eggs
- 1 small onion, finely chopped
- 2 cloves garlic, minced
- 1 tablespoon Worcestershire sauce
- 1 teaspoon salt
- 1/2 teaspoon black pepper
- 1/2 teaspoon smoked paprika
- 1/2 cup ketchup
- 1 tablespoon brown sugar
- Black olives (for decoration)
- Provolone cheese slices (for decoration)
- Red bell pepper (for decoration)
Cooking Instructions:
- Preheat the Oven: Begin by preheating your oven to 350°F (175°C) to guarantee it’s ready for baking the meatloaf.
- Prepare the Meat Mixture: In a large mixing bowl, combine the ground beef, breadcrumbs, milk, eggs, chopped onion, minced garlic, Worcestershire sauce, salt, pepper, and smoked paprika. Mix everything thoroughly until all the ingredients are well incorporated.
- Shape the Meatloaf: Transfer the mixture to a baking sheet lined with parchment paper. Shape the mixture into a loaf, using your hands to form a zombie-like head or face. Be creative with the shaping to give it that eerie look.
- Decorate the Meatloaf: Use provolone cheese slices to create eyes and teeth, and black olives for pupils. Cut the red bell pepper into pieces to form a tongue and other facial features. Arrange these decorations on the shaped meatloaf to bring your zombie to life.
- Prepare the Glaze: In a small bowl, mix the ketchup and brown sugar together. Spread this glaze evenly over the top of the meatloaf to add flavor and a glossy finish.
- Bake the Meatloaf: Place the decorated meatloaf in the preheated oven and bake for about 1 hour, or until the internal temperature reaches 160°F (71°C). The glaze should be caramelized, and the meatloaf should be cooked through.
- Serve: Allow the meatloaf to rest for a few minutes before slicing. Serve the spooky slices to your guests and enjoy the Halloween fun.
Extra Tips:
For an even spookier presentation, consider placing the Zombie Meatloaf on a platter surrounded by mashed potatoes styled as tombstones or graveyard dirt. You can also use green food coloring in the potatoes for an extra eerie effect.
When shaping the meatloaf, keep in mind that a well-defined face will enhance its ghoulish appearance. Feel free to get creative with the decorations and use additional vegetables or cheeses to customize your zombie’s look. Enjoy the process and have fun with this Halloween culinary project!
Spiderweb Soup
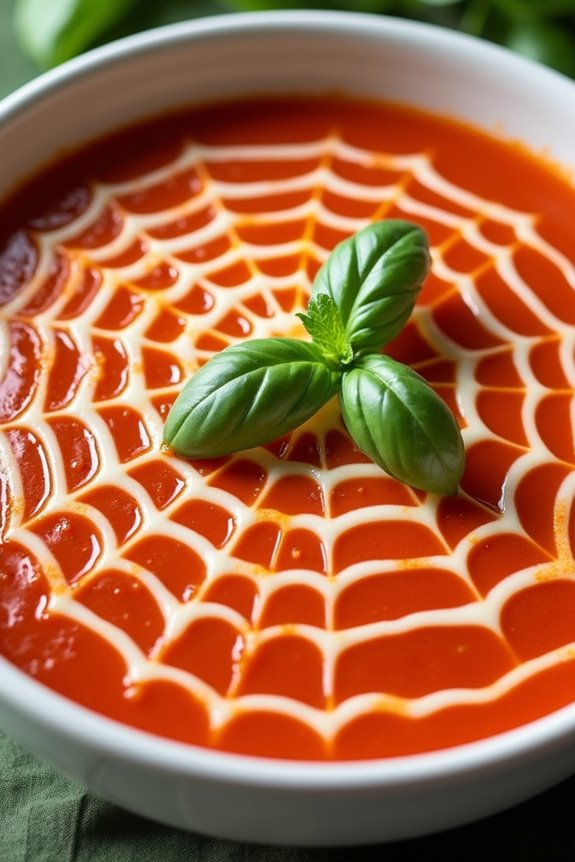
Delight your guests this Halloween with a spooky yet scrumptious Spiderweb Soup. This dish combines the comforting flavors of a classic tomato soup with a fun twist that will fascinate both kids and adults. The spiderweb design on top of the soup is crafted from a creamy mixture, creating a striking contrast against the rich, vibrant red of the soup.
Perfect for a chilly Halloween evening, this soup is as delicious as it’s visually enchanting. It not only serves as a warm appetizer but also as a centerpiece that ties your Halloween-themed dinner together.
Creating the spiderweb effect is easier than it looks, and it’s a great way to get creative in the kitchen. The key is to have a smooth, creamy consistency for the web design that can easily be piped onto the soup. This dish serves 4-6 people, making it ideal for a small gathering.
As you prepare this festive dish, remember that the quality of your ingredients will elevate the flavor, so opt for ripe tomatoes and fresh herbs whenever possible.
Ingredients for 4-6 servings:
- 2 tablespoons olive oil
- 1 large onion, chopped
- 2 cloves garlic, minced
- 2 pounds ripe tomatoes, chopped
- 3 cups vegetable broth
- 1 tablespoon tomato paste
- 1 teaspoon sugar
- Salt and pepper to taste
- 1/4 cup heavy cream
- 2 tablespoons sour cream
- Fresh basil leaves for garnish
Cooking Instructions:
- Prepare the Base: In a large pot, heat the olive oil over medium heat. Add the chopped onion and garlic, sautéing until the onion becomes translucent, about 5 minutes.
- Cook the Tomatoes: Add the chopped tomatoes to the pot along with the vegetable broth, tomato paste, and sugar. Bring the mixture to a boil, then reduce the heat and let it simmer for approximately 20 minutes, until the tomatoes are very soft.
- Blend the Soup: Use an immersion blender to puree the soup until smooth. Alternatively, you can carefully transfer the soup to a blender in batches. Once blended, return the soup to the pot.
- Season the Soup: Taste and season with salt and pepper to your preference. Let the soup simmer on low heat for another 5 minutes.
- Prepare the Spiderweb Mixture: In a small bowl, combine the heavy cream and sour cream, mixing until smooth.
- Create the Spiderweb Design: To form the spiderweb, pour the sour cream mixture into a squeeze bottle or a piping bag with a small nozzle. Pipe a spiral pattern on the surface of each bowl of soup, starting from the center and working your way outward.
- Finish the Spiderweb: Use a toothpick or skewer to drag lines from the center of the spiral to the edge, creating a web-like pattern.
- Garnish and Serve: Garnish with fresh basil leaves and serve the soup hot.
Extra Tips:
For a smoother soup, make sure to strain it through a fine mesh sieve after blending to remove any remaining solids. If fresh tomatoes aren’t available, canned tomatoes can be used as a substitute, just verify they’re of high quality.
The spiderweb design can also be practiced on a separate surface before applying it to the soup, allowing you to perfect your technique. Finally, serve the soup immediately after creating the web design to maintain its appearance. Enjoy your spooky, delicious Spiderweb Soup!
Haunted Graveyard Casserole

Get ready to spook your taste buds with the Haunted Graveyard Casserole, a delightfully eerie dish perfect for a Halloween-themed dinner. This casserole combines the comforting flavors of ground beef, vegetables, and cheese, topped with a crunchy breadcrumb crust.
To give it a hauntingly fun twist, the dish is decorated with edible tombstones and ghostly shapes, making it a centerpiece that will surely impress your guests. Whether you’re hosting a Halloween party or simply enjoying a themed dinner at home, this casserole is a delicious way to get into the festive spirit.
The Haunted Graveyard Casserole not only looks impressive but is also relatively easy to prepare. This dish offers a balance of carbohydrates, proteins, and vegetables, making it a hearty meal for 4-6 people.
The spooky decorations are made with simple ingredients like tortilla cutouts and olives, allowing you to get creative with your designs. As you prepare this casserole, you’ll find that it’s both a feast for the eyes and the palate, bringing the eerie charm of a haunted graveyard straight to your dinner table.
Ingredients (Serves 4-6):
- 1 pound ground beef
- 1 medium onion, chopped
- 2 cloves garlic, minced
- 1 cup frozen mixed vegetables (carrots, peas, corn)
- 1 can (10.5 oz) cream of mushroom soup
- 1 cup shredded cheddar cheese
- 1 cup breadcrumbs
- 1 tablespoon butter, melted
- Salt and pepper to taste
- 4-6 flour tortillas
- Black olives (for decoration)
- Fresh parsley (for garnishing)
Cooking Instructions:
- Preheat the Oven: Start by preheating your oven to 375°F (190°C). This guarantees that the casserole will cook evenly and the cheese will melt perfectly.
- Cook the Beef Mixture: In a large skillet over medium heat, cook the ground beef until it’s browned. Add the chopped onion and minced garlic, cooking until the onion is translucent and fragrant. Drain any excess fat from the skillet.
- Add Vegetables and Soup: Stir in the frozen mixed vegetables and cream of mushroom soup. Season with salt and pepper to taste. Mix well until all the ingredients are combined and heated through. Remove from heat.
- Assemble the Casserole: Transfer the beef and vegetable mixture to a greased 9×13-inch baking dish. Sprinkle the shredded cheddar cheese evenly over the top.
- Prepare the Breadcrumb Topping: In a small bowl, mix the breadcrumbs with the melted butter. Sprinkle this mixture over the cheese layer to form a crust.
- Bake the Casserole: Place the baking dish in the preheated oven and bake for 25-30 minutes, or until the cheese is bubbly and the breadcrumbs are golden brown.
- Create the Graveyard Decorations: While the casserole is baking, use cookie cutters to cut tombstone and ghost shapes out of the flour tortillas. Arrange these on a baking sheet and bake in the oven for 5-7 minutes, or until they’re crisp.
- Decorate and Serve: Once the casserole is done, remove it from the oven and let it cool slightly. Arrange the tortilla tombstones and ghosts on top of the casserole. Use sliced black olives to create eyes for the ghosts. Garnish with fresh parsley to resemble grass.
Extra Tips:
For added flavor, consider seasoning the ground beef with a bit of Worcestershire sauce or your favorite herbs. If you prefer a spicier version, feel free to add some chopped jalapeños or a dash of hot sauce to the beef mixture.
When creating the tortilla decorations, get creative with your designs – you can even enlist kids to help cut out spooky shapes. Finally, this casserole can be prepared a day in advance and refrigerated; simply bake it just before serving for a hassle-free Halloween feast.
Bone-Chilling Chili
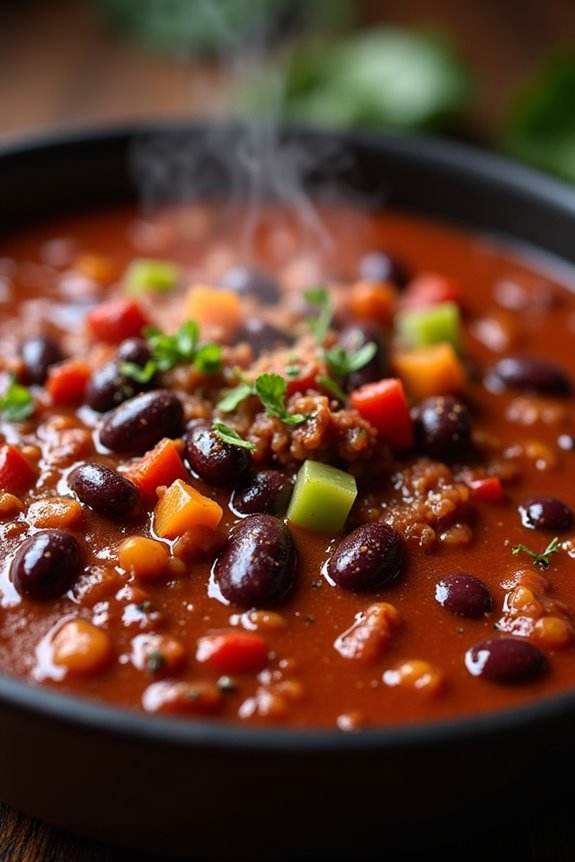
Sink your teeth into a cauldron of Bone-Chilling Chili, a gruesomely delicious concoction perfect for a Halloween-themed dinner. This dish is a spine-tingling blend of flavors, featuring a hearty mix of beans, ground beef, and a medley of spices that will warm your guests from within while sending shivers down their spines.
The rich, deep red color of the chili mimics the eerie hues of a haunted house, making it the perfect centerpiece for a spooky evening. Whether you’re hosting a ghoulish gathering or a cozy night in, this chili is sure to be a hit with its comforting textures and devilishly bold taste.
Crafted to serve 4-6 people, this Bone-Chilling Chili isn’t just a feast for the eyes but also a delight for the taste buds. The combination of cumin, smoked paprika, and a touch of cinnamon adds a mysterious depth, while the addition of fresh peppers and garlic brings a punch of flavor that lingers ever so delightfully.
As the chili simmers away, your kitchen will be filled with an intoxicating aroma that will lure even the most reluctant of ghosts to the table. So gather your ingredients, summon your inner chef, and let the magic unfold in your very own kitchen.
Ingredients:
- 2 tablespoons olive oil
- 1 large onion, chopped
- 3 cloves garlic, minced
- 1 pound ground beef
- 1 green bell pepper, chopped
- 1 red bell pepper, chopped
- 2 tablespoons chili powder
- 1 tablespoon cumin
- 1 teaspoon smoked paprika
- 1/2 teaspoon cinnamon
- 1/4 teaspoon cayenne pepper
- 1 (28-ounce) can crushed tomatoes
- 1 (15-ounce) can kidney beans, drained and rinsed
- 1 (15-ounce) can black beans, drained and rinsed
- 1 cup beef broth
- Salt and pepper to taste
- Optional toppings: sour cream, shredded cheese, chopped cilantro
Cooking Instructions:
- Prepare the Base: In a large pot or Dutch oven, heat the olive oil over medium heat. Add the chopped onion and minced garlic, sautéing until the onion becomes translucent and fragrant, about 5 minutes.
- Brown the Beef: Add the ground beef to the pot, breaking it up with a spoon. Cook until the beef is browned all over, ensuring there are no pink bits, approximately 7-8 minutes.
- Add the Vegetables: Stir in the chopped green and red bell peppers, cooking for another 3-4 minutes until they start to soften.
- Spice it Up: Sprinkle in the chili powder, cumin, smoked paprika, cinnamon, and cayenne pepper. Stir well to coat the beef and vegetables, allowing the spices to bloom and release their aromas for about 1-2 minutes.
- Combine the Rest: Pour in the crushed tomatoes, kidney beans, black beans, and beef broth. Stir to combine all ingredients thoroughly.
- Simmer the Chili: Bring the mixture to a gentle boil, then reduce the heat to low. Cover the pot and let the chili simmer for at least 30-40 minutes, stirring occasionally. This will allow the flavors to meld beautifully.
- Season to Taste: Taste the chili and add salt and pepper according to your preference. If desired, adjust the spices to increase heat or flavor intensity.
- Serve: Once the chili is ready, ladle it into bowls and top with optional sour cream, shredded cheese, and chopped cilantro before serving.
Extra Tips:
For an even deeper flavor, consider making the chili a day in advance and allowing it to sit overnight in the refrigerator. This resting period enhances the complexity of the spices.
If you prefer a vegetarian version, substitute the ground beef with textured vegetable protein or additional beans. To thicken the chili, mash some of the beans with the back of a spoon before adding them to the pot.
Finally, feel free to adjust the level of heat by modifying the amount of cayenne pepper to suit your guests’ taste preferences.