

This year, as Halloween crept closer, I couldn’t help but dream up a menu that would sprinkle a bit of magic onto our celebration. Each dish, from the vibrant Monster Mash Guacamole to the spooky Mummy Hot Dogs, was crafted to tickle the taste buds and add a dash of festive fun. The real enchantment, though, came with the sweet treats, especially the adorable Pumpkin Patch Cupcakes. Are you ready to see how these whimsical ideas came to life?
Monster Mash Guacamole
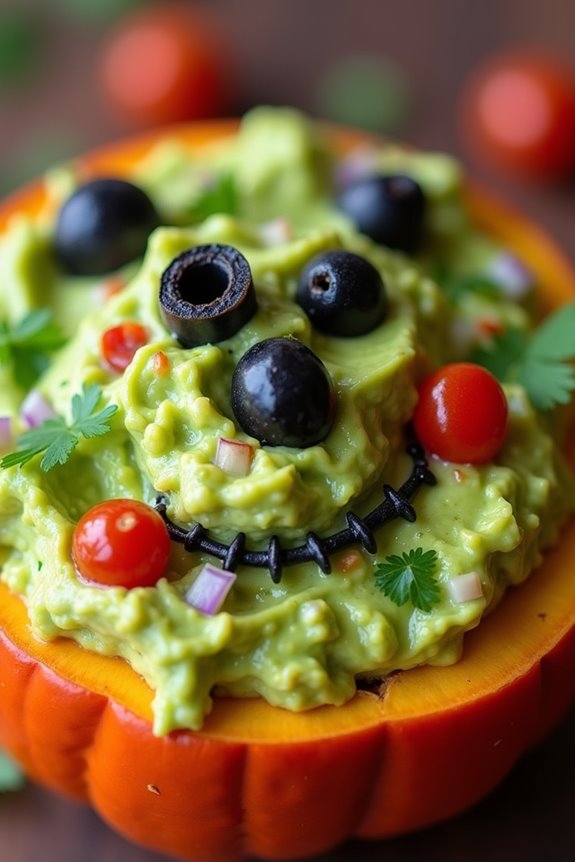
Transform your traditional guacamole into a spooky treat with this Monster Mash Guacamole recipe. Perfect for a Halloween gathering, this dish isn’t only festive but also incredibly delicious. With its vibrant green hue and a dash of creative flair, this appetizer will be a hit among both kids and adults. The creamy texture of avocados combined with a mix of fresh ingredients creates an irresistible dip that’s both healthy and fun.
To give your guacamole a monstrous twist, use black olives and cherry tomatoes to create eerie faces on top, or serve it in mini carved pumpkins for an extra fright factor. This recipe is perfect for a serving size of 4-6 people, making it ideal for a small party or family gathering. Let your creativity run wild as you prepare this ghoulishly good guacamole, and watch as your guests delight in every bite.
Ingredients (Serving Size: 4-6 people):
- 4 ripe avocados
- 1 lime, juiced
- 1 teaspoon salt
- 1/2 cup diced onion
- 3 tablespoons chopped fresh cilantro
- 2 roma tomatoes, diced
- 1 teaspoon minced garlic
- 1 pinch ground cayenne pepper (optional)
- Black olives (for decoration)
- Cherry tomatoes (for decoration)
Cooking Instructions:
- Prepare the Avocados: Cut the avocados in half and remove the pits. Scoop the flesh into a large mixing bowl.
- Mash the Avocados: Using a fork or potato masher, mash the avocado until it’s smooth yet slightly chunky. This will be the base of your guacamole.
- Add Lime Juice and Salt: Pour the lime juice over the mashed avocado and sprinkle with salt. Stir well to combine and prevent the avocados from browning.
- Mix in Fresh Ingredients: Add the diced onion, chopped cilantro, roma tomatoes, and minced garlic to the avocado mixture. Stir gently to guarantee all ingredients are evenly distributed.
- Season to Taste: Add a pinch of ground cayenne pepper if you desire a bit of heat. Taste the guacamole and adjust the seasoning as needed.
- Decorate: Slice black olives and cherry tomatoes to create eyes and mouths for your monster faces. Arrange them on top of the guacamole for a spooky effect.
- Serve: Transfer the Monster Mash Guacamole to a serving bowl. If desired, serve it in a hollowed-out mini pumpkin for added Halloween flair.
Extra Tips:
For the best flavor, prepare your Monster Mash Guacamole just before serving to guarantee it stays fresh and vibrant. If you need to make it ahead of time, cover it tightly with plastic wrap, pressing the wrap directly onto the surface of the guacamole to minimize oxidation.
Additionally, if you’re feeling adventurous, experiment with adding other spooky elements like edible eyes or using different vegetables to create various monster expressions. Enjoy your Halloween-themed creation with tortilla chips, vegetable sticks, or as a topping for your favorite Halloween dishes.
Witch’s Broomstick Cheese Snacks
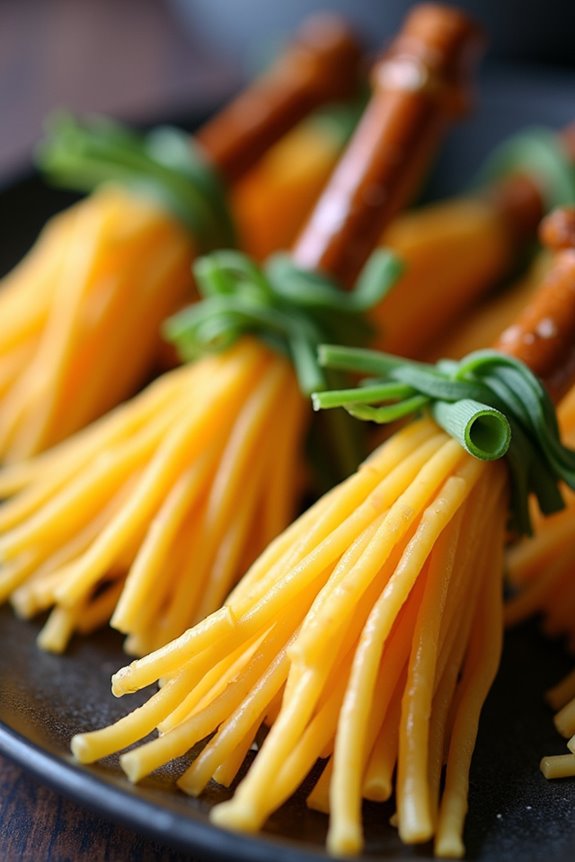
The combination of the crunchy pretzel sticks and the soft, savory cheese creates a delightful texture contrast that makes these snacks irresistible. They aren’t only perfect for serving at parties, but they can also be a fun activity for kids to help with in the kitchen.
With a little creativity, you can turn a few common ingredients into a Halloween-themed treat that will be the talk of the party.
Ingredients (serving size: 4-6 people):
- 1 package (8 oz) of string cheese
- 1 bag of pretzel sticks
- Fresh chives or green onion stalks
Cooking Instructions:
1. Prepare the Cheese:
Take the string cheese and cut each piece into thirds. Each third will serve as the bristly part of the broom.
2. Create the Bristles:
Using a sharp knife, carefully slice the bottom half of each cheese piece lengthwise into thin strips. Be cautious not to cut all the way through the cheese, so it remains intact as a solid top with bristle-like strands hanging below.
3. Assemble the Broomsticks:
Gently insert a pretzel stick into the uncut top portion of the cheese. Push it in just enough so that it holds securely without breaking the cheese.
4. Tie the Brooms:
Cut the chives or green onion stalks into small strips, about 3-4 inches long. Use them to tie around the top of the cheese where it meets the pretzel stick, resembling the tie of a traditional broom. Secure with a simple knot or a bow for an added decorative touch.
5. Serve and Enjoy:
Place your Witch’s Broomstick Cheese Snacks on a Halloween-themed platter and serve immediately.
Extra Tips:
For best results, verify the cheese is cold and firm before slicing to prevent it from becoming too soft and difficult to work with.
If you’re preparing these snacks ahead of time, consider refrigerating them until ready to serve. You can also experiment with different types of cheese or flavored pretzel sticks to add an extra dimension of flavor.
If you’re finding it difficult to tie the chives, briefly soak them in warm water to make them more pliable. Enjoy your spooky, cheesy broomsticks!
Mummy Hot Dogs
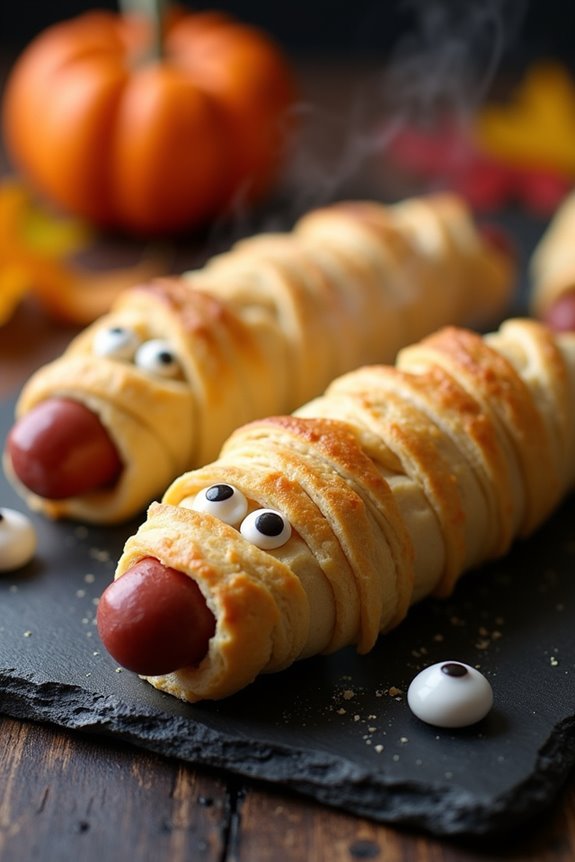
Whether you’re hosting a Halloween party or just need a quick, themed snack, Mummy Hot Dogs are a fantastic choice. They’re simple to prepare, and the ingredients are easily accessible at your local grocery store.
With just a few steps, you can create a dish that’s both visually appealing and scrumptious. The added touch of edible eyes gives these mummies their characteristic look, making them an instant hit at any Halloween event.
Ingredients (serving size 4-6 people):
- 8 hot dogs
- 1 can (8 ounces) refrigerated crescent roll dough
- 1 tablespoon all-purpose flour (for dusting)
- 1 egg, beaten (for egg wash)
- 16 small edible candy eyes
- Ketchup and mustard (optional, for serving)
Cooking Instructions:
- Preheat the Oven: Start by preheating your oven to 375°F (190°C). This guarantees that it reaches the correct temperature by the time you’re ready to bake.
- Prepare the Dough: On a lightly floured surface, unroll the crescent roll dough. Using a knife or pizza cutter, slice the dough into thin strips, approximately 1/4 inch wide. These strips will serve as the mummy’s bandages.
- Wrap the Hot Dogs: Take a hot dog and wrap the strips of dough around it, leaving a small space unwrapped near one end for the mummy’s face. Overlap the strips slightly to give the appearance of bandages. Repeat with all hot dogs.
- Apply Egg Wash: Place the wrapped hot dogs on a baking sheet lined with parchment paper. Brush each one with a beaten egg using a pastry brush. This will give the “bandages” a nice golden color when baked.
- Bake: Place the baking sheet in the preheated oven and bake for about 15-18 minutes, or until the dough is golden brown and cooked through.
- Add Eyes: Once baked, remove from the oven and let cool for a few minutes. Add two small candy eyes to the unwrapped area of each hot dog to create the mummy’s face.
- Serve: Serve the mummy hot dogs warm with ketchup and mustard on the side for dipping.
Extra Tips:
For a more flavorful twist, consider using cheese-filled hot dogs or adding a slice of cheese under the dough before wrapping.
If you’re using candy eyes that might melt, wait until the hot dogs cool slightly before adding them. You can also use dots of mustard or ketchup to create eyes if candy eyes are unavailable.
Keep leftover mummies wrapped in foil and reheat them in the oven to maintain their crispiness. Enjoy your spooky treat!
Spooky Spider Deviled Eggs
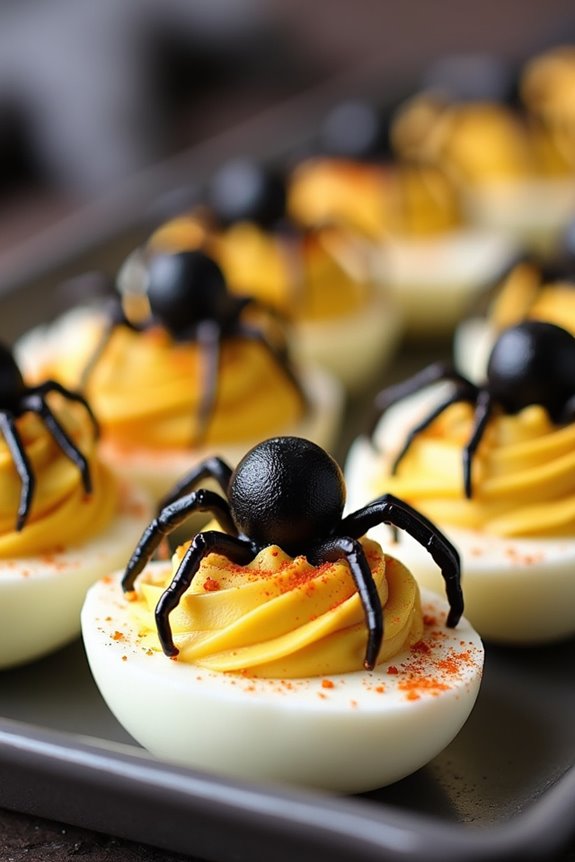
Spooky Spider Deviled Eggs are a delicious and fun way to bring some Halloween spirit to your table. These creepy appetizers are perfect for a themed party, blending classic deviled egg flavors with a spooky twist. By creatively using black olives to craft little spider decorations on top of each egg, you can transform a simple dish into a festive Halloween treat.
This recipe is sure to impress both kids and adults, making it a must-have for your holiday gathering. The creamy yolk mixture is seasoned with classic ingredients like mayonnaise and mustard, guaranteeing that these deviled eggs aren’t only visually appealing but also deliciously flavorful. The addition of paprika adds a subtle kick, while the black olive spiders provide a unique and playful touch.
With a little bit of effort, you can easily create these Spooky Spider Deviled Eggs and add a touch of Halloween magic to your menu. This recipe serves 4-6 people, making it perfect for a small gathering or as part of a larger spread.
Ingredients:
- 6 large eggs
- 1/4 cup mayonnaise
- 1 teaspoon yellow mustard
- Salt to taste
- Pepper to taste
- Paprika for garnish
- 12 black olives (pitted)
Cooking Instructions:
- Boil the Eggs: Start by placing the eggs in a single layer in a saucepan. Cover them with water, about an inch above the eggs. Bring the water to a boil over medium-high heat. Once boiling, turn off the heat, cover the pan, and let the eggs sit for 10-12 minutes.
- Cool and Peel the Eggs: After cooking, transfer the eggs to a bowl of ice water to cool for about 5 minutes. This makes them easier to peel. Gently crack and peel each egg, ensuring the shells are completely removed.
- Prepare the Egg Yolks: Slice each egg in half lengthwise. Carefully scoop out the yolks into a mixing bowl, placing the whites aside on a serving platter.
- Make the Filling: Using a fork, mash the egg yolks until they’re crumbly. Add mayonnaise, mustard, salt, and pepper to taste. Mix until smooth and creamy.
- Fill the Egg Whites: Spoon or pipe the yolk mixture back into the egg white halves, mounding slightly.
- Create the Olive Spiders: Slice the black olives in half. Use one half as the spider body, placing it on top of the yolk mixture. Thinly slice the remaining olive halves to create legs, arranging four slices on each side of the body.
- Garnish and Serve: Lightly sprinkle paprika over the eggs for a touch of color and flavor. Serve immediately or refrigerate until ready to serve.
Extra Tips:
When making Spooky Spider Deviled Eggs, verify the eggs are boiled correctly for easy peeling by using older eggs if possible, as they tend to peel more easily.
For a vibrant presentation, consider using a piping bag or a plastic bag with the corner snipped off to fill the egg whites with the yolk mixture. If you want to get creative, try using red pepper flakes instead of paprika for an added kick.
Remember to make the spiders just before serving to keep the olives fresh and shiny.
Ghostly Pizza Bagels
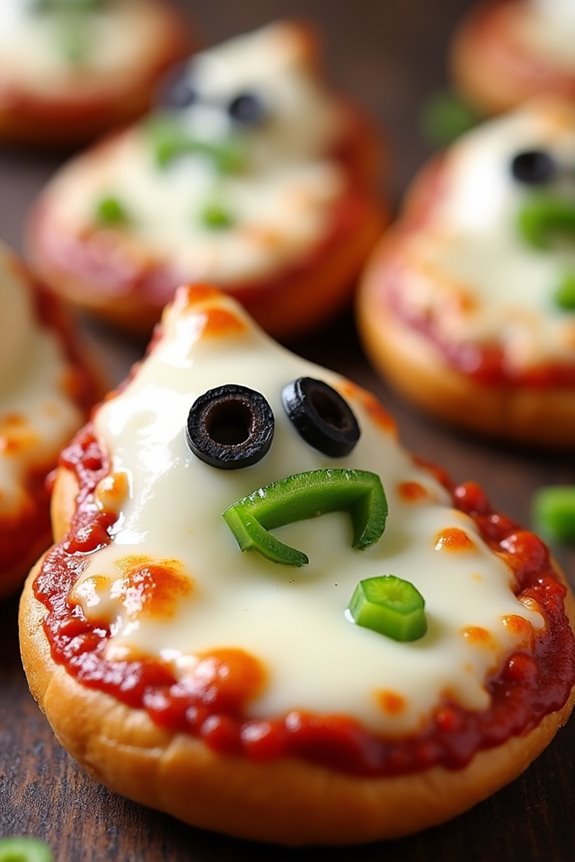
Ghostly Pizza Bagels are a fun and spooky twist on the classic pizza bagel, perfect for a Halloween party or a themed dinner. These bite-sized treats are easy to make and allow for creativity with their ghostly designs. The base is a crispy bagel half, topped with delicious pizza sauce and gooey mozzarella cheese, which is shaped into ghostly forms.
With just a few additional toppings like olives and bell peppers, you can create spooky ghost faces that will delight both kids and adults. This recipe isn’t only simple to make but also permits customization, depending on your taste preferences. You can add your favorite toppings or keep it simple with just cheese and sauce.
The best part about Ghostly Pizza Bagels is that they can be prepped ahead of time and quickly baked just before serving, making them an ideal option for busy Halloween nights. Whether you’re hosting a gathering or just looking for a festive meal, these pizza bagels are sure to be a hit.
Ingredients (for 4-6 people):
- 6 bagels, halved
- 1 cup pizza sauce
- 2 cups shredded mozzarella cheese
- 12 slices of mozzarella cheese (for ghost shapes)
- 1/2 cup black olives, sliced
- 1/2 cup green bell peppers, diced
- 1 tablespoon olive oil
- 1 teaspoon dried oregano
- Salt and pepper to taste
Cooking Instructions:
- Preheat the Oven: Preheat your oven to 375°F (190°C) to guarantee it’s hot enough to make the bagel bases crispy.
- Prepare the Bagels: Lay out the halved bagels on a baking sheet, cut side up. Brush each half lightly with olive oil to help them crisp up in the oven.
- Add the Sauce: Spread a generous tablespoon of pizza sauce over each bagel half, guaranteeing the surface is evenly coated.
- Create Ghost Shapes: Cut the mozzarella slices into ghost shapes using a sharp knife or cookie cutter. Arrange these ghost shapes over the sauce on each bagel half.
- Decorate the Ghost Faces: Use the sliced black olives and diced green bell peppers to create eyes and mouths on the ghost shapes for a spooky effect.
- Season and Bake: Sprinkle a bit of dried oregano, salt, and pepper over the bagels. Place the baking sheet in the preheated oven and bake for 10-12 minutes or until the cheese is melted and bubbly.
- Serve: Remove from the oven and let them cool slightly. Serve warm and enjoy the ghostly goodness!
Extra Tips:
To make your Ghostly Pizza Bagels even more fun, consider using a variety of toppings such as pepperoni, mushrooms, or jalapeños to create different ghost expressions.
If you prefer a more nutritious option, use whole-grain bagels and low-fat cheese. For crispier bagels, toast the bagel halves lightly before adding the toppings.
Remember to keep an eye on the bagels while they bake to prevent the cheese from burning, as ovens can vary. Happy haunting and enjoy your delicious Halloween treat!
Pumpkin Patch Cupcakes

Pumpkin Patch Cupcakes are a delightful and festive treat perfect for any Halloween gathering. These cupcakes combine the warm, comforting flavors of pumpkin spice with the fun and creativity of Halloween decorations. Topped with creamy, spiced frosting and adorable pumpkin decorations, they’re sure to be a hit with both kids and adults.
Whether you’re hosting a Halloween party or just want to bring a bit of seasonal cheer to your family, these cupcakes are both easy to make and a joy to eat.
The base of these cupcakes is a moist pumpkin cake, made with real pumpkin puree and spiced with cinnamon, nutmeg, and cloves. The frosting is a luscious cream cheese blend, enhanced with a touch of maple syrup for extra sweetness. To bring the pumpkin patch theme to life, the cupcakes are garnished with candy pumpkins and green icing vines. This recipe serves 4-6 people, making it perfect for a small gathering or family treat.
Ingredients:
- 1 cup all-purpose flour
- 1 teaspoon baking soda
- 1/2 teaspoon baking powder
- 1/2 teaspoon ground cinnamon
- 1/4 teaspoon ground nutmeg
- 1/4 teaspoon ground cloves
- 1/4 teaspoon salt
- 1/2 cup canned pumpkin puree
- 1/2 cup granulated sugar
- 1/4 cup brown sugar
- 1/2 cup vegetable oil
- 2 large eggs
- 1 teaspoon vanilla extract
- 4 ounces cream cheese, softened
- 1/4 cup unsalted butter, softened
- 1 cup powdered sugar
- 1 tablespoon maple syrup
- Small candy pumpkins
- Green decorating icing
Cooking Instructions:
- Preheat the Oven: Begin by preheating your oven to 350°F (175°C). Line a muffin tin with cupcake liners to prepare for the batter.
- Mix Dry Ingredients: In a medium bowl, whisk together the flour, baking soda, baking powder, cinnamon, nutmeg, cloves, and salt. Set aside.
- Combine Wet Ingredients: In a large mixing bowl, combine the pumpkin puree, granulated sugar, brown sugar, vegetable oil, eggs, and vanilla extract. Beat until well combined and smooth.
- Incorporate Dry Ingredients: Gradually add the dry ingredients to the wet mixture, mixing until just combined. Be careful not to overmix, as this can make the cupcakes dense.
- Fill the Cupcake Liners: Evenly divide the batter among the prepared cupcake liners, filling each about two-thirds full.
- Bake: Place the muffin tin in the preheated oven and bake for 18-20 minutes, or until a toothpick inserted into the center of a cupcake comes out clean. Allow the cupcakes to cool in the pan for about 5 minutes before transferring them to a wire rack to cool completely.
- Prepare the Frosting: In a medium bowl, beat together the softened cream cheese and butter until smooth. Gradually add the powdered sugar and continue to beat until fluffy. Stir in the maple syrup for added flavor.
- Decorate: Once the cupcakes are completely cool, frost them with the cream cheese frosting. Use the green decorating icing to create vines on top of the frosting, and place a candy pumpkin in the center of each cupcake to complete the pumpkin patch look.
Extra Tips:
To enhance the pumpkin flavor, consider adding a teaspoon of pumpkin pie spice to the batter. For a playful twist, you can also mix in chocolate chips or chopped nuts into the batter before baking.
When decorating, feel free to get creative with other Halloween-themed candies or edible glitter for a spookier effect. If you prefer a less sweet frosting, reduce the amount of powdered sugar to taste.
Enjoy these cupcakes with a warm cup of apple cider for the perfect autumn treat!
Creepy Crawly Pretzel Sticks
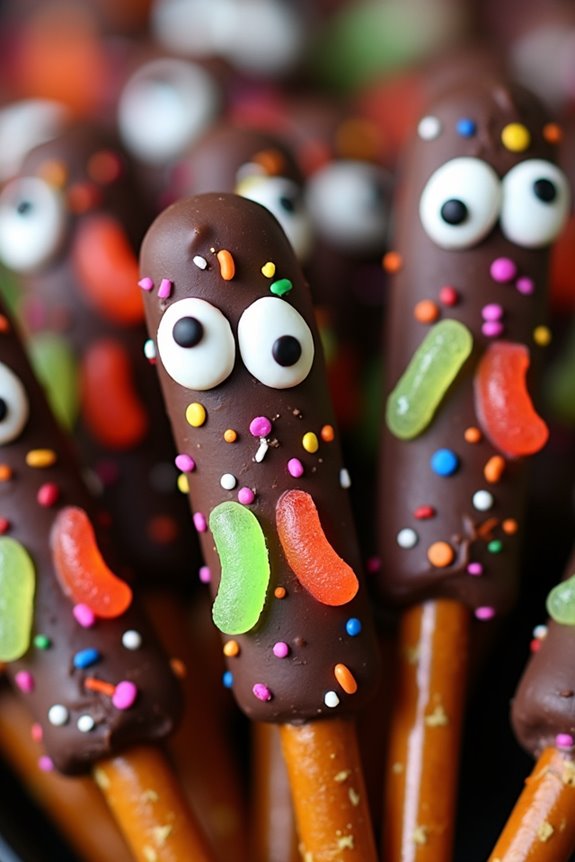
Indulge in the eerie and delicious world of Halloween-themed treats with these Creepy Crawly Pretzel Sticks. Perfect for adding a spooky touch to your Halloween party, these treats combine the salty crunch of pretzel sticks with the sweet allure of chocolate.
With the addition of candy eyes and gummy worms, each pretzel stick transforms into a creepy crawly creature that’s as delightful to look at as it’s to eat. Whether you’re entertaining kids or adults, these festive snacks are sure to be a hit and a conversation starter at any gathering.
These Creepy Crawly Pretzel Sticks aren’t only fun to make but also simple enough that you can enlist the help of little hands in the kitchen. The recipe makes enough for a serving size of 4-6 people, making it perfect for a small gathering or a cozy family night in.
With just a few ingredients and some creativity, you can whip up a batch of these spooky snacks in no time, leaving you plenty of room to enjoy the rest of your Halloween festivities.
Ingredients (Serves 4-6):
- 24 pretzel rods
- 1 cup of semi-sweet chocolate chips
- 1 tablespoon of coconut oil
- 48 candy eyes
- 24 gummy worms
- 1/4 cup of sprinkles (optional)
Cooking Instructions:
- Prepare the Chocolate Coating: In a microwave-safe bowl, combine the semi-sweet chocolate chips and coconut oil. Microwave in 30-second intervals, stirring between each, until the chocolate is completely melted and smooth.
- Coat the Pretzels: Lay out a sheet of parchment paper on a baking tray to prevent sticking. Dip each pretzel rod into the melted chocolate, ensuring that about two-thirds of each rod is coated. Let any excess chocolate drip off before placing the pretzel on the parchment paper.
- Decorate with Candy Eyes and Gummy Worms: While the chocolate is still wet, press two candy eyes onto each pretzel rod. Next, wrap a gummy worm around each rod, pressing gently so it adheres to the chocolate.
- Add Sprinkles (Optional): If desired, sprinkle the chocolate-coated sections with your choice of sprinkles for extra color and texture.
- Allow to Set: Transfer the baking tray to the refrigerator and allow the chocolate to set for about 15-20 minutes, or until completely firm.
- Serve and Enjoy: Once set, remove the pretzel sticks from the parchment paper and serve them on a festive platter for your guests to enjoy.
Extra Tips:
For an even more festive presentation, consider using different colored chocolate melts instead of semi-sweet chocolate, such as orange or green, to match the Halloween theme.
You can also experiment with different types of sprinkles or edible glitter to add more flair to your Creepy Crawly Pretzel Sticks. If you’re making these treats in advance, store them in an airtight container in the refrigerator to keep the chocolate from melting.
Finally, if you prefer a nutty flavor, try adding crushed nuts to the chocolate coating before it sets. Enjoy your spooky creations!
Vampire Fang Cookies
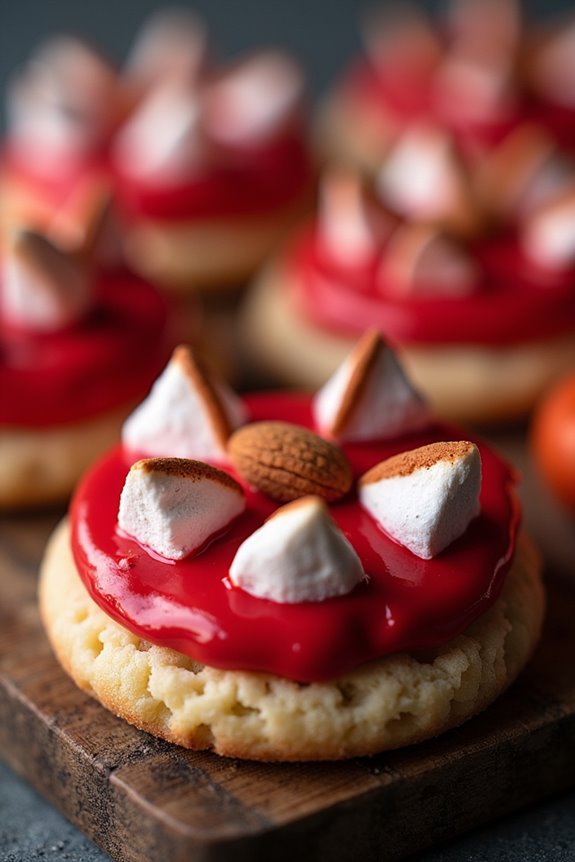
Celebrate this Halloween with a frightfully fun treat by making Vampire Fang Cookies! These delightful cookies aren’t only delicious but also embody the spooky spirit of Halloween. Perfect for a themed party or just a fun family activity, these cookies are designed to resemble a vampire’s sharp fangs, with a touch of creativity to make them stand out.
The base of these cookies is a classic sugar cookie, which is easy to mold and decorate. These Vampire Fang Cookies aren’t only visually striking but also a delightful treat to enjoy. The use of marshmallows and almond slivers makes them both fun and flavorful. This recipe yields about 24 cookies, which is perfect for a serving size of 4-6 people. Gather your ingredients and follow the steps below to create this ghoulish treat that’s sure to impress both children and adults alike.
Ingredients:
- 1 cup unsalted butter, softened
- 1 cup granulated sugar
- 1 large egg
- 1 teaspoon vanilla extract
- 2 ½ cups all-purpose flour
- ½ teaspoon baking powder
- ½ teaspoon salt
- 1 cup red frosting
- 24 large marshmallows, cut in half
- 48 almond slivers
Cooking Instructions:
- Prepare the Dough: In a large mixing bowl, cream together the softened butter and sugar until light and fluffy. Add in the egg and vanilla extract, mixing until well combined.
- Combine Dry Ingredients: In a separate bowl, whisk together the flour, baking powder, and salt. Gradually add this dry mixture to the wet ingredients, mixing until just combined and a dough forms.
- Chill the Dough: Divide the dough into two portions, flatten them into disks, wrap in plastic wrap, and refrigerate for about 1 hour. This will make the dough easier to roll out and cut.
- Preheat and Prepare: Preheat your oven to 350°F (175°C). Line two baking sheets with parchment paper.
- Roll and Cut Out Cookies: On a lightly floured surface, roll out one disk of dough to about ¼ inch thickness. Use a round cookie cutter (about 3 inches in diameter) to cut out circles. Re-roll scraps as necessary to cut more cookies.
- Bake the Cookies: Place the cookies on the prepared baking sheets, spacing them about 2 inches apart. Bake for 10-12 minutes or until the edges are just beginning to turn golden. Let them cool on the baking sheets for a few minutes before transferring to a wire rack to cool completely.
- Decorate: Once cooled, spread a generous layer of red frosting around the edges of each cookie. Press two marshmallow halves onto the cookie, slightly overlapping, to create the appearance of gums. Insert almond slivers in between the marshmallows to resemble fangs.
- Set and Serve: Allow the frosting to set before serving. Enjoy your spooky Vampire Fang Cookies!
Extra Tips:
When cutting the marshmallows, use kitchen scissors for a clean cut. If the dough becomes too sticky while rolling, chill it for a few more minutes.
For a more dramatic look, you can use red gel food coloring in the frosting to achieve a blood-red color. Additionally, if almond slivers are unavailable or if you have nut allergies, you can use small white candy pieces for the fangs.
Keep the cookies stored in an airtight container to maintain freshness.
Eyeball Pasta Salad
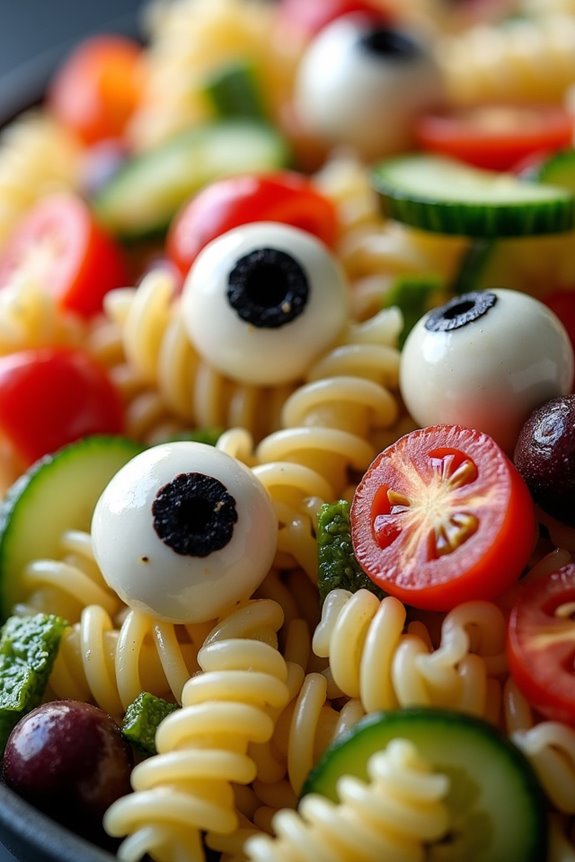
Halloween is the perfect time to get creative in the kitchen, and what better way to celebrate than with a spooky dish like Eyeball Pasta Salad? This festive dish isn’t only visually striking but also deliciously satisfying. It’s a fun and easy recipe that will thrill both kids and adults at any Halloween gathering. The combination of pasta, fresh vegetables, and a tangy dressing is given a creepy twist with the addition of mozzarella “eyeballs,” making it the star of your Halloween spread.
Eyeball Pasta Salad isn’t only a feast for the eyes but also a nutritious option for your party menu. The mozzarella balls, cleverly disguised as eyeballs with olives, bring a bit of fright to your table while maintaining the dish’s deliciousness. The pasta salad can be served as a side dish or a main course, depending on your Halloween party plans. This dish is designed to serve 4-6 people, making it perfect for a small gathering or family dinner.
Ingredients for Eyeball Pasta Salad (Serving Size: 4-6 people):
- 12 oz (340 g) rotini or fusilli pasta
- 1 cup cherry tomatoes, halved
- 1 cup cucumber, diced
- 1/2 cup black olives, sliced
- 1/2 cup green olives, sliced
- 1/2 cup red bell pepper, diced
- 12 mini mozzarella balls
- 2 tablespoons olive oil
- 1 tablespoon balsamic vinegar
- 1 teaspoon Italian seasoning
- Salt and pepper to taste
- 12 small round slices of black olives (for the eyeballs)
Instructions:
- Cook the Pasta: Begin by boiling a large pot of salted water. Add the pasta and cook according to the package instructions until al dente. Drain the pasta and rinse it under cold water to stop the cooking process and cool it down.
- Prepare the Vegetables: While the pasta is cooking, prepare your vegetables. Halve the cherry tomatoes, dice the cucumber and red bell pepper, and slice the black and green olives. Set these aside.
- Make the Dressing: In a small bowl, whisk together the olive oil, balsamic vinegar, Italian seasoning, salt, and pepper. This will be the dressing for your pasta salad.
- Assemble the Salad: In a large mixing bowl, combine the cooked and cooled pasta, cherry tomatoes, cucumber, red bell pepper, and sliced olives. Pour the dressing over the top and toss until everything is well coated.
- Create the Eyeballs: Take each mini mozzarella ball and press a small slice of black olive into the center to create an “eyeball.” Repeat this for all the mozzarella balls.
- Add the Eyeballs: Gently fold the mozzarella eyeballs into the pasta salad. Make sure they’re evenly distributed throughout the salad for the best visual effect.
- Chill and Serve: Cover the pasta salad and refrigerate for at least 30 minutes before serving to allow the flavors to meld together. Serve chilled and enjoy the spooky presentation!
Extra Tips:
To enhance the flavor of the Eyeball Pasta Salad, consider making the dressing a day in advance to allow the flavors to develop. You can also experiment with different types of pasta or add in extra vegetables like carrots or zucchini for added color and nutrients.
If you want to add a bit of protein, grilled chicken or sliced salami can be mixed in. For a vegetarian version, simply verify that any added proteins are plant-based. Finally, to make the eyeballs even more realistic, use a small amount of ketchup or hot sauce around the olive slice on the mozzarella balls to mimic bloodshot eyes.
Gory Gelatin Brain
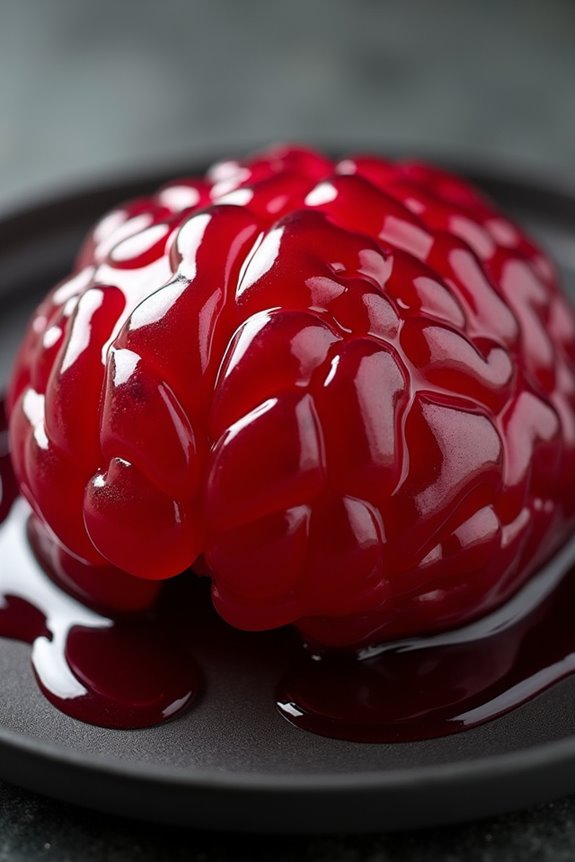
For a frightfully fun Halloween treat, the Gory Gelatin Brain is a must-have centerpiece that will both terrify and delight your guests. This eerie dish not only looks the part but tastes surprisingly delicious! With its realistic, brain-like appearance, this dessert will be the highlight of your Halloween spread.
Designed to serve 4-6 people, this recipe is easy to follow and requires minimal ingredients, making it a stress-free addition to your spooky festivities. The Gory Gelatin Brain is perfect for those who enjoy a bit of theatrical flair with their Halloween treats. The combination of flavored gelatin, condensed milk, and food coloring allows you to create a dessert that looks gruesome yet tastes delightful.
The texture is perfectly wobbly, mimicking that of a real brain, and the vibrant red color adds to the gory effect. Whether you’re hosting a Halloween party or simply want to surprise your family with a creepy dessert, this Gory Gelatin Brain is sure to impress.
Ingredients (Serves 4-6):
- 2 packages (6 oz each) of strawberry or raspberry flavored gelatin
- 1 cup of sweetened condensed milk
- 3 cups of boiling water
- 1 cup of cold water
- Red food coloring
- Brain-shaped gelatin mold
Cooking Instructions:
- Prepare the Gelatin Mixture: In a large mixing bowl, dissolve the flavored gelatin in 3 cups of boiling water. Stir until fully dissolved, then add 1 cup of cold water to the mixture.
- Add Condensed Milk: Pour the sweetened condensed milk into the gelatin mixture and stir until well combined. This will give the brain its opaque, fleshy appearance.
- Color the Mixture: Add a few drops of red food coloring to the gelatin mix and stir. Adjust the amount of food coloring until you achieve a realistic brain hue, with a slightly pinkish-red tint.
- Mold the Brain: Lightly grease the inside of the brain-shaped gelatin mold with a neutral oil spray to guarantee easy removal. Pour the gelatin mixture into the mold, filling it completely.
- Chill the Gelatin: Place the filled mold in the refrigerator and allow it to set for at least 6 hours, or until the gelatin is firm to the touch. Overnight chilling is recommended for best results.
- Unmold the Brain: To unmold, gently loosen the edges of the gelatin from the mold, then invert it onto a serving platter. If necessary, dip the mold briefly in warm water to help release the gelatin.
Extra Tips:
When preparing your Gory Gelatin Brain, verify the mixture is thoroughly mixed to avoid any streaks of unmixed gelatin or milk, which can affect the appearance.
To add a more dramatic effect, consider drizzling some red berry sauce over the brain before serving, to mimic oozing blood. If you don’t have a brain-shaped mold, a similar-sized bowl can be used, though the shape will differ.
Finally, take care when unmolding the gelatin to avoid breakage; a gentle touch and a little patience go a long way!
Haunted Graveyard Dirt Cups
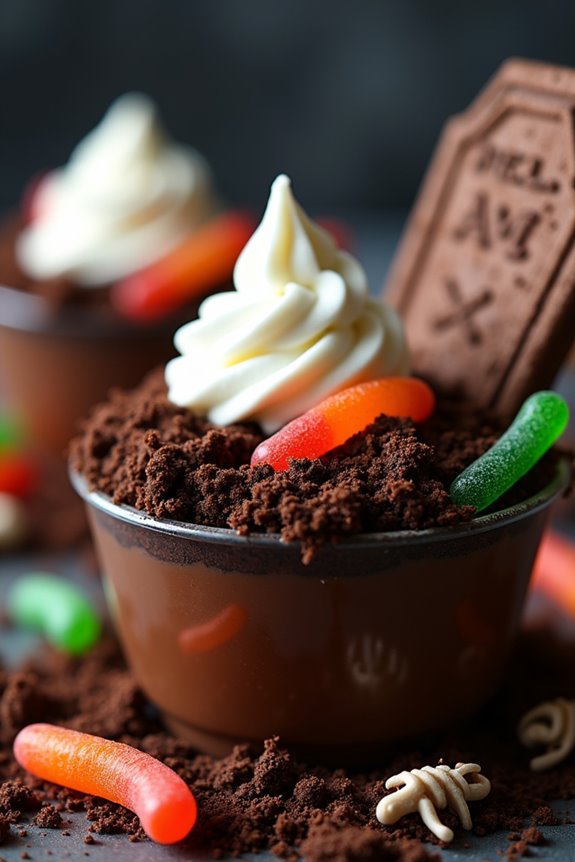
For those looking for a fun and spooky treat to serve at a Halloween party, Haunted Graveyard Dirt Cups are a perfect choice. These eerie desserts combine layers of rich chocolate pudding, crushed cookies, and ghoulish decorations to create a mini graveyard scene in a cup. Not only are they visually appealing, but they also offer a deliciously decadent combination of textures and flavors that will delight both kids and adults alike. The best part? They’re incredibly easy to make and require no baking, making them a convenient option for busy hosts.
Crafting these dirt cups is a creative and fun activity that you can even involve the kids in. The base layer consists of smooth chocolate pudding, followed by a crunchy layer of crushed chocolate cookies that mimic the appearance of dirt. To make these cups truly haunting, you can decorate them with gummy worms, candy skeletons, and tombstone-shaped cookies. This recipe serves 4-6 people, making it an ideal option for small gatherings or family parties. With a little bit of imagination and a few simple ingredients, you can create a hauntingly delightful dessert that will surely be a crowd-pleaser.
Ingredients (Serving Size: 4-6 people):
- 2 cups chocolate pudding (store-bought or homemade)
- 1 package (about 15-20) chocolate sandwich cookies
- 1/2 cup whipped cream
- 1/4 cup gummy worms
- 6-8 tombstone-shaped cookies (such as Milano or homemade)
- 1/4 cup candy skeletons or other Halloween-themed candies
- 6 small clear cups or jars
Cooking Instructions:
- Prepare the Chocolate Pudding: If you’re making chocolate pudding from scratch, cook it according to your recipe and allow it to cool completely. If using store-bought pudding, simply open the containers and have them ready.
- Crush the Cookies: Place the chocolate sandwich cookies in a resealable plastic bag. Using a rolling pin or a heavy object, crush the cookies until they resemble fine crumbs. This will be your “dirt.”
- Layer the Cups: Begin by placing a generous spoonful of chocolate pudding at the bottom of each cup or jar. Spread it to create an even layer.
- Add the Dirt Layer: Sprinkle a layer of the crushed cookies over the pudding in each cup, ensuring it covers the pudding evenly. This layer should look like a layer of dirt.
- Decorate with Creepy Elements: Insert a few gummy worms into the cookie dirt, allowing them to peek out slightly. Next, place a tombstone-shaped cookie at the back of the cup to resemble a grave marker. Scatter candy skeletons or other Halloween candies around the surface for added spookiness.
- Finish with Whipped Cream: Add a small dollop of whipped cream on top of the dirt to mimic a freshly dug grave. Be careful not to cover your decorations.
- Chill Before Serving: Place the completed cups in the refrigerator for at least 30 minutes to allow the flavors to meld and for the pudding to set a bit more.
Extra Tips:
When crushing the cookies, be sure to leave some slightly larger pieces to add a bit of texture contrast. For a more festive touch, you can tint the whipped cream with a few drops of food coloring to match the Halloween theme, such as orange or green. Additionally, you can personalize each cup by writing names or spooky messages on the tombstone cookies using edible markers.
These dirt cups are best enjoyed the same day they’re assembled but can be stored in the fridge for up to two days if needed.