

Hosting a Halloween gathering? Let’s make it a spellbinding affair with some frightfully fun treats. Picture your guests sipping on a bubbling Witch’s Brew Punch while savoring Mummy Hot Dogs and Spooky Spider Deviled Eggs. Each dish is designed to enchant and delight. Ready to explore more ghoulishly delicious recipes for your party?
Witch’s Brew Punch
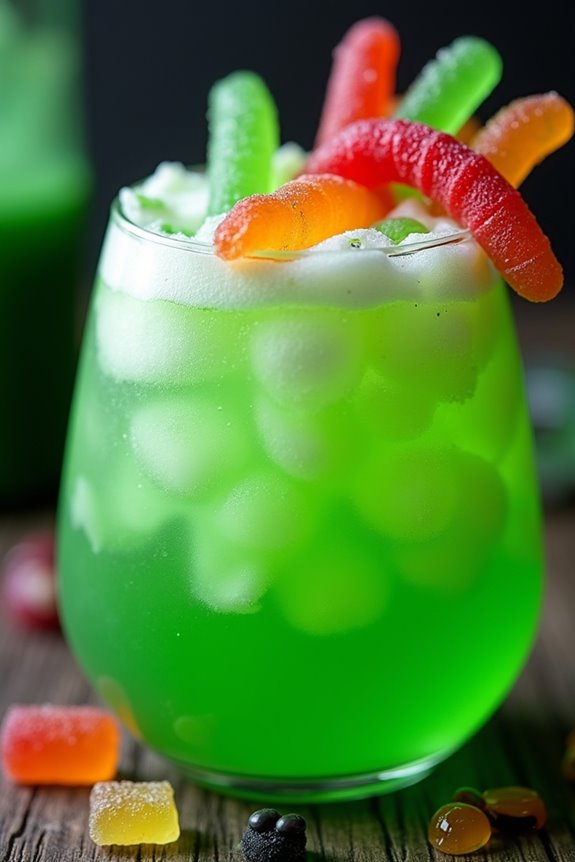
Halloween is the perfect time to release your creativity in the kitchen and delight your guests with themed treats and drinks. One standout addition to your spooky soirée is the Witch’s Brew Punch. This enchanting concoction isn’t only a visual spectacle but also a deliciously invigorating drink that will cast a spell on everyone who tastes it. With a vibrant green hue and a fizzy, fruity flavor, this punch is sure to be a hit at your Halloween party.
The Witch’s Brew Punch is a versatile recipe that allows you to adjust the ingredients to suit your taste. It combines a blend of juices, soda, and fruit, creating a bubbly, sweet, and tangy beverage that’s perfect for both kids and adults. Served in a cauldron or a large punch bowl, this drink can be garnished with gummy worms or other spooky candies to add an extra touch of Halloween magic. Ideal for serving 4-6 people, this recipe guarantees there’s enough for everyone to enjoy.
Ingredients:
- 2 cups pineapple juice
- 2 cups orange juice
- 1 liter lemon-lime soda
- 1 cup lime sherbet
- 1/2 cup grenadine syrup
- 1 cup gummy worms or spooky candies for garnish
- Ice cubes
Cooking Instructions:
- Prepare the Punch Base: In a large punch bowl or cauldron, pour in the pineapple juice and orange juice. Stir them together to blend the flavors.
- Add the Fizz: Slowly add the lemon-lime soda to the juice mixture. Be gentle to preserve the soda’s carbonation, which adds a delightful fizz to the punch.
- Incorporate the Sherbet: Scoop the lime sherbet into the punch. Allow it to slowly melt and dissolve, turning the punch a vibrant green and adding a creamy texture.
- Sweeten with Grenadine: Pour the grenadine syrup over the mixture. This won’t only sweeten the punch but also create a mesmerizing swirl of colors as it settles at the bottom.
- Chill with Ice: Add enough ice cubes to keep the punch cold, making sure it’s invigorating with every sip.
- Garnish and Serve: Just before serving, garnish the punch with gummy worms or your choice of spooky candies for an eerie effect. Serve in clear cups to showcase the vibrant colors and visual appeal.
Extra Tips:
For an adult version of Witch’s Brew Punch, consider adding a splash of rum or vodka to give it a boozy twist. If you prefer a less sweet punch, reduce the amount of grenadine syrup.
You can also experiment with different sherbet flavors, such as lemon or raspberry, to create variations in color and taste. Finally, if you’re serving this punch to children, make sure to monitor the candy garnishes to avoid any choking hazards.
Enjoy the magical ambiance this punch brings to your Halloween festivities!
Mummy Hot Dogs
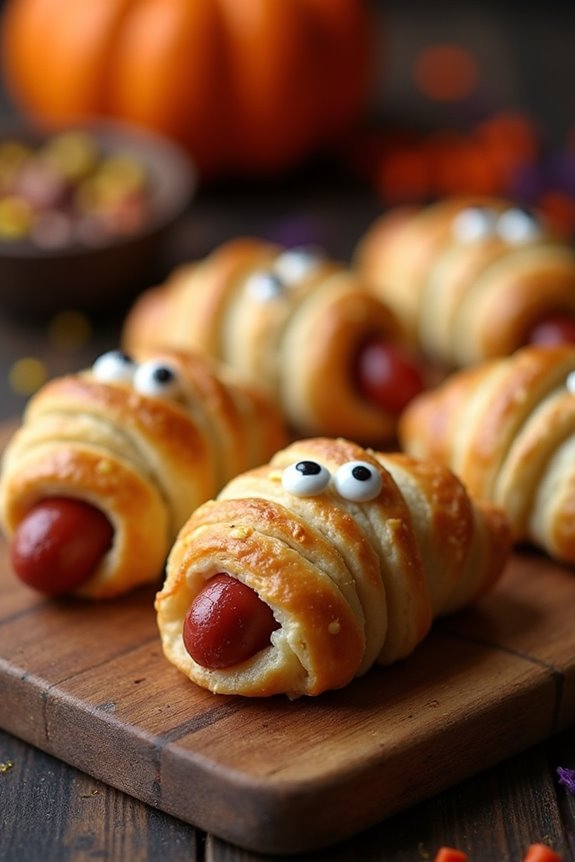
Mummy Hot Dogs are a spooky and fun treat that’s perfect for any Halloween gathering. These delicious snacks aren’t only easy to prepare, but they also add a festive touch to your party table. Wrapped in flaky crescent dough and adorned with edible eyes, these hot dogs will surely be a hit with both kids and adults alike.
The best part about Mummy Hot Dogs is that they require minimal ingredients and effort, making them an ideal last-minute party snack. Whether you’re hosting a Halloween party or simply want to delight your family with a themed meal, Mummy Hot Dogs are a marvelous choice.
With their adorable appearance and savory taste, they make a great addition to any Halloween menu. Serve them as an appetizer or a main course, and watch them disappear in no time. This recipe serves 4-6 people, guaranteeing that everyone gets a taste of these delightful mummies.
Ingredients (Serves 4-6):
- 1 can (8 oz) refrigerated crescent roll dough
- 8 hot dogs
- 1 tablespoon mustard or ketchup (for decoration)
- 16 small edible candy eyes or black sesame seeds
Cooking Instructions:
- Preheat the Oven: Begin by preheating your oven to 375°F (190°C). This guarantees that the oven is at the right temperature for cooking the Mummy Hot Dogs evenly.
- Prepare the Dough: Unroll the crescent roll dough and separate it into four rectangles. Pinch the perforations together to seal them, creating a solid sheet of dough.
- Cut the Dough: Using a knife or a pizza cutter, slice each rectangle into thin strips, about 1/4 inch wide. These strips will be used to wrap around the hot dogs to create the mummy effect.
- Wrap the Hot Dogs: Take one hot dog and start wrapping it with the dough strips, leaving a small gap for the “face” of the mummy. Overlap the strips slightly to give a bandaged look. Repeat for all hot dogs.
- Bake the Mummies: Place the wrapped hot dogs on a baking sheet lined with parchment paper. Bake in the preheated oven for 12-15 minutes or until the dough is golden brown.
- Add the Eyes: Remove the hot dogs from the oven and let them cool for a minute. Use a tiny dot of mustard or ketchup to stick the candy eyes or sesame seeds onto the hot dogs to create faces.
- Serve and Enjoy: Arrange the Mummy Hot Dogs on a platter and serve them with a side of mustard or ketchup for dipping.
Extra Tips:
When wrapping the hot dogs, try to keep the dough strips thin and even to guarantee that they cook evenly. If you don’t have candy eyes, black sesame seeds or small dots of mustard or ketchup work as excellent substitutes.
For a spicier version, consider using jalapeño-flavored hot dogs or adding a slice of cheese underneath the dough for a cheesy surprise. Make sure to keep an eye on the oven, as the dough can brown quickly. Enjoy your Halloween-themed snack, and don’t be afraid to get creative with additional toppings or decorative elements!
Spooky Spider Deviled Eggs
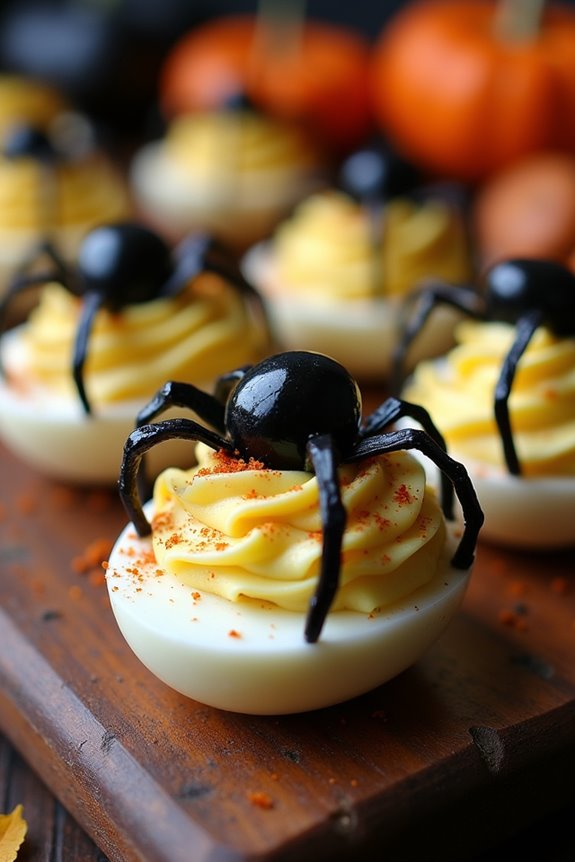
Searching for a frightful yet delicious touch to your Halloween-themed party? Search no more than Spooky Spider Deviled Eggs. This eerie twist on a classic appetizer will delight and surprise your guests, making it a perfect addition to your spooky spread.
The devilishly creamy yolk filling combined with the clever use of black olives to create spider decorations gives these deviled eggs a creepy-crawly aesthetic that’s sure to be a hit among both kids and adults.
Not only are these eggs visually striking, but they also pack a flavorful punch. The combination of mayonnaise, mustard, and a hint of paprika in the yolk mixture brings a well-balanced taste to your palate. These eggs aren’t only fun to make but also a great conversation starter for your Halloween gathering.
Let’s explore the ingredients and instructions to bring these creepy critters to life.
Ingredients for 4-6 servings:
- 6 large eggs
- 1/4 cup mayonnaise
- 1 teaspoon Dijon mustard
- 1/8 teaspoon salt
- 1/8 teaspoon black pepper
- 1/4 teaspoon smoked paprika (plus more for garnish)
- 12 whole black olives (pitted)
Instructions:
- Boil the Eggs: Place the eggs in a large saucepan and cover them with cold water. Bring the water to a boil over medium-high heat. Once it begins to boil, remove the saucepan from the heat, cover it with a lid, and let it sit for 10-12 minutes.
- Cool and Peel: After the eggs have rested, drain the hot water and run cold water over the eggs until they’re cool to the touch. Peel the eggs carefully, taking care not to damage the whites.
- Prepare the Filling: Cut each egg in half lengthwise. Gently scoop out the yolks and place them in a mixing bowl. Arrange the egg whites on a serving platter.
- Make the Yolk Mixture: Mash the yolks with a fork until they reach a fine crumble. Add mayonnaise, Dijon mustard, salt, black pepper, and 1/4 teaspoon of smoked paprika to the bowl. Mix thoroughly until smooth and creamy.
- Fill the Egg Whites: Use a spoon or a piping bag to fill each egg white half with the yolk mixture, making sure each half is generously filled.
- Create the Spiders: Cut the black olives in half. Use one half for the spider body and slice the other half lengthwise into thin strips to create eight legs. Arrange one half olive on top of the filling and place four olive strips on each side to form the spider legs.
- Garnish and Serve: Lightly sprinkle additional smoked paprika over the filled eggs for added flavor and color. Serve immediately or chill in the refrigerator until ready to serve.
Extra Tips:
To guarantee perfectly smooth deviled egg filling, make sure to mash the yolks thoroughly before mixing with other ingredients. You can use a food processor for an even creamier texture.
When cutting the olives for the spider legs, use a sharp knife to achieve thin, even strips, which will make your spiders appear more realistic. If you’re preparing these deviled eggs in advance, keep them covered in the refrigerator to maintain freshness.
Ghostly Pizza Bites
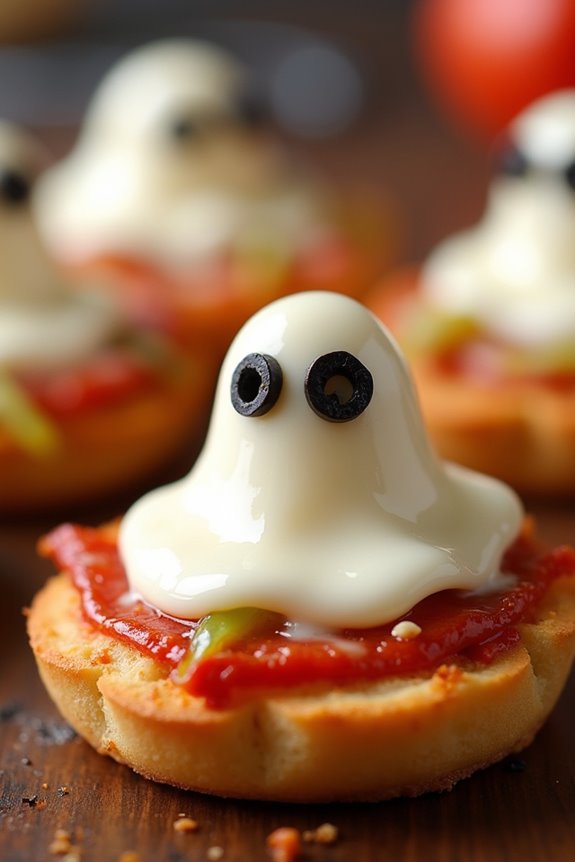
Transform your Halloween party into a haunted delight with these spooky Ghostly Pizza Bites. Perfect for a crowd of 4-6 people, these miniature pizzas aren’t only adorable but also deliciously satisfying. Each bite-sized treat is topped with gooey cheese shaped like a ghost, complete with little olive pieces for eyes, making them an exciting and festive addition to your spread of Halloween-themed party foods.
Whether you’re hosting a party for kids or adults, these playful and tasty pizza bites will surely be a hit.
The beauty of Ghostly Pizza Bites lies in their simplicity and adaptability. You can prepare the dough from scratch, use store-bought pizza dough, or even opt for pre-made mini pizza bases to save time. The base is slathered with a rich tomato sauce, sprinkled with your favorite toppings, and finished with a generous layer of mozzarella cheese cut into ghost shapes.
These pizza bites are then baked to perfection, resulting in a fun and flavorful treat that captures the spooky spirit of Halloween.
Ingredients (Serves 4-6):
- 1 lb pizza dough or 12 mini pizza bases
- 1 cup tomato sauce
- 2 cups shredded mozzarella cheese
- 12 mozzarella cheese slices
- Black olives, sliced
- Your choice of toppings (e.g., pepperoni, bell peppers, mushrooms)
Instructions:
- Prepare the Dough/Base: Preheat your oven to 400°F (200°C). If using pizza dough, roll it out on a floured surface to about 1/4 inch thick and cut into 3-4 inch rounds. If using mini pizza bases, place them on a baking sheet lined with parchment paper.
- Add the Sauce: Spread a tablespoon of tomato sauce evenly over each dough round or mini pizza base, leaving a small border around the edges.
- Choose Your Toppings: Add your desired toppings over the sauce. If using pepperoni or vegetables, make sure to slice them thinly so they cook evenly.
- Create the Ghosts: For the ghost shapes, use a ghost-shaped cookie cutter to cut the mozzarella slices. If you don’t have a cookie cutter, use a knife to carefully cut out ghost shapes.
- Assemble the Pizza Bites: Place a mozzarella ghost on top of each pizza bite. Use small pieces of black olives to create eyes on each cheese ghost.
- Bake: Place the baking sheet in the preheated oven and bake for 10-12 minutes, or until the cheese is melted and bubbly, and the crust edges are golden brown.
- Serve: Remove the pizza bites from the oven and let them cool slightly before serving.
Extra Tips:
For a crispier crust, consider pre-baking the dough rounds or mini pizza bases for 3-4 minutes before adding the sauce and toppings. If you prefer a different cheese, try using provolone or cheddar, but make sure they melt well.
To make the ghost shapes more defined, press the cookie cutter or knife firmly into the cheese slices. Feel free to experiment with different toppings and create a variety of pizza bites to cater to different tastes.
Monster Eyeball Meatballs
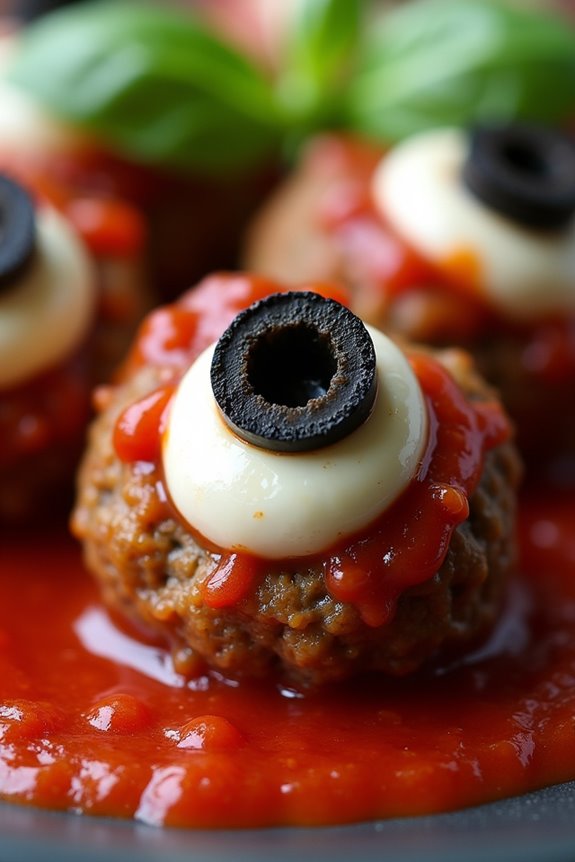
The secret to these eerie eyeballs is in the garnish—using olives and cheese to create realistic eyeball effects on each meatball. The dish isn’t only visually appealing but also packed with savory flavors that blend perfectly with the tomato-based sauce.
Whether you’re hosting a Halloween party or just want to surprise your family with a fun meal, Monster Eyeball Meatballs will certainly do the trick!
Ingredients (Serves 4-6):
- 1 pound ground beef
- 1/2 cup breadcrumbs
- 1/4 cup grated Parmesan cheese
- 1/4 cup milk
- 1 large egg
- 1 teaspoon garlic powder
- 1 teaspoon onion powder
- 1/2 teaspoon salt
- 1/2 teaspoon black pepper
- 1/2 teaspoon dried oregano
- 1/2 teaspoon dried basil
- 24 small mozzarella balls (bocconcini or ciliegine)
- 24 pitted black olives
- 2 cups marinara sauce
- Fresh basil leaves (for garnish, optional)
Instructions:
- Preheat the Oven: Preheat your oven to 375°F (190°C). Line a baking sheet with parchment paper or aluminum foil for easy cleanup.
- Prepare the Meatball Mixture: In a large mixing bowl, combine the ground beef, breadcrumbs, Parmesan cheese, milk, egg, garlic powder, onion powder, salt, black pepper, oregano, and basil. Mix everything together until well combined. Avoid overmixing to keep the meatballs tender.
- Form the Meatballs: Using your hands, take about 2 tablespoons of the meat mixture and roll it into a ball. Repeat this process until all the meat is used up, placing the meatballs evenly spaced on the prepared baking sheet.
- Add the Eyeball Effect: Press a mozzarella ball into the center of each meatball gently. Then, slice the black olives in half and place one half on top of each mozzarella ball, creating the look of an eyeball.
- Bake the Meatballs: Place the baking sheet in the preheated oven and bake for 20-25 minutes, or until the meatballs are cooked through and the cheese is melted and slightly browned.
- Heat the Sauce: While the meatballs are baking, heat the marinara sauce in a large saucepan over medium heat. Stir occasionally until the sauce is warm.
- Serve: Once the meatballs are done, remove them from the oven. Spoon some marinara sauce onto a serving platter, then place the meatballs on top. Drizzle more sauce over the meatballs and garnish with fresh basil leaves if desired.
Extra Tips:
For perfectly uniform meatballs, use an ice cream scoop or a cookie scoop to portion out the meat mixture. This guarantees even cooking.
If you want to add a bit of heat to your Monster Eyeball Meatballs, consider mixing in a pinch of red pepper flakes or some chopped jalapeños.
Additionally, these meatballs can be made ahead of time—prepare them up to the baking step, then refrigerate until you’re ready to cook. This makes party prep even easier!
Graveyard Taco Dip
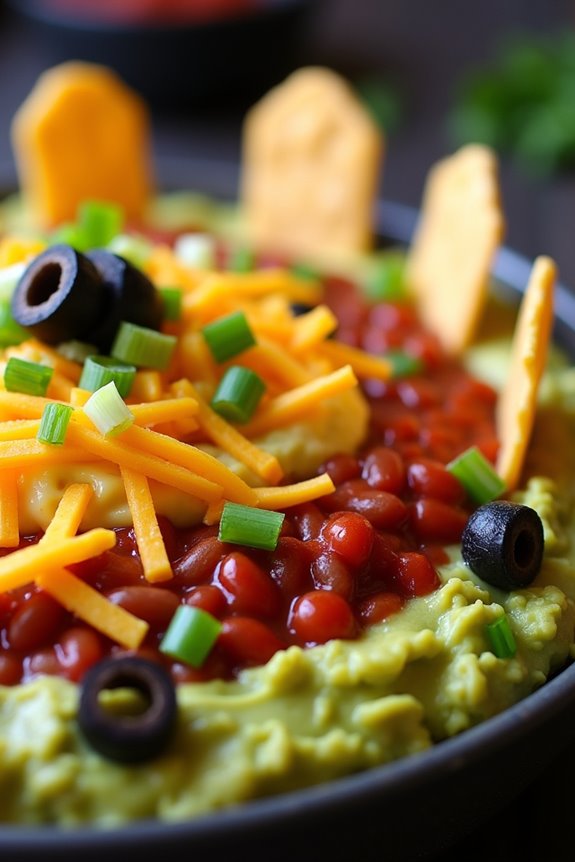
Halloween is the perfect time to get creative in the kitchen, and what better way to do so than with a spooky yet delicious Graveyard Taco Dip? This dish is a crowd-pleaser, combining the rich flavors of a traditional taco dip with a fun and creepy presentation that’s bound to impress your guests.
The layers of creamy, cheesy, and zesty ingredients mimic the flavors of a taco, while the decorative elements turn it into a haunting masterpiece. With just a few simple ingredients and a dash of creativity, you can create a memorable Halloween-themed dish that will be the talk of the party.
The Graveyard Taco Dip isn’t only visually appealing but also incredibly easy to assemble, making it an excellent choice for a Halloween gathering. The base layers consist of seasoned cream cheese, refried beans, guacamole, and salsa, topped with shredded cheese and olives.
The real fun begins when you transform tortilla chips into tombstones, and add a sprinkle of green onions for that eerie graveyard feel. This recipe serves 4-6 people, perfect for a small get-together or as part of a larger spread of Halloween treats.
Ingredients:
- 8 oz cream cheese, softened
- 1 packet taco seasoning
- 1 can (16 oz) refried beans
- 1 cup guacamole
- 1 cup salsa
- 2 cups shredded cheddar cheese
- 1 can (2.25 oz) sliced black olives, drained
- 2 green onions, chopped
- Tortilla chips (for tombstones)
Instructions:
- Prepare the Base Layer: In a medium bowl, mix the softened cream cheese with the taco seasoning until well combined. Spread this mixture evenly at the bottom of a 9×13 inch serving dish.
- Add the Bean Layer: Gently spread the refried beans over the cream cheese layer, making sure to cover it completely.
- Guacamole Layer: Spoon the guacamole over the bean layer and spread it out evenly using a spatula.
- Salsa Layer: Pour the salsa over the guacamole, spreading it evenly to guarantee each layer remains distinct.
- Cheese and Olive Topping: Sprinkle the shredded cheddar cheese over the salsa layer, followed by an even distribution of sliced black olives.
- Create the Tombstones: Carefully cut some of the tortilla chips into tombstone shapes using kitchen scissors or a sharp knife. Insert them vertically into the dip along the edges to create a graveyard appearance.
- Final Touches: Sprinkle chopped green onions over the top to resemble grass growing in the graveyard.
- Chill and Serve: Cover the dish with plastic wrap and refrigerate for at least 30 minutes before serving to allow the flavors to meld together. Serve with additional tortilla chips on the side for dipping.
Tips for Cooking:
For best results, make the Graveyard Taco Dip a few hours ahead of time to allow the flavors to develop and intensify.
If you’re short on time, you can prepare the cream cheese mixture and refried bean layers the night before and store them in the refrigerator. Just assemble the remaining layers and decorations closer to serving time.
You can also personalize the tombstones by writing spooky messages with edible markers or using guacamole to create creepy faces. Remember to keep the dip chilled until serving, especially if using it outdoors or in a warm environment, to maintain its freshness and taste.
Jack-o’-Lantern Stuffed Peppers
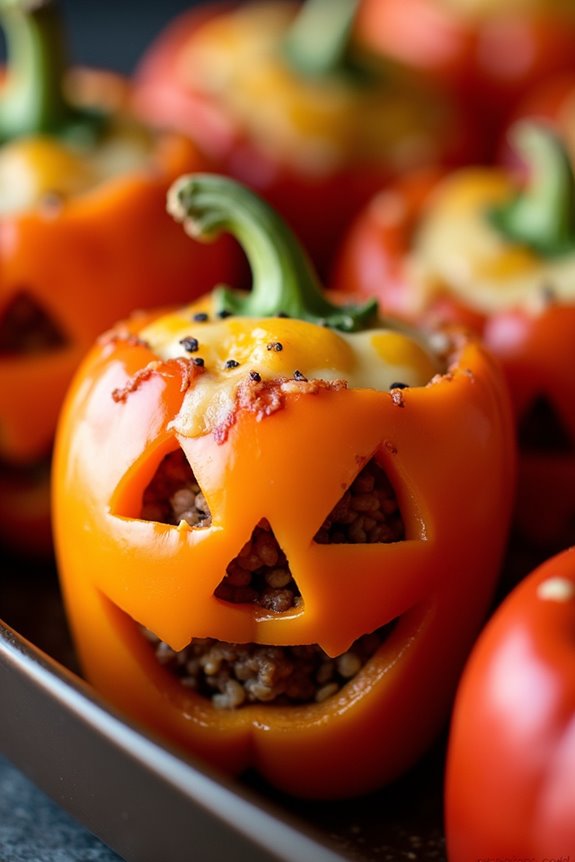
Embrace the Halloween spirit with these delightfully spooky Jack-o’-Lantern Stuffed Peppers. This dish isn’t only visually fun but also a delicious and healthy meal option. Perfect for a Halloween party or a festive family dinner, these stuffed peppers are carved to look like mini jack-o’-lanterns and filled with a savory mixture of ground beef, rice, and aromatic vegetables. The combination of ingredients guarantees a satisfying meal that will impress both kids and adults alike.
Preparing Jack-o’-Lantern Stuffed Peppers is a fun activity where you can get creative with carving silly, scary, or cute faces into the bell peppers. The dish is highly adaptable, allowing you to experiment with different fillings or substitute ingredients to cater to dietary preferences. Whether you’re a novice cook or an experienced chef, this recipe is straightforward and rewarding, making it an ideal choice for bringing the Halloween theme to your dining table.
Ingredients for 4-6 servings:
- 6 medium-sized orange bell peppers
- 1 pound ground beef (or ground turkey)
- 1 cup cooked rice
- 1 medium onion, chopped
- 2 cloves garlic, minced
- 1 cup diced tomatoes (canned or fresh)
- 1 teaspoon Italian seasoning
- Salt and pepper to taste
- 1 cup shredded mozzarella cheese
- 2 tablespoons olive oil
Cooking Instructions:
- Prepare the Peppers: Preheat your oven to 375°F (190°C). Wash the bell peppers thoroughly. Slice off the tops of the peppers and remove the seeds and membranes inside. Carefully carve jack-o’-lantern faces into the side of each pepper using a small paring knife. Set aside the peppers and their tops.
- Cook the Filling: In a large skillet, heat olive oil over medium heat. Add the chopped onion and minced garlic, sautéing until the onion becomes translucent. Add the ground beef, breaking it apart with a spatula, and cook until browned. Drain excess fat if necessary.
- Add Ingredients: Stir in the cooked rice, diced tomatoes, Italian seasoning, salt, and pepper. Mix well and let the mixture simmer for about 5 minutes, allowing the flavors to meld together.
- Stuff the Peppers: Spoon the beef and rice mixture into each carved pepper until they’re fully packed. Place the peppers upright in a baking dish, ensuring they sit snugly together to avoid tipping over. Sprinkle shredded mozzarella cheese on top of the filling.
- Bake the Peppers: Place the tops back on the peppers and cover the baking dish with aluminum foil. Bake in the preheated oven for 30 minutes. Remove the foil and bake for an additional 10-15 minutes, or until the peppers are tender and the cheese is golden and bubbly.
- Serve: Carefully transfer the baked Jack-o’-Lantern Stuffed Peppers to a serving platter. Let them cool slightly before serving to guarantee the filling sets and is easier to handle.
Extra Tips:
For a vegetarian version, substitute the ground meat with black beans or lentils. If you prefer a bit of spice, add some red pepper flakes or chopped jalapeños to the filling. Make sure not to over-carve the faces on the peppers, as this might cause them to collapse during baking.
If you opt for red or yellow peppers, the taste will be slightly sweeter, offering a different flavor profile that complements the savory filling. Enjoy your Halloween-themed meal with some spooky decorations and a festive atmosphere to enhance the experience!
Pumpkin Cheese Ball
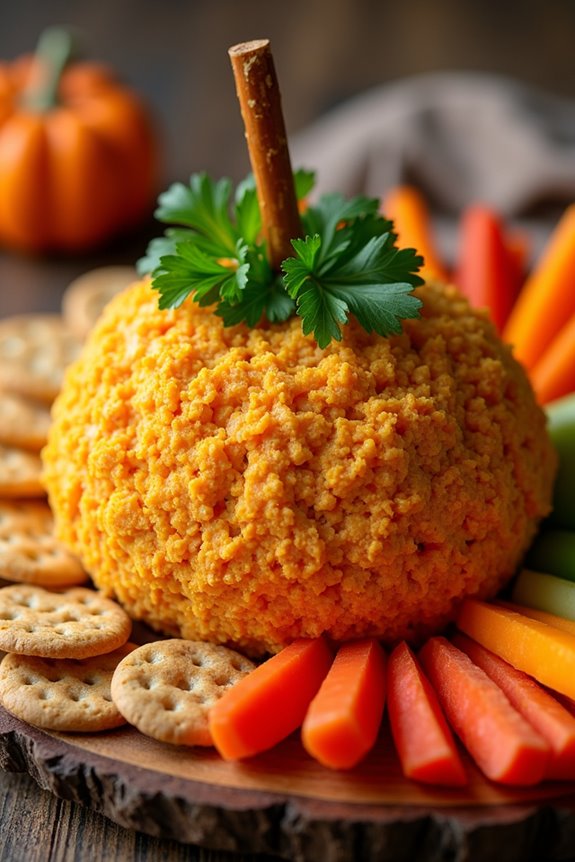
Get ready to delight your guests with a spooky yet delicious Pumpkin Cheese Ball, a perfect addition to any Halloween-themed party spread. This festive appetizer not only looks the part but also packs a punch in flavor. Shaped like a pumpkin, it combines the tanginess of cream cheese with the sharpness of cheddar, creating a creamy, savory treat that pairs well with crackers or vegetable sticks.
This dish is an excellent choice for a crowd, and its eye-catching presentation is sure to be a conversation starter at your gathering. The Pumpkin Cheese Ball is simple to prepare and can be made ahead of time, allowing you to focus on other party preparations. The combination of textures and flavors will have your guests coming back for more.
The addition of spices like paprika and garlic powder adds a subtle depth of flavor, perfectly complementing the cheese. Plus, the exterior coating of crushed nacho chips gives it a crunchy finish and a vibrant orange color reminiscent of a real pumpkin. With just a few ingredients and some creativity, you can bring this fun and delicious dish to life.
Ingredients (Serves 4-6):
- 16 oz cream cheese, softened
- 2 cups sharp cheddar cheese, shredded
- 1 tablespoon Worcestershire sauce
- 1 teaspoon garlic powder
- 1 teaspoon paprika
- 1/2 teaspoon salt
- 1 cup crushed nacho cheese-flavored tortilla chips
- 1 pretzel stick
- Fresh parsley leaves (for decoration)
Cooking Instructions:
- Prepare the Cheese Mixture: In a large mixing bowl, combine the softened cream cheese, shredded cheddar cheese, Worcestershire sauce, garlic powder, paprika, and salt. Mix well until all ingredients are thoroughly combined, forming a smooth and cohesive mixture.
- Shape the Cheese Ball: Transfer the cheese mixture onto a piece of plastic wrap. Shape it into a ball, wrapping the plastic tightly around it to help maintain its form. Refrigerate for at least 2 hours to allow the cheese ball to firm up.
- Coat the Cheese Ball: Once the cheese ball has set, remove it from the refrigerator. Roll it in the crushed nacho cheese-flavored tortilla chips until it’s fully coated, ensuring every part of the cheese ball is covered for an even orange hue.
- Add the Finishing Touches: Place the coated cheese ball onto a serving platter. Insert a pretzel stick into the top to mimic a pumpkin stem. Arrange fresh parsley leaves around the base of the pretzel stick to resemble pumpkin leaves.
- Serve and Enjoy: Serve the Pumpkin Cheese Ball with an assortment of crackers or vegetable sticks. Encourage guests to dip and enjoy the delightful combination of creamy and crunchy textures.
Extra Tips:
For a more intense flavor, prepare the cheese ball a day in advance and let it sit in the refrigerator overnight. This will allow the spices to meld beautifully with the cheeses. Additionally, if you prefer a milder flavor, you can substitute half of the sharp cheddar with a milder cheese like Monterey Jack.
When crushing the tortilla chips, aim for a medium consistency—not too fine—to retain some crunch. Finally, have fun with the presentation by adding small decorative elements like a candy eye or a slice of bell pepper to enhance the pumpkin theme even further.
Bloody Finger Cookies
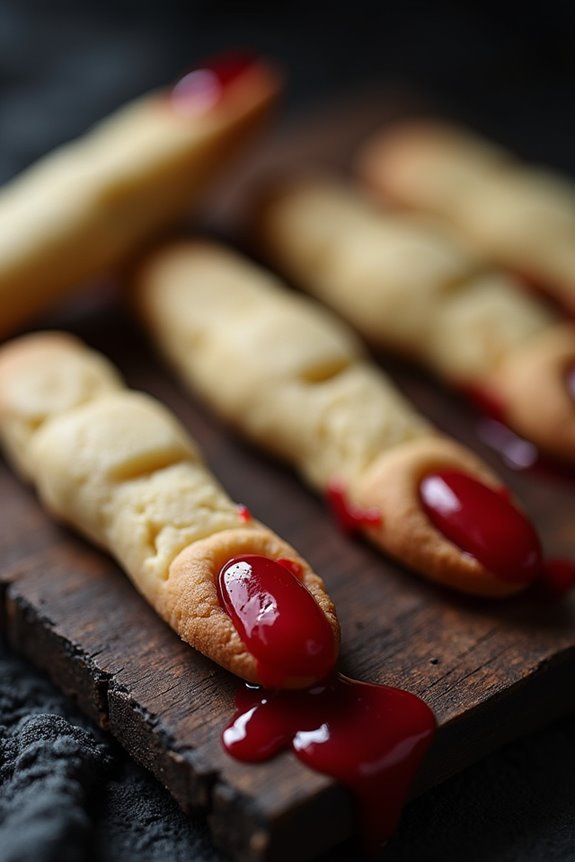
Halloween is the perfect time to get creative in the kitchen, and these Bloody Finger Cookies are sure to be a hit at your spooky celebration. Designed to look like severed fingers, these cookies not only add a frightful touch to your party table but also taste deliciously buttery and sweet. Their eerie appearance is achieved with a combination of almond slivers and red decorating gel, making them both creepy and delightful for guests of all ages.
They’re easy to make and perfect for involving kids in the kitchen, turning baking into a fun Halloween activity. The cookies are made with a simple shortbread dough, shaped into finger-like forms, and detailed with a few easy-to-find ingredients. The addition of almond slivers for fingernails and a touch of red gel for blood creates a realistic, gory effect. The result is a whimsical and slightly frightening treat that’s sure to be a conversation starter.
Let’s jump into the recipe for these hauntingly delicious cookies, perfect for serving 4-6 people.
Ingredients:
- 1 cup unsalted butter, softened
- 1 cup powdered sugar
- 1 egg
- 1 teaspoon vanilla extract
- 1 teaspoon almond extract
- 2 2/3 cups all-purpose flour
- 1 teaspoon baking powder
- 1 teaspoon salt
- 36 whole blanched almonds
- Red decorating gel
Cooking Instructions:
- Preheat Oven: Preheat your oven to 325°F (165°C) and line two baking sheets with parchment paper to prevent the cookies from sticking.
- Prepare Dough: In a large mixing bowl, beat together the softened butter and powdered sugar until light and fluffy. Add the egg, vanilla extract, and almond extract, and continue to mix until well combined.
- Combine Dry Ingredients: In another bowl, whisk together the flour, baking powder, and salt. Gradually add the dry ingredients to the wet mixture, mixing until a soft dough forms.
- Shape Fingers: Take a tablespoon of dough and roll it into a thin, finger-like shape approximately 3 inches long. Pinch the dough in two places to create knuckle shapes and lightly score the knuckles with a knife to add detail.
- Add Fingernails: Press a blanched almond firmly into one end of each cookie to form a fingernail. Repeat with the remaining dough and almonds.
- Bake: Arrange the finger cookies on the prepared baking sheets, leaving some space between each cookie. Bake in the preheated oven for 20-25 minutes, or until lightly golden.
- Add Blood Effect: Allow the cookies to cool on a wire rack. Once cooled, use the red decorating gel to add a drop of “blood” around the almond fingernail or at the severed end of each cookie for a gruesome effect.
Extra Tips:
For the best visual effect, you can slightly vary the thickness and length of each cookie to make them look more realistic. If the dough becomes too soft to handle while shaping, chill it in the refrigerator for 15-20 minutes to make it easier to work with.
To enhance the gruesome appearance, consider adding a few drops of red food coloring to the dough before baking to create a more dramatic effect. Make sure you press the almonds firmly into the dough so they don’t fall off after baking. Enjoy the thrill of scaring your guests with these eerie yet tasty treats!
Creepy Crawly Cupcakes
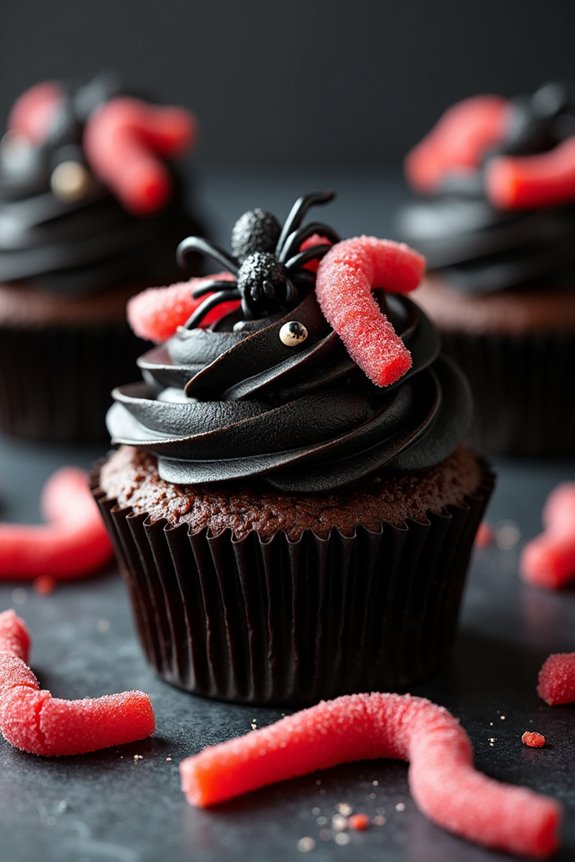
Release your inner baker this Halloween with these delightful Creepy Crawly Cupcakes that are sure to spook and satisfy your guests. These cupcakes aren’t only a treat for the taste buds but also a visual delight, adorned with sugary spiders and other creepy critters that will make your Halloween party a memorable one.
The base of these cupcakes is a rich, moist chocolate cake, topped with a creamy and smooth frosting. With creative toppings that bring the creepy crawly theme to life, these cupcakes are perfect for both kids and adults alike.
The beauty of these cupcakes lies in their versatility; you can customize the creepy crawlies to your liking, using anything from gummy worms to chocolate spiders. Whether you’re throwing a kid-friendly bash or an adults-only soiree, these cupcakes are sure to be a hit.
The combination of rich chocolate and decorative toppings makes for a dessert that’s as delicious as it’s festive. Get ready to embrace the Halloween spirit and impress your guests with these spook-tacular treats!
Ingredients (Serves 4-6 people):
- 1 cup all-purpose flour
- 1 cup granulated sugar
- 1/3 cup unsweetened cocoa powder
- 1 teaspoon baking powder
- 1/2 teaspoon baking soda
- 1/4 teaspoon salt
- 1/2 cup milk
- 1/4 cup vegetable oil
- 1 large egg
- 1 teaspoon vanilla extract
- 1/2 cup boiling water
- 1/2 cup unsalted butter, softened
- 2 cups powdered sugar
- 2 tablespoons milk
- 1 teaspoon vanilla extract
- Black food coloring gel
- Assorted candy spiders, gummy worms, and edible eyes
Instructions:
- Preheat and Prepare: Preheat your oven to 350°F (175°C). Line a 12-cup muffin tin with cupcake liners to guarantee easy removal of the cupcakes after baking.
- Mix Dry Ingredients: In a large mixing bowl, combine the flour, granulated sugar, cocoa powder, baking powder, baking soda, and salt. Whisk until the ingredients are well blended.
- Combine Wet Ingredients: In a separate bowl, whisk together the milk, vegetable oil, egg, and vanilla extract until well combined. Slowly pour the wet ingredients into the dry ingredients, stirring until just combined.
- Add Boiling Water: Carefully stir in the boiling water to the batter. The mixture will be thin, but this is normal. Continue to mix until the batter is smooth and uniform.
- Bake the Cupcakes: Pour the batter evenly into the lined muffin tin, filling each cup about two-thirds full. Bake in the preheated oven for 18-20 minutes, or until a toothpick inserted into the center comes out clean. Allow them to cool completely on a wire rack.
- Prepare the Frosting: In a medium bowl, beat the softened butter until creamy. Gradually add the powdered sugar, one cup at a time, beating well after each addition. Mix in the milk and vanilla extract, then add the black food coloring gel to achieve the desired spooky color.
- Frost and Decorate: Once the cupcakes have cooled, use a piping bag or a spatula to frost each cupcake with the black buttercream. Decorate with candy spiders, gummy worms, and edible eyes to create the creepy crawly effect.
Extra Tips:
When making Creepy Crawly Cupcakes, you can experiment with different decorations to match your Halloween theme. Consider using crushed chocolate cookies to mimic soil or adding colored sprinkles for a pop of color.
If you want to make the cupcakes look even more eerie, try adding a few drops of red gel food coloring to create a bloodshot effect on the frosting. Remember, the key to great cupcakes is making sure they’re fully cooled before frosting, as this prevents the frosting from melting and sliding off.
Happy haunting!
Dracula’s Blood Punch

Dracula’s Blood Punch is the perfect eerie centerpiece for your Halloween-themed party, guaranteed to send a shiver down the spine of any guest. This spine-chilling concoction combines vivid colors and tantalizing flavors, making it both a visual and taste sensation. With its deep red hue, reminiscent of the legendary vampire’s favorite drink, this punch is sure to add a spooky yet delightful touch to your gathering.
Prepare to bewitch your guests with this simple yet spectacular recipe, which balances the tangy notes of cranberry juice with the invigorating zest of citrus. The addition of fizzy soda and chilling ice cubes transforms this punch into an unforgettable Halloween potion. Not only is it visually striking, but it also provides a deliciously thirst-quenching experience for both adults and children. Gather your cauldrons and get ready to brew a punch that will make Dracula himself rise from his coffin for a sip.
Ingredients (serving size: 4-6 people):
- 4 cups cranberry juice
- 2 cups pomegranate juice
- 1 cup orange juice
- 1 cup pineapple juice
- 1 liter lemon-lime soda (such as Sprite or 7-Up)
- 1 cup fresh or frozen raspberries
- 1 orange, thinly sliced
- 1 cup ice cubes
- Optional: 1/2 cup vodka or rum for an adult version
Cooking Instructions:
- Prepare the Base: In a large punch bowl, combine the cranberry juice, pomegranate juice, orange juice, and pineapple juice. Stir well to verify all the flavors are fully integrated. This forms the blood-red base of your punch.
- Add the Fizz: Slowly pour the lemon-lime soda into the juice mixture. Stir gently to mix, being careful not to lose too much of the carbonation, which adds a bubbly, eerie effect to the punch.
- Incorporate the Fruits: Add the fresh or frozen raspberries to the punch. These will float and add a gory, blood-clot effect. Next, layer in the thinly sliced orange rounds, which will provide a vibrant contrast and a burst of citrus flavor.
- Chill the Punch: Add ice cubes to the punch bowl to keep the concoction cold and invigorating. The ice will also help dilute the punch slightly, balancing the sweetness.
- Optional Boozy Twist: For an adult version, stir in 1/2 cup of vodka or rum. Verify that this is clearly labeled if serving at a mixed-age party.
- Serve and Enjoy: Ladle the punch into clear glasses or cups, ensuring each serving gets a mix of fruits. Enjoy the mysterious allure of Dracula’s Blood Punch.
Extra Tips:
For an added dramatic effect, consider using a decorative punch bowl or a cauldron to serve your Dracula’s Blood Punch.
You can also freeze some of the fruit in ice cube trays with a bit of juice, making spooky ice cubes that will melt slowly in the punch, keeping it cold while releasing more flavors.
If you prefer a less sweet punch, consider using soda water instead of lemon-lime soda for a less sugary option.
And remember, if you’re adding alcohol, keep a non-alcoholic version available for guests who prefer it.
Worms in Dirt Pudding Cups

Worms in Dirt Pudding Cups are a fun and eerie treat perfect for any Halloween-themed party. This dessert combines creamy chocolate pudding with a crunchy cookie “dirt” topping, complete with gummy worms slithering through the layers. It’s a simple yet spooky dish that adds a playful and delicious element to your Halloween festivities.
The visual appeal of the dirt pudding cups, with their wiggly worms and crumbly dirt, is sure to capture the imagination and taste buds of kids and adults alike.
Creating Worms in Dirt Pudding Cups isn’t only enjoyable but also a creative activity that can involve the entire family. The process involves preparing the pudding, crumbling the cookies to resemble dirt, and artfully arranging the gummy worms.
This no-bake dessert is a time-saver and can be prepared a day in advance, allowing you to focus on other party details. Plus, the individual cups make serving easy and mess-free, ensuring that your guests can grab a cup and enjoy without any hassle.
Ingredients for 4-6 servings:
- 2 cups cold milk
- 1 package (3.9 ounces) instant chocolate pudding mix
- 1 package (14 ounces) chocolate sandwich cookies
- 1 package (7 ounces) gummy worms
- 1 cup whipped topping
Cooking Instructions:
- Prepare the Pudding: In a large mixing bowl, whisk together the cold milk and instant chocolate pudding mix for about 2 minutes until well combined. The mixture should start to thicken. Once mixed, let it sit for 5 minutes to allow the pudding to set.
- Make the Dirt: While the pudding is setting, place chocolate sandwich cookies in a resealable plastic bag. Using a rolling pin or your hands, crush the cookies until they resemble fine crumbs. You can also use a food processor to achieve a dirt-like consistency.
- Layer the Cups: Once the pudding is set, spoon an even layer of pudding into each cup. Add a layer of crushed cookies on top of the pudding, creating a dirt effect. Repeat the layering process until the cups are filled, ending with a layer of cookie crumbs on top.
- Add the Worms: Carefully insert gummy worms into the cups, allowing some to hang over the edge for a more realistic “crawling out of the dirt” appearance.
- Finish with Whipped Topping: Add a dollop of whipped topping to each cup for extra creaminess. Optionally, sprinkle a few extra cookie crumbs on top of the whipped topping for added texture.
Extra Tips:
For a more personalized touch, consider using clear plastic or glass cups so that the layers are visible, enhancing the visual “dirt” effect.
If you want to vary the texture, mix some crushed nuts or mini chocolate chips into the cookie crumbs. For those looking to reduce sugar, consider using sugar-free pudding mix and low-sugar gummy worms.
Skeleton Bone Breadsticks

Skeleton Bone Breadsticks are a spooky and fun addition to any Halloween-themed party table. These breadsticks are designed to resemble eerie bones, adding a touch of fright to your festivities. Not only do they fit perfectly with the Halloween theme, but they’re also deliciously soft and seasoned, making them a crowd-pleaser for both kids and adults alike. Serve them with a side of marinara or a cheese dip to complete the experience.
Creating Skeleton Bone Breadsticks is a straightforward process that even beginner cooks can master. With a few simple ingredients and some creativity, you can transform ordinary dough into creepy, bone-shaped treats. This recipe yields enough breadsticks to serve 4-6 people, making it ideal for a small gathering. Each breadstick is flavored with garlic and herbs, guaranteeing every bite is as flavorful as it’s visually intriguing.
Ingredients for 4-6 people:
- 1 pound of pizza dough
- 2 tablespoons of olive oil
- 1 tablespoon of garlic powder
- 1 tablespoon of dried Italian herbs (such as oregano, basil, and thyme)
- 1/2 teaspoon of salt
- 1/2 cup of grated Parmesan cheese
- 1 cup of marinara sauce (for dipping)
Cooking Instructions:
- Preheat the Oven: Begin by preheating your oven to 400°F (200°C). Prepare a baking sheet by lining it with parchment paper to prevent sticking.
- Prepare the Dough: Roll out the pizza dough on a lightly floured surface to about 1/4 inch thickness. Use a sharp knife or pizza cutter to cut the dough into strips approximately 6 inches long and 1 inch wide.
- Shape the Bones: To give the breadsticks their bone-like appearance, take each strip and tie a knot at both ends. This will represent the knobby ends of the bone. Stretch the dough slightly to emphasize the bone shape.
- Season the Breadsticks: In a small bowl, mix together the olive oil, garlic powder, Italian herbs, and salt. Brush this mixture evenly over each breadstick. Confirm every breadstick is well-coated for maximum flavor.
- Add Cheese: Sprinkle the grated Parmesan cheese evenly over the top of the breadsticks. The cheese will add a rich, savory taste and a slight crunch once baked.
- Bake: Place the prepared breadsticks on the lined baking sheet, ensuring they’re spaced apart to allow for even baking. Bake in the preheated oven for 15-20 minutes, or until they’re golden brown and cooked through.
- Serve: Remove the breadsticks from the oven and allow them to cool slightly on a wire rack. Serve warm with a side of marinara sauce for dipping.
Extra Tips:
For an extra Halloween touch, you can use black food gel to lightly draw lines along the center of the breadsticks, mimicking the appearance of bones. If you prefer a spicier version, add a pinch of crushed red pepper flakes to the olive oil mixture.
These breadsticks are best enjoyed fresh out of the oven but can be reheated in a warm oven if needed. Adjust the seasoning to your taste, and don’t be afraid to experiment with different herbs or cheeses to create your own unique version of Skeleton Bone Breadsticks.