

Halloween is just around the corner, and I’m already dreaming about sharing festive treats with coworkers. There’s an enchanting charm in a tray filled with spooky spider cookies and caramel apples that brings everyone together. Last year, our ghostly popcorn balls were a massive hit! If you’re planning to bring some ghoulish goodies to the office, I’ve compiled a list that will make your coworkers’ taste buds scream with delight. Curious to see what other eerie eats made the cut?
Spooky Spider Cookies
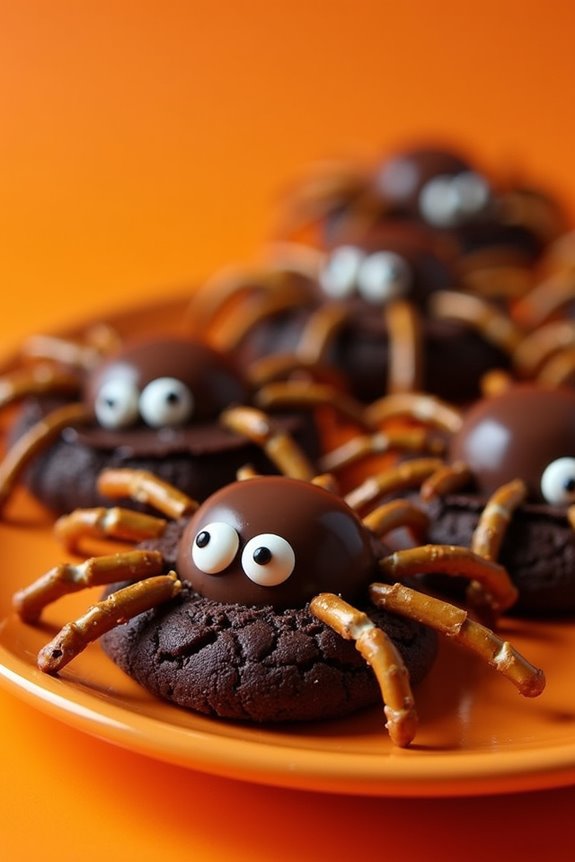
Spooky Spider Cookies are a delightful and fun treat to share with your coworkers during Halloween. These cookies not only taste delicious but also add an element of spookiness to your Halloween celebrations. With a rich chocolate flavor and a creepy-crawly appearance, these cookies are sure to be a hit among your colleagues.
Whether you’re hosting a Halloween party in the office or just want to surprise your coworkers with a festive treat, these Spooky Spider Cookies are the perfect choice. The cookies are easy to make and require simple ingredients that you might already have in your pantry.
The recipe yields a batch of 24 cookies, making it ideal for serving 4-6 people if each person has 4-6 cookies. The cookies are soft and chewy with a decadent chocolate flavor, and they’re decorated with candy eyes and pretzel legs to create a spooky spider look.
Let’s explore the ingredients and step-by-step instructions to create these Halloween-themed treats.
Ingredients (Serving Size: 4-6 people)
- 1 cup unsalted butter, softened
- 1 cup granulated sugar
- 1 cup packed brown sugar
- 2 large eggs
- 1 teaspoon vanilla extract
- 2 1/2 cups all-purpose flour
- 1 cup unsweetened cocoa powder
- 1 teaspoon baking soda
- 1/2 teaspoon salt
- 24 chocolate truffles or chocolate-covered cherries
- Small candy eyes
- 96 small pretzel sticks (for spider legs)
Cooking Instructions
- Prepare the Oven and Baking Sheets: Preheat your oven to 350°F (175°C). Line two baking sheets with parchment paper or silicone baking mats to prevent the cookies from sticking.
- Mix the Wet Ingredients: In a large mixing bowl, cream together the softened butter, granulated sugar, and brown sugar until light and fluffy. This should take about 2-3 minutes using an electric mixer. Add the eggs one at a time, mixing well after each addition. Stir in the vanilla extract until fully incorporated.
- Combine the Dry Ingredients: In a separate bowl, whisk together the all-purpose flour, cocoa powder, baking soda, and salt. Make sure the dry ingredients are well mixed to guarantee even distribution in the batter.
- Create the Cookie Dough: Gradually add the dry ingredients to the wet ingredients, mixing on low speed until combined. Be careful not to overmix, as this can make the cookies tough.
- Shape the Cookies: Using a cookie scoop or tablespoon, scoop the dough onto the prepared baking sheets, spacing each cookie about 2 inches apart. Flatten each scoop slightly with your fingers.
- Add the Chocolate Truffles: Place a chocolate truffle or chocolate-covered cherry in the center of each flattened dough ball. Gently press it in so it sticks well to the dough.
- Bake the Cookies: Place the baking sheets in the preheated oven and bake for 10-12 minutes, or until the edges of the cookies are set. They should be soft in the center.
- Decorate the Cookies: Once removed from the oven, immediately press two candy eyes onto each chocolate truffle to create the spider’s eyes. Insert eight pretzel sticks around each truffle to form the spider legs. Allow the cookies to cool completely on the baking sheets.
Extra Tips
When making Spooky Spider Cookies, verify that your butter is at room temperature, as this will make it easier to cream with the sugars.
You can also customize the cookies with different types of chocolate truffles or candies for the spider bodies. If you don’t have pretzel sticks, you can use broken pieces of licorice for the legs.
Make sure the cookies are completely cooled before transferring them to a serving platter to prevent the decorations from falling apart. These cookies store well in an airtight container for up to a week, making them perfect for preparing ahead of time for your Halloween festivities.
Creepy Caramel Apples
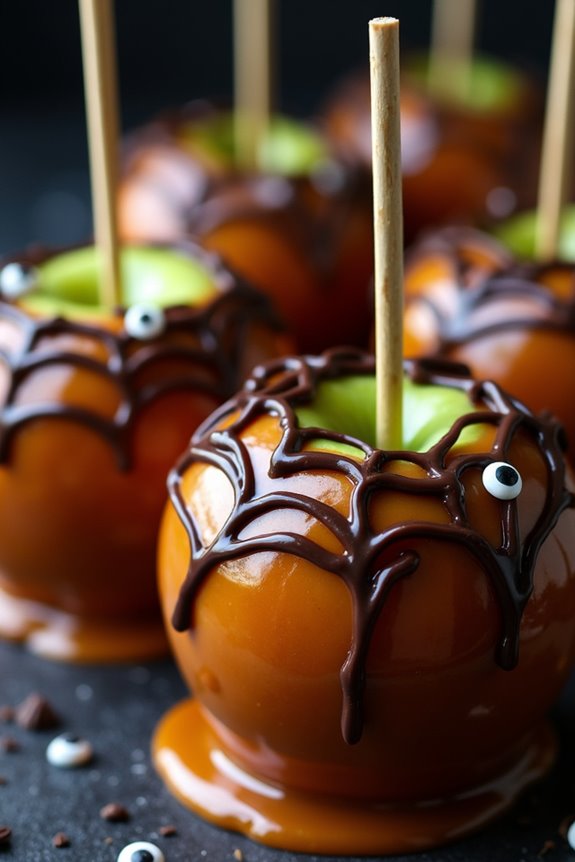
Creepy Caramel Apples are the perfect Halloween treats to surprise and delight your coworkers. These deliciously sinister apples are coated with a thick layer of homemade caramel, then drizzled with dark chocolate for an extra spooky touch. The contrasting textures and flavors make them an irresistible snack that combines the crispness of apples with the gooey sweetness of caramel and the rich bitterness of chocolate.
Whether you’re hosting a Halloween office party or just want to bring a festive snack to share, Creepy Caramel Apples are bound to be a hit. This recipe yields 4-6 servings, making it ideal for a small gathering or office celebration.
The process starts by preparing your apples and setting up a station where you can easily coat them in caramel. Using seasonal apples such as Granny Smith or Honeycrisp will provide a nice balance of tartness against the sweet caramel. Once coated, the apples are further decorated with a drizzle of dark chocolate to enhance their spooky appearance. This treat is fun to make and even more enjoyable to eat, capturing the essence of Halloween in every bite.
Ingredients:
- 4-6 medium-sized apples (preferably Granny Smith or Honeycrisp)
- 1 cup of granulated sugar
- 1/2 cup of unsalted butter
- 1/2 cup of heavy cream
- 1/4 cup of light corn syrup
- 1 teaspoon of vanilla extract
- 1/2 teaspoon of sea salt
- 1 cup of dark chocolate chips
- Wooden sticks or skewers
Instructions:
- Prepare the Apples: Wash the apples thoroughly and dry them completely. Insert a wooden stick or skewer into the stem end of each apple, making sure it’s secure. Line a baking sheet with parchment paper to prevent sticking.
- Make the Caramel: In a medium saucepan over medium heat, combine the sugar, butter, heavy cream, and corn syrup. Stir continuously until the mixture reaches a smooth consistency.
- Increase the heat to medium-high and bring the mixture to a boil. Allow it to boil for approximately 5-7 minutes without stirring, or until it reaches a deep amber color.
- Add Flavorings: Remove the caramel from heat and stir in the vanilla extract and sea salt. Mix well until fully incorporated.
- Coat the Apples: Working quickly, dip each apple into the caramel, making certain it’s completely coated. Allow any excess caramel to drip off before placing the apples on the prepared baking sheet. Let them cool for about 15 minutes, or until the caramel sets.
- Melt the Chocolate: While the caramel is setting, melt the dark chocolate chips in a microwave-safe bowl in 30-second intervals, stirring in between until smooth.
- Decorate the Apples: Drizzle the melted chocolate over the caramel-coated apples using a fork or a piping bag for a more controlled design. Allow the chocolate to set at room temperature or refrigerate briefly for faster results.
Extra Tips:
To guarantee the caramel adheres well to the apples, make sure the apples are completely dry before dipping. If the caramel begins to harden while coating the apples, gently reheat it on low heat until it becomes fluid again.
For an even creepier effect, consider adding edible eyes or candy spiders to the chocolate drizzle. These small touches will make your Creepy Caramel Apples even more festive and fun for Halloween!
Ghostly Popcorn Balls
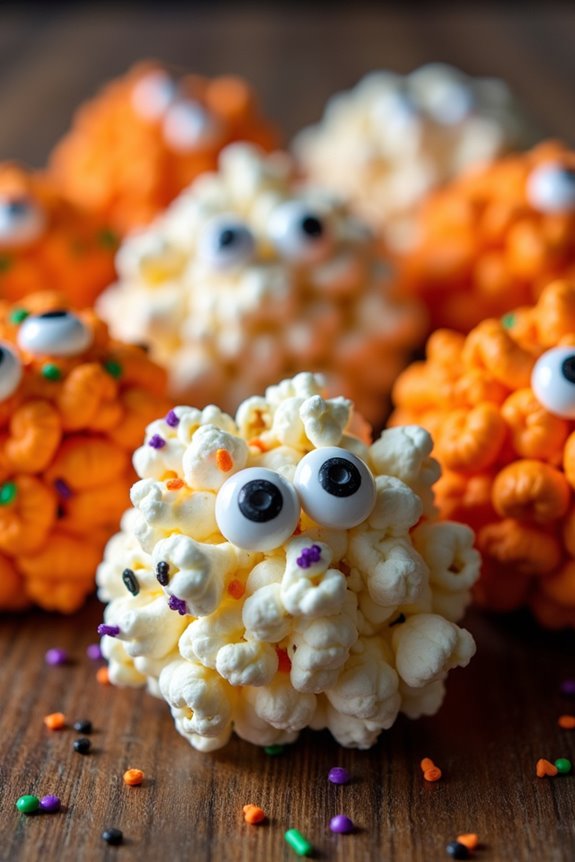
Ghostly Popcorn Balls are a delightful treat to share with your coworkers during the Halloween season. These spooky snacks aren’t only fun to make but also deliciously addictive with their sweet and salty flavor combination. The popcorn balls can be easily customized with different colors and toppings to suit the Halloween theme, making them a versatile addition to any office celebration. Perfect for sharing, these treats can be made ahead of time and stored for convenient distribution among your colleagues.
The creation of Ghostly Popcorn Balls is a simple yet rewarding process that requires minimal ingredients and effort. By following a few straightforward steps, you can craft a batch of these hauntingly good snacks to delight everyone in your workplace. Whether you’re planning a Halloween potluck or simply want to surprise your coworkers with a festive treat, these popcorn balls are sure to be a hit.
Ingredients for 4-6 servings:
- 12 cups popped popcorn
- 1 cup granulated sugar
- 1 cup light corn syrup
- 1/4 cup unsalted butter
- 1/2 teaspoon salt
- 1 teaspoon vanilla extract
- Optional: Food coloring, candy eyes, or Halloween-themed sprinkles
Cooking Instructions:
- Prepare the Popcorn: Start by popping 12 cups of popcorn using your preferred method. Once popped, transfer the popcorn to a large mixing bowl, removing any unpopped kernels to prevent unpleasant surprises.
- Make the Syrup: In a medium saucepan, combine the granulated sugar, light corn syrup, unsalted butter, and salt. Place the saucepan over medium heat and stir occasionally until the mixture comes to a boil. Continue boiling for about 2-3 minutes, or until the sugar has fully dissolved and the mixture is clear.
- Add Vanilla and Color: Remove the saucepan from the heat and stir in the vanilla extract. If you wish to add a festive touch, incorporate a few drops of food coloring until the desired hue is achieved.
- Coat the Popcorn: Carefully pour the hot syrup over the prepared popcorn in the mixing bowl. Using a spatula or wooden spoon, gently toss the popcorn to guarantee it’s evenly coated with the syrup.
- Form the Balls: Allow the mixture to cool slightly, just enough to handle comfortably. Grease your hands with a bit of butter or oil, then scoop out a portion of the popcorn mixture and shape it into a ball. Repeat until all the popcorn is used, aiming for balls about the size of a tennis ball.
- Add Decorations: While the popcorn balls are still slightly warm, press candy eyes or sprinkles into them to create ghostly faces or patterns. Allow the popcorn balls to cool completely on a baking sheet lined with parchment paper.
Extra Tips:
To keep your Ghostly Popcorn Balls from sticking, verify your hands remain well-greased throughout the shaping process. If the mixture becomes too hard to handle, briefly warm it in the microwave to soften.
Store the finished popcorn balls in an airtight container at room temperature for up to a week, allowing you to make them ahead of time. For a more personalized touch, consider using different colors or flavored extracts to match your coworkers’ tastes or your Halloween theme.
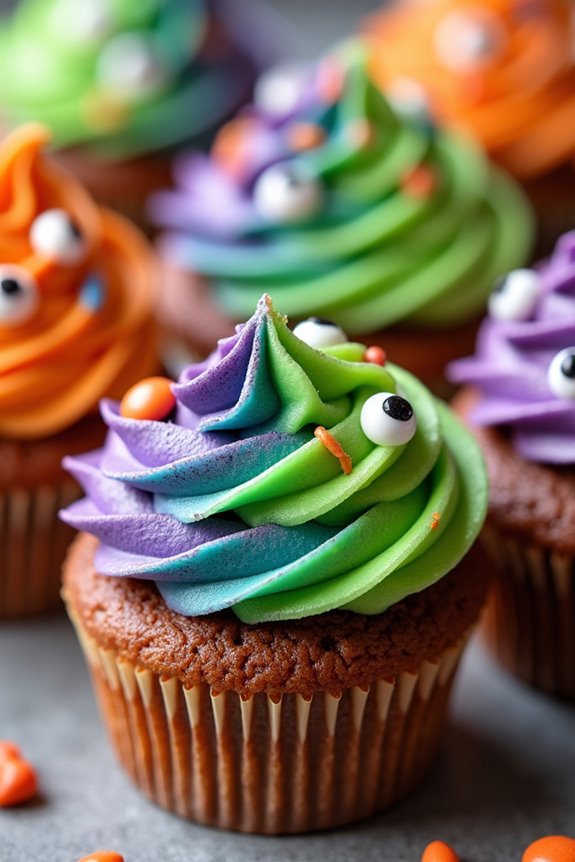
Monster Mash Cupcakes
If you’re aiming to surprise your coworkers this Halloween with a spooky yet delicious treat, search no further than Monster Mash Cupcakes. These cupcakes aren’t only fun to make but also guarantee a delightful surprise for anyone who gets a taste.
With their vibrant colors and whimsical decorations, Monster Mash Cupcakes are guaranteed to be the talk of the office Halloween party. Their soft, moist texture combined with a rich, creamy frosting will satisfy any sweet tooth.
Monster Mash Cupcakes are perfect for a serving size of 4-6 people, making them an ideal choice for a small gathering or potluck. The recipe is simple and doesn’t require any advanced baking skills, making it accessible to bakers of all levels.
The combination of classic vanilla cupcakes with a colorful frosting and playful decorations brings out the Halloween spirit in every bite. These cupcakes are sure to bring smiles and maybe a few spooky surprises to anyone who sees them.
Ingredients for Monster Mash Cupcakes (serves 4-6):
- 1 cup all-purpose flour
- 1 cup granulated sugar
- 1/2 cup unsalted butter, softened
- 2 large eggs
- 1/2 cup milk
- 1 teaspoon vanilla extract
- 1 1/2 teaspoons baking powder
- 1/4 teaspoon salt
- Food coloring (green, purple, orange)
- Assorted Halloween-themed sprinkles and candy decorations
- 1 cup butter, softened (for frosting)
- 4 cups powdered sugar (for frosting)
- 1 teaspoon vanilla extract (for frosting)
- 2-3 tablespoons milk (for frosting)
Cooking Instructions:
- Preheat the Oven: Begin by preheating your oven to 350°F (175°C). Line a cupcake pan with paper liners to prepare for the batter.
- Mix the Dry Ingredients: In a medium-sized bowl, whisk together the flour, baking powder, and salt. Set this mixture aside for later use.
- Prepare the Wet Ingredients: In a large mixing bowl, cream together the softened butter and granulated sugar until light and fluffy. This should take about 2-3 minutes. Add the eggs one at a time, beating well after each addition. Stir in the vanilla extract.
- Combine Ingredients: Gradually add the dry ingredients to the wet mixture, alternating with the milk. Begin and end with the dry ingredients, mixing until just combined. Be careful not to overmix.
- Add Food Coloring: Divide the batter into three equal parts. Add a few drops of green, purple, and orange food coloring to each portion and mix until the desired color is achieved.
- Fill the Cupcake Liners: Spoon the different colored batters into the lined cupcake pan, filling each liner about two-thirds full.
- Bake the Cupcakes: Place the cupcake pan in the preheated oven and bake for 18-20 minutes, or until a toothpick inserted into the center comes out clean. Allow the cupcakes to cool completely on a wire rack.
- Prepare the Frosting: In a separate bowl, cream together the softened butter and powdered sugar until smooth. Add the vanilla extract and milk, beating until the frosting is light and fluffy.
- Frost and Decorate: Divide the frosting into three portions and color each with the corresponding food coloring. Using a piping bag or a knife, frost the cooled cupcakes. Finish by decorating with Halloween-themed sprinkles and candy.
Extra Tips:
To guarantee your Monster Mash Cupcakes are the highlight of the party, consider experimenting with different candy eyes and themed sprinkles to give each cupcake its own unique personality.
If you’re short on time, store-bought vanilla frosting can be used in place of homemade. Just remember to color it with food gel to achieve the vibrant hues.
Additionally, always allow your cupcakes to cool completely before frosting to prevent the icing from melting. With these tips, your cupcakes won’t only taste delicious but also look fantastically spooky!
Witch’s Brew Punch
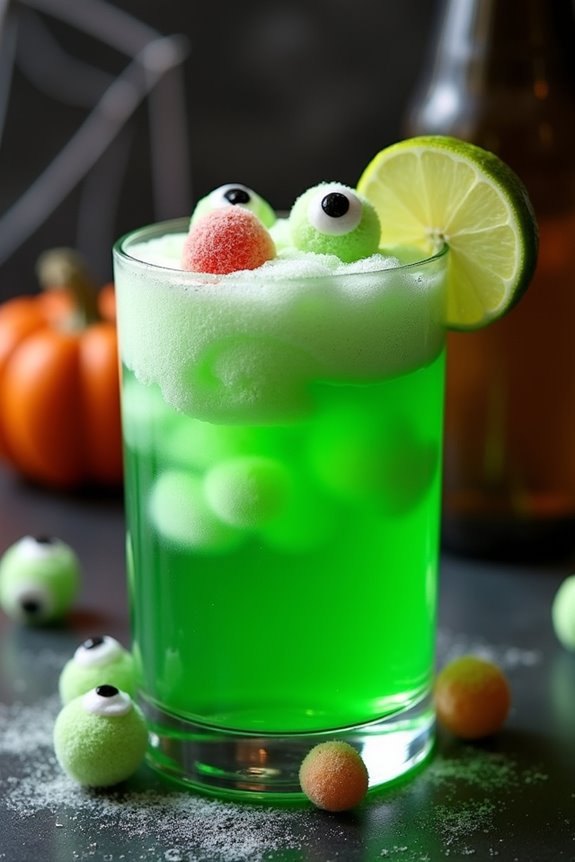
Witch’s Brew Punch is the perfect festive drink to bring a touch of spooky delight to your Halloween office party. This vibrant and delicious punch isn’t only visually appealing with its eerie green hue but also a delightful concoction that will surely please the taste buds of your coworkers.
Whether you’re hosting a potluck or simply want to surprise your team with a fun beverage, this Witch’s Brew Punch is simple to make and can be easily prepared in advance.
To create this enchanting drink, you’ll blend a mix of fruity flavors with a hint of fizz, making it a revitalizing choice for any Halloween gathering. The addition of gummy worms or floating eyeball candies can add a creepy and playful element to the punch, making it a conversation starter.
This recipe is designed to serve 4-6 people, guaranteeing everyone gets a taste of this magical brew.
Ingredients:
- 4 cups lemon-lime soda
- 2 cups pineapple juice
- 2 cups orange juice
- 1 cup ginger ale
- 1/2 cup lime sherbet
- Ice cubes
- Gummy worms or candy eyeballs for garnish
Instructions:
- Prepare the Base: In a large punch bowl, combine the lemon-lime soda, pineapple juice, and orange juice. Stir gently to mix the juices and soda thoroughly.
- Add Fizz: Slowly pour in the ginger ale, allowing it to blend with the other liquids. This will add a nice fizz to your punch, enhancing the overall texture and taste.
- Add Sherbet: Scoop the lime sherbet into the punch mixture. As it melts, it will create a frothy, creamy texture on the surface, giving the punch its signature witchy appearance.
- Chill the Punch: Add ice cubes to the punch to keep it chilled and invigorating. Stir gently to ensure everything is well mixed.
- Garnish and Serve: For a spooky touch, add gummy worms or candy eyeballs as a garnish floating on top of the punch. Serve immediately in clear cups to showcase the eerie green color of the brew.
Extra Tips:
For a more dramatic presentation, consider serving the Witch’s Brew Punch in a cauldron-shaped punch bowl.
You can also experiment with different candy garnishes to fit the Halloween theme, such as gummy spiders or edible glitter.
If you want to prepare the punch ahead of time, mix the juices and soda, and add the sherbet and garnishes just before serving to maintain the frothy texture and visual appeal.
Adjust the sweetness by adding more or less sherbet according to your preference.
Eerie Eyeball Truffles
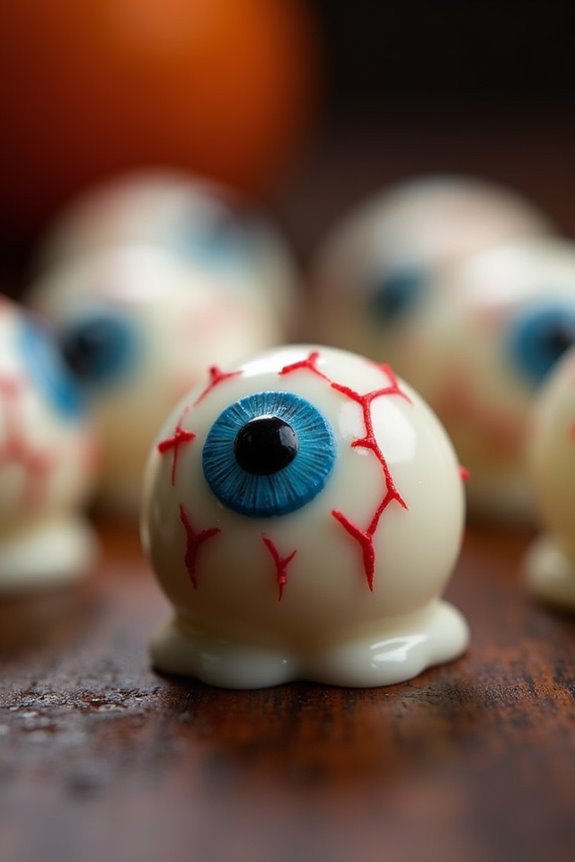
Eerie Eyeball Truffles aren’t only a delicious treat but also a fun and spooky addition to any Halloween office party. These truffles are rich, creamy, and chocolatey, with an unexpected twist that will delight your coworkers. The eyeball design adds a touch of the macabre, making them perfect for the Halloween theme.
Whether you’re a seasoned baker or a beginner, this recipe is straightforward and guaranteed to impress. The truffles are made with a luscious chocolate ganache center, rolled in white chocolate and adorned with eerie eyeball decorations. They’re best served chilled, making them an excellent make-ahead dessert.
These bite-sized treats aren’t only eye-catching but also incredibly indulgent, making them a hit at any gathering.
Ingredients (Serving size: 4-6 people)
- 1 cup semi-sweet chocolate chips
- 1/2 cup heavy cream
- 1 teaspoon vanilla extract
- 8 ounces white chocolate, chopped
- Red and blue food coloring
- 1/4 cup powdered sugar
- 12 candy eyes
- 1 tablespoon coconut oil
Cooking Instructions
- Prepare the Ganache: Place the semi-sweet chocolate chips in a heatproof bowl. In a small saucepan, heat the heavy cream over medium heat until it just begins to simmer. Pour the hot cream over the chocolate chips and let it sit for a minute. Stir until the chocolate is completely melted and smooth. Add the vanilla extract and mix well.
- Chill the Ganache: Cover the bowl with plastic wrap and place it in the refrigerator for about 1-2 hours or until the mixture is firm enough to scoop.
- Form the Truffles: Once the ganache is firm, use a small cookie scoop or a spoon to form small balls (about 1 inch in diameter). Roll each ball between your palms to make them smooth. Place them on a baking sheet lined with parchment paper.
- Chill Again: Return the truffle balls to the refrigerator for about 30 minutes to firm up.
- Melt the White Chocolate: In a microwave-safe bowl, combine the white chocolate and coconut oil. Microwave in 30-second intervals, stirring in between, until completely melted and smooth.
- Decorate the Truffles: Divide the melted white chocolate into two bowls. Add a few drops of red food coloring to one bowl and blue to the other, mixing well to achieve the desired colors. Dip each chilled truffle into the white chocolate, guaranteeing an even coating, and place it back on the parchment paper.
- Add Candy Eyes: Before the chocolate sets, press a candy eye onto the top of each truffle.
- Add Details: Using a toothpick, add extra details such as veins or iris lines with the colored melted chocolate for added eeriness.
- Final Chill: Place the decorated truffles back in the refrigerator for about 30 minutes to set completely.
Extra Tips
For best results, confirm that the ganache is thoroughly chilled before rolling into balls to prevent melting. If you find the mixture is too sticky, dust your hands with a bit of powdered sugar to aid in shaping the truffles.
When melting the white chocolate, be careful not to overheat, as it can seize and become unusable. If this happens, a bit of extra coconut oil can help to smooth it out.
Finally, store the truffles in an airtight container in the refrigerator until serving to maintain their firmness and freshness. Enjoy the spooky delight of Eerie Eyeball Truffles with your coworkers!
Jack-o’-Lantern Cheese Balls
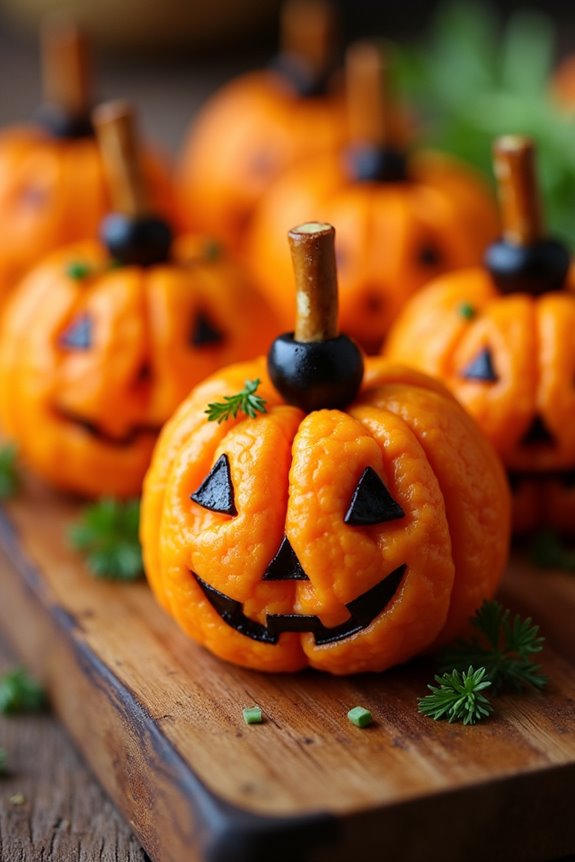
Halloween is the perfect time to get creative in the kitchen, and Jack-o’-Lantern Cheese Balls are a fun and festive treat that can bring a smile to your coworkers’ faces. These savory snacks aren’t only delicious but also add a touch of Halloween spirit to your office party or break room. Shaped like mini pumpkins and adorned with cute little faces, these cheese balls are sure to be a hit with both cheese lovers and Halloween enthusiasts alike.
The beauty of Jack-o’-Lantern Cheese Balls lies in their simplicity and versatility. Made with a blend of creamy cheeses, spices, and other flavorful ingredients, they’re shaped into small, individual-sized portions that resemble the classic Halloween decoration. With a serving size of 4-6 people, this recipe is perfect for sharing with a small group of coworkers.
Whether you serve them with crackers, pretzels, or fresh veggies, these cheese balls are a delightful addition to any Halloween gathering.
Ingredients (Serving Size: 4-6 people)
- 16 oz cream cheese, softened
- 2 cups shredded cheddar cheese
- 1 teaspoon garlic powder
- 1 teaspoon onion powder
- 1/2 teaspoon smoked paprika
- 1/2 teaspoon black pepper
- 1/4 teaspoon salt
- Orange food coloring
- Pretzel sticks (for stems)
- Black olives or black food coloring (for faces)
- Fresh parsley or chives (for leaves)
Cooking Instructions
- Prepare the Cheese Mixture: In a large mixing bowl, combine the softened cream cheese and shredded cheddar cheese. Mix well using a hand mixer or spatula until the cheeses are thoroughly blended.
- Add Seasonings: Add the garlic powder, onion powder, smoked paprika, black pepper, and salt to the cheese mixture. Mix until the spices are evenly distributed throughout the cheese.
- Color the Cheese: To achieve the classic pumpkin look, add a few drops of orange food coloring to the cheese mixture. Stir until the color is evenly incorporated, adjusting the amount of food coloring as necessary to reach your desired shade of orange.
- Shape the Cheese Balls: Using your hands, shape the cheese mixture into small balls, approximately the size of a golf ball. Confirm each ball is smooth and round.
- Create Pumpkin Shapes: Insert a pretzel stick into the top of each cheese ball to mimic the stem of a pumpkin. Use a toothpick or your fingers to gently indent the sides of the cheese balls, creating the ridges that resemble a pumpkin.
- Decorate the Faces: For the Jack-o’-Lantern faces, cut small pieces of black olives to form eyes and mouths, or use black food coloring to draw the faces with a fine-tipped brush or toothpick. Be creative with your designs!
- Add Leaves: Garnish each cheese ball with a small sprig of fresh parsley or chives near the pretzel stem to resemble leaves.
- Chill and Serve: Place the finished cheese balls in the refrigerator for at least 1 hour to firm up before serving. Serve with your choice of crackers, pretzels, or fresh vegetables.
Extra Tips
When making Jack-o’-Lantern Cheese Balls, it’s important to verify the cream cheese is fully softened before mixing to avoid lumps. If you’re short on time, you can speed up the softening process by microwaving the cream cheese for a few seconds.
Additionally, be patient when adding food coloring; it’s easy to add more, but you can’t take it away. Start with a small amount and gradually increase until you reach the desired color.
Finally, when shaping the cheese balls, lightly oiling your hands can help prevent the mixture from sticking. Enjoy your festive and flavorful Halloween creation!
Haunted Haystack Treats
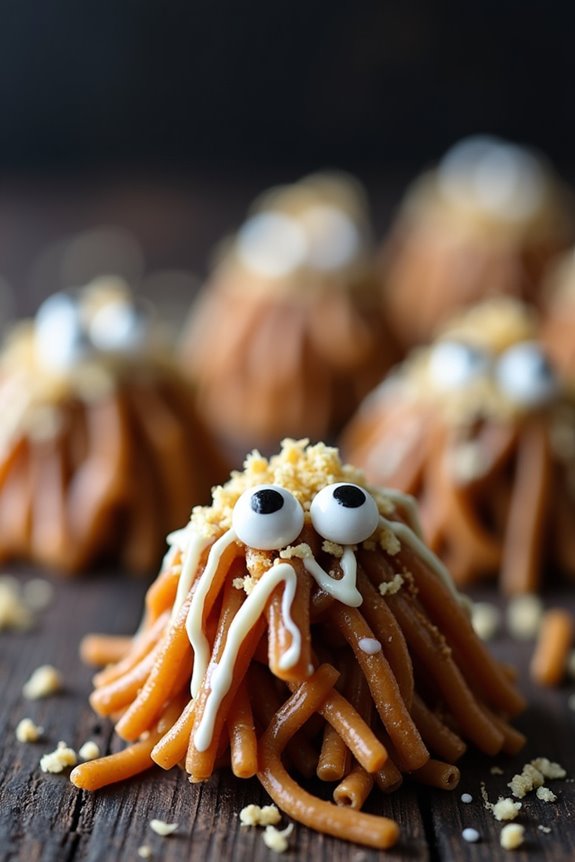
Haunted Haystack Treats are the perfect spooky yet scrumptious treat to share with your coworkers during the Halloween season. These no-bake delights are a fun twist on the classic haystack cookies, with a ghostly makeover to suit the haunted festivities. The combination of crunchy noodles, sweet chocolate, and eerie decorations make them not only a treat to eat but also a delight to create. They offer a delightful mix of textures and flavors, making them an irresistible addition to any Halloween spread.
These treats are perfect for a Halloween office party or a cozy gathering with friends, as they’re easy to make in advance and can be tailored to suit different tastes. The ghostly decorations add a touch of spookiness without being overly creepy, making them suitable for everyone. Plus, with a serving size of 4-6 people, you can easily double or halve the recipe depending on your needs.
Let’s explore the ingredients needed to make these deliciously spooky treats.
Ingredients (Serving Size: 4-6 people)
- 3 cups chow mein noodles
- 1 cup butterscotch chips
- 1 cup milk chocolate chips
- 1/2 cup peanut butter
- 1/4 cup mini marshmallows
- Candy eyes (24 pieces)
- 1/4 cup shredded coconut (optional for texture)
- White chocolate or candy melts (for ghost decoration)
Cooking Instructions
- Prepare Your Ingredients: Before starting, measure out all your ingredients to make the process smoother. If you’re using them, spread the shredded coconut on a baking sheet and toast in a preheated oven at 350°F for about 5 minutes until it’s lightly golden. Set aside.
- Melt the Chocolate and Butterscotch: In a large microwave-safe bowl, combine the butterscotch chips, milk chocolate chips, and peanut butter. Microwave on high in 30-second intervals, stirring in between, until the mixture is smooth and fully melted.
- Combine the Ingredients: Once the chocolate mixture is melted, add the chow mein noodles and mini marshmallows to the bowl. Stir thoroughly until all the noodles and marshmallows are coated with the chocolate mixture.
- Shape the Haystacks: Line a baking sheet with parchment paper. Using a spoon, drop heaping tablespoonfuls of the mixture onto the parchment paper, shaping them into small mounds to resemble haystacks.
- Decorate the Haystacks: While the haystacks are still warm, press two candy eyes into each haystack to create a haunted look. Melt the white chocolate or candy melts according to package instructions and drizzle over the haystacks to create ghostly drapes.
- Set the Treats: Allow the Haunted Haystack Treats to cool at room temperature until they’re set and firm. This usually takes about 30 minutes. If desired, sprinkle the toasted coconut over the tops before they completely harden for added texture.
Extra Tips
When making Haunted Haystack Treats, make sure that the chocolate mixture isn’t overheated as it can seize and become unusable. If you prefer a nut-free version, substitute peanut butter with a sunflower seed butter or omit it entirely.
For a more vibrant presentation, consider using colored candy melts for the ghost decoration, or even add a bit of orange food coloring to the butterscotch mixture. Finally, store the treats in an airtight container to maintain their freshness if preparing them a day or two in advance.
Vampire Bite Brownies
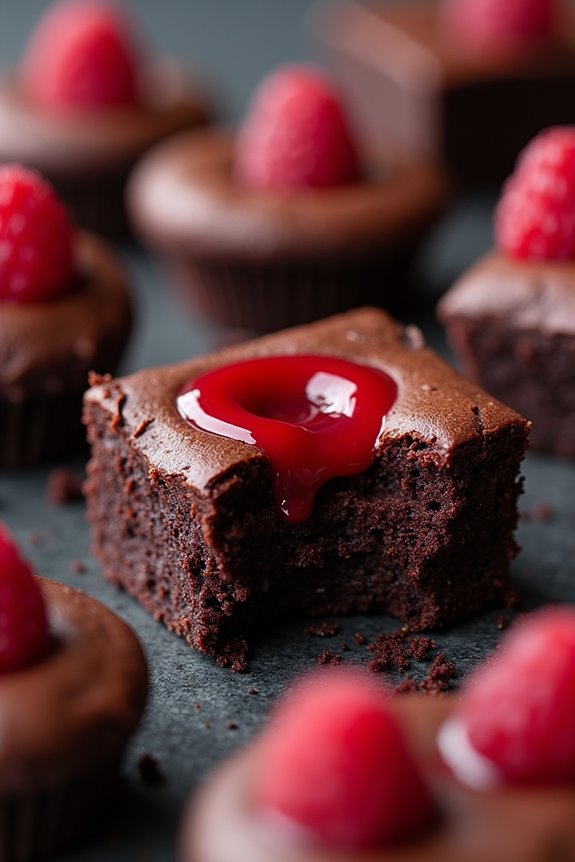
Vampire Bite Brownies are the perfect spooky treat to share with coworkers during Halloween. These decadent chocolate brownies, adorned with a chilling raspberry sauce, mimic the eerie appearance of a vampire’s bite. The rich, fudgy texture of the brownies pairs wonderfully with the sweet yet tart raspberry coulis, creating a flavor combination that’s both delicious and visually striking.
This recipe is designed to serve 4-6 people, making it ideal for a small office gathering or a festive gift to friends. The key to these brownies is their deep, dark chocolate flavor, achieved by using high-quality cocoa powder and chocolate chips. The raspberry coulis drizzled on top not only enhances the brownie with a burst of fruitiness but also adds to the Halloween theme with its blood-red color.
Whether you’re looking to impress your coworkers with your baking skills or simply want to add a touch of spookiness to the office, these Vampire Bite Brownies are sure to be a hit.
Ingredients (serving size: 4-6 people):
- 1 cup unsalted butter
- 2 cups granulated sugar
- 4 large eggs
- 1 teaspoon vanilla extract
- 1 cup all-purpose flour
- 1/2 cup unsweetened cocoa powder
- 1/2 teaspoon salt
- 1 cup semi-sweet chocolate chips
- 1 cup fresh raspberries
- 1/4 cup water
- 2 tablespoons sugar (for raspberry coulis)
Cooking Instructions:
- Preheat the Oven: Preheat your oven to 350°F (175°C) and grease a 9×9 inch baking pan with butter or non-stick spray to prevent the brownies from sticking.
- Melt Butter and Mix with Sugar: In a medium saucepan, melt 1 cup of unsalted butter over medium heat. Once melted, remove from heat and stir in 2 cups of granulated sugar until fully dissolved.
- Add Eggs and Vanilla: Allow the butter and sugar mixture to cool slightly, then add 4 large eggs, one at a time, beating well after each addition. Stir in 1 teaspoon of vanilla extract.
- Combine Dry Ingredients: In a separate bowl, whisk together 1 cup of all-purpose flour, 1/2 cup of unsweetened cocoa powder, and 1/2 teaspoon of salt. Gradually fold the dry ingredients into the wet mixture until just combined.
- Incorporate Chocolate Chips: Fold in 1 cup of semi-sweet chocolate chips, making sure they’re evenly distributed throughout the batter.
- Bake the Brownies: Pour the brownie batter into the prepared baking pan, spreading it evenly. Bake in the preheated oven for 25-30 minutes, or until a toothpick inserted into the center comes out with a few moist crumbs.
- Prepare Raspberry Coulis: While the brownies are baking, combine 1 cup of fresh raspberries, 1/4 cup of water, and 2 tablespoons of sugar in a small saucepan. Cook over medium heat, stirring occasionally, until the raspberries break down and the mixture thickens slightly. Strain through a fine mesh sieve to remove seeds and set aside.
- Cool and Decorate: Once the brownies are baked, allow them to cool in the pan for at least 15 minutes. Using a piping bag or spoon, drizzle the raspberry coulis over the brownies to resemble vampire bites.
Extra Tips:
For an extra spooky touch, you can use a toothpick to create small fang marks in the raspberry coulis, giving the appearance of a vampire bite. If fresh raspberries aren’t available, frozen raspberries can be used for the coulis; just verify they’re fully thawed before cooking.
To enhance the chocolate flavor further, consider adding a teaspoon of espresso powder to the brownie batter. These brownies are best served fresh, but they can be stored in an airtight container for up to three days.
Mummy Wrapped Hot Dogs

Mummy Wrapped Hot Dogs are a fun and festive treat that are perfect for sharing with coworkers during Halloween celebrations. These spooky snacks aren’t only easy to make but also delicious, making them an ideal option for a workplace potluck or a themed office party. Wrapped in flaky crescent roll dough, the hot dogs resemble little mummies, complete with mustard or ketchup eyes for a delightful and playful touch.
This recipe serves 4-6 people, making it great for a small gathering or for surprising your team at work. The combination of the savory hot dogs and the buttery, golden crescent dough is sure to be a hit with adults and kids alike. Plus, they can be prepared in advance and baked just before serving, allowing you more time to enjoy the festivities.
Ingredients:
- 1 can of refrigerated crescent roll dough
- 8 hot dogs
- Mustard or ketchup for decorating
- Cooking spray or parchment paper
Cooking Instructions:
- Preheat the Oven: Begin by preheating your oven to 375°F (190°C). This guarantees the oven is hot enough to cook the dough evenly once the Mummy Wrapped Hot Dogs are placed inside.
- Prepare the Baking Sheet: Line a baking sheet with parchment paper or lightly spray it with cooking spray to prevent the mummies from sticking during baking.
- Roll Out the Dough: Open the can of crescent roll dough and unroll it on a clean surface. Separate the dough into four rectangles, pressing the perforations to seal them if necessary. Use a knife or a pizza cutter to slice each rectangle into thin strips, about 1/4 inch wide.
- Wrap the Hot Dogs: Take one hot dog and start wrapping it with the dough strips, leaving a small gap at one end for the face. Wrap the strips in a criss-cross pattern, mimicking the look of a mummy’s bandages. Repeat this process for each hot dog.
- Bake the Mummies: Place the wrapped hot dogs on the prepared baking sheet. Bake in the preheated oven for 12-15 minutes, or until the dough is golden brown and cooked through.
- Decorate the Mummies: Once baked, remove the mummies from the oven and let them cool for a few minutes. Use mustard or ketchup to add small dots for eyes on each mummy.
Extra Tips:
To add a touch of creativity, you can experiment with different types of sausage or cheese-filled hot dogs for added flavor.
If you’re preparing these ahead of time, assemble the mummies and keep them in the refrigerator until you’re ready to bake. This will help save time on the day of your event.
Additionally, consider serving them with a variety of dipping sauces, like honey mustard or spicy ketchup, to cater to different taste preferences. Enjoy your Halloween celebration with these adorable and tasty Mummy Wrapped Hot Dogs!
Bewitched Pretzel Rods

Bewitched Pretzel Rods are the perfect Halloween treat to cast a delicious spell on your coworkers. These sweet and salty snacks are easy to make and can add a touch of magic to any office Halloween party. With just a few ingredients and a little bit of creativity, you can whip up a batch of these enchanting pretzel rods in no time. The recipe offers a delightful combination of crunchy pretzels, creamy chocolate, and a sprinkle of Halloween-themed decorations that are certain to impress.
The beauty of Bewitched Pretzel Rods lies in their simplicity and versatility. You can customize them with different types of chocolate and toppings to suit your taste preferences or dietary needs. Whether you prefer milk, dark, or white chocolate, these pretzel rods will be a hit. Plus, they can easily be prepared in larger quantities, making them ideal for sharing with a group of 4-6 people. So, gather your ingredients and get ready to stir up some Halloween magic in the kitchen!
Ingredients (Serving Size: 4-6 people):
- 12 pretzel rods
- 1 cup semi-sweet chocolate chips
- 1 cup white chocolate chips
- Halloween-themed sprinkles or colored sugar
- Wax paper or parchment paper
Cooking Instructions:
- Prepare Your Workspace: Begin by lining a baking sheet with wax paper or parchment paper to prevent the pretzel rods from sticking as they cool.
- Melt the Chocolate: In separate microwave-safe bowls, melt the semi-sweet chocolate chips and white chocolate chips. Heat each bowl in the microwave in 30-second intervals, stirring between each interval, until the chocolate is completely melted and smooth.
- Dip the Pretzel Rods: Holding a pretzel rod by one end, dip it into the melted chocolate, covering about two-thirds of the rod. Allow any excess chocolate to drip off before placing it on the prepared baking sheet.
- Add the Magic Touch: While the chocolate is still wet, sprinkle the pretzel rods with Halloween-themed sprinkles or colored sugar. Be sure to add the decorations quickly, as the chocolate will set quite fast.
- Cool and Set: Once all the pretzel rods are decorated, place the baking sheet in the refrigerator for about 15 minutes, or until the chocolate has hardened completely.
- Serve and Enjoy: Once the chocolate has set, your Bewitched Pretzel Rods are ready to be served. Arrange them on a festive platter and watch them disappear!
Extra Tips:
When making Bewitched Pretzel Rods, the key to a smooth and glossy chocolate coating is to ascertain that no water comes into contact with the chocolate, as this can cause it to seize.
If you don’t have a microwave, you can also melt the chocolate using a double boiler on the stove. Additionally, feel free to experiment with different toppings such as crushed nuts or mini candies to add variety to your pretzel rods.
Storing them in an airtight container at room temperature will keep them fresh for several days, making them a great make-ahead option for your Halloween festivities.
Black Cat Oreo Pops

Black Cat Oreo Pops are a whimsical and delicious treat perfect for sharing with coworkers during the Halloween season. These adorable confections combine the classic taste of Oreos with a fun, festive twist that will surely bring a smile to anyone’s face.
With just a few simple ingredients, you can create these delightful pops that not only look fantastic but also taste amazing. They’re the perfect balance of crunchy, creamy, and chocolatey indulgence.
Creating these pops is a great way to celebrate the spooky season with your colleagues. They’re easy to make, and the decorating part can even serve as a fun group activity if you decide to involve your coworkers in the process.
Whether you’re preparing them for an office party or simply want to surprise your team with a sweet treat, Black Cat Oreo Pops are sure to be a hit.
Ingredients for 4-6 servings:
- 10 Oreo cookies
- 1 cup of semi-sweet chocolate chips
- 1 tablespoon of coconut oil
- 20 candy eyes
- 10 pieces of small black licorice or string licorice
- 20 small triangle-shaped candy pieces (e.g., mini chocolate chips or candy corn)
- Lollipop sticks
Cooking Instructions:
- Prepare the Oreos: Carefully separate the Oreo cookies, keeping the cream filling intact on one side. Insert a lollipop stick into the cream-filled side, then gently press the other cookie half back on top to secure the stick.
- Melt the Chocolate: In a microwave-safe bowl, combine the chocolate chips and coconut oil. Microwave in 30-second intervals, stirring after each, until fully melted and smooth. Alternatively, use a double boiler to melt the chocolate.
- Coat the Oreos: Dip each Oreo pop into the melted chocolate, using a spoon to help cover the entire cookie. Allow any excess chocolate to drip off. Place the coated pops onto a parchment-lined baking sheet.
- Decorate the Pops: Before the chocolate sets, attach two candy eyes near the top of each pop. Position a small triangle-shaped candy piece below the eyes to form the cat’s nose. Cut the black licorice into small pieces and arrange them as whiskers on either side of the nose.
- Set the Pops: Allow the decorated pops to sit at room temperature or refrigerate them for about 20 minutes, until the chocolate has completely set and hardened.
Extra Tips:
For best results, make sure your ingredients are at room temperature before you start. This helps the chocolate adhere better to the cookies.
If you prefer a more intense chocolate flavor, you can use dark chocolate chips instead of semi-sweet. Additionally, if you find the candy eyes slipping off, press them gently into the chocolate to secure them.
Experiment with different candy pieces for the cat’s nose to create various looks, and consider using colored candy melts for a more vibrant appearance.
Ghoulish Guacamole Dip
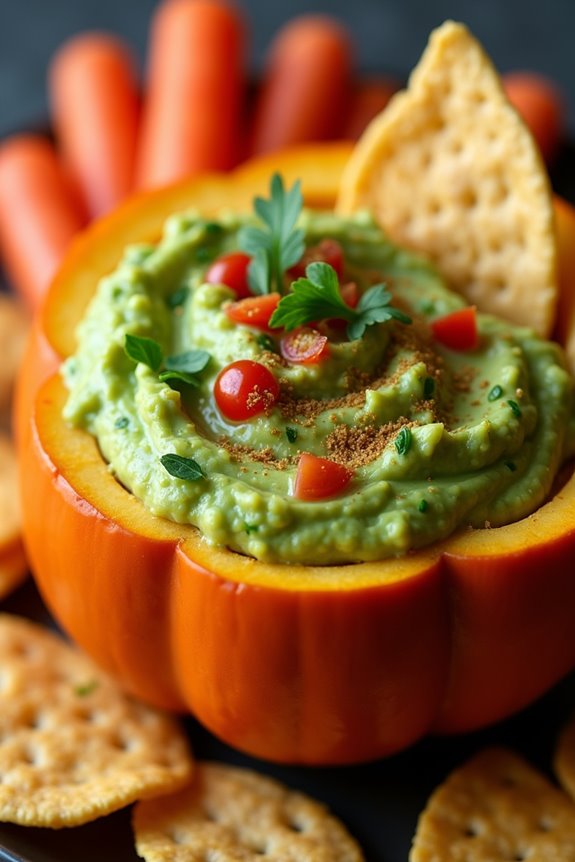
Halloween is a perfect time to bring some spooky fun to the workplace, and what better way to do it than with a deliciously eerie treat like Ghoulish Guacamole Dip? This vibrant green dip isn’t only a visual delight but also a scrumptious snack that your coworkers will love. The creamy texture of avocados combined with a hint of lime and a touch of spice makes this dip an irresistible addition to any Halloween spread. Perfect for sharing, this recipe serves 4-6 people, making it ideal for a small office gathering or potluck.
Ghoulish Guacamole Dip is both easy to prepare and customize according to your taste preferences. You can keep it mild and fresh, or add a kick of heat for those who enjoy a bit of spice. Pair it with an assortment of dippers like tortilla chips, veggie sticks, or even Halloween-themed crackers to keep with the spooky theme.
This dip isn’t just about the taste; it’s also about the presentation. Consider serving it in a carved-out pumpkin or with a side of creepy-shaped chips for that extra festive touch.
Ingredients for 4-6 servings:
- 4 ripe avocados
- 1 small onion, finely chopped
- 2 tomatoes, deseeded and diced
- 1 jalapeño, finely chopped (optional)
- 2 tablespoons lime juice
- 1/4 cup fresh cilantro, chopped
- Salt and pepper to taste
- 1/4 teaspoon garlic powder
- 1/4 teaspoon ground cumin
Cooking Instructions:
- Prepare the Avocados: Start by cutting the avocados in half, removing the pit, and scooping the flesh into a large bowl. Use a fork or a potato masher to mash the avocados until they reach your desired consistency; they can be smooth or slightly chunky.
- Mix Ingredients: Add the chopped onion, diced tomatoes, and jalapeño (if using) to the mashed avocados. Mix them well to guarantee even distribution of flavors.
- Add Seasonings: Pour in the lime juice and sprinkle the cilantro, salt, pepper, garlic powder, and cumin over the avocado mixture. Stir everything together until all ingredients are thoroughly combined.
- Taste and Adjust: Taste the guacamole and adjust the seasoning as desired. You might want to add more lime juice for tanginess, more salt for flavor, or more jalapeño for heat, depending on your preference.
- Chill and Serve: Once the guacamole is seasoned to your liking, cover the bowl with plastic wrap, pressing it directly onto the surface of the guacamole to prevent browning. Refrigerate for at least 30 minutes to allow the flavors to meld. Serve chilled with your choice of dippers.
Extra Tips:
To prevent your Ghoulish Guacamole Dip from turning brown, be sure to keep it covered with plastic wrap directly touching the surface. If you’re making it ahead of time, add an extra splash of lime juice just before serving to freshen it up.
For a more festive presentation, consider adding edible decorations like black olive slices for eyes or using cookie cutters to create Halloween shapes out of the dippers. Enjoy your spooky creation and watch it disappear as quickly as a ghost in the night!
Pumpkin Spice Rice Krispies Treats
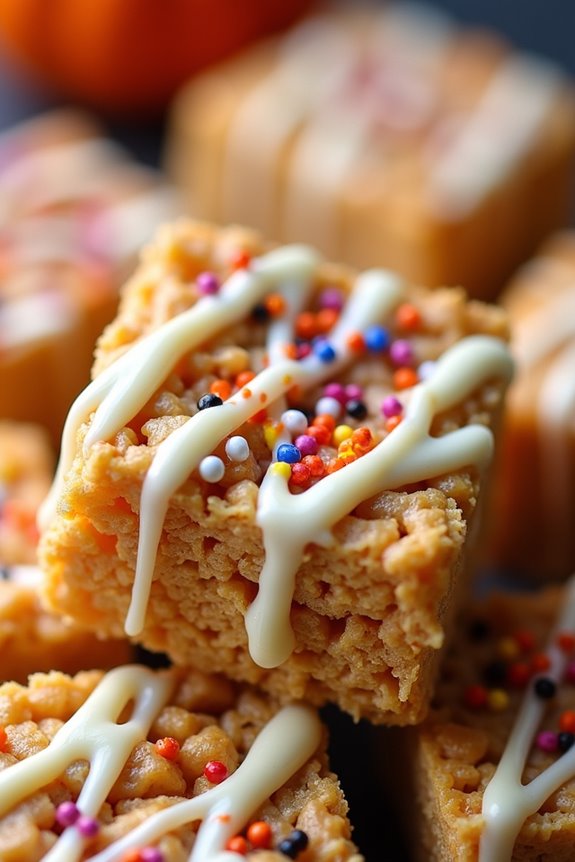
Pumpkin Spice Rice Krispies Treats are the perfect Halloween treat to share with your coworkers. These delightful bars combine the classic gooey and crispy texture of Rice Krispies treats with the warm and comforting flavors of pumpkin spice, making them an irresistible snack.
They’re easy to make and require no baking, which means you can whip up a batch quickly and with minimal fuss. Whether you’re hosting a Halloween office party or simply want to surprise your colleagues with a festive treat, these Pumpkin Spice Rice Krispies Treats are certain to be a hit.
The combination of pumpkin spice and marshmallows creates a unique twist on the traditional Rice Krispies treats, with a hint of fall flavors that are both comforting and delicious. These treats are also highly customizable. You can add festive sprinkles on top or drizzle with white chocolate for an extra touch of sweetness.
The recipe below yields enough for 4-6 people, making it perfect for sharing in the office break room or as a thoughtful gift for your coworkers.
Ingredients (Serves 4-6):
- 3 tablespoons unsalted butter
- 1 package (10 oz) mini marshmallows
- 1 teaspoon pumpkin pie spice
- 6 cups Rice Krispies cereal
- Optional: 1/2 cup white chocolate chips for drizzling
- Optional: Halloween-themed sprinkles for decoration
Instructions:
- Melt the Butter: In a large saucepan, melt the unsalted butter over low heat. Stir continuously to prevent the butter from burning.
- Add Marshmallows: Once the butter is completely melted, add the mini marshmallows to the saucepan. Stir the mixture consistently until the marshmallows are completely melted and smooth.
- Incorporate Pumpkin Spice: Stir in the pumpkin pie spice into the melted marshmallow mixture until it’s fully incorporated. This will give your treats a warm, autumnal flavor.
- Mix in Cereal: Remove the saucepan from the heat and immediately add the Rice Krispies cereal. Stir quickly and thoroughly to guarantee that all the cereal is evenly coated with the marshmallow mixture.
- Transfer to Pan: Grease a 9×13-inch baking dish with a light layer of butter or non-stick spray. Press the cereal mixture into the prepared dish evenly using a buttered spatula or wax paper.
- Cool and Set: Allow the mixture to cool and set at room temperature for about 30 minutes. This will make it easier to cut into squares.
- Optional Decorations: If desired, melt the white chocolate chips in a microwave-safe bowl, then drizzle over the top of the Rice Krispies treats. Add Halloween-themed sprinkles for a festive touch.
- Cut and Serve: Once set, cut the treats into squares and serve them to your coworkers, or package them individually for gifting.
Extra Tips: For an even more pronounced pumpkin flavor, consider adding a few tablespoons of canned pumpkin puree to the marshmallow mixture, but be sure to adjust the cereal quantity slightly to keep the treats from becoming too sticky.
If you’re using canned pumpkin, make sure it’s pure pumpkin and not pumpkin pie filling, as the latter contains additional spices and sugar. Additionally, using fresh marshmallows is key to achieving the right texture; older marshmallows may not melt as smoothly.
Enjoy these treats with a cup of hot apple cider or a pumpkin spice latte for the ultimate autumn experience.
Zombie Finger Cookies
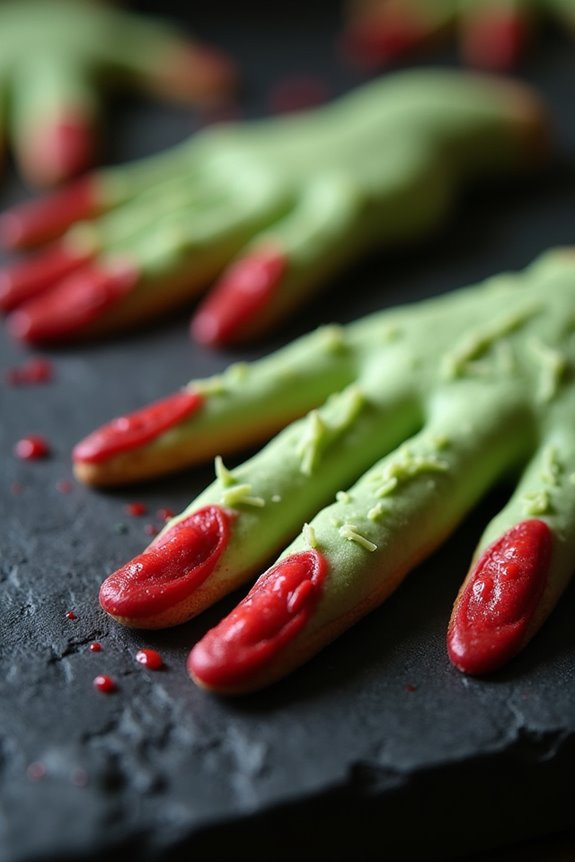
Halloween is the perfect time to indulge in spooky treats that are both eerie and delicious. One of the most delightfully creepy options is Zombie Finger Cookies. These ghoulish goodies are sure to be a hit among coworkers, adding a touch of horror to your Halloween festivities. With their realistic appearance and scrumptious taste, these cookies will leave everyone both horrified and delighted. Perfect for a Halloween party or office treat, Zombie Finger Cookies are surprisingly easy to make and will surely impress all who dare to try them.
The key to making convincing Zombie Finger Cookies lies in the details. By using simple ingredients and a little creativity, you can transform ordinary cookie dough into a batch of terrifyingly tasty fingers. These cookies aren’t only fun to make, but they also allow you to express your inner artist as you craft each finger to perfection. Whether you’re a seasoned baker or a Halloween enthusiast, this recipe will guide you through the process of creating these spooky treats for 4-6 people.
Ingredients:
- 1 cup unsalted butter, softened
- 1 cup powdered sugar
- 1 large egg
- 1 teaspoon vanilla extract
- 1 teaspoon almond extract
- 2 2/3 cups all-purpose flour
- 1 teaspoon baking powder
- 1 teaspoon salt
- 1/2 cup blanched almonds
- Red food coloring gel
- Green food coloring gel
Instructions:
- Prepare the Dough: In a large mixing bowl, cream together the softened butter and powdered sugar until the mixture is light and fluffy. This should take about 2-3 minutes using a hand mixer or stand mixer.
- Add Wet Ingredients: Add the egg, vanilla extract, and almond extract to the creamed mixture. Beat until fully combined, ensuring the mixture is smooth and uniform.
- Combine Dry Ingredients: In a separate bowl, whisk together the all-purpose flour, baking powder, and salt. Gradually add this mixture to the wet ingredients, mixing on low speed until a dough forms.
- Color the Dough: Divide the dough into two equal portions. Add a few drops of green food coloring to one half and knead until the color is evenly distributed. Repeat with the other half using red food coloring. Each portion should have a distinct, vibrant color.
- Shape the Fingers: Preheat your oven to 350°F (175°C). Line a baking sheet with parchment paper. Take small amounts of the dough and roll them into finger-sized shapes. Use a knife to make several horizontal indentations, creating knuckle lines.
- Add Fingernails: Press a blanched almond into the tip of each cookie to resemble a fingernail. You can dip the tip of the almond in red food coloring gel to give it a bloody effect.
- Bake: Place the prepared cookies on the baking sheet, leaving enough space between each. Bake for 15-18 minutes or until the edges are lightly golden. Keep an eye on them to avoid overbaking.
- Cool and Serve: Let the cookies cool on the baking sheet for a few minutes before transferring them to a wire rack to cool completely. Once cooled, arrange them on a platter for a creepy presentation.
Extra Tips:
For a more authentic zombie look, you can add additional details like scars or warts using a toothpick to etch in lines or by adding small pieces of dough to create raised bumps.
If you’re short on time, you can use store-bought sugar cookie dough, though the homemade version offers a richer flavor. Remember to adjust the food coloring to achieve the desired level of spookiness.
These cookies can be stored in an airtight container for up to a week, so you can prepare them in advance for your Halloween celebration.