

Hey there, fellow Halloween enthusiasts! 🎃
If you’re gearing up for a fang-tastic Halloween bash and need some treats that’ll disappear faster than a ghost at midnight, you’re in the right place.
I’ve got some wickedly fun ideas that’ll make your spooky soirée unforgettable. From candy corn popcorn that hits all the sweet spots to gummy worm jello that’s as eerie as it is delicious, these treats are sure to be a hit.
Trust me, they’re so irresistible, you’ll want to whip up extra batches!
Spooky Spider Deviled Eggs
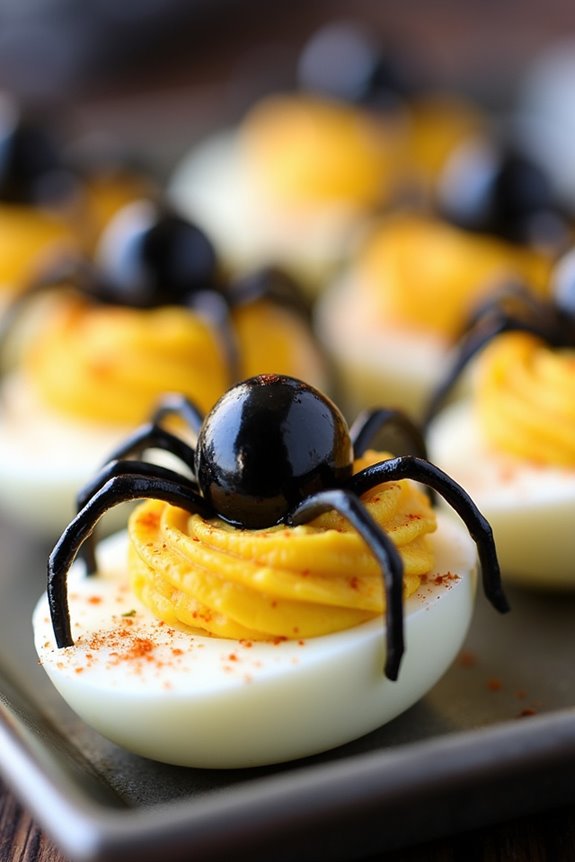
Are you ready to spook up your Halloween party with a dish that’s both delicious and delightfully eerie? Spooky Spider Deviled Eggs are the perfect addition to your festive spread. These classic deviled eggs take a creepy turn with the addition of black olive spiders, making them a hit with both kids and adults. Not only are they visually impressive, but they also pack a punch of flavor that will have your guests reaching for more.
Deviled eggs are a timeless favorite, known for their creamy, tangy filling. By adding a creative twist, you can easily transform them into a Halloween-themed appetizer. The key to these Spooky Spider Deviled Eggs is in the presentation. With just a few additional ingredients, you can create a dish that’s as fun to make as it’s to eat. Perfect for a serving size of 4-6 people, this recipe is sure to be a crowd-pleaser at any Halloween gathering.
Ingredients:
- 6 large eggs
- 1/4 cup mayonnaise
- 1 teaspoon Dijon mustard
- 1 teaspoon white vinegar
- Salt and pepper to taste
- Paprika for garnish
- 12 black olives
Cooking Instructions:
- Boil the Eggs: Place the eggs in a single layer in a saucepan and cover them with water. Bring the water to a boil over high heat. Once boiling, remove the saucepan from the heat and cover it. Let the eggs sit in the hot water for 12 minutes.
- Prepare the Eggs: After 12 minutes, transfer the eggs to a bowl of ice water to cool for at least 5 minutes. This will make them easier to peel. Once cooled, peel the eggs carefully to avoid damaging the whites.
- Make the Filling: Cut each egg in half lengthwise and remove the yolks. Place the yolks in a mixing bowl and mash them with a fork. Add mayonnaise, Dijon mustard, white vinegar, salt, and pepper to the yolks. Mix until smooth and creamy.
- Fill the Egg Whites: Spoon or pipe the yolk mixture back into the egg white halves, mounding slightly.
- Create the Spiders: Cut the black olives in half. Use one half for the spider’s body and slice the other half into thin strips for the legs. Arrange the olive pieces on top of each deviled egg to resemble a spider.
- Garnish and Serve: Lightly sprinkle paprika over the eggs for a splash of color and an extra hint of flavor. Arrange the finished Spooky Spider Deviled Eggs on a serving platter and enjoy!
Extra Tips:
When boiling the eggs, it’s essential to use a gentle touch when peeling them to maintain the integrity of the egg whites.
If you’re looking to prepare these deviled eggs in advance, you can boil and peel the eggs the day before, storing them in the refrigerator. Just remember to assemble the spiders closer to the time of serving to keep them fresh and intact.
Additionally, if you want to add a little more flair, consider using different types of olives or adding a touch of hot sauce to the yolk mixture for a spicy kick.
Creepy Candy Corn Popcorn
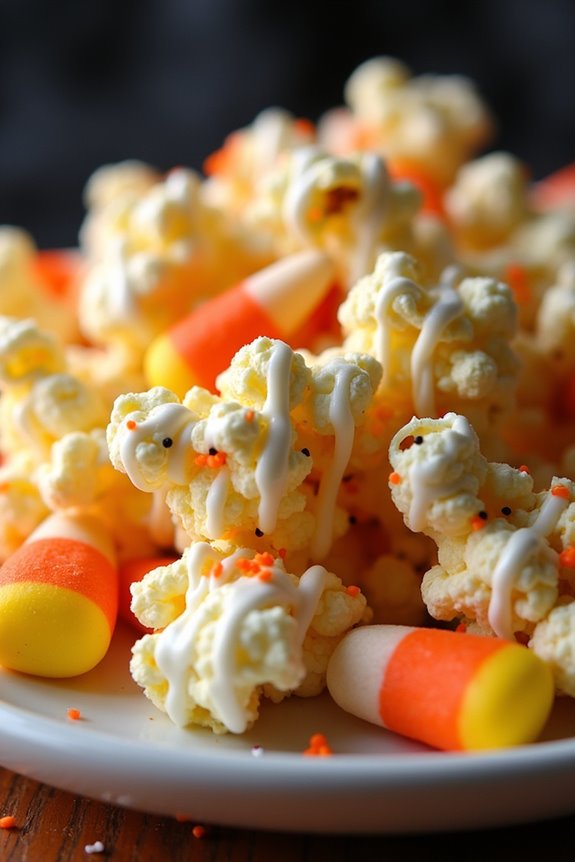
Creepy Candy Corn Popcorn is a frightfully fun treat that’s perfect for Halloween parties. This sweet and salty snack combines the classic flavors of candy corn with the satisfying crunch of popcorn, creating a delightful mix that both kids and adults will love.
The vibrant orange, yellow, and white colors of candy corn add a festive touch to the popcorn, making it a visually appealing addition to your party spread. Not only is it delicious, but it’s also incredibly easy to make, ensuring you spend less time in the kitchen and more time enjoying the festivities.
Whether you’re hosting a spooky celebration or simply looking for a themed snack to enjoy on a cozy Halloween night, Creepy Candy Corn Popcorn is a must-try. The combination of buttery popcorn, sweet candy corn, and a hint of chocolate creates a flavor explosion that’s hard to resist.
Plus, the recipe is simple enough for even the most novice cooks, making it a great option for involving the little ones in the party preparations. Prepare to impress your guests with this ghoulishly good treat that promises to be a hit at any Halloween gathering.
Ingredients (Serving Size: 4-6 people):
- 10 cups of popped popcorn
- 1 cup of candy corn
- 1/2 cup of white chocolate chips
- 1/2 cup of semi-sweet chocolate chips
- 1/4 cup of unsalted butter, melted
- 1/2 teaspoon of salt
- 1/2 teaspoon of vanilla extract
- Orange and black sprinkles (optional)
Instructions:
- Prepare the Popcorn: Begin by popping the popcorn. You can use either an air popper or microwave popcorn. Make sure to remove any unpopped kernels. Place the popped popcorn into a large mixing bowl.
- Melt the Chocolates: In separate microwave-safe bowls, melt the white chocolate chips and semi-sweet chocolate chips. Heat the chocolates in 30-second intervals, stirring in between until completely melted and smooth.
- Combine Butter and Vanilla: In a small bowl, combine the melted butter, vanilla extract, and salt. Stir until the mixture is well combined.
- Assemble the Popcorn Mix: Drizzle the butter mixture over the popcorn, tossing gently to coat the popcorn evenly. Then, pour the melted white chocolate and semi-sweet chocolate over the popcorn, using a spatula to mix until all the popcorn is coated.
- Add the Candy Corn and Sprinkles: Once the popcorn is evenly coated with chocolate, add the candy corn and sprinkles, if using. Gently toss again to distribute the candy and sprinkles throughout the popcorn.
- Let it Set: Spread the popcorn mixture onto a large baking sheet lined with parchment paper. Allow the chocolate to set by letting it sit at room temperature for about 30 minutes or until the chocolate hardens.
- Serve and Enjoy: Once the chocolate is set, break the popcorn into clusters and serve in a large bowl or individual cups for easy snacking.
Extra Tips: For a more festive presentation, consider using Halloween-themed bowls or bags for serving the Creepy Candy Corn Popcorn. If you prefer a less sweet variation, adjust the amount of candy corn to your taste.
Additionally, you can experiment with other Halloween candies, such as gummy worms or chocolate-covered pretzels, to add variety to this treat. Remember to store any leftovers in an airtight container to maintain freshness, although this delicious snack tends to disappear quickly!
Monster Mash Cupcakes
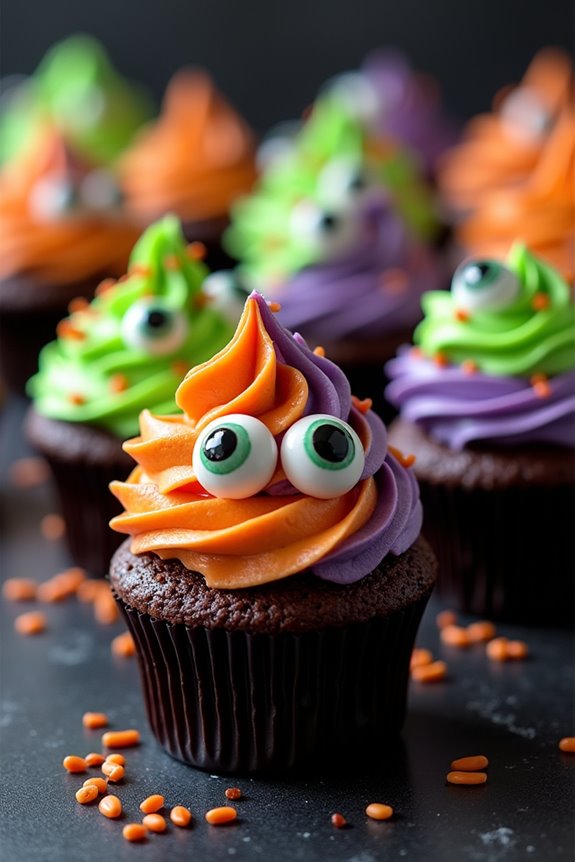
Looking to thrill your friends and family with a ghoulishly delightful treat at your next Halloween party? Monster Mash Cupcakes are the perfect choice to add a spooky yet sweet touch to your festive table.
These cupcakes aren’t only delicious but also incredibly fun to decorate, allowing you to release your creativity in the most monstrous way possible. With a rich chocolate base and vibrant frosting, these cupcakes are sure to be the highlight of your Halloween gathering.
These cupcakes are easy to make, and with the right ingredients and a little bit of imagination, you can create a batch of 12 to 16 cupcakes, perfect for serving 4-6 people. Whether you’re an experienced baker or just looking for a fun activity to do with the kids, these Monster Mash Cupcakes are bound to be a hit.
So, tie on your apron, gather your ingredients, and get ready to whip up some deliciously spooky cupcakes!
Ingredients:
- 1 cup all-purpose flour
- 1 cup granulated sugar
- 1/2 cup unsweetened cocoa powder
- 1 teaspoon baking powder
- 1/2 teaspoon baking soda
- 1/4 teaspoon salt
- 1/2 cup whole milk
- 1/4 cup vegetable oil
- 1 large egg
- 1 teaspoon vanilla extract
- 1/2 cup boiling water
- 1 cup butter, softened (for frosting)
- 4 cups powdered sugar (for frosting)
- 2-3 tablespoons milk (for frosting)
- Food coloring (green, purple, and orange)
- Edible candy eyes
- Assorted Halloween-themed sprinkles
Cooking Instructions:
- Preheat the Oven: Preheat your oven to 350°F (175°C) and line a muffin tin with cupcake liners.
- Mix Dry Ingredients: In a large mixing bowl, combine the flour, sugar, cocoa powder, baking powder, baking soda, and salt. Use a whisk to confirm all dry ingredients are thoroughly combined.
- Combine Wet Ingredients: In a separate bowl, whisk together the milk, vegetable oil, egg, and vanilla extract until well blended.
- Create the Batter: Gradually add the wet ingredients to the dry ingredients, mixing with a hand mixer on medium speed until the batter is smooth. Carefully stir in the boiling water until fully incorporated. The batter will be thin, which is normal.
- Fill the Cupcake Liners: Carefully pour the batter into the prepared cupcake liners, filling each about two-thirds full.
- Bake: Place the muffin tin in the oven and bake for 18-22 minutes, or until a toothpick inserted into the center of a cupcake comes out clean. Once baked, allow the cupcakes to cool in the pan for 5 minutes before transferring them to a wire rack to cool completely.
- Prepare the Frosting: In a large bowl, beat the softened butter until creamy. Gradually add the powdered sugar, one cup at a time, alternating with a tablespoon of milk until the frosting reaches a smooth, spreadable consistency.
- Color the Frosting: Divide the frosting into three bowls. Add a few drops of green food coloring to the first bowl, purple to the second, and orange to the third. Mix each thoroughly until the color is evenly distributed.
- Decorate the Cupcakes: Once the cupcakes are completely cooled, use a piping bag or a knife to spread the frosting on each cupcake. Mix and match frosting colors for a fun effect. Top with edible candy eyes and Halloween-themed sprinkles to create your own monster designs.
Extra Tips:
When decorating your Monster Mash Cupcakes, feel free to get creative with the designs. Use different-sized candy eyes to give each cupcake a unique personality.
If you want to add more texture, consider using shredded coconut or crushed cookies for hair or fur. For added flavor, you can incorporate a teaspoon of instant espresso powder into the dry ingredients to enhance the chocolate taste.
Finally, if you have leftovers, store the cupcakes in an airtight container to keep them fresh for up to three days.
Witch’s Brew Brownies
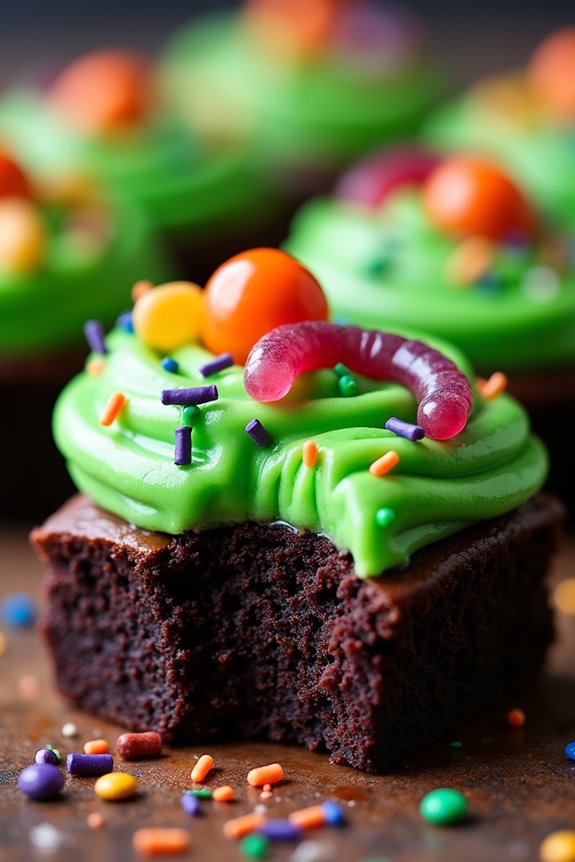
Witch’s Brew Brownies are the perfect spooky treat for your Halloween party, combining the rich decadence of classic brownies with a whimsical twist that will delight both kids and adults.
These gooey, chocolatey delights are topped with a colorful and eerie “brew” that captures the essence of a witch’s cauldron, complete with bubbling green frosting and eerie edible decorations. Whether you’re hosting a large gathering or a cozy get-together, these brownies are certain to be the highlight of your Halloween spread.
The base of the Witch’s Brew Brownies is a dense and fudgy brownie layer that serves as the perfect canvas for the vibrant toppings. The magical brew is made using a simple yet visually striking green frosting, which can be piped or spread over the brownies to create a bubbling, cauldron-like effect.
To add to the spooky charm, top it off with assorted Halloween candies, such as gummy worms, candy eyeballs, and sprinkles, to mimic the appearance of a witch’s potion. This recipe yields enough to serve 4-6 people, making it ideal for intimate gatherings or as part of a larger dessert selection.
Ingredients
- 1 cup unsalted butter
- 2 cups granulated sugar
- 4 large eggs
- 1 teaspoon vanilla extract
- 1 cup all-purpose flour
- 1/2 cup unsweetened cocoa powder
- 1/4 teaspoon salt
- 1/2 teaspoon baking powder
- 1 cup green frosting (store-bought or homemade)
- Assorted Halloween candies (gummy worms, candy eyeballs, sprinkles)
Instructions
- Preheat the Oven: Preheat your oven to 350°F (175°C) and prepare a 9×9 inch baking pan by lining it with parchment paper or greasing it lightly with butter.
- Melt the Butter: In a microwave-safe bowl, melt the butter. This should take about 1-2 minutes, depending on your microwave. Allow it to cool slightly.
- Mix Wet Ingredients: In a large mixing bowl, combine the melted butter and granulated sugar. Whisk together until well combined. Add the eggs one at a time, beating well after each addition. Stir in the vanilla extract.
- Combine Dry Ingredients: In a separate bowl, sift together the flour, cocoa powder, salt, and baking powder. Gradually add these dry ingredients to the wet mixture, stirring until just combined. Be careful not to overmix.
- Bake the Brownies: Pour the brownie batter into the prepared baking pan, spreading it evenly. Bake in the preheated oven for 25-30 minutes, or until a toothpick inserted into the center comes out with a few moist crumbs.
- Cool and Frost: Allow the brownies to cool completely in the pan. Once cooled, spread or pipe the green frosting over the top, creating a bubbling effect.
- Decorate: Decorate with assorted Halloween candies, placing them strategically to mimic a witch’s brew. Let your creativity shine with the arrangement!
Extra Tips
When making Witch’s Brew Brownies, make sure to allow the brownies to cool completely before adding the frosting; this prevents it from melting and losing its shape.
If you’re making homemade frosting, consider adding a drop of mint or vanilla extract for an extra flavor boost. For the best spooky effect, feel free to experiment with different Halloween-themed candies.
Mummy Hot Dogs
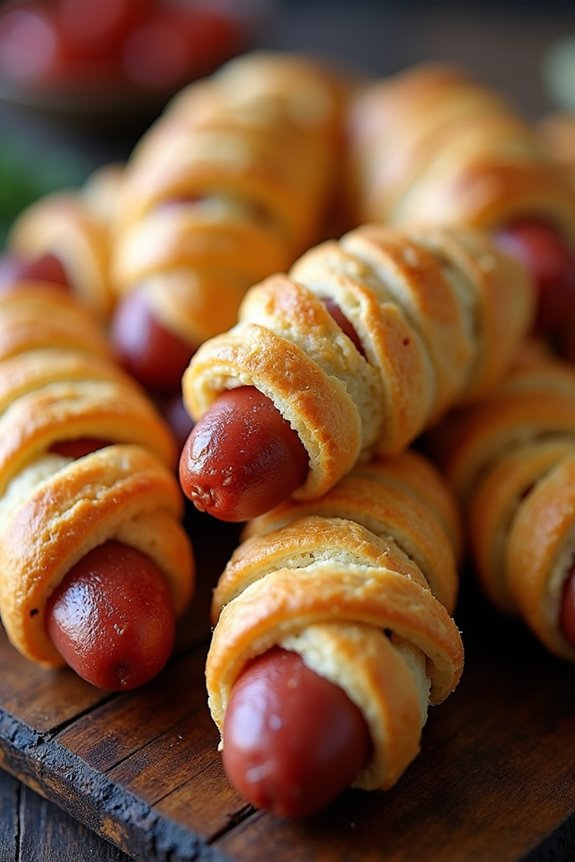
Mummy Hot Dogs are a fun and spooky treat perfect for any Halloween party. These adorable appetizers aren’t only easy to make but also a hit with both kids and adults alike. Wrapped in flaky crescent dough and decorated with mustard or ketchup eyes, these mummy hot dogs are certain to add a touch of Halloween spirit to your party spread. Serve them with a variety of dipping sauces, and watch them disappear from the plate as quickly as they appeared.
The key to making perfect Mummy Hot Dogs is in the wrapping technique. The crescent dough should be cut into thin strips and carefully wrapped around the hot dogs to create the appearance of bandages. The result is a deliciously buttery and flaky outer layer that complements the juicy hot dog inside. This recipe makes enough Mummy Hot Dogs to serve 4-6 people, making it ideal for a small gathering or as part of a larger buffet.
Ingredients (for 4-6 people):
- 1 (8-ounce) can refrigerated crescent roll dough
- 8 hot dogs
- Cooking spray
- Mustard or ketchup, for decoration
Cooking Instructions:
- Preheat the oven: Begin by preheating your oven to 375°F (190°C). This will guarantee that your Mummy Hot Dogs cook evenly and develop a golden-brown crust.
- Prepare the dough: Unroll the crescent roll dough and separate it into four rectangles. Pinch the perforations to seal them, creating a solid piece of dough.
- Cut the dough: Using a sharp knife or pizza cutter, slice each rectangle into thin strips. The thinner the strips, the more bandage-like the dough will appear once wrapped around the hot dogs.
- Wrap the hot dogs: Take one hot dog at a time and begin wrapping it with the dough strips. Start at the bottom and leave a small space for the face. Overlap the strips slightly and twist them as you go to create a mummy-like appearance. Repeat this process for each hot dog.
- Bake the Mummy Hot Dogs: Lightly spray a baking sheet with cooking spray and place the wrapped hot dogs on it. Bake them in the preheated oven for about 12-15 minutes or until the dough is golden brown.
- Decorate the mummies: Once baked, remove the hot dogs from the oven and let them cool for a minute. Use a small amount of mustard or ketchup to dot eyes onto the exposed part of the hot dog to complete the mummy look.
Extra Tips:
For an extra touch of flavor, consider adding a slice of cheese under the dough before wrapping the hot dogs. You can also experiment with different types of sausages or hot dogs, such as turkey or vegetarian options, to cater to different dietary preferences.
If you’re hosting a larger party, this recipe can easily be doubled or tripled. Remember to serve the Mummy Hot Dogs warm for the best taste and texture.
Ghostly Cheese and Crackers

If you’re looking for a fun and easy appetizer that will delight your guests at your Halloween party, Ghostly Cheese and Crackers are a spooktacular choice. This simple yet creative dish transforms ordinary cheese slices into ghostly shapes, perfect for getting everyone in the Halloween spirit. By using cookie cutters and a few other ingredients, you can create a platter of these hauntingly delicious snacks in no time.
Ghostly Cheese and Crackers aren’t only visually appealing but also incredibly tasty. The combination of creamy cheese and crispy crackers is a classic pairing that everyone loves. This recipe is perfect for serving 4-6 people, making it an ideal choice for small gatherings or as part of a larger spread of Halloween treats. Whether you’re hosting a party for kids or adults, these eerie edibles are sure to be a hit.
Ingredients for Ghostly Cheese and Crackers (serving size: 4-6 people):
- 12 slices of cheddar cheese
- 24 round crackers
- 12 small black olives
- 1 tube of cream cheese
- 1 small tube of black decorating gel or icing
Cooking Instructions:
- Prepare the Cheese Ghosts: Begin by laying out the slices of cheddar cheese on a flat surface. Using a ghost-shaped cookie cutter, carefully cut out ghost shapes from each slice. You should be able to get one or two ghosts per slice, depending on the size of your cutter.
- Assemble the Crackers: Place the round crackers on a large serving platter. Make sure they’re evenly spaced to allow room for the cheese ghosts.
- Decorate with Olives: Slice the small black olives into thin rings. These will serve as the eyes for your cheese ghosts.
- Attach the Eyes: Using a small dab of cream cheese as an adhesive, place two olive slices onto each cheese ghost to create the eyes. Press gently to verify they stick.
- Add the Mouths: Use the black decorating gel or icing to draw a small, spooky mouth on each cheese ghost. Be creative with the expressions to give each ghost a unique character.
- Arrange on Crackers: Carefully place each decorated cheese ghost onto a cracker. Press down lightly to verify they stay in place.
- Serve and Enjoy: Your Ghostly Cheese and Crackers are now ready to serve! Arrange them neatly on the platter and watch them disappear as your guests enjoy this fun Halloween treat.
Extra Tips:
For a more diverse platter, consider using different types of cheese, such as mozzarella or Swiss, to vary the flavor and color of your ghosts. If you don’t have a ghost-shaped cookie cutter, you can hand-cut simple ghost shapes with a knife.
Additionally, for a gluten-free version, substitute regular crackers with gluten-free options. To save time, you can also prepare the cheese ghosts in advance and store them in the refrigerator until ready to serve. Enjoy your hauntingly delicious creation!
Pumpkin Patch Pretzels
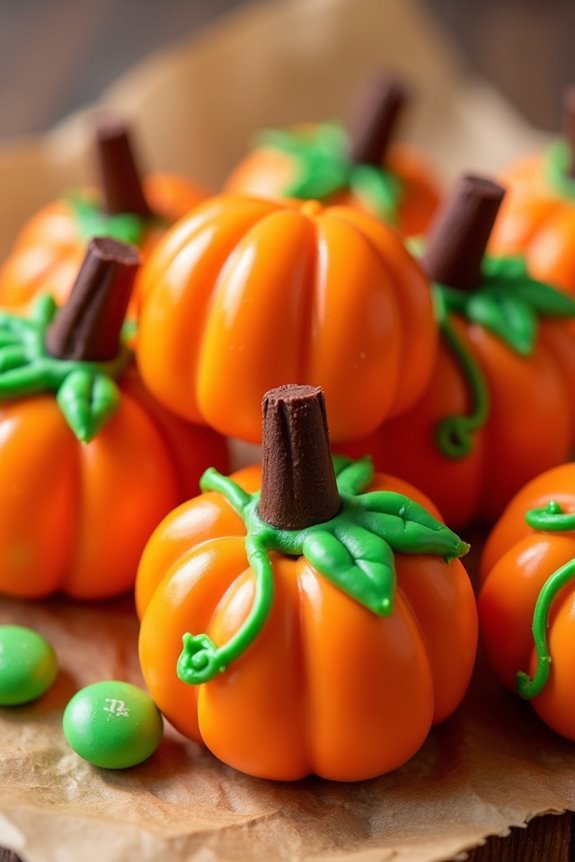
Celebrate the spooky season with these delightful Pumpkin Patch Pretzels, a perfect addition to your Halloween party spread. These charming treats combine the sweetness of candy melts with the salty crunch of pretzels, creating a deliciously addictive snack that’s easy to make and fun to eat.
Shaped like little pumpkins, these pretzels not only bring a festive look to your table but also offer a delightful balance of flavors that both kids and adults will enjoy.
Whether you’re hosting a Halloween party or simply want to indulge in some seasonal fun, Pumpkin Patch Pretzels are sure to be a hit. They require minimal ingredients and are quick to assemble, making them an ideal last-minute treat.
With just a few steps, you can create a batch of these festive snacks that are visually appealing and satisfyingly tasty.
Ingredients: (Serving size: 4-6 people)
- 24 mini pretzel twists
- 1 cup orange candy melts
- 1/4 cup green candy melts
- 24 mini chocolate chips
- 24 green M&M’s
Cooking Instructions:
- Prepare Your Workspace: Line a baking sheet with parchment paper. This will make it easier to remove the pretzels once the candy melts have hardened.
- Melt the Orange Candy Melts: Place the orange candy melts in a microwave-safe bowl. Microwave in 30-second intervals, stirring in between, until completely melted and smooth.
- Coat the Pretzels: Dip each mini pretzel twist into the melted orange candy, using a fork to help coat completely. Tap off any excess candy melt and place the pretzels on the prepared baking sheet.
- Add Chocolate Chips: Before the orange candy coating hardens, press a mini chocolate chip into the top center of each pretzel to resemble a pumpkin’s stem.
- Melt the Green Candy Melts: In a separate bowl, melt the green candy melts using the same method as before. Once melted, transfer the green candy to a piping bag or a small plastic bag with a tiny corner snipped off.
- Decorate with Green Candy: Pipe small green leaves or vines around the chocolate chip stem on each pretzel to complete the pumpkin look.
- Add Green M&M’s: Place a green M&M next to the chocolate chip on each pretzel to add a pop of color and further enhance the pumpkin appearance.
- Let Them Set: Allow the pretzels to sit at room temperature until the candy melts have completely hardened, approximately 20-30 minutes. You can also speed up the process by placing them in the refrigerator for about 10 minutes.
Extra Tips:
When melting the candy melts, be cautious not to overheat them as this can cause the candy to seize and become unusable.
If the candy melts are too thick, you can add a teaspoon of vegetable shortening to achieve a smoother consistency.
Be creative with your designs—use different colored candy melts or decorations to personalize your Pumpkin Patch Pretzels.
These treats can be stored in an airtight container for up to a week, making them an excellent option for preparing ahead of your Halloween festivities.
Frightful Fruit Skewers
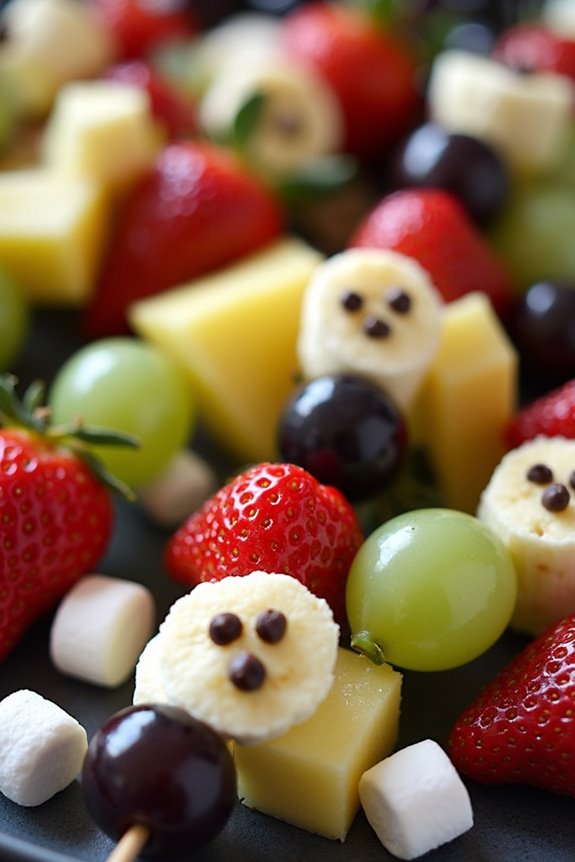
Frightful Fruit Skewers are a perfect addition to any Halloween party, combining the freshness of fruit with the spooky fun of the holiday. These skewers aren’t only visually appealing with their eerie designs, but they’re also a healthy and delicious treat that both kids and adults will enjoy. The key to making these skewers truly frightful is in the creative presentation, using a variety of fruits to mimic spooky creatures or Halloween symbols.
The preparation of Frightful Fruit Skewers is simple, making it a great activity to involve little ones in the kitchen. You can use a variety of fruits to create different characters, such as ghostly bananas or creepy crawly grapes. To add an extra Halloween touch, you can use edible markers or small cookie cutters to shape and design the fruit pieces. These skewers aren’t only a tasty snack but also a fun centerpiece for your Halloween spread.
Ingredients (Serves 4-6 people):
- 2 bananas
- 1 cup of strawberries
- 1 cup of green grapes
- 1 cup of black grapes
- 1 apple
- 1/2 cup of pineapple chunks
- 1/4 cup of mini marshmallows
- 12-18 wooden skewers
- Edible black marker or chocolate chips for decoration
Instructions:
- Prepare the Fruit: Begin by washing all the fruits thoroughly. Peel the bananas and cut them into 1-inch slices. Hull the strawberries and cut them in half if they’re large. Core and slice the apple into thin, manageable pieces.
- Assemble the Skewers: Start with a wooden skewer and thread on a combination of fruits. For example, start with a piece of pineapple, followed by a strawberry, a banana slice, a green grape, a black grape, and finally an apple slice. Repeat until all skewers are filled, guaranteeing a mix of colors and textures on each skewer.
- Decorate: Use an edible black marker to draw spooky faces on the banana slices, turning them into little ghosts. Alternatively, use melted chocolate chips to dot eyes and mouths on the bananas, or to add details to other fruit pieces.
- Finish and Serve: Once all the skewers are decorated, place them on a platter. Add mini marshmallows to the ends of skewers for a ghostly effect, or scatter them around the platter for added decoration. Serve immediately or refrigerate until ready to serve.
Extra Tips:
- To prevent the apple slices from browning, dip them in a mixture of lemon juice and water before assembling them on the skewers.
- Feel free to get creative with the fruit you choose; kiwi slices or melon balls can add additional color and flavor to your skewers.
- If you don’t have an edible black marker, use a toothpick dipped in melted chocolate to create details.
- Make sure the skewers aren’t overcrowded with fruit to guarantee they’re easy to handle and eat.
- Prepare the skewers a few hours in advance and keep them chilled to maintain freshness.
Eyeball Cake Pops

Eyeball Cake Pops are a spooky and fun treat perfect for any Halloween party. These creepy yet delicious confections combine the moist, fluffy texture of cake with a rich candy coating, all fashioned to look like eerie eyeballs. They aren’t only a delightful dessert but also a fantastic conversation starter, and kids and adults alike will enjoy biting into these ghoulish goodies.
Whether you’re hosting a haunted house event or simply want to surprise your family with a festive snack, these Eyeball Cake Pops will surely make a memorable addition to your Halloween celebrations.
Creating these Eyeball Cake Pops involves forming cake balls from a prepared cake mix, dipping them in white candy melts, and decorating them to resemble spooky eyeballs. This recipe yields 24-30 cake pops, making it ideal for serving at a gathering of 4-6 people. The process is simple and allows for plenty of creative flair, whether you prefer classic red and white eyes or want to experiment with fun colors and edible decorations.
Follow the steps below to craft these delightfully unsettling treats.
Ingredients:
- 1 box of cake mix (flavor of your choice)
- Ingredients required for the cake mix (usually eggs, oil, and water)
- 1 can of frosting (16 oz)
- 24-30 lollipop sticks
- 1 package of white candy melts (12 oz)
- 1 package of red candy melts (or colored candy melts for iris)
- Black gel icing or edible marker
- Candy eyeballs or chocolate chips for pupils
Instructions:
- Prepare the Cake: Bake the cake according to the package instructions. Once baked, allow it to cool completely. Once cooled, crumble the cake into fine crumbs in a large bowl.
- Make the Cake Balls: Add half of the can of frosting to the crumbled cake. Mix thoroughly with your hands until the mixture reaches a dough-like consistency. Roll the mixture into small balls, approximately 1 inch in diameter, and place them on a baking sheet lined with parchment paper. You should have about 24-30 cake balls.
- Chill the Cake Balls: Place the baking sheet in the refrigerator for at least 1 hour, or until the cake balls are firm.
- Melt the Candy Coating: In a microwave-safe bowl, melt the white candy melts according to the package instructions. Make sure the coating is smooth and free of lumps.
- Assemble the Cake Pops: Remove the cake balls from the refrigerator. Dip the end of each lollipop stick into the melted white candy coating, then insert it into a cake ball. This helps secure the stick in place. Allow the coating to set for a few minutes.
- Coat the Cake Pops: Once the sticks are secure, dip each cake pop into the melted white candy coating, ensuring it’s completely covered. Gently tap off excess coating and place the cake pop back on the parchment paper to set.
- Decorate the Eyeballs: Melt the red candy melts (or your chosen color for the iris) and use a toothpick or a small brush to paint an iris onto each cake pop. Once the iris is set, use black gel icing or an edible marker to draw a pupil in the center. Finally, attach a candy eyeball or chocolate chip to complete the look.
Extra Tips:
To make your Eyeball Cake Pops even more realistic, you can use red or black food coloring to draw vein-like lines on the white surface of the cake pops. If you’re short on time, you can also purchase pre-made cake balls.
When melting the candy coating, be cautious not to overheat it, as this can cause the coating to become too thick or seize. If the coating becomes too thick, add a small amount of vegetable oil to thin it out.
With a little practice and creativity, you’ll have a batch of Eyeball Cake Pops that are as delicious as they’re frightfully fun!
Gory Gummy Worm Jello
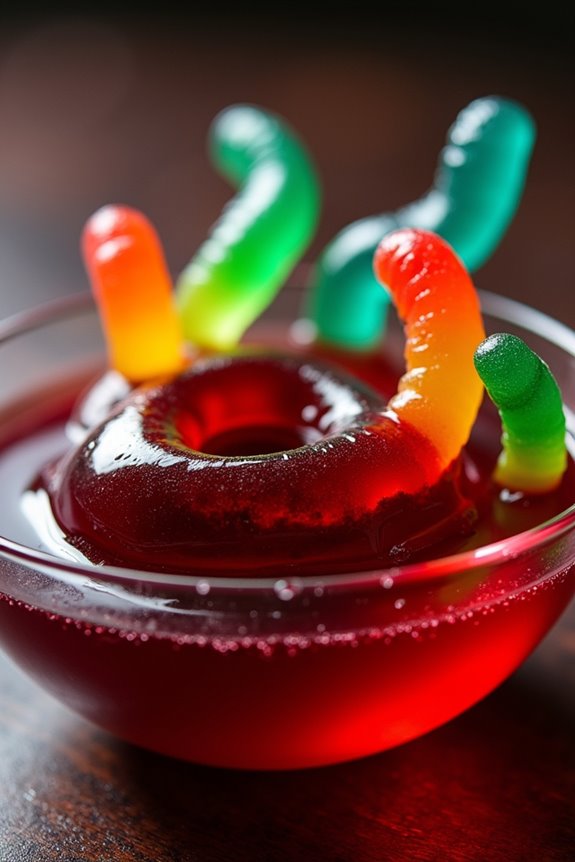
Gory Gummy Worm Jello is the perfect spooky and delicious treat for any Halloween party. This delightful dish combines the creepy-crawly fun of gummy worms with the wobbly texture of jello, creating a dessert that’s certain to impress both kids and adults alike. The vibrant colors and slimy appearance make it a standout on any Halloween buffet table, while the sweet flavors guarantee that it’s not just a visual treat but a tasty one too.
This recipe is designed to serve 4-6 people, making it ideal for small gatherings or as part of a larger spread of Halloween-themed snacks. The preparation is simple and involves just a few ingredients that come together to create a dessert that’s both visually striking and deliciously sweet. It’s an easy, fun project that can even involve the kids, allowing them to get in on the Halloween spirit by helping to create the gory, worm-filled treat.
Ingredients:
- 2 packages of raspberry or cherry flavored jello (3 oz each)
- 2 cups of boiling water
- 1 cup of cold water
- 1 cup of chilled vodka (optional, for adult version)
- 1 pack of gummy worms
- 1-2 drops of green food coloring (optional, for extra slime effect)
Instructions:
- Prepare the Jello Base: Begin by boiling 2 cups of water. Once boiling, pour the water into a large mixing bowl. Add the two packages of jello powder and stir continuously until the powder is fully dissolved.
- Add Cold Liquid: Once the jello powder is dissolved, stir in 1 cup of cold water. For an adult version, substitute 1 cup of chilled vodka for the cold water. Mix thoroughly to guarantee all ingredients are combined.
- Color Enhancement (Optional): If you desire an extra spooky look, add 1-2 drops of green food coloring to the jello mixture and stir until the color is evenly distributed. This will give the jello a slimy, eerie appearance.
- Add Gummy Worms: Pour a portion of the jello mixture into your chosen serving dish, filling it about halfway. Arrange gummy worms throughout the jello, letting some ends dangle out of the mixture for a ghastly effect. Pour the remaining jello mixture over the worms, ensuring they’re mostly submerged yet still visible.
- Refrigerate: Carefully transfer the dish to the refrigerator. Allow the jello to set for at least 4 hours, or until firm. This will guarantee the gummy worms are suspended in the jello and the mixture is fully set.
- Serve and Enjoy: Once the jello is set, it’s ready to serve. Use a spoon to scoop portions into bowls or plates, making sure each serving has plenty of gummy worms for that creepy Halloween vibe.
For an extra touch of gory fun, consider serving the Gory Gummy Worm Jello in clear cups or a clear bowl so the worms can be seen through the sides. If you’re making an alcohol-free version, you can use any type of juice instead of vodka to add extra flavor. Additionally, experimenting with different flavors of jello can yield exciting results, so feel free to get creative with your combinations to suit your Halloween party theme.
Vampire Bite Cookies
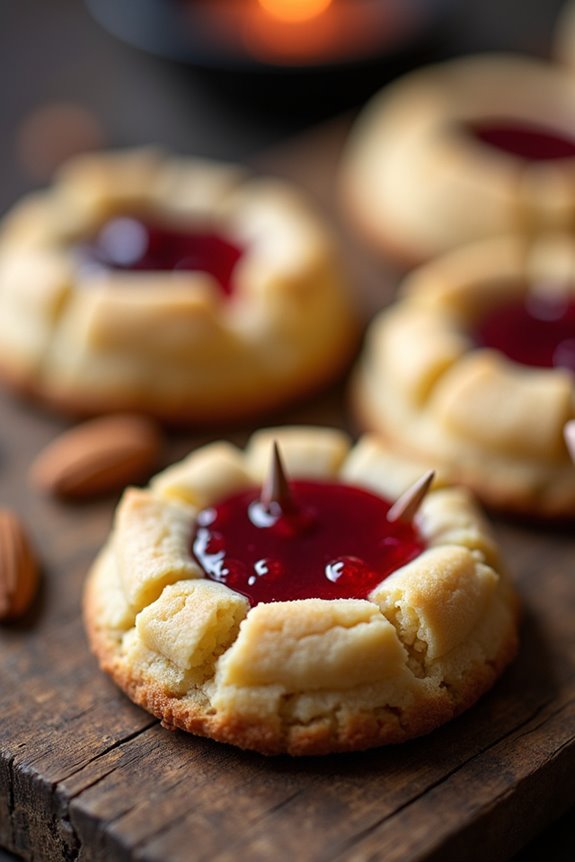
Vampire Bite Cookies are a spooktacular treat perfect for Halloween parties. With their unique design, these cookies mimic the look of vampire bites, complete with red “blood” icing and strategically placed “fangs.”
They’re not only delicious but also serve as a fantastic conversation starter, making them ideal for any Halloween gathering. With a chewy, buttery base and a hint of almond extract, these cookies will surely satisfy everyone’s sweet tooth while adding a chilling element to your party spread.
These cookies are easy to make and can be customized with different flavors and colors to suit your preferences. They’re great for involving kids in the kitchen, letting their creativity run wild with the icing and decoration.
The recipe outlined below serves 4-6 people, making it perfect for a small to medium-sized gathering. So, gather your ingredients and get ready to sink your teeth into these delightful Vampire Bite Cookies!
Ingredients
- 2 1/4 cups all-purpose flour
- 1/2 teaspoon baking soda
- 1/2 teaspoon salt
- 1 cup unsalted butter, softened
- 3/4 cup granulated sugar
- 3/4 cup packed light brown sugar
- 1 teaspoon vanilla extract
- 1/2 teaspoon almond extract
- 2 large eggs
- Red gel or liquid food coloring
- 1/2 cup raspberry or cherry jam
- 1/2 cup slivered almonds
Instructions
- Preheat the Oven: Set your oven to 350°F (175°C). Line two baking sheets with parchment paper to prevent sticking.
- Mix Dry Ingredients: In a medium bowl, whisk together the all-purpose flour, baking soda, and salt. This guarantees even distribution of the baking soda and salt throughout the flour.
- Cream the Butter and Sugars: In a large mixing bowl, beat the softened butter, granulated sugar, and brown sugar together until the mixture is light and fluffy, about 3-4 minutes. This step incorporates air which helps the cookies rise.
- Add Extracts and Eggs: Mix in the vanilla and almond extracts, followed by the eggs, one at a time. Beat until each egg is fully incorporated before adding the next.
- Combine Wet and Dry Mixtures: Gradually add the flour mixture to the wet ingredients, mixing on low speed just until combined. Avoid over-mixing to keep the cookies tender.
- Prepare the Blood Icing: In a small bowl, mix the raspberry or cherry jam with a few drops of red food coloring until a deep red color is achieved. This will be used to mimic the blood.
- Shape the Cookies: Use a tablespoon to scoop dough onto the prepared baking sheets, leaving about 2 inches between each for spreading. Press a thumbprint into the center of each cookie to create a small well.
- Add the Fangs: Insert two slivered almonds into each cookie, positioned parallel to each other, resembling vampire fangs.
- Bake: Place the cookies in the preheated oven and bake for 10-12 minutes, or until the edges are golden brown.
- Add the Blood: Once the cookies are out of the oven and cooled slightly, fill the thumbprint wells with the prepared red jam mixture using a small spoon.
- Cool Completely: Allow the cookies to cool completely on a wire rack before serving. This helps them firm up and makes them easier to handle.
Extra Tips
For an even spookier effect, you can add a drop of red food coloring to the dough itself for a faintly red-tinted cookie base. Additionally, if you can’t find slivered almonds, you can use white chocolate chips for a sweeter “fang” alternative.
When adding the jam, be careful not to overfill, as it can spread too much and lose the bite effect. These cookies store well in an airtight container for up to a week, making them a convenient make-ahead option for busy party planners.