

As Halloween is just around the corner, I can’t help but feel the excitement of creating festive treats that are both spooky and delicious. Picture yourself enjoying a creepy-crawly cupcake or a ghostly meringue cookie. With a sprinkle of creativity, your kitchen can turn into a Halloween wonderland. It’s all about those little details that make your celebration truly special. I have some fantastic ideas that will make your Halloween unforgettable.
Creepy-Crawly Cupcakes
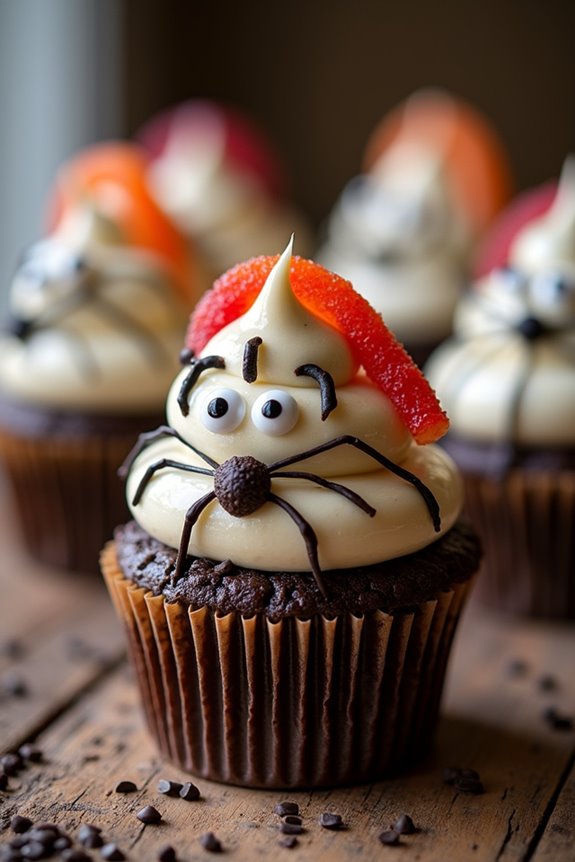
Creepy-Crawly Cupcakes are a spooktacular treat that will leave your Halloween guests both delighted and a little bit frightened! These cupcakes aren’t only delicious but also a fun activity to make with family or friends. With a moist chocolate base, a gooey marshmallow topping, and eerie edible decorations, they’re perfect for any Halloween party.
The best part about these cupcakes is that they’re versatile, allowing you to get creative with the creepy-crawly decorations, making them as spooky or as cute as you desire. Whether you’re hosting a Halloween party or just want to enjoy a festive treat, these Creepy-Crawly Cupcakes are sure to be a hit.
The recipe is designed to serve 4-6 people, making it perfect for a small gathering or for indulging yourself in some Halloween fun. By following the step-by-step instructions, you can create these delightful cupcakes with ease, even if you don’t consider yourself a baking expert. So, gather your ingredients, put on your apron, and get ready to make some deliciously spooky treats!
Ingredients:
- 1 cup all-purpose flour
- 1 cup granulated sugar
- 1/2 cup unsweetened cocoa powder
- 1 teaspoon baking powder
- 1/2 teaspoon baking soda
- 1/4 teaspoon salt
- 1/2 cup buttermilk
- 1/4 cup vegetable oil
- 1 large egg
- 1 teaspoon vanilla extract
- 1/2 cup boiling water
- 12 large marshmallows
- Black food coloring
- Candy eyes
- Gummy worms
- Chocolate sprinkles
Instructions:
- Preheat the Oven: Start by preheating your oven to 350°F (175°C) and line a 12-cup muffin pan with cupcake liners.
- Mix Dry Ingredients: In a large mixing bowl, whisk together the flour, sugar, cocoa powder, baking powder, baking soda, and salt until well combined.
- Combine Wet Ingredients: In a separate bowl, mix the buttermilk, vegetable oil, egg, and vanilla extract until smooth.
- Combine Wet and Dry Ingredients: Gradually add the wet ingredients to the dry ingredients, mixing until just combined. Be careful not to overmix.
- Add Boiling Water: Carefully stir in the boiling water until the batter is smooth and thin.
- Fill Cupcake Liners: Pour the batter evenly into the prepared cupcake liners, filling each about two-thirds full.
- Bake: Place the muffin pan in the preheated oven and bake for 18-20 minutes, or until a toothpick inserted into the center of a cupcake comes out clean.
- Cool the Cupcakes: Remove the cupcakes from the oven and let them cool in the pan for about 5 minutes before transferring them to a wire rack to cool completely.
- Prepare Marshmallow Topping: Once the cupcakes are cool, place one marshmallow on top of each cupcake. Place them under a broiler for 30-60 seconds, or until the marshmallows are puffed and slightly golden brown.
- Decorate: Remove the cupcakes from the broiler and immediately press candy eyes into the marshmallows. Use black food coloring to draw spider legs on the marshmallow with a toothpick, and add gummy worms and chocolate sprinkles for extra creepy effects.
Extra Tips:
For best results, verify all your ingredients are at room temperature before you start baking. This will help the batter mix more evenly and result in a smoother texture.
When adding the boiling water, be careful as it can splash and is very hot. If you want to make the decorating process more fun, set up a decorating station with a variety of edible decorations and let everyone add their personal creepy-crawly touches.
Finally, make sure not to leave the marshmallows under the broiler too long, as they can burn quickly. Enjoy your spooky creation!
Ghostly Meringue Cookies
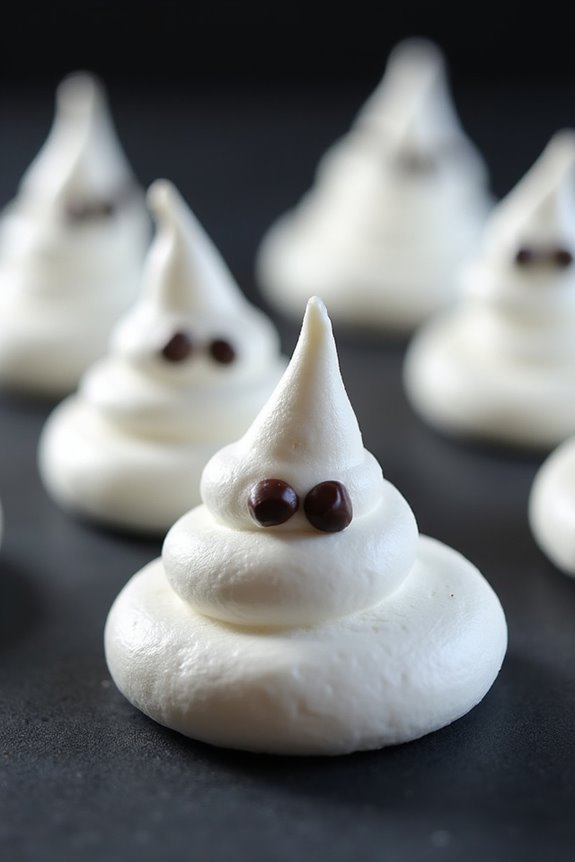
Ghostly Meringue Cookies are a spooktacular addition to your Halloween treats collection. These delightful little cookies are crisp on the outside and soft and chewy on the inside, creating an ethereal texture perfect for a ghostly appearance. The simplicity of the ingredients allows you to focus on creating the perfect shape and adding a touch of spooky fun with little chocolate eyes. Not only are they a treat for the palate, but they also make for an eye-catching display on your Halloween dessert table.
Perfect for serving 4-6 people, these Ghostly Meringue Cookies are a great way to get into the Halloween spirit. You don’t need a lot of ingredients, and most of them are probably already in your pantry. With some careful whisking and a dash of creativity, you can whip up a batch of these ghosts in no time. They’re also gluten-free, making them a great option for those with dietary restrictions.
Ingredients:
- 4 large egg whites
- 1 cup granulated sugar
- 1/4 teaspoon cream of tartar
- 1/2 teaspoon vanilla extract
- Mini chocolate chips or melted chocolate for eyes
Instructions:
- Preheat the Oven: Start by preheating your oven to 225°F (110°C). Line a baking sheet with parchment paper to prevent the meringues from sticking.
- Prepare the Meringue: In a clean, dry mixing bowl, add the egg whites and cream of tartar. Using an electric mixer, beat the egg whites on medium speed until soft peaks form. Gradually add the sugar, one tablespoon at a time, while continuing to beat the mixture. Increase the speed to high and beat until the meringue is glossy and stiff peaks form. This should take about 7-10 minutes.
- Add Flavor: Once you have stiff peaks, add the vanilla extract and gently fold it into the meringue using a spatula. Be careful not to deflate the mixture.
- Shape the Ghosts: Transfer the meringue into a piping bag fitted with a large round tip. Pipe the meringue onto the prepared baking sheet in ghost shapes, making them slightly pointed at the top.
- Add the Eyes: Carefully place two mini chocolate chips or small dots of melted chocolate onto each ghost for eyes.
- Bake: Bake the meringues in the preheated oven for about 1.5 to 2 hours, or until they’re dry to the touch. Turn off the oven and leave the meringues inside to cool completely. This will help them dry out fully without cracking.
- Serve: Once cooled, serve your Ghostly Meringue Cookies immediately or store them in an airtight container to keep them crisp.
Extra Tips: When making meringues, make certain that all your equipment is free from any grease or moisture, as these can prevent the egg whites from whipping properly.
It’s also important to add the sugar gradually to make sure it dissolves completely, which gives the meringues their glossy sheen. If you’re making these on a humid day, be aware that the meringues might take a bit longer to dry out, so adjust your baking time accordingly.
For a creative twist, you can use edible food coloring to add spooky features or different shapes to your ghosts.
Witch’s Brew Brownies
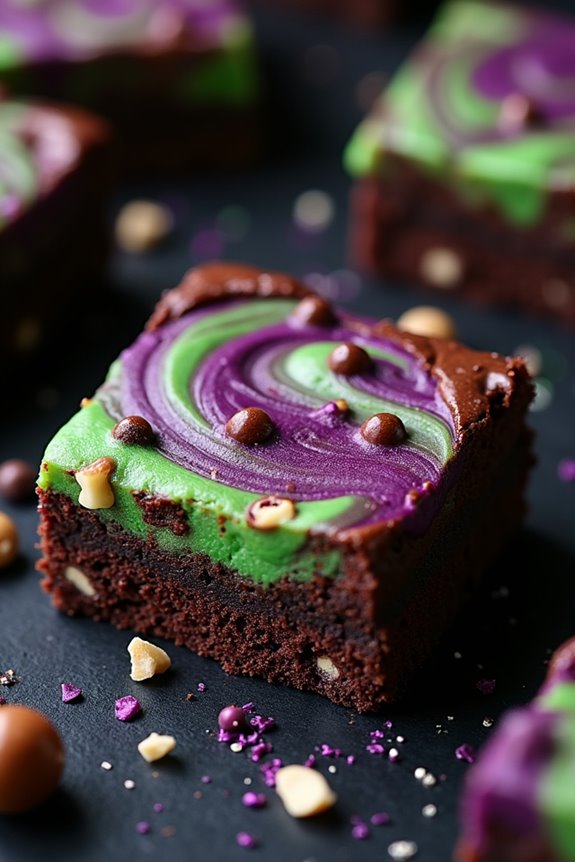
Witch’s Brew Brownies are a magical and decadent treat perfect for any Halloween celebration. These brownies combine rich chocolate with eerie ingredients that create a spooky and delicious dessert. The combination of dark chocolate and mysterious swirls of green and purple makes these brownies a feast for the eyes and the taste buds.
Whether you’re hosting a Halloween party or enjoying a cozy night in, these brownies are sure to cast a delicious spell on everyone who tries them. The recipe is designed to serve 4-6 people, making it ideal for a small gathering or a family Halloween treat.
The preparation involves making a classic brownie base, then adding a bewitching twist with vibrant colors and flavors. Follow the steps below to create your own batch of Witch’s Brew Brownies that will mesmerize your guests and add a touch of magic to your Halloween festivities.
Ingredients (Serves 4-6):
- 1 cup unsalted butter
- 2 cups granulated sugar
- 4 large eggs
- 1 cup all-purpose flour
- 1 cup unsweetened cocoa powder
- 1/2 teaspoon salt
- 1 teaspoon vanilla extract
- Green and purple food coloring
- 1/2 cup white chocolate chips
- 1/2 cup dark chocolate chips
- 1/2 cup chopped nuts (optional)
Instructions:
- Preheat the Oven: Begin by preheating your oven to 350°F (175°C). Line a 9×13 inch baking pan with parchment paper or lightly grease it to prevent the brownies from sticking.
- Prepare the Brownie Batter: In a large saucepan, melt the unsalted butter over low heat. Once melted, remove from heat and stir in the granulated sugar until well combined. Allow the mixture to cool slightly before adding the eggs one at a time, stirring well after each addition. Add the vanilla extract.
- Mix the Dry Ingredients: In a separate bowl, sift together the all-purpose flour, unsweetened cocoa powder, and salt. Gradually add these dry ingredients to the wet mixture, stirring until just combined.
- Add the Colors and Flavors: Divide the brownie batter into three equal parts. In one part, stir in green food coloring, and in another, stir in purple food coloring. Leave the third part as it is. Stir in the white chocolate chips into the green batter, and the dark chocolate chips into the purple batter.
- Assemble the Brownies: Pour the plain brownie batter into the prepared pan, spreading it evenly. Drop spoonfuls of the green and purple batters randomly over the top. Use a knife or skewer to gently swirl the batters together, creating a marbled effect. Sprinkle the chopped nuts over the top if using.
- Bake the Brownies: Place the pan in the preheated oven and bake for 25-30 minutes, or until a toothpick inserted into the center comes out with a few moist crumbs. Be careful not to overbake, as you want the brownies to remain fudgy.
- Cool and Serve: Allow the brownies to cool in the pan for about 15 minutes before transferring them to a wire rack to cool completely. Cut into squares and serve.
Extra Tips: For the best results, use high-quality chocolate and cocoa powder to enhance the flavor of the brownies. If you’re looking to add an extra spooky touch, consider adding edible glitter or Halloween-themed sprinkles on top before baking.
When swirling the colored batters, be gentle to maintain the distinct colors. These brownies can be stored in an airtight container for up to four days, but they’re best enjoyed fresh.
Monster Eyeball Truffles
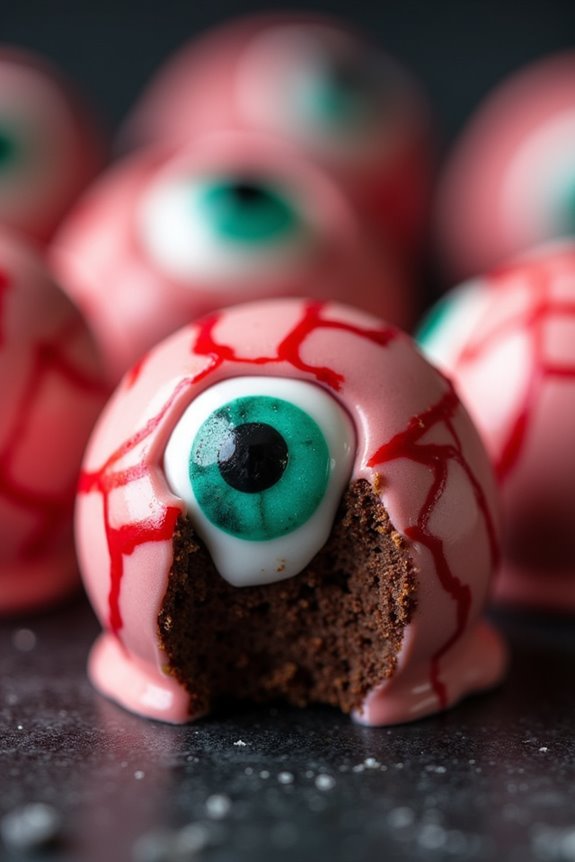
Monster Eyeball Truffles are a spooky and delicious treat perfect for your Halloween festivities. These creepy confections aren’t only fun to make but also a hit among kids and adults alike. With their ghoulish appearance and rich chocolatey flavor, they make a fabulous addition to any Halloween party spread. Imagine biting into a soft, decadent truffle, only to be “eyed” by a candy iris staring back at you – a delightful surprise that will surely give your guests a fright!
Creating these Monster Eyeball Truffles is an enjoyable activity that can engage your creativity and add a touch of whimsy to your Halloween treats. The process involves crafting decadent chocolate truffles and transforming them into eerie eyeballs using colored candy melts, edible gel, and candy eyes. The recipe is straightforward and allows room for customization, so you can choose your favorite colors and designs to make each eyeball uniquely terrifying. This recipe yields enough truffles to serve 4-6 people, making it ideal for a small gathering or family treat.
Ingredients for Monster Eyeball Truffles (Serves 4-6):
- 12 oz semisweet chocolate chips
- 1/2 cup heavy cream
- 1 tsp vanilla extract
- 1/4 cup unsalted butter, softened
- 1 cup powdered sugar
- 8 oz white candy melts
- Assorted food coloring (red, green, blue, etc.)
- Edible gel pens (black or red)
- Candy eyes
Cooking Instructions:
- Prepare the Truffle Mixture:
- In a heatproof bowl, combine the semisweet chocolate chips and heavy cream. Microwave the mixture in 30-second intervals, stirring in between each, until the chocolate is completely melted and smooth.
- Stir in the vanilla extract and softened butter until fully incorporated. Gradually add the powdered sugar, mixing until the truffle mixture is smooth and thick.
- Chill the Mixture:
- Cover the bowl with plastic wrap and refrigerate the truffle mixture for about 1-2 hours, or until it’s firm enough to scoop and shape.
- Shape the Truffles:
- Once chilled, use a small cookie scoop or spoon to portion out the truffle mixture. Roll each portion between your palms to form smooth, round balls. Place the balls onto a baking sheet lined with parchment paper.
- Decorate the Eyeballs:
- Melt the white candy melts according to the package instructions. Divide the melted candy into separate bowls and tint each with your chosen food coloring.
- Dip each truffle ball into the colored candy melt, ensuring it’s fully coated. Allow excess candy to drip off, then place back on the parchment-lined sheet to set.
- Add the Details:
- Once the candy coating has set, use edible gel pens to draw red veins across the eyeballs for a bloodshot effect.
- Affix a candy eye to the center of each truffle while the candy coating is still slightly sticky, pressing gently to adhere.
Extra Tips:
When melting the chocolate and candy melts, be careful not to overheat them, as this can cause the mixture to seize. If you prefer a more intense flavor, consider using dark chocolate instead of semisweet chocolate chips.
For additional spooky effects, try using different colored candy eyes or adding edible glitter to give these truffles a magical glint. Remember to store the truffles in a cool, dry place to prevent them from melting or becoming too soft before serving.
Spider Web Sugar Cookies
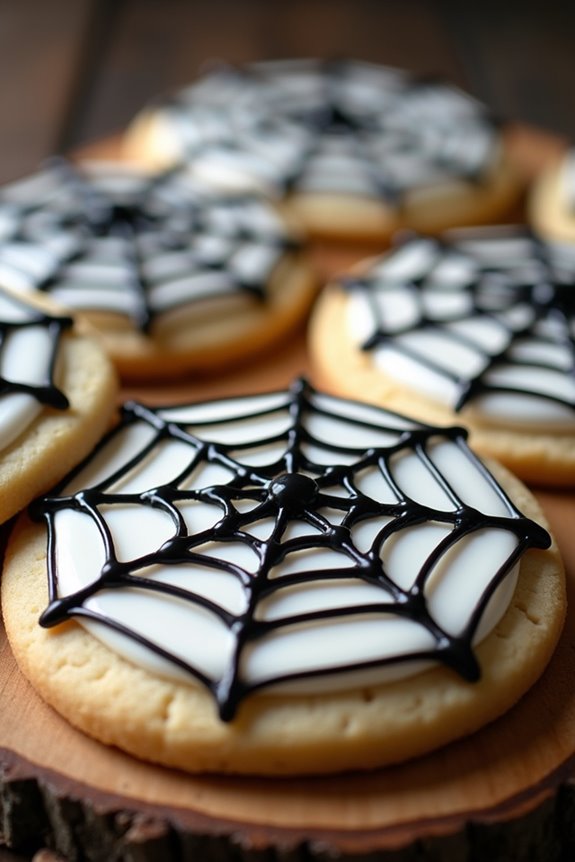
Spider Web Sugar Cookies are a delightful and spooky treat that’s perfect for Halloween celebrations. These cookies aren’t only delicious but also visually striking, making them a hit at any Halloween party. The base of the cookie is a classic sugar cookie, which provides a sweet and buttery flavor. The fun part comes in with the decorating, where you create intricate spider web designs using icing. This recipe is a wonderful way to get creative in the kitchen and impress your guests with a treat that looks as good as it tastes.
The key to making Spider Web Sugar Cookies is in the preparation and decoration. You’ll start with a simple sugar cookie dough, which is rolled out and cut into shapes. After baking, the cookies are cooled and then decorated with royal icing to create the spider web effect. This recipe yields about 24 cookies, making it perfect for serving between 4-6 people. Each cookie is a canvas for your artistic expression, allowing you to customize the designs and colors to suit your Halloween theme.
Ingredients (Serves 4-6):
- 2 ¾ cups all-purpose flour
- 1 teaspoon baking powder
- ½ teaspoon salt
- 1 cup unsalted butter, softened
- 1 ½ cups granulated sugar
- 1 large egg
- 2 teaspoons vanilla extract
- 1 teaspoon almond extract (optional)
- Black food coloring gel
- 3 cups powdered sugar
- 2 tablespoons meringue powder
- 6 tablespoons water
Cooking Instructions:
- Prepare the Dough: In a medium bowl, whisk together the flour, baking powder, and salt. In a large bowl, beat the softened butter and granulated sugar together until light and fluffy. Add the egg, vanilla extract, and almond extract (if using) and mix until well combined. Gradually add the dry ingredients to the wet ingredients until a dough forms.
- Chill the Dough: Divide the dough into two discs, wrap them in plastic wrap, and refrigerate for at least 1 hour. This helps the dough firm up, making it easier to roll out and cut.
- Preheat and Roll Out: Preheat your oven to 350°F (175°C). On a lightly floured surface, roll out one disc of dough to about ¼-inch thickness. Use a round cookie cutter to cut out shapes and transfer them to a baking sheet lined with parchment paper.
- Bake the Cookies: Bake the cookies in the preheated oven for 8-10 minutes or until the edges are just beginning to turn golden. Remove from the oven and allow them to cool on the baking sheet for 5 minutes before transferring them to a wire rack to cool completely.
- Prepare the Royal Icing: In a medium bowl, combine the powdered sugar, meringue powder, and water. Beat with an electric mixer on low speed until the icing is smooth and glossy. Divide the icing into two bowls. Tint one bowl with black food coloring gel, leaving the other white.
- Decorate the Cookies: Fill two piping bags with the white and black icing. Cover each cookie with a layer of white icing. While the icing is still wet, pipe concentric circles of black icing on top. Use a toothpick to drag lines from the center to the edges to create a spider web pattern.
- Set the Icing: Allow the decorated cookies to sit at room temperature until the icing is completely set, about 2 hours.
Extra Tips:
When making Spider Web Sugar Cookies, ascertain all your ingredients are at room temperature before you start, as this will help everything blend more smoothly.
When decorating, if you’re new to royal icing, practice your piping technique on parchment paper before moving to the cookies. You can also use additional colors to add variety to your spider web designs.
Remember to have fun with the decorating process and let your creativity shine!
Frankenstein Rice Krispie Treats
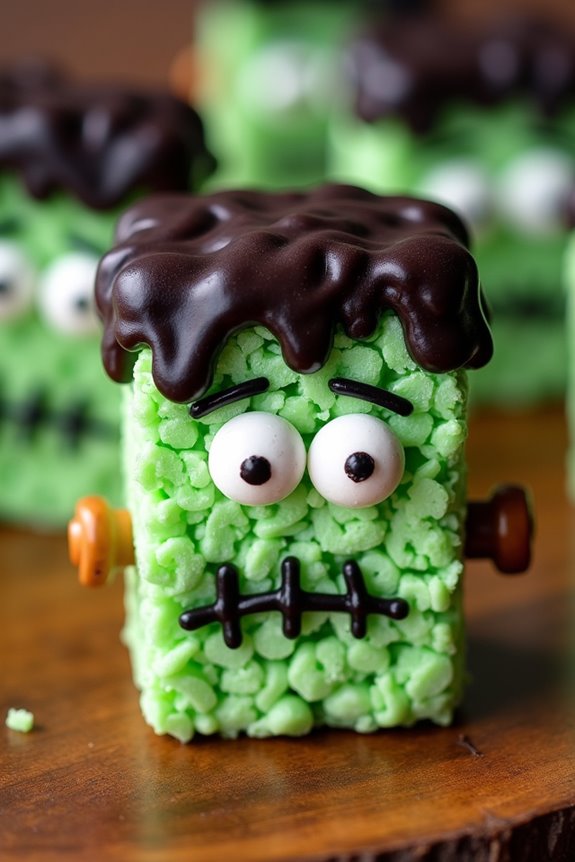
Frankenstein Rice Krispie Treats are a fun and spooky twist on the classic Rice Krispie Treats, perfect for celebrating Halloween. These treats aren’t only delicious but also visually striking, making them an excellent addition to your Halloween party spread. With their green color and Frankenstein-themed decorations, they’re sure to be a hit with both kids and adults alike.
By following this simple recipe, you can create these delightful treats that are as much fun to make as they’re to eat. The key to making these Frankenstein Rice Krispie Treats is to pay attention to the details that bring the iconic Frankenstein character to life. This recipe will guide you through the steps of transforming ordinary Rice Krispie Treats into a spooky masterpiece.
The ingredients listed below will yield a serving size suitable for 4-6 people, guaranteeing that there’s enough for everyone to enjoy. Gather your ingredients and get ready for a Halloween treat that’s both frightful and delightful!
Ingredients (Serves 4-6):
- 4 cups of Rice Krispies cereal
- 10 oz bag of mini marshmallows
- 3 tablespoons of unsalted butter
- Green food coloring
- 1 cup of semisweet chocolate chips
- 1/2 cup of white chocolate chips
- 12 candy eyes
- Black decorating gel or icing
- 12 pretzel rods, broken in half
Cooking Instructions:
- Prepare the Base: Start by melting the butter in a large saucepan over low heat. Once the butter is fully melted, add the mini marshmallows and stir continuously until they’re completely melted and smooth.
- Color the Mixture: Add a few drops of green food coloring to the melted marshmallow mixture and stir well until you achieve the desired shade of Frankenstein green.
- Combine with Cereal: Remove the saucepan from the heat and quickly add the Rice Krispies cereal. Stir well until the cereal is fully coated with the green marshmallow mixture.
- Shape the Treats: Pour the mixture into a greased 9×13 inch baking dish. Use a buttered spatula or wax paper to evenly press the mixture into the dish, creating an even layer.
- Set and Cool: Allow the mixture to cool and set for about 30 minutes. Once set, cut the treats into rectangles or squares that will form the basis of your Frankenstein faces.
- Decorate the Faces: Melt the semisweet chocolate chips in a microwave-safe bowl in 30-second intervals, stirring between each, until smooth. Dip the top of each treat into the melted chocolate to create Frankenstein’s hair. While the chocolate is still wet, press two candy eyes into each treat.
- Add Details: Melt the white chocolate chips in the same manner as the semisweet chips. Use a toothpick to add stitches and scars to the face with the black decorating gel or icing. Finally, insert a pretzel rod half into each side of the treat to create Frankenstein’s neck bolts.
- Final Touches: Allow the decorated treats to set at room temperature until the chocolate hardens. Serve and enjoy!
Extra Tips:
To guarantee your Frankenstein Rice Krispie Treats turn out perfectly, make sure to work quickly when mixing the cereal with the marshmallow mixture, as it can harden if left too long.
If you find the mixture too sticky to handle, lightly butter your hands or spatula for easier handling. Additionally, you can customize the level of green by adjusting the amount of food coloring to suit your preference.
Finally, if you want to make these treats ahead of time, store them in an airtight container to keep them fresh for a few days.
Pumpkin Patch Cupcakes
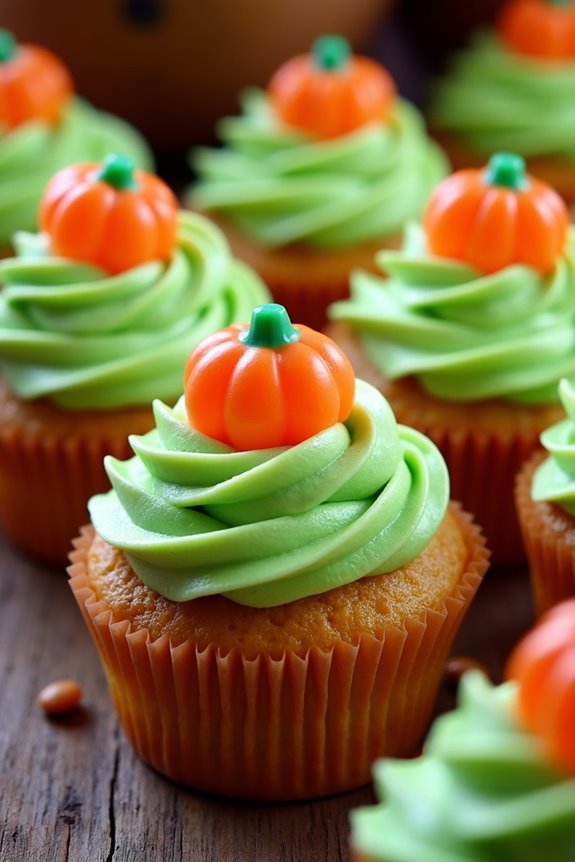
These cupcakes start with a moist and flavorful pumpkin base, infused with spices like cinnamon, nutmeg, and ginger, which perfectly complement the natural sweetness of the pumpkin puree.
Once baked and cooled, the cupcakes are topped with a smooth vanilla buttercream frosting, colored to resemble the vibrant green of pumpkin vines. To complete the pumpkin patch theme, each cupcake is garnished with a candy pumpkin, adding a touch of whimsy and fun to your Halloween spread.
Follow this simple recipe to create your own pumpkin patch cupcakes, guaranteed to impress both kids and adults alike.
Ingredients for Pumpkin Patch Cupcakes (serving size: 4-6 people):
- 1 1/2 cups all-purpose flour
- 1 teaspoon baking powder
- 1/2 teaspoon baking soda
- 1/2 teaspoon salt
- 1 teaspoon ground cinnamon
- 1/2 teaspoon ground nutmeg
- 1/4 teaspoon ground ginger
- 1/2 cup unsalted butter, softened
- 1 cup granulated sugar
- 2 large eggs
- 1 teaspoon vanilla extract
- 3/4 cup pumpkin puree
- 1/2 cup whole milk
- 1 cup unsalted butter (for frosting)
- 3-4 cups powdered sugar (for frosting)
- 2 teaspoons vanilla extract (for frosting)
- Green food coloring (for frosting)
- Candy pumpkins for decoration
Cooking Instructions:
- Preheat Oven and Prepare Muffin Tin: Preheat your oven to 350°F (175°C). Line a muffin tin with cupcake liners to facilitate easy removal after baking.
- Mix Dry Ingredients: In a medium-sized bowl, whisk together the flour, baking powder, baking soda, salt, cinnamon, nutmeg, and ginger. Set aside.
- Cream Butter and Sugar: In a large mixing bowl, beat the softened butter and granulated sugar together until light and fluffy. This should take about 3-4 minutes.
- Add Eggs and Vanilla: Add the eggs one at a time to the butter-sugar mixture, beating well after each addition. Mix in the vanilla extract.
- Incorporate Pumpkin Puree: Stir in the pumpkin puree until well combined. The mixture will have a smooth and creamy texture.
- Combine Wet and Dry Ingredients: Gradually add the dry ingredients to the wet mixture, alternating with the milk. Begin and end with the dry ingredients. Mix until just combined, being careful not to overmix.
- Fill and Bake: Divide the batter evenly among the cupcake liners, filling each about 2/3 full. Bake for 18-20 minutes or until a toothpick inserted into the center of a cupcake comes out clean.
- Cool the Cupcakes: Allow the cupcakes to cool in the tin for about 5 minutes before transferring them to a wire rack to cool completely.
- Prepare the Frosting: In a large bowl, beat the butter until creamy. Gradually add the powdered sugar, one cup at a time, mixing well after each addition. Add the vanilla extract and enough green food coloring to achieve the desired hue.
- Frost the Cupcakes: Once the cupcakes have cooled completely, pipe or spread the green frosting over each cupcake.
- Decorate with Candy Pumpkins: Place a candy pumpkin on top of each frosted cupcake to create the pumpkin patch effect.
Extra Tips:
For the best results, verify that all your ingredients, particularly the butter and eggs, are at room temperature before starting. This will help achieve a smooth batter and even baking.
If you find the frosting too thick, add a tablespoon of milk to adjust the consistency. Conversely, if it’s too thin, add more powdered sugar.
When using food coloring, start with a small amount and gradually increase until you reach the desired shade of green. This will prevent over-coloring and allow you to achieve the perfect hue for your pumpkin patch cupcakes.
Vampire Bite Red Velvet Cake
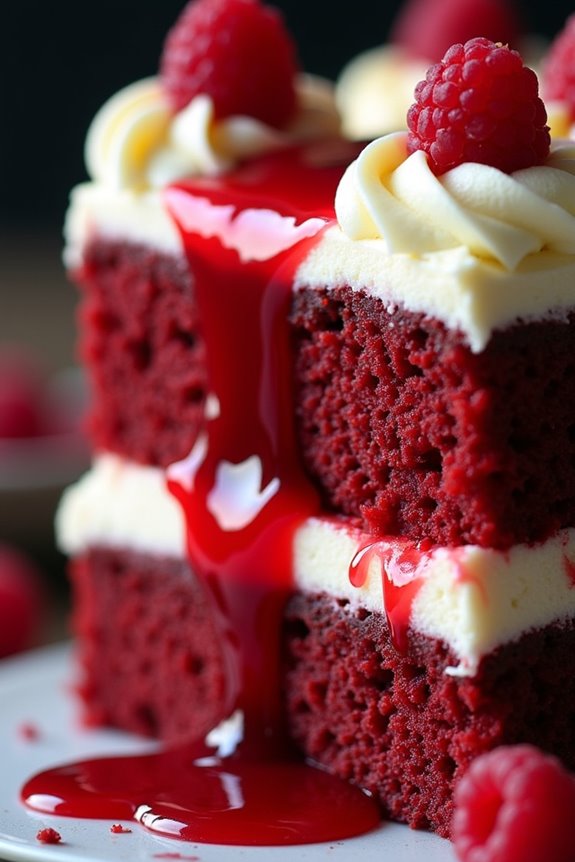
Vampire Bite Red Velvet Cake is a spooky and delicious addition to your Halloween festivities. With its rich red color and decadent cream cheese frosting, this cake is designed to impress and delight your guests. The “vampire bite” effect is achieved by using a raspberry sauce that oozes out when you cut into the cake, resembling fresh “bites” of a vampire.
This dessert is both visually striking and scrumptiously satisfying, making it a perfect centerpiece for your Halloween party. This recipe yields a serving size suitable for 4-6 people, making it ideal for a small gathering or family event. The cake is moist and fluffy, with a subtle cocoa flavor that complements the tangy cream cheese frosting. The raspberry sauce adds a fruity twist that enhances the overall taste experience.
Follow the steps below to recreate this hauntingly delicious cake in your own kitchen.
Ingredients:
- 2 1/2 cups all-purpose flour
- 1 1/2 cups granulated sugar
- 1 teaspoon baking soda
- 1 teaspoon salt
- 1 teaspoon cocoa powder
- 1 1/2 cups vegetable oil
- 1 cup buttermilk, room temperature
- 2 large eggs, room temperature
- 2 tablespoons red food coloring
- 1 teaspoon vanilla extract
- 1 teaspoon white vinegar
- 1 cup unsalted butter, softened
- 8 ounces cream cheese, softened
- 4 cups powdered sugar
- 1 teaspoon vanilla extract (for frosting)
- 1 cup fresh raspberries
- 1/4 cup granulated sugar (for raspberry sauce)
- 2 tablespoons water
Instructions:
- Prepare the Cake: Preheat your oven to 350°F (175°C). Grease and flour two 9-inch round cake pans. In a large bowl, sift together the flour, sugar, baking soda, salt, and cocoa powder.
- Mix Wet Ingredients: In another bowl, whisk together the vegetable oil, buttermilk, eggs, red food coloring, vanilla extract, and white vinegar until well combined.
- Combine Ingredients: Gradually add the wet ingredients to the dry ingredients, mixing until just combined. Be careful not to overmix, as this can result in a dense cake.
- Bake the Cake: Divide the batter evenly between the prepared cake pans. Bake for 25-30 minutes, or until a toothpick inserted into the center comes out clean. Allow the cakes to cool in the pans for 10 minutes, then transfer to wire racks to cool completely.
- Make the Frosting: In a large bowl, beat the softened butter and cream cheese together until smooth. Gradually add the powdered sugar and vanilla extract, beating until light and fluffy.
- Prepare the Raspberry Sauce: In a small saucepan, combine the raspberries, sugar, and water. Cook over medium heat, stirring frequently, until the raspberries break down and the mixture thickens, about 5-7 minutes. Strain the sauce through a fine mesh sieve to remove the seeds.
- Assemble the Cake: Place one cake layer on a serving plate. Spread a layer of cream cheese frosting over the top. Add the second cake layer and frost the top and sides of the cake with the remaining frosting.
- Create the Vampire Bite Effect: Use a skewer or toothpick to poke several holes in the top of the cake. Carefully spoon the raspberry sauce into the holes, allowing it to drip down the sides slightly to create a “bleeding” effect.
Extra Tips:
For an even more dramatic effect, consider adding a few drops of black food coloring to the raspberry sauce for a darker, more sinister look. If you don’t have buttermilk, you can make a substitute by adding a tablespoon of vinegar or lemon juice to a cup of milk and letting it sit for 5 minutes.
Finally, verify the cake layers are completely cool before frosting to prevent the frosting from melting. Enjoy your spooky Vampire Bite Red Velvet Cake!
Haunted House Gingerbread

Create a spooky centerpiece for your Halloween festivities with this Haunted House Gingerbread. This delightful treat not only serves as a stunning visual piece but also tantalizes the taste buds with its aromatic spices and sweet icing. Perfect for a party of 4-6 people, the Haunted House Gingerbread combines the joy of baking with the creative fun of decorating, making it an ideal activity to enjoy with family and friends.
To make this delicious Haunted House Gingerbread, you’ll need a mix of classic gingerbread ingredients and some decorative items to bring your haunted house to life. The gingerbread dough is crafted with warm spices, providing a comforting aroma as it bakes. Assemble and decorate your gingerbread house with icing and candies to create a creepy yet charming Halloween centerpiece.
Ingredients (for 4-6 people):
- 3 1/4 cups all-purpose flour
- 3/4 teaspoon baking soda
- 1 tablespoon ground ginger
- 1 tablespoon ground cinnamon
- 1/2 teaspoon ground cloves
- 1/4 teaspoon salt
- 3/4 cup (1 1/2 sticks) unsalted butter, softened
- 1/2 cup packed dark-brown sugar
- 1 large egg
- 1/2 cup unsulfured molasses
- 2 teaspoons vanilla extract
- Assorted candies for decoration (gumdrops, candy corn, etc.)
- Royal icing (for assembly and decoration)
Cooking Instructions:
- Prepare the Dough: In a large bowl, whisk together the flour, baking soda, ginger, cinnamon, cloves, and salt. In a separate bowl, beat the butter and brown sugar until light and fluffy. Add the egg, molasses, and vanilla extract, mixing until well combined. Gradually add the flour mixture, mixing until the dough comes together.
- Chill the Dough: Divide the dough into two disks, wrap each in plastic wrap, and refrigerate for at least 2 hours or until firm.
- Preheat the Oven: Preheat your oven to 350°F (175°C). Line baking sheets with parchment paper.
- Roll and Cut the Dough: On a lightly floured surface, roll out one disk of dough to 1/4-inch thickness. Use gingerbread house templates to cut out the shapes for the house walls, roof, and other details. Transfer to prepared baking sheets.
- Bake the Gingerbread: Bake in the preheated oven for 10-15 minutes, or until the edges are firm. Let the pieces cool completely on a wire rack.
- Assemble the House: Use royal icing as the “glue” to assemble the gingerbread house. Start by attaching the walls and allow them to set before adding the roof.
- Decorate the House: Once the structure is stable, use royal icing to attach assorted candies and create spooky designs on your haunted house.
Extra Tips:
For a seamless assembly, make sure each piece of gingerbread is completely cooled before starting the construction process. If the dough becomes too soft while rolling, return it to the refrigerator for a few minutes to firm up.
When decorating, use piping bags with small tips for finer details and consider adding edible glitter or food coloring to royal icing to enhance the haunted look. If you have any leftover dough, cut out additional shapes like ghosts or bats to add around your haunted house for extra spookiness!
Candy Corn Popcorn Balls
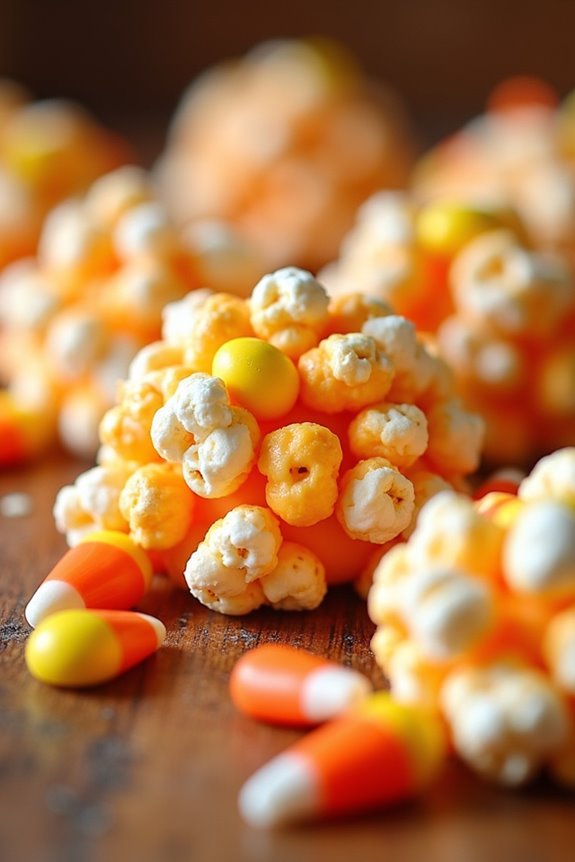
Candy Corn Popcorn Balls are a delightful and festive treat perfect for Halloween celebrations. These sweet and crunchy snacks combine the classic flavors of popcorn and candy corn, creating a delicious, colorful, and visually appealing treat. Ideal for parties or simply enjoying with family and friends, these popcorn balls are sure to be a hit with both kids and adults. Their vibrant orange, yellow, and white hues add a touch of Halloween spirit to any occasion.
Making Candy Corn Popcorn Balls is a fun and easy process that can be enjoyed by all ages. With just a few simple ingredients, you can create these scrumptious treats in no time. The recipe involves melting marshmallows to bind the popcorn and candy corn together, resulting in a gooey, sticky mixture that’s then shaped into balls.
The key to achieving the perfect texture is to work quickly while the mixture is still warm and pliable. Be certain to have everything prepared and ready to go before you start, so you can enjoy the process without any hassle.
Ingredients (Serving Size: 4-6 people):
- 10 cups of popped popcorn
- 3 cups of mini marshmallows
- 1 cup of candy corn
- 1/2 cup of unsalted butter
- 1/2 teaspoon of vanilla extract
- A pinch of salt
Cooking Instructions:
- Prepare the Popcorn: Begin by popping the popcorn using your preferred method. Once popped, measure out 10 cups and place it in a large mixing bowl. Make sure to remove any unpopped kernels for safety.
- Melt the Butter and Marshmallows: In a large saucepan, melt 1/2 cup of unsalted butter over medium heat. Once melted, add 3 cups of mini marshmallows and stir continuously until the marshmallows are completely melted and smooth.
- Add Vanilla and Salt: Remove the saucepan from the heat and stir in 1/2 teaspoon of vanilla extract and a pinch of salt. Mix well to incorporate the flavors evenly.
- Combine with Popcorn: Pour the melted marshmallow mixture over the popcorn in the mixing bowl. Using a spatula, gently fold the mixture until the popcorn is evenly coated.
- Add Candy Corn: Quickly add 1 cup of candy corn to the popcorn mixture. Continue folding until the candy corn is well distributed throughout the mixture.
- Shape the Popcorn Balls: While the mixture is still warm, lightly grease your hands with cooking spray or butter. Take a handful of the mixture and gently press it together to form a ball. Repeat this process until all of the mixture is used, making approximately 10-12 popcorn balls.
- Cool and Set: Place the popcorn balls on a parchment-lined baking sheet and let them cool at room temperature until they’re firm and set, about 30 minutes.
Extra Tips:
When making Candy Corn Popcorn Balls, timing is essential. Work quickly after adding the marshmallow mixture to the popcorn to guarantee it remains pliable for shaping.
Greasing your hands prevents sticking and helps in forming the popcorn balls more easily. If you need to make them ahead of time, store the popcorn balls in an airtight container to keep them fresh. If you prefer a less sweet version, reduce the amount of candy corn or substitute with nuts or pretzels for added texture and flavor variety.
Mummy Chocolate Bars

These bars are fundamentally a twist on the classic chocolate bar, dressed up for Halloween with a simple yet effective mummy wrap design.
You’ll be using white chocolate to create the mummy’s bandages and edible candy eyes to give them a playful personality. This recipe is designed to serve 4-6 people, making it ideal for a small gathering or as a treat to share with friends and family.
Ingredients:
- 1 pound milk chocolate
- 1 cup marshmallow cream
- 1/2 cup peanut butter
- 1/2 cup powdered sugar
- 1 teaspoon vanilla extract
- 1/2 cup white chocolate chips
- 12 small edible candy eyes
Instructions:
- Prepare the Chocolate Base:
- Begin by melting the milk chocolate in a microwave-safe bowl or over a double boiler. Stir until smooth and glossy.
- Line an 8×8 inch baking pan with parchment paper. Pour the melted chocolate into the pan and spread it evenly using a spatula. Place the pan in the refrigerator to set for about 20 minutes.
- Make the Nougat Layer:
- In a mixing bowl, combine the marshmallow cream, peanut butter, powdered sugar, and vanilla extract. Stir until the mixture is smooth and well combined.
- Remove the chocolate base from the refrigerator and spread the nougat mixture evenly over the top. Place it back into the refrigerator for another 20 minutes to set.
- Create the Mummy Design:
- Melt the white chocolate chips in a microwave-safe bowl, stirring every 15 seconds until completely melted and smooth.
- Transfer the melted white chocolate into a piping bag or a plastic sandwich bag with a small corner cut off. Pipe thin lines across the bars to create the appearance of mummy bandages.
- Add the Eyes:
- While the white chocolate is still soft, gently press two candy eyes onto each bar, about an inch apart, to give each mummy its face.
- Allow the white chocolate to fully set and harden before cutting the bars into individual pieces.
- Serve and Enjoy:
- Once the mummy chocolate bars are fully set, carefully lift them out of the pan using the parchment paper. Cut into bars and serve.
Extra Tips:
For a more pronounced mummy effect, you can double-layer the white chocolate bandages by allowing the first layer to set slightly before adding another.
If you don’t have a piping bag, a plastic sandwich bag will work just fine—just make sure the hole you cut is small to control the flow of white chocolate.
Feel free to experiment with different chocolate flavors or add-ins to customize your bars to your liking. Remember to store any leftovers in an airtight container at room temperature to maintain their freshness.
Bloody Finger Pretzels
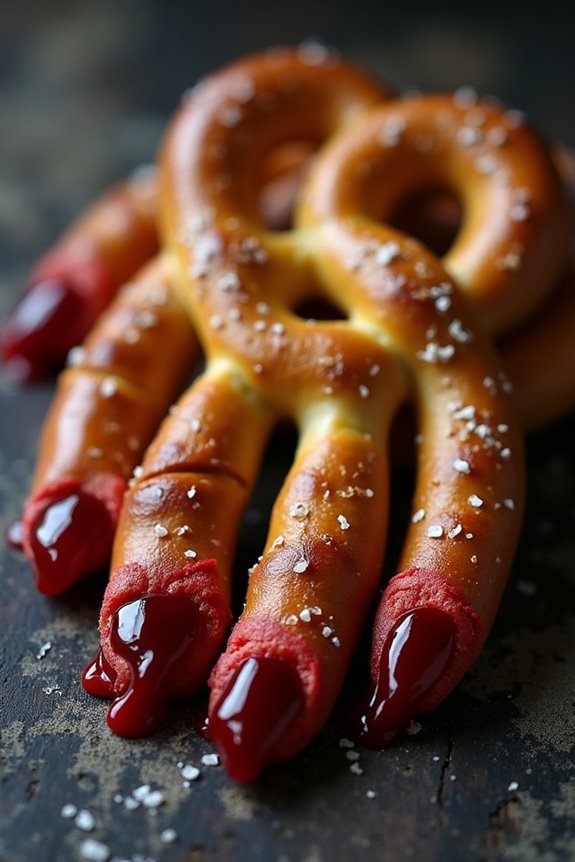
Halloween is the perfect time to get creative in the kitchen, and what better way to add a spooky touch to your celebration than with Bloody Finger Pretzels? These creepy yet delicious treats will surely be a hit at your next Halloween party. They aren’t only fun to make but also a delightful combination of sweet and savory flavors that will leave your guests both amused and satisfied.
Perfect for kids and adults alike, Bloody Finger Pretzels are an easy and entertaining way to bring some festive flair to your Halloween spread. The dish is fundamentally pretzel dough shaped into fingers, complete with a “bloody” almond nail and a red-tinted glaze to give it that extra eerie effect. This recipe makes enough for 4-6 people, ensuring everyone at your gathering can enjoy these ghoulish goodies.
With just a few simple ingredients and some creative shaping, you can transform ordinary pretzels into a chilling treat that tastes as good as it looks. Let’s explore the ingredients you’ll need and the steps to bring this spooky snack to life.
Ingredients for 4-6 people:
- 4 cups all-purpose flour
- 1 tablespoon sugar
- 2 teaspoons salt
- 1 package active dry yeast (about 2 1/4 teaspoons)
- 1 1/2 cups warm water (about 110°F)
- 2/3 cup baking soda
- 10 cups water
- 2 tablespoons softened butter
- 1 large egg (beaten, for egg wash)
- 2 tablespoons coarse sea salt
- 12 whole blanched almonds
- Red food coloring
- 1/4 cup strawberry or raspberry jam
Cooking Instructions:
- Prepare the Dough: In a large mixing bowl, combine the flour, sugar, and salt. In a separate small bowl, dissolve the yeast in the warm water. Let it sit for about 5 minutes until it becomes frothy. Add the yeast mixture and softened butter to the flour mixture, and stir until well combined.
- Knead the Dough: Knead the dough on a floured surface for about 8-10 minutes until it becomes smooth and elastic. Place the dough in a greased bowl, cover it with a clean towel, and let it rise in a warm place for about 1 hour or until doubled in size.
- Shape the Fingers: Preheat your oven to 450°F (232°C). Punch down the risen dough and divide it into 12 equal pieces. Roll each piece into a finger-like shape, about 4-5 inches long. Press one end of each “finger” to flatten slightly, and make three shallow cuts in the middle to resemble knuckles.
- Add the Nails: Press a blanched almond into the flattened end of each pretzel finger to create the appearance of a fingernail.
- Prepare the Baking Soda Solution: In a large pot, bring 10 cups of water and 2/3 cup baking soda to a boil.
- Boil the Pretzels: Carefully drop each pretzel finger into the boiling water for about 30 seconds. Remove with a slotted spoon and place on a baking sheet lined with parchment paper.
- Apply Egg Wash and Bake: Brush each pretzel finger with the beaten egg wash and sprinkle with coarse sea salt. Bake in the preheated oven for about 12-15 minutes or until they turn golden brown.
- Create the Bloody Effect: Mix a few drops of red food coloring into the strawberry or raspberry jam until it reaches the desired “bloody” color. Just before serving, dip the almond end of each pretzel finger into the jam to create a bloody effect.
Extra Tips:
For an even more realistic look, you can use a knife to score additional lines on the fingers to mimic skin creases. Make sure not to overbake the pretzels, as you want them to remain soft inside.
If you prefer a sweeter version, you can brush the pretzels with melted butter and sprinkle them with cinnamon sugar instead of salt. These Bloody Finger Pretzels can be made ahead of time, and just before serving, you can apply the “bloody” jam for maximum effect. Enjoy your Halloween treat!
Jack-o’-Lantern Cheesecake
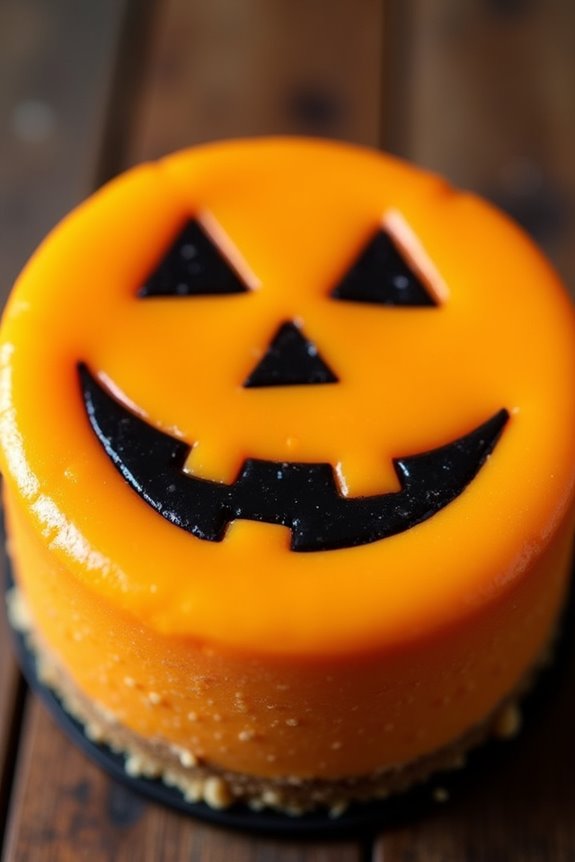
Jack-o’-Lantern Cheesecake is the perfect Halloween treat that combines the creamy delight of cheesecake with the festive spirit of a carved pumpkin. This dessert not only satisfies your sweet tooth but also adds a decorative touch to your Halloween table. With its rich texture and playful appearance, the Jack-o’-Lantern Cheesecake is sure to be a hit at any autumn gathering. The cheesecake is flavored with pumpkin puree and warm spices, giving it a delightful seasonal twist that will have everyone asking for seconds.
Creating a Jack-o’-Lantern Cheesecake isn’t as intimidating as it may seem. By following this recipe, you’ll be able to craft a visually stunning and delicious dessert that embodies the spirit of Halloween. The key is to take your time and enjoy the process of sculpting a cheesecake that resembles a classic jack-o’-lantern. Whether you’re an experienced baker or a novice in the kitchen, this recipe provides a step-by-step guide to help you accomplish a masterpiece that will impress your guests.
Ingredients (Serves 4-6)
- 1 1/2 cups graham cracker crumbs
- 1/3 cup unsalted butter, melted
- 1/4 cup granulated sugar
- 3 (8 oz) packages cream cheese, softened
- 1 cup granulated sugar
- 1 teaspoon vanilla extract
- 3 large eggs
- 1 cup pumpkin puree
- 1 teaspoon ground cinnamon
- 1/2 teaspoon ground nutmeg
- 1/4 teaspoon ground ginger
- Orange and black food coloring
- Whipped cream (optional, for serving)
Cooking Instructions
- Prepare the Crust: Preheat your oven to 325°F (163°C). In a mixing bowl, combine the graham cracker crumbs, melted butter, and 1/4 cup granulated sugar until the mixture is well combined and resembles wet sand. Press the mixture into the bottom of a 9-inch springform pan to form the crust. Bake for 10 minutes, then remove from the oven and set aside to cool.
- Make the Cheesecake Filling: In a large mixing bowl, beat the softened cream cheese and 1 cup of granulated sugar together until smooth and creamy. Add the vanilla extract and eggs, one at a time, mixing well after each addition. Next, add the pumpkin puree, cinnamon, nutmeg, and ginger, and mix until fully incorporated.
- Color the Filling: Divide the cheesecake batter into two portions. Add orange food coloring to the larger portion, stirring until you achieve your desired shade of orange. To a small portion, add black food coloring to create a contrasting color for the jack-o’-lantern’s facial features.
- Assemble the Cheesecake: Pour the orange cheesecake batter over the cooled crust, smoothing the top with a spatula. Use the black-colored batter to create a jack-o’-lantern face on top of the cheesecake. You can use a small spoon or piping bag to draw eyes, nose, and a mouth.
- Bake the Cheesecake: Place the springform pan in the oven and bake for 50-60 minutes, or until the edges are set and the center is slightly jiggly. Turn off the oven and leave the cheesecake inside with the door ajar for about 1 hour.
- Cool and Chill: Remove the cheesecake from the oven and let it cool to room temperature. Once cooled, refrigerate it for at least 4 hours or overnight to set completely.
- Serve: Run a knife around the edge of the pan to loosen the cheesecake before releasing the springform. Slice and serve with a dollop of whipped cream, if desired.
Extra Tips
To guarantee your Jack-o’-Lantern Cheesecake has a smooth texture, make sure all your ingredients are at room temperature before you start mixing. This will help avoid lumps in the cheesecake batter.
When creating the jack-o’-lantern face, use toothpicks or a small piping tip for precision. For a more vibrant orange color, gradually add food coloring until the desired shade is reached.
Remember to let the cheesecake chill thoroughly to develop its rich flavor and firm texture.
Witch Hat Cones
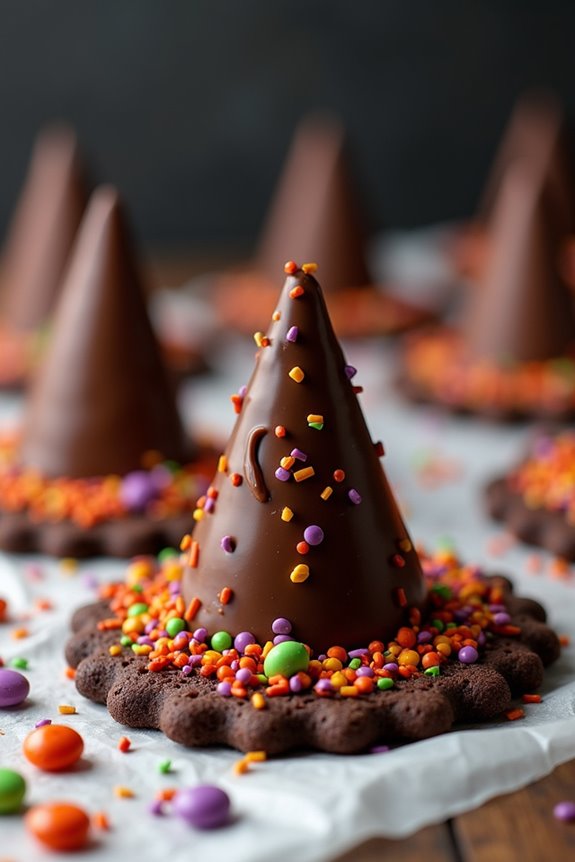
Transform your Halloween celebrations into a magical occasion with these enchanting Witch Hat Cones. These delightful treats not only capture the essence of the spooky holiday but also serve as a fun and creative activity for both kids and adults alike. The combination of crispy sugar cones and rich chocolate will leave your guests spellbound, making them a perfect addition to your Halloween party spread.
Crafting these Witch Hat Cones is a simple yet rewarding process that involves dipping sugar cones into melted chocolate and decorating them with colorful sprinkles and candies to resemble a witch’s hat. The vibrant and playful presentation of these treats makes them an instant hit, and the delicious taste will have everyone coming back for more. Whether you’re hosting a Halloween party or looking for a festive dessert, these Witch Hat Cones are sure to impress.
Ingredients (Serves 4-6):
- 6 sugar cones
- 1 cup semi-sweet chocolate chips
- 6 round chocolate cookies (e.g., Oreos)
- 1/4 cup assorted Halloween-themed sprinkles
- 1/4 cup small candies (e.g., M&Ms, candy corn)
- 1 tablespoon vegetable oil
Cooking Instructions:
- Prepare the Chocolate: Begin by melting the semi-sweet chocolate chips in a microwave-safe bowl. Add the vegetable oil to the chocolate chips and microwave them in 30-second intervals, stirring in between until smooth and fully melted.
- Dip the Cones: Carefully dip the open end of each sugar cone into the melted chocolate, making sure that the outside is evenly coated. Allow any excess chocolate to drip off back into the bowl.
- Attach the Cookies: Press the chocolate-dipped end of each cone onto the center of a round chocolate cookie. This forms the base of the witch hat. Hold it in place for a moment to allow the chocolate to set slightly and create a secure bond.
- Decorate: While the chocolate is still soft, sprinkle the assorted Halloween-themed sprinkles over the cones. Add small candies around the base of each cone to mimic a band on the witch hat.
- Set the Treats: Place the completed witch hat cones on a baking sheet lined with parchment paper or a silicone mat. Allow them to set completely at room temperature or in the refrigerator for faster setting.
Extra Tips:
To guarantee that your Witch Hat Cones turn out perfectly, make sure the chocolate isn’t too hot when dipping the cones, as this can cause it to become too runny and difficult to work with.
If you find the chocolate thickening as you work, gently reheat it in the microwave for a few seconds to restore its smooth consistency.
Additionally, feel free to get creative with the decorations by using different types of sprinkles and candies to match your Halloween theme. These treats are best enjoyed fresh, so prepare them on the day of your event for ideal taste and presentation.
Skeleton Bone Meringues

Elevate your Halloween treat game with these spooky yet delightful Skeleton Bone Meringues. These crispy, airy meringues are shaped like bones to fit the eerie theme of the holiday. Meringues are made from whipped egg whites and sugar, creating a light and sweet treat that melts in your mouth. The simplicity of these ingredients brings forth a delicate texture, while the creative shape adds a festive touch. Perfect as a standalone treat or a decorative item for your Halloween dessert table, these meringues are sure to impress both kids and adults alike.
Crafting these Skeleton Bone Meringues requires a bit of patience and precision, but the results are well worth the effort. The key to perfect meringues lies in achieving stiff peaks in the egg whites, which guarantees a stable structure that holds its shape during baking. Once piped into bone shapes and baked to perfection, these meringues can be stored in an airtight container to maintain their crispiness. Follow this recipe to create a batch that serves 4-6 people, making it ideal for a small gathering or family treat.
Ingredients (Serves 4-6):
- 4 large egg whites, at room temperature
- 1 cup granulated sugar
- 1 teaspoon vanilla extract
- 1/4 teaspoon cream of tartar
- Pinch of salt
Cooking Instructions:
- Prepare the Baking Sheets: Preheat your oven to 225°F (110°C). Line two baking sheets with parchment paper. If desired, draw bone shapes on the parchment paper as a guide, turning the paper over so the ink doesn’t touch the meringue.
- Whip the Egg Whites: In a clean, dry bowl, add the egg whites and a pinch of salt. Using an electric mixer, beat the egg whites on medium speed until foamy.
- Add Cream of Tartar: Gradually add the cream of tartar to the foamy egg whites and continue beating until soft peaks form.
- Incorporate Sugar and Vanilla: Slowly add the granulated sugar, about a tablespoon at a time, while beating on high speed. Add the vanilla extract and continue to beat until stiff, glossy peaks form and the sugar is fully dissolved.
- Pipe the Meringue: Transfer the meringue mixture into a piping bag fitted with a large round tip. Pipe the meringue onto the prepared baking sheets in the shape of bones, using the drawn templates as a guide if needed.
- Bake the Meringues: Place the baking sheets in the preheated oven and bake for approximately 1 to 1.5 hours, or until the meringues are dry and can easily be lifted off the parchment paper. They shouldn’t brown.
- Cool and Store: Turn off the oven and let the meringues cool inside with the door slightly ajar for about an hour. Once completely cool, store them in an airtight container to maintain crispness.
Extra Tips:
When making meringues, it’s essential to verify that your mixing bowl and beaters are completely clean and free of any grease, as fat can prevent the egg whites from whipping properly.
It’s also important to add sugar gradually to allow it to dissolve completely, which contributes to a smooth, glossy finish. If your meringues start to brown, reduce the oven temperature slightly.
Finally, avoid making meringues on humid days, as moisture can make them sticky. Happy Halloween baking!