

Hey there, fellow Halloween enthusiasts! 🎃
Are you ready to bring some spooky and healthy magic to your Halloween celebrations this year?
Forget the candy overload—I’ve got some fabulous recipes that are not just nutritious but also incredibly fun.
From Spooky Spider Deviled Eggs to Monster Mouth Apple Slices, these treats are perfect for keeping the festive spirit alive without the sugar rush.
Let’s create a Halloween spread that’s as delightful as it is wholesome!
Spooky Spider Deviled Eggs
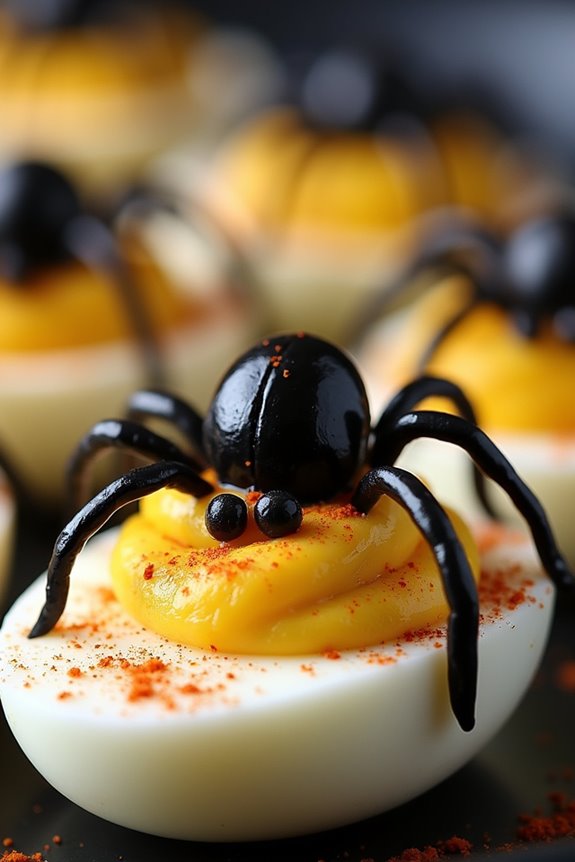
Searching for a fun and healthy treat to serve at your Halloween gathering? Seek no further than Spooky Spider Deviled Eggs! These creepy yet delicious snacks are perfect for adding a festive touch to your party spread.
Made with hard-boiled eggs, a flavorful filling, and adorned with black olive “spiders,” these deviled eggs are both visually appealing and tasty. Not only are they a hit with kids, but adults will also appreciate the creative twist on a classic appetizer.
Spooky Spider Deviled Eggs offer a balance of protein and healthy fats, making them a satisfying snack that won’t derail your healthy eating goals. Plus, they’re incredibly easy to prepare, allowing you to spend more time enjoying the festivities.
This recipe will yield 12 deviled eggs, suitable for serving 4-6 people, making it a great option for small gatherings or as part of a larger buffet.
Ingredients (Serves 4-6 people)
- 6 large eggs
- 3 tablespoons mayonnaise
- 1 teaspoon Dijon mustard
- 1 teaspoon white vinegar
- Salt and pepper to taste
- Paprika for garnish
- 12 black olives, pitted
Cooking Instructions
- Boil the Eggs: Place the eggs in a saucepan and cover them with cold water. Bring the water to a rolling boil over medium-high heat, then cover the saucepan with a lid and remove it from heat. Let the eggs sit in the hot water for about 10-12 minutes.
- Cool and Peel the Eggs: Once the eggs are done cooking, transfer them to a bowl of ice water to cool for about 5 minutes. Peel the eggs carefully, making sure the whites remain intact.
- Prepare the Egg Filling: Slice each egg in half lengthwise and gently remove the yolks, placing them in a mixing bowl. Set the egg whites aside on a serving platter.
- Make the Filling: Mash the egg yolks with a fork. Add mayonnaise, Dijon mustard, white vinegar, salt, and pepper. Mix until smooth and creamy. Adjust seasoning as needed.
- Fill the Egg Whites: Spoon or pipe the egg yolk mixture back into the hollow of each egg white half.
- Create the Spider Decoration: Slice the black olives in half. Use one half as the spider’s body, placing it on top of the filled egg. Slice the other half into thin strips to create the spider’s legs. Arrange the legs around the body on the egg.
- Garnish and Serve: Lightly sprinkle paprika over the eggs for a touch of color. Serve your Spooky Spider Deviled Eggs on a festive platter.
Extra Tips
For the best presentation, it’s important to use eggs that are as fresh as possible to guarantee easy peeling.
If you find your filling is too thick, you can add a little more mayonnaise or a splash of milk to achieve the desired creaminess.
To make the spider assembly easier, use a paring knife for precise cuts when slicing the olives.
And remember, these deviled eggs can be made a few hours ahead and stored in the refrigerator until ready to serve, making them an excellent option for party planning.
Monster Mouth Apple Slices
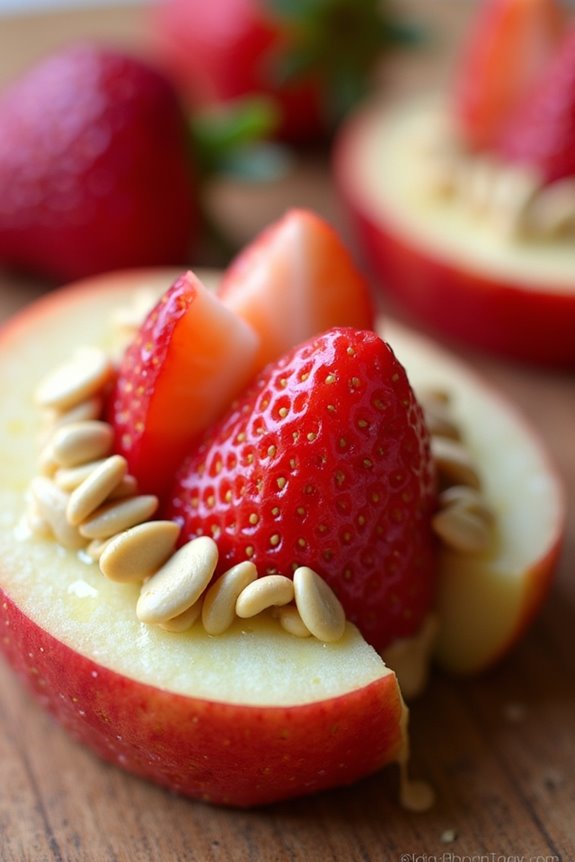
Monster Mouth Apple Slices are a fun and spooky addition to any Halloween celebration, and they offer a healthier alternative to traditional sugary treats. These creative snacks aren’t only visually appealing but also packed with the nutritional benefits of fresh apples, strawberries, sunflower seeds, and creamy nut butter. Perfect for kids and adults alike, Monster Mouth Apple Slices are easy to prepare and are sure to be a hit at any Halloween gathering or party.
In addition to being delicious, these Monster Mouth Apple Slices are a great way to encourage kids to eat more fruit. The natural sweetness of the apples pairs wonderfully with the richness of the nut butter, while the strawberries and sunflower seeds add a delightful texture. With just a few simple ingredients, you can create a festive and healthy snack that will keep everyone coming back for more.
Ingredients for Monster Mouth Apple Slices (serving size: 4-6 people):
- 3 large apples (any variety)
- 1 cup nut butter (peanut, almond, or sunflower seed butter)
- 1 cup strawberries, hulled and sliced
- 1/2 cup sunflower seeds (shelled)
- 1/4 cup mini marshmallows (optional for added fun)
Instructions:
- Prepare the Apples: Start by washing the apples thoroughly. Cut each apple into quarters and remove the core. Then, slice each quarter into thin wedges, approximately 1/4 inch thick.
- Create the Monster Mouths: Take two apple wedges and spread a generous amount of nut butter onto one side of each wedge. This will act as the “glue” to hold the mouth together.
- Assemble the Mouths: Place sliced strawberries between the two apple wedges, with the pointed ends facing outward to resemble a tongue sticking out. Press the apple wedges together gently so that the nut butter holds the strawberries in place.
- Add the Teeth: Insert sunflower seeds along the edge of the apple wedges to create “teeth.” Space them out to mimic a jagged, monstrous grin. If using mini marshmallows, you can also place them randomly along the top wedge for additional “teeth” or “eyes.”
- Plate and Serve: Arrange the Monster Mouth Apple Slices on a large platter and serve immediately. These snacks are best enjoyed fresh to prevent the apples from browning.
Extra Tips:
To prevent the apple slices from browning, you can soak them briefly in a mixture of water and lemon juice before assembling. Be sure to pat them dry with a paper towel to remove excess moisture before applying the nut butter.
Additionally, if you’re preparing these snacks ahead of time, store them in an airtight container in the refrigerator to maintain their freshness. Feel free to get creative with your Monster Mouths by experimenting with different types of nut butter or adding other healthy toppings like raisins or dried cranberries for eyes.
Ghostly Banana Pops

Ghostly Banana Pops are a delightful and healthy Halloween treat that combines the natural sweetness of bananas with a touch of spooky fun. These whimsical snacks are perfect for a Halloween party or just to surprise your family with a ghoulishly good dessert.
The simplicity of the ingredients and the ease of preparation make it a wonderful activity to do with kids, letting them release their creativity while making a nutritious snack.
These pops aren’t only a hit with children but also a great way for adults to indulge in the Halloween spirit without the guilt of consuming too much sugar. By using bananas and a few other simple ingredients, you can create a festive and healthy alternative to traditional Halloween candy.
Not only are they fun to make, but Ghostly Banana Pops are also a great way to incorporate fruit into your Halloween festivities, guaranteeing that everyone can enjoy a treat that’s as delightful as it’s nutritious.
Ingredients (for 4-6 people):
- 3 large bananas
- 1 cup white chocolate chips
- 12 mini chocolate chips (for eyes)
- 6 popsicle sticks
- 1 tablespoon coconut oil
Instructions:
- Prepare the Bananas: Start by peeling the bananas and cutting them in half. Insert a popsicle stick into the flat end of each banana half, making sure that it holds firmly. Place the banana pops on a baking sheet lined with parchment paper.
- Freeze the Bananas: Once all the bananas have been prepared, put the baking sheet in the freezer for about 30 minutes. This will help the bananas hold their shape when dipped in chocolate.
- Melt the Chocolate: In a microwave-safe bowl, combine the white chocolate chips with the coconut oil. Microwave in 30-second intervals, stirring in between, until the chocolate is completely melted and smooth.
- Coat the Bananas: Remove the bananas from the freezer. Dip each banana pop into the melted white chocolate, turning it to make sure an even coat. Allow any excess chocolate to drip off.
- Add the Eyes: Before the chocolate sets, press two mini chocolate chips onto each banana pop to create ghostly eyes.
- Set the Chocolate: Place the coated banana pops back onto the parchment paper and return them to the freezer for about 15 minutes, or until the chocolate is firm.
- Serve: Once the chocolate is set, your Ghostly Banana Pops are ready to be served. Enjoy them straight from the freezer for a chilly treat!
Extra Tips:
For an added layer of flavor, consider sprinkling some crushed nuts or coconut flakes onto the chocolate before it sets.
If you want to make the pops ahead of time, they can be stored in the freezer for up to a week. Just make sure they’re kept in an airtight container to prevent freezer burn.
If you’re serving these at a party, you might want to add a few drops of food coloring to the white chocolate for a more colorful and festive look.
Mummy Avocado Toast
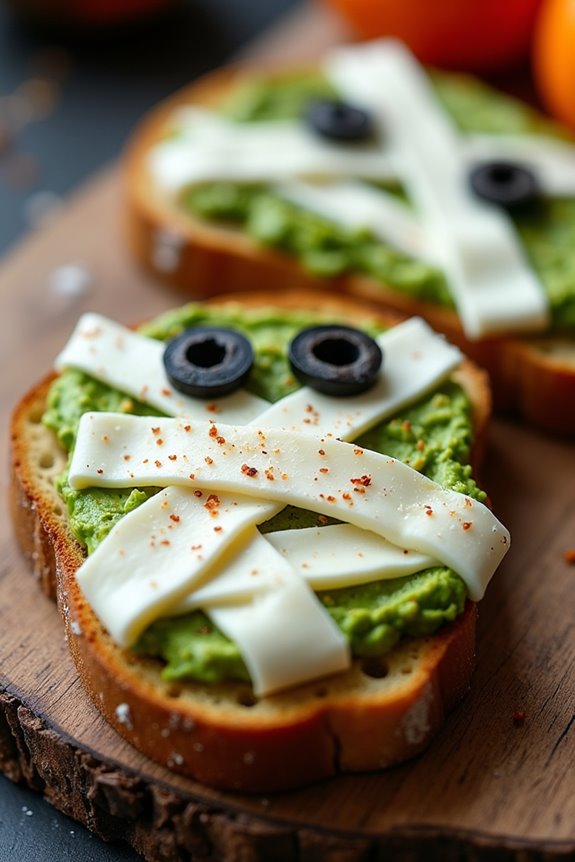
Mummy Avocado Toast is a fun and spooky twist on the classic avocado toast, perfect for a healthy Halloween treat. This delightful snack isn’t only visually appealing with its mummy-like appearance but also packed with nutrients, making it a great option for both kids and adults. The creamy avocado paired with crisp bread and spooky olive eyes create a dish that’s as tasty as it’s fun to look at.
This recipe is designed to serve 4-6 people, making it ideal for a small Halloween gathering or family snack time. With just a few simple ingredients and steps, you can whip up this festive dish in no time. Whether you’re looking to add a healthy option to your Halloween spread or simply enjoy a creative snack, Mummy Avocado Toast is sure to captivate.
Ingredients:
- 4-6 slices of whole grain or sourdough bread
- 3 ripe avocados
- 1 tablespoon lime juice
- Salt and pepper to taste
- 6-8 slices of mozzarella cheese
- 12-18 black olives, pitted and sliced for eyes
- Optional: red pepper flakes for extra spice
Instructions:
- Prepare the Avocado Mixture:
- Cut the avocados in half, remove the pits, and scoop the flesh into a bowl. Add lime juice, salt, and pepper. Mash the avocados with a fork until creamy and well combined.
- Toast the Bread:
- Lightly toast the slices of bread until they’re golden brown and crispy. This will provide a sturdy base for the avocado spread and toppings.
- Spread the Avocado:
- Evenly spread a generous layer of the mashed avocado mixture onto each slice of toasted bread.
- Create the Mummy Wraps:
- Cut the mozzarella cheese into thin strips. Lay the strips across each slice of avocado toast, crisscrossing them to resemble mummy wraps.
- Add the Eyes:
- Place two slices of black olives on each piece of toast to create the mummy’s eyes. Press them gently into the cheese strips to make sure they stay in place.
- Serve:
- Arrange the Mummy Avocado Toast on a platter and, if desired, sprinkle with red pepper flakes for a hint of spice. Serve immediately and enjoy!
Extra Tips:
To maintain the avocados’ freshness and green color, prepare the avocado mixture just before assembling the toasts. If you’re prepping ahead, you can keep the avocado mixture in an airtight container with a layer of plastic wrap directly on the surface to minimize browning.
For a gluten-free option, substitute the bread with your favorite gluten-free variety. Additionally, you can get creative with the mummy design by using different types of cheese or adding slices of red bell pepper for a pop of color.
Jack-o’-Lantern Stuffed Peppers
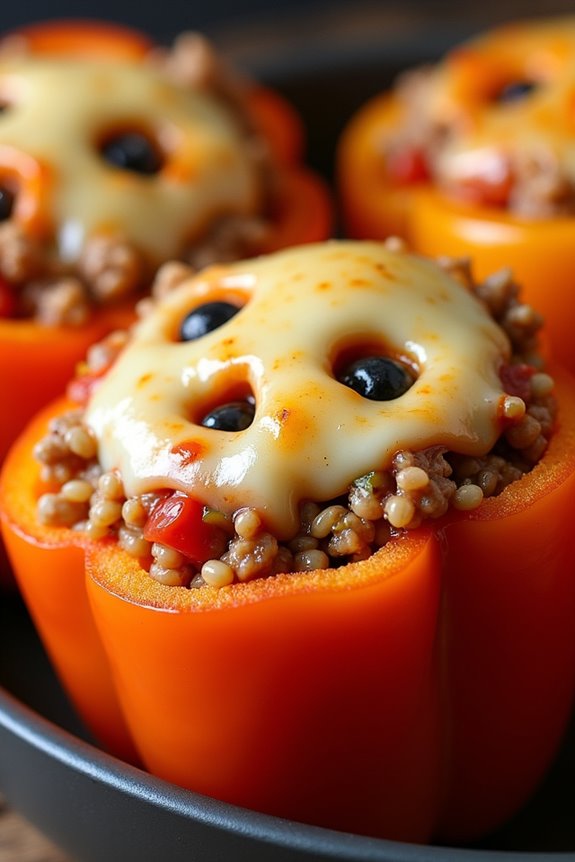
Celebrate a healthy Halloween with Jack-o’-Lantern Stuffed Peppers, a fun and nutritious dish that will delight both kids and adults. These vibrant orange bell peppers are carved to resemble classic jack-o’-lanterns and filled with a savory mixture of ground turkey, rice, and vegetables. Not only do they make for a festive presentation, but they’re also packed with protein and fiber, making them a satisfying meal that doesn’t compromise your health goals.
This recipe serves 4-6 people, making it perfect for a small Halloween gathering or family dinner. The preparation involves carving the faces on the peppers, cooking the filling, and then baking everything to perfection. The result is a deliciously spooky meal that’s both visually appealing and packed with flavor. Follow the instructions below to create your own Halloween-themed stuffed peppers.
Ingredients (Serves 4-6)
- 6 orange bell peppers
- 1 pound ground turkey
- 1 cup cooked brown rice
- 1 small onion, diced
- 2 cloves garlic, minced
- 1 cup diced tomatoes (canned or fresh)
- 1 cup shredded mozzarella cheese
- 1 tablespoon olive oil
- 1 teaspoon dried oregano
- 1 teaspoon ground cumin
- Salt and pepper to taste
Cooking Instructions
1. Preheat the Oven: Preheat your oven to 375°F (190°C) to prepare for baking the stuffed peppers.
2. Prepare the Peppers: Wash the bell peppers thoroughly. Cut off the tops and remove the seeds and membranes. Using a small knife, carefully carve jack-o’-lantern faces into the sides of each pepper. Set them aside.
3. Cook the Filling: In a large skillet, heat the olive oil over medium heat. Add the diced onion and minced garlic, sautéing until the onion becomes translucent, about 3-4 minutes.
Add the ground turkey to the skillet, cooking until browned and fully cooked. Stir in the diced tomatoes, cooked brown rice, oregano, cumin, salt, and pepper. Allow the mixture to simmer for 5 minutes, letting the flavors meld together.
4. Stuff the Peppers: Spoon the turkey mixture into each carved pepper, filling them generously. Place the stuffed peppers upright in a baking dish. Sprinkle the top of each with shredded mozzarella cheese.
5. Bake: Cover the dish with aluminum foil and Bake in the preheated oven for 30 minutes. Remove the foil and bake for an additional 10 minutes, or until the cheese is melted and bubbly.
6. Serve: Once baked, remove the peppers from the oven. Allow them to cool slightly before serving to enjoy the full flavors.
Extra Tips
When carving the peppers, be gentle to avoid cutting too deeply and puncturing the sides. If you’re short on time, you can prepare the filling a day ahead and store it in the refrigerator until you’re ready to stuff and bake the peppers.
For added flavor, consider adding chopped fresh herbs like basil or parsley to the filling. Additionally, this recipe is versatile, so feel free to substitute the ground turkey with chicken or beef, or make it vegetarian by using beans or lentils instead. Enjoy your spooky, healthy meal!
Witch’s Broomstick Snacks

Witch’s Broomstick Snacks are a fun and healthy alternative to traditional Halloween treats, perfect for parties or after-school snacks. These clever snacks not only capture the spooky spirit of the season but also offer a nutritious option that both kids and adults will enjoy. Made with simple ingredients, Witch’s Broomstick Snacks are incredibly easy to prepare and can be assembled in just a few minutes.
The base of these Witch’s Broomstick Snacks is made from cheese and pretzel sticks, creating a whimsical and tasty combination. The cheese is cut and shaped to resemble the bristles of a broom, while the pretzel stick serves as the broom handle. It’s a creative and delightful dish that will certainly add a touch of magic to your Halloween celebrations. This recipe serves 4-6 people, making it ideal for small gatherings or family fun.
Ingredients:
- 6 string cheese sticks
- 12 pretzel sticks
- 12 fresh chives or thin strips of green onion
- Optional: 1 small cucumber, sliced (for garnish)
Instructions:
- Prepare the Cheese: Begin by unwrapping the string cheese sticks. Cut each stick into halves, resulting in 12 pieces. This will form the bristles of the broom.
- Shape the Broom Bristles: Use a sharp knife to carefully make several vertical cuts at one end of each cheese piece, approximately halfway up. This creates the appearance of broom bristles.
- Assemble the Broomsticks: Insert a pretzel stick into the uncut end of each cheese piece. Press the pretzel gently into the cheese to make sure it’s secure but take care not to break the pretzel.
- Tie the Broom: Wrap a chive or a thin strip of green onion around the top of the cheese, just below where the cuts were made, to give the appearance of a broom binding. Tie it tightly, and if necessary, use a small dab of water to help the chive stick.
- Add Garnish (Optional): If desired, arrange the broomsticks on a platter with slices of cucumber around them for a fresh garnish.
Extra Tips:
Confirm the string cheese is at room temperature before cutting to prevent it from cracking.
If you find the chives or green onion strips are difficult to tie, you can soften them slightly by blanching in hot water for a few seconds. This will make them more pliable and easier to handle.
For an added touch of creativity, you can use different types of cheese or dip the ends of the pretzels in dark chocolate for a sweet twist on this savory snack.
Eyeball Caprese Bites
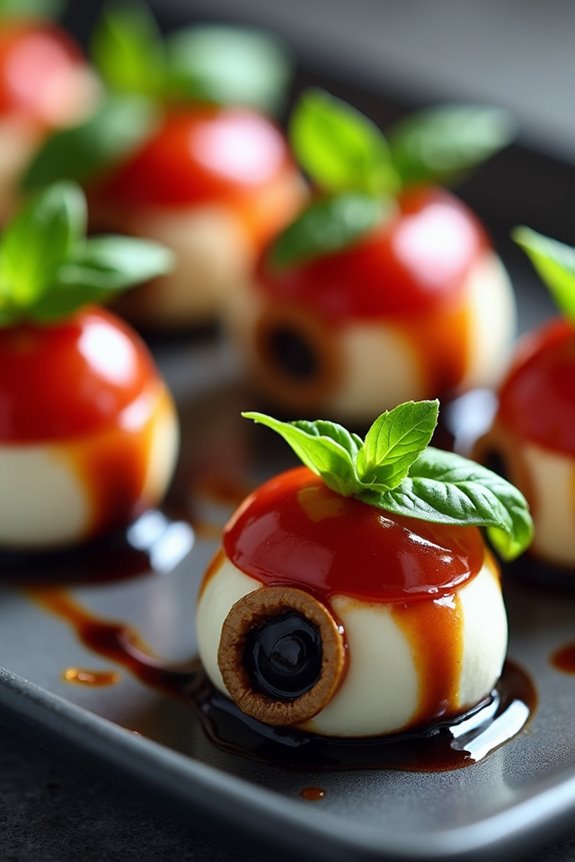
Eyeball Caprese Bites are a fun and spooky twist on the traditional Italian salad that’s perfect for a Halloween gathering. This dish combines the fresh flavors of mozzarella, tomatoes, and basil with a playful presentation that mimics eerie eyeballs. It’s an easy and healthy appetizer that adds a festive touch to your Halloween spread, delighting both kids and adults with its creative appearance and delicious taste.
These Eyeball Caprese Bites aren’t only visually appealing but also packed with nutrients. The mozzarella provides a good source of calcium and protein, while the tomatoes add a dose of vitamins and antioxidants. Fresh basil leaves contribute a burst of flavor and a hint of green that perfectly complements the other ingredients. This recipe is designed to serve 4-6 people, making it an ideal choice for small gatherings or family dinners during the Halloween season.
Ingredients for Eyeball Caprese Bites (Serves 4-6):
- 12 small fresh mozzarella balls
- 12 cherry or grape tomatoes
- 24 fresh basil leaves
- 12 pitted black olives
- 2 tablespoons balsamic glaze
- Salt and pepper to taste
- Toothpicks or small skewers
Cooking Instructions:
- Prepare the Ingredients: Begin by washing the cherry or grape tomatoes and basil leaves thoroughly. Drain the mozzarella balls and olives to guarantee they aren’t too wet.
- Assemble the Eyeballs: Take a mozzarella ball and place a basil leaf on top of it. Cut a small slice off the bottom of a cherry tomato to create a flat surface, then place the tomato on the basil leaf with the cut side down. This will form the base of your eyeball.
- Add the Pupil: Slice the black olives into thin rings. Place a ring on top of each tomato to create the appearance of a pupil. If the olives are too large, you can use a smaller piece or slice them accordingly.
- Secure with Toothpicks: Pierce a toothpick or small skewer through the center of each assembled eyeball, making sure it holds the mozzarella, basil, tomato, and olive together firmly.
- Season and Drizzle: Arrange the Eyeball Caprese Bites on a serving platter. Lightly season them with salt and pepper, then drizzle the balsamic glaze over the top for added flavor and decoration.
Extra Tips:
For an extra spooky effect, consider using different colored tomatoes, such as yellow or green, to create a variety of eyeball colors. Additionally, you can experiment with different types of olives or use a small dab of pesto instead of basil for a unique twist.
If you prefer a stronger flavor, marinate the mozzarella balls in olive oil, garlic, and herbs before assembling the bites. Remember to serve these bites immediately for the freshest taste and best presentation.
Creepy-Crawly Veggie Platter
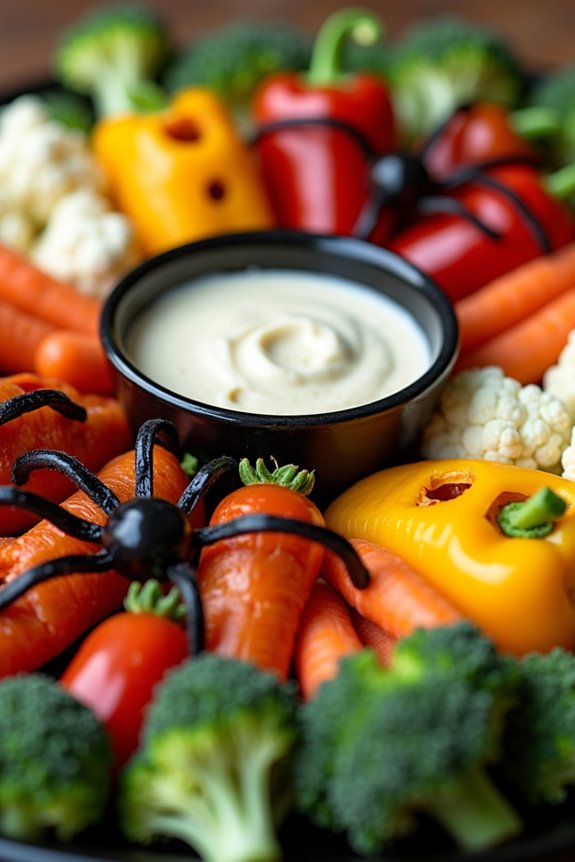
Halloween is a time for fun, frights, and feasts, and what better way to combine all three than with a Creepy-Crawly Veggie Platter? This platter transforms fresh, colorful vegetables into a spooky, yet healthy attraction for your Halloween party. Not only is it a feast for the eyes, but it’s also a guilt-free treat that provides a revitalizing contrast to the usual sugar-laden sweets of the season. Ideal for serving 4-6 people, this dish is perfect for a small gathering of friends or family.
This platter consists of a variety of vegetables arranged to resemble creepy-crawlies and other Halloween-themed designs. Imagine cherry tomato spiders, cucumber snakes, and bell pepper jack-o’-lanterns, all served with a delicious dip. This platter isn’t only visually appealing but also packed with nutrients, making it a great way to get both kids and adults to enjoy their veggies. With a little creativity and some basic ingredients, you can whip up this spooky snack in no time.
Ingredients for 4-6 People:
- 1 large cucumber
- 1 cup cherry tomatoes
- 1 red bell pepper
- 1 yellow bell pepper
- 1 cup baby carrots
- 1 cup broccoli florets
- 1 cup cauliflower florets
- 1/2 cup black olives
- 1/2 cup hummus or ranch dressing (for dipping)
Instructions:
- Prepare the Vegetables:
- Start by washing all the vegetables thoroughly.
- Slice the cucumber into thin rounds. These will serve as the body for your cucumber snakes.
- Halve the cherry tomatoes, which will become the bodies of your tomato spiders.
- Create the Creepy-Crawlies:
- For the cherry tomato spiders, use black olives cut into thin strips as legs. Arrange the olive strips around the halved cherry tomatoes to resemble spider legs.
- For the cucumber snakes, lay out the cucumber slices in a winding pattern. Use a halved cherry tomato as a head at the end of each snake.
- For the bell pepper jack-o’-lanterns, cut the tops off the red and yellow bell peppers, hollow them out, and carve faces into the sides as you’d a pumpkin.
- Assemble the Platter:
- Arrange the baby carrots, broccoli florets, and cauliflower florets around the platter to fill in the empty spaces and add texture.
- Place the jack-o’-lantern peppers around the platter as eye-catching centerpieces.
- Serve the hummus or ranch dressing in a small bowl in the center for dipping.
- Final Touches:
- Add any remaining black olive strips or whole olives around the platter for added creepy effect.
- Confirm everything is securely placed so it won’t shift easily when served.
Extra Tips:
To add more spookiness, consider using a mix of purple and orange carrots to create a more colorful and eerie effect.
If you want to make the platter more interactive, you can provide small skewers or toothpicks so guests can assemble their own veggie spiders or snakes. This not only makes the platter more engaging but can also serve as a fun activity for the kids.
Be sure to prepare the platter as close to serving time as possible to keep the vegetables fresh and crisp.
Frankenstein Kiwi Pops
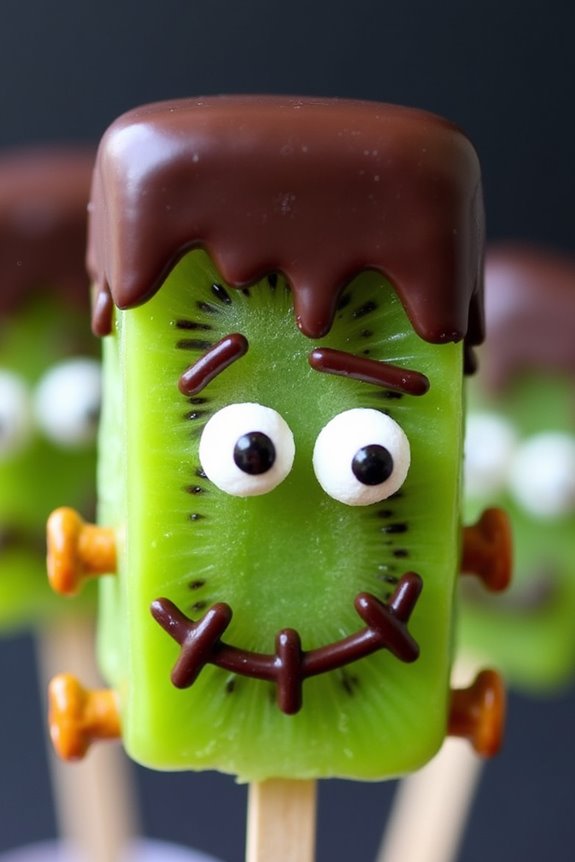
Frankenstein Kiwi Pops are a fun and healthy Halloween snack that bring a spooky twist to your festive celebrations. These ghoulishly delightful treats aren’t only visually appealing but also packed with nutrients thanks to the star ingredient, kiwi. Kiwis are rich in Vitamin C and dietary fiber, making them the perfect choice for a guilt-free indulgence during the Halloween season.
Perfect for kids and adults alike, these pops are easy to make and can be a creative activity to engage the whole family in the kitchen. Crafting Frankenstein Kiwi Pops involves a simple process of assembling and decorating, making them an excellent option for those who want to avoid overly sugary snacks while still embracing the spirit of Halloween.
With their bright green color and quirky details, these pops are sure to be a hit at any gathering. They can be used as a snack or even as a party favor for your little monsters. Gather your ingredients, and let’s bring Frankenstein to life on a stick!
Ingredients (Serving Size: 4-6 People)
- 6 kiwis
- 1 cup of dark chocolate chips
- 1 tablespoon of coconut oil
- 12 mini marshmallows
- 24 candy eyeballs
- 12 pretzel sticks
- 6 popsicle sticks
Cooking Instructions
- Prepare the Kiwis: Begin by peeling the kiwis carefully. Slice each kiwi into thick rounds, making sure each slice is about 1/2 inch thick. You should get about two slices per kiwi.
- Insert the Sticks: Gently insert a popsicle stick into the bottom of each kiwi slice. Be careful not to push too hard to avoid breaking the slice.
- Melt the Chocolate: In a microwave-safe bowl, combine the dark chocolate chips and coconut oil. Heat in the microwave in 30-second intervals, stirring in between, until the chocolate is fully melted and smooth.
- Coat the Kiwis: Dip one end of each kiwi slice into the melted chocolate, about one-third of the way. This will form the “hair” of your Frankenstein. Allow any excess chocolate to drip off before setting it aside on a parchment-lined tray.
- Create Facial Features: While the chocolate is still soft, place two candy eyeballs on the kiwi slice, just below the chocolate-covered part. Use mini marshmallows to form bolts by sticking them on the side of the kiwi, secured by a tiny dab of chocolate.
- Add Final Touches: Break the pretzel sticks in half and insert them into the sides of the kiwi, right where the marshmallows are, to resemble Frankenstein’s bolts.
- Chill and Serve: Place the tray in the refrigerator for about 15-20 minutes or until the chocolate is fully set. Serve your Frankenstein Kiwi Pops chilled.
Extra Tips
For a smoother and more manageable chocolate coating, make sure to use coconut oil, as it helps in achieving a glossy finish. If candy eyeballs aren’t available, you can create eyes using small dots of white chocolate and a tiny dot of dark chocolate for the pupil.
This recipe is versatile, so feel free to customize with additional decorations like sprinkles or colored icing to add more personality to each Frankenstein. Enjoy these treats fresh, as kiwis are best consumed soon after preparation for peak flavor and texture.
Pumpkin Patch Hummus Cups
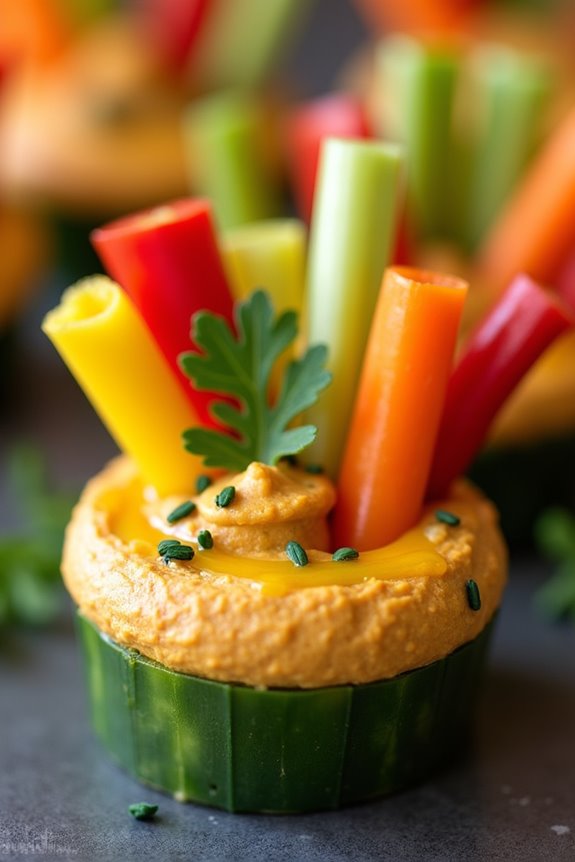
Pumpkin Patch Hummus Cups are a delightful and nutritious way to celebrate Halloween without overindulging in sweets. These festive snacks are perfect for both kids and adults, bringing a touch of Halloween spirit to your table with minimal effort. The combination of creamy hummus, fresh vegetables, and a hint of pumpkin makes for a delicious snack that’s both healthy and visually appealing.
These Pumpkin Patch Hummus Cups are designed to serve 4-6 people, making them perfect for a small gathering or family treat. They can be prepared ahead of time and are easy to assemble, allowing you to focus on other Halloween festivities. The individual cups make serving and clean-up a breeze, while the vibrant colors and flavors guarantee they’ll be a hit with everyone.
Ingredients:
- 2 cups of plain hummus
- 1/2 cup canned pumpkin puree
- 1 teaspoon ground cumin
- 1 teaspoon smoked paprika
- Salt and pepper to taste
- 1 tablespoon olive oil
- 1 small cucumber, sliced into rounds
- 1 bell pepper, cut into strips
- 1 bunch of celery, cut into sticks
- 1 small carrot, cut into sticks
- 12-18 mini plastic cups (or small glass cups)
- Fresh parsley for garnish
Instructions:
1. Prepare the Hummus Mixture:
In a large mixing bowl, combine the plain hummus and canned pumpkin puree. Stir until the pumpkin is fully incorporated into the hummus, creating a smooth and creamy mixture.
2. Season the Hummus:
Add the ground cumin, smoked paprika, salt, and pepper to the hummus mixture. Mix well to guarantee the spices are evenly distributed, enhancing the flavor profile of the hummus.
3. Assemble the Cups:
Using a spoon or small scoop, evenly distribute the pumpkin hummus mixture into each of the mini cups, filling them about halfway.
4. Add the Veggies:
Insert a few slices of cucumber, bell pepper strips, celery sticks, and carrot sticks into the hummus in each cup. Arrange them to resemble a “pumpkin patch” with the veggies standing upright.
5. Finish with Garnish:
Drizzle a small amount of olive oil over each cup of hummus and add a sprinkle of fresh parsley for a pop of color and added flavor.
6. Serve:
Place the assembled cups on a serving platter or tray and serve immediately or refrigerate until ready to serve.
Extra Tips:
To make these Pumpkin Patch Hummus Cups even more festive, consider using small, Halloween-themed cups or adding edible eyes to the vegetable sticks for a spooky touch. If you prefer a spicier version, add a pinch of cayenne pepper to the hummus mixture.
These cups can be prepared a few hours ahead of your event, but for the freshest taste, add the veggies just before serving.
Dracula’s Blood Smoothie
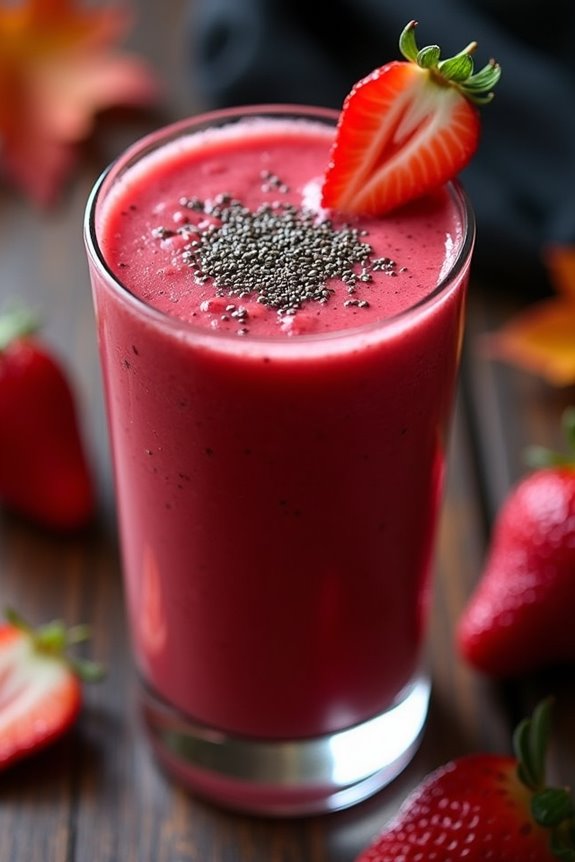
Dracula’s Blood Smoothie is a frightfully fun and healthy Halloween treat that will delight both kids and adults. This vibrant red smoothie isn’t only visually striking but also packed with nutrients, making it a perfect addition to your Halloween festivities. Made with a blend of fruits and vegetables, this smoothie provides a naturally sweet and invigorating taste without any artificial colors or flavors.
It’s an excellent way to sneak in some extra vitamins and minerals during the candy-filled holiday season. The name might sound eerie, but Dracula’s Blood Smoothie is a wholesome beverage that can be enjoyed as a breakfast option, snack, or even a party drink.
The smoothie gets its rich red hue from beets and strawberries, complemented by the creamy texture of bananas and the hydrating power of coconut water. Whether you’re hosting a spooky gathering or simply in the mood for a thematic treat, this smoothie will surely impress with its taste and presentation.
Ingredients (serving size: 4-6 people):
- 2 medium-sized beets, peeled and chopped
- 2 cups frozen strawberries
- 2 ripe bananas
- 2 cups coconut water
- 1 cup Greek yogurt
- 1 tablespoon honey (optional)
- 1 teaspoon vanilla extract
- 1 tablespoon chia seeds
- Ice cubes (optional)
Instructions:
- Prepare the Beets: Start by peeling and chopping the beets into small pieces. This will make it easier to blend them smoothly in the smoothie.
- Blend the Base Ingredients: In a high-speed blender, combine the chopped beets, frozen strawberries, and bananas. Blend on high until the mixture is smooth and no large chunks remain.
- Add Liquids and Flavorings: Pour in the coconut water and Greek yogurt. Add the honey and vanilla extract if desired. Blend the mixture again until all ingredients are well incorporated.
- Incorporate Chia Seeds: Add the chia seeds into the blender, and pulse a few times to mix them evenly into the smoothie. The chia seeds will add a nutritional boost and a slightly thicker texture.
- Adjust Consistency: If the smoothie is too thick, add more coconut water to reach your desired consistency. For a colder drink, add a handful of ice cubes and blend until smooth.
- Serve and Enjoy: Pour the Dracula’s Blood Smoothie into glasses and serve immediately. For an extra spooky touch, garnish with a slice of strawberry or a sprinkle of chia seeds on top.
Extra Tips:
For the most vibrant color and flavor, use fresh, high-quality beets and strawberries. If the beets are too earthy in taste for your preference, you can adjust the sweetness by adding a bit more honey.
This smoothie can be made ahead of time and stored in the refrigerator for up to 24 hours. Just give it a good stir before serving. If you’re catering to guests with dietary restrictions, you can substitute the Greek yogurt with a dairy-free alternative like almond or soy yogurt. Enjoy this healthy Halloween treat and let it add a touch of spooky fun to your celebrations!
Skeleton Bone Breadsticks

Skeleton Bone Breadsticks are a fun and festive way to celebrate Halloween while still keeping things on the healthier side. These breadsticks are shaped to resemble bones, making them a spooky complement to any Halloween spread. Not only are they visually appealing, but they also offer a deliciously crunchy texture that pairs well with a variety of dips, such as marinara sauce or a healthy hummus.
The recipe for Skeleton Bone Breadsticks is simple and can be made with whole wheat flour to increase the nutritional value. Baking these breadsticks instead of frying them also helps to reduce the fat content. Kids and adults alike will enjoy making and eating these bone-shaped treats, making them a great addition to any Halloween party or gathering. Here’s how you can make enough for 4-6 people.
Ingredients:
- 2 cups whole wheat flour
- 1 packet (2 1/4 teaspoons) active dry yeast
- 1 cup warm water (about 110°F)
- 1 tablespoon olive oil
- 1 tablespoon honey
- 1 teaspoon salt
- 1 tablespoon garlic powder
- 1/2 cup grated Parmesan cheese
- 1 egg (for egg wash)
Cooking Instructions:
- Prepare the Yeast: In a small bowl, combine the warm water, honey, and yeast. Stir gently and let it sit for about 5 minutes until it becomes frothy. This indicates that the yeast is active.
- Mix the Dough: In a large mixing bowl, combine the whole wheat flour, salt, and garlic powder. Make a well in the center and add the yeast mixture and olive oil. Stir until the ingredients are combined and form a dough.
- Knead the Dough: Turn the dough onto a lightly floured surface and knead for about 5-7 minutes until it becomes smooth and elastic. If the dough is sticky, incorporate a little more flour as needed.
- Let the Dough Rise: Place the dough in a lightly oiled bowl, cover it with a clean kitchen towel, and let it rise in a warm spot for about 1 hour until it has doubled in size.
- Shape the Breadsticks: Preheat your oven to 400°F (200°C). Punch down the dough and divide it into 12 equal pieces. Roll each piece into a long rope, about 8-10 inches in length. To create the bone shape, make a small knot at each end of the rope.
- Add Cheese and Egg Wash: Place the bone-shaped breadsticks on a lined baking sheet. Brush each breadstick with the beaten egg, then sprinkle with grated Parmesan cheese.
- Bake: Bake the breadsticks in the preheated oven for 15-18 minutes, or until they’re golden brown and sound hollow when tapped.
- Cool and Serve: Allow the breadsticks to cool slightly on a wire rack. Serve warm with your choice of dips.
Extra Tips:
To guarantee your breadsticks have a nice crisp exterior, make sure the oven is fully preheated before baking. If you prefer a softer breadstick, you can reduce the baking time slightly.
For added flavor, consider incorporating herbs like rosemary or thyme into the dough. If you want more of a cheesy flavor, mix some extra Parmesan cheese into the dough before shaping the breadsticks.
Finally, if you’re planning to make these breadsticks ahead of time, they can be frozen after baking and then reheated in the oven before serving.
Black Cat Popcorn Mix
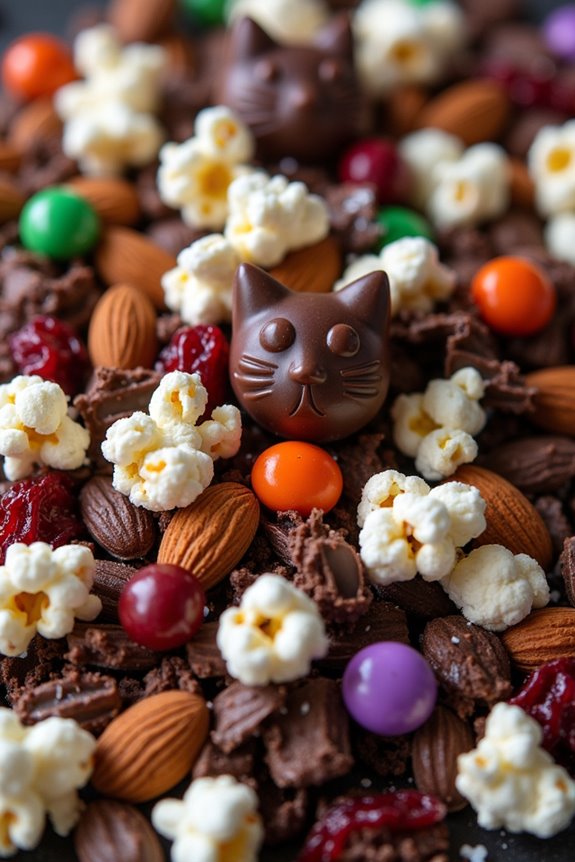
Halloween is a time for spooky fun, and what better way to celebrate than with a delicious and festive snack? Black Cat Popcorn Mix is the perfect treat to enjoy during your Halloween festivities. This whimsical and tasty snack combines the crunch of popcorn with the sweetness of chocolate and the nuttiness of almonds, all enhanced with a hint of salt for balance.
It’s not only delicious but also visually appealing, thanks to the dark chocolate that gives it a “black cat” theme. Whether you’re hosting a Halloween party or enjoying a cozy night in with a scary movie, Black Cat Popcorn Mix is sure to be a hit.
The blend of flavors and textures will keep everyone coming back for more, and the best part is that it’s easy to make. You can whip up a batch in no time, allowing you to spend more time enjoying the spooky season with your friends and family.
Ingredients for 4-6 servings:
- 8 cups popped popcorn
- 1 cup dark chocolate chips
- 1 cup slivered almonds
- 1/2 cup dried cranberries
- 1/4 cup pumpkin seeds
- 1/4 cup candy-coated chocolates (like M&M’s)
- 1 tablespoon olive oil
- 1/2 teaspoon salt
- 1/4 teaspoon cinnamon
Cooking Instructions:
- Prepare the Popcorn: Begin by popping your popcorn using an air popper or stovetop method. You’ll need about 8 cups of popped popcorn. Once popped, transfer the popcorn to a large mixing bowl.
- Melt the Chocolate: In a microwave-safe bowl, combine the dark chocolate chips. Heat in the microwave in 30-second intervals, stirring between each interval, until the chocolate is fully melted and smooth.
- Coat the Popcorn: Drizzle the melted chocolate over the popcorn in the mixing bowl. Use a spatula or large spoon to gently toss the popcorn, making sure that the chocolate is evenly distributed.
- Add the Mix-ins: Sprinkle the slivered almonds, dried cranberries, pumpkin seeds, and candy-coated chocolates over the chocolate-coated popcorn. Continue to gently mix until all the ingredients are evenly incorporated.
- Season the Mix: Drizzle the olive oil over the mix, then sprinkle the salt and cinnamon. Toss everything together one last time to guarantee the seasoning is well dispersed.
- Set and Serve: Spread the popcorn mix out on a baking sheet lined with parchment paper. Allow it to set at room temperature for about 20 minutes, or until the chocolate has hardened. Once set, transfer to a serving bowl and enjoy!
Extra Tips:
For a more intense chocolate flavor, consider adding a teaspoon of cocoa powder to the melted chocolate before drizzling it over the popcorn. If you prefer a bit of heat, a dash of cayenne pepper can give your Black Cat Popcorn Mix an unexpected spicy kick.
Feel free to customize the mix with your favorite nuts or dried fruits for a personal touch. Remember, this snack is best enjoyed fresh, so try to consume it on the day you make it for the best taste and texture.