

Whenever I think of comfort food, I’m instantly transported back to my grandmother’s kitchen, where the aroma of chicken pot pie filled the air. There’s something so gratifying about digging into a creamy mac and cheese, its crunchy topping crackling under the fork. These dishes, like a slow-cooker beef stew or a savory glazed meatloaf, are more than recipes; they’re heartwarming memories on a plate. Curious about what other nostalgic flavors await?
Hearty Chicken Pot Pie to Warm Your Soul
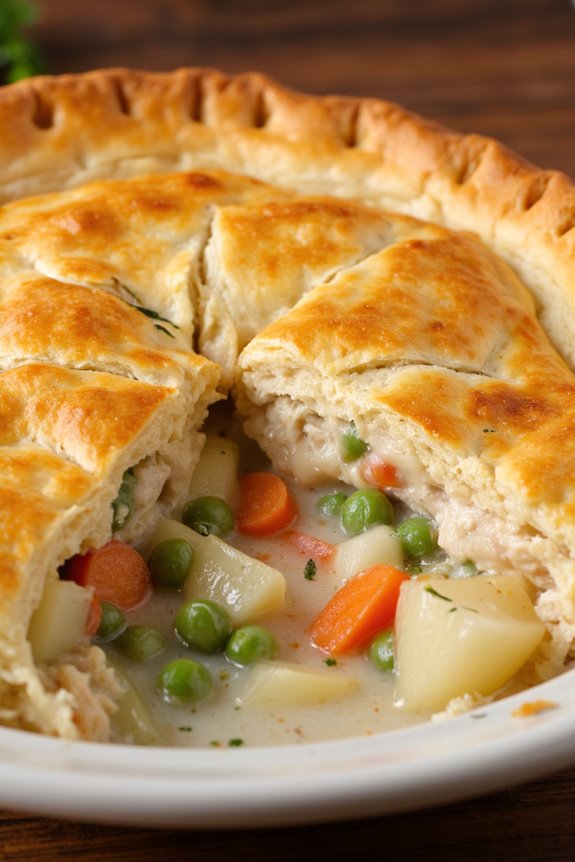
There’s nothing quite like a warm, comforting meal to soothe the soul, and a Hearty Chicken Pot Pie fits the bill perfectly. This classic dish combines tender chunks of chicken, a medley of vegetables, and a rich, creamy sauce, all encased in a flaky, golden crust.
It’s the quintessential comfort food that brings a sense of home and warmth to any dinner table. The balance of flavors and textures makes it a family favorite, providing a sense of satisfaction and nostalgia with every bite.
The beauty of a chicken pot pie is in its versatility; you can adapt it with your favorite vegetables or use leftovers from your fridge to create a unique version every time. This recipe serves 4-6 people, making it perfect for a family dinner or a gathering with friends.
Whether served on a cold winter’s night or as a hearty meal at the end of a long day, this chicken pot pie is sure to delight and comfort.
Ingredients (Serves 4-6):
- 1 1/2 lbs boneless, skinless chicken breasts
- Salt and pepper to taste
- 2 tbsp olive oil
- 1 cup diced onion
- 1 cup diced carrots
- 1 cup frozen peas
- 1 cup diced potatoes
- 3 cloves garlic, minced
- 1/3 cup all-purpose flour
- 1 3/4 cups chicken broth
- 2/3 cup heavy cream
- 1 tsp dried thyme
- 1 tsp dried rosemary
- 1 tbsp fresh parsley, chopped
- 1 package (approx. 14 oz) refrigerated pie crusts (2 crusts)
Cooking Instructions:
- Preheat and Prepare: Preheat your oven to 400°F (200°C). Season the chicken breasts with salt and pepper.
- Cook the Chicken: In a large skillet over medium heat, add olive oil. Cook the chicken breasts for 6-7 minutes per side until fully cooked and golden brown. Remove from the skillet, let cool slightly, then dice into bite-sized pieces.
- Cook the Vegetables: In the same skillet, add diced onion, carrots, and potatoes. Sauté for 5-7 minutes until the vegetables begin to soften. Add the garlic and cook for another 1 minute until fragrant.
- Make the Sauce: Stir in the flour and cook for 1-2 minutes. Slowly whisk in the chicken broth and heavy cream, ensuring no lumps remain. Add the dried thyme, rosemary, salt, and pepper to taste. Continue to simmer until the mixture thickens, about 5 minutes.
- Combine Ingredients: Stir the diced chicken, frozen peas, and fresh parsley into the sauce. Mix well to combine all ingredients evenly.
- Prepare the Pie: Roll out one pie crust and fit it into the bottom of a pie dish. Pour the chicken and vegetable mixture into the crust, spreading it out evenly.
- Top and Seal: Roll out the second pie crust and place it over the filling. Trim any excess dough and crimp the edges to seal. Cut a few slits in the top to allow steam to escape.
- Bake: Place the pie in the preheated oven and bake for 30-35 minutes until the crust is golden brown. Let it cool for about 10 minutes before serving.
Extra Tips:
For a truly golden and flaky top crust, brush the pie crust with a beaten egg before baking. If you want to save time, you can use rotisserie chicken instead of cooking the chicken breasts from scratch.
Additionally, feel free to swap out the vegetables based on personal preference or what you have on hand; green beans or corn make great additions. For a more flavorful filling, consider adding a splash of white wine along with the chicken broth.
Creamy Mac and Cheese: Crunchy Topping Included

Creamy Mac and Cheese: Crunchy Topping Included is the ultimate comfort food dish that combines the smooth, velvety texture of a rich cheese sauce with the satisfying crunch of a golden breadcrumb topping. This recipe is perfect for a cozy family dinner or a comforting get-together with friends.
The secret to this dish lies in its perfectly balanced flavors, achieved by using a blend of different cheeses that melt into a creamy, luscious sauce, while the crispy topping adds the perfect contrast in texture.
This version of mac and cheese is a crowd-pleaser and ideal for serving 4-6 people. The dish not only satisfies cheese lovers with its gooey goodness but also provides a delightful crunch with every bite, thanks to the breadcrumb topping. The combination of creamy and crispy elements makes this recipe a standout among classic comfort foods, and it’s sure to be a hit at any table.
Ingredients
- 12 ounces elbow macaroni
- 4 tablespoons unsalted butter
- 1/4 cup all-purpose flour
- 3 cups whole milk
- 1 cup heavy cream
- 2 cups shredded sharp cheddar cheese
- 1 cup shredded mozzarella cheese
- 1/2 cup grated Parmesan cheese
- Salt and pepper to taste
- 1 cup panko breadcrumbs
- 2 tablespoons melted butter
- 1/4 teaspoon paprika (optional)
Instructions
1. Boil the Macaroni: Begin by bringing a large pot of salted water to a boil. Add the elbow macaroni and cook according to package instructions until al dente. Drain and set aside.
2. Make the Cheese Sauce: In a large saucepan, melt 4 tablespoons of butter over medium heat. Whisk in the flour and cook for about 1 minute until it forms a smooth paste.
Slowly add the milk and heavy cream, whisking continuously to prevent lumps. Cook this mixture for about 5-7 minutes until it thickens.
3. Add the Cheese: Reduce the heat to low and gradually stir in the cheddar, mozzarella, and Parmesan cheeses. Continue stirring until all the cheese has melted and the sauce is smooth and creamy. Season with salt and pepper to taste.
4. Combine Macaroni and Sauce: Add the cooked macaroni to the cheese sauce and stir until the pasta is well-coated.
5. Prepare the Topping: In a small bowl, combine the panko breadcrumbs with the melted butter and paprika (if using). Stir until the breadcrumbs are evenly coated.
6. Assemble the Dish: Preheat your oven to 350°F (175°C). Transfer the macaroni and cheese mixture into a greased baking dish. Evenly sprinkle the breadcrumb mixture over the top.
7. Bake: Place the baking dish in the oven and bake for 20-25 minutes, or until the topping is golden brown and crispy.
Extra Tips
For an even richer flavor, consider using a mix of different cheeses such as Gruyère or fontina, which add depth to the dish.
If you prefer a spicier kick, you can add a pinch of cayenne pepper to the cheese sauce. To prevent the cheese from becoming oily, avoid overbaking, and let the dish rest for a few minutes before serving to allow the sauce to set slightly.
Enjoy your creamy mac and cheese while it’s warm and gooey!
Effortless Comfort With Slow-Cooker Beef Stew
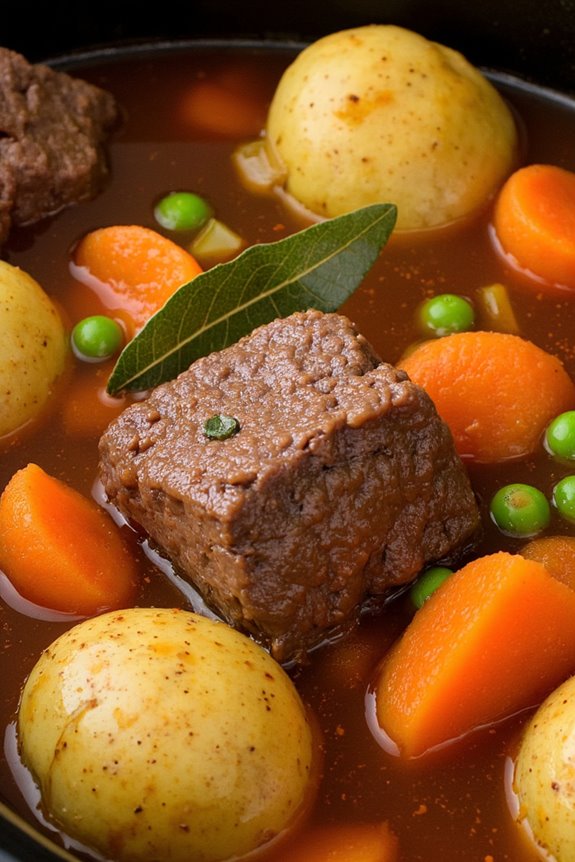
There’s nothing quite like coming home to the warm, inviting aroma of a Slow-Cooker Beef Stew. This classic comfort food is a perfect blend of tender beef, hearty vegetables, and rich, savory broth, all cooked to perfection in a slow-cooker.
It’s an ideal meal for those who crave delicious, home-cooked food without spending hours in the kitchen. With minimal prep time and the convenience of slow-cooking, you can enjoy a wholesome and satisfying dinner that feels like a warm hug in a bowl.
This Slow-Cooker Beef Stew isn’t only effortless to prepare, but it’s also a hit with both family and friends. The slow-cooked process allows the flavors to meld beautifully, resulting in a stew that’s both flavorful and filling.
Whether you’re serving it for a weeknight dinner or a cozy weekend meal, this dish is sure to please. Plus, with a serving size of 4-6 people, it’s perfect for feeding a crowd or enjoying leftovers the next day.
Ingredients (Serves 4-6):
- 2 pounds beef chuck, cut into 1-inch cubes
- 1/4 cup all-purpose flour
- 1/2 teaspoon salt
- 1/2 teaspoon black pepper
- 2 tablespoons olive oil
- 4 cups beef broth
- 3 cloves garlic, minced
- 2 tablespoons tomato paste
- 1 tablespoon Worcestershire sauce
- 1 teaspoon dried thyme
- 4 large carrots, sliced
- 4 medium potatoes, diced
- 1 large onion, chopped
- 1 cup frozen peas
- 1 bay leaf
Cooking Instructions:
- Prepare the Beef: In a large bowl, combine the beef cubes with flour, salt, and pepper. Toss until the beef is evenly coated with the flour mixture.
- Brown the Beef: Heat olive oil in a large skillet over medium-high heat. Add the beef cubes in batches, browning them on all sides. This process will take about 5 minutes per batch. Once browned, transfer the beef to the slow-cooker.
- Deglaze the Skillet: In the same skillet, add a splash of beef broth to deglaze the pan, scraping up any browned bits from the bottom. Pour this mixture into the slow-cooker.
- Add Aromatics and Liquids: To the slow-cooker, add the minced garlic, tomato paste, Worcestershire sauce, dried thyme, and the remaining beef broth. Stir well to combine.
- Add Vegetables: Add the carrots, potatoes, onion, and bay leaf to the slow-cooker. Stir everything together to guarantee the ingredients are well mixed.
- Cook the Stew: Cover the slow-cooker and cook on low for 7-8 hours or on high for 4-5 hours, until the beef is tender and the vegetables are cooked through.
- Finish with Peas: About 30 minutes before the stew is done, stir in the frozen peas. Cover and continue cooking until the peas are heated through.
Extra Tips:
For the best texture and flavor, choose a well-marbled cut of beef chuck, which becomes tender and flavorful when slow-cooked.
If you prefer a thicker stew, you can mix a tablespoon of cornstarch with a little water and stir it into the stew about an hour before it’s done.
Additionally, feel free to customize the vegetables according to your preference—parsnips, mushrooms, or turnips can be great additions. Enjoy your Slow-Cooker Beef Stew with a side of crusty bread to soak up the delicious broth!
Savory Glazed Meatloaf for Family Dinners
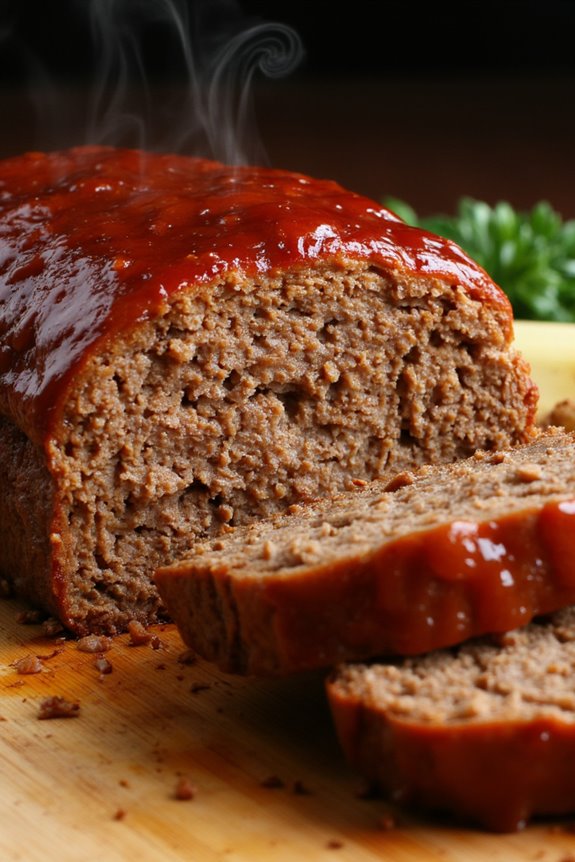
There’s nothing quite like the comforting aroma of a perfectly cooked meatloaf wafting through your home, especially when it’s a savory glazed meatloaf designed to bring families together around the dinner table. This classic dish is a staple in many households, cherished for its hearty flavors and satisfying texture.
Our savory glazed meatloaf combines ground beef with a medley of spices and a delectable glaze that caramelizes as it bakes. It’s the perfect dish for family dinners, offering warmth and comfort in every bite.
This recipe serves 4-6 people, making it ideal for a family gathering or a cozy evening at home. The secret to a delicious meatloaf lies in its balance of flavors and the rich glaze that tops it off. With ingredients readily available in most kitchens, you can whip up this dish without fuss, guaranteeing that everyone around the table is satisfied.
Follow the steps below to create a meatloaf that’s juicy on the inside and perfectly glazed on the outside, ready to impress your loved ones.
Ingredients:
- 2 lbs ground beef
- 1 cup breadcrumbs
- 1/2 cup milk
- 1 large egg
- 1 small onion, finely chopped
- 2 cloves garlic, minced
- 1 tablespoon Worcestershire sauce
- 1 tablespoon Dijon mustard
- 1/2 teaspoon salt
- 1/2 teaspoon black pepper
- 1/4 cup ketchup
- 2 tablespoons brown sugar
- 1 tablespoon apple cider vinegar
Cooking Instructions:
- Preheat the Oven: Preheat your oven to 350°F (175°C) to make sure it’s ready for baking your meatloaf.
- Prepare the Meatloaf Mixture: In a large bowl, combine the ground beef, breadcrumbs, milk, egg, onion, garlic, Worcestershire sauce, Dijon mustard, salt, and pepper. Mix thoroughly using your hands or a spoon until all ingredients are well incorporated.
- Shape the Meatloaf: Transfer the meat mixture to a lightly greased loaf pan or form it into a loaf shape on a lined baking sheet. Confirm the loaf is compact and evenly shaped for consistent cooking.
- Prepare the Glaze: In a small bowl, mix together the ketchup, brown sugar, and apple cider vinegar until smooth. This will create the sweet and tangy glaze for the meatloaf.
- Apply the Glaze: Spread the glaze evenly over the top of the meatloaf using a spoon or brush, making sure it covers the entire surface.
- Bake the Meatloaf: Place the meatloaf in the preheated oven and bake for 60-70 minutes, or until the internal temperature reaches 160°F (71°C). The glaze should be caramelized and the meatloaf firm to the touch.
- Rest and Serve: Once baked, let the meatloaf rest for about 10 minutes before slicing. This allows the juices to redistribute, making it easier to cut and serve.
Extra Tips:
For a more flavorful meatloaf, consider adding chopped fresh herbs like parsley or thyme to the meat mixture. If you prefer a slightly spicier kick, a pinch of cayenne pepper or smoked paprika can elevate the taste.
When mixing the meatloaf ingredients, avoid overworking the meat to prevent it from becoming dense. Finally, leftover meatloaf makes for excellent sandwiches, so don’t hesitate to make a little extra to enjoy the next day!
Shepherd’s Pie With Fresh Seasonal Veggies

Shepherd’s Pie With Fresh Seasonal Veggies is a comforting and hearty dish that combines the rich flavors of ground meat with the freshness of seasonal vegetables, all topped with a creamy layer of mashed potatoes. This classic comfort food is perfect for family dinners or cozy gatherings, providing a satisfying meal that’s both nutritious and delicious.
The use of fresh vegetables not only enhances the flavor but also adds a vibrant touch to the traditional Shepherd’s Pie, making it perfect for any season. This version of Shepherd’s Pie can be made with ground beef or lamb, paired with a medley of seasonal vegetables such as carrots, peas, and green beans.
The mashed potato topping is creamy and buttery, providing the perfect complement to the savory meat filling. Whether you’re looking to warm up on a chilly night or simply enjoy a comforting meal with your loved ones, this recipe is sure to please everyone at the table.
Ingredients (Serves 4-6):
- 1 1/2 pounds ground beef or lamb
- 1 onion, finely chopped
- 2 cloves garlic, minced
- 2 cups fresh seasonal vegetables (e.g., carrots, peas, green beans), chopped
- 2 tablespoons tomato paste
- 1 cup beef or vegetable broth
- 1 tablespoon Worcestershire sauce
- Salt and pepper to taste
- 4 cups mashed potatoes
- 1/2 cup shredded cheddar cheese (optional)
- 2 tablespoons olive oil
- 1 tablespoon fresh thyme leaves (optional)
Cooking Instructions:
- Prepare the Mashed Potatoes: If you haven’t already prepared mashed potatoes, start by boiling peeled and diced potatoes in salted water until tender. Drain, then mash with butter, milk, salt, and pepper until smooth. Set aside.
- Cook the Meat: In a large skillet or frying pan, heat olive oil over medium heat. Add the chopped onion and garlic, sautéing until the onion is translucent. Add the ground beef or lamb, cooking until browned and breaking it up with a spoon as it cooks.
- Add Vegetables and Seasoning: Stir in the chopped seasonal vegetables, cooking for another 3-4 minutes until they start to soften. Mix in the tomato paste, Worcestershire sauce, and broth, stirring to combine. Season with salt, pepper, and thyme, allowing the mixture to simmer for about 10 minutes.
- Assemble the Pie: Preheat your oven to 400°F (200°C). Transfer the meat and vegetable mixture into a baking dish, spreading it evenly. Spoon the mashed potatoes on top, smoothing them out with a spatula. If desired, sprinkle shredded cheddar cheese over the potatoes for an extra cheesy topping.
- Bake: Place the dish in the preheated oven and bake for 20-25 minutes, or until the top is golden brown and the filling is bubbling around the edges. Allow it to cool for a few minutes before serving.
Extra Tips:
For a more flavorful pie, consider adding a splash of red wine to the meat mixture while it simmers. If you prefer a smoother potato topping, use a potato ricer or food mill to achieve a silkier texture.
Remember that the choice of vegetables can vary with what’s in season; feel free to experiment with different combinations such as zucchini, corn, or bell peppers to keep the dish fresh and exciting each time you make it.
Cheesy Baked Ziti With Ricotta and Mozzarella

Cheesy Baked Ziti With Ricotta and Mozzarella is a classic comfort food dish that brings warmth and satisfaction to any table. This hearty Italian-American favorite is perfect for family dinners or gatherings with friends, thanks to its delicious combination of flavors and easy preparation.
The dish features tender ziti pasta enveloped in a rich tomato sauce, layered with creamy ricotta cheese, and topped with gooey mozzarella. It’s baked to perfection, creating a golden, bubbly crust that invites everyone to dig in.
This recipe for Cheesy Baked Ziti With Ricotta and Mozzarella is designed to serve 4-6 people, making it ideal for a small dinner party or a cozy family meal. The ingredients are simple and easily accessible, guaranteeing that you can whip up this comforting dish whenever the craving strikes.
Whether you’re a seasoned cook or a kitchen novice, this recipe provides a straightforward approach to creating a delicious and satisfying meal.
Ingredients:
- 1 pound ziti pasta
- 4 cups marinara sauce
- 1 cup ricotta cheese
- 2 cups shredded mozzarella cheese
- 1/2 cup grated Parmesan cheese
- 1 tablespoon olive oil
- 2 cloves garlic, minced
- 1 teaspoon dried oregano
- 1 teaspoon dried basil
- Salt and pepper to taste
- Fresh basil leaves for garnish (optional)
Instructions:
- Preheat the Oven: Start by preheating your oven to 375°F (190°C) to guarantee it’s hot and ready for baking.
- Cook the Pasta: In a large pot of boiling salted water, cook the ziti pasta until al dente, following package instructions (usually about 8-10 minutes). Drain the pasta and set aside.
- Prepare the Sauce: In a large skillet, heat the olive oil over medium heat. Add the minced garlic and sauté until fragrant, about 1 minute. Stir in the marinara sauce, oregano, and basil, allowing the sauce to simmer for 5 minutes. Season with salt and pepper to taste.
- Mix the Cheeses: In a medium bowl, combine the ricotta cheese with half of the mozzarella and Parmesan cheeses. Mix well to create a creamy cheese mixture.
- Assemble the Ziti: In a large baking dish, spread a thin layer of the sauce mixture on the bottom. Add half of the cooked ziti, then cover with half of the remaining sauce. Spread the ricotta mixture over the sauce, then layer the rest of the ziti on top. Pour the remaining sauce over the ziti, and sprinkle the top with the rest of the mozzarella and Parmesan cheeses.
- Bake the Dish: Cover the baking dish with aluminum foil and bake in the preheated oven for 20 minutes. Remove the foil and bake for an additional 10-15 minutes, or until the cheese is melted and bubbly with a golden brown crust.
- Garnish and Serve: Remove from the oven and let the baked ziti cool for a few minutes. Garnish with fresh basil leaves if desired, and serve hot.
Extra Tips:
For an extra kick of flavor, consider adding cooked Italian sausage or ground beef to the sauce. This can transform the dish into a heartier meal.
Additionally, if you prefer a bit of spice, a pinch of red pepper flakes can be added to the sauce for a mild heat. Always taste and adjust the seasoning as you go to guarantee the dish meets your palate preferences.
Finally, if you have leftovers, Cheesy Baked Ziti with Ricotta and Mozzarella reheats beautifully, making it a convenient meal to enjoy again the next day.
Beef Stroganoff: Traditional Meets Modern
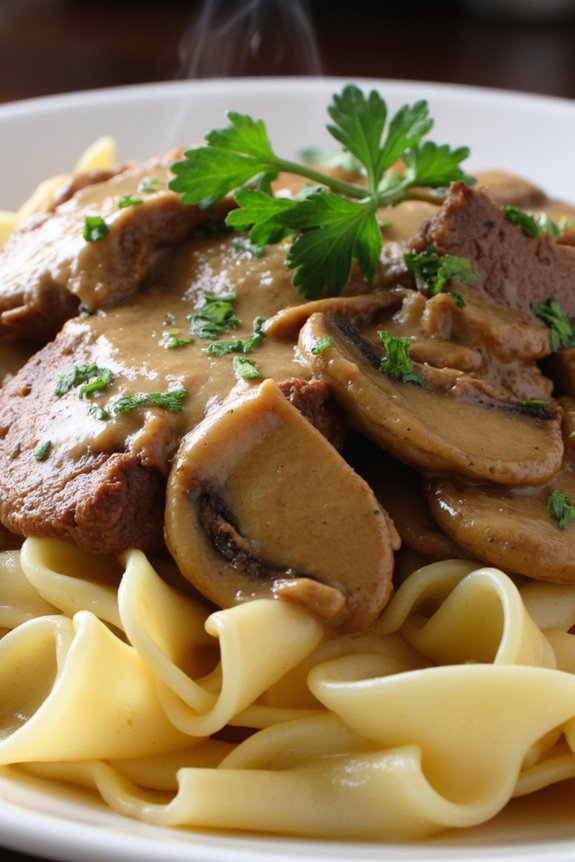
Beef Stroganoff is a classic dish that combines tender strips of beef with a rich and creamy sauce, typically served over egg noodles or rice. This comforting meal has its origins in Russia but has been embraced by cooks worldwide, leading to various adaptations over the years.
Our version of Beef Stroganoff brings a modern twist to the traditional recipe, incorporating fresh mushrooms and a touch of Dijon mustard for added depth of flavor. This dish is perfect for a cozy family dinner or an elegant meal to impress guests.
Our recipe serves 4-6 people and balances the timeless flavors of Beef Stroganoff with contemporary touches, ensuring a delightful culinary experience. By using high-quality beef and fresh ingredients, you’ll create a mouthwatering dish that satisfies your cravings for comfort food.
Whether you’re a long-time fan of Beef Stroganoff or trying it for the first time, this recipe will quickly become a favorite in your household.
Ingredients:
- 1 ½ pounds of beef sirloin or tenderloin, thinly sliced
- 2 tablespoons olive oil
- 1 tablespoon unsalted butter
- 1 large onion, finely chopped
- 3 cloves garlic, minced
- 1 pound mushrooms, sliced
- 1 tablespoon all-purpose flour
- 1 cup beef broth
- 1 cup sour cream
- 1 tablespoon Dijon mustard
- Salt and pepper, to taste
- 1 tablespoon fresh parsley, chopped (optional)
- Egg noodles or rice, for serving
Cooking Instructions:
- Prepare the Beef: Begin by seasoning the thinly sliced beef with salt and pepper. Heat 1 tablespoon of olive oil in a large skillet over medium-high heat. Add the beef in batches to avoid overcrowding the pan, cooking each batch for about 2-3 minutes until browned. Remove the beef from the skillet and set aside.
- Cook the Vegetables: In the same skillet, add the remaining olive oil and butter. Once the butter has melted, add the chopped onion and sauté for 3-4 minutes until translucent. Stir in the minced garlic and sliced mushrooms, cooking for an additional 5-7 minutes until the mushrooms are tender and browned.
- Create the Sauce: Sprinkle the flour over the cooked vegetables and stir well to combine. Gradually pour in the beef broth, stirring continuously to avoid lumps. Bring the mixture to a simmer and cook for about 5 minutes until the sauce thickens.
- Combine Ingredients: Reduce the heat to low and return the browned beef to the skillet. Stir in the sour cream and Dijon mustard, mixing until well incorporated. Allow the stroganoff to simmer gently for another 5 minutes, ensuring the beef is heated through and the flavors meld together.
- Serve: Taste and adjust the seasoning with salt and pepper as needed. Serve the Beef Stroganoff over cooked egg noodles or rice, garnished with fresh parsley if desired.
Extra Tips:
When selecting beef for this dish, choose cuts like sirloin or tenderloin for the best tenderness and flavor. If you prefer a thicker sauce, you can adjust the flour amount or let the sauce simmer a bit longer.
To add a touch of freshness, consider including a splash of lemon juice or a sprinkle of paprika. For those interested in a lighter version, swap the sour cream with Greek yogurt.
Finally, always remember to taste and adjust the seasonings to suit your palate, ensuring a perfectly balanced dish every time.
Soul-Warming Chicken and Fluffy Dumplings

There’s nothing quite like a bowl of soul-warming chicken and fluffy dumplings to bring comfort to your table. This classic dish not only satisfies the taste buds but also provides a heartwarming experience perfect for any cozy evening or family gathering. The creamy, savory broth gently cradles tender pieces of chicken and pillowy dumplings, creating a harmonious blend of flavors and textures that invite a sense of nostalgia and satisfaction.
Whether you’re combatting a chilly night or simply craving the comforts of a home-cooked meal, this recipe is sure to guarantee warmth and cheer. Crafted to serve 4-6 people, this recipe is designed to be both simple and rewarding. The process begins by simmering chicken with aromatic vegetables to develop a rich, flavorful broth. The dumplings are then made from a simple batter, dropped into the simmering broth where they puff up to perfection. This dish isn’t only straightforward to prepare but also adaptable, allowing you to infuse your personal touch or adjust ingredients based on availability or preference.
Ingredients:
- 1 whole chicken (about 3-4 pounds), cut into pieces
- 8 cups chicken broth
- 2 cups water
- 1 onion, diced
- 3 carrots, sliced
- 3 celery stalks, sliced
- 2 cloves garlic, minced
- 1 teaspoon salt
- 1 teaspoon black pepper
- 1 teaspoon dried thyme
- 2 cups all-purpose flour
- 1 tablespoon baking powder
- 1 teaspoon salt (for dumplings)
- 1/4 cup cold unsalted butter
- 1 cup milk
- 2 tablespoons chopped parsley (optional for garnish)
Instructions:
- Prepare the Broth: In a large pot, combine the chicken pieces, chicken broth, and water. Bring to a boil over medium-high heat. Reduce the heat to low, cover, and simmer for about 30 minutes until the chicken is cooked through.
- Cook the Vegetables: Remove the chicken from the pot and set aside to cool. Add the onion, carrots, celery, garlic, salt, pepper, and thyme to the broth. Simmer for another 15 minutes until the vegetables are tender.
- Shred the Chicken: Once the chicken is cool enough to handle, remove the skin and bones. Shred the meat into bite-sized pieces and return it to the pot.
- Make the Dumpling Batter: In a mixing bowl, combine the flour, baking powder, and salt. Cut in the cold butter using a pastry cutter or fork until the mixture resembles coarse crumbs. Stir in the milk until just combined.
- Cook the Dumplings: Bring the broth back to a gentle boil. Drop spoonfuls of the dumpling batter into the pot, spacing them out slightly as they’ll expand. Cover the pot and reduce the heat to a simmer. Cook for about 15 minutes without lifting the lid, allowing the dumplings to cook through and become fluffy.
- Serve: Once the dumplings are cooked, stir gently to verify nothing sticks to the bottom of the pot. Ladle the chicken and dumplings into bowls, garnish with chopped parsley if desired, and serve hot.
Extra Tips:
For the best results, verify your dumpling batter isn’t overmixed to maintain their fluffiness. When simmering the dumplings, resist the urge to lift the lid as this can release steam and affect their rise. If you prefer a thicker broth, consider adding a slurry of cornstarch and water just before adding the dumplings.
Feel free to customize the recipe by adding peas or other vegetables you have on hand. Enjoy this dish with a side of crusty bread for an extra layer of comfort.
Velvety Tomato Soup With Grilled Cheese Bites

Velvety Tomato Soup With Grilled Cheese Bites is the perfect comfort meal that combines the rich, savory flavors of a classic tomato soup with the crispy, cheesy goodness of mini grilled cheese sandwiches. This dish is ideal for a cozy evening at home or as a crowd-pleaser at a gathering.
The thick, creamy texture of the tomato soup pairs beautifully with the crunchy, gooey bites of grilled cheese, creating a harmonious blend of flavors that’s both satisfying and nostalgic.
In this recipe, fresh tomatoes are simmered with aromatic herbs and spices to create a velvety soup base, which is then blended to smooth perfection. The grilled cheese bites are made by crafting mini sandwiches, filled with a combination of cheeses, and then grilled to golden perfection.
These delightful bites are served alongside or dunked into the soup, making every bite a symphony of flavors and textures. This recipe serves 4-6 people, making it perfect for family dinners or small gatherings.
Ingredients for Velvety Tomato Soup With Grilled Cheese Bites (Serves 4-6):
*For the Tomato Soup:*
- 2 tablespoons olive oil
- 1 medium onion, chopped
- 3 cloves garlic, minced
- 8 large ripe tomatoes, chopped
- 1 tablespoon tomato paste
- 4 cups vegetable broth
- 1 teaspoon sugar
- 1 teaspoon salt
- 1/2 teaspoon black pepper
- 1/4 teaspoon red pepper flakes (optional)
- 1/2 cup heavy cream
- 1/4 cup fresh basil leaves, chopped
For the Grilled Cheese Bites:
- 8 slices of bread
- 2 cups shredded cheddar cheese
- 1 cup shredded mozzarella cheese
- 4 tablespoons butter, softened
Cooking Instructions:
- Prepare the Soup Base: Heat olive oil in a large pot over medium heat. Add the chopped onion and sauté until translucent, about 5 minutes. Stir in the minced garlic and cook for an additional minute until fragrant.
- Cook the Tomatoes: Add the chopped tomatoes and tomato paste to the pot. Cook for about 10 minutes, stirring occasionally, until the tomatoes begin to break down.
- Simmer the Soup: Pour in the vegetable broth and add sugar, salt, black pepper, and red pepper flakes. Bring the mixture to a boil, then reduce the heat and let it simmer for 20 minutes, allowing the flavors to meld.
- Blend the Soup: Use an immersion blender to puree the soup until smooth. Alternatively, transfer the soup in batches to a blender, then return it to the pot.
- Add Cream and Basil: Stir in the heavy cream and fresh basil, and let the soup heat through for another 5 minutes. Adjust seasoning if necessary.
- Prepare Grilled Cheese Bites: Preheat a skillet over medium heat. Butter one side of each bread slice. On the unbuttered side, layer a mix of cheddar and mozzarella cheese. Top with another slice, buttered side up.
- Grill the Sandwiches: Place the sandwiches on the skillet and grill for 3-4 minutes on each side until golden brown and the cheese is melted. Remove from heat and cut into bite-sized pieces.
- Serve: Ladle the tomato soup into bowls and serve with grilled cheese bites on the side or dunked into the soup.
Extra Tips:
When making the tomato soup, using vine-ripened tomatoes will enhance the flavor, making the soup taste fresher and more robust.
If you prefer a smoother soup, strain it through a fine-mesh sieve after blending. For the grilled cheese bites, feel free to experiment with different cheese combinations or even add a slice of ham for extra flavor.
If you want to make the meal even more comforting, consider serving it with a side of crusty bread or a simple green salad.
Buttermilk Fried Chicken: A Southern Classic

Buttermilk Fried Chicken is a beloved Southern classic that combines the crispy, golden perfection of fried chicken with the rich, tangy flavor of buttermilk. This dish is a staple in Southern kitchens and is often served during family gatherings, picnics, and special occasions. The secret to achieving the ideal texture and taste lies in marinating the chicken in buttermilk, which tenderizes the meat and imparts a subtle tanginess that complements the savory spices in the breading.
The perfect Buttermilk Fried Chicken involves a few simple but important steps to guarantee the chicken is juicy on the inside and crispy on the outside. The process begins with a flavorful marinade, followed by a seasoned flour coating, and finally, a careful frying technique. Whether you’re serving this dish with classic sides like mashed potatoes and coleslaw or enjoying it on its own, Buttermilk Fried Chicken is sure to be a hit at your dinner table.
Ingredients (serves 4-6):
- 4 pounds of chicken pieces (legs, thighs, breasts, and wings)
- 2 cups buttermilk
- 2 teaspoons salt, divided
- 1 teaspoon black pepper, divided
- 1 teaspoon paprika
- 1 teaspoon garlic powder
- 1 teaspoon onion powder
- 1 teaspoon cayenne pepper
- 2 cups all-purpose flour
- 1 teaspoon baking powder
- Vegetable oil, for frying
Cooking Instructions:
- Marinate the Chicken: In a large bowl, combine the chicken pieces with the buttermilk, 1 teaspoon of salt, and 1/2 teaspoon of black pepper. Confirm all the chicken is well-coated and cover the bowl. Refrigerate for at least 4 hours, or overnight for best results.
- Prepare the Coating: In a shallow dish, mix together the flour, baking powder, remaining 1 teaspoon of salt, remaining 1/2 teaspoon of black pepper, paprika, garlic powder, onion powder, and cayenne pepper.
- Coat the Chicken: Remove the chicken from the buttermilk marinade, allowing excess to drip off. Dredge each piece in the seasoned flour mixture, pressing firmly to confirm the coating adheres well. Place coated chicken on a wire rack and let it rest for about 15 minutes to allow the coating to set.
- Heat the Oil: In a deep skillet or Dutch oven, heat about 2 inches of vegetable oil to 350°F (175°C). Use a thermometer to maintain a consistent temperature, which is vital for even cooking.
- Fry the Chicken: Carefully place a few pieces of chicken into the hot oil, being cautious not to overcrowd the pan. Fry the chicken in batches for about 12-15 minutes per side, or until golden brown and the internal temperature reaches 165°F (74°C).
- Drain and Serve: Remove the fried chicken from the oil and let it drain on a wire rack or paper towels to remove excess oil. Serve immediately for the best texture and flavor.
Extra Tips:
For an extra crispy crust, double dip the chicken by dipping it back into the buttermilk after the first coating and then back into the flour mixture before frying. Maintaining the oil temperature is key to preventing the chicken from becoming greasy; adjust the heat as needed to keep it consistent.
If you prefer a more intense flavor, adjust the spices to your liking, adding more cayenne for heat or more garlic powder for depth. Enjoy your delicious homemade Buttermilk Fried Chicken with your favorite sides and a revitalizing beverage.
Lasagna Layers Packed With Comforting Flavors

Lasagna is one of those timeless dishes that seems to wrap you in a warm hug with every bite. Perfect for family dinners or gatherings, this classic Italian dish is all about layers of flavor and texture. The rich meat sauce, creamy béchamel, and gooey cheese all come together between tender sheets of pasta to create a meal that’s as comforting as it’s delicious.
Whether you’re serving it on a chilly winter evening or enjoying leftovers the next day, this lasagna is sure to become a favorite in your recipe collection.
The key to a good lasagna lies in the careful layering of ingredients and the balance of flavors. The meat sauce, typically made with a combination of ground beef and pork, is simmered with tomatoes, herbs, and spices to develop a deep, savory taste. Meanwhile, a smooth béchamel sauce adds creaminess and helps to bind the layers of pasta and cheese.
This recipe makes enough to serve 4-6 people, making it ideal for a family dinner or small gathering.
Ingredients (Serves 4-6):
- 9 lasagna noodles
- 1 pound ground beef
- 1/2 pound ground pork
- 1 onion, finely chopped
- 3 cloves garlic, minced
- 1 can (28 ounces) crushed tomatoes
- 2 tablespoons tomato paste
- 1 teaspoon dried oregano
- 1 teaspoon dried basil
- Salt and pepper, to taste
- 3 tablespoons butter
- 3 tablespoons all-purpose flour
- 2 cups milk
- Pinch of nutmeg
- 2 cups ricotta cheese
- 2 cups shredded mozzarella cheese
- 1 cup grated Parmesan cheese
- Fresh basil leaves, for garnish
Cooking Instructions:
- Prepare the Meat Sauce: In a large skillet or saucepan, brown the ground beef and pork over medium heat until fully cooked. Drain any excess fat. Add the chopped onion and minced garlic to the skillet and sauté until the onions are translucent, about 5 minutes. Stir in the crushed tomatoes, tomato paste, oregano, basil, salt, and pepper. Let the sauce simmer on low heat for 30 minutes, stirring occasionally.
- Cook the Noodles: While the sauce is simmering, bring a large pot of salted water to a boil. Cook the lasagna noodles according to package instructions until al dente. Drain and lay them flat on a clean towel to prevent sticking.
- Make the Béchamel Sauce: In a medium saucepan, melt the butter over medium heat. Whisk in the flour and cook for about 1 minute until it forms a paste. Gradually whisk in the milk until smooth. Continue cooking, whisking constantly, until the sauce thickens, about 5 minutes. Season with a pinch of nutmeg and a little salt.
- Assemble the Lasagna: Preheat your oven to 375°F (190°C). Spread a thin layer of meat sauce on the bottom of a 9×13-inch baking dish. Place a layer of noodles over the sauce, followed by more meat sauce, a layer of béchamel, dollops of ricotta cheese, and a sprinkle of mozzarella and Parmesan. Repeat the layers until all ingredients are used, finishing with a layer of noodles covered with béchamel and topped with the remaining mozzarella and Parmesan.
- Bake the Lasagna: Cover the dish with aluminum foil and bake in the preheated oven for 25 minutes. Remove the foil and bake for an additional 15 minutes, or until the cheese on top is golden and bubbly. Allow the lasagna to cool for 10 minutes before slicing.
- Garnish and Serve: Garnish with fresh basil leaves before serving. Enjoy your hearty classic lasagna with a side salad or garlic bread.
Extra Tips:
To make your lasagna even more flavorful, consider making the meat sauce a day ahead to allow the flavors to meld together. If you’re short on time, store-bought marinara can be used instead of homemade sauce, but be sure to adjust the seasoning to your taste.
For a vegetarian version, replace the meat with sautéed mushrooms, spinach, or zucchini. Finally, always let the lasagna rest before cutting; this helps the layers set and makes serving easier.
Chili Con Carne and Fresh Cornbread Duo
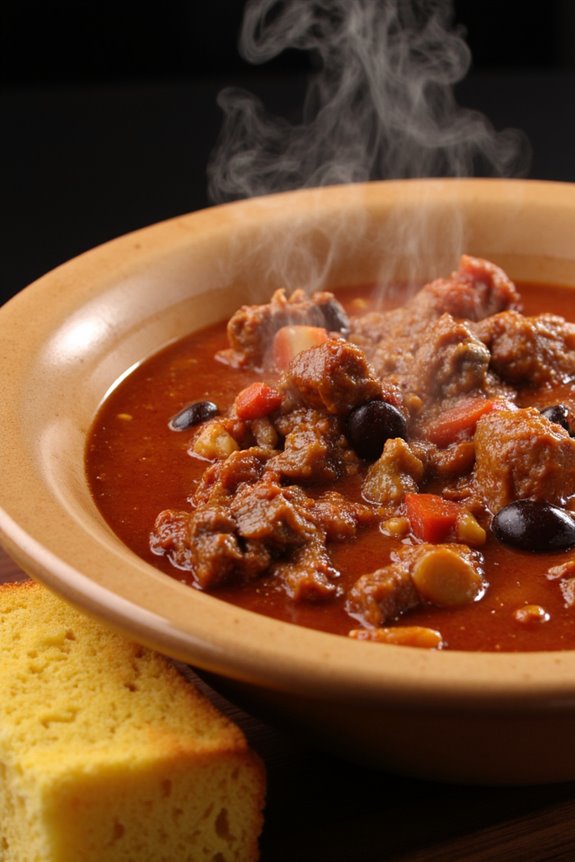
Chili Con Carne and Fresh Cornbread Duo is a comforting and hearty meal that combines the robust flavors of a classic chili with the sweet, crumbly texture of homemade cornbread. This duo is perfect for a cozy family dinner or a casual gathering with friends. The spicy and savory notes of the chili are perfectly complemented by the warm, buttery taste of cornbread, making every bite a delightful experience.
This dish not only fills the belly but also warms the soul, making it an ideal choice for chilly evenings or when you need a taste of home.
To prepare this delightful combination, you’ll start by simmering a pot of chili con carne— a dish that melds ground beef, beans, and a blend of spices into a rich and flavorful stew. While the chili is bubbling away, you’ll whip up a batch of fresh cornbread, which is simple yet satisfying. The cornbread is baked until golden brown, creating a wonderful contrast to the hearty chili. Together, these dishes create a comforting meal that’s sure to satisfy and impress your guests or family members.
Ingredients for Chili Con Carne (serves 4-6):
- 2 tablespoons olive oil
- 1 large onion, diced
- 3 cloves garlic, minced
- 1 pound ground beef
- 2 tablespoons chili powder
- 1 teaspoon ground cumin
- 1 teaspoon paprika
- 1/2 teaspoon cayenne pepper (optional)
- 1 (14.5 oz) can diced tomatoes
- 2 tablespoons tomato paste
- 1 (15 oz) can kidney beans, drained and rinsed
- 1 (15 oz) can black beans, drained and rinsed
- 1 cup beef broth
- Salt and pepper to taste
Ingredients for Fresh Cornbread (serves 4-6):
- 1 cup cornmeal
- 1 cup all-purpose flour
- 1/4 cup granulated sugar
- 1 tablespoon baking powder
- 1/2 teaspoon salt
- 1 cup milk
- 2 large eggs
- 1/4 cup melted butter
Cooking Instructions:
- Prepare the Chili Con Carne:
- In a large pot, heat the olive oil over medium heat. Add the diced onion and sauté for about 5 minutes until it becomes translucent.
- Stir in the minced garlic and cook for another minute until fragrant.
- Add the ground beef to the pot. Cook until browned, breaking it up with a spoon as it cooks, about 7-10 minutes.
- Mix in the chili powder, cumin, paprika, and cayenne pepper (if using). Stir well to coat the beef with the spices.
- Pour in the diced tomatoes with their juice and the tomato paste. Stir to combine.
- Add the kidney beans, black beans, and beef broth. Stir everything together.
- Bring the chili to a boil, then reduce the heat to low. Cover and let it simmer for at least 30 minutes, stirring occasionally. Season with salt and pepper to taste.
- Make the Fresh Cornbread:
- Preheat your oven to 400°F (200°C). Grease an 8×8 inch baking dish or a similar-sized pan.
- In a large bowl, whisk together the cornmeal, flour, sugar, baking powder, and salt.
- In another bowl, whisk together the milk, eggs, and melted butter.
- Pour the wet ingredients into the dry ingredients and stir until just combined. Don’t overmix.
- Pour the batter into the prepared baking dish.
- Bake for 20-25 minutes, or until the top is golden brown and a toothpick inserted into the center comes out clean.
- Serve:
- Once the chili and cornbread are ready, serve the chili hot in bowls with a slice of cornbread on the side. Enjoy!
Extra Tips:
For a deeper flavor, consider preparing the chili a day ahead. Allowing the chili to sit overnight enhances the blend of spices and ingredients.
When making cornbread, make certain the butter is fully melted and cooled slightly before adding to the mix to prevent the eggs from cooking prematurely. If you prefer a sweeter cornbread, you can increase the sugar by a couple of tablespoons. Additionally, topping the chili with cheddar cheese, sour cream, or chopped cilantro adds an extra layer of flavor and presentation.