

As the holiday season approaches, I can already feel the excitement of baking with kids. There’s something magical about mixing creativity with tasty treats. From Reindeer Rice Krispie Treats to whimsical Gingerbread Houses, each recipe becomes a canvas for young imaginations. It’s all about creating sweet memories together. Get ready to turn your kitchen into a festive wonderland with these delightful ideas.
Reindeer Rice Krispie Treats
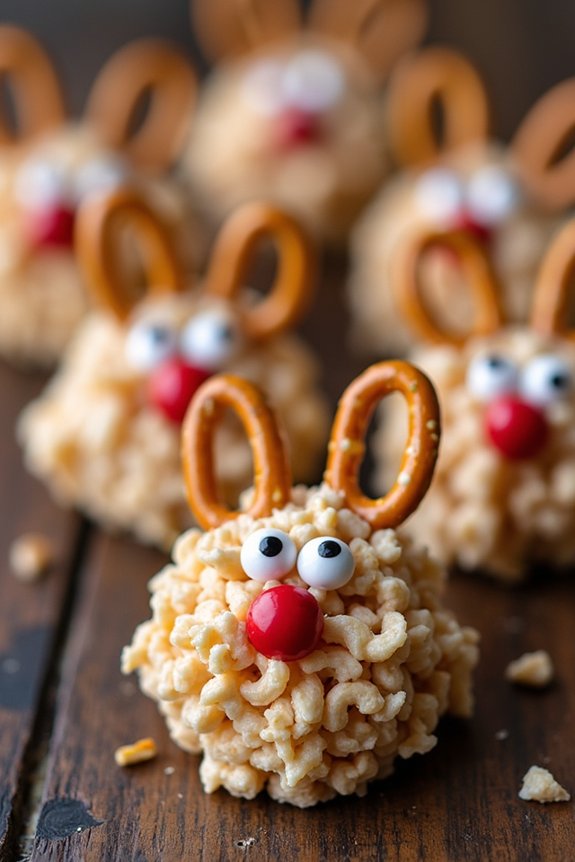
Reindeer Rice Krispie Treats are the perfect kid-friendly dessert for the holiday season. These delightful and festive treats combine the classic, gooey goodness of Rice Krispie treats with a playful reindeer design that’s sure to bring a smile to any child’s face.
Not only are they fun to make, but they also offer a creative activity for the whole family to enjoy together. With just a few ingredients and a little imagination, you can transform these simple snacks into adorable reindeer that are almost too cute to eat.
These treats are ideal for Christmas parties, school events, or simply as a fun holiday snack at home. The recipe is straightforward, making it easy for younger chefs to participate in the preparation.
The addition of pretzel antlers, candy eyes, and a bright red nose transforms the standard Rice Krispie treat into a charming reindeer that captures the spirit of Christmas. Let’s plunge into the recipe and get started on these whimsical holiday goodies.
Ingredients (Serves 4-6)
- 6 cups Rice Krispies cereal
- 1 package (10 oz) mini marshmallows
- 3 tablespoons unsalted butter
- 1 teaspoon vanilla extract
- Pretzel twists (approx. 12 pieces)
- Mini candy eyes (24 pieces)
- Red candy-coated chocolates (6 pieces, like M&Ms)
Cooking Instructions
1. Prepare the Pan: Start by greasing a 9×13 inch baking dish with butter or non-stick spray to confirm the treats don’t stick when cutting.
2. Melt the Butter and Marshmallows: In a large saucepan over medium heat, melt the butter. Add the mini marshmallows and stir continuously until they’re completely melted and smooth.
Remove from heat and stir in the vanilla extract.
3. Combine with Cereal: Gently fold in the Rice Krispies cereal until it’s evenly coated with the marshmallow mixture. Make sure all the cereal is well combined for a consistent texture.
4. Transfer to Pan: Pour the cereal mixture into the prepared baking dish. Use a buttered spatula or wax paper to evenly press the mixture into the pan, confirming it’s flat and compact.
5. Cool and Cut: Allow the mixture to cool at room temperature for at least 30 minutes. Once set, cut into rectangles or squares that will serve as the base for your reindeer treats.
6. Decorate the Reindeer: Insert two pretzel twists at the top of each treat to form the antlers. Place two candy eyes below the antlers and press a red candy-coated chocolate below the eyes to form the reindeer’s nose.
Press gently to confirm they stick to the treats.
7. Set and Serve: Let the decorated treats sit for a few minutes to confirm the decorations are secure. Serve and enjoy your festive Reindeer Rice Krispie Treats!
Extra Tips
For added festive flair, consider using colored marshmallows or adding a sprinkle of edible glitter to the treats.
If you’re working with little helpers, pre-portion the decorations for each reindeer to make assembly easier and more organized.
Finally, confirm the treats are fully cooled before cutting and decorating to maintain their shape and make the process smoother. Enjoy the holiday fun with these delightful treats!
Santa Hat Cupcakes

Santa Hat Cupcakes are a delightful treat that add a touch of whimsy and festive cheer to any holiday gathering. These cupcakes aren’t only delicious but also visually appealing, resembling little Santa hats with their bright red frosting topped with fluffy white pom-poms. They’re perfect for kids and adults alike, making them a great addition to any holiday dessert table.
The combination of rich chocolate cupcakes, sweet vanilla frosting, and fresh strawberries creates a delightful balance of flavors that’s bound to impress your family and friends.
These cupcakes are easy to make and require just a few simple ingredients, making them an ideal project for little hands to help with in the kitchen. Whether you’re hosting a Christmas party or simply want to enjoy some holiday baking with your family, Santa Hat Cupcakes are a fun and festive choice. Kids will love assembling the hats and decorating their cupcakes, making it a memorable and interactive experience for everyone involved.
Ingredients (Serves 4-6):
- 1 ½ cups all-purpose flour
- 1 cup granulated sugar
- ½ cup unsweetened cocoa powder
- 1 teaspoon baking soda
- ½ teaspoon salt
- 1 cup water
- ⅓ cup vegetable oil
- 1 tablespoon white vinegar
- 1 teaspoon vanilla extract
- 1 cup heavy cream
- 2 tablespoons powdered sugar
- 1 teaspoon vanilla extract
- 6 fresh strawberries, hulled
- Red food coloring
Instructions:
- Prepare the Cupcake Batter: Preheat your oven to 350°F (175°C) and line a muffin tin with paper liners. In a large mixing bowl, combine the flour, sugar, cocoa powder, baking soda, and salt. Mix well to guarantee the dry ingredients are evenly distributed.
- Mix the Wet Ingredients: In a separate bowl, combine the water, vegetable oil, white vinegar, and vanilla extract. Stir the wet ingredients until they’re well combined.
- Combine and Bake: Gradually add the wet ingredients to the dry ingredients, stirring until just combined. Be careful not to overmix. Pour the batter into the prepared muffin tin, filling each liner about two-thirds full. Bake for 18-20 minutes, or until a toothpick inserted into the center of a cupcake comes out clean. Allow the cupcakes to cool completely on a wire rack.
- Prepare the Frosting: While the cupcakes are cooling, beat the heavy cream, powdered sugar, and vanilla extract in a mixing bowl until stiff peaks form. If desired, add a few drops of red food coloring to achieve a vibrant red color, mixing until the color is evenly distributed.
- Assemble the Santa Hats: Once the cupcakes are cool, use a piping bag with a star tip to pipe a ring of red frosting around the edge of each cupcake, leaving the center open. Place a hulled strawberry, tip side up, in the center of each cupcake to form the Santa hat. Pipe a small dollop of frosting on top of each strawberry to create the pom-pom.
Extra Tips:
When preparing Santa Hat Cupcakes, make certain the cupcakes are completely cooled before frosting them to prevent the frosting from melting.
If you’re short on time, you can use a store-bought cake mix and pre-made frosting to speed up the process. For an added touch, sprinkle some edible glitter or colored sugar on the hats to make them sparkle.
If you want to avoid artificial food coloring, try using natural red food dye made from beet juice. Finally, if you’re working with kids, consider setting up a decorating station where they can enjoy personalizing their own cupcakes, encouraging creativity and holiday spirit.
Christmas Tree Brownies

Preparing these Christmas Tree Brownies is an enjoyable and straightforward process that results in a batch of beautifully decorated, delicious brownies. With homemade brownie batter or pre-made mix, you can whip up a batch in no time, making it an ideal dessert option for holiday gatherings or cozy family nights.
The decorating phase is where the real fun begins, allowing everyone to adorn their brownie trees with icing garlands, sprinkle ornaments, and candy stars. This recipe yields enough to serve 4-6 people, making it perfect for small family get-togethers or as a delightful addition to a larger dessert spread.
Ingredients (Serves 4-6):
- 1 cup all-purpose flour
- 1 cup granulated sugar
- 1/2 cup unsweetened cocoa powder
- 1/2 teaspoon baking powder
- 1/4 teaspoon salt
- 1/2 cup unsalted butter, melted
- 2 large eggs
- 1 teaspoon vanilla extract
- Green icing (store-bought or homemade)
- Edible star sprinkles
- Assorted sprinkles for decoration
- Mini candy canes (optional)
Cooking Instructions:
- Preheat and Prepare Pan: Preheat your oven to 350°F (175°C). Line an 8×8 inch baking pan with parchment paper, leaving some overhang on the sides to easily lift the brownies out later.
- Mix Dry Ingredients: In a large mixing bowl, whisk together the flour, sugar, cocoa powder, baking powder, and salt until evenly combined.
- Combine Wet Ingredients: In another bowl, whisk together the melted butter, eggs, and vanilla extract until smooth. Gradually pour this mixture into the dry ingredients, mixing until just combined. Be careful not to overmix.
- Bake the Brownies: Pour the brownie batter into the prepared baking pan, spreading it evenly with a spatula. Bake in the preheated oven for 20-25 minutes, or until a toothpick inserted into the center comes out with a few moist crumbs. Allow the brownies to cool completely in the pan on a wire rack.
- Cut into Trees: Once cooled, lift the brownies out of the pan using the parchment paper. Cut the brownies into triangles to resemble Christmas trees. You can get creative with the size of your trees based on your preference.
- Decorate: Using green icing, pipe zigzag lines across each triangle to mimic garland on a tree. Decorate with assorted sprinkles as ornaments and place an edible star at the top of each tree. If desired, insert a mini candy cane at the base of each triangle to serve as the tree trunk.
Extra Tips:
When preparing the brownie batter, make certain that you don’t overmix once the wet and dry ingredients are combined; this could result in tough brownies instead of the desired fudgy texture.
If you’re short on time, a store-bought brownie mix can be a convenient alternative. For a more personalized touch, allow each child to decorate their own brownie tree, turning this into a fun family activity.
If you find it difficult to cut the brownies into even triangles, use a ruler to measure and mark your cuts before slicing. Enjoy the process and let your creativity shine through in the decorations!
Snowman Sugar Cookies

There’s nothing quite as delightful as getting into the holiday spirit by making festive treats with your family. Snowman Sugar Cookies are a fantastic choice for kid-friendly Christmas desserts that not only look adorable but also taste delicious.
These cookies are perfect for a fun afternoon of baking and decorating, allowing children to express their creativity while enjoying the sweet aromas of vanilla and sugar wafting through your home.
The beauty of Snowman Sugar Cookies lies in their simplicity and the joy of decorating each cookie to resemble playful snowmen. Soft and buttery, these cookies serve as the perfect canvas for colorful frostings, candy eyes, and tiny carrot noses made from orange icing.
Whether you’re serving them at a Christmas party or giving them as homemade gifts, they’re sure to bring smiles to everyone’s faces. Let’s explore the recipe to create a batch of Snowman Sugar Cookies that serves 4-6 people.
Ingredients:
- 2 ¾ cups all-purpose flour
- 1 teaspoon baking powder
- ½ teaspoon salt
- 1 cup unsalted butter, softened
- 1 ½ cups granulated sugar
- 1 large egg
- 1 teaspoon vanilla extract
- White icing for decorating
- Black decorating gel or mini chocolate chips for eyes
- Orange decorating icing for noses
- Assorted candies or sprinkles for buttons
Instructions:
- Prepare the Dough: In a medium-sized bowl, whisk together the all-purpose flour, baking powder, and salt. Set aside. In a large mixing bowl, cream the softened butter and granulated sugar together until light and fluffy. This should take about 3-4 minutes on medium speed.
- Mix Wet Ingredients: Beat in the egg and vanilla extract until well combined. Gradually add the dry ingredients to the wet mixture, mixing on low speed, until a soft dough forms. Wrap the dough in plastic wrap and refrigerate for at least 1 hour. This will make it easier to roll and cut.
- Preheat and Roll: Preheat your oven to 350°F (175°C). On a lightly floured surface, roll out the dough to about ¼ inch thickness. Use round cookie cutters of varying sizes to create the snowman shapes (one larger circle for the body and a smaller one for the head).
- Bake the Cookies: Place the cutouts on a baking sheet lined with parchment paper, leaving a little space between each one. Bake in the preheated oven for 8-10 minutes, or until the edges are just starting to turn golden. Let them cool on the baking sheet for a few minutes before transferring to a wire rack to cool completely.
- Decorate the Snowmen: Once the cookies are completely cool, use white icing to cover the surface of each cookie. Add black decorating gel or mini chocolate chips for the eyes and buttons. Use orange decorating icing to create the carrot noses. Let the icing set before serving.
Extra Tips:
To make the decorating process smoother, consider preparing your icing and decorating gels in advance.
If working with younger children, pre-cutting the cookies and setting up a decorating station with all the toppings can make the activity more enjoyable and less messy.
Additionally, if you prefer a hint of color in your cookies, you can add a few drops of food coloring to the icing to create vibrant snowmen.
Enjoy the creative process and the sweet results with your loved ones!
Gingerbread House Decorating

Creating a gingerbread house isn’t only a delightful Christmas tradition but also a creative project that the whole family can enjoy. This activity combines the festive spirit of the holiday season with a hands-on creative experience. Building a gingerbread house allows children to express their artistic side while indulging in the sweet treats of the season. The best part is that gingerbread houses don’t have to be perfect; they’re charming in their own unique, sometimes wobbly ways.
For this kid-friendly gingerbread house decorating project, we’ll make a simple gingerbread dough, prepare icing to act as the “glue,” and gather an assortment of colorful candies for decoration. This recipe is designed for a serving size of 4-6 people, meaning it will produce enough materials for a small family to each decorate their own house or collaborate on a larger construction. Get ready to release your creativity and make a sweet centerpiece for your holiday celebrations.
Ingredients:
- 6 cups all-purpose flour
- 1 tablespoon ground ginger
- 1 tablespoon ground cinnamon
- 1 teaspoon ground cloves
- 1 teaspoon baking soda
- 1 teaspoon salt
- 1 cup unsalted butter, softened
- 1 cup dark brown sugar, packed
- 1 1/4 cups molasses
- 2 large eggs
- 1 teaspoon vanilla extract
- 4 cups confectioners’ sugar
- 3 large egg whites
- Assorted candies (gumdrops, candy canes, sprinkles, licorice, etc.)
Cooking Instructions:
1. Prepare the Dough:
In a large mixing bowl, whisk together the flour, ginger, cinnamon, cloves, baking soda, and salt. In another bowl, beat the butter and brown sugar together until creamy. Add molasses, eggs, and vanilla extract, and mix until combined. Gradually add the dry ingredients to the wet ingredients, mixing until a stiff dough forms.
2. Chill the Dough:
Divide the dough into two discs, wrap them in plastic wrap, and refrigerate for at least 2 hours or overnight. This will make the dough easier to roll out and help prevent it from spreading during baking.
3. Roll Out the Dough:
Preheat your oven to 350°F (175°C). On a floured surface, roll out one disc of dough to about 1/4 inch thickness. Use gingerbread house templates to cut out the shapes for the walls and roof of your house.
4. Bake the Pieces:
Place the cut-out pieces on a baking sheet lined with parchment paper. Bake for 12-15 minutes or until the edges are lightly browned. Let the pieces cool completely on a wire rack before assembly.
5. Make the Icing:
In a large bowl, beat the confectioners’ sugar and egg whites together until stiff peaks form. This royal icing will act as the “glue” to hold your gingerbread house together.
6. Assemble the House:
Use the royal icing to attach the walls of the house together, holding each piece in place for a few moments until they stand on their own. Once the walls are stable, attach the roof pieces. Allow the structure to set for at least 30 minutes before decorating.
7. Decorate the House:
Use the remaining icing to attach assorted candies to the house, creating a festive and colorful design. Let your imagination run wild with patterns and arrangements.
Extra Tips:
When constructing your gingerbread house, make sure to apply a generous amount of royal icing at the joints to guarantee stability. If you’re working with young kids, consider assembling the house beforehand and letting them focus on the fun part—decorating!
Keep in mind that the gingerbread pieces can be made a day or two in advance and stored in an airtight container to save time. Finally, if the icing becomes too stiff during decorating, simply stir in a few drops of water to reach the desired consistency. Enjoy the process, and don’t worry about perfection—each gingerbread house is unique!
Peppermint Bark Pops
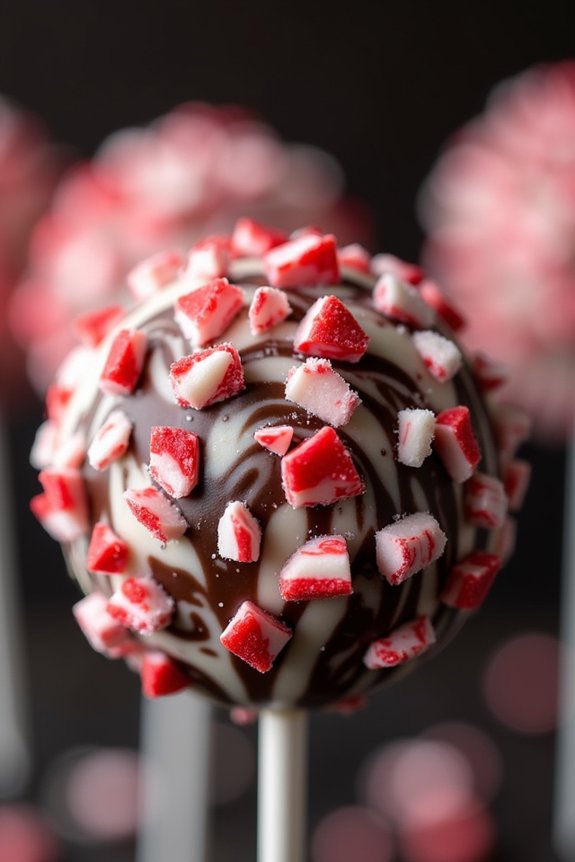
Peppermint Bark Pops are a delightful and festive treat that will surely bring joy to both kids and adults during the holiday season. These delicious pops combine the rich flavors of chocolate with the invigorating taste of peppermint, creating a perfect balance of sweet and minty goodness. Not only are they fun to eat, but Peppermint Bark Pops are also easy to make and can be a great activity to involve kids in the kitchen.
With just a few simple ingredients, you can create a batch of these pops that are bound to be a hit at any Christmas gathering. These pops are perfect for sharing, making them a fantastic choice for a serving size of 4-6 people. You can easily double or triple the recipe if you’re planning to serve a larger crowd.
The combination of smooth chocolate, crunchy peppermint, and the convenience of pops on a stick make this dessert a memorable addition to your holiday dessert lineup. Whether you’re hosting a Christmas party or simply want a sweet treat to enjoy with your family, Peppermint Bark Pops are a must-try.
Ingredients (for 4-6 people):
- 1 cup semi-sweet chocolate chips
- 1 cup white chocolate chips
- 1 teaspoon peppermint extract
- 6 candy canes, crushed
- 12 lollipop sticks or popsicle sticks
- Parchment paper
Instructions:
- Melt the Chocolate: Begin by melting the semi-sweet chocolate chips in a microwave-safe bowl. Heat in 30-second intervals, stirring in between, until the chocolate is fully melted and smooth.
- Prepare the White Chocolate: Next, melt the white chocolate chips in a separate microwave-safe bowl using the same method. Once melted, stir in the peppermint extract to infuse the minty flavor into the white chocolate.
- Crush the Candy Canes: Place the candy canes in a plastic bag and crush them using a rolling pin until they’re in small, coarse pieces.
- Assemble the Pops: Line a baking sheet with parchment paper. Dip each lollipop stick into the melted semi-sweet chocolate, then place the stick onto the parchment paper, making sure there’s enough space between each for the pops to spread.
- Layer the Chocolate: Spoon a small amount of semi-sweet chocolate over the end of each stick, spreading it into a circle or oval shape. Follow by spooning a layer of white chocolate over the semi-sweet chocolate, creating a marbled effect by swirling the two chocolates slightly with a toothpick.
- Add the Candy Cane Topping: Sprinkle the crushed candy canes over the top of the chocolate pops while they’re still wet. Press the pieces gently to help them stick.
- Set the Pops: Allow the Peppermint Bark Pops to set at room temperature until the chocolate is firm, or place them in the refrigerator for about 15-20 minutes to speed up the process.
- Serve and Enjoy: Once the pops are completely set, carefully remove them from the parchment paper and serve them to your enthusiastic guests.
Extra Tips: For an extra festive touch, consider drizzling a bit of red or green colored icing over the top of the pops before adding the candy cane pieces. You can also experiment with different types of chocolate, such as milk chocolate or dark chocolate, depending on your preference.
If you’re making these with kids, supervise the melting process closely to promote safety. With a bit of creativity, you can even use different holiday-themed toppings to customize your Peppermint Bark Pops to suit any occasion.
Festive Fruit Kabobs
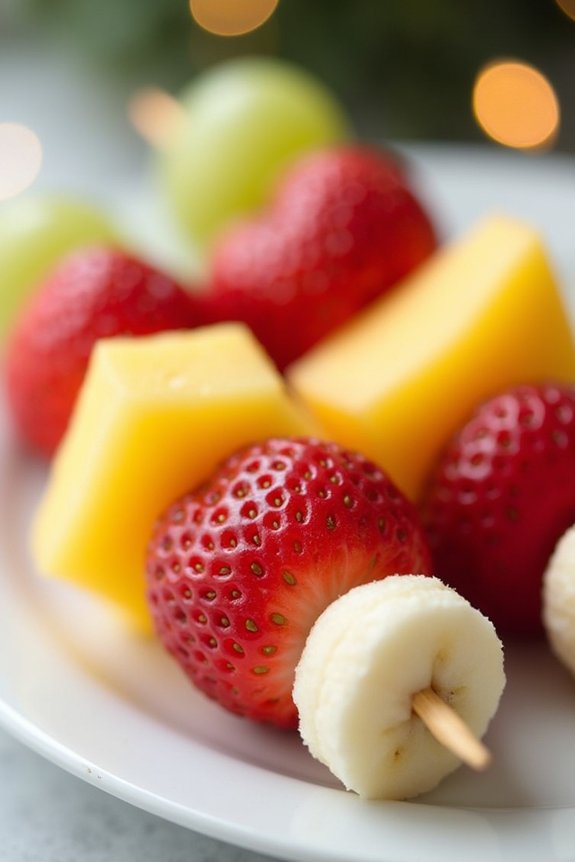
Creating these Festive Fruit Kabobs is a fantastic way to engage kids in the kitchen. The process involves minimal preparation and no cooking, making it an ideal activity for little hands. Children can help wash, peel, and assemble the fruits onto skewers, which can foster their interest in healthy eating.
Plus, with the option to include a honey-yogurt dip, these kabobs offer a sweet yet nutritious treat everyone will love.
Ingredients for 4-6 servings:
- 2 bananas
- 1 pint of strawberries
- 1 cup green grapes
- 1 cup red grapes
- 1 pineapple
- 1 cup melon balls (cantaloupe or honeydew)
- Wooden skewers
- Optional: 1 cup vanilla yogurt and 2 tablespoons honey for dipping sauce
Instructions:
- Prepare the Fruits: Start by washing all the fruits thoroughly. Peel the bananas and cut them into thick slices. Hull the strawberries and cut them in half if they’re large. Remove the skin from the pineapple and cut it into bite-sized cubes. If using melon, scoop out balls using a melon baller.
- Assemble the Kabobs: Take a wooden skewer and begin threading the fruits onto it in a pattern. For example, start with a grape, followed by a strawberry half, a banana slice, a pineapple cube, and a melon ball. Continue this pattern until the skewer is full, leaving a little space at each end for handling.
- Repeat the Process: Continue assembling the remaining skewers until all your fruits are used up. Aim for a colorful and balanced mix of fruits on each skewer to make them visually appealing.
- Prepare the Dip (Optional): If you wish to serve a dip, mix the vanilla yogurt with honey in a small bowl until well combined. Serve this alongside the kabobs for a delicious dipping option.
- Serve and Enjoy: Arrange the fruit kabobs on a platter and serve immediately. They can also be stored in the refrigerator until ready to serve, guaranteeing they remain fresh and cool.
Extra Tips:
When selecting fruits, choose those that are ripe and firm to guarantee they hold well on the skewers. If you’re preparing these kabobs in advance, consider brushing the banana slices with a little lemon juice to prevent browning.
For added festive flair, use holiday-themed skewers or decorate the platter with sprigs of mint. Encourage kids to get creative with their fruit combinations and patterns, making this a fun and interactive dessert option.
Holiday Pretzel Hugs

Holiday Pretzel Hugs are a delightful and easy-to-make treat that’s perfect for involving kids in Christmas baking activities. These festive bites combine the sweet and salty flavors of pretzels, chocolate, and candy-coated chocolates, making them irresistible to both children and adults alike.
Whether you’re planning a holiday party or simply looking for a fun kitchen project with the little ones, these pretzel hugs are sure to bring holiday cheer to your table.
The simplicity of this recipe is part of its charm. With just a few ingredients and minimal baking time, you can have a batch of these colorful treats ready in no time. Plus, their bright colors and unique shapes make them an eye-catching addition to any holiday dessert spread.
This recipe yields enough Holiday Pretzel Hugs for 4-6 people, making it perfect for small gatherings or as a special treat for the family.
Ingredients (serving size: 4-6 people):
- 48 mini pretzels
- 48 Hershey’s Hugs chocolates
- 48 red and green candy-coated chocolates (such as M&M’s)
Cooking Instructions:
- Preheat the oven: Begin by preheating your oven to 200°F (93°C). This low temperature is just enough to soften the chocolate without melting it completely.
- Arrange the pretzels: Line a baking sheet with parchment paper. Place mini pretzels in a single layer on the baking sheet, ensuring they aren’t touching each other.
- Add the chocolate: Unwrap the Hershey’s Hugs chocolates and place one on top of each pretzel. Make sure they’re centered so they melt evenly.
- Bake the pretzels: Carefully place the baking sheet in the preheated oven. Bake for about 4-5 minutes, until the chocolates are glossy and soft but not completely melted.
- Add the candy-coated chocolates: Remove the baking sheet from the oven. While the chocolate is still soft, gently press one candy-coated chocolate into the center of each Hug, pushing it down gently to spread the chocolate slightly.
- Cool the treats: Allow the pretzel hugs to cool on the baking sheet for about 10 minutes, then transfer them to the refrigerator for an additional 15-20 minutes to set completely.
- Serve and enjoy: Once the chocolate has hardened, your Holiday Pretzel Hugs are ready to be served or stored in an airtight container for later.
Extra Tips:
For an even more festive touch, consider using pretzels in different shapes, such as stars or trees.
If you’re making these treats with young children, supervise them closely when removing the baking sheet from the oven and pressing the candies into the warm chocolate.
To avoid any burning, you can also let the pretzel hugs cool slightly before handling.
Additionally, if you’re preparing these treats in advance, they can be stored in an airtight container for up to a week, making them a convenient option for early holiday preparations.
Chocolate-Dipped Marshmallow Pops

Chocolate-Dipped Marshmallow Pops are a delightful and festive treat perfect for kids and adults alike. These delicious pops aren’t only easy to make but also fun to customize with various toppings, making them ideal for a Christmas dessert spread.
With a combination of fluffy marshmallows and rich, melted chocolate, these pops are certain to be a hit at any holiday gathering. Plus, they’re the perfect size for little hands and can be decorated with sprinkles, crushed candy canes, or colored sugar to match the festive theme.
To make Chocolate-Dipped Marshmallow Pops, you don’t need a lot of time or ingredients. They can be prepared quickly, making them a great last-minute addition to your holiday dessert table.
Whether you’re hosting a Christmas party or enjoying a cozy night in with family, these pops will add a touch of sweetness to your celebration. The recipe is simple enough for kids to help out, making it a fun family activity that will result in delicious treats everyone will enjoy.
Ingredients (for 4-6 people):
- 12 large marshmallows
- 1 cup semi-sweet chocolate chips
- 1 tablespoon coconut oil or vegetable oil
- 12 lollipop sticks
- Assorted sprinkles, crushed candy canes, or colored sugar for decoration
Instructions:
- Prepare the Workspace: Line a baking sheet with parchment paper or a silicone baking mat. This will prevent the pops from sticking and make for easy cleanup.
- Insert Lollipop Sticks: Gently insert a lollipop stick into each marshmallow, making sure not to push it all the way through. Set aside.
- Melt the Chocolate: In a microwave-safe bowl, combine the chocolate chips and coconut oil. Microwave in 30-second intervals, stirring after each, until the chocolate is fully melted and smooth.
- Dip the Marshmallows: Hold a marshmallow by the stick and dip it into the melted chocolate, turning to coat evenly. Allow excess chocolate to drip off.
- Decorate: Immediately after dipping, sprinkle the marshmallow with your choice of decorations. You can roll the chocolate-covered marshmallow in a bowl of sprinkles or crushed candy if preferred.
- Set the Pops: Place the decorated marshmallow pops onto the prepared baking sheet. Repeat dipping and decorating with the remaining marshmallows.
- Chill: Refrigerate the marshmallow pops for about 15-20 minutes, or until the chocolate has hardened.
Extra Tips:
For a more festive touch, consider using different types of chocolate such as white or dark chocolate to create a variety of flavors. If you want to get creative, add a few drops of peppermint extract to the melted chocolate for a minty twist.
Remember to have an assortment of toppings to offer a colorful and diverse selection of pops. Store any leftover pops in an airtight container in the refrigerator to keep them fresh.
If making with kids, make sure they’re supervised, especially during the melting process, to prevent any accidents. Enjoy these delectable Christmas treats with a warm cup of cocoa for a perfect holiday pairing!
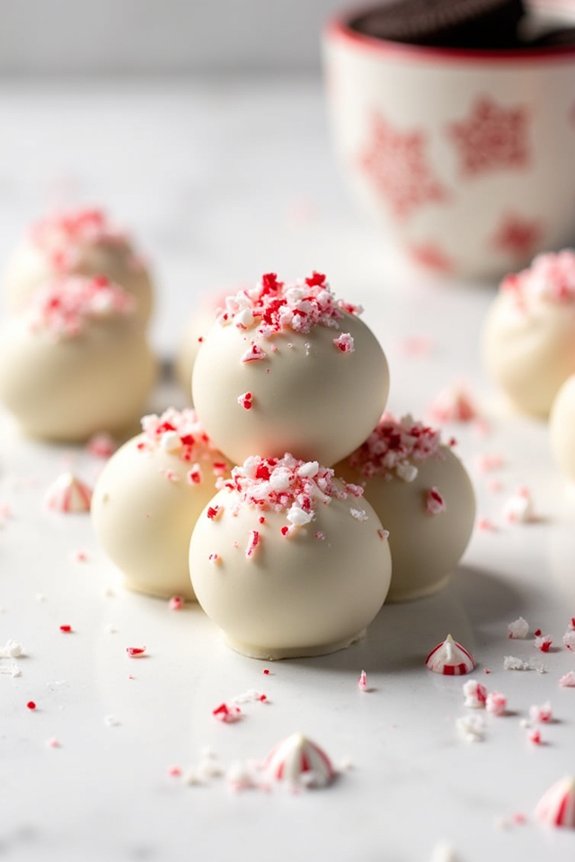
Candy Cane Oreo Truffles
Candy Cane Oreo Truffles are the perfect festive treat to delight kids and adults alike during the holiday season. These bite-sized desserts combine the rich, chocolatey goodness of Oreos with the invigorating taste of peppermint, making them a delightful addition to any Christmas dessert spread.
The best part is that these truffles require no baking, which means you can make them quickly and easily with your little ones. These truffles have a creamy, smooth interior with a crunchy candy cane coating that makes them irresistible. Their delightful appearance can also double as a fun, edible decoration for your holiday table.
Whether you’re looking for a simple holiday baking project or a deliciously sweet gift, Candy Cane Oreo Truffles are a fantastic choice.
Ingredients (Serving size: 4-6 people):
- 24 Oreo cookies
- 4 oz cream cheese, softened
- 8 oz white chocolate chips
- 4 peppermint candy canes, crushed
- 1/2 teaspoon peppermint extract (optional)
Cooking Instructions:
- Prepare the Oreos: Begin by placing the Oreo cookies in a food processor. Pulse until they’re finely ground to a crumb-like consistency. This will form the base of your truffles.
- Mix with Cream Cheese: Transfer the Oreo crumbs to a mixing bowl and add the softened cream cheese. If you want a more intense peppermint flavor, add 1/2 teaspoon of peppermint extract. Mix thoroughly until the mixture is well combined and smooth.
- Form the Truffles: Using your hands or a small cookie scoop, shape the Oreo mixture into small balls, approximately 1 inch in diameter. Place them on a baking sheet lined with parchment paper. Once all balls are formed, refrigerate for at least 30 minutes to allow them to firm up.
- Melt the White Chocolate: While the truffles are chilling, melt the white chocolate chips in a microwave-safe bowl. Heat in 30-second intervals, stirring in between, until the chocolate is completely melted and smooth.
- Coat the Truffles: Remove the chilled truffles from the refrigerator. Using a fork or toothpick, dip each truffle into the melted white chocolate, ensuring they’re completely covered. Allow any excess chocolate to drip off before placing them back on the parchment-lined baking sheet.
- Decorate with Candy Canes: Immediately after dipping each truffle in chocolate, sprinkle the crushed candy canes over the top before the chocolate sets. This will create a crunchy, peppermint exterior.
- Chill and Serve: Once all truffles are coated and decorated, return them to the refrigerator for at least 15 minutes, or until the chocolate is set. Serve chilled and enjoy!
Extra Tips:
To make your Candy Cane Oreo Truffles even more festive, consider using colored candy melts instead of white chocolate for a vibrant appearance.
Additionally, if you don’t have a food processor, you can place the Oreos in a sealed plastic bag and crush them with a rolling pin. For a smoother chocolate coating, confirm everything is at room temperature before dipping.